


后台管理系统前后端联调
保持后端项目正常运行
启动前端项目
第一步:安装node,建议安装18.20.3版本长期支持版
第二步:配置npm的镜像
npm config set registry https://registry.npmmirror.com
第三步:导入前端项目rentHouseAdmin,使用webstorm或者vscode
第四步:执行命令
npm install
第五步:配置后端接口地址
修改项目根目录下的.env.development文件中的VITE_APP_BASE_URL变量的值为后端接口的地址,此处改为http://localhost:8080即可,如下
VITE_APP_BASE_URL='http://localhost:8080'
第六步:启动项目
npm run dev
如果遇到报错,请检查node版本,node -v 查看当前node版本,版本太低的话,会导致npm install 出现报错
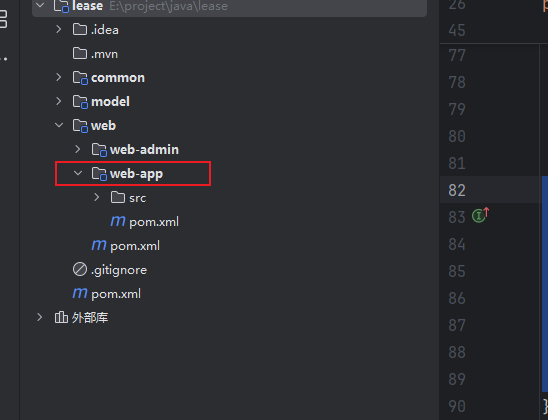
移动端后端开发
我们移动端后端的路径是web-app下
SpringBoot配置
1.创建application.yml配置文件
在web-app模块的src/main/resources目录下新建application.yml文件,文件内容如下:
server:
  port: 8081
2. 创建SpringBoot启动类
在web-app模块下创建com.yuhuan.lease.AppWebApplication类,内容如下:
@SpringBootApplication
public class AppWebApplication {
    public static void main(String[] args) {
        SpringApplication.run(AppWebApplication.class);
    }
}
Mybatis-Plus配置
这个配置和web-admin一样,可以复制过来
spring:
  datasource:
    type: com.zaxxer.hikari.HikariDataSource
    url: jdbc:mysql://192.168.200.128:3306/lease?useUnicode=true&characterEncoding=utf-8&useSSL=false&allowPublicKeyRetrieval=true&serverTimezone=GMT%2b8
    username: root
    password: Server@123
    hikari:
      connection-test-query: SELECT 1 # 自动检测连接
      connection-timeout: 60000 #数据库连接超时时间,默认30秒
      idle-timeout: 500000 #空闲连接存活最大时间,默认600000(10分钟)
      max-lifetime: 540000 #此属性控制池中连接的最长生命周期,值0表示无限生命周期,默认1800000即30分钟
      maximum-pool-size: 12 #连接池最大连接数,默认是10
      minimum-idle: 10 #最小空闲连接数量
      pool-name: SPHHikariPool # 连接池名称
  data:
    redis:
      host: 192.168.200.128
      port: 6379
      database: 0

#用于打印框架生成的sql语句,便于调试
mybatis-plus:
  configuration:
    log-impl: org.apache.ibatis.logging.stdout.StdOutImpl
#  global-config:
#    db-config:
#      logic-delete-field: isDeleted # 全局逻辑删除的实体字段名
#      logic-delete-value: 1 # 逻辑已删除值(默认为 1)
#      logic-not-delete-value: 0 # 逻辑未删除值(默认为 0)


minio:
  endpoint: http://192.168.200.128:9000
  access-key: minioadmin
  secret-key: minioadmin
  bucket-name: lease

springdoc:
  default-flat-param-object: true
Knife4j配置
1. 配置类
在 web-app 模块下创建配置类:com.yuhuan.lease.web.app.custom.config.Knife4jConfiguration,代码如下:
@Configuration
public class Knife4jConfiguration {

    @Bean
    public OpenAPI customOpenAPI() {
        return new OpenAPI()
                .info(new Info()
                        .title("APP接口")
                        .version("1.0")
                        .description("用户端APP接口")
                        .termsOfService("http://doc.xiaominfo.com")
                        .license(new License().name("Apache 2.0")
                                .url("http://doc.xiaominfo.com")));
    }


    @Bean
    public GroupedOpenApi loginAPI() {
        return GroupedOpenApi.builder().group("登录信息").
                pathsToMatch("/app/login/**", "/app/info").
                build();
    }

    @Bean
    public GroupedOpenApi personAPI() {
        return GroupedOpenApi.builder().group("个人信息").
                pathsToMatch(
                        "/app/history/**",
                        "/app/appointment/**",
                        "/app/agreement/**"
                ).
                build();
    }

    @Bean
    public GroupedOpenApi lookForRoomAPI() {
        return GroupedOpenApi.builder().group("找房信息").
                pathsToMatch(
                        "/app/apartment/**",
                        "/app/room/**",
                        "/app/payment/**",
                        "/app/region/**",
                        "/app/term/**"
                ).
                build();
    }
}
导入基础代码
导入的代码和目标位置如下:
| 导入代码 | 模块 | 包名/路径 | 说明 |
|---|---|---|---|
| mapper接口 | web-app | com.yuhuan.lease.web.app.mapper | 略 |
| mapper xml | web-app | src/main/resources/mapper | 略 |
| service | web-app | com.yuhuan.lease.web.app.service | 略 |
| serviceImpl | web-app | com.yuhuan.lease.web.app.service.impl | 略 |
导入接口定义代码
需要导入的代码和目标位置如下:
| 导入代码 | 模块 | 包名/路径 | 说明 |
|---|---|---|---|
| controller | web-app | com.yuhuan.lease.web.app.controller | 略 |
| vo | web-app | com.yuhuan.lease.web.app.vo | View Object,用于封装或定义接口接受及返回的数据结构 |
启动项目
由于common模块配置了MinioClient这个Bean,而web-app模块依赖common模块,在启动AppWebApplication时,SpringBoot会尝试创建MinioClient实例。但由于web-app模块的application.yml文件中缺少MinioClient所需参数(该模块暂不需要使用MinioClient),导致实例创建失败。
解决方案是给MinioClient的配置类添加@ConditionalOnProperty注解,该注解确保仅当存在minio.endpoint属性时才会启用配置类。
@Configuration
@EnableConfigurationProperties(MinioProperties.class)
@ConditionalOnProperty(name = "minio.endpoint")
public class MinioConfiguration {

    @Autowired
    private MinioProperties properties;

    @Bean
    public MinioClient minioClient() {
        return MinioClient.builder().endpoint(properties.getEndpoint()).credentials(properties.getAccessKey(), properties.getSecretKey()).build();
    }
}
登录管理
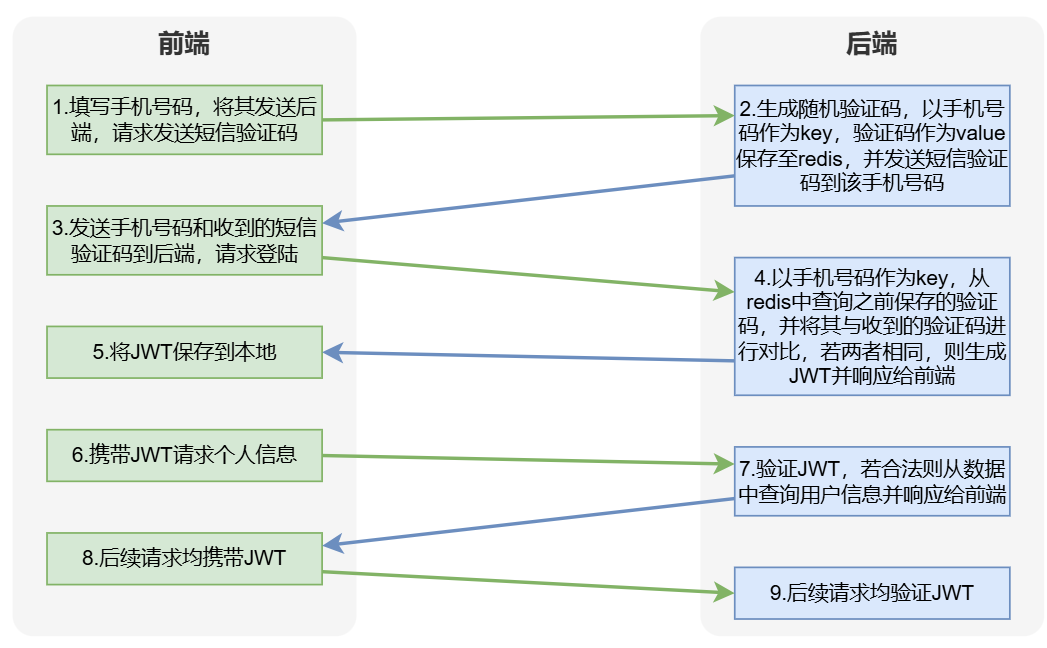
登录管理涉及三个核心接口:短信验证码获取、用户登录和个人信息查询。此外,还需通过HandlerInterceptor为所有受保护接口添加JWT验证逻辑。
接口开发
注入LoginService
@RestController
@Tag(name = "登录管理")
@RequestMapping("/app/")
public class LoginController {

    @Autowired
    private LoginService service;
}
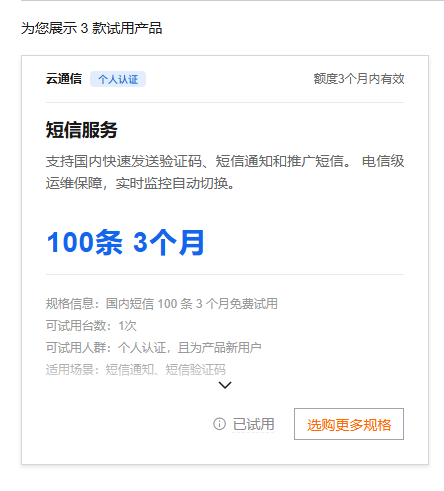
1.获取短信验证码
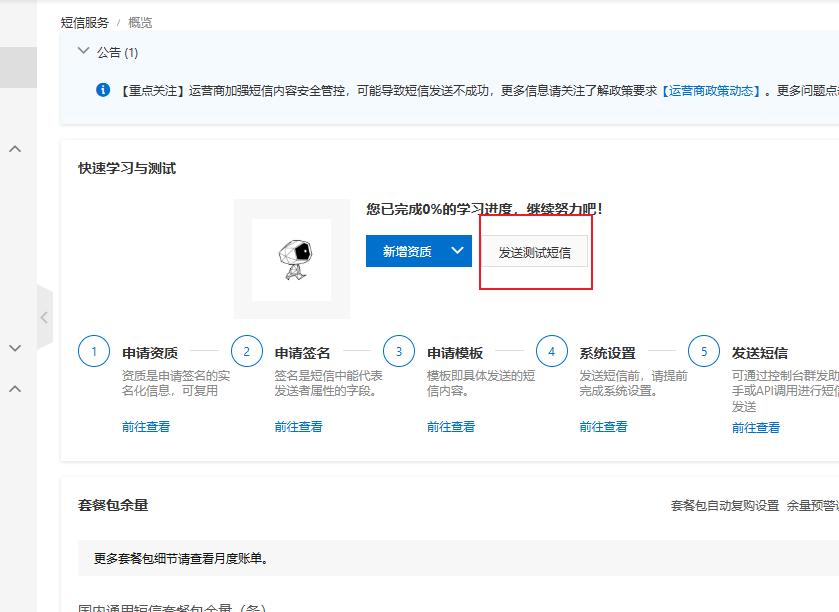
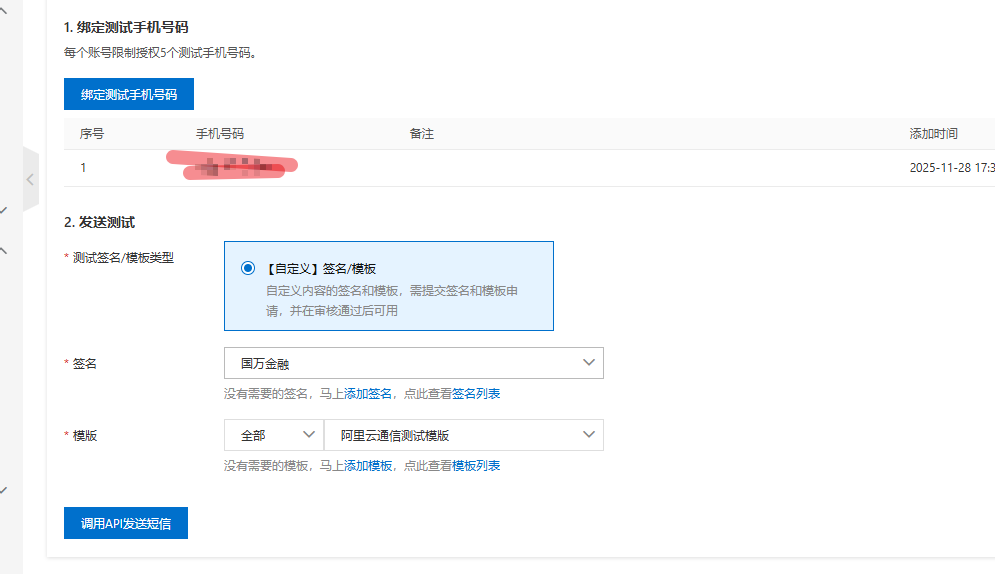
我们这里使用阿里云的短信服务,登录阿里云后,搜索短信服务,先申请免费试用
点击发送测试短信
简单配置一下
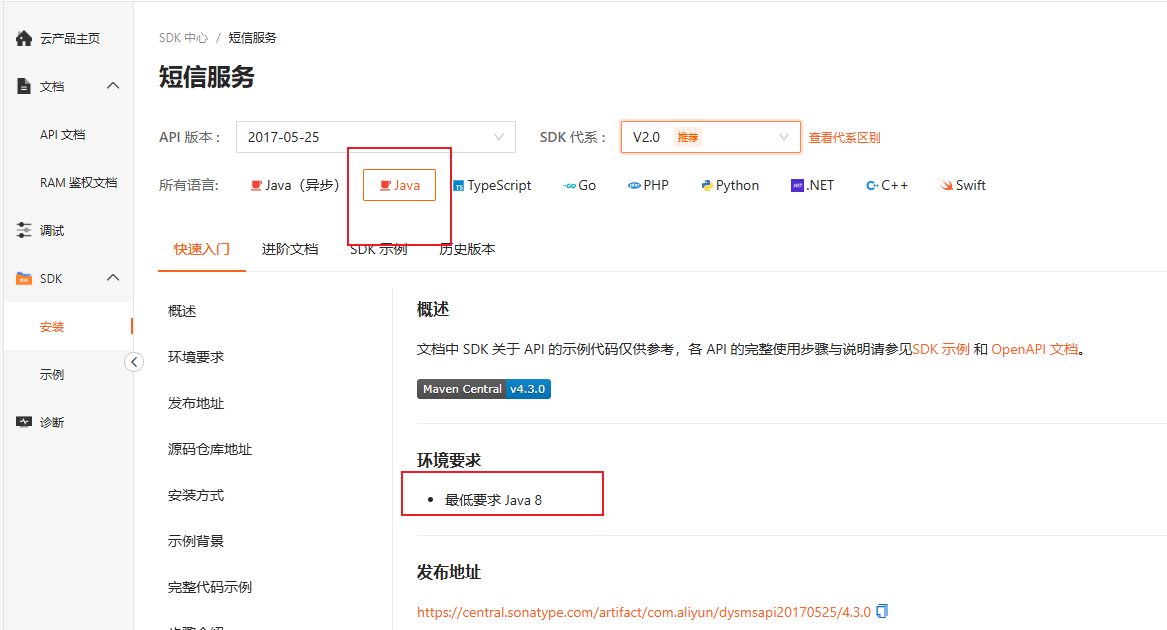
我们选择java版本,下面有maven的依赖,我们引入进来就行了,在common模块的pom.xml文件中增加如下内容
<dependency>
    <groupId>com.aliyun</groupId>
    <artifactId>dysmsapi20170525</artifactId>
</dependency>
- 在application.yml中增加如下内容
aliyun:
  sms:
    access-key-id: <access-key-id>
    access-key-secret: <access-key-secret>
    endpoint: dysmsapi.aliyuncs.com
上述access-key-id、access-key-secret需根据实际情况进行修改。
在common模块中创建com.yuhuan.lease.common.sms.AliyunSMSProperties类,具体实现如下:
@Data
@ConfigurationProperties(prefix = "aliyun.sms")
public class AliyunSMSProperties {

    private String accessKeyId;

    private String accessKeySecret;

    private String endpoint;
}
- 在
common模块中创建com.yuhuan.lease.common.sms.AliyunSmsConfiguration类,具体实现如下:
package com.yuhuan.lease.common.sms;

import com.aliyun.dysmsapi20170525.Client;
import com.aliyun.teaopenapi.models.Config;
import org.springframework.beans.factory.annotation.Autowired;
import org.springframework.boot.autoconfigure.condition.ConditionalOnProperty;
import org.springframework.boot.context.properties.EnableConfigurationProperties;
import org.springframework.context.annotation.Bean;
import org.springframework.context.annotation.Configuration;

@Configuration
@EnableConfigurationProperties(AliyunSMSProperties.class)
@ConditionalOnProperty(name = "aliyun.sms.endpoint")
public class AliyunSMSConfiguration {

    @Autowired
    private AliyunSMSProperties properties;

    @Bean
    public Client smsClient() {
        Config config = new Config();
        config.setAccessKeyId(properties.getAccessKeyId());
        config.setAccessKeySecret(properties.getAccessKeySecret());
        config.setEndpoint(properties.getEndpoint());
        try {
            return new Client(config);
        } catch (Exception e) {
            throw new RuntimeException(e);
        }

    }
}
-
controller层
    @GetMapping("login/getCode")
    @Operation(summary = "获取短信验证码")
    public Result getCode(@RequestParam String phone) {
        service.getSMSCode(phone);
        return Result.ok();
    }
-
service层
public interface LoginService {
    void getSMSCode(String phone);
}
@Service
public class LoginServiceImpl implements LoginService {
    @Autowired
    private StringRedisTemplate stringRedisTemplate;
    @Autowired
    private SmsService smsService;
    @Override
    public void getSMSCode(String phone) {
        String code = CodeUtil.getRandomCode(6);
        String key = RedisConstant.APP_LOGIN_PREFIX + phone;

        Boolean hasKey = stringRedisTemplate.hasKey(key);
        if (hasKey) {
            Long ttl = stringRedisTemplate.getExpire(key, TimeUnit.SECONDS);
            if (ttl > RedisConstant.APP_LOGIN_CODE_TTL_SEC - RedisConstant.APP_LOGIN_CODE_RESEND_TIME_SEC) {
                throw new LeaseException(ResultCodeEnum.APP_SEND_SMS_TOO_OFTEN);
            }
        }

        stringRedisTemplate.opsForValue().set(key, code, RedisConstant.APP_LOGIN_CODE_TTL_SEC, TimeUnit.SECONDS);
        smsService.sendSms(phone, code);
    }
}
package com.yuhuan.lease.web.app.service;

public interface SmsService {
    void sendSms(String phone, String code);
}
@Service
public class SmsServiceImpl implements SmsService {
    @Autowired
    private Client client;
    @Override
    public void sendSms(String phone, String code) {
        SendSmsRequest smsRequest = new SendSmsRequest();
        smsRequest.setPhoneNumbers(phone);
        smsRequest.setSignName("阿里云短信测试");
        smsRequest.setTemplateCode("SMS_154950909");
        smsRequest.setTemplateParam("{\"code\":\"" + code + "\"}");
        try {
            client.sendSms(smsRequest);
        } catch (Exception e) {
            throw new RuntimeException(e);
        }
    }
}
阿里云现在试用的短信,也要认证,并且个人都没有办法认证,要企业账号,真是垃圾

2. 登录和注册接口
登录注册校验流程
-
参数校验
- 前端提交手机号
phone和短信验证码code - 若任一参数为空,返回"手机号为空"或"验证码为空"
- 前端提交手机号
-
验证码校验
- 根据
phone查询Redis存储的验证码 - 若未查到,返回"验证码已过期"
- 若验证码不匹配,返回"验证码错误"
- 根据
-
用户处理
- 查询数据库用户信息
- 若用户不存在,自动创建新用户并入库
-
状态检查
- 检查用户是否被禁用
- 若被禁用,返回"账号被禁用"
-
认证通过
- 生成JWT令牌返回给前端
-
查看数据结构
@Data
@Schema(description = "APP端登录实体")
public class LoginVo {

    @Schema(description = "手机号码")
    private String phone;

    @Schema(description = "短信验证码")
    private String code;
}
-
controller层
    @PostMapping("login")
    @Operation(summary = "登录")
    public Result<String> login(@RequestBody LoginVo loginVo) {
        String token = service.login(loginVo);
        return Result.ok(token);
    }
-
service层
public interface LoginService {
    void getSMSCode(String phone);
    String login(LoginVo loginVo);
}
    /**
     * 用户登录接口实现
     * 功能说明:基于手机号+验证码的登录逻辑,支持新用户自动注册,登录成功后返回JWT令牌
     * @param loginVo 登录请求参数封装对象(包含手机号、验证码等信息)
     * @return JWT令牌(用于后续接口鉴权)
     * @throws LeaseException 业务异常(包含具体错误码和提示信息)
     */
    public String login(LoginVo loginVo) {
        // 1. 基础参数校验:手机号非空校验
        // 手机号是登录的核心标识,必须传递,否则直接抛出参数为空异常
        if (!StringUtils.hasText(loginVo.getPhone())) {
            throw new LeaseException(ResultCodeEnum.APP_LOGIN_PHONE_EMPTY);
        }

        // 1. 基础参数校验:验证码非空校验
        // 验证码是身份验证的关键,必须传递,否则直接抛出参数为空异常
        if (!StringUtils.hasText(loginVo.getCode())) {
            throw new LeaseException(ResultCodeEnum.APP_LOGIN_CODE_EMPTY);
        }

        // 2. 验证码有效性校验:从Redis中获取存储的验证码
        // 构建Redis中验证码的存储key(前缀+手机号,保证唯一性)
        String key = RedisConstant.APP_LOGIN_PREFIX + loginVo.getPhone();
        // 从Redis获取对应手机号的验证码(验证码发送时已存入,设置了过期时间)
        String code = redisTemplate.opsForValue().get(key);

        // 2.1 验证码过期/未发送校验:Redis中无对应验证码,说明已过期或未发送
        if (code == null) {
            throw new LeaseException(ResultCodeEnum.APP_LOGIN_CODE_EXPIRED);
        }

        // 2.2 验证码正确性校验:前端传入的验证码与Redis中存储的不一致
        if (!code.equals(loginVo.getCode())) {
            throw new LeaseException(ResultCodeEnum.APP_LOGIN_CODE_ERROR);
        }

        // 3. 用户存在性校验:根据手机号查询用户信息
        // 构建Lambda查询条件(避免硬编码字段名,提高代码可维护性)
        LambdaQueryWrapper<UserInfo> queryWrapper = new LambdaQueryWrapper<>();
        queryWrapper.eq(UserInfo::getPhone, loginVo.getPhone()); // 按手机号精确查询
        UserInfo userInfo = userInfoService.getOne(queryWrapper); // 查询单个用户(手机号唯一)

        // 3.1 新用户自动注册:如果用户不存在,创建默认用户信息
        if (userInfo == null) {
            userInfo = new UserInfo();
            userInfo.setPhone(loginVo.getPhone()); // 绑定登录手机号
            userInfo.setStatus(BaseStatus.ENABLE); // 初始状态:启用(可正常使用)
            // 默认昵称:"用户-手机号后4位"(保护隐私,无需用户手动设置)
            userInfo.setNickname("用户-" + loginVo.getPhone().substring(6));
            userInfoService.save(userInfo); // 保存新用户到数据库
        }

        // 4. 账号状态校验:判断用户是否被禁用
        // 若用户状态为禁用(DISABLE),不允许登录,抛出对应异常
        if (userInfo.getStatus().equals(BaseStatus.DISABLE)) {
            throw new LeaseException(ResultCodeEnum.APP_ACCOUNT_DISABLED_ERROR);
        }

        // 5. 生成JWT令牌:登录成功,创建包含用户ID和手机号的令牌
        // JWT令牌用于后续接口请求的身份认证,避免重复登录校验
        return JwtUtil.createToken(userInfo.getId(), loginVo.getPhone());
    }
-
编写AuthInterceptor
在web-app模块中创建com.yuhuan.lease.web.app.custom.interceptor.AuthInterceptor类,具体实现如下:
@Component
public class AuthInterceptor implements HandlerInterceptor {

    @Override
    public boolean preHandle(HttpServletRequest request, HttpServletResponse response, Object handler) {
        String token = request.getHeader("access-token");

        Claims claims = JwtUtil.parseToken(token);
        Long userId = claims.get("userId", Long.class);
        String username = claims.get("username", String.class);
        LoginUserHolder.setLoginUser(new LoginUser(userId, username));

        return true;
    }

    @Override
    public void afterCompletion(HttpServletRequest request, HttpServletResponse response, Object handler, Exception ex) throws Exception {
        LoginUserHolder.clear();
    }
}
-
注册AuthInterceptor
@Configuration
public class WebMvcConfiguration implements WebMvcConfigurer {

    @Autowired
    private AuthInterceptor authInterceptor;

    @Override
    public void addInterceptors(InterceptorRegistry registry) {
        registry.addInterceptor(this.authInterceptor).addPathPatterns("/app/**").excludePathPatterns("/app/login/**");
    }
}
在增加上述拦截器后,为方便继续调试其他接口,可以获取一个长期有效的Token,将其配置到Knife4j的全局参数中。
3.查询登录用户的个人信息
-
查看响应数据结构
@Schema(description = "用户基本信息")
@Data
@AllArgsConstructor
public class UserInfoVo {

    @Schema(description = "用户昵称")
    private String nickname;

    @Schema(description = "用户头像")
    private String avatarUrl;
}
-
controller层
    @GetMapping("info")
    @Operation(summary = "获取登录用户信息")
    public Result<UserInfoVo> info() {
        UserInfoVo info = service.getUserInfoById(LoginUserHolder.getLoginUser().getUserId());
        return Result.ok(info);
    }
-
service层
public interface LoginService {
    void getSMSCode(String phone);

    String login(LoginVo loginVo);

    UserInfoVo getUserInfoById(Long userId);
}
    @Override
    public UserInfoVo getUserInfoById(Long userId) {
        UserInfo userInfo = userInfoService.getById(userId);
        return new UserInfoVo(userInfo.getNickname(), userInfo.getAvatarUrl());
    }
找房
地区信息
房源搜索模块的地区信息需通过三个接口获取:查询省份列表、根据省份ID查询城市列表、根据城市ID查询区县列表。具体实现如下:
在RegionController中添加以下接口:
@Tag(name = "地区信息")
@RestController
@RequestMapping("/app/region")
public class RegionController {

    @Autowired
    private ProvinceInfoService provinceInfoService;

    @Autowired
    private CityInfoService cityInfoService;

    @Autowired
    private DistrictInfoService districtInfoService;

    @Operation(summary = "查询省份信息列表")
    @GetMapping("province/list")
    public Result<List<ProvinceInfo>> listProvince() {
        List<ProvinceInfo> list = provinceInfoService.list();
        return Result.ok(list);
    }

    @Operation(summary = "根据省份id查询城市信息列表")
    @GetMapping("city/listByProvinceId")
    public Result<List<CityInfo>> listCityInfoByProvinceId(@RequestParam Long id) {
        LambdaQueryWrapper<CityInfo> queryWrapper = new LambdaQueryWrapper<>();
        queryWrapper.eq(CityInfo::getProvinceId, id);
        List<CityInfo> list = cityInfoService.list(queryWrapper);
        return Result.ok(list);
    }

    @GetMapping("district/listByCityId")
    @Operation(summary = "根据城市id查询区县信息")
    public Result<List<DistrictInfo>> listDistrictInfoByCityId(@RequestParam Long id) {
        LambdaQueryWrapper<DistrictInfo> queryWrapper = new LambdaQueryWrapper<>();
        queryWrapper.eq(DistrictInfo::getCityId, id);
        List<DistrictInfo> list = districtInfoService.list(queryWrapper);
        return Result.ok(list);
    }
}
支付方式
关于找房模块的支付方式功能,只需一个接口即可实现全部支付方式的获取。具体实现方案如下:
请在PaymentTypeController中新增以下代码内容:
@Tag(name = "支付方式接口")
@RestController
@RequestMapping("/app/payment")
public class PaymentTypeController {

    @Autowired
    private PaymentTypeService service;
    @Operation(summary = "获取全部支付方式列表")
    @GetMapping("list")
    public Result<List<PaymentType>> list() {
        List<PaymentType> list = service.list();
        return Result.ok(list);
    }
}
房间信息
需要实现三个房间信息相关的接口:
- 按条件分页查询房间列表
- 根据ID查询房间详情
- 按公寓ID分页查询房间列表
具体实现步骤如下:
首先在RoomController中注入RoomInfoService,代码如下:
@Autowired
private RoomInfoService roomInfoService;
1.按条件分页查询房间列表
-
查看数据请求结构以及返回结构
@Data
@Schema(description = "房间查询实体")
public class RoomQueryVo {


    @Schema(description = "省份Id")
    private Long provinceId;

    @Schema(description = "城市Id")
    private Long cityId;

    @Schema(description = "区域Id")
    private Long districtId;

    @Schema(description = "最小租金")
    private BigDecimal minRent;

    @Schema(description = "最大租金")
    private BigDecimal maxRent;

    @Schema(description = "支付方式")
    private Long paymentTypeId;

    @Schema(description = "价格排序方式", allowableValues = {"desc", "asc"})
    private String orderType;
}
@Schema(description = "APP房间列表实体")
@Data
public class RoomItemVo {

    @Schema(description = "房间id")
    private Long id;

    @Schema(description = "房间号")
    private String roomNumber;

    @Schema(description = "租金(元/月)")
    private BigDecimal rent;

    @Schema(description = "房间图片列表")
    private List<GraphVo> graphVoList;

    @Schema(description = "房间标签列表")
    private List<LabelInfo> labelInfoList;

    @Schema(description = "房间所属公寓信息")
    private ApartmentInfo apartmentInfo;
}
-
controller层
    @Operation(summary = "分页查询房间列表")
    @GetMapping("pageItem")
    public Result<IPage<RoomItemVo>> pageItem(@RequestParam long current, @RequestParam long size, RoomQueryVo queryVo) {
        Page<RoomItemVo> page = new Page<>(current, size);
        IPage<RoomItemVo> list = roomInfoService.pageRoomItemByQuery(page, queryVo);
        return Result.ok(list);
    }
-
service层
public interface RoomInfoService extends IService<RoomInfo> {
    IPage<RoomItemVo> pageRoomItemByQuery(Page<RoomItemVo> page, RoomQueryVo queryVo);
}
public class RoomInfoServiceImpl extends ServiceImpl<RoomInfoMapper, RoomInfo>
        implements RoomInfoService {
    @Autowired
    private RoomInfoMapper roomInfoMapper;
    @Override
    public IPage<RoomItemVo> pageRoomItemByQuery(Page<RoomItemVo> page, RoomQueryVo queryVo) {
        return roomInfoMapper.pageRoomItemByQuery(page, queryVo);
    }
}
-
mapper层
public interface RoomInfoMapper extends BaseMapper<RoomInfo> {

    IPage<RoomItemVo> pageRoomItemByQuery(Page<RoomItemVo> page, RoomQueryVo queryVo);
}
<!--
RoomInfoMapper:房间信息数据访问层接口映射文件
核心功能:提供房间列表查询、关联数据(公寓、图片、标签)查询等数据操作
对应接口:com.yuhuan.lease.web.app.mapper.RoomInfoMapper
-->
<mapper namespace="com.yuhuan.lease.web.app.mapper.RoomInfoMapper">
<!--
结果集映射:RoomItemVoMap
作用:将数据库查询结果映射为前端所需的 RoomItemVo 视图对象
autoMapping="true":开启属性自动映射(字段名与属性名一致时无需手动配置)
关联关系说明:
1. 一对一关联:房间 -> 公寓信息(ApartmentInfo)
2. 一对多关联:房间 -> 图片列表(GraphVoList)
3. 一对多关联:房间 -> 标签列表(LabelInfoList)
-->
<resultMap id="RoomItemVoMap" type="com.yuhuan.lease.web.app.vo.room.RoomItemVo" autoMapping="true">
<!-- 主键映射:房间ID(手动指定确保主键匹配,避免自动映射异常) -->
<id column="id" property="id"/>
<!--
一对一关联映射:公寓信息(ApartmentInfo)
property:RoomItemVo 中存储公寓信息的属性名
javaType:关联对象的全类名
autoMapping="true":公寓信息的字段自动映射到 ApartmentInfo 属性
-->
<association property="apartmentInfo" javaType="com.yuhuan.lease.model.entity.ApartmentInfo"
autoMapping="true">
<!-- 公寓主键映射:注意column="id"对应公寓表的ID(因查询时未别名,需明确主键) -->
<id column="id" property="id"/>
</association>
<!--
一对多关联映射:房间图片列表(GraphVoList)
property:RoomItemVo 中存储图片列表的属性名
ofType:集合中元素的全类名(GraphVo)
select:子查询SQL的ID(通过房间ID查询图片列表)
column:传递给子查询的参数(房间ID,对应主查询的room_info.id)
-->
<collection property="graphVoList" ofType="com.yuhuan.lease.web.app.vo.graph.GraphVo"
select="selectGraphVoListByRoomId" column="id"/>
<!--
一对多关联映射:房间标签列表(LabelInfoList)
逻辑说明:通过房间ID关联 room_label 中间表,间接查询标签信息
select:子查询SQL的ID(通过房间ID查询标签列表)
column:传递给子查询的参数(房间ID)
-->
<collection property="labelInfoList" ofType="com.yuhuan.lease.model.entity.LabelInfo"
select="selectLabelInfoListByRoomId" column="id"/>
</resultMap>
<!--
分页查询房间列表(带条件筛选)
id:对应Mapper接口中的方法名 pageRoomItemByQuery
resultMap:使用上面定义的 RoomItemVoMap 进行结果映射
核心逻辑:
1. 主表:room_info(房间表),关联表:apartment_info(公寓表)
2. 过滤条件:未删除、已发布、未被占用(排除租赁中/已签约状态)
3. 支持省/市/区、租金范围、支付方式筛选
4. 支持租金升序/降序排序
-->
<select id="pageRoomItemByQuery" resultMap="RoomItemVoMap">
select
ri.id, -- 房间ID
ri.room_number, -- 房间号
ri.rent, -- 租金
ai.id apartment_id, -- 公寓ID(别名避免与房间ID冲突)
ai.name, -- 公寓名称
ai.introduction, -- 公寓简介
ai.district_id, -- 区域ID
ai.district_name, -- 区域名称
ai.city_id, -- 城市ID
ai.city_name, -- 城市名称
ai.province_id, -- 省份ID
ai.province_name, -- 省份名称
ai.address_detail, -- 详细地址
ai.latitude, -- 纬度(用于地图定位)
ai.longitude, -- 经度(用于地图定位)
ai.phone, -- 联系电话
ai.is_release -- 公寓发布状态
from room_info ri -- 房间表别名 ri
-- 左连接公寓表:条件包含公寓未删除(ai.is_deleted=0),避免查询已删除公寓的房间
left join apartment_info ai on ri.apartment_id = ai.id and ai.is_deleted = 0
<where>
-- 基础过滤条件:房间未删除(逻辑删除)
ri.is_deleted = 0
-- 房间已发布(只有发布状态的房间才对用户可见)
and ri.is_release = 1
-- 排除已被占用的房间:查询租赁协议中状态为 2(租赁中)、5(已签约)的房间ID,排除这些房间
and ri.id not in(
select room_id
from lease_agreement
where is_deleted = 0 -- 协议未删除
and status in(2,5) -- 协议状态:租赁中/已签约
)
<!-- 条件筛选:省份ID(非空时生效) -->
<if test="queryVo.provinceId != null">
and ai.province_id = #{queryVo.provinceId}
</if>
<!-- 条件筛选:城市ID(非空时生效) -->
<if test="queryVo.cityId != null">
and ai.city_id = #{queryVo.cityId}
</if>
<!-- 条件筛选:区域ID(非空时生效) -->
<if test="queryVo.districtId != null">
and ai.district_id = #{queryVo.districtId}
</if>
<!-- 条件筛选:租金范围(最小租金和最大租金都非空时生效) -->
<if test="queryVo.minRent != null and queryVo.maxRent != null">
and (ri.rent >= #{queryVo.minRent} and ri.rent <= #{queryVo.maxRent})
</if>
<!-- 条件筛选:支付方式(非空时生效) -->
<if test="queryVo.paymentTypeId != null">
and ri.id in (
-- 通过房间-支付方式中间表查询符合支付方式的房间ID
select room_id
from room_payment_type
where is_deleted = 0 -- 中间表记录未删除
and payment_type_id = #{queryVo.paymentTypeId} -- 匹配指定支付方式ID
)
</if>
</where>
<!-- 排序条件:orderType为asc(升序)或desc(降序)时生效,按租金排序 -->
<if test="queryVo.orderType == 'desc' or queryVo.orderType == 'asc'">
order by ri.rent ${queryVo.orderType}
</if>
</select>
<!--
根据房间ID查询图片列表
id:子查询ID,供 resultMap 中的 collection 标签调用
resultType:查询结果映射为 GraphVo 视图对象
逻辑说明:
1. 从 graph_info(图片表)查询
2. 过滤条件:未删除、关联类型为2(item_type=2 表示房间图片,与业务定义对应)
3. 按房间ID(item_id=#{id})查询,id为传递的房间ID参数
-->
<select id="selectGraphVoListByRoomId" resultType="com.yuhuan.lease.web.app.vo.graph.GraphVo">
select
id, -- 图片ID
name, -- 图片名称
item_type, -- 关联类型(2=房间图片)
item_id, -- 关联对象ID(房间ID)
url -- 图片访问地址
from graph_info
where is_deleted = 0 -- 图片未删除
and item_type = 2 -- 仅查询房间相关图片
and item_id = #{id} -- 匹配当前房间ID
</select>
<!--
根据房间ID查询标签列表
id:子查询ID,供 resultMap 中的 collection 标签调用
resultType:查询结果映射为 LabelInfo 实体对象
逻辑说明:
1. 从 label_info(标签表)查询
2. 通过 room_label(房间-标签中间表)关联,查询房间绑定的标签
3. 过滤条件:标签未删除、中间表记录未删除、匹配当前房间ID
-->
<select id="selectLabelInfoListByRoomId" resultType="com.yuhuan.lease.model.entity.LabelInfo">
select
id, -- 标签ID
type, -- 标签类型
name -- 标签名称
from label_info
where is_deleted = 0 -- 标签未删除
-- 关联房间-标签中间表,查询当前房间绑定的标签ID
and id in (
select label_id
from room_label
where is_deleted = 0 -- 中间表记录未删除
and room_id = #{id} -- 匹配当前房间ID
)
</select>
</mapper>
2. 根据ID查询房间详细信息
-
查看响应数据结构
@Data
@Schema(description = "APP房间详情")
public class RoomDetailVo extends RoomInfo {

    @Schema(description = "所属公寓信息")
    private ApartmentItemVo apartmentItemVo;

    @Schema(description = "图片列表")
    private List<GraphVo> graphVoList;

    @Schema(description = "属性信息列表")
    private List<AttrValueVo> attrValueVoList;

    @Schema(description = "配套信息列表")
    private List<FacilityInfo> facilityInfoList;

    @Schema(description = "标签信息列表")
    private List<LabelInfo> labelInfoList;

    @Schema(description = "支付方式列表")
    private List<PaymentType> paymentTypeList;

    @Schema(description = "杂费列表")
    private List<FeeValueVo> feeValueVoList;

    @Schema(description = "租期列表")
    private List<LeaseTerm> leaseTermList;
}
-
controller层
    @Operation(summary = "根据id获取房间的详细信息")
    @GetMapping("getDetailById")
    public Result<RoomDetailVo> getDetailById(@RequestParam Long id) {
        RoomDetailVo roomInfo = roomInfoService.getDetailById(id);
        return Result.ok(roomInfo);
    }
-
service层
public interface RoomInfoService extends IService<RoomInfo> {
    IPage<RoomItemVo> pageRoomItemByQuery(Page<RoomItemVo> page, RoomQueryVo queryVo);

    RoomDetailVo getDetailById(Long id);
}
    public RoomDetailVo getDetailById(Long id) {
        //1.查询房间信息
        RoomInfo roomInfo = roomInfoMapper.selectById(id);
        if (roomInfo == null) {
            return null;
        }
        //2.查询图片
        List<GraphVo> graphVoList = graphInfoMapper.selectListByItemTypeAndId(ItemType.ROOM, id);
        //3.查询租期
        List<LeaseTerm> leaseTermList = leaseTermMapper.selectListByRoomId(id);
        //4.查询配套
        List<FacilityInfo> facilityInfoList = facilityInfoMapper.selectListByRoomId(id);
        //5.查询标签
        List<LabelInfo> labelInfoList = labelInfoMapper.selectListByRoomId(id);
        //6.查询支付方式
        List<PaymentType> paymentTypeList = paymentTypeMapper.selectListByRoomId(id);
        //7.查询基本属性
        List<AttrValueVo> attrValueVoList = attrValueMapper.selectListByRoomId(id);
        //8.查询杂费信息
        List<FeeValueVo> feeValueVoList = feeValueMapper.selectListByApartmentId(roomInfo.getApartmentId());
        //9.查询公寓信息
        ApartmentItemVo apartmentItemVo = apartmentInfoService.selectApartmentItemVoById(roomInfo.getApartmentId());

        RoomDetailVo roomDetailVo = new RoomDetailVo();
        BeanUtils.copyProperties(roomInfo, roomDetailVo);

        roomDetailVo.setApartmentItemVo(apartmentItemVo);
        roomDetailVo.setGraphVoList(graphVoList);
        roomDetailVo.setAttrValueVoList(attrValueVoList);
        roomDetailVo.setFacilityInfoList(facilityInfoList);
        roomDetailVo.setLabelInfoList(labelInfoList);
        roomDetailVo.setPaymentTypeList(paymentTypeList);
        roomDetailVo.setFeeValueVoList(feeValueVoList);
        roomDetailVo.setLeaseTermList(leaseTermList);
        return roomDetailVo;
    }
编写Mapper层逻辑
-
编写查询房间图片逻辑
-
在GraphInfoMapper中增加如下内容
List<GraphVo> selectListByItemTypeAndId(ItemType itemType, Long id); -
在GraphInfoMapper.xml增加如下内容
<select id="selectListByItemTypeAndId" resultType="com.atguigu.lease.web.app.vo.graph.GraphVo">
    select name,
           url
    from graph_info
    where is_deleted = 0
      and item_type = #{itemType}
      and item_id = #{id}
</select>
-
-
编写查询房间可选租期逻辑
-
在LeaseTermMapper中增加如下内容
List<LeaseTerm> selectListByRoomId(Long id); -
在LeaseTermMapper.xml中增加如下内容
<select id="selectListByRoomId" resultType="com.atguigu.lease.model.entity.LeaseTerm">
    select id,
           month_count,
           unit
    from lease_term
    where is_deleted = 0
      and id in (select lease_term_id
                 from room_lease_term
                 where is_deleted = 0
                   and room_id = #{id})
</select>
-
-
编写查询房间配套逻辑
-
在FacilityInfoMapper中增加如下内容
List<FacilityInfo> selectListByRoomId(Long id); -
在FacilityInfoMapper.xml中增加如下内容
<select id="selectListByRoomId" resultType="com.atguigu.lease.model.entity.FacilityInfo">
    select id,
           type,
           name,
           icon
    from facility_info
    where is_deleted = 0
      and id in (select facility_id
                 from room_facility
                 where is_deleted = 0
                   and room_id = #{id})
</select>
-
-
编写查询房间标签逻辑
-
在LabelInfoMapper中增加如下内容
List<LabelInfo> selectListByRoomId(Long id); -
在LabelInfoMapper.xml中增加如下内容
<select id="selectListByRoomId" resultType="com.atguigu.lease.model.entity.LabelInfo">
    select id,
           type,
           name
    from label_info
    where is_deleted = 0
      and id in (select label_id
                 from room_label
                 where is_deleted = 0
                   and room_id = #{id})
</select>
-
-
编写查询房间可选支付方式逻辑
-
在PaymentTypeMapper中增加如下内容
List<PaymentType> selectListByRoomId(Long id); -
在PaymentTypeMapper.xml中增加如下内容
<select id="selectListByRoomId" resultType="com.atguigu.lease.model.entity.PaymentType">
    select id,
           name,
           pay_month_count,
           additional_info
    from payment_type
    where is_deleted = 0
      and id in (select payment_type_id
                 from room_payment_type
                 where is_deleted = 0
                   and room_id = #{id})
</select>
-
-
编写查询房间属性逻辑
-
在AttrValueMapper中增加如下内容
List<AttrValueVo> selectListByRoomId(Long id); -
在AttrValueMapper.xml中增加如下内容
<select id="selectListByRoomId" resultType="com.atguigu.lease.web.app.vo.attr.AttrValueVo">
    select av.id,
           av.name,
           av.attr_key_id,
           ak.name attr_key_name
    from attr_value av
             left join attr_key ak on av.attr_key_id = ak.id and ak.is_deleted = 0
    where av.is_deleted = 0
      and av.id in (select attr_value_id
                    from room_attr_value
                    where is_deleted = 0
                      and room_id = #{id})
</select>
-
-
编写查询房间杂费逻辑
-
在FeeValueMapper中增加如下内容
List<FeeValueVo> selectListByApartmentId(Long id); -
在FeeValueMapper.xml中增加如下内容
<select id="selectListByApartmentId" resultType="com.atguigu.lease.web.app.vo.fee.FeeValueVo">
    select fv.id,
           fv.name,
           fv.unit,
           fv.fee_key_id,
           fk.name fee_key_name
    from fee_value fv
             left join fee_key fk on fv.fee_key_id = fk.id and fk.is_deleted = 0
    where fv.is_deleted = 0
      and fv.id in (select fee_value_id
                    from apartment_fee_value
                    where is_deleted = 0
                      and apartment_id = #{id})
</select>
-
编写查询所属公寓信息逻辑
编写Service层逻辑
在ApartmentInfoService中增加如下内容
ApartmentItemVo selectApartmentItemVoById(Long id);
在ApartmentInfoServiceImpl中增加如下内容
@Override
public ApartmentItemVo selectApartmentItemVoById(Long id) {

    ApartmentInfo apartmentInfo = apartmentInfoMapper.selectById(id);

    List<LabelInfo> labelInfoList = labelInfoMapper.selectListByApartmentId(id);

    List<GraphVo> graphVoList = graphInfoMapper.selectListByItemTypeAndId(ItemType.APARTMENT, id);

    BigDecimal minRent = roomInfoMapper.selectMinRentByApartmentId(id);

    ApartmentItemVo apartmentItemVo = new ApartmentItemVo();
    BeanUtils.copyProperties(apartmentInfo, apartmentItemVo);

    apartmentItemVo.setGraphVoList(graphVoList);
    apartmentItemVo.setLabelInfoList(labelInfoList);
    apartmentItemVo.setMinRent(minRent);
    return apartmentItemVo;
}
编写Mapper层逻辑
-
编写查询标签信息逻辑
-
在LabelInfoMapper中增加如下内容
List<LabelInfo> selectListByApartmentId(Long id); -
在LabelInfoMapper.xml中增加如下内容
<select id="selectListByApartmentId" resultType="com.atguigu.lease.model.entity.LabelInfo"> select id, type, name from label_info where is_deleted = 0 and id in (select label_id from apartment_label where is_deleted = 0 and apartment_id = #{id}) </select> -
编写查询公寓最小租金逻辑
-
在RoomInfoMapper中增加如下内容
BigDecimal selectMinRentByApartmentId(Long id); -
在RoomInfoMapper.xml中增加如下内容
<select id="selectMinRentByApartmentId" resultType="java.math.BigDecimal">
    select min(rent)
    from room_info
    where is_deleted = 0
    and is_release = 1
    and apartment_id = #{id}
</select>
-
-
@Async
在 Spring Boot 中,@Async 是 异步方法执行注解,核心作用是:让被标注的方法脱离当前主线程,在独立的线程池(异步线程)中执行,避免主线程阻塞,提高程序并发能力和响应速度。
一、核心场景:解决「同步阻塞」问题
举个直观例子,理解它的价值:
1. 无 @Async(同步执行)
// 同步方法:发送短信(假设耗时3秒)
public void sendSms(String phone) {
    try { Thread.sleep(3000); } catch (InterruptedException e) {}
    System.out.println("短信发送成功:" + phone);
}

// 主方法调用
public static void main(String[] args) {
    long start = System.currentTimeMillis();
    sendSms("13800138000"); // 阻塞3秒
    System.out.println("主线程结束,总耗时:" + (System.currentTimeMillis() - start) + "ms");
}
执行结果:
短信发送成功:13800138000
主线程结束,总耗时:3003ms
→ 主线程必须等待 sendSms 执行完才能继续,造成阻塞。
2. 加 @Async(异步执行)
// 异步方法:加 @Async 注解,方法会在独立线程执行
@Async
public CompletableFuture<Void> sendSms(String phone) {
    try { Thread.sleep(3000); } catch (InterruptedException e) {}
    System.out.println("短信发送成功:" + phone);
    return CompletableFuture.runAsync(() -> {}); // 异步方法建议返回 CompletableFuture
}

// 主方法调用
public static void main(String[] args) {
    long start = System.currentTimeMillis();
    sendSms("13800138000"); // 不阻塞,直接返回
    System.out.println("主线程结束,总耗时:" + (System.currentTimeMillis() - start) + "ms");
}
执行结果:
主线程结束,总耗时:5ms
短信发送成功:13800138000 // 3秒后在异步线程输出
→ 主线程无需等待,直接继续执行,异步线程在后台完成耗时操作。
二、@Async 的核心作用
- 解除主线程阻塞:耗时操作(如发短信、邮件、调用第三方接口、文件上传)异步执行,主线程快速响应(比如接口快速返回结果,不用用户等待)。
- 提高并发效率:多个异步方法可同时在不同线程执行(依赖线程池),比如同时发送 10 条短信,同步需要 30 秒,异步可能只需要 3 秒(线程池足够的情况下)。
- 解耦业务逻辑:将非核心耗时操作(如日志记录、数据统计)异步化,不影响核心业务流程(如订单提交、支付)。
三、使用条件(必须满足,否则异步不生效)
@Async 不是加了就生效,需要 2 个关键配置:
1. 启动类加 @EnableAsync 注解(开启异步功能)
@SpringBootApplication
@EnableAsync // 必须加!启用Spring的异步方法支持
public class LeaseApplication {
    public static void main(String[] args) {
        SpringApplication.run(LeaseApplication.class, args);
    }
}
2. 异步方法必须是「Spring 管理的 Bean 的方法」
- 方法所在类必须被
@Component、@Service、@Controller等注解标注(让 Spring 扫描为 Bean)。 - 不能在「同一个类内部调用异步方法」(Spring 通过 AOP 动态代理实现异步,内部调用会绕过代理,导致注解失效)。
❌ 错误示例(内部调用,异步失效):
@Service
public class SmsService {
    // 内部调用异步方法,@Async不生效
    public void test() {
        sendSms("13800138000"); // 同步执行,会阻塞
    }

    @Async
    public CompletableFuture<Void> sendSms(String phone) {
        // 耗时操作
    }
}
✅ 正确示例(外部调用,通过 Spring Bean 代理):
@Service
public class SmsService {
    @Async
    public CompletableFuture<Void> sendSms(String phone) {
        // 耗时操作
    }
}

@Controller
public class OrderController {
    @Autowired
    private SmsService smsService;

    // 外部调用SmsService的异步方法,生效
    @GetMapping("/order")
    public String createOrder() {
        smsService.sendSms("13800138000"); // 异步执行,不阻塞
        return "订单创建成功";
    }
}
四、关键细节
1. 异步方法的返回值
- 无返回值:可以用
void,但建议返回CompletableFuture<Void>(方便后续监听异步任务完成状态)。 - 有返回值:必须返回
CompletableFuture<T>(如CompletableFuture<String>),通过它获取异步执行的结果。@Async public CompletableFuture<String> queryData(String id) { // 耗时查询(如查数据库、第三方接口) String result = "查询结果:" + id; return CompletableFuture.completedFuture(result); } // 调用方获取结果 public void test() { CompletableFuture<String> future = queryData("1001"); future.whenComplete((result, e) -> { if (e == null) { System.out.println("异步结果:" + result); } else { System.out.println("异步任务失败:" + e.getMessage()); } }); }
2. 线程池配置(默认线程池的问题)
- Spring 默认的异步线程池:
SimpleAsyncTaskExecutor,每次执行异步方法都会创建新线程(无上限,高并发下可能导致线程耗尽)。 - 建议自定义线程池(控制线程数量、队列大小):
@Configuration
@EnableAsync
public class AsyncConfig {
    // 自定义异步线程池
    @Bean(name = "asyncExecutor")
    public Executor asyncExecutor() {
        ThreadPoolTaskExecutor executor = new ThreadPoolTaskExecutor();
        executor.setCorePoolSize(5); // 核心线程数(默认活跃线程)
        executor.setMaxPoolSize(10); // 最大线程数(峰值线程)
        executor.setQueueCapacity(20); // 任务队列大小(超出核心线程时,任务先入队)
        executor.setThreadNamePrefix("Async-"); // 线程名前缀(方便日志排查)
        executor.setRejectedExecutionHandler(new ThreadPoolExecutor.CallerRunsPolicy()); // 队列满时,由调用线程执行(避免任务丢失)
        executor.initialize();
        return executor;
    }
}

// 异步方法指定使用自定义线程池
@Async("asyncExecutor")
public CompletableFuture<Void> sendSms(String phone) {
    // 耗时操作
}
3. 异常处理
异步方法的异常不会直接抛给调用方,需要通过 CompletableFuture 的 whenComplete、exceptionally 处理,或全局配置异常处理器:
// 全局异步异常处理器
@Configuration
public class AsyncExceptionHandler implements AsyncUncaughtExceptionHandler {
    @Override
    public void handleUncaughtException(Throwable ex, Method method, Object... params) {
        System.err.println("异步方法异常:" + method.getName() + ",参数:" + Arrays.toString(params));
        System.err.println("异常信息:" + ex.getMessage());
    }
}

// 关联到线程池
@Bean(name = "asyncExecutor")
public Executor asyncExecutor() {
    ThreadPoolTaskExecutor executor = new ThreadPoolTaskExecutor();
    // ... 其他配置
    executor.setTaskDecorator(new AsyncTaskDecorator() {
        @Override
        public Runnable decorate(Runnable runnable) {
            return new DelegatingSecurityContextRunnable(runnable);
        }
    });
    executor.setAsyncUncaughtExceptionHandler(new AsyncExceptionHandler()); // 绑定异常处理器
    executor.initialize();
    return executor;
}
五、常用场景
- 耗时的非核心操作:发送短信、邮件、推送通知(用户不需要等待这些操作完成)。
- 批量处理:批量导入数据、批量生成报表(多线程并行处理,提高效率)。
- 第三方接口调用:调用慢接口(如银行支付回调、物流接口),异步执行避免阻塞主流程。
- 日志 / 统计:异步记录操作日志、统计接口访问量(不影响核心业务响应)。
总结
@Async 的核心是「异步解耦 + 提高并发」,让耗时操作在后台线程执行,主线程快速响应。使用时必须满足:@EnableAsync 开启功能、异步方法是 Spring Bean 的外部调用、合理配置线程池(避免资源耗尽)。它是 Spring Boot 中优化系统性能、提升用户体验的常用注解。
项目优化
缓存优化
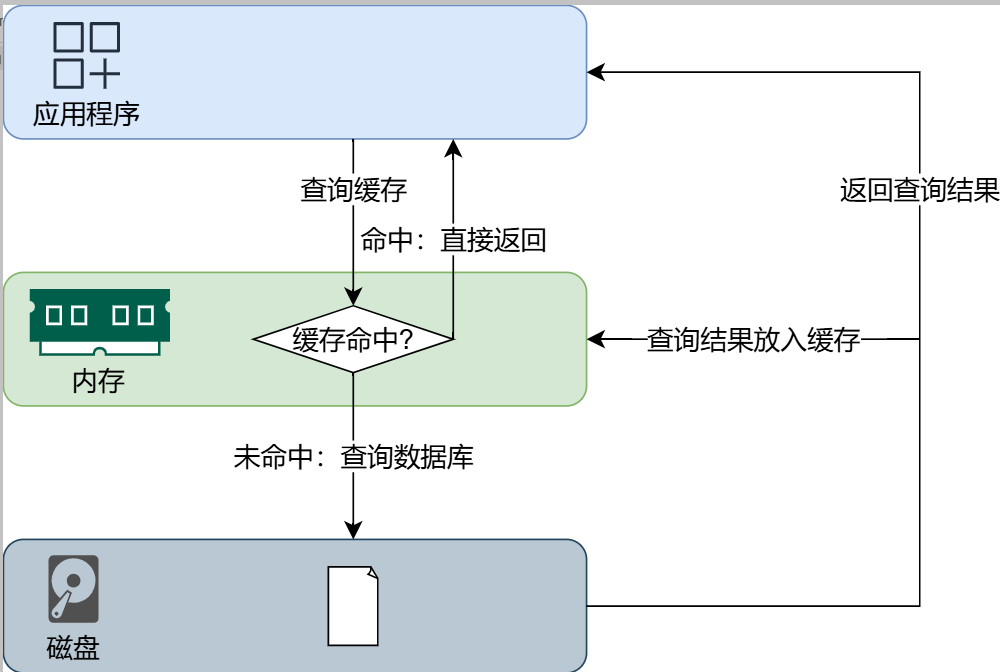
缓存优化是一种高性价比的性能提升手段,通过简单的配置调整往往能获得显著的性能改善。其核心原理是将频繁访问且查询成本较高的数据(如MySQL中的数据库记录)临时存储在内存(如Redis)中。后续访问相同数据时,可直接从内存快速读取,避免了磁盘I/O操作。由于内存的读写速度远高于磁盘,这种优化能显著提升系统性能。
在缓存优化过程中,数据库与缓存数据的一致性问题尤为关键。若数据库数据变更而缓存未同步更新,就会导致数据不一致。常见的解决方案包括:
- 更新数据库时同步更新缓存
- 更新数据库时直接删除缓存
以移动端"根据ID获取房间详情"接口为例进行缓存优化。该接口涉及多表查询,频繁访问数据库导致查询性能较低,适合采用缓存策略来提升查询效率。
1.自定义RedisTemplate
本项目使用Reids保存缓存数据,因此我们需要使用RedisTemplate进行读写操作。前文提到过,Spring-data-redis提供了StringRedisTemplate和RedisTemplate<Object,Object>两个实例,但是两个实例均不满足我们当前的需求,所以我们需要自定义RedisTemplate。
在common模块中创建com.yuhuan.lease.common.redis.RedisConfiguration类,内容如下
@Configuration
public class RedisConfiguration {

    @Bean
    public RedisTemplate<String, Object> stringObjectRedisTemplate(RedisConnectionFactory redisConnectionFactory) {
        RedisTemplate<String, Object> template = new RedisTemplate<>();
        template.setConnectionFactory(redisConnectionFactory);
        template.setKeySerializer(RedisSerializer.string());
        template.setValueSerializer(RedisSerializer.java());
        return template;
    }
}
2.编写缓存逻辑
修改web-app模块中的com.yuhuan.lease.web.app.service.impl.RoomInfoServiceImpl中的getDetailById方法,如下
@Override
public RoomDetailVo getDetailById(Long id) {

        String key = RedisConstant.APP_ROOM_PREFIX + id;
        RoomDetailVo roomDetailVo = (RoomDetailVo) stringObjectRedisTemplate.opsForValue().get(key);

        if (roomDetailVo == null) {
            System.out.println("获取房间详情-" + Thread.currentThread().getName());
            //1.查询房间信息
            RoomInfo roomInfo = roomInfoMapper.selectById(id);
            if (roomInfo == null) {
                return null;
            }
            //2.查询图片
            List<GraphVo> graphVoList = graphInfoMapper.selectListByItemTypeAndId(ItemType.ROOM, id);
            //3.查询租期
            List<LeaseTerm> leaseTermList = leaseTermMapper.selectListByRoomId(id);
            //4.查询配套
            List<FacilityInfo> facilityInfoList = facilityInfoMapper.selectListByRoomId(id);
            //5.查询标签
            List<LabelInfo> labelInfoList = labelInfoMapper.selectListByRoomId(id);
            //6.查询支付方式
            List<PaymentType> paymentTypeList = paymentTypeMapper.selectListByRoomId(id);
            //7.查询基本属性
            List<AttrValueVo> attrValueVoList = attrValueMapper.selectListByRoomId(id);
            //8.查询杂费信息
            List<FeeValueVo> feeValueVoList = feeValueMapper.selectListByApartmentId(roomInfo.getApartmentId());
            //9.查询公寓信息
            ApartmentItemVo apartmentItemVo = apartmentInfoService.selectApartmentItemVoById(roomInfo.getApartmentId());

            roomDetailVo = new RoomDetailVo();
            BeanUtils.copyProperties(roomInfo, roomDetailVo);

            roomDetailVo.setApartmentItemVo(apartmentItemVo);
            roomDetailVo.setGraphVoList(graphVoList);
            roomDetailVo.setAttrValueVoList(attrValueVoList);
            roomDetailVo.setFacilityInfoList(facilityInfoList);
            roomDetailVo.setLabelInfoList(labelInfoList);
            roomDetailVo.setPaymentTypeList(paymentTypeList);
            roomDetailVo.setFeeValueVoList(feeValueVoList);
            roomDetailVo.setLeaseTermList(leaseTermList);


            stringObjectRedisTemplate.opsForValue().set(key, roomDetailVo);
        }

        //10.保存浏览历史
        browsingHistoryService.saveHistory(LoginUserHolder.getLoginUser().getUserId(), id);

        return roomDetailVo;
}
3.编写删除缓存逻辑
为保证缓存数据的一致性,在房间信息发生变化时,需要删除相关缓存。
修改web-admin模块中的com.atguigu.lease.web.admin.service.impl.RoomInfoServiceImpl中的saveOrUpdateRoom方法,如下
@Override
public void saveOrUpdateRoom(RoomSubmitVo roomSubmitVo) {
    boolean isUpdate = roomSubmitVo.getId() != null;
    super.saveOrUpdate(roomSubmitVo);

    //若为更新操作,则先删除与Room相关的各项信息列表
    if (isUpdate) {
        //1.删除原有graphInfoList
        ......

        //2.删除原有roomAttrValueList
        ......

        //3.删除原有roomFacilityList
        ......

        //4.删除原有roomLabelList
        ......

        //5.删除原有paymentTypeList
        ......

        //6.删除原有leaseTermList
        ......

        //7.删除缓存
        redisTemplate.delete(RedisConstant.APP_LOGIN_PREFIX + roomSubmitVo.getId());
    }

    //1.保存新的graphInfoList
    ......

    //2.保存新的roomAttrValueList
    ......

    //3.保存新的facilityInfoList
    ......

    //4.保存新的labelInfoList
    ......

    //5.保存新的paymentTypeList
    ......

    //6.保存新的leaseTermList
    ......
}
修改web-admin模块中的com.yuhuan.lease.web.admin.service.impl.RoomInfoServiceImpl中的removeRoomById方法,如下
@Override
public void removeRoomById(Long id) {

    //1.删除RoomInfo
    ......

    //2.删除graphInfoList
    ......

    //3.删除attrValueList
    ......

    //4.删除facilityInfoList
    ......

    //5.删除labelInfoList
    ......

    //6.删除paymentTypeList
    ......

    //7.删除leaseTermList
    ......

    //8.删除缓存
    redisTemplate.delete(RedisConstant.APP_ROOM_PREFIX + id);
}
压力测试
可使用Postman或者Apifox等工具对根据ID获取房间详情这个接口进行压力测试,下图是增加缓存前后的测试报告


 1474
1474

 被折叠的 条评论
为什么被折叠?
被折叠的 条评论
为什么被折叠?
 到【灌水乐园】发言


