


引言:
ead_image (Image, 'bottles/bottle_mouth_' + 1$'.02')
fast_threshold (Image, Region, 0, 50, 20)
opening_circle (Region, RegionOpening, 3.5)
closing_circle (RegionOpening, RegionClosing, 3.5)
fill_up (RegionClosing, RegionFillUp)
*将输入的区域转换为对应的边界轮区域
*****思路1:区域->XLD 把区域直接转化为XLD轮廓
gen_contour_region_xld (RegionFillUp, Contours, 'border')
fit_circle_contour_xld (Contours, 'algebraic', -1, 0, 0, 3, 2, Row, Column, Radius, StartPhi, EndPhi, PointOrder)
gen_circle (Circle, Row, Column, Radius)
erosion_circle (Circle, RegionErosion,60)
difference (Circle, RegionErosion, RegionDifference)
*****思路2 :图像->XLD 从区域中抠图,再获取XLD
boundary (RegionFillUp, RegionBorder, 'outer')
dilation_circle (RegionBorder, RegionDilation, 3.5)
reduce_domain (Image, RegionDilation, ImageReduced)
*从灰度图像中提取高精度的边缘轮廓(XLD 格式)
edges_sub_pix (ImageReduced, Edges, 'canny', 1, 20, 40)
*分割亚像素
segment_contours_xld (Edges, ContoursSplit, 'lines_circles', 5, 4, 2)
count_obj (ContoursSplit, Number)
NumContours := Number
MaxLength := -1.0
MaxIndex := -1
* 遍历所有轮廓
for i := 0 to NumContours - 1 by 1
* 计算当前轮廓的长度
select_obj (ContoursSplit, ObjectSelected, i+1)
length_xld(ObjectSelected, CurrentLength)
* 比较并更新最大值和索引
if (CurrentLength > MaxLength)
MaxLength := CurrentLength
MaxIndex := i+1
endif
endfor
select_obj (ObjectSelected, ObjectSelected1, MaxIndex)
一、核心应用场景
1. 精密零件尺寸测量
-
场景:检测圆形零件(如轴承、齿轮、垫片)的直径、圆度误差。
2. 缺陷检测(如划痕、凹坑)
-
场景:检测圆形表面是否存在缺陷(如瓶盖、镜片)。
3. 机器人抓取定位
-
场景:识别圆形工件的位置和姿态,引导机器人抓取。
4. 光学字符识别(OCR)预处理
-
场景:定位圆形标签(如药瓶标签)上的文字区域。
5. 运动轨迹跟踪
-
场景:跟踪圆形运动目标(如旋转机械零件)。
二、实战代码
dev_get_window (WindowHandle)
read_image (Image, 'C:/Users/10314/Desktop/pic1.jpg')
get_image_size (Image, Width1, Height1)
draw_circle (WindowHandle, Row, Column, Radius)
gen_circle_contour_xld (ContCircle, Row, Column, Radius, 0, 6.28318, 'positive', 1)
* 初始化参数
NumPoints := 10
Width := 30
Height := 5
* 初始化矩形集合
measureRowList := []
measureColumnList := []
* 生成10个矩形,角度跟随圆上的点
dev_set_color('green')
for i := 0 to NumPoints-1 by 1
Angle := i * (6.28318 / NumPoints)
* 计算圆上的点坐标(通过极坐标系计算方法,注意Row方向上是减法)
X := Column + Radius * cos(Angle)
Y := Row - Radius * sin(Angle)
* 生成矩形(角度为圆上点的角度)
* gen_rectangle2的参数:
* (Row, Column, Phi, Length1, Length2)
* Phi是矩形的旋转角度(弧度)
* Length1是矩形的半长轴,Length2是半短轴
gen_rectangle2(Rectangle, Y, X, Angle, Width/2, Height/2)
*生成测量矩形2句柄
gen_measure_rectangle2 (Y, X, Angle, Width/2, Height/2, Width1, Height1, 'nearest_neighbor', MeasureHandle)
measure_pos (Image, MeasureHandle, 1, 50, 'positive', 'first', RowEdge, ColumnEdge, Amplitude, Distance)
if (|RowEdge| != 0 and |ColumnEdge| != 0)
measureRowList[i]:=RowEdge
measureColumnList[i]:=ColumnEdge
dev_set_color('magenta')
gen_cross_contour_xld (Cross, RowEdge, ColumnEdge, 18, rad(45))
dev_set_color('green')
*删除句柄
clear_handle (MeasureHandle)
endif
endfor
*判断1.数组数量与检测的数量是否一致 2.数组中是否有0存在,因为如果索引3被赋值,1、2如果为空会被默认赋值0
if(|measureRowList|==NumPoints and |measureColumnList|==NumPoints)
checkResult:=true
for i:=0 to |measureRowList|-1 by 1
if(measureRowList[i]==0 or measureColumnList[i]==0)
checkResult:=false
break
endif
endfor
if(checkResult==false)
dev_open_window(100, 100, 500, 500, 'black', WindowHandle1)
if (WindowHandle1 == 0)
disp_message(WindowHandle1, '窗口打开失败', 'window', 12, 12, 'red', 'true')
stop()
endif
set_display_font(WindowHandle1, 15, 'mono', 'false', 'false')
errorMsg := '检测到的卡尺数据中存在空'+ '\n' + '检测错误!'
dev_disp_text (errorMsg, 'window', 10, 10, 'green', ['box','box_color'], ['true','blue'])
disp_continue_message(WindowHandle1, 'black', 'true')
stop()
else
*圆拟合
gen_contour_polygon_xld (Contour, measureRowList, measureColumnList)
*Contour输入xld的轮廓
* Mode 'algebraic' 使用代数距离进行拟合(默认,速度快但精度略低)'geometric':使用几何距离进行拟合(精度高但计算量大)。
* -1 Iterations最大迭代次数。设为 -1 时,Halcon 自动选择最优迭代次数。
* 0 ClippingEndPoints是否裁剪轮廓的端点(1 表示裁剪,0 表示不裁剪)。
* 0 ClippingFactor裁剪因子(仅当 ClippingEndPoints=1 时有效)。裁剪轮廓的百分比(例如 0.1 表示裁剪 10% 的端点)。
* 3 MinContourLength 拟合所需的最小轮廓点数。若轮廓点数少于该值,拟合失败。
* 2 Precision 1:低精度 2:高精度(默认)
* Row1 Column1 Radius1 拟合圆的圆心坐标(Row, Column)和半径(Radius)。
* StartPhi, EndPhi 拟合圆的起始和结束角度(弧度制),通常用于表示轮廓的覆盖范围。
* PointOrder 'positive':轮廓点按顺时针方向排列。 'negative':轮廓点按逆时针方向排列。
fit_circle_contour_xld (Contour, 'algebraic', -1, 0, 0, 3, 2, Row1, Column1, Radius1, StartPhi, EndPhi, PointOrder)
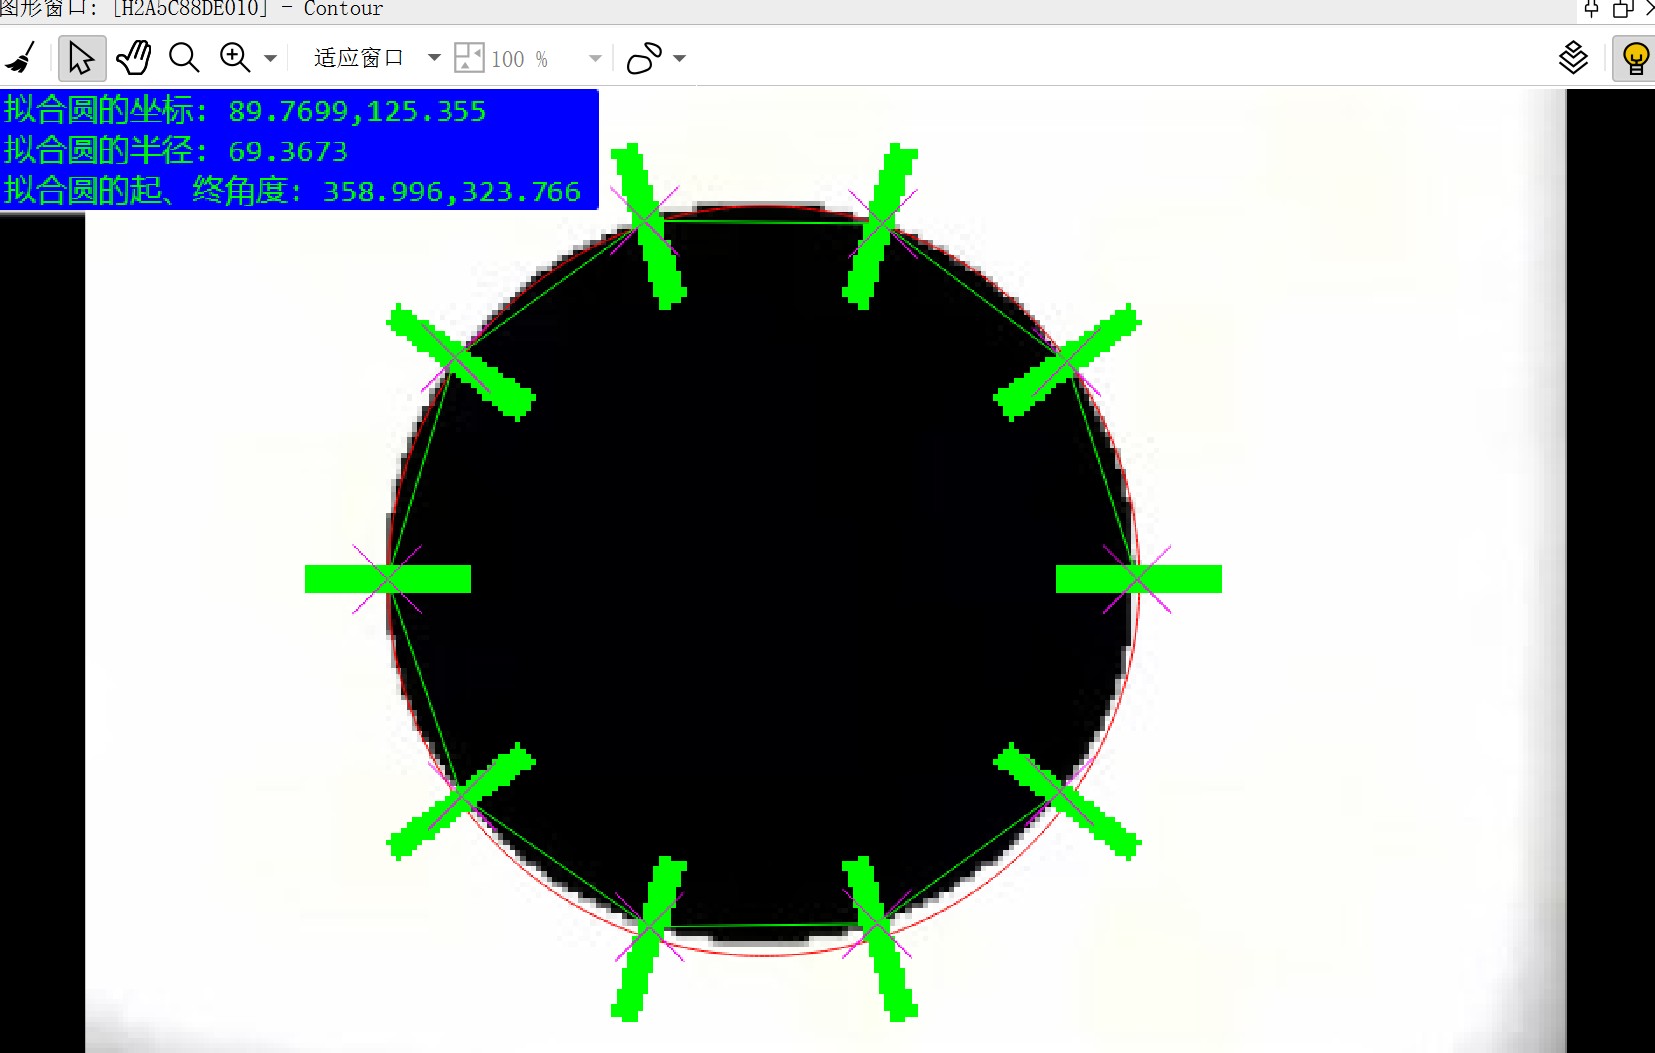
msg:='拟合圆的坐标: '+ Row1+','+Column1 +'\n' +'拟合圆的半径: '+ Radius1+'\n' +'拟合圆的起、终角度: '+ deg(StartPhi)+','+deg(EndPhi)
set_display_font (WindowHandle, 16, 'mono', 'false', 'false')
dev_disp_text (msg, 'window', 0, 0, 'green', ['box','box_color'], ['true','blue'])
endif
else
dev_open_window(100, 100, 500, 500, 'black', WindowHandle2)
if (WindowHandle2 == 0)
disp_message(WindowHandle2, '窗口打开失败', 'window', 12, 12, 'red', 'true')
stop()
endif
set_display_font(WindowHandle2, 15, 'mono', 'false', 'false')
errorMsg := '检测到的卡尺数量为' + '\n' + |measureRowList| + '\n' + '检测错误!'
dev_disp_text (errorMsg, 'window', 10, 10, 'green', ['box','box_color'], ['true','blue'])
disp_continue_message(WindowHandle2, 'black', 'true')
stop()
endif
最终实现效果:


 87
87

 被折叠的 条评论
为什么被折叠?
被折叠的 条评论
为什么被折叠?
 到【灌水乐园】发言


