


 文章介绍了如何使用UltralyticsYOLOv8进行图像分割,展示了如何加载模型、进行预测并处理预测结果,包括获取类别、边界框和分割掩码,以及计算细胞区域面积。还提供了一个批量处理图片并存储结果的示例。
本文提供两种方法计算掩膜面积,一是在原图像尺寸上,获取每个掩膜对象外轮廓的的面积;二是在转换后的统一尺寸或原图像尺寸上,计数每个掩膜对象像素点数。并且提供了将面积显示在输出图像上的方法。
关于分割官方文档传送门:
片段 -Ultralytics YOLOv8 文档![]() https://docs.ultralytics.com/zh/tasks/segment/seg-predict官方文档示例:
https://docs.ultralytics.com/zh/tasks/segment/seg-predict官方文档示例:
from ultralytics import YOLO

# Load a model
model = YOLO('yolov8n-seg.pt')  # load an official model
model = YOLO('path/to/best.pt')  # load a custom model

# Predict with the model
results = model('https://ultralytics.com/images/bus.jpg') # predict on an imagecv2.contourArea获取掩膜面积基本方法
results是一个列表,其中每个元素包含boxes(类别、边界框、置信度等基本信息)、masks(分割的掩码)、keypoints(关于姿态估计,分割任务时为None)、probs(关于分类,分割任务时为None)
从boxes中获取每个对象的cls(类别索引),需从张量中获取值,再映射到names中;再从mask中获取对应对象的xy(边缘点坐标),计算面积使用cv2.contourArea()函数。
该方法适用于:在计算中空图形的面积时,会忽略中空部分,仅计算外轮廓的面积。如不符合项目需要,看下面的data.sum方法
这个边缘xy以及xyn(归一化)的获取是在ultralytics/utils/ops.py的mask2segments方法
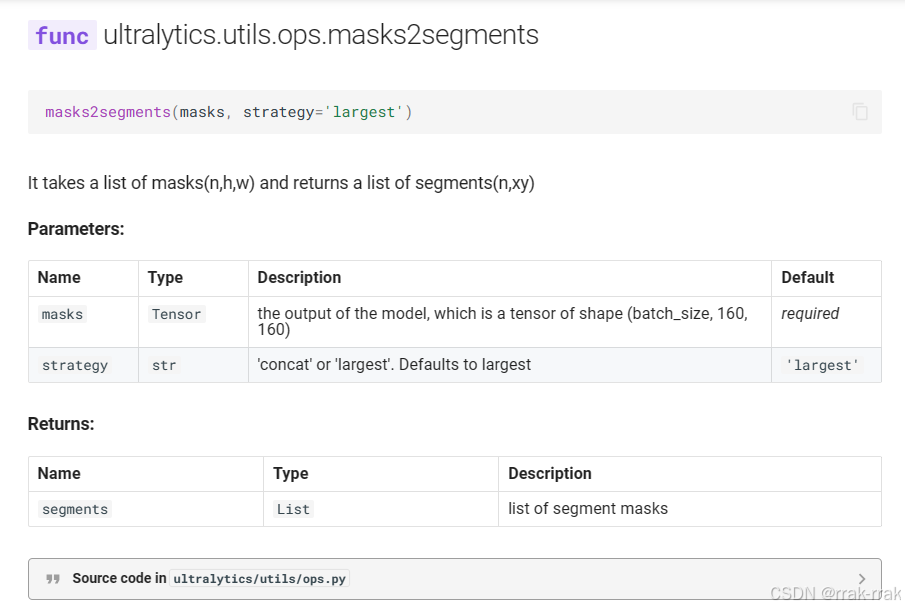
- masks (tensor): 一个形状为(n,w,h)的张量,n是批量大小,h和w是掩码的高度和宽度。n是这张图像的掩膜数量,h×w矩阵是各个掩膜信息(在某个位置,为1则表明此处是掩膜的一部分,为0则不是)。
- strategy:指定如何处理提取到的轮廓,默认值是largest。可选值:
- concat:将所有提取到的轮廓拼接在一起。
- largest:选择面积最大的轮廓。
新建文件,运行代码示例:
from ultralytics import YOLO
import cv2

# Load a model
model = YOLO("模型路径")  # load an official model

# Define path to the image file
source = "图像路径"

# Predict with the model
results = model(source=source, save=False)  # predict on an image

for result in results:
    boxes = result.boxes  # Boxes 对象,用于边界框输出
    masks = result.masks  # Masks 对象,用于分割掩码输出
    names = result.names
    for box, mask in zip(boxes, masks):
        for cls, contour in zip(box.cls, mask.xy):
            class_id = cls.item() # 获取张量的值
            class_name = names[class_id] # 将类别的序号转化成类别名
            print(class_name)
            print(cv2.contourArea(contour)) # 计算轮廓面积
其中模型对应的.yaml文件:
path: ../datasets/WSY-seg  # dataset root dir
train: images/train  # train images (relative to 'path') 128 images
val: images/train  # val images (relative to 'path') 128 images
test:  # test images (optional)

# Classes
names:
  0: embryo
  1: cell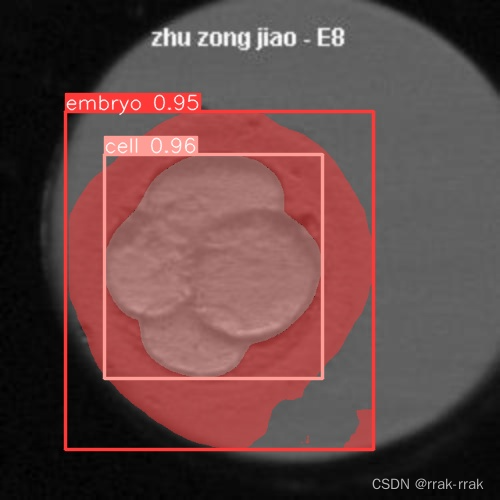
输出结果:
image 1/1 图像路径: 640x640 1 embryo, 1 cell, 27.9ms
Speed: 4.7ms preprocess, 27.9ms inference, 8.0ms postprocess per image at shape (1, 3, 640, 640)
cell
34007.87353515625
embryo
76430.6640625
注意此处的embryo是包含了cell的,是不能标中空的。
cv2.contourArea批量处理图像获取掩膜面积方法
这里是用另外一个模型,分割图像中的cell和segment。
source是文件夹路径。该代码生成一个df,包括图片名称和对应的面积。这样可以导出excel或csv。
import pandas as pd
from ultralytics import YOLO
import cv2

def get_last_part_of_string(string):
    last_backslash_index = string.rfind('\\')
    if last_backslash_index != -1:
        return string[last_backslash_index + 1:]
    else:
        return string

# Load a model
model = YOLO(r"E:\202306\segment\train_happy\weights\best.pt")

# Define path to the image file
source = r"E:\202306\人工评价+问题(1)\人工评价+问题\embryo_dataset_F25数据集\JE577_EMB7_DISCARD"

# Predict with the model
results = model(source=source, save=False, conf=0.7)

data = []  # Initialize an empty list to store the data


for result in results:
    record = {}
    boxes = result.boxes
    masks = result.masks
    path = get_last_part_of_string(result.path)
    record["Path"] = path
    cell_areas = []
    cell_areas_box = []
    segment_areas = []

    for box, mask in zip(boxes, masks):
        for cls, boxxyxy, maskContour in zip(box.cls, box.xyxy, mask.xy):
            class_id = cls.item()
            x1, y1, x2, y2 = [item.item() for item in boxxyxy]
            if class_id == 1.0:  # cell
                boxArea = (x2 - x1) * (y2 - y1)
                cell_areas_box.append(boxArea)
                cell_areas.append(cv2.contourArea(maskContour))
            elif class_id == 2.0:  # segment
                segmentArea = cv2.contourArea(maskContour)
                segment_areas.append(segmentArea)


    record["len_cell_areas"] = len(cell_areas)
    record["cell_areas"] = cell_areas
    data.append(record)

# Create DataFrame
df = pd.DataFrame(data)


print(df)
运行结果示例:
       Path  len_cell_areas                                         cell_areas
0   图片01.png               1                                [5982.572664737556]
1   图片02.png               1                                 [5917.78414849074]
2   图片03.png               1                                [5838.779726962515]
3   图片04.png               1                                [5920.048454688906]
4   图片05.png               1                                [5870.545019034616]
5   图片06.png               1                                [6221.850625191393]
6   图片07.png               1                                [6003.519054066506]
7   图片08.png               2             [4716.300056756678, 6220.655430036932]
8   图片09.png               2              [2925.302606760233, 3053.55887752166]
9   图片10.png               2            [3267.8019318568986, 2970.969230435032]
10  图片11.png               2                [11576.5380859375, 12864.990234375]
11  图片12.png               2             [2546.697752431646, 2434.669943689063]
12  图片13.png               2           [3835.7404975981335, 2332.3920037686767]
13  图片14.png               1                                [6029.749145191818]
14  图片15.png               3  [10395.81298828125, 9761.3525390625, 6403.8085...
15  图片16.png               3  [1893.9676402151235, 2125.634363901001, 996.73...
16  图片17.png               3  [1779.0463765645109, 2163.7527813625347, 940.5...
17  图片18.png               2            [2098.2091324186476, 2094.938419651953]
18  图片19.png               4  [1714.886724891694, 1636.82584444643, 762.3676...
19  图片20.png               4  [895.5303360021499, 907.3558746517228, 878.043...
20 图片21.png 5 [797.3409886407608, 1180.4745866096928, 742.86...data.sum获取掩膜面积的方法:特定尺寸及原尺寸
首先我们知道,图像进入YOLO后先同一转化成特定尺寸再进行推理,之后(在后处理时)还要回到原先尺寸。这个尺寸就是参数imgsz,如不设置,默认是384*640.
这是通常我们使用的一个预测代码,设置断点查看masks(如下图)就可以看出:
- orig_shape就是图像zidane.jpg原尺寸,
- shape中[384,640]就是转换成的统一尺寸,3是指这张图中检测到了3个对象也就是绘制了3个掩膜。
- data是掩膜信息,其形状就是shape,其元素的值为0(该处不属于某个特定掩膜)或1(该处属于某个特定掩膜)
from ultralytics import YOLO

model = YOLO("yolov8n-seg.pt")
source = 'ultralytics/assets/zidane.jpg'
results = model(source=source, save=False)

for result in results:
    boxes = result.boxes
    masks = result.masks
    for box, mask in zip(boxes, masks):
        pass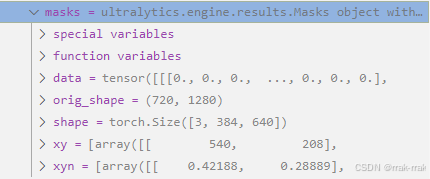
因此若想知道在转换成统一尺寸上图像上的面积,只需要对data中每一个掩膜对象(二维数组)求和。当然如果想知道具体像素位置也是可以的。
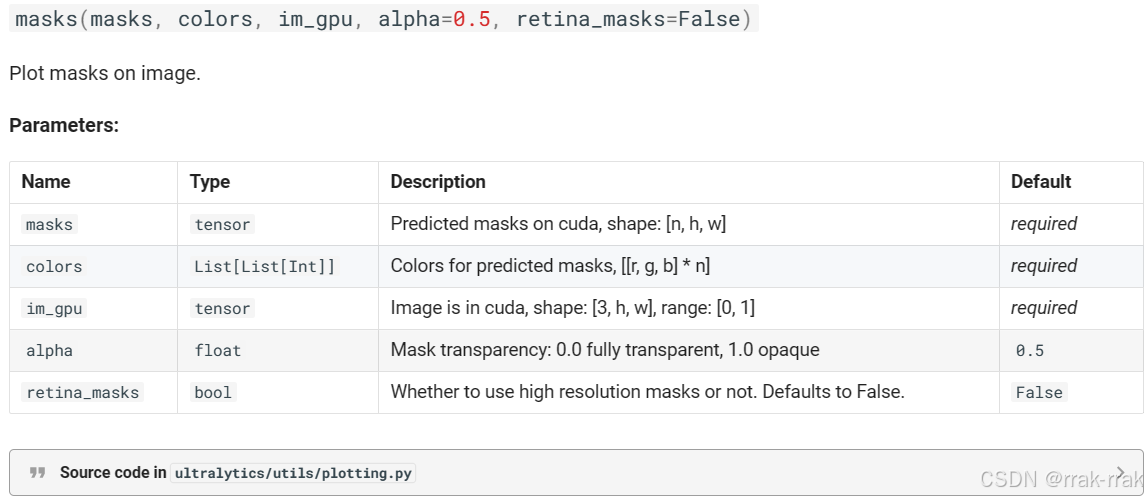
results没有提供原尺寸的图像掩膜信息(对于2024年3月下载的源码)。但是提供转换函数,位置在ultralytics/utils/ops.py的scale_image,作用是将掩码(或图像)从YOLO推理的尺寸缩放回原始图像的尺寸。在绘制掩码(绘图函数plotting.py的masks,在下文也会提到)中调用了该函数。
官方介绍
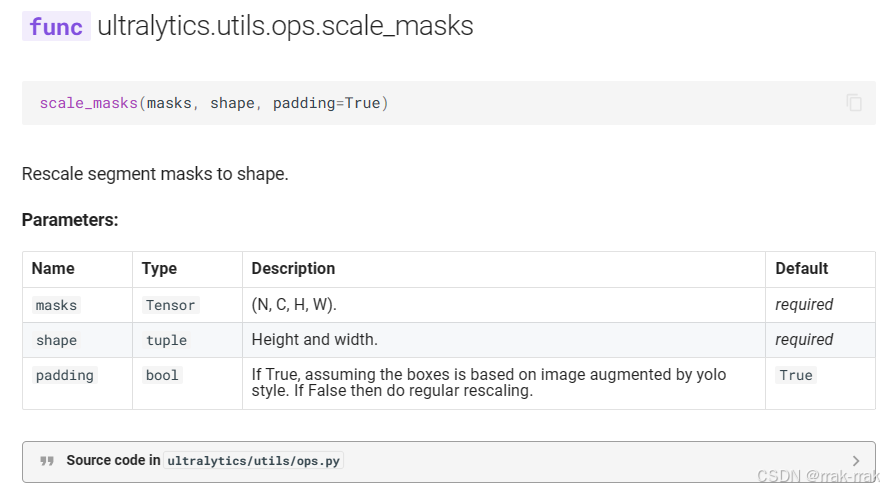
因此对于输出结果,调用scale_image函数可得到原图像尺寸的掩膜
from ultralytics import YOLO
from ultralytics.utils.ops import scale_image

# Load a pretrained YOLOv8n model
model = YOLO("yolov8n-seg.pt")

# Define path to the image file
source = 'ultralytics/assets/zidane.jpg'

# Run inference on the source
results = model(source=source, save=False)  # list of Results objects

for result in results:
    boxes = result.boxes
    masks = result.masks
    names = result.names
    for box, mask in zip(boxes, masks):
        for cls, data in zip(box.cls, mask.data):
            class_id = int(cls.item())
            class_name = names[class_id]
            print(class_name)
            # 打印统一尺寸的掩膜对象面积
            print(data.sum().item())
            # 打印原图像尺寸的掩膜对象面积
            ori_mask_data = scale_image(data.cpu().numpy(),mask.orig_shape)
            print(ori_mask_data.sum())
运行结果:
image 1/1 E:\202306\DeepLearnWork\yolov8-main\ultralytics\assets\zidane.jpg: 384x640 2 persons, 1 tie, 26.9ms
Speed: 3.0ms preprocess, 26.9ms inference, 9.0ms postprocess per image at shape (1, 3, 384, 640)
person
57275.0
229100.0
person
38664.0
154656.0
tie
2563.0
10252.0
每个类名后第一行是统一尺寸的掩膜对象面积,第二行是原尺寸的掩膜对象面积。
将掩膜面积(及标签)显示在输出图像上(批量处理)
方法1 计算轮廓面积并显示轮廓
这里提供一种方法YOLOv8实例分割获取每个对象的面积并显示在图像上,直接运行以下预测的文件即可
核心是cv2.drawContours()绘制掩码轮廓,cv2.putText()打印要显示的信息
from ultralytics import YOLO
import cv2
import os
import numpy as np

# Load a pretrained YOLOv8n model
model = YOLO('yolov8n-seg.pt')

# Define path to the directory containing image files
source = 'ultralytics/assets'

# 指定输出路径
output_dir = 'output_images'
if not os.path.exists(output_dir):
    os.makedirs(output_dir)

# 获取待预测文件名称,用于保存同名文件
def get_last_part_of_string(path):
    return os.path.basename(path)

#  hex to BGR
def hex_to_bgr(hex):
    return tuple(int(hex[i:i+2], 16) for i in (4, 2, 0))

# 颜色,同plotting.py的设置
hexs = (
    "FF3838", "FF9D97", "FF701F", "FFB21D", "CFD231",
    "48F90A", "92CC17", "3DDB86", "1A9334", "00D4BB",
    "2C99A8", "00C2FF", "344593", "6473FF", "0018EC",
    "8438FF", "520085", "CB38FF", "FF95C8", "FF37C7"
)
colors = [hex_to_bgr(h) for h in hexs]

# 开始预测
results = model(source=source, save=False)  # list of Results objects

for result in results:
    image_path = result.path
    image = cv2.imread(image_path)
    boxes = result.boxes  # Boxes 对象,用于边界框输出
    masks = result.masks  # Masks 对象,用于分割掩码输出
    names = result.names  # 获取类别名称字典

    for box, mask in zip(boxes, masks):
        for cls, contour in zip(box.cls, mask.xy):
            class_id = int(cls.item())  # 获取张量的值并转换为整数
            color = colors[class_id % len(colors)]  # 获取颜色
            contour = np.array(contour, dtype=np.int32)  # 确保轮廓是整数类型
            area = cv2.contourArea(contour)  # 计算轮廓面积
            class_name = names[class_id]  # 获取类别名称

            # 计算轮廓的中心
            M = cv2.moments(contour)
            if M['m00'] != 0:
                cx = int(M['m10'] / M['m00'])
                cy = int(M['m01'] / M['m00'])
            else:
                cx, cy = 0, 0

            # 绘制掩码轮廓
            cv2.drawContours(image, [contour], -1, color, 2)

            # 在图像上绘制面积和类名
            text = f'{class_name} {area:.2f}'
            cv2.putText(image, text, (cx, cy), cv2.FONT_HERSHEY_SIMPLEX, 0.5, color, 2)

    # 保存图像
    output_path = os.path.join(output_dir, get_last_part_of_string(image_path))
    cv2.imwrite(output_path, image)
    print(f'Saved: {output_path}')
这样在设定的output_dir路径下可见输出结果:
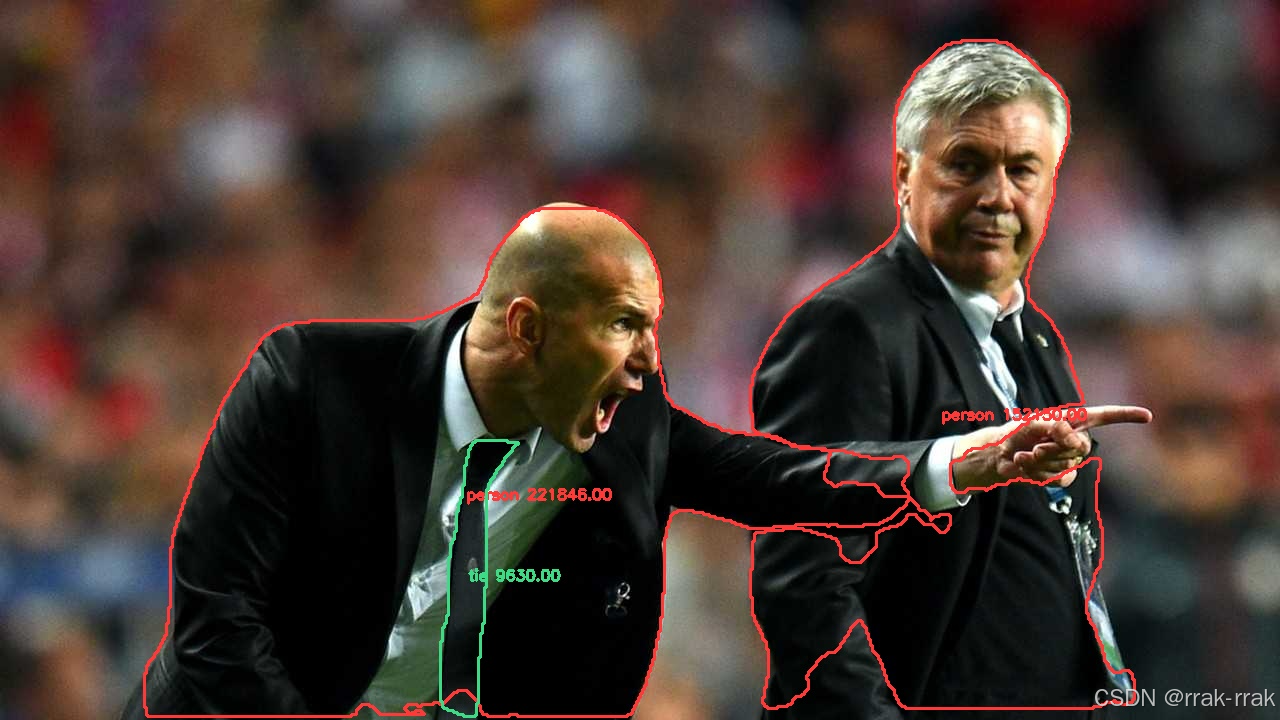
这种方法,直接运用YOLO输出的结果在原图像上绘制。这里的像素面积是原图像尺寸的。
方法2 更改plotting.py的masks函数,掩膜像素点求和
YOLO原有的绘图功能在ultralytics/utils/plotting.py,官方文档对plotting.py的说明在以下链接:
绘图 -Ultralytics YOLO 文档![]() https://docs.ultralytics.com/zh/reference/utils/plotting/#ultralytics.utils.plotting.Annotator.queue_counts_display绘制掩膜图像在该文件的masks函数:
https://docs.ultralytics.com/zh/reference/utils/plotting/#ultralytics.utils.plotting.Annotator.queue_counts_display绘制掩膜图像在该文件的masks函数:
若要绘制,核心的输入参数是:
masks (tensor): 一个形状为(n,w,h)的张量,n是批量大小,h和w是掩码的高度和宽度。n是这张图像的掩膜数量,h×w矩阵是各个掩膜信息(在某个位置,为1则表明此处是掩膜的一部分,为0则不是)
- mask_area = torch.sum(masks[i]).item()计算掩膜中非零像素点的总数,将张量转换为 Python 数值,得到掩膜的面积
- mask_positions = np.where(masks[i].cpu().numpy() > 0)找到第i个掩膜中所有像素值非零的位置,接下来以此确定绘制文本的位置
因此在masks函数中添加以下代码
        # 计算每个掩膜的面积并在其附近显示面积信息
        for i in range(len(masks)):
            mask_area = torch.sum(masks[i]).item()

            # 找到掩膜中心
            mask_positions = np.where(masks[i].cpu().numpy() > 0)
            mask_center_y = int(np.mean(mask_positions[0]))
            mask_center_x = int(np.mean(mask_positions[1]))

            # 绘制文本
            text_pos = (mask_center_x - 20, mask_center_y)  # 调整文本显示位置
            cv2.putText(im_mask_np, f"{int(mask_area)}", text_pos, cv2.FONT_HERSHEY_SIMPLEX, 0.5, (255, 255, 255), 2)
即:将masks函数替换成以下内容:
    def masks(self, masks, colors, im_gpu, alpha=0.5, retina_masks=False):
        """
        Plot masks on image and display mask area near each mask.

        Args:
            masks (tensor): Predicted masks on cuda, shape: [n, h, w]
            colors (List[List[Int]]): Colors for predicted masks, [[r, g, b] * n]
            im_gpu (tensor): Image is in cuda, shape: [3, h, w], range: [0, 1]
            alpha (float): Mask transparency: 0.0 fully transparent, 1.0 opaque
            retina_masks (bool): Whether to use high resolution masks or not. Defaults to False.
        """
        if self.pil:
            # Convert to numpy first
            self.im = np.asarray(self.im).copy()
        if len(masks) == 0:
            return
        if im_gpu.device != masks.device:
            im_gpu = im_gpu.to(masks.device)

        colors = torch.tensor(colors, device=masks.device, dtype=torch.float32) / 255.0  # shape(n, 3)
        colors = colors[:, None, None]  # shape(n, 1, 1, 3)
        masks = masks.unsqueeze(3)  # shape(n, h, w, 1)
        masks_color = masks * (colors * alpha)  # shape(n, h, w, 3)

        inv_alpha_masks = (1 - masks * alpha).cumprod(0)  # shape(n, h, w, 1)
        mcs = masks_color.max(dim=0).values  # shape(h, w, 3)

        im_gpu = im_gpu.flip(dims=[0])  # flip channel
        im_gpu = im_gpu.permute(1, 2, 0).contiguous()  # shape(h, w, 3)
        im_gpu = im_gpu * inv_alpha_masks[-1] + mcs
        im_mask = im_gpu * 255
        im_mask_np = im_mask.byte().cpu().numpy()

        # 来计算每个掩膜的面积并在其附近显示面积信息
        for i in range(len(masks)):
            mask_area = torch.sum(masks[i]).item()

            # 找到掩膜中心
            mask_positions = np.where(masks[i].cpu().numpy() > 0)
            mask_center_y = int(np.mean(mask_positions[0]))
            mask_center_x = int(np.mean(mask_positions[1]))

            # 绘制文本
            text_pos = (mask_center_x - 20, mask_center_y)  # 调整文本显示位置
            cv2.putText(im_mask_np, f"{int(mask_area)}", text_pos, cv2.FONT_HERSHEY_SIMPLEX, 0.5, (255, 255, 255), 2)

        # Update self.im with the masked image
        self.im[:] = im_mask_np if retina_masks else ops.scale_image(im_mask_np, self.im.shape)
运行官方示例detect.py即可:
from ultralytics import YOLO

model = YOLO('yolov8n-seg.pt')
source = 'ultralytics/assets/zidane.jpg'
results = model(source = source, save = True)
效果如下:
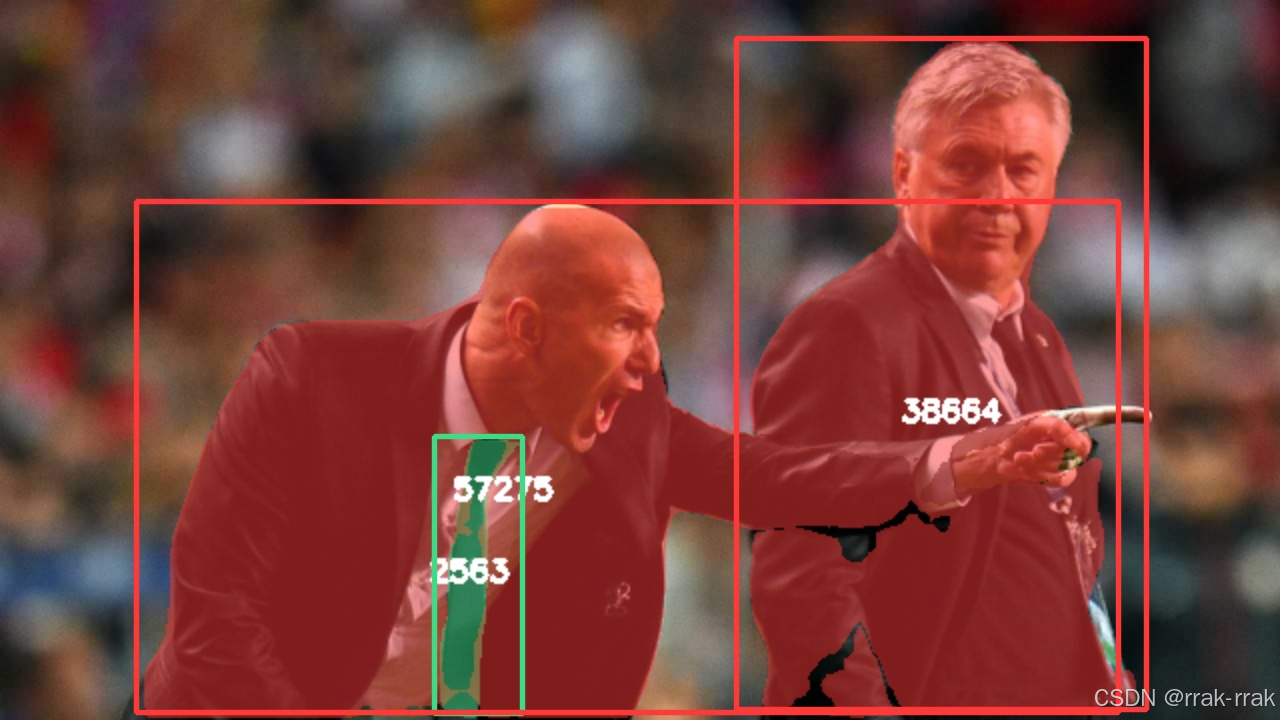
注:我这里没有显示label和conf,是因为没有调用其他画图函数。不是更改的masks的缘故。
需要注意的是YOLO调用绘制掩膜图像函数时候,也是在转换统一尺寸后的图上绘制的。
另外,方法1是用YOLO输出的结果计算外轮廓的面积,方法2是计数掩膜点数并在绘制掩膜图像同时绘制在图上。


 2486
2486

 被折叠的 条评论
为什么被折叠?
被折叠的 条评论
为什么被折叠?
 到【灌水乐园】发言


