


一、引言
实例分割(Instance Segmentation)是计算机视觉中的一项关键任务,它不仅可以检测物体的位置,还能为每个目标生成精确的像素级掩码。YOLOv8 在目标检测的基础上,新增了实例分割(segmentation)功能,使得该模型可以高效地进行语义分割和目标分割任务。本文将详细介绍如何使用 YOLOv8 进行实例分割,包括数据准备、模型训练、推理、评估及优化等内容。
二、YOLOv8 实例分割简介
YOLOv8 的实例分割版本采用了基于掩码(Mask-Based)的分割方法,结合目标检测的能力,预测每个目标的精确轮廓。它的主要特性如下:
- 端到端训练:只需提供标注数据,即可训练分割模型。
- 高效推理:支持实时推理,适用于资源受限的设备。
- 灵活部署:支持PyTorch、ONNX、TensorRT、OpenVINO 等多种格式导出和部署。
三、环境配置
在开始实例分割之前,确保你的环境满足以下要求:
1. 硬件要求
- 操作系统:Windows 10 / Linux
- GPU:NVIDIA 计算能力 6.1 以上(推荐)
- CUDA 版本:11.6 及以上
- 内存:16GB 及以上
2. 软件依赖
安装 PyTorch 和 YOLOv8:
pip install ultralytics
如果需要 GPU 训练,请安装 PyTorch 适用于 CUDA 的版本:
pip install torch torchvision torchaudio --index-url https://download.pytorch.org/whl/cu116
检查 YOLOv8 是否安装成功:
yolo --version
四、数据准备
YOLOv8 需要的数据格式与目标检测类似,但要增加分割掩码(mask)信息。
1. 数据集格式
YOLOv8 支持COCO格式和YOLO格式的分割数据。以下是 YOLO 格式的示例:
datasets/custom_segmentation/
├── images/
│   ├── train/
│   ├── valid/
│   ├── test/
├── labels/
│   ├── train/
│   ├── valid/
│   ├── test/
├── dataset.yaml
每个 labels 目录中的 .txt 文件包含。
<class_id> <x1,y1,x2,y2,x3,y3,...> <confidence>
其中,<x1,y1> 是目标的掩码点坐标,适用于多边形分割。
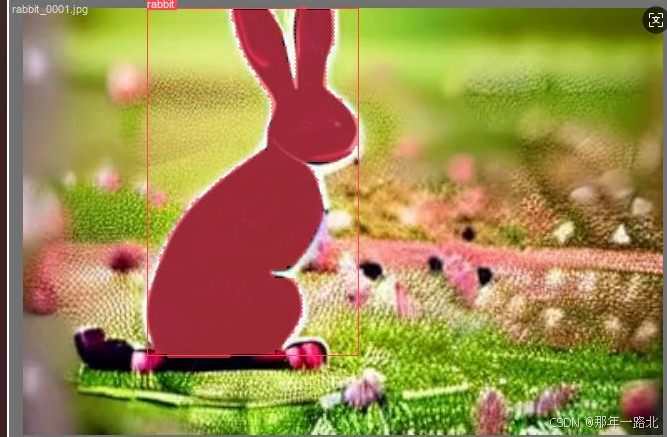
我先通过lableme手动标注实例分割数据集,生成json文件。将json文件转换成txt文件,自行写一个脚本即可,以下附带我所写的脚本:
# -*- coding: gbk -*-
import os
import json
import cv2

def convert_labelme_json_to_yolov8_txt(root_json_dir, img_dir, output_dir):
    """
    将 Labelme 标注生成的 JSON 文件转换为适用于 YOLOv8 实例分割的 TXT 文件。

    :param root_json_dir: 包含 JSON 文件的根目录,支持子文件夹
    :param img_dir: 图像文件所在的目录
    :param output_dir: 转换后的 TXT 文件保存的目录
    """
    # 全局的类别映射
    global_class_mapping = {}

    # 处理 train 和 valid 子文件夹
    for sub_dir in ['train', 'valid']:
        sub_json_dir = os.path.join(root_json_dir, sub_dir)
        sub_img_dir = os.path.join(img_dir, sub_dir)
        sub_output_dir = os.path.join(output_dir, sub_dir)

        # 确保输出子目录存在,如果不存在则创建
        if not os.path.exists(sub_output_dir):
            os.makedirs(sub_output_dir)

        # 递归遍历子 JSON 目录及其子文件夹
        for root, _, files in os.walk(sub_json_dir):
            for json_file in files:
                if json_file.endswith('.json'):
                    # 构建 JSON 文件的完整路径
                    json_path = os.path.join(root, json_file)
                    try:
                        # 读取 JSON 文件
                        with open(json_path, 'r', encoding='utf-8') as f:
                            data = json.load(f)
                    except Exception as e:
                        print(f"Failed to load {json_path}: {e}")
                        continue

                    # 获取图像文件名
                    img_name = data.get('imagePath')
                    if not img_name:
                        print(f"Missing 'imagePath' in {json_path}, skipping...")
                        continue

                    # 处理路径分隔符
                    img_name = img_name.replace('\\', '/')
                    # 规范化路径
                    img_name = os.path.normpath(img_name)

                    # 提取文件名
                    img_filename = os.path.basename(img_name)

                    # 尝试直接使用 img_name 构建路径
                    img_path = os.path.join(sub_img_dir, img_name)
                    if not os.path.exists(img_path):
                        # 如果直接构建的路径不存在,使用文件名构建路径
                        img_path = os.path.join(sub_img_dir, img_filename)

                    if not os.path.exists(img_path):
                        print(f"Image file does not exist: {img_path}")
                        continue

                    try:
                        # 读取图像以获取尺寸
                        img = cv2.imread(img_path)
                        if img is None:
                            print(f"Failed to read image: {img_path}")
                            continue
                        img_height, img_width, _ = img.shape
                    except Exception as e:
                        print(f"Error reading image {img_path}: {e}")
                        continue

                    # 准备输出的 TXT 文件路径
                    txt_file = os.path.splitext(img_filename)[0] + '.txt'
                    txt_path = os.path.join(sub_output_dir, txt_file)

                    try:
                        # 打开 TXT 文件以写入
                        with open(txt_path, 'w', encoding='utf-8') as txt_f:
                            for shape in data.get('shapes', []):
                                label = shape['label']
                                # 如果类别名称不在全局映射中,添加新的映射
                                if label not in global_class_mapping:
                                    global_class_mapping[label] = len(global_class_mapping)
                                class_index = global_class_mapping[label]
                                points = shape['points']

                                # 归一化多边形点坐标
                                normalized_points = []
                                for point in points:
                                    x = point[0] / img_width
                                    y = point[1] / img_height
                                    # 确保归一化后的坐标在 [0, 1] 范围内
                                    x = max(0, min(1, x))
                                    y = max(0, min(1, y))
                                    normalized_points.extend([x, y])

                                # 写入一行标注信息
                                line = [str(class_index)] + [str(round(coord, 6)) for coord in normalized_points]
                                txt_f.write(' '.join(line) + '\n')
                        print(f"Converted {json_path} to {txt_path}")
                    except Exception as e:
                        print(f"Error writing to {txt_path}: {e}")

    # 打印类别映射
    print("类别映射:")
    for label, index in global_class_mapping.items():
        print(f"{label}: {index}")

# 示例使用
root_json_dir = '/data/mask.json/'  # 假设 JSON 文件存放在这个目录下,包含 train 和 valid 子文件夹
img_dir = '/data/images'  # 图像文件所在目录,包含 train 和 valid 子文件夹
output_dir = '/data/labels1/'  # 输出 TXT 文件的目录,会自动创建 train 和 valid 子文件夹
convert_labelme_json_to_yolov8_txt(root_json_dir, img_dir, output_dir)
2. 数据标注
可以使用LabelMe、Roboflow、CVAT等标注工具来生成分割数据集。
3. 数据集配置
在 dataset.yaml 文件中定义数据集路径:
path: datasets/custom_segmentation
train: images/train
val: images/valid
test: images/test
nc: 2  # 类别数
names: ['car', 'person']
五、训练 YOLOv8 实例分割模型
YOLOv8 提供了 task=segment 模式来进行实例分割训练。
1. 训练命令
yolo task=segment mode=train model=yolov8s-seg.pt data=dataset.yaml epochs=50 imgsz=640 batch=16 device=0
2. 训练参数
| 参数 | 说明 |
|---|---|
task=segment | 指定实例分割任务 |
mode=train | 训练模式 |
model=yolov8s-seg.pt | 预训练模型 |
data=dataset.yaml | 数据集配置文件 |
epochs=50 | 训练轮数 |
imgsz=640 | 训练图片尺寸 |
batch=16 | 批量大小 |
device=0 | 使用 GPU 训练 |
3. 训练过程
训练过程中,YOLOv8 会输出每个 Epoch 的损失值和评估指标,如 mAP@50 和 mAP@50:95。
4. 训练结果
训练完成后,模型会保存在 runs/segment/train/weights/best.pt和 runs/segment/train/weights/last.pt。
六、模型推理
训练完成后,我们可以使用 predict 模式对新图像进行实例分割推理。
1. 运行推理
yolo task=segment mode=predict model=runs/segment/train/weights/best.pt source=images/test/ save=True
推理结果将自动保存在 runs/segment/predict/ 目录下。
2. 可视化分割结果
可以使用 Matplotlib 读取并展示结果:
import cv2
import matplotlib.pyplot as plt

image = cv2.imread("runs/segment/predict/image.jpg")
image = cv2.cvtColor(image, cv2.COLOR_BGR2RGB)

plt.imshow(image)
plt.axis("off")
plt.show()
七、模型评估
训练完成后,我们需要对模型进行评估,以判断其泛化能力和分割效果。
1. 评估指标
- mAP(Mean Average Precision):衡量检测和分割的准确度
- IoU(Intersection over Union):衡量分割掩码的精度
- Precision / Recall:评估分类性能
2. 运行验证
yolo task=segment mode=val model=runs/segment/train/weights/best.pt data=dataset.yaml
输出示例:
mAP@50: 85.2%
mAP@50:95: 67.8%
IoU: 75.4%
八、模型优化
如果模型的分割效果不够理想,我们可以采用以下优化方法:
1. 增加训练数据
- 扩展数据集,加入更多不同场景的样本
- 使用数据增强,如翻转、裁剪、颜色变换等
2. 训练更大模型
尝试使用 yolov8m-seg.pt 或 yolov8l-seg.pt:
yolo task=segment mode=train model=yolov8m-seg.pt data=dataset.yaml epochs=100 imgsz=640 batch=32 device=0
3. 量化和剪枝
如果需要加速推理,可以采用量化或剪枝技术:
yolo task=segment mode=export model=best.pt format=onnx simplify=True
九、总结
本文详细介绍了如何使用 YOLOv8 进行实例分割,包括:
- 数据准备:如何整理数据集并进行标注
- 模型训练:使用 YOLOv8 进行实例分割训练
- 模型推理:如何使用训练好的模型进行分割
- 模型评估:计算 mAP、IoU 及其他指标
- 模型优化:提高分割效果的方法
YOLOv8 使得实例分割任务变得更加简单和高效,适用于自动驾驶、医学图像分析、安防监控等多个领域。🚀🚀🚀
感谢大家点赞评论关注!


 3万+
3万+

 被折叠的 条评论
为什么被折叠?
被折叠的 条评论
为什么被折叠?
 到【灌水乐园】发言


