


目录
1. Yolov5 和 Yolov8 差异简介
Yolov8 相较于 Yolov5最大的区别就是不再有之前的 objectness 分支,只有解耦的分类和bbox回归分支,如下图所示。
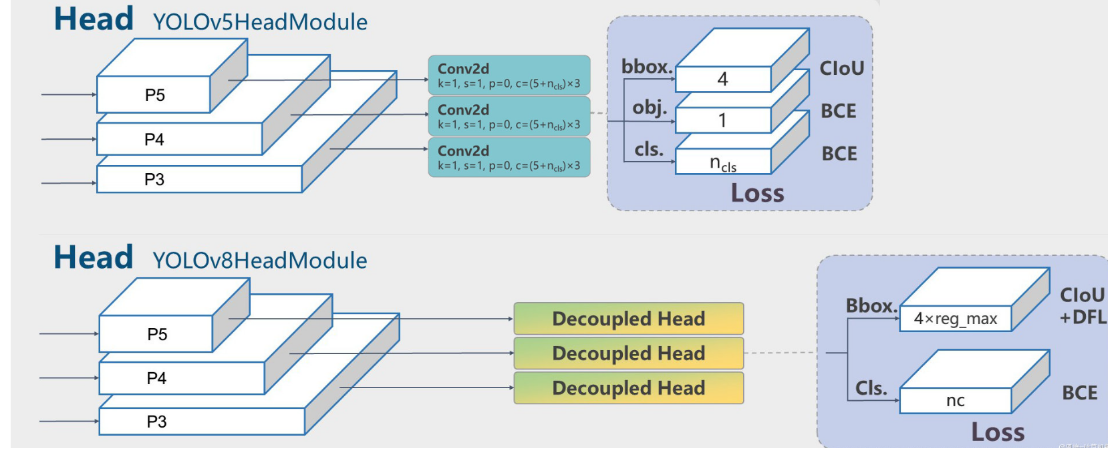
YOLOv5 输出特征图尺度为 80x80、40x40 和 20x20 的三个特征图,将三个不同尺度的类别预测分支、bbox 预测分支和 obj 预测分支(对象置信度预测分支)进行拼接,并进行维度变换。为了后续方便处理,会将原先的通道维度置换到最后,类别预测分支、bbox 预测分支和 obj 预测分支的 shape 分别为 (b, 3x80x80+3x40x40+3x20x20, 80)=(b,25200,80),(b,25200,4),(b,25200,1)。
YOLOv8 输出特征图尺度为 80x80、40x40 和 20x20 的三个特征图。 Head 部分输出分类和回归共 6 个尺度的特征图。将 3 个不同尺度的类别预测分支、bbox 预测分支进行拼接,并进行维度变换。为了后续方便处理,会将原先的通道维度置换到最后,类别预测分支 和 bbox 预测分支 shape 分别为 (b, 80x80+40x40+20x20, 80)=(b,8400,80),(b,8400,4)。
推理过程如下:
| YOLOv5 推理流程 | YOLOv8 推理流程 |
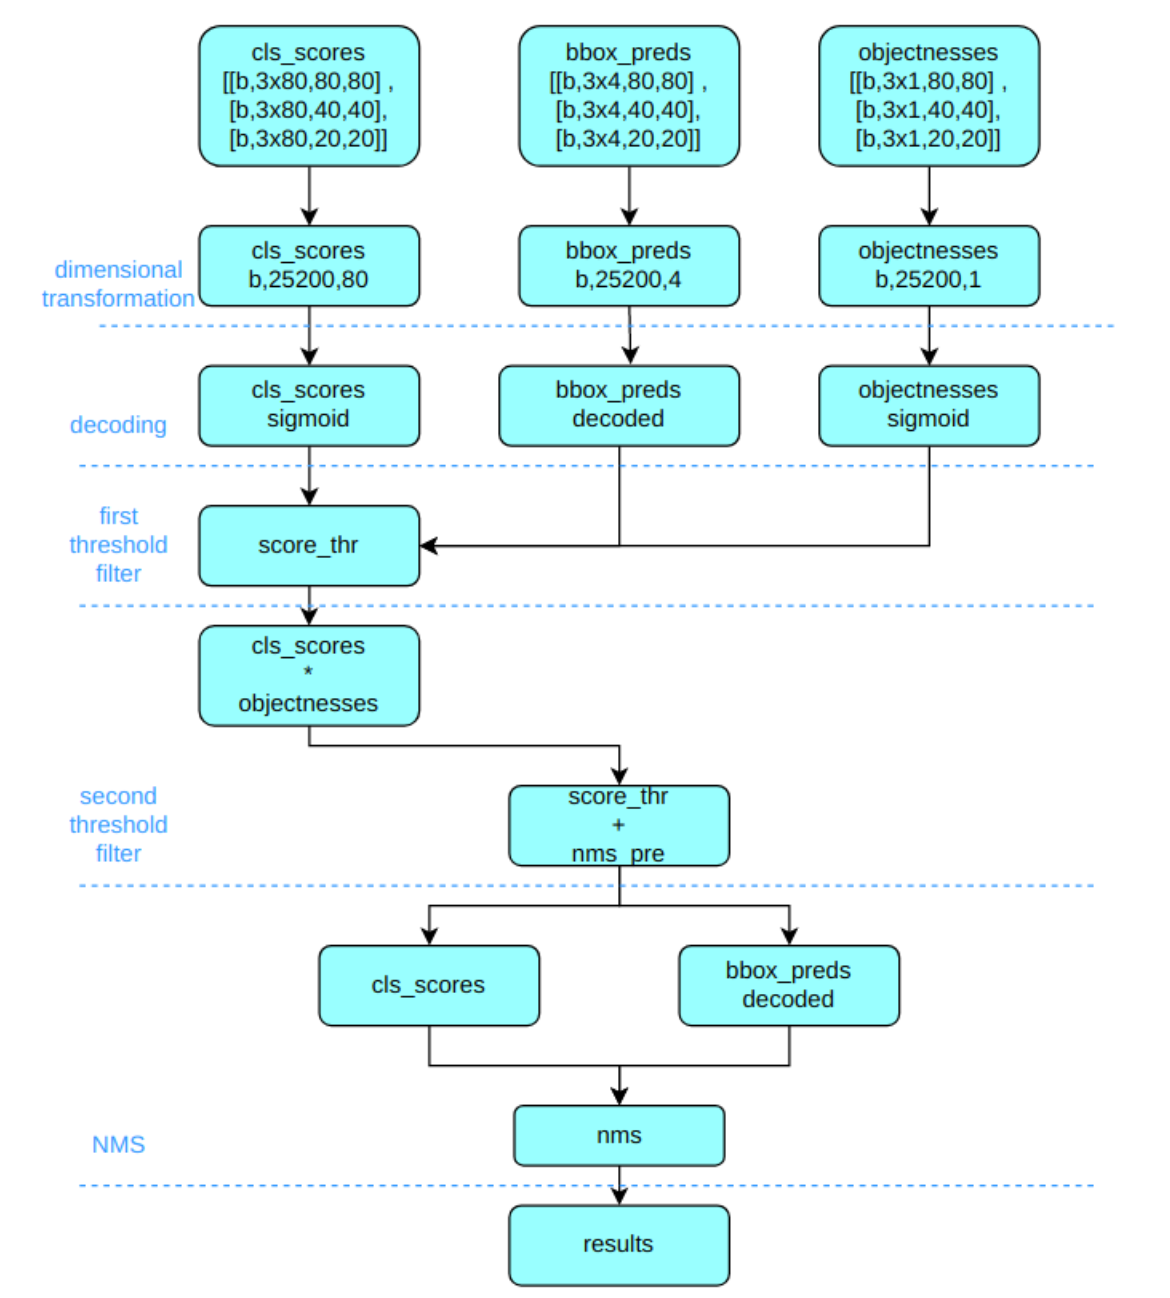 | 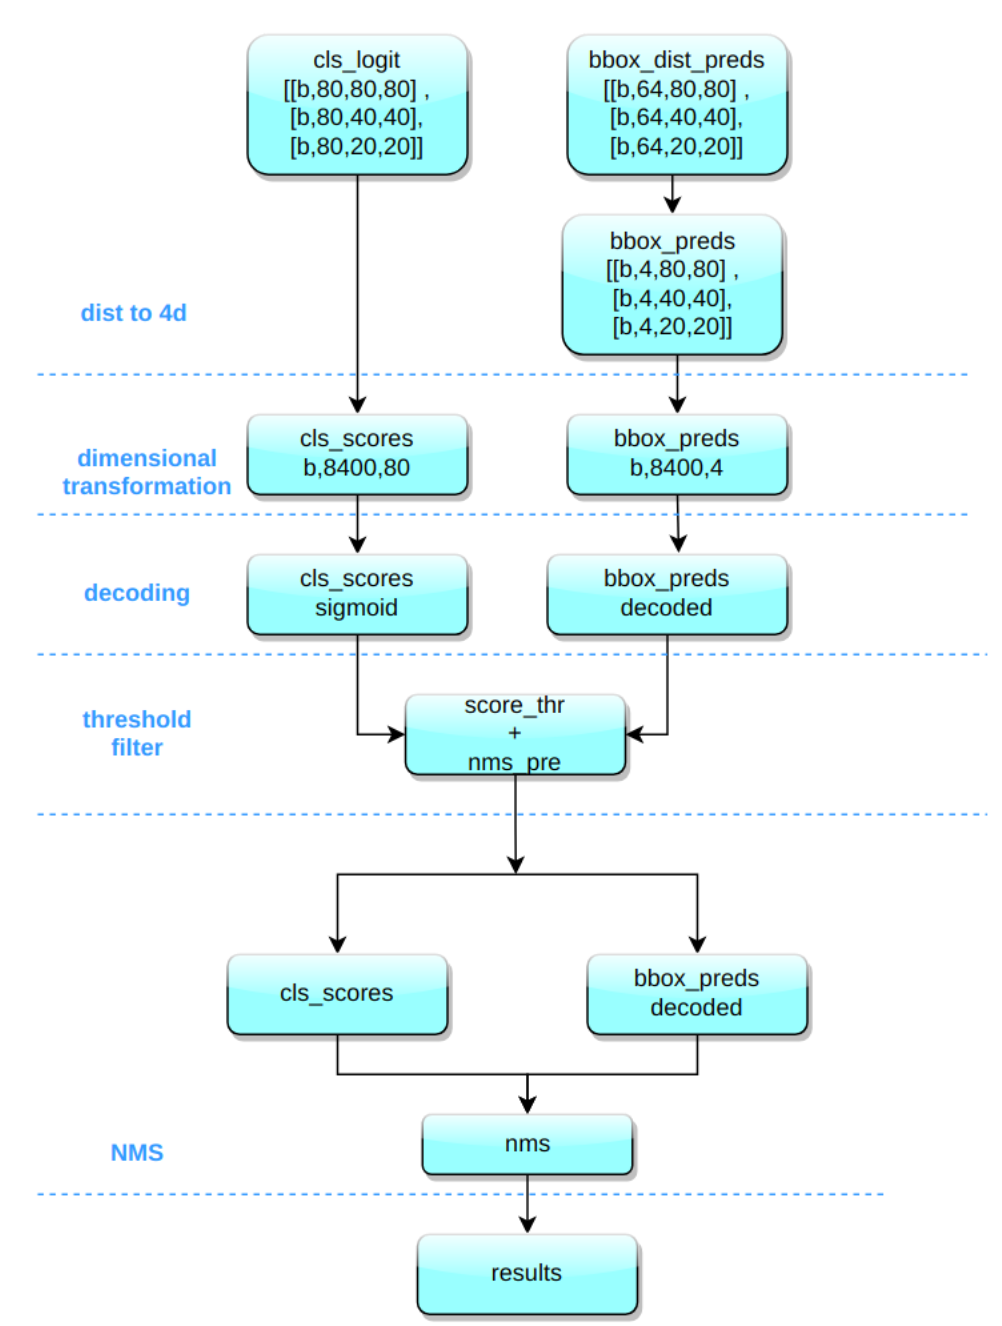 |
2. Yolov8 pt 转 onnx 模型拆解思路
由于原生 YOLOv8 模型转 onnx 模型后,bounding box 的解码包含在 onnx 模型当中,使用 rk3588 的推理效率不高,所以将 decode 部分拆解出来,放在 cpu 上运行。同时类别输出和框输出的数值范围不一致,量化后可能导致精度的下降。
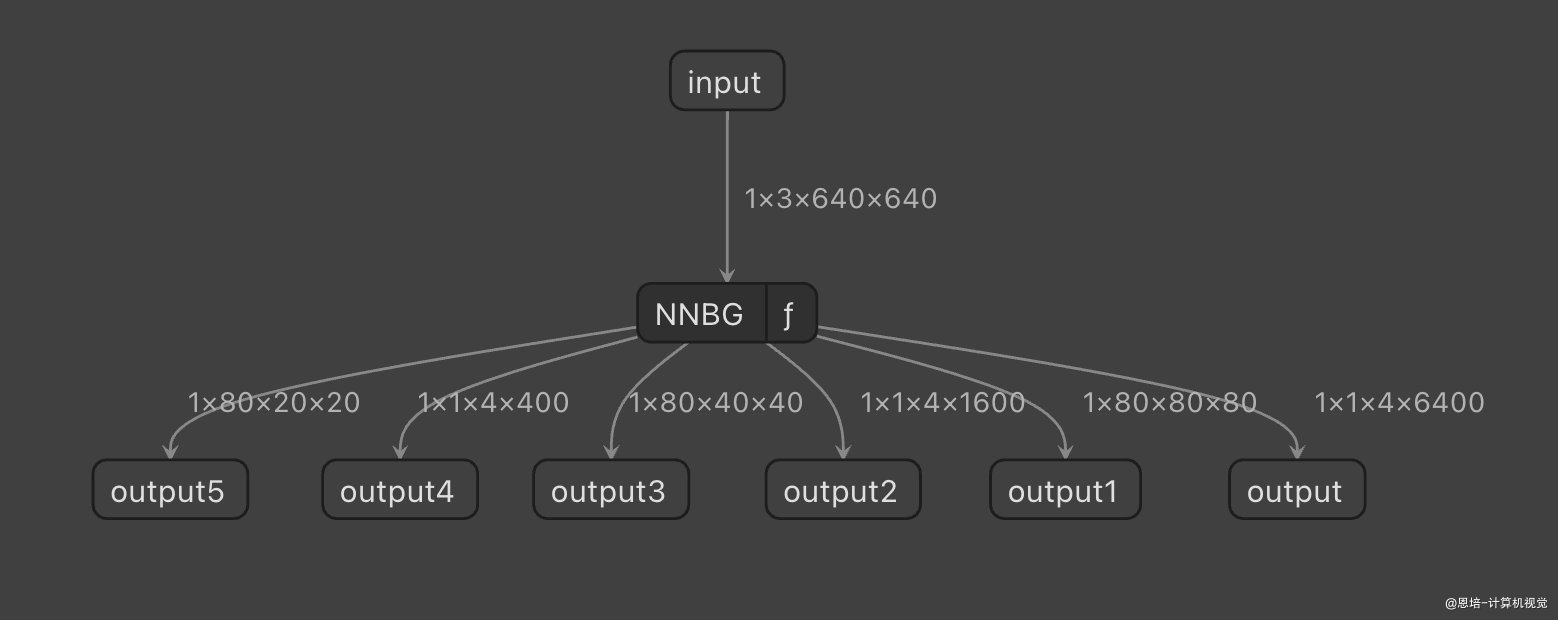
YOLOv8 检测模型输出的 shape 是1x84x8400,为三个特征图的分类和回归分支,故可以将原始输出拆分为6个输出:3对分类和3对回归。
拆解前后 onnx 输出对比图如下:
| 修改前 ONNX 输出 | 修改后 RKNN 输出 |
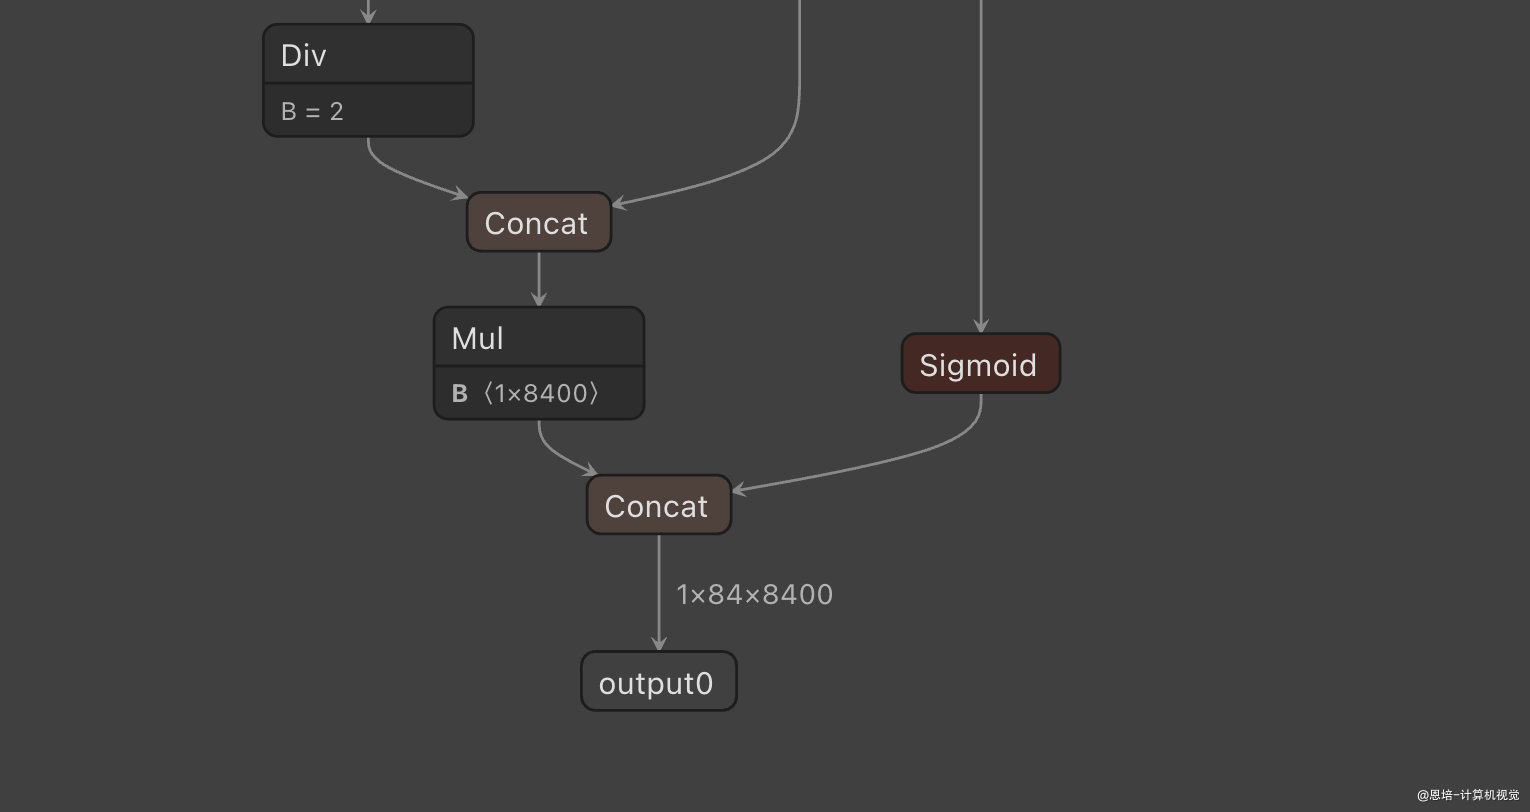 |  |
需要注意的是,在修改模型时需要使用 利用 Softmax 和 Conv 对 Distribution Focal Loss 中的积分表示 bbox 形式进行解码,变成常规的 4 维度 bbox。
3. onnx 转 rknn 后推理代码
以 reg1 为例:1x1x4x6400 包含了目标边界框相对于网格中心的偏移量。
以 cls1 为例:1x80x80x80 代表了80个类的置信度,需要通过softmax将其转化成概率分布。
因此需要遍历每个头,得到每个头、每个网格上、每个类的置信度,然后进行阈值过滤,只保留阈值超过规定的网格,再进行坐标变换,将reg1格式的 bbox 输出转化为实际原图上的坐标,最后对保留的 box 框进行 box nms 后,得到最终输出结果。
rk3588上推理代码如下:
import cv2
import time
import numpy as np
from rknnlite.api import RKNNLite
from math import exp

CLASSES = ['person', 'bicycle', 'car', 'motorcycle', 'airplane', 'bus', 'train', 'truck', 'boat', 'traffic light',
           'fire hydrant', 'stop sign', 'parking meter', 'bench', 'bird', 'cat', 'dog', 'horse', 'sheep', 'cow',
           'elephant', 'bear', 'zebra', 'giraffe', 'backpack', 'umbrella', 'handbag', 'tie', 'suitcase', 'frisbee',
           'skis', 'snowboard', 'sports ball', 'kite', 'baseball bat', 'baseball glove', 'skateboard', 'surfboard',
           'tennis racket', 'bottle', 'wine glass', 'cup', 'fork', 'knife', 'spoon', 'bowl', 'banana', 'apple',
           'sandwich', 'orange', 'broccoli', 'carrot', 'hot dog', 'pizza', 'donut', 'cake', 'chair', 'couch',
           'potted plant', 'bed', 'dining table', 'toilet', 'tv', 'laptop', 'mouse', 'remote', 'keyboard', 'cell phone',
           'microwave', 'oven', 'toaster', 'sink', 'refrigerator', 'book', 'clock', 'vase', 'scissors', 'teddy bear',
           'hair drier', 'toothbrush']

class_num = len(CLASSES)
meshgrid = []
headNum = 3                                 # 检测头个数
mapSize = [[80, 80], [40, 40], [20, 20]]    # 网格大小
strides = [8, 16, 32]                       # 每层特征图的步长,表示该特征图上的每个像素在原始图像中对应的像素距离。它用于将特征图上的坐标偏移转换为原始图像上的偏移。
object_threshold = 0.25                     # 置信度阈值
nms_threshold = 0.45                        # nms阈值


def sigmoid(x):
    return 1 / (1 + exp(-x))


def GenerateMeshgrid():
    """
        生成每个特征图上的网格中心坐标
        meshgrid = [
            x0, y0, x1, y1, ..., x6399, y6399,  # 第一层特征图 (80x80)
            x0, y0, x1, y1, ..., x1599, y1599,  # 第二层特征图 (40x40)
            x0, y0, x1, y1, ..., x399, y399     # 第三层特征图 (20x20)
        ]
    """
    for index in range(headNum):
        for i in range(mapSize[index][0]):
            for j in range(mapSize[index][1]):
                meshgrid.append(j + 0.5)        # 加 0.5 是为了将坐标移到每个单元格的中心位置
                meshgrid.append(i + 0.5)


def letterbox(im, new_shape=(640, 640), color=(114, 114, 114), auto=False, scaleFill=False, scaleup=True, stride=32):
    # Resize and pad image while meeting stride-multiple constraints
    shape = im.shape[:2]  # current shape [height, width]
    if isinstance(new_shape, int):
        new_shape = (new_shape, new_shape)

    # Scale ratio (new / old)
    r = min(new_shape[0] / shape[0], new_shape[1] / shape[1])
    if not scaleup:  # only scale down, do not scale up (for better val mAP)
        r = min(r, 1.0)

    # Compute padding
    ratio = r, r  # width, height ratios
    new_unpad = int(round(shape[1] * r)), int(round(shape[0] * r))
    dw, dh = new_shape[1] - new_unpad[0], new_shape[0] - new_unpad[1]  # wh padding

    if auto:  # 当 auto=True 时,函数会调整填充的大小,使得最终的宽高仍符合 stride 的整数倍。这样做的目的是确保图像尺寸与网络的步长匹配,但结果可能会导致图像的最终尺寸不完全是 (640, 640)。
        dw, dh = np.mod(dw, stride), np.mod(dh, stride)  # wh padding
    elif scaleFill:  # 当 scaleFill=True 时,图像会被直接拉伸(不保持宽高比)到目标尺寸 (640, 640)
        dw, dh = 0.0, 0.0
        new_unpad = (new_shape[1], new_shape[0])
        ratio = new_shape[1] / shape[1], new_shape[0] / shape[0]  # width, height ratios

    dw /= 2  # divide padding into 2 sides
    dh /= 2

    if shape[::-1] != new_unpad:  # resize
        im = cv2.resize(im, new_unpad, interpolation=cv2.INTER_LINEAR)
    top, bottom = int(round(dh - 0.1)), int(round(dh + 0.1))
    left, right = int(round(dw - 0.1)), int(round(dw + 0.1))
    im = cv2.copyMakeBorder(im, top, bottom, left, right, cv2.BORDER_CONSTANT, value=color)  # add border
    return im, ratio, (dw, dh)


def box_iou(x_min1, y_min1, x_max1, y_max1, x_min2, y_min2, x_max2, y_max2, eps=1e-7):
    """
        两个 box 框的交集除以并集,iou 越大代表两个框重叠度越高
        args:
            eps: 预防除0的情况
    """

    # 交集
    x_min = max(x_min1, x_min2)
    y_min = max(y_min1, y_min2)
    x_max = min(x_max1, x_max2)
    y_max = min(y_max1, y_max2)

    # 交集面积
    iter_width = max(x_max - x_min, 0)
    iter_height = max(y_max - y_min, 0)
    iter_area = iter_width * iter_height

    # 并集面积
    union_area = (x_max1 - x_min1) * (y_max1 - y_min1) + (x_max2 - x_min2) * (y_max2 - y_min2)

    # 交并比
    return iter_area / (union_area - iter_area + eps)


def nms_boxes(boxes):
    """
        执行nms来过滤检测框
        box格式: [class, score, xmin, ymin, xmax, ymax]
    """

    nms_boxes = []

    # 根据检测框置信度进行降序排序
    sorted_boxes = sorted(boxes, key=lambda x: x[1], reverse=True)

    for i in range(len(sorted_boxes)):
        x_min1 = sorted_boxes[i][2]
        y_min1 = sorted_boxes[i][3]
        x_max1 = sorted_boxes[i][4]
        y_max1 = sorted_boxes[i][5]
        class_id = sorted_boxes[i][0]

        # 检测框 id != -1 ,表示当前检测框未被删除(抑制)
        if sorted_boxes[i][0] != -1:
            nms_boxes.append(sorted_boxes[i])

            # 遍历剩余检测框
            for j in range(i+1, len(sorted_boxes), 1):
                # 剩余检测框中仅判断当前和当前classId相同
                if sorted_boxes[i][0] == sorted_boxes[j][0]:
                    x_min2 = sorted_boxes[j][2]
                    y_min2 = sorted_boxes[j][3]
                    x_max2 = sorted_boxes[j][4]
                    y_max2 = sorted_boxes[j][5]

                    # 计算IOU
                    iou = box_iou(x_min1, y_min1, x_max1, y_max1, x_min2, y_min2, x_max2, y_max2)
                    # 如果 iou 大于阈值,则当前检测框box2和box1属于同一目标框,将classId赋值为-1,后续不必继续进行比较
                    if iou > nms_threshold:
                        sorted_boxes[j][0] = -1

    return nms_boxes


def postprocess(out, ori_img_h, ori_img_w, ratio, dw, dh):
    output = []
    detect_result = []

    for i in range(len(out)):
        output.append(out[i].reshape((-1)))

    gridIndex = -2

    for index in range(headNum):
        cls = output[index * 2 + 1]     # 第1、3、5个head的cls,即类别置信度
        reg = output[index * 2 + 0]     # 第0、2、4个head的reg,即回归框,它包含了目标边界框相对于网格中心的偏移量。一般情况下,回归预测会有 4 个值(左、上、右、下的偏移量)

        for h in range(mapSize[index][0]):
            for w in range(mapSize[index][1]):
                gridIndex += 2
                for cl in range(class_num):
                    cls_val = sigmoid(cls[cl * mapSize[index][0] * mapSize[index][1] + h * mapSize[index][1] + w])
                    if cls_val > object_threshold:
                        # x1, y1: 使用网格中心的 x, y 坐标减去左、上边界的回归偏移量,得到左上角坐标。
                        x1 = (meshgrid[gridIndex + 0] - reg[0 * mapSize[index][0] * mapSize[index][1] + h * mapSize[index][1] + w]) * strides[index]
                        y1 = (meshgrid[gridIndex + 1] - reg[1 * mapSize[index][0] * mapSize[index][1] + h * mapSize[index][1] + w]) * strides[index]
                        # x2, y2: 使用网格中心的 x, y 坐标加上右、下边界的回归偏移量,得到右下角坐标。
                        x2 = (meshgrid[gridIndex + 0] + reg[2 * mapSize[index][0] * mapSize[index][1] + h * mapSize[index][1] + w]) * strides[index]
                        y2 = (meshgrid[gridIndex + 1] + reg[3 * mapSize[index][0] * mapSize[index][1] + h * mapSize[index][1] + w]) * strides[index]

                        # 复原到原图
                        x_min = (x1 - dw) / ratio[0]
                        y_min = (y1 - dh) / ratio[1]
                        x_max = (x2 - dw) / ratio[0]
                        y_max = (y2 - dh) / ratio[1]
                        # 将边界框限制在图片内
                        x_min = max(0, x_min)
                        y_min = max(0, y_min)
                        x_max = min(ori_img_w, x_max)
                        y_max = min(ori_img_h, y_max)

                        # 组合成 box 数组:[类别,置信度,x1,y1,x2,y2]
                        box = [cl, cls_val, x_min, y_min, x_max, y_max]
                        detect_result.append(box)

    # nms
    pred_boxes = nms_boxes(detect_result)
    return pred_boxes


def rknn_infer(RKNNModulePath, data):

    rknn_lite = RKNNLite(verbose=False)

    ret = rknn_lite.load_rknn(path=RKNNModulePath)
    if ret != 0:
        print("load rknn model fialed!")
        exit(ret)

    ret = rknn_lite.init_runtime()
    if ret != 0:
        print("init runtime env fialed!")
        exit(ret)


    t1 = time.time()
    pred_rknn = rknn_lite.inference(inputs=[data], data_format="nchw")
    t2 = time.time()
    print(f"infer_time:{t2-t1}")

    return pred_rknn


if __name__ == '__main__':

    GenerateMeshgrid()

    image_path = "./images/04.jpg"
    model_path = "./weights/yolov8s.rknn"
    imgsz = (640, 640)

    img = cv2.imread(image_path)
    print(img.shape)
    img_h, img_w = img.shape[:2]
    im, ratio, pad = letterbox(img, imgsz)
    im = im.transpose((2, 0, 1))[::-1]  # HWC to CHW, BGR to RGB
    im = np.ascontiguousarray(im)
    im = im.astype(np.float32)
    im /= 255                           # 0 - 255 to 0.0 - 1.0
    if len(im.shape) == 3:
        im = im[None]                   # expand for batch dim


    pred = rknn_infer(model_path, im)
    t1 = time.time()
    pred_boxes = postprocess(pred, img_h, img_w, ratio, pad[0], pad[1])
    t2 = time.time()

    print(f"postprocess_time:{t2-t1}")

    for i in range(len(pred_boxes)):
        xmin = int(pred_boxes[i][2])
        ymin = int(pred_boxes[i][3])
        xmax = int(pred_boxes[i][4])
        ymax = int(pred_boxes[i][5])
        classId = pred_boxes[i][0]
        score = pred_boxes[i][1]

        cv2.rectangle(img, (xmin, ymin), (xmax, ymax), (0, 255, 0), 2)
        ptext = (xmin, ymin)
        title = CLASSES[classId] + ":%.2f" % (score)
        cv2.putText(img, title, ptext, cv2.FONT_HERSHEY_SIMPLEX, 0.6, (0, 0, 255), 2, cv2.LINE_AA)

    cv2.imwrite('./images/04_result.jpg', img)
    t3 = time.time()
    print(f"total_time:{t3-t1}")
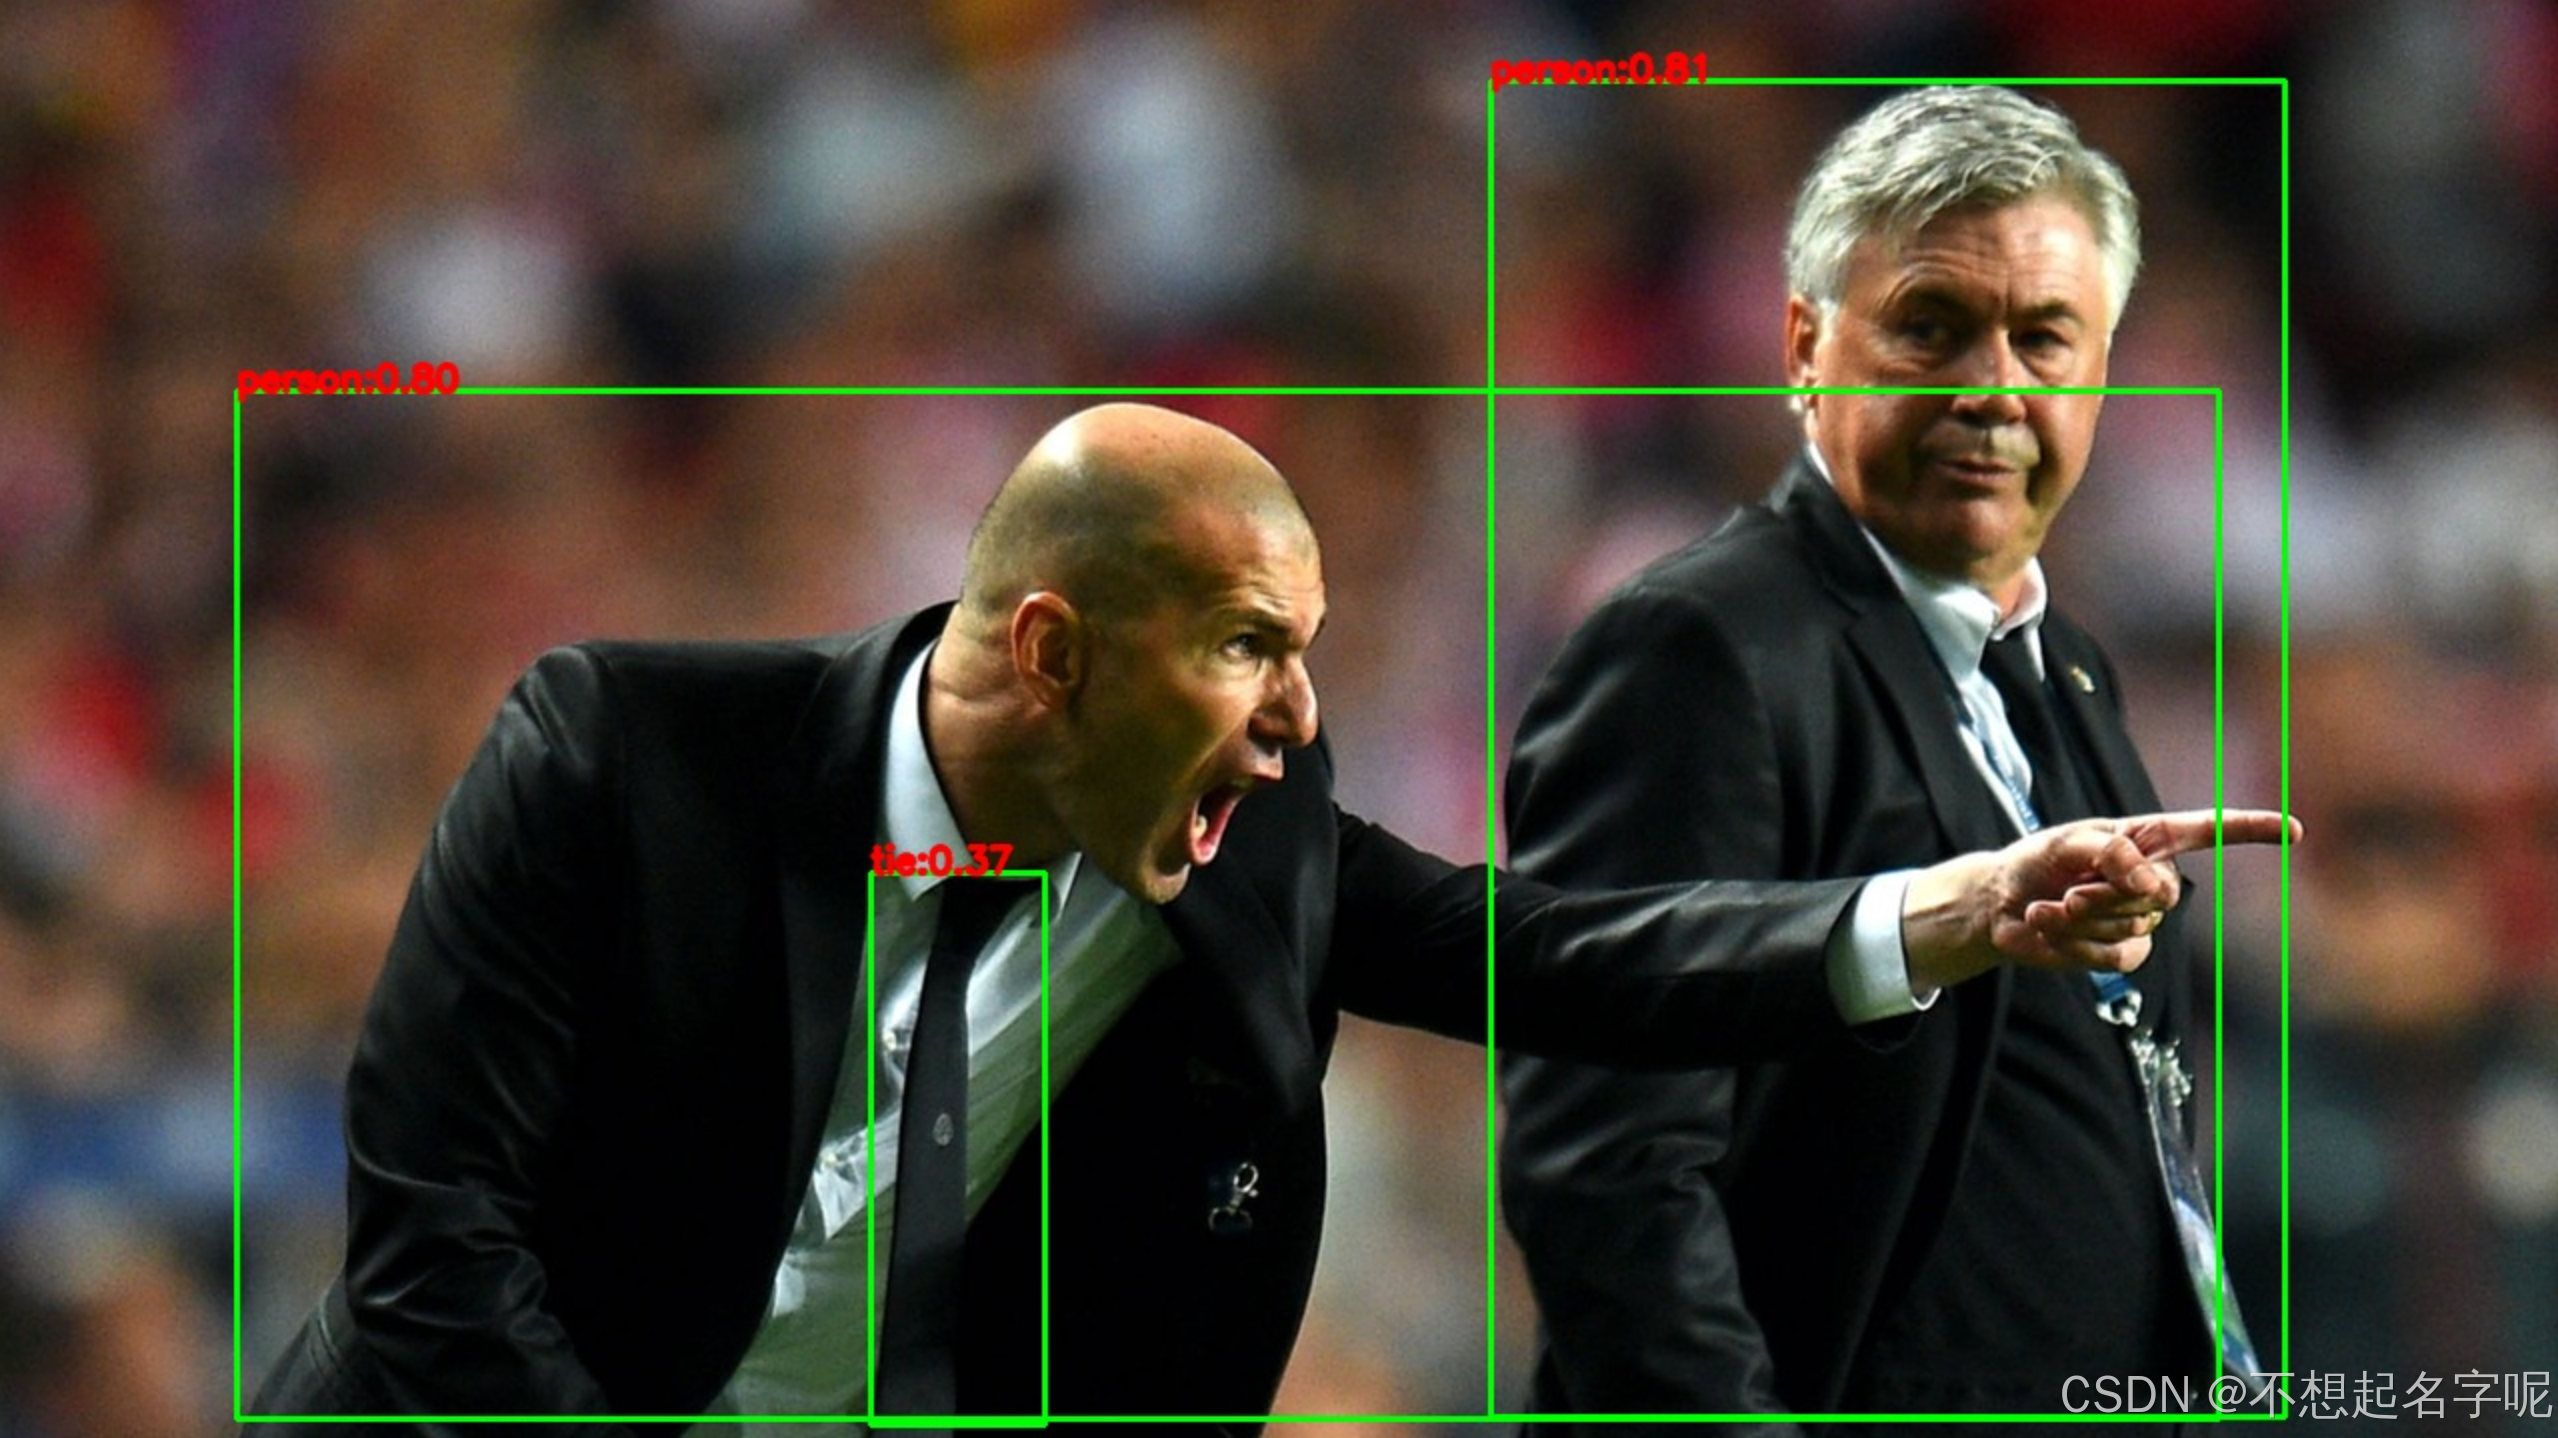
4. 推理结果
没有量化的情况下,推理速度在0.1秒左右,后处理速度0.4秒左右,总时长0.55秒左右


 716
716

 被折叠的 条评论
为什么被折叠?
被折叠的 条评论
为什么被折叠?
 到【灌水乐园】发言


