


 本文介绍了如何使用PCL库进行圆柱模型分割,包括滤波去噪、法线估计、平面分割、圆柱分割等步骤,并展示了实验结果。通过实例演示了从原始点云到分割模型的详细过程。
原文链接:Cylinder model segmentation — Point Cloud Library 0.0 documentation
目录
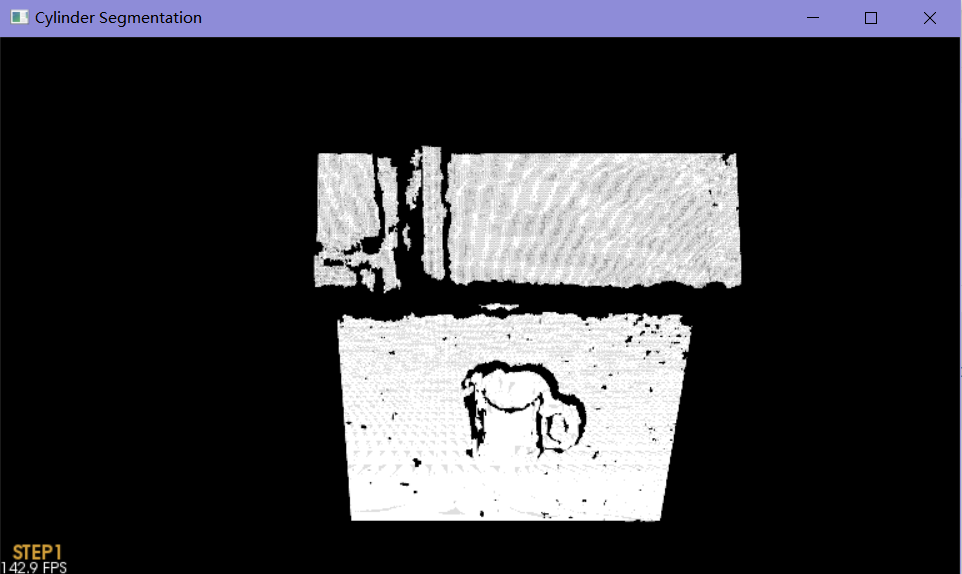
本教程演示了如何运行圆柱形模型的Sample Consensus分割。为了使示例更实用一些,将以下操作应用于输入数据集(按顺序):
- 距离1.5米以上的数据点被过滤
- 每一点的表面法线被估计
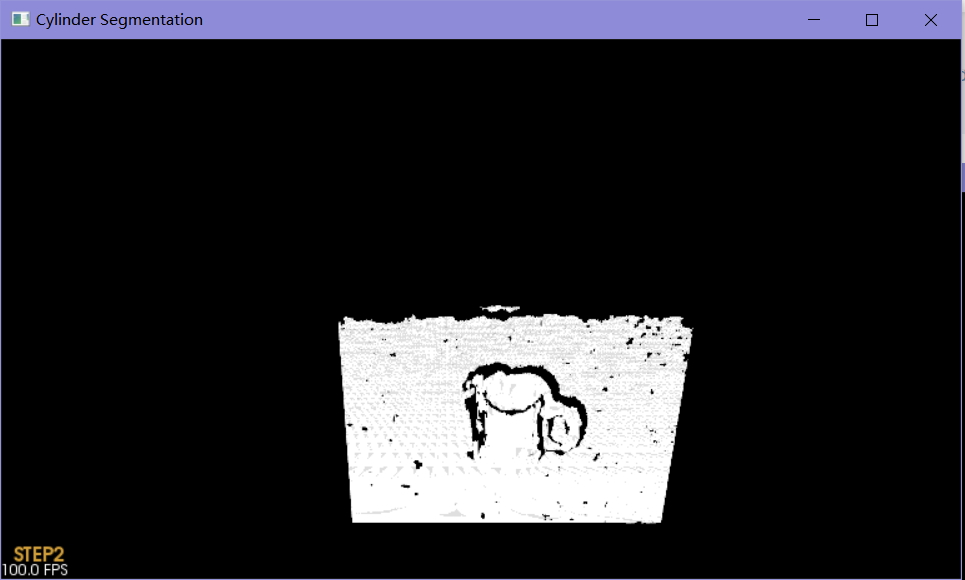
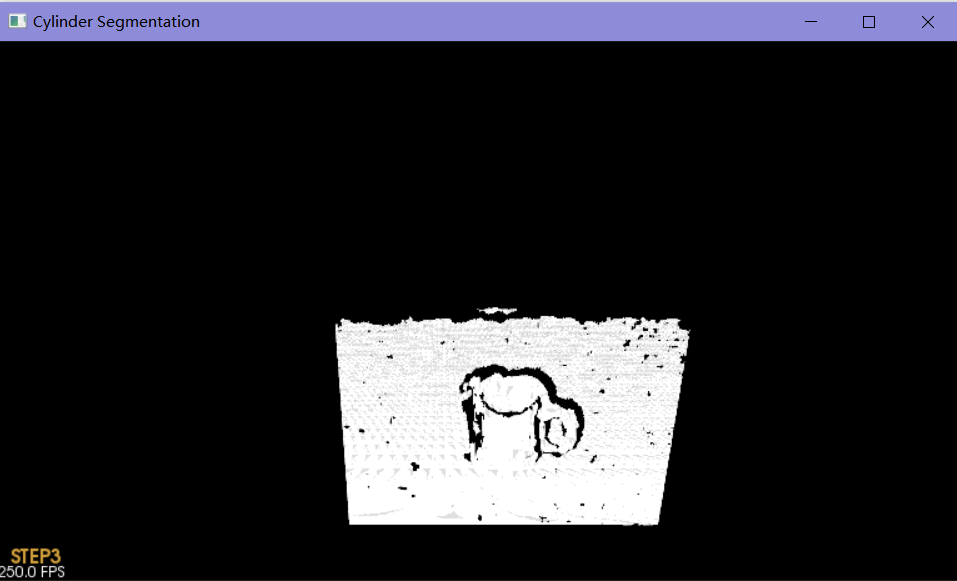
- 一个平面模型被分割,显示,并保存到本地
- 一个圆柱形模型(在本数据集中是一个杯子)被分割,显示,并保存到本地
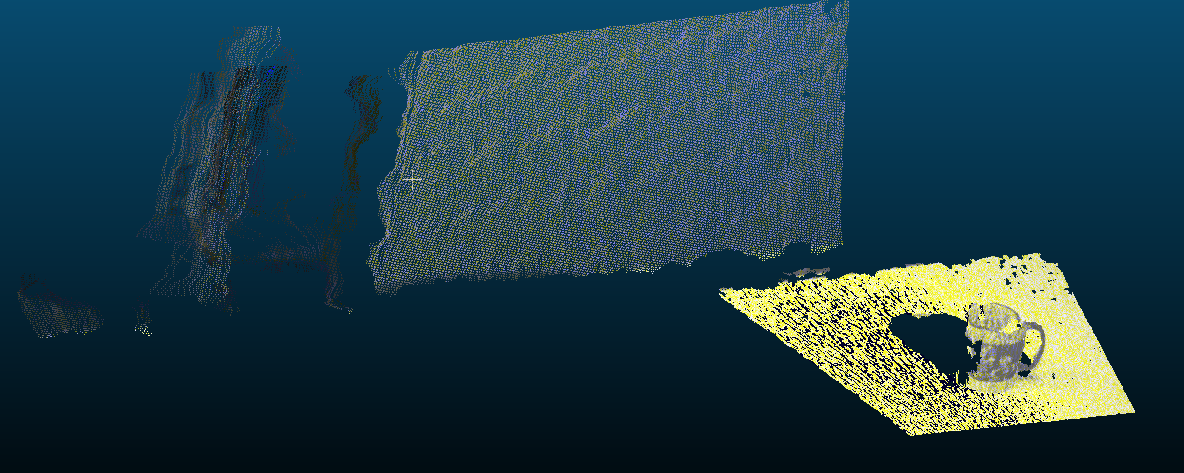
本次使用的数据集:table_scene_mug_stereo_textured.pcd
- 一个杯子
- 一个平面
- 离得很远的背景杂点
由于数据中存在噪声,圆柱模型并不完美。

处理流程
- 滤波去噪:pass_through_filter();
- 法线估计 normals_estimate();
- 把平面分割出来 plane_seg();
- 利用分割结果(获取到的下标):使用平面点云的下标将平面抽取出来,并保存:get_plane();
- 移除平面及其法线,将结果保存在cloud_filtered2,cloud_normals2:remove_plane();
- 将圆柱分割出来,得到系数因子和下标 cylinder_seg();
- 将圆柱抽取并保存 get_cylinder();
圆柱分割
平面分割可以参考博文:PCL教程-点云分割之平面模型分割
	seg.setOptimizeCoefficients(true);
	seg.setModelType(pcl::SACMODEL_NORMAL_PLANE);
	seg.setNormalDistanceWeight(0.1);
	seg.setMethodType(pcl::SAC_RANSAC);
	seg.setMaxIterations(100);
	seg.setDistanceThreshold(0.03);
	seg.setInputCloud(cloud_filtered);
	seg.setInputNormals(cloud_normals);
- Using a model of type: SACMODEL_NORMAL_PLANE
- Setting normal distance weight to 0.100000
- Using a method of type: SAC_RANSAC with a model threshold of 0.030000
- Setting the maximum number of iterations to 100
下面重点介绍圆柱分割:
// Create the segmentation object for cylinder segmentation and set all the parameters
  seg.setOptimizeCoefficients (true);
  seg.setModelType (pcl::SACMODEL_CYLINDER);
  seg.setMethodType (pcl::SAC_RANSAC);
  seg.setNormalDistanceWeight (0.1);
  seg.setMaxIterations (10000);
  seg.setDistanceThreshold (0.05);
  seg.setRadiusLimits (0, 0.1);
- 这里同样使用了RANSAC鲁棒估计来获取圆柱的系数因子。
- 还设置了距离阈值为0.05m(5cm):小于这个阈值的点将标记为圆柱内部点。
- 此外还设置了表面法线的距离权重为0.1
- 限制了圆柱模型的半径为0~0.1m(10cm)
- 最大的迭代次数为10000
程序代码
#include <pcl/ModelCoefficients.h>
#include <pcl/io/pcd_io.h>
#include <pcl/point_types.h>
#include <pcl/filters/extract_indices.h>
#include <pcl/filters/passthrough.h>
#include <pcl/features/normal_3d.h>
#include <pcl/sample_consensus/method_types.h>
#include <pcl/sample_consensus/model_types.h>
#include <pcl/segmentation/sac_segmentation.h>
#include<pcl/visualization/pcl_visualizer.h>
#include<string>

typedef pcl::PointXYZ PointT;
// All the objects needed
pcl::PCDReader reader;
pcl::PassThrough<PointT> pass;
pcl::NormalEstimation<PointT, pcl::Normal> ne;
pcl::SACSegmentationFromNormals<PointT, pcl::Normal> seg;
pcl::PCDWriter writer;
pcl::ExtractIndices<PointT> extract;
pcl::ExtractIndices<pcl::Normal> extract_normals;
pcl::search::KdTree<PointT>::Ptr tree(new pcl::search::KdTree<PointT>());

// Datasets
pcl::PointCloud<PointT>::Ptr cloud(new pcl::PointCloud<PointT>);
pcl::PointCloud<PointT>::Ptr cloud_filtered(new pcl::PointCloud<PointT>);
pcl::PointCloud<pcl::Normal>::Ptr cloud_normals(new pcl::PointCloud<pcl::Normal>);
pcl::PointCloud<PointT>::Ptr cloud_filtered2(new pcl::PointCloud<PointT>);
pcl::PointCloud<pcl::Normal>::Ptr cloud_normals2(new pcl::PointCloud<pcl::Normal>);
pcl::ModelCoefficients::Ptr coefficients_plane(new pcl::ModelCoefficients), coefficients_cylinder(new pcl::ModelCoefficients);
pcl::PointIndices::Ptr inliers_plane(new pcl::PointIndices), inliers_cylinder(new pcl::PointIndices);

pcl::PointCloud<PointT>::Ptr cloud_plane(new pcl::PointCloud<PointT>());
pcl::PointCloud<PointT>::Ptr cloud_cylinder(new pcl::PointCloud<PointT>());
//PCLVisualizer
pcl::visualization::PCLVisualizer viewer("Cylinder Segmentation");

int step_count;

void pass_through_filter()
{
	// Build a passthrough filter to remove spurious NaNs
	pass.setInputCloud(cloud);
	pass.setFilterFieldName("z");
	pass.setFilterLimits(0, 1.5);
	pass.filter(*cloud_filtered);
	std::cerr << "PointCloud after filtering has: " << cloud_filtered->points.size() << " data points." << std::endl;

}

void normals_estimate()
{
	// Estimate point normals
	ne.setSearchMethod(tree);
	ne.setInputCloud(cloud_filtered);
	ne.setKSearch(50);
	ne.compute(*cloud_normals);
}

void plane_seg()
{
	// Create the segmentation object for the planar model and set all the parameters
	seg.setOptimizeCoefficients(true);
	seg.setModelType(pcl::SACMODEL_NORMAL_PLANE);
	seg.setNormalDistanceWeight(0.1);
	seg.setMethodType(pcl::SAC_RANSAC);
	seg.setMaxIterations(100);
	seg.setDistanceThreshold(0.03);
	seg.setInputCloud(cloud_filtered);
	seg.setInputNormals(cloud_normals);
	// Obtain the plane inliers and coefficients
	seg.segment(*inliers_plane, *coefficients_plane);
	std::cerr << "Plane coefficients: " << *coefficients_plane << std::endl;
}

void get_plane()
{
	// Extract the planar inliers from the input cloud
	extract.setInputCloud(cloud_filtered);
	extract.setIndices(inliers_plane);
	extract.setNegative(false);

	// Write the planar inliers to disk

	extract.filter(*cloud_plane);
	std::cerr << "PointCloud representing the planar component: " << cloud_plane->points.size() << " data points." << std::endl;
	writer.write("table_scene_mug_stereo_textured_plane.pcd", *cloud_plane, false);
}

void remove_plane()
{
	// Remove the planar inliers, extract the rest
	extract.setNegative(true);
	extract.filter(*cloud_filtered2);
	extract_normals.setNegative(true);
	extract_normals.setInputCloud(cloud_normals);
	extract_normals.setIndices(inliers_plane);
	extract_normals.filter(*cloud_normals2);
}

void cylinder_seg()
{
	// Create the segmentation object for cylinder segmentation and set all the parameters
	seg.setOptimizeCoefficients(true);
	seg.setModelType(pcl::SACMODEL_CYLINDER);
	seg.setMethodType(pcl::SAC_RANSAC);
	seg.setNormalDistanceWeight(0.1);
	seg.setMaxIterations(10000);
	seg.setDistanceThreshold(0.05);
	seg.setRadiusLimits(0, 0.1);
	seg.setInputCloud(cloud_filtered2);
	seg.setInputNormals(cloud_normals2);

	// Obtain the cylinder inliers and coefficients
	seg.segment(*inliers_cylinder, *coefficients_cylinder);
	std::cerr << "Cylinder coefficients: " << *coefficients_cylinder << std::endl;
}
void get_cylinder()
{
	extract.setInputCloud(cloud_filtered2);
	extract.setIndices(inliers_cylinder);
	extract.setNegative(false);

	extract.filter(*cloud_cylinder);
	if (cloud_cylinder->points.empty())
		std::cerr << "Can't find the cylindrical component." << std::endl;
	else
	{
		std::cerr << "PointCloud representing the cylindrical component: " << cloud_cylinder->points.size() << " data points." << std::endl;
		writer.write("table_scene_mug_stereo_textured_cylinder.pcd", *cloud_cylinder, false);
	}
}

void keyboard_event_occurred(const pcl::visualization::KeyboardEvent& event,
	void * nothing)
{
	if (event.getKeySym() == "space" && event.keyDown())
	{
		++step_count;
	}
}
int
main(int argc, char** argv)
{
	step_count = 1;
	std::string str = "STEP";
	//初始化PCLVisualizer
	//viewer.addCoordinateSystem(1);
	//viewer.setBackgroundColor(0, 0, 255);
	viewer.addText(str+ std::to_string(step_count), 10, 10,16, 200,200,100,"text");

	viewer.registerKeyboardCallback(&keyboard_event_occurred, (void*)NULL);


	// Read in the cloud data
	reader.read("table_scene_mug_stereo_textured.pcd", *cloud);
	std::cerr << "PointCloud has: " << cloud->points.size() << " data points." << std::endl;

	// 显示原始点云
	//pcl::visualization::PointCloudColorHandlerCustom<PointT> color_cloud(cloud, 255, 0, 0);
	viewer.addPointCloud(cloud,"cloud");
	viewer.setPointCloudRenderingProperties(pcl::visualization::PCL_VISUALIZER_POINT_SIZE, 1,"cloud");


	//滤波去噪
	pass_through_filter();

	// 法线估计
	normals_estimate();

	// 把平面分割出来
	plane_seg();

	// 利用平面点云的下标将平面抽取出来,并保存
	get_plane();

	// 移除平面及其法线,将结果保存在cloud_filtered2,cloud_normals2
	remove_plane();

	// 将圆柱分割出来,得到系数因子和下标
	cylinder_seg();

	// 将圆柱抽取并保存
	get_cylinder();
	while (!viewer.wasStopped())
	{
		viewer.spinOnce();
		if (step_count < 8)
		{
			viewer.updateText(str + std::to_string(step_count), 10, 10, 16, 50, 100, 200, "text");
			switch (step_count)
			{
			case 2:
				//滤波去噪
				viewer.updatePointCloud(cloud_filtered, "cloud"); break;
			case 3:
				//法线估计
				plane_seg();break;
			case 4:
				//利用平面点云的下标将平面抽取出来,并保存
				viewer.updatePointCloud(cloud_plane, "cloud"); break;
			case 5:
				//移除平面及其法线,将结果保存在cloud_filtered2,cloud_normals2
				viewer.updatePointCloud(cloud_filtered2, "cloud"); break;
			case 6:
				// 将圆柱分割出来,得到系数因子和下标
				cylinder_seg();
				break;
			case 7:
				//// 将圆柱抽取并保存
				viewer.updatePointCloud(cloud_cylinder, "cloud"); break;
			default:
				break;
			}
		}
		else {
			break;
		}

	}

	return (0);
}
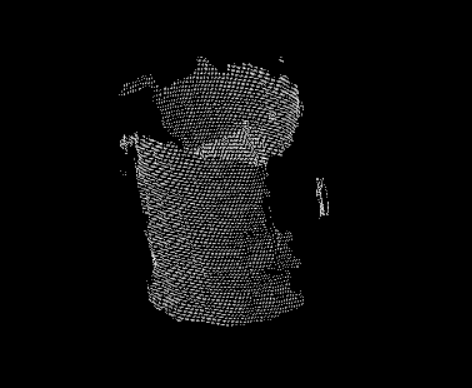
实验结果
打印结果
PointCloud has: 307200 data points.
PointCloud after filtering has: 139897 data points.
Plane coefficients: header:
seq: 0 stamp: 0 frame_id:
values[]
values[0]: 0.0161902
values[1]: -0.837667
values[2]: -0.545941
values[3]: 0.528862PointCloud representing the planar component: 116300 data points.
Cylinder coefficients: header:
seq: 0 stamp: 0 frame_id:
values[]
values[0]: 0.0543319
values[1]: 0.100139
values[2]: 0.787577
values[3]: -0.0135876
values[4]: 0.834831
values[5]: 0.550338
values[6]: 0.0387446PointCloud representing the cylindrical component: 11462 data points.
原始点云
过滤杂点
平面分割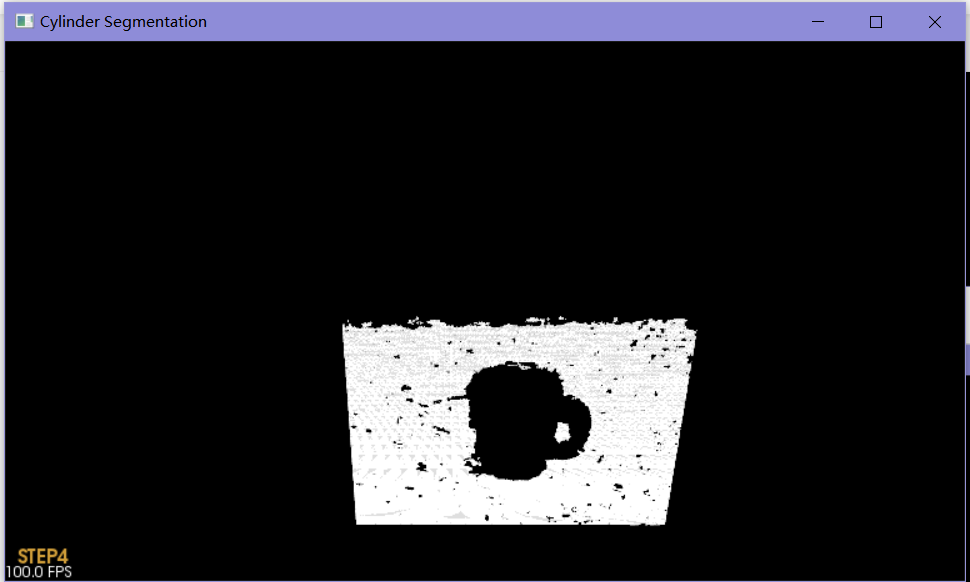
将平面去除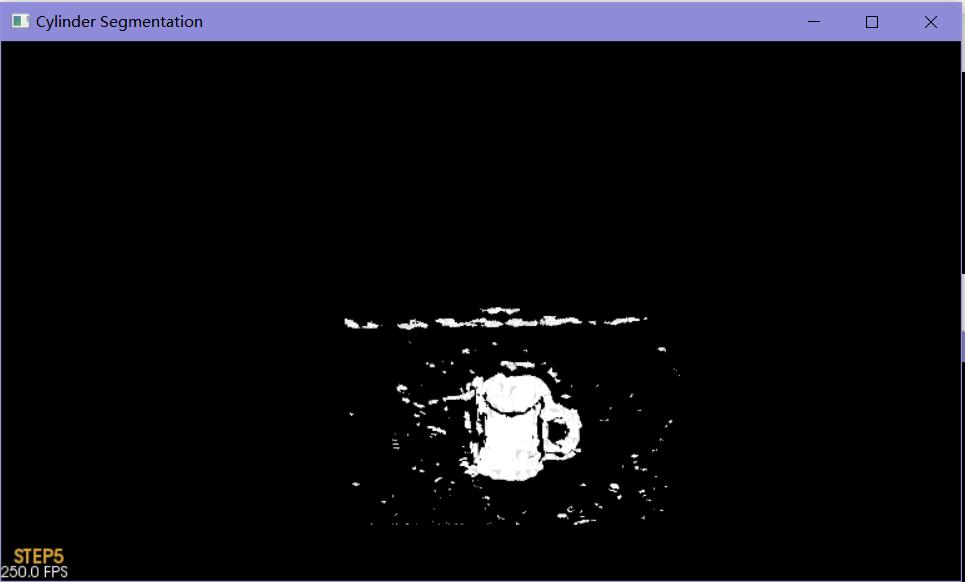
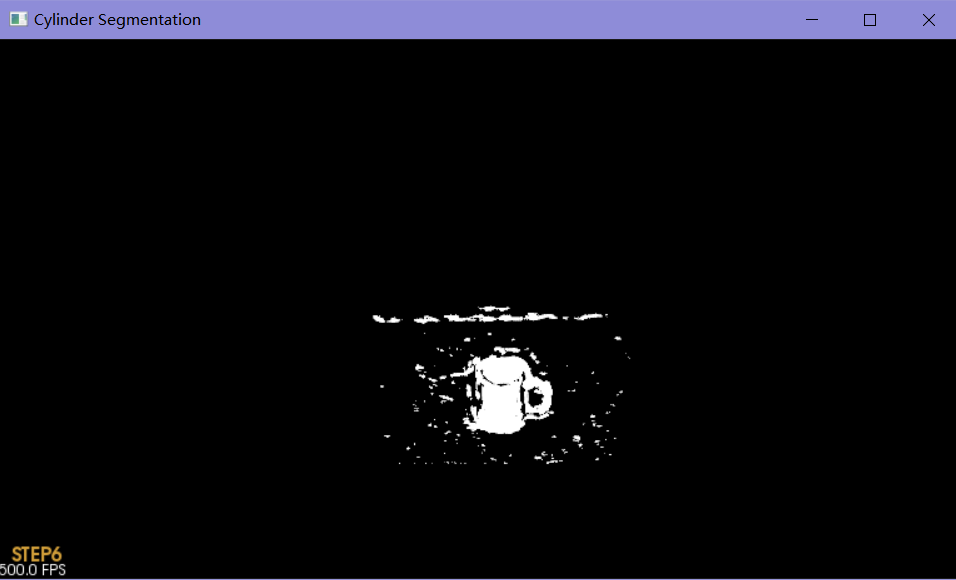
分割圆柱
CMakeLists.txt
cmake_minimum_required(VERSION 2.8 FATAL_ERROR)

project(cylinder_segmentation)

find_package(PCL 1.2 REQUIRED)

include_directories(${PCL_INCLUDE_DIRS})
link_directories(${PCL_LIBRARY_DIRS})
add_definitions(${PCL_DEFINITIONS})

add_executable (cylinder_segmentation cylinder_segmentation.cpp)
target_link_libraries (cylinder_segmentation ${PCL_LIBRARIES})


 3234
3234


 到【灌水乐园】发言


