


 本文详细介绍了如何基于红黑树实现Map和Set容器,包括改造红黑树节点、实现Map和Set框架、改造红黑树插入逻辑、实现红黑树迭代器以及完善Map和Set迭代器等内容。
Map和Set的简易实现
ps:在简易实现map和set之前你可能需要先学会怎么使用map和set,不会的同学可以戳这里:map容器的使用和set容器的使用,并且要实现自己的map和set你还要知道平衡树的旋转和红黑树原理,不会的同学可以戳这里:AVL树的旋转和浅谈红黑树原理。
Map和Set容器模型
如果你已经拥有了以上的技能,那么我们现在来聊一聊map和set的模型。通过使用我们发现,map是一个K-V模型,他可以通过Key来寻找Value,在生活的使用的场景中字典就是一个很典型的例子。而set仅仅是一个K的模型,他只负责查看Key值在不在,生活中我们经常刷门禁卡判断你的信息是否存在算是一个不错的例子。
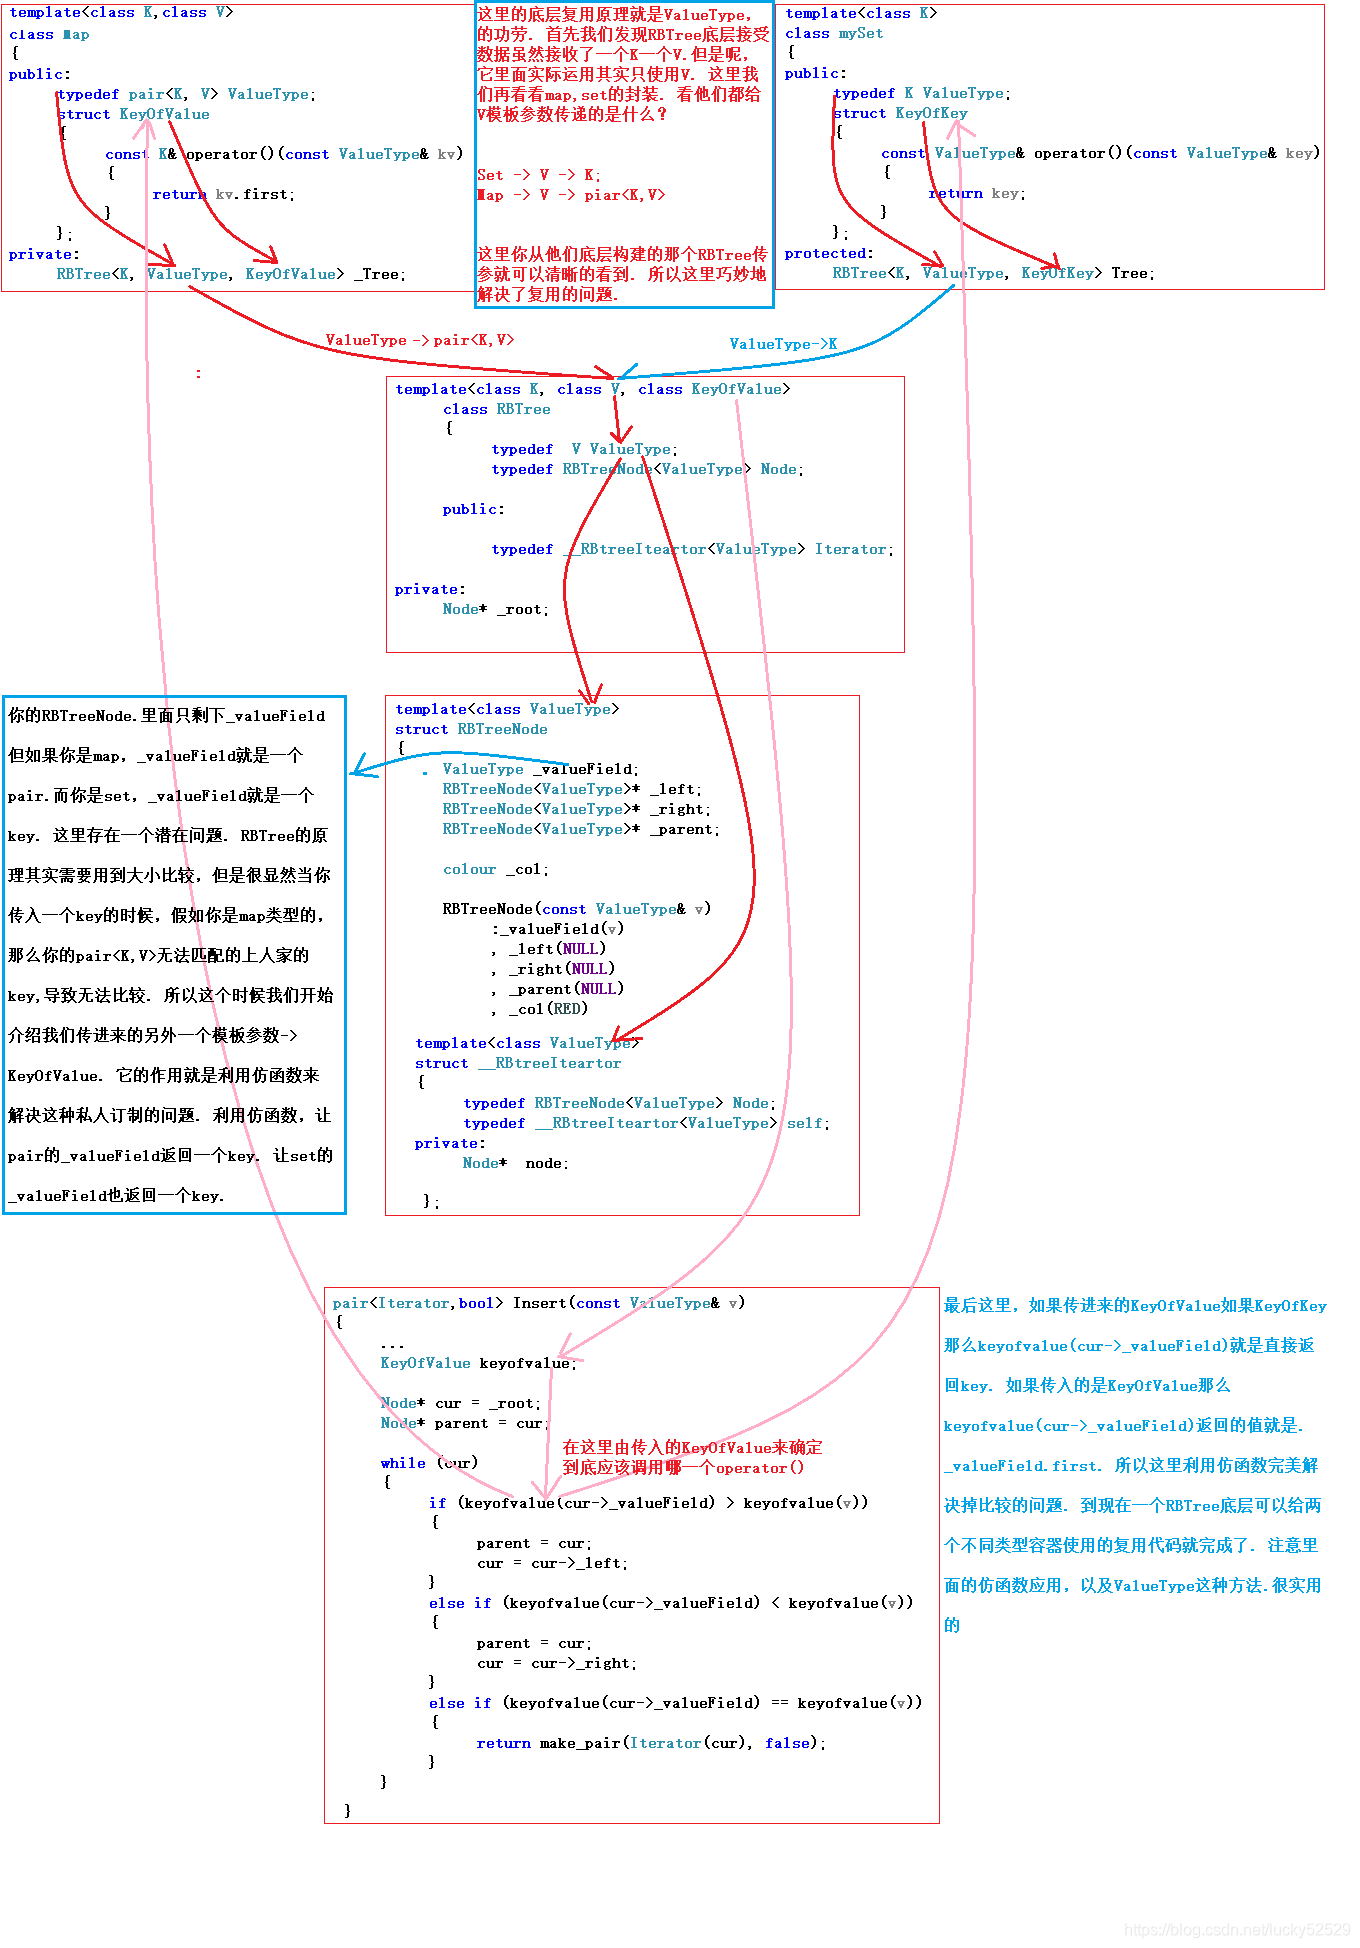
说到这里,有的同学可能会说,那么是不是我们需要两颗红黑树分别来封装map和set,答案当然是不需要。因为我们只需要在红黑树节点中分别存储K值和K-V的pair<>,但是问题又来了,我们知道在红黑树进行插入数据时需要使用key进行比较,set传入K当然可以直接比较,但是map传入pair<> 无法直接比较,我们需要使用pair的first进行比较。所以这里我们使用仿函数就轻松解决了这个问题

手把手带你实现map和set
因为从某种程度上map的功能包含了set的功能,map也可以单纯的判断目标在不在,所以这里我们就拿map来举例,相信你会了map的实现,set一定不在话下。
1.改造红黑树的节点
上面我们已经提过了,因为这里红黑树的节点现在自己也不知道接受什么类型的数据,所以直接用V模板参数表示:
ps:改造基于笔者的前一篇博客浅谈红黑树原理和实现。
template<class V>
struct RBTreeNode
{
	typedef V ValueType;//未知类型的Value

	ValueType _Value;
	RBTreeNode<ValueType>* _left;
	RBTreeNode<ValueType>* _right;
	RBTreeNode<ValueType>* _parent;
	colour _col;

	RBTreeNode(const ValueType& v)
		: _Value(v)
		, _left(nullptr)
		, _right(nullptr)
		, _parent(nullptr)
		, _col(RED)
	{}
};
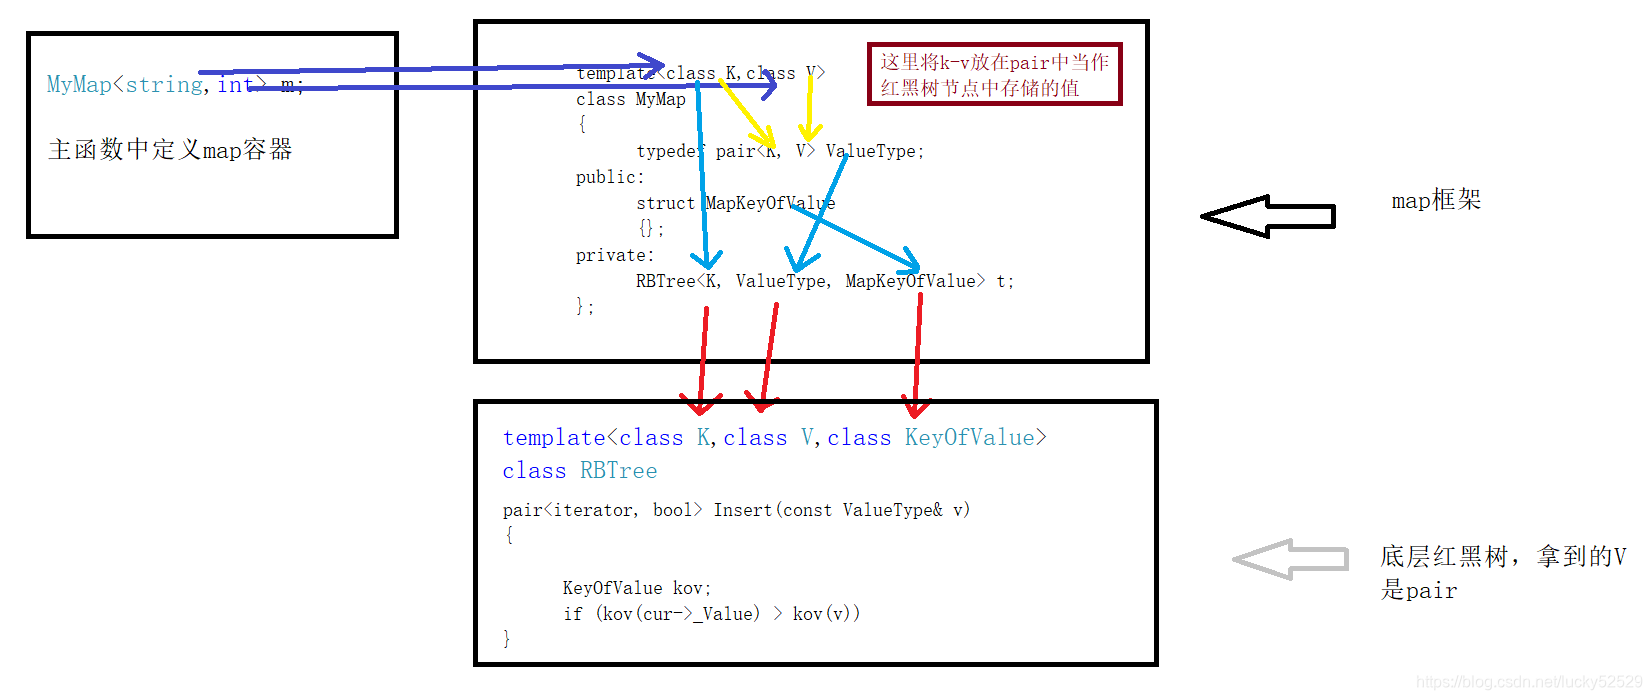
2.简易的map的框架
insert函数的返回值是一个pair,pair的first的是插入节点的迭代器,second是bool值,插入成功是true否则false,具体查阅文档
template<class K,class V>//外部定义map时显示实例化还是使用K-V
class MyMap
{
	typedef pair<K, V> ValueType;//这里红黑树中将会存储pair<K, V>
public:

	struct MapKeyOfValue//传给红黑树的仿函数
	{
		const K& operator()(const ValueType& kv)
		{
			return kv.first;//我们需要使用pair的first进行比较
		}
	};

	pair<iterator, bool> Insert(const ValueType& key)
	{
		return t.Insert(key);
	}

private:
	RBTree<K, ValueType, MapKeyOfValue> t;//第一个参数:K值 第二个参数:节点中存的值 第三个参数:仿函数
};
3.改造红黑树insert
这里我们就不在梳理插入的逻辑,我们只标记出修改的部分:
pair<iterator, bool> Insert(const ValueType& v)//返回值是pair
	{
		if (_root == nullptr)
		{
			_root = new Node(v);
			_root->_col = BLACK;
			return make_pair(iterator(_root), true);//此时返回pair,pair.first是头节点的迭代器
		}

		KeyOfValue kov;//这是改造的关键,这里定义一个比较的仿函数
		Node* parent = nullptr;
		Node* cur = _root;
		while (cur)
		{
			if (kov(cur->_Value) > kov(v))//这里的仿函数会为我们返回pair的first,也就是key,让我们进行比较
			{
				parent = cur;
				cur = cur->_left;
			}
			else if (kov(cur->_Value) < kov(v))//同上
			{
				parent = cur;
				cur = cur->_right;
			}
			else
			{
				return make_pair(iterator(cur), true);
			}
		}
		cur = new Node(v);
		cur->_col = RED;
		Node* ret = cur;//这里记录一下cur,因为我们最后插入成功会返回他的迭代器
		if (kov(parent->_Value) > kov(v))//仿函数的使用
		{
			parent->_left = cur;
			cur->_parent = parent;
		}
		else
		{
			parent->_right = cur;
			cur->_parent = parent;
		}

		while (parent && parent->_col == RED)
		{
			Node* grandfather = parent->_parent;
			if (parent == grandfather->_left)
			{
				Node* uncle = grandfather->_right;
				if (uncle && uncle->_col == RED)
				{
					uncle->_col = parent->_col = BLACK;
					grandfather->_col = RED;

					cur = grandfather;
					parent = cur->_parent;
				}
				else
				{
					if (cur == parent->_right)
					{
						RotateL(parent);
						swap(cur, parent);
					}
					RotateR(grandfather);
					parent->_col = BLACK;
					grandfather->_col = RED;
					break;
				}
			}
			else
			{
				Node* uncle = grandfather->_left;
				if (uncle && uncle->_col == RED)
				{
					uncle->_col = parent->_col = BLACK;
					grandfather->_col = RED;

					cur = grandfather;
					parent = cur->_parent;
				}
				else
				{
					if (cur == parent->_left)
					{
						RotateR(parent);
						swap(cur, parent);
					}
					RotateL(grandfather);
					parent->_col = BLACK;
					grandfather->_col = RED;
					break;
				}
			}
		}
		_root->_col = BLACK;
		return make_pair(iterator(ret), true);//插入成功返回成功pair,pair.first为插入成功节点的iterator
	}
到这里,我们对红黑树插入的基本改造就完成了,但是很多同学还是很懵,为了让大家看的更清楚,参考下图:
4.红黑的迭代器
因为map也可以使用红黑树的迭代器,所以这里我们来实现红黑树的迭代器:其实红黑树的迭代器可以是一个节点的指针,但是要进行++,*等操作,所以我们将他的迭代器定义为一个类,类中重载++,*等操作
template<class V>//可能是pair也可能使key
struct _RBTreeiterator
{
	typedef V ValueType;
	typedef RBTreeNode<ValueType> Node;
	typedef _RBTreeiterator<ValueType> self;
public:
	Node* _node;//本质上迭代器就是节点的指针
	_RBTreeiterator(Node* node)
		:_node(node)
	{}

	_RBTreeiterator(const self& node)
	{
		_node = node._node;
	}

	ValueType& operator*()//返回的可能是key,也可能是pair,对应他们的操作
	{
		return _node->_Value;
	}

	ValueType* operator->()
	{
		return &_node->_Value;
	}

	self& operator=(const self& node)
	{
		_node = node._node;
	}

	bool operator!=(const self& node)
	{
		return _node != node._node;
	}

	self& operator++()
	{
		if (_node->_right == nullptr)
		{
			Node* parent = _node->_parent;
			while (parent && parent->_right == _node)
			{
				_node = parent;
				parent = parent->_parent;
			}
			_node = parent;
		}
		else
		{
			Node* left = _node->_right;
			while (left->_left)
			{
				left = left->_left;
			}
			_node = left;
		}
		return *this;
	}
};
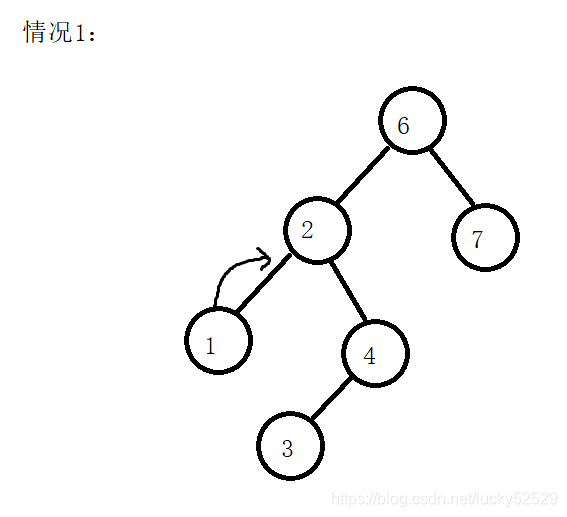
我们有必要单独讲解一下这里的++操作,要有序的遍历这颗树我们就必须进行树的中序遍历,所以我们一定是从这颗树的最左节点开始,之前我们进行中序遍历的树只有左右节点指针,所以压入左路节点,每进行出栈操作紧接着压入top节点右节点的最左节点。
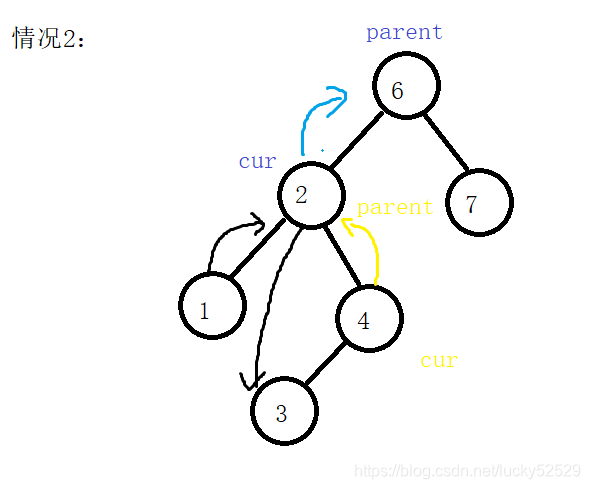
但是今天我们的红黑树拥有指向父节点的指针,所以可以不借助栈来直接进行操作:来看会出现的几种情况
- 我们此时访问完了2节点,需要访问下一个节点是2右节点的最左节点,也就是3
- 此时我们访问完了节点3,他的右节点为空,证明3这个节点所有的节点已经访问完,所以我们向上更新,寻找第一个左子树节点已经全部访问完的父节点,也就是4

- 同样,当访问完4节点时也会出现与3同样的情况,我们向上跟新到6,得出规律,当cur不为parent的右节点时停止
参考代码:
self& operator++()
	{
		if (_node->_right == nullptr)//说明需要跟新cur不为parent的右节点时停止
		{
			Node* parent = _node->_parent;
			while (parent && parent->_right == _node)
			{
				_node = parent;
				parent = parent->_parent;
			}
			_node = parent;
		}
		else
		{
			Node* left = _node->_right;//此时对应情况1
			while (left->_left)
			{
				left = left->_left;
			}
			_node = left;
		}
		return *this;
	}
5.完善红黑树和map的迭代器
下面截取红黑树中实现迭代器中的一部分:
template<class K,class V,class KeyOfValue>
class RBTree
{
	typedef V ValueType;
	typedef RBTreeNode<ValueType> Node;
public:
	typedef _RBTreeiterator<ValueType> iterator;
	iterator begin()
	{
		Node* cur = _root;
		while (cur && cur->_left)//从树的最左节点开始
		{
			cur = cur->_left;
		}
		return iterator(cur);
	}

	iterator end()
	{
		return iterator(nullptr);
	}
}
此时我们可以借助红黑树的迭代器进一步完成我们的map:
template<class K,class V>
class MyMap
{
	typedef pair<K, V> ValueType;
public:
	struct MapKeyOfValue
	{
		const K& operator()(const ValueType& kv)
		{
			return kv.first;
		}
	};

	typedef typename RBTree<K, ValueType, MapKeyOfValue>::iterator iterator;//取红黑树中的迭代器
    //如果没有typename,编译器就会去RBTree里面去寻找Iterator.但是RBTree并没有实例化,所以会找不到
	//然后报错. 所以typename告诉编译器这个类型是一个模板的类型,现在先不要确定它的类型.

	pair<iterator, bool> Insert(const ValueType& key)
	{
		return t.Insert(key);
	}

	V& operator[](const K& key)
	{
		pair<iterator, bool> ret = t.Insert(make_pair(key,V()));
		return ret.first->second;
	}

	iterator begin()//调用红黑树的迭代器
	{
		return t.begin();
	}

	iterator end()
	{
		return t.end();
	}
private:
	RBTree<K, ValueType, MapKeyOfValue> t;
};
我们知道map还支持map是支持[]的,所以我们还需要重载他的方括号:
V& operator[](const K& key)
{
	pair<iterator, bool> ret = t.Insert(make_pair(key,V()));//插入成功将value设置为类型的默认缺省类型
	return ret.first->second;//ret.first取到这个节点的迭代器,ret.first->second可以对value进行修改
}
说到这里我们的简易map也就实现完成了,当然set也是相同的道理,我直接将代码贴给大家
简易set
template<class K>
class MySet
{
public:
	typedef K ValueType;
	struct SetKeyOfValue
	{
		const K& operator()(const ValueType& key)//注意这里直接返回key就可以比较
		{
			return key;
		}
	};

	typedef typename RBTree<K, K, SetKeyOfValue>::iterator iterator;

	pair<iterator, bool> Insert(const ValueType& key)
	{
		return t.Insert(key);
	}

	iterator begin()
	{
		return t.begin();
	}

	iterator end()
	{
		return t.end();
	}

private:
	RBTree<K, ValueType, SetKeyOfValue> t;
};
简易map
template<class K,class V>
class MyMap
{
	typedef pair<K, V> ValueType;
public:
	struct MapKeyOfValue
	{
		const K& operator()(const ValueType& kv)
		{
			return kv.first;
		}
	};

	typedef typename RBTree<K, ValueType, MapKeyOfValue>::iterator iterator;

	pair<iterator, bool> Insert(const ValueType& key)
	{
		return t.Insert(key);
	}

	V& operator[](const K& key)
	{
		pair<iterator, bool> ret = t.Insert(make_pair(key,V()));
		return ret.first->second;
	}

	iterator begin()
	{
		return t.begin();
	}

	iterator end()
	{
		return t.end();
	}
private:
	RBTree<K, ValueType, MapKeyOfValue> t;
};
底层红黑树
不想关的代码就先不贴了,可以去笔者上篇博客寻找:
template<class K,class V,class KeyOfValue>
class RBTree
{
	typedef V ValueType;
	typedef RBTreeNode<ValueType> Node;
public:
	typedef _RBTreeiterator<ValueType> iterator;

	RBTree()
		:_root(nullptr)
	{}

	~RBTree()
	{}

	iterator begin()
	{
		Node* cur = _root;
		while (cur && cur->_left)
		{
			cur = cur->_left;
		}
		return iterator(cur);
	}

	iterator end()
	{
		return iterator(nullptr);
	}

	pair<iterator, bool> Insert(const ValueType& v)
	{
		if (_root == nullptr)
		{
			_root = new Node(v);
			_root->_col = BLACK;
			return make_pair(iterator(_root), true);
		}

		KeyOfValue kov;
		Node* parent = nullptr;//记录cur节点的上一个节点
		Node* cur = _root;
		while (cur)
		{
			if (kov(cur->_Value) > kov(v))//如果插入值小于当前节点值,向左树走
			{
				parent = cur;
				cur = cur->_left;
			}
			else if (kov(cur->_Value) < kov(v))//如果插入值大于当前节点值,向右树走
			{
				parent = cur;
				cur = cur->_right;
			}
			else
			{
				//已经存在当前值
				return make_pair(iterator(cur), true);
			}
		}
		cur = new Node(v);
		cur->_col = RED;//新节点插入红色节点
		Node* ret = cur;
		if (kov(parent->_Value) > kov(v))//将cur插入树中
		{
			parent->_left = cur;
			cur->_parent = parent;
		}
		else
		{
			parent->_right = cur;
			cur->_parent = parent;
		}

		while (parent && parent->_col == RED)//如果当前插入节点的父亲节点为黑色则不需要调整
		{
			Node* grandfather = parent->_parent;//通过grandfather查看uncle节点在其的哪一侧
			if (parent == grandfather->_left)
			{
				Node* uncle = grandfather->_right;
				if (uncle && uncle->_col == RED)//如果叔叔为红色,对应情况1
				{
					uncle->_col = parent->_col = BLACK;
					grandfather->_col = RED;

					cur = grandfather;
					parent = cur->_parent;
				}
				else//如果叔叔为黑色,或者不存在
				{
					if (cur == parent->_right)//判断是否需要进行双旋,对应情况3
					{
						RotateL(parent);
						swap(cur, parent);//对照图发现,需要交换指针
					}
					RotateR(grandfather);//只单旋对应情况二
					parent->_col = BLACK;
					grandfather->_col = RED;
					break;
				}
			}
			else//相反的情况
			{
				Node* uncle = grandfather->_left;
				if (uncle && uncle->_col == RED)
				{
					uncle->_col = parent->_col = BLACK;
					grandfather->_col = RED;

					cur = grandfather;
					parent = cur->_parent;
				}
				else
				{
					if (cur == parent->_left)
					{
						RotateR(parent);
						swap(cur, parent);
					}
					RotateL(grandfather);
					parent->_col = BLACK;
					grandfather->_col = RED;
					break;
				}
			}
		}
		_root->_col = BLACK;//一定注意当情况一发生后,可能根节点是红色,每次插入后跟新成黑色
		return make_pair(iterator(ret), true);
	}

	void RotateR(Node* parent)//右单旋
	{
		Node* SubL = parent->_left;
		Node* SubLR = SubL->_right;
		parent->_left = SubLR;
		if (SubLR)
		{
			SubLR->_parent = parent;
		}
		SubL->_right = parent;
		Node* pNode = parent->_parent;
		parent->_parent = SubL;
		if (parent == _root)
		{
			_root = SubL;
		}
		else
		{
			if (pNode->_left == parent)
			{
				pNode->_left = SubL;
			}
			else
			{
				pNode->_right = SubL;
			}
		}
		SubL->_parent = pNode;
	}

	void RotateL(Node* parent)//左单旋
	{
		Node* SubR = parent->_right;
		Node* SubRL = SubR->_left;
		parent->_right = SubRL;
		if (SubRL)
		{
			SubRL->_parent = parent;
		}
		SubR->_left = parent;
		Node* pNode = parent->_parent;//记录当前parent的父亲节点,以便让SubR指向当前parent的父亲节点
		parent->_parent = SubR;
		if (_root == parent)
		{
			_root = SubR;
		}
		else
		{
			if (pNode->_left == parent)
			{
				pNode->_left = SubR;
			}
			else
			{
				pNode->_right = SubR;
			}
		}
		SubR->_parent = pNode;
	}
private:
	Node* _root;
};
总结
我们这里只实现了map和set的插入函数和迭代器,其余查找函数都是基于红黑树,然后进行红黑树接口的调用。这里重点并不是让大家知道这些接口怎么实现,因为map和set相当于是红黑树一层马甲,我们重在理解set和map是怎么在模型不相同的情况下共用一颗红黑树。
图片转自优秀的学长,图片链接:https://blog.youkuaiyun.com/Dawn_sf/article/details/78506299


 1412
1412

 被折叠的 条评论
为什么被折叠?
被折叠的 条评论
为什么被折叠?
 到【灌水乐园】发言


