基于pytorch的Seq2Seq的实现

本文深入探讨Seq2Seq模型,它由编码器和解码器两部分组成,两者均由循环神经网络构建。编码器接收序列输入并输出隐藏状态,解码器利用该状态生成预测序列。代码示例展示了PyTorch中EncoderRNN和DecoderRNN的实现,以及如何将它们组合成Seq2Seq模型进行序列预测。

摘要生成于 C知道 ,由 DeepSeek-R1 满血版支持, 前往体验 >

  1. 结构
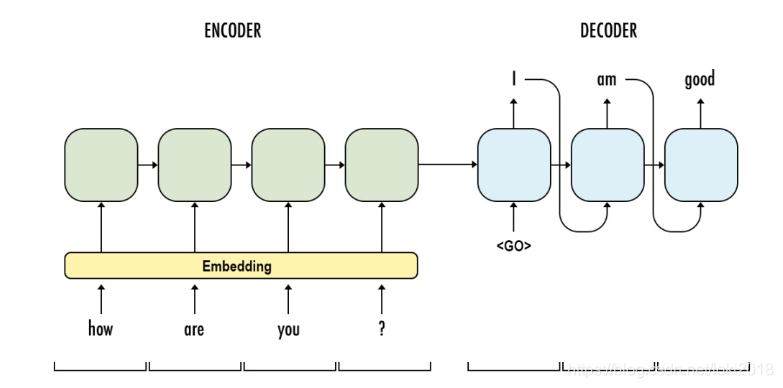
    这是一种经典的Seq2Seq结构,由两部分组成,Encoder 和 Decoder(编码器和解码器), 这两个部分的构造几乎一模一样,都是由循环神经网络组成,层数,隐藏层维度都是一样的。
    它的原理是一个序列输入到编码器之后,编码器输出最后的隐藏状态(h)到解码器, h包含了序列的前后信息,然后通过解码器对h处理,逐步生成相应的预测序列。
    在这里插入图片描述

  2. Encoder
    以下是Encoder的一段基本代码,由最基本的RNN组成:
    需要弄清楚它矩阵的变换。

class EncoderRNN(nn.Module):

    def __init__(self,input_size, hidden_size, n_layers, emb_size, dropout=0.5, bidirections=False):
        """
        :param input_size:源序列的编码总数, 例如英文26个字母,那么这里就是26
        :param hidden_size:隐藏层参数
        :param n_layers: 网络层数
        :param emb_size: embedding维度
        :param dropout: dropout参数
        :param bidierctions: 双向还是单向
        """
        super(EncoderRNN, self).__init__()
        self.input_size = input_size
        self.n_layers = n_layers
        self.hidden_size = hidden_size
        self.emb_size = emb_size
        self.dropout = dropout
        self.bidirecions = bidirections

        self.Embedding = nn.Embedding(self.input_size, self.emb_size)  # embedding编码
        self.RNN = nn.RNN(self.emb_size, self.hidden_size, self.n_layers, dropout=self.dropout, bidirectional=self.bidirecions)

    def forward(self, src):
        # src [seq_len, batch]

        embedded = self.Embedding(src)

        #embedded [seq_len, batch, emb_size]

        out, h = self.RNN(embedded)
        
        # out [seq_len, batch, direction*hidden_size]
        # h [n_layers*directions, batch, hidden_size]

        return out, h

然后我们任意设定一个序列输入到网络中,pytorch中的循环神经网络喂入的数据形式比较特殊,它的batch_size并不是在第一维,而是在第二维,因此我们的数据也要做相应的调整。

if __name__ == "__main__":
    INPUT_SIZE = 10
    HIDDEN_SIZE = 20
    N_LAYERS = 2
    EMB_SIZE = 10
    model = EncoderRNN(INPUT_SIZE, HIDDEN_SIZE, N_LAYERS, EMB_SIZE)
    x = torch.tensor([[1, 2, 3, 4, 9], [2, 2, 3, 4, 6]]).T # 做转置就是为了将batch放到第二维
    # batch : 2
    # seq_len : 5
    out, h = model(x)
    
    print(f"out shape is {out.shape}")
    print(f"h shape is {h.shape}")
    
"""
out shape is torch.Size([5, 2, 20])
h shape is torch.Size([2, 2, 20])
"""

由此可见,输出的维度符合我们的预期。学习RNN最重要的就是要弄明白这里面的维度变化。

  1. Decoder
    以下是解码器部分的代码,需要注意解码器的输入和编码器的区别
class DecoderRNN(nn.Module):

    def __init__(self, out_dim, hidden_size, n_layers, emb_size, dropout=0.5, bidirections=False):
        """
        :param out_dim:目标序列的编码长度,若是中文翻译为英文,那么英文就是目标序列,那这里就是26
        :param hidden_size: 隐藏层维度,和编码器一致
        :param n_layers: 层数,和编码器一致
        :param emb_size: embedding维度,任意,为了方便一般和编码器一致
        :param dropout: dropout参数
        :param bidirections: 双向或是单向,和编码器一致
        """
        super(DecoderRNN, self).__init__()
        self.out_dim = out_dim
        self.n_layers = n_layers
        self.hidden_size = hidden_size
        self.emb_size = emb_size
        self.dropout = dropout
        self.bidirecions = bidirections

        self.Embedding = nn.Embedding(self.out_dim, self.emb_size)  # embedding编码
        self.RNN = nn.RNN(self.emb_size, self.hidden_size, self.n_layers, dropout=self.dropout,
                          bidirectional=self.bidirecions)
        self.dropout = nn.Dropout(dropout)
        self.softmax = nn.LogSoftmax(dim=1)  # 由于后面使用的损失函数是NLLLOSS,要做个logsoftmax,如果用的是CrossEntropyLoss可以不用加这一操作 

        # 定义线性层
        if bidirections:
            self.fc_out = nn.Linear(hidden_size*2, self.out_dim)
        else:
            self.fc_out = nn.Linear(hidden_size, self.out_dim)

    def forward(self, token_input, hidden):
        """
        需要注意的是解码器的输入:每次都是输入一个单步的词或者字,还有来自编码器的h
        第一次的输入是开始符
        :param token_input:[batch]
        :param hidden: [directions*n_layers, batch, hidden_size]
        """
        embedded = self.dropout(self.Embedding(token_input))  # 这里可以增加一个dropout,减少过拟合
        # embedded [batch, emb_size]

        embedded = embedded.unsqueeze(0)  # 为了保证输入到RNN中的形状正确,那么要对它升一个维度
        # embedded [1, batch, emb_size]

        out, hidden = self.RNN(embedded)
        # out [1, batch, hidden_size*directions]
        # hidden [directions*n_layers, batch, hidden_size]

        out = self.fc_out(out)
        # out [1, batch, out_dim]

        out = out.squeeze(0)  # 降一次维
        # out [batch, out_dim]

        out = self.softmax(out)
        # 这里的out就是我们预测的值了
        # hidden在传给下一个时间步使用

        return out, hidden

任意取一个初始开始字符数组输入到解码器中

if __name__ == "__main__":
    INPUT_DIM = 10
    OUT_DIM = 8
    HIDDEN_SIZE = 20
    N_LAYERS = 2
    EMB_SIZE = 10
    encoder = EncoderRNN(INPUT_DIM, HIDDEN_SIZE, N_LAYERS, EMB_SIZE)
    decoder = DecoderRNN(OUT_DIM, HIDDEN_SIZE, N_LAYERS, EMB_SIZE)
    x = torch.tensor([[1, 2, 3, 4, 9], [2, 2, 3, 4, 6]]).T
    # batch : 2
    # seq_len : 5
    out, h = encoder(x)
    token = torch.tensor([0, 0])
    print(f"encoder out shape is {out.shape}")
    print(f"encoder h shape is {h.shape}")
    out, h = decoder(token, h)
    print(f"decoder out shape is {out.shape}")
    print(f"decoder h shape is {h.shape}")
    
"""
encoder out shape is torch.Size([5, 2, 20])
encoder h shape is torch.Size([2, 2, 20])
decoder out shape is torch.Size([2, 8])
decoder h shape is torch.Size([2, 2, 20])
"""
  1. Seq2Seq
    最后只需要将编码器和解码器组合到一起就是一个完整的Seq2Seq模型了
class Seq2Seq(nn.Module):

    def __init__(self, encoder, decoder, device, max_len=5):
        """
        :param encoder: 编码器模块
        :param decoder: 解码器模块
        :param device: 训练设备类型
        :param max_len: 预测序列的最大长度
        """
        super(Seq2Seq, self).__init__()
        self.encoder = encoder
        self.decoder = decoder
        self.max_len = max_len
        self.device = device

        en_layers = self.encoder.n_layers
        de_layers = self.decoder.n_layers

        en_hid = self.encoder.hidden_size
        de_hid = self.decoder.hidden_size

        en_direction = self.encoder.bidirections
        de_direction = self.decoder.bidirections

        # 编码器和解码器需要保证以下参数都是一致的
        assert en_layers == de_layers, \
            "Hidden dimensions of encoder and decoder must be equal!"
        assert en_hid == de_hid, \
            "Encoder and decoder must have equal number of layers!"
        assert en_direction == de_direction, \
            "If decoder is bidirectional, encoder must be bidirectional either!"

    def forward(self, src):
        self.encoder.to(self.device)
        self.decoder.to(self.device)
        # src [seq_len, batch]
        en_out, hidden = self.encoder(src)
        # en_out [seq_len, batch, direction*hidden_size]
        # hidden [n_layers*directions, batch, hidden_size]
        batch_size = en_out.shape[1]

        #设置一个张量来存储所有的解码器输出
        all_decoder_outputs = torch.zeros((self.max_len, batch_size, self.decoder.out_dim), device=self.device)

        token = torch.tensor([0, 0], device=device)  # decoder的初始输入
        for i in range(self.max_len):
            de_out, hidden = decoder(token, hidden)
            all_decoder_outputs[i] = de_out
            # de_out [batch, out_dim]
            topv, topi = de_out.topk(1) # 获取每个batch预测的最大概率值以及索引,索引对应的目标序列就是预测的值
            token = topi.flatten()  # 解码器下一次的输入

        # 最后返回输出的所有概率矩阵来计算交叉熵损失
        return all_decoder_outputs

设置一组标签和特征,送入网络中,得到的结果计算交叉熵损失。

if __name__ == "__main__":
    INPUT_DIM = 10
    OUT_DIM = 8
    HIDDEN_SIZE = 20
    N_LAYERS = 2
    EMB_SIZE = 10
    device = torch.device('cuda' if torch.cuda.is_available() else 'cpu')
    encoder = EncoderRNN(INPUT_DIM, HIDDEN_SIZE, N_LAYERS, EMB_SIZE)
    decoder = DecoderRNN(OUT_DIM, HIDDEN_SIZE, N_LAYERS, EMB_SIZE)
    x = torch.tensor([[1, 2, 3, 4, 9], [2, 2, 3, 4, 6]], device=device).T
    y = torch.tensor([[3, 1, 3, 4, 6], [4, 1, 3, 4, 4]], device=device).reshape(-1)
    # batch : 2
    # seq_len : 5

    seq2seq = Seq2Seq(encoder, decoder, device)
    o = seq2seq(x)
    print(o.shape)
    criterion = nn.NLLLoss()
    loss = criterion(o.reshape(-1, OUT_DIM), y)
    print(loss)
"""
torch.Size([5, 2, 8])
tensor(2.0671, device='cuda:0', grad_fn=<NllLossBackward>)
"""
评论 2
添加红包

请填写红包祝福语或标题

红包个数最小为10个

红包金额最低5元

当前余额3.43前往充值 >
需支付:10.00
成就一亿技术人!
领取后你会自动成为博主和红包主的粉丝 规则
hope_wisdom
发出的红包
实付
使用余额支付
点击重新获取
扫码支付
钱包余额 0

抵扣说明:

1.余额是钱包充值的虚拟货币,按照1:1的比例进行支付金额的抵扣。
2.余额无法直接购买下载,可以购买VIP、付费专栏及课程。

余额充值