


上代码:
在编译代码前,确保安转 Python3.0 和用 pip 安装 Adafruit-SSD1306 库
import time
import os
import Adafruit_SSD1306
from PIL import Image
from PIL import ImageDraw
from PIL import ImageFont
import subprocess
# Raspberry Pi引脚配置:
RST = None # 在PiOLED上,此引脚不被使用
# 使用硬件I2C的128x32显示器:
disp = Adafruit_SSD1306.SSD1306_128_32(rst=RST)
# 初始化库
disp.begin()
# 清楚显示
disp.clear()
disp.display()
# 创建用于绘图的空白图像
# 确保创建模式为'1'的图像,表示1位颜色。
width = disp.width
height = disp.height
image = Image.new('1', (width, height))
# 获取用于在图像上绘制的绘图对象
draw = ImageDraw.Draw(image)
# 绘制一个黑色填充的框以清除图像。
draw.rectangle((0, 0, width, height), outline=0, fill=0)
# 加载默认字体。
font = ImageFont.load_default()
def getCPULoadRate():
f1 = os.popen("cat /proc/stat", 'r')
stat1 = f1.readline()
count = 10
data_1 = []
for i in range(count):
data_1.append(int(stat1.split(' ')[i + 2]))
total_1 = sum(data_1)
idle_1 = data_1[3]
time.sleep(1)
f2 = os.popen("cat /proc/stat", 'r')
stat2 = f2.readline()
data_2 = []
for i in range(count):
data_2.append(int(stat2.split(' ')[i + 2]))
total_2 = sum(data_2)
idle_2 = data_2[3]
total = total_2 - total_1
idle = idle_2 - idle_1
usage = total - idle
usageRate = int(float(usage * 100 / total))
return "CPU:" + str(usageRate) + "%"
while True:
# 清除图像
draw.rectangle((0, 0, width, height), outline=0, fill=0)
# 获取系统监控数据
CPU = getCPULoadRate()
cmd = os.popen('vcgencmd measure_temp').readline()
CPU_TEMP = cmd.replace("temp=", "Temp:").replace("'C\n", "C")
cmd = "free -m | awk 'NR==2{printf \"RAM:%s/%s MB \", $2-$3,$2}'"
MemUsage = subprocess.check_output(cmd, shell=True)
MemUsage = str(MemUsage).lstrip('b\'').rstrip('\'')
cmd = "df -h | awk '$NF==\"/\"{printf \"Disk:%d/%dMB\", ($2-$3)*1024,$2*1024}'"
Disk = subprocess.check_output(cmd, shell=True)
Disk = str(Disk).lstrip('b\'').rstrip('\'')
cmd = "hostname -I | cut -d\' \' -f1"
IP = subprocess.check_output(cmd, shell=True)
IP = str(IP).lstrip('b\'').rstrip('\'').rstrip('\\n')
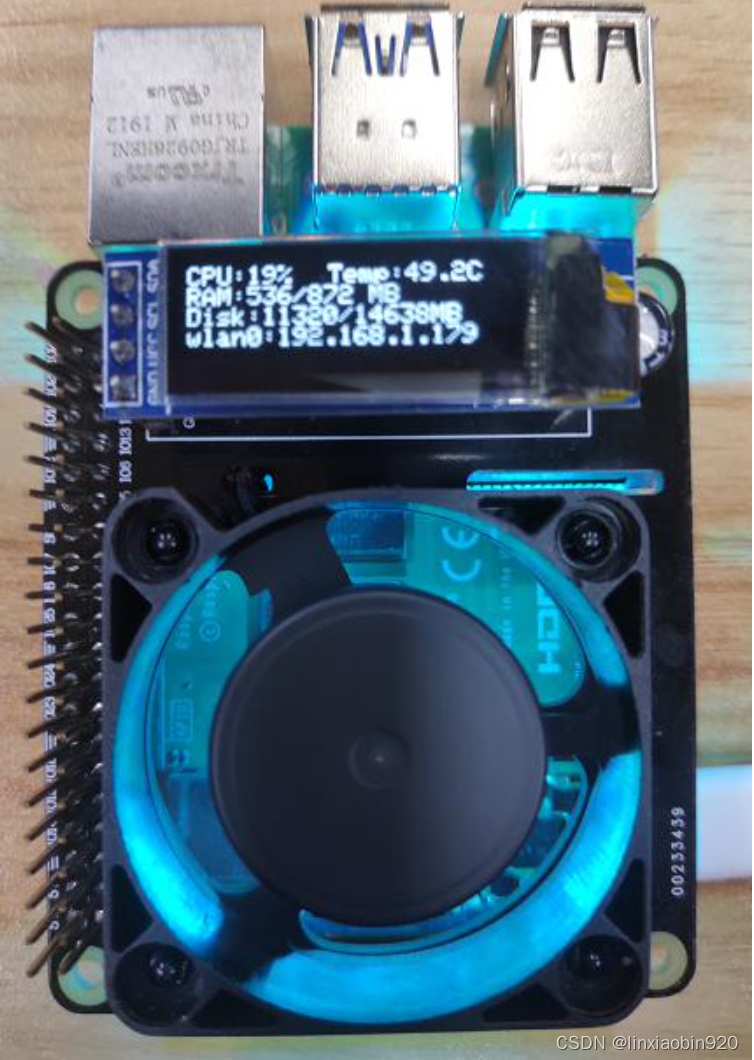
# 写入文本到显示器
draw.text((0, 0), str(CPU), font=font, fill=255)
draw.text((64, 0), str(CPU_TEMP), font=font, fill=255)
draw.text((0, 10), str(MemUsage), font=font, fill=255)
draw.text((0, 20), str(Disk), font=font, fill=255)
draw.text((0, 30), "wlan0:" + str(IP), font=font, fill=255)
# 显示图像
disp.image(image)
disp.display()
# 控制图片显示时长
time.sleep(2) # 修改显示时长为2秒
犹豫控制使用硬件I2C的128x32显示器:需要考虑屏幕显示渲染图片的占用可能性,如果你的树莓派包含多个显示屏幕,需要考虑显示屏的选择:
以下是一个示例代码,用于控制两个不同显示屏显示不同的内容:
import time
import os

import Adafruit_SSD1306

from PIL import Image
from PIL import ImageDraw
from PIL import ImageFont

import subprocess

# Raspberry Pi引脚配置:
RST = None  # 在PiOLED上,此引脚不被使用

# 使用硬件I2C的128x32显示器:
disp1 = Adafruit_SSD1306.SSD1306_128_32(rst=RST, i2c_address=0x3C)  # 显示屏1的I2C地址
disp2 = Adafruit_SSD1306.SSD1306_128_32(rst=RST, i2c_address=0x3D)  # 显示屏2的I2C地址

# 初始化库
disp1.begin()
disp2.begin()

# 清楚显示
disp1.clear()
disp1.display()

disp2.clear()
disp2.display()

# 创建用于绘图的空白图像
# 确保创建模式为'1'的图像,表示1位颜色。
width = disp1.width
height = disp1.height
image1 = Image.new('1', (width, height))
image2 = Image.new('1', (width, height))

# 获取用于在图像上绘制的绘图对象
draw1 = ImageDraw.Draw(image1)
draw2 = ImageDraw.Draw(image2)

# 加载默认字体。
font = ImageFont.load_default()

def getCPULoadRate():
    f1 = os.popen("cat /proc/stat", 'r')
    stat1 = f1.readline()
    count = 10
    data_1 = [int(stat1.split()[i+1]) for i in range(count)]
    total_1 = sum(data_1)
    idle_1 = data_1[3]

    time.sleep(1)

    f2 = os.popen("cat /proc/stat", 'r')
    stat2 = f2.readline()
    data_2 = [int(stat2.split()[i+1]) for i in range(count)]
    total_2 = sum(data_2)
    idle_2 = data_2[3]

    total = total_2 - total_1
    idle = idle_2 - idle_1
    usage = total - idle
    usageRate = int(float(usage * 100 / total))
    return "CPU:" + str(usageRate) + "%"

while True:
    # 清除图像1
    draw1.rectangle((0, 0, width, height), outline=0, fill=0)

    # 获取系统监控数据
    CPU = getCPULoadRate()

    cmd = os.popen('vcgencmd measure_temp').readline()
    CPU_TEMP = cmd.replace("temp=", "Temp:").replace("'C\n", "C")

    cmd = "free -m | awk 'NR==2{printf \"RAM:%s/%s MB \", $2-$3,$2}'"
    MemUsage = subprocess.check_output(cmd, shell=True)
    MemUsage = str(MemUsage).lstrip('b\'').rstrip('\'')

    # 显示屏1内容
    draw1.text((0, 0), str(CPU), font=font, fill=255)
    draw1.text((0, 10), str(CPU_TEMP), font=font, fill=255)
    draw1.text((0, 20), str(MemUsage), font=font, fill=255)

    # 清除图像2
    draw2.rectangle((0, 0, width, height), outline=0, fill=0)

    cmd = "df -h | awk '$NF==\"/\"{printf \"Disk:%d/%dMB\", ($2-$3)*1024,$2*1024}'"
    Disk = subprocess.check_output(cmd, shell=True)
    Disk = str(Disk).lstrip('b\'').rstrip('\'')

    cmd = "hostname -I | cut -d\' \' -f1"
    IP = subprocess.check_output(cmd, shell=True)
    IP = str(IP).lstrip('b\'').rstrip('\'').rstrip('\\n')

    # 显示屏2内容
    draw2.text((0, 0), str(Disk), font=font, fill=255)
    draw2.text((0, 10), "wlan0:" + str(IP), font=font, fill=255)

    # 显示图像1
    disp1.image(image1)
    disp1.display()

    # 显示图像2
    disp2.image(image2)
    disp2.display()

    # 控制图片显示时长
    time.sleep(2)  # 修改显示时长为2秒


 3431
3431

 被折叠的 条评论
为什么被折叠?
被折叠的 条评论
为什么被折叠?
 到【灌水乐园】发言


