


 本文详细介绍了如何在Ubuntu 18.04上安装CUDA和GPU驱动,包括两种CUDA安装方法,并给出了已装驱动的安装步骤。同时,展示了CMakeLists.txt的编写,用于管理CUDA项目的编译。此外,还解释了CUDA中的网格、线程块和线程概念,以及提供了一个RGB图像转灰度的CUDA程序示例。
Ubuntu安装CUDA和GPU驱动
CUDA安装方法
方法一:如果没有装GPU驱动
wget https://developer.download.nvidia.com/compute/cuda/repos/ubuntu1804/x86_64/cuda-ubuntu1804.pin

sudo mv cuda-ubuntu1804.pin /etc/apt/preferences.d/cuda-repository-pin-600

wget https://developer.download.nvidia.com/compute/cuda/11.2.0/local_installers/cuda-repo-ubuntu1804-11-2-local_11.2.0-460.27.04-1_amd64.deb

sudo dpkg -i cuda-repo-ubuntu1804-11-2-local_11.2.0-460.27.04-1_amd64.deb

sudo apt-key add /var/cuda-repo-ubuntu1804-11-2-local/7fa2af80.pub

sudo apt-get update

sudo apt-get -y install cuda如果下载不到deb包,也可以通过在官网下载cuda的deb包安装。

方法二:已经装了GPU驱动
通过在官网下载cuda的run脚本安装。安装时,取消安装显卡驱动。
wget https://developer.download.nvidia.com/compute/cuda/11.2.0/local_installers/cuda_11.2.0_460.27.04_linux.run

sudo sh cuda_11.2.0_460.27.04_linux.run
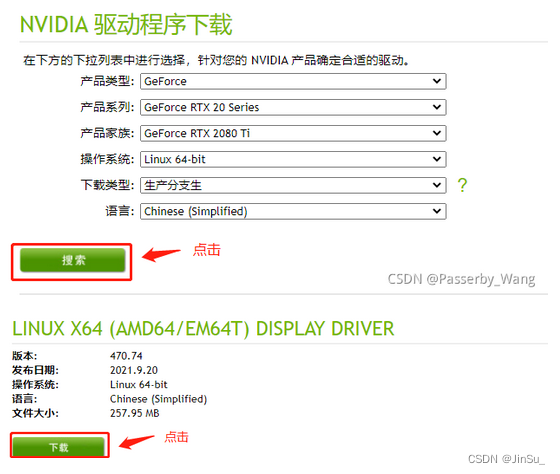
GPU驱动安装方法
1.在显卡官网下载驱动NVIDIA*run.sh文件
2.屏蔽掉nouveau
sudo gedit /etc/modprobe.d/blacklist-nouveau.conf
填入以下两行:
blacklist nouveau
options nouveau modeset=0
3.执行命令
sudo update-initramfs -u
4.reboot重启电脑
5.CTRL+ALT+F1进入字符界面,执行
sudo service lightdm stop
6.执行安装显卡脚本 sudo ./NVIDIA*run.sh
7.reboot重启
CMakeLists.txt的编写
# CMake 最低版本号要求
cmake_minimum_required (VERSION 2.8)

# 设置项目名称
SET(PROJECT_NAME "demo" CACHE STRING "project's name")

# 项目信息
project (${PROJECT_NAME})

set(CMAKE_CXX_FLAGS "${CMAKE_CXX_FLAGS} -std=c++11")
set(CMAKE_CXX_FLAGS_RELEASE "${CMAKE_CXX_FLAGS_RELEASE} -O3 -DNDEBUG ")

SET(CMAKE_CONFIGURATION_TYPES "Release" CACHE STRING "" FORCE)
SET(CMAKE_BUILD_TYPE "Release" CACHE STRING "" FORCE)

find_package(OpenCV REQUIRED NO_MODULE PATHS /home/leonjin/project/master-opencv-4.5.2/opencv-4.5.2/build NO_DEFAULT_PATH)
include_directories(${OpenCV_INCLUDE_DIRS})
message("OpenCV_INCLUDE_DIRS : ${OpenCV_INCLUDE_DIRS}")
message("OpenCV_LIBS : ${OpenCV_LIBS}")

find_package(OpenMP REQUIRED)
if(OpenMP_FOUND)
    message(STATUS "found openmp")
    set(CMAKE_C_FLAGS ${CMAKE_C_FLAGS} ${OPENMP_C_FLAGS})
    set(CMAKE_CXX_FLAGS ${CMAKE_CXX_FLAGS} ${OPENMP_CXX_FLAGS})
    set(CMAKE_EXE_LINKER_FLAGS ${CMAKE_EXE_LINKER_FLAGS} ${OpenMP_EXE_LINKER_FLAGS})
else()
    message(FATAL_ERROR "openmp not found!")
endif()

find_package(CUDA REQUIRED)
message("CUDA_INCLUDE_DIRS: ${CUDA_INCLUDE_DIRS}")

cuda_add_executable(image_load_save image_load_save.cpp rgb_to_grey.h rgb_to_grey.cu)

target_link_libraries(image_load_save ${OpenCV_LIBS})
采用cuda_add_executable构建可执行文件(正常是add_executable)
采用cuda_add_library构建链接库(正常是add_library)
理解CUDA中的网格(Grid),线程块(Block)和线程(thread)
对于CUDA的软件架构我们在逻辑上分为三个层次结构每个层次结构类型有三个维度(x,y,z),层次结构从小到大依次是Thread(线程),Block(线程块),Grid(网格)。
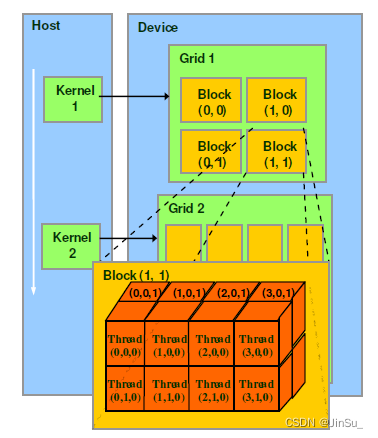
一个kernel对应一个Grid,该Grid又包含若干个Block,Block内包含若干个thread。Grid跑GPU的时候,可能是独占一个GPU,也可能是多个kernel并发占用一个GPU。
RGB图像转灰度CUDA程序
image_load_save.cpp
#include <stdlib.h>
#include <stdio.h>
#include <string.h>
#include <math.h>
#include <cuda_runtime.h>
#include <opencv2/opencv.hpp>
#include "rgb_to_grey.h"


void runTest(int argc, char **argv);

void load_image(std::string image_path, unsigned char **img_data, unsigned int& numData, int& width, int& height)
{
    cv::Mat _image_mat = cv::imread(image_path);
    width = _image_mat.cols;
    height = _image_mat.rows;
    numData = _image_mat.rows * _image_mat.cols;
    int channelNums = _image_mat.channels();

    *img_data = (unsigned char *)malloc(sizeof(unsigned char) * numData * 3);
    for (int row_id = 0; row_id < height; ++row_id)
    {
        for (int col_id = 0; col_id < width; ++col_id)
        {
            cv::Vec3b _color = _image_mat.at<cv::Vec3b>(row_id, col_id);

            *(*img_data+(row_id*width + col_id)*3 + 0) = _color[0];
            *(*img_data+(row_id*width + col_id)*3 + 1) = _color[1];
            *(*img_data+(row_id*width + col_id)*3 + 2) = _color[2];

        }
    }

}

void save_image(std::string image_path, unsigned char **img_data, int width, int height)
{
    cv::Mat _output_mat(height, width, CV_8UC1);
    _output_mat.data = *img_data;
    cv::imshow("_output_mat",_output_mat);
    cv::imwrite(image_path, _output_mat);
    cv::waitKey(0);
}

int
main(int argc, char **argv)
{
    runTest(argc, argv);
}

void readGPUMemory(){
	size_t avail;
	size_t total;
	int deviceCount=0;
	cudaGetDeviceCount(&deviceCount);              // 用deviceCount获取显卡总数量
	for(int i_dev=0;i_dev<deviceCount;i_dev++)
	{
		cudaSetDevice(i_dev);		               // 使用第i_dev张显卡作为使用的显卡
		cudaMemGetInfo(&avail, &total);            // 获取可用和总显存大小
		printf("Device %d Memeory:\n",i_dev);
		printf("Avaliable Memery = %dm   Total Memory = %dm\n", int(avail/1024/1024), int(total / 1024 / 1024));
		printf("\n");
	}
}

void
runTest(int argc, char **argv)
{

    readGPUMemory();//读取当前可用显存

    std::string _input_image = "../data/fg.jpg";
    std::string _output_image = "output.jpg";
    unsigned char *src_img = NULL;
    unsigned int numData;
    int width, height;
    load_image(_input_image, &src_img, numData, width, height);//加载图像

    unsigned int memSize = sizeof(u_char) * numData;
    unsigned int input_memSize = sizeof(u_char) * numData * 3;

    unsigned char *d_img;
    checkCudaErrors(cudaMalloc((void **) &d_img, input_memSize));//在GPU显存中开辟数据存放空间

    checkCudaErrors(cudaMemcpy(d_img,  src_img, input_memSize, cudaMemcpyHostToDevice));//从host端拷贝数据到device端


    // 定义灰度图
    unsigned char *d_odata;
    checkCudaErrors(cudaMalloc((void **) &d_odata, memSize));//在GPU显存中开辟数据存放空间

    unsigned char *h_odata = (unsigned char *)malloc(memSize);

    for (unsigned int i = 0; i < numData; i++)
        h_odata[i] = 0;

    checkCudaErrors(cudaMemcpy(d_odata, h_odata, memSize, cudaMemcpyHostToDevice));//从host端拷贝数据到device端

    readGPUMemory();
    convertGreyInterface(d_img, d_odata, width, height);//运行封装的cuda函数


    checkCudaErrors(cudaMemcpy(h_odata, d_odata, memSize, cudaMemcpyDeviceToHost));//从device端拷贝数据到host端
    save_image(_output_image, &h_odata, width, height);

    checkCudaErrors(cudaFree(d_odata));//释放显存
    checkCudaErrors(cudaFree(d_img));
    if (h_odata != NULL)
        free(h_odata);//释放内存
    if (src_img != NULL)
        free(src_img);

    readGPUMemory();
}
rgb_to_grey.h
#include <cuda_runtime.h>
#define blockSize_x 32
#define blockSize_y 32
#define checkCudaErrors(res) if(res!=cudaSuccess){exit(-1);}

extern "C" {

  void convertGreyInterface(unsigned char* d_img, unsigned char *d_odata, int width, int height);

}
rgb_to_grey.cu
#include <stdlib.h>
#include <stdio.h>
#include <string.h>
#include <math.h>
#include <cuda_runtime.h>
#include "rgb_to_grey.h"

int iDivUp(int a, int b)
{
    return ((a % b) != 0) ? (a / b + 1) : (a / b);
}

__device__ float getalpha(int c){
    if(c==0)return 0.114;
    if(c==1)return 0.587;
    if(c==2)return 0.299;
    return 0;
}

__global__ void
convertGrey(unsigned char* d_img, unsigned char *d_odata, int width, int height)
{
    // access thread id
    const int idx = blockDim.x * blockIdx.x + threadIdx.x;
    const int idy = blockDim.y * blockIdx.y + threadIdx.y;

    int offset = idy * width + idx;
    unsigned char _val_b = *(d_img + offset * 3 + 0);
    unsigned char _val_g = *(d_img + offset * 3 + 1);
    unsigned char _val_r = *(d_img + offset * 3 + 2);

    unsigned char out = (unsigned char)(_val_b * getalpha(0) + _val_g * getalpha(1) + _val_r * getalpha(2));
    d_odata[offset] = out;

}

extern "C" void convertGreyInterface(unsigned char* d_img, unsigned char *d_odata, int width, int height)
{
    dim3 numThreads = dim3(blockSize_x, blockSize_y, 1);
    dim3 numBlocks = dim3(iDivUp(width, numThreads.x), iDivUp(height, numThreads.y));
    convertGrey<<<numBlocks, numThreads>>>(d_img, d_odata, width, height);

}


 1143
1143

 被折叠的 条评论
为什么被折叠?
被折叠的 条评论
为什么被折叠?
 到【灌水乐园】发言


