


from PIL import Image
import os
import numpy as np
import torch
import torch.nn as nn
import copy
from torch.autograd import Variable
from torchvision import models
import matplotlib.cm as mpl_color_map


def preprocess(pil_im, resize=True):
    """
        Processes image for CNNs

    Args:
        PIL_img (PIL_img): PIL Image or numpy array to process
        resize_im (bool): Resize to 224 or not
    returns:
        im_as_var (torch variable): Variable that contains processed float tensor
    """
    mean = [0.485, 0.456, 0.406]
    std = [0.229, 0.224, 0.225] # mean and std for RGB channels in ImageNet
    if type(pil_im) != Image.Image:
        pil_im = Image.fromarray(pil_im) # convert input image to Image.image
    if resize:
        pil_im = pil_im.resize((224, 224), Image.ANTIALIAS) # resize image as width 224 and height 224
    image_array = np.float32(pil_im)
    image_array = image_array.transpose(2, 0, 1) # transpose to (D, W, H) form

    for channel, _ in enumerate(image_array):
        image_array[channel] /= 255
        image_array[channel] -= mean[channel]
        image_array[channel] /= std[channel] # normalize image array

    image_tensor = torch.from_numpy(image_array).float()
    image_tensor.unsqueeze_(0) # add one channel shaped as 1, 3, 224, 224
    image_variable = Variable(image_tensor, requires_grad=True)
    return image_variable


def get_example_params(list_index):
    """
        Gets used variables for almost all visualizations, like the image, model etc.

    Args:
        example_index (int): Image id to use from examples

    returns:
        original_image (numpy arr): Original image read from the file
        prep_img (numpy_arr): Processed image
        file_name_to_export (string): File name to export the visualizations
        pretrained_model(Pytorch model): Model to use for the operations
    """
    examples = ['../input_images/cat10.png', '../input_images/cat134.png', '../input_images/dog10014.png', '../input_images/panda1.png', '../input_images/tiger1.png']
    img_path = examples[list_index]
    file_name_to_export = img_path[img_path.rfind('/')+1:img_path.rfind('.')]
    original_image = Image.open(img_path).convert('RGB') # open as RGB format
    prep_img = preprocess(original_image)
    pretrained_model = models.alexnet(pretrained = True)
    return (original_image, prep_img, file_name_to_export, pretrained_model)


def format_np_output(np_arr):
    """
        This is a (kind of) bandaid fix to streamline saving procedure.
        It converts all the outputs to the same format which is 3xWxH with using sucecssive if clauses.

    Args:
        im_as_arr (Numpy array): Matrix of shape 1xWxH or WxH or 3xWxH
    """
    if len(np_arr.shape) == 2:
        np_arr = np.expand_dims(np_arr, axis=0) # case 1: append one dimension
    if np_arr.shape[0] == 1:
        np_arr = np.repeat(np_arr, 3, axis=0) # case 2: 1xWxH --> 3xWxH
    if np_arr.shape[0] == 3:
        np_arr = np_arr.transpose(1, 2, 0) # case 3: WxHx3
    if np.max(np_arr) <= 1:
        np_arr = (np_arr * 255).astype(np.uint8) # case 4: if normalized then x255
    return np_arr


def save_img(im_to_save, save_path):
    """
        Saves a numpy matrix or PIL image as an image

    Args:
        im_as_arr (Numpy array): Matrix of shape DxWxH
        path (str): Path to the image
    """
    if isinstance(im_to_save, np.ndarray):
        im_to_save = format_np_output(im_to_save)
        im_to_save = Image.fromarray(im_to_save)
    im_to_save.save(save_path)


def apply_colormap_to_image(origin_img, activation_map, colormap_type):
    """
        Apply heatmap on image

    Args:
        org_img (PIL img): Original image
        activation_map (numpy arr): Activation map (grayscale) 0-255
        colormap_name (str): Name of the colormap
    """
    color_map = mpl_color_map.get_cmap(colormap_type) # get colormap of hsv format
    no_trans_heatmap = color_map(activation_map)

    heatmap = copy.deepcopy(no_trans_heatmap)
    heatmap[:, :, 3] = 0.4 # change alpha
    heatmap = Image.fromarray((heatmap * 255).astype(np.uint8)) # heatmap image
    no_trans_heatmap = Image.fromarray((no_trans_heatmap*255).astype(np.uint8)) # no_trans_heatmap image

    heatmap_on_image = Image.new("RGBA", origin_img.size)
    heatmap_on_image = Image.alpha_composite(heatmap_on_image, origin_img.convert("RGBA"))
    heatmap_on_image = Image.alpha_composite(heatmap_on_image, heatmap) # heatmap + original image
    return no_trans_heatmap, heatmap_on_image


def save_class_activation_images(origin_img, activation_map, file_name):
    """
        Save cam activation map and activation map on the original image

    Args:
        org_img (PIL img): Original image
        activation_map (numpy arr): Activation map (grayscale) 0-255
        file_name (str): File name of the exported image
    """
    if not os.path.exists("../results"):
        os.makedirs("../results")
    heatmap, heatmap_on_image = apply_colormap_to_image(origin_img, activation_map, "hsv")
    heatmap_path = os.path.join("../results", file_name + "heatmap.png")
    save_img(heatmap, heatmap_path)
    heatmap_on_image_path = os.path.join("../results", file_name + "heatmap_on_image.png")
    save_img(heatmap_on_image, heatmap_on_image_path)
    activation_path = os.path.join("../results", file_name + "activation_map.png")
    save_img(activation_map, activation_path)


class Camextractor():
    """
        Class activation map extractor: to extract the feature at target layer
    """

    def __init__(self, model, target_layer):
        self.model = model
        self.target_layer = int(target_layer)
        self.gradient = None

    def save_gradient(self, grad):
        self.gradient = grad

    def conv_output(self, x):
        # forward pass and save conv result at target layer
        conv_out = None
        for layer_index, layer in self.model.features._modules.items():
            print("layer_index:", layer_index, "layer:", layer)
            x = layer(x) # forward for layer at layer_index
            if int(layer_index) == self.target_layer:
                x.register_hook(self.save_gradient) # register hook and save gradients
                conv_out = x
        return conv_out, x

    def forward_pass(self, x):
        # forward pass for the whole model
        conv_out, x = self.conv_output(x)
        x = x.view(x.size(0), -1) # flatten
        x = self.model.classifier(x) # classifier and if softmax added behind, then output probability of each class
        return conv_out, x

class Layercam():
    """
        Produces class activation map using LayerCam method
    """

    def __init__(self, model, target_layer):

        self.model = model
        self.model.eval() # evaluation patten, not to activate BatchNorm and Dropout
        self.target_layer = int(target_layer)
        self.extractor = Camextractor(self.model, self.target_layer)

    def generate_cam(self, input_image):

        conv_out, model_out = self.extractor.forward_pass(input_image) # forward pass and save conv result at target layer
        target_class = np.argmax(model_out.data.numpy()) # classify and get the result with maximum probability
        one_hot_out = torch.FloatTensor(1, model_out.size()[-1]).zero_()
        one_hot_out[0][target_class] = 1 # target for back propagation
        self.model.features.zero_grad()
        self.model.classifier.zero_grad() # zero gradient
        model_out.backward(gradient = one_hot_out, retain_graph = True)
        target_out = conv_out.data.numpy()[0] # target layer output
        weight = self.extractor.gradient.data.numpy()[0] # weight for gradient
        weight[weight < 0] = 0 # relu
        cam = np.sum(weight * target_out, axis=0) # element multiply between weight and target layer output, then sum
        cam = (cam - np.min(cam)) / (np.max(cam) - np.min(cam)) # normalize cam to [0, 1]
        cam = np.uint8(cam * 255) # [0, 255]
        cam = np.uint8(Image.fromarray(cam).resize((input_image.shape[2], input_image.shape[3]), Image.ANTIALIAS)) / 255
        return cam


if __name__ == "__main__":

    target_example = 4  # Tiger '../input_images/tiger1.png'
    (original_image, prep_img, file_name_to_export, pretrained_model) = get_example_params(target_example)
    layercam = Layercam(pretrained_model, target_layer=9)
    cam = layercam.generate_cam(prep_img)
    save_class_activation_images(original_image, cam, file_name_to_export)
    print('Layer cam completed')
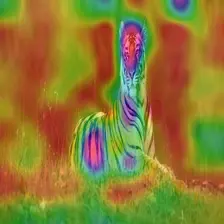
tiger1heatmap_on_image.png
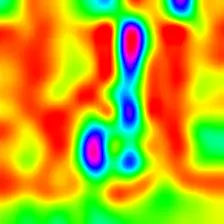
tiger1heatmap.png

tiger1activation_map.png
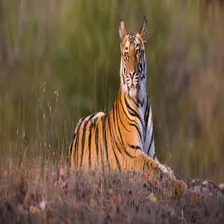
tiger1.png
AI大模型学习福利
作为一名热心肠的互联网老兵,我决定把宝贵的AI知识分享给大家。 至于能学习到多少就看你的学习毅力和能力了 。我已将重要的AI大模型资料包括AI大模型入门学习思维导图、精品AI大模型学习书籍手册、视频教程、实战学习等录播视频免费分享出来。
一、全套AGI大模型学习路线
AI大模型时代的学习之旅:从基础到前沿,掌握人工智能的核心技能!
因篇幅有限,仅展示部分资料,需要点击文章最下方名片即可前往获取
二、640套AI大模型报告合集
这套包含640份报告的合集,涵盖了AI大模型的理论研究、技术实现、行业应用等多个方面。无论您是科研人员、工程师,还是对AI大模型感兴趣的爱好者,这套报告合集都将为您提供宝贵的信息和启示。

因篇幅有限,仅展示部分资料,需要点击文章最下方名片即可前往获
三、AI大模型经典PDF籍
随着人工智能技术的飞速发展,AI大模型已经成为了当今科技领域的一大热点。这些大型预训练模型,如GPT-3、BERT、XLNet等,以其强大的语言理解和生成能力,正在改变我们对人工智能的认识。 那以下这些PDF籍就是非常不错的学习资源。

因篇幅有限,仅展示部分资料,需要点击文章最下方名片即可前往获
四、AI大模型商业化落地方案
因篇幅有限,仅展示部分资料,需要点击文章最下方名片即可前往获
作为普通人,入局大模型时代需要持续学习和实践,不断提高自己的技能和认知水平,同时也需要有责任感和伦理意识,为人工智能的健康发展贡献力量


 1276
1276

 被折叠的 条评论
为什么被折叠?
被折叠的 条评论
为什么被折叠?
 到【灌水乐园】发言


