


课程作业
https://games104.boomingtech.com/sc/course-work/
尝试自己看框架
mian 里面,首先取到 PiccoloEditor.ini 的路径
然后创建引擎类 Piccolo::PiccoloEngine(),传入配置文件的路径,初始化引擎
创建编辑器类 Piccolo::PiccoloEditor(),传入引擎实例,初始化编辑器
运行编辑器
最后退出时清空编辑器和引擎,关闭引擎
main.cpp
int main(int argc, char** argv)
{
    std::filesystem::path executable_path(argv[0]);
    std::filesystem::path config_file_path = executable_path.parent_path() / "PiccoloEditor.ini";

    Piccolo::PiccoloEngine* engine = new Piccolo::PiccoloEngine();

    engine->startEngine(config_file_path.generic_string());
    engine->initialize();

    Piccolo::PiccoloEditor* editor = new Piccolo::PiccoloEditor();
    editor->initialize(engine);

    editor->run();

    editor->clear();

    engine->clear();
    engine->shutdownEngine();

    return 0;
}
启动引擎所需要的工作主要是两个
一个是注册反射,一个是启动各个系统
这个反射我之前没写过……有点看不懂,先放着
engine.cpp
    void PiccoloEngine::startEngine(const std::string& config_file_path)
    {
        Reflection::TypeMetaRegister::metaRegister();

        g_runtime_global_context.startSystems(config_file_path);

        LOG_INFO("engine start");
    }
启动系统这里,清一色的使用共享指针管理,这很酷
https://blog.youkuaiyun.com/fl2011sx/article/details/103941346
global_context.cpp
    void RuntimeGlobalContext::startSystems(const std::string& config_file_path)
    {
        m_config_manager = std::make_shared<ConfigManager>();
        m_config_manager->initialize(config_file_path);

        m_file_system = std::make_shared<FileSystem>();

        m_logger_system = std::make_shared<LogSystem>();

        m_asset_manager = std::make_shared<AssetManager>();

        m_physics_manager = std::make_shared<PhysicsManager>();
        m_physics_manager->initialize();

        m_world_manager = std::make_shared<WorldManager>();
        m_world_manager->initialize();

        m_window_system = std::make_shared<WindowSystem>();
        WindowCreateInfo window_create_info;
        m_window_system->initialize(window_create_info);

        m_input_system = std::make_shared<InputSystem>();
        m_input_system->initialize();

        m_particle_manager = std::make_shared<ParticleManager>();
        m_particle_manager->initialize();

        m_render_system = std::make_shared<RenderSystem>();
        RenderSystemInitInfo render_init_info;
        render_init_info.window_system = m_window_system;
        m_render_system->initialize(render_init_info);

        m_debugdraw_manager = std::make_shared<DebugDrawManager>();
        m_debugdraw_manager->initialize();

        m_render_debug_config = std::make_shared<RenderDebugConfig>();
    }
ConfigManager 初始化读取配置文件,他这里就是,默认配置文件是那种,每一行就是 key=value 这种格式的
config_manager.cpp
    void ConfigManager::initialize(const std::filesystem::path& config_file_path)
    {
        // read configs
        std::ifstream config_file(config_file_path);
        std::string   config_line;
        while (std::getline(config_file, config_line))
        {
            size_t seperate_pos = config_line.find_first_of('=');
            if (seperate_pos > 0 && seperate_pos < (config_line.length() - 1))
            {
                std::string name  = config_line.substr(0, seperate_pos);
                std::string value = config_line.substr(seperate_pos + 1, config_line.length() - seperate_pos - 1);
                if (name == "BinaryRootFolder")
                {
                    m_root_folder = config_file_path.parent_path() / value;
                }
最后还是回到
editor.cpp
    void PiccoloEditor::run()
    {
        assert(m_engine_runtime);
        assert(m_editor_ui);
        float delta_time;
        while (true)
        {
            delta_time = m_engine_runtime->calculateDeltaTime();
            g_editor_global_context.m_scene_manager->tick(delta_time);
            g_editor_global_context.m_input_manager->tick(delta_time);
            if (!m_engine_runtime->tickOneFrame(delta_time))
                return;
        }
    }
之后再看进去,就是控制各个组件的 tick
很强……所以原来他就是直接在 while(true) 里面循环啊,朴实无华
就看这些吧……
看作业相关的代码
说实话,有点没懂为什么这里用 static_cast 而不是 dynamic_cast,不是说基类到子类需要检查吗
估计是已经知道这就是继承的子类,所以很有信息不会出错?
color_grading_pass.cpp
    void ColorGradingPass::initialize(const RenderPassInitInfo* init_info)
    {
        RenderPass::initialize(nullptr);

        const ColorGradingPassInitInfo* _init_info = static_cast<const ColorGradingPassInitInfo*>(init_info);
        m_framebuffer.render_pass                  = _init_info->render_pass;

        setupDescriptorSetLayout();
        setupPipelines();
        setupDescriptorSet();
        updateAfterFramebufferRecreate(_init_info->input_attachment);
    }
着色器相关
这个着色器代码是 opengl 的
说实话,这里有好多默认的东西我都不知道……所以我直接看别人代码了
https://blog.youkuaiyun.com/t1370620378/article/details/125414521
首先他这个
highp ivec2 lut_tex_size = textureSize(color_grading_lut_texture_sampler, 0);
返回的是 LUT 贴图的整数长度
而 LUT 的色块都是正方形的,所以长肯定是宽的整数倍
所以一除就是色块的个数
highp float blockNum = lutSize.x / lutSize.y;
然后他这个 LUT 每一个色块是 G R,沿着 B 排列

又因为色彩已经转换到 sRGB 空间了,而这里默认颜色值在 0 1 之间
所以只要把输入的颜色的 b 与色块数量一相乘,就能得到输入的颜色所在的 LUT 的色块位置
highp float blockIndexL = floor(color.b * blockNum);
highp float blockIndexR = ceil(color.b * blockNum);
lutSize.y 可以当作色块边长来使用
这个时候我们需要对整个 LUT 计算我的点的 UV
而输入颜色的 G 已经是 0 到 1,色块的 G 也占满了 LUT 的宽度,所以输入颜色的 G 就是 LUT UV 的 v
而要采样的点的 LUT UV 的 u 还需要计算这个像素的 x 值除以 LUT 的长度
void main()
{
    highp ivec2 lut_tex_size = textureSize(color_grading_lut_texture_sampler, 0);

    highp vec4 color = subpassLoad(in_color).rgba;

    highp vec2 lutSize = vec2(lut_tex_size.x, lut_tex_size.y);

    highp float blockNum = lutSize.x / lutSize.y;

    highp float blockIndexL = floor(color.b * blockNum);
    highp float blockIndexR = ceil(color.b * blockNum);

    highp float lutCoordXL = (blockIndexL * lutSize.y + color.r * lutSize.y) / lutSize.x;
    highp float lutCoordXR = (blockIndexR * lutSize.y + color.r * lutSize.y) / lutSize.x;

    highp float lutCoorY = color.g;

    highp vec2 lutCoordL = vec2(lutCoordXL, lutCoorY);
    highp vec2 lutCoordR = vec2(lutCoordXR, lutCoorY);

    highp vec4 lutcolorL = texture(color_grading_lut_texture_sampler, lutCoordL);
    highp vec4 lutcolorR = texture(color_grading_lut_texture_sampler, lutCoordR);

    highp float weight = fract(color.b * lutSize.y);

    out_color = mix(lutcolorL, lutcolorR, weight);
}
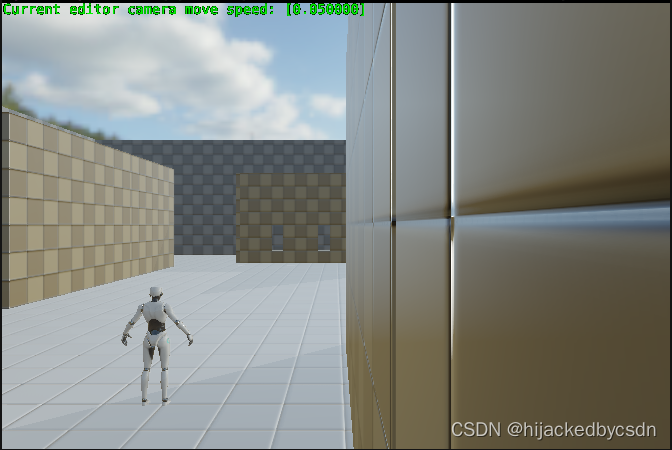
原始:
结果:
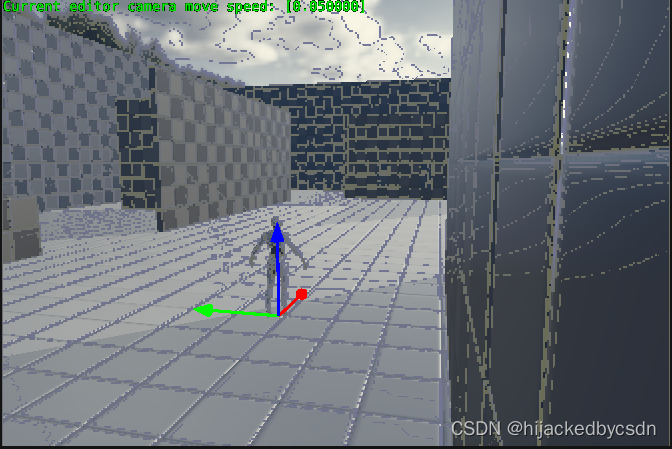
条纹问题
我又试了另一个人的代码
https://blog.youkuaiyun.com/lifesize/article/details/126183608
void main()
{
    highp ivec2 lut_tex_size = textureSize(color_grading_lut_texture_sampler, 0);

    highp float _COLORS = float(lut_tex_size.y);

    highp vec4 color = subpassLoad(in_color).rgba;

    // texture(color_grading_lut_texture_sampler, uv)

    //(小白须知:R可认为是红色的强度,G是绿色的强度,B是蓝色的强度)

    //首先根据rendering.global.json文件里面看到LUT图的路径,然后我们根据这个路径找到LUT图打开看它的样子

    //我们会发现,它从左往右有16个颜色格子,而打开它的文件属性我们可以看到这个图片的分辨率为长256,宽16。

    //而且每个格子内,越往右越红,越往下越绿,这说明单个格子内横轴方向向右为R值,竖轴方向向下为G值,u方向为横轴向右,v方向为纵轴向下

    //那么32个格子就是32种不同的B值下,对应的R和G值的图。如果用三维的色彩空间来表示的话会更直观

    //那么我们现在就要得到该像素点对应地在LUT图的单个格子中,以格子左上角顶点建系,求该像素点对应的LUT图在单个格子中对应的坐标

    //注意,这里的位置下标的单位长度为1个像素,就是在LUT图的单个格子上一个像素一个像素地数

    highp float red_subscript = (_COLORS-1.0)*color.r;

    highp float green_subscript = (_COLORS-1.0)*color.g;

    highp float blue_subscript = (_COLORS-1.0)*color.b;

    highp float x_size = float(lut_tex_size.x);//求LUT图的横轴长度,一个像素点一个像素点地数

    //因为决定在哪个格子上取色采样的是B值,所以我们要用基础色的B值决定横轴坐标u

    highp float x1  =red_subscript+ceil(blue_subscript)*_COLORS;//ceil(x)是求不大于x的最大整数

    highp float u1 = x1/x_size;//因为读取LUT图用的坐标是uv坐标系,u和v的取值范围都是[0,1],所以这里除以LUT图的横向像素点数就转化为了uv坐标系

    highp float x2 = red_subscript+floor(blue_subscript)*_COLORS;//floor(x)是求大于x的最小整数

    highp float u2 = x2/x_size;

    //为什么上面我们要求两个u值,而且一个偏大一个偏小?

    //因为后面我们要对LUT图采样得到的值偏大的和偏小的按合理的比例混合得出合适的输出颜色,提高输出值的精度,防止走样

    //现在我们要根据u值求出v值,v值是由绿色也就是G值确定的

    highp float y = green_subscript;

    highp float v = y/_COLORS;//xy坐标系转化为uv坐标系

    //采样,在LUT图上采取一大一小两个样本

    highp vec2 p1 = vec2(u1,v);

    highp vec2 p2 = vec2(u2,v);

    highp vec3 color1 = texture(color_grading_lut_texture_sampler,p1).xyz;

    highp vec3 color2 = texture(color_grading_lut_texture_sampler,p2).xyz;

    //混合,其中frack是取小数部分的意思,按混合比例就是从前一个格子过度到后一个格子之间取舍,这里看颜色RGB的三维坐标系色彩空间图的话理解起来比较直观

    highp vec3 mixed_color = mix(color2,color1,fract(blue_subscript));

    out_color = vec4(mixed_color,color.a);
}
结果还是一样
其实仔细一看,这个场景中的大部分颜色都是正确的,比如说,你可以看到墙上的高光会很柔和
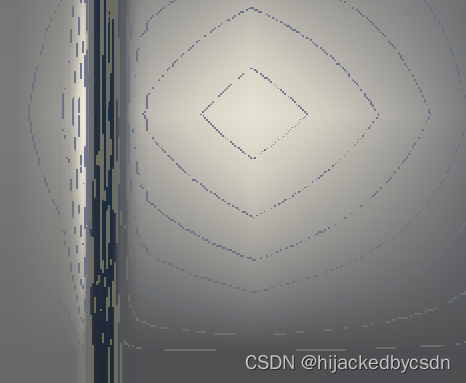
再仔细看这个 LUT,这些条纹颜色都出现在哪
我觉得这些条纹都出现在左上角和右下角,所以我猜测可能是输入的颜色超出了范围
但是钳制一下就知道不是
然后我感觉这个又跟天空盒有关,毕竟天空盒中的条纹是不会变的,并且似乎,如果我看不到天空盒,也会出现与天空盒有关的条纹


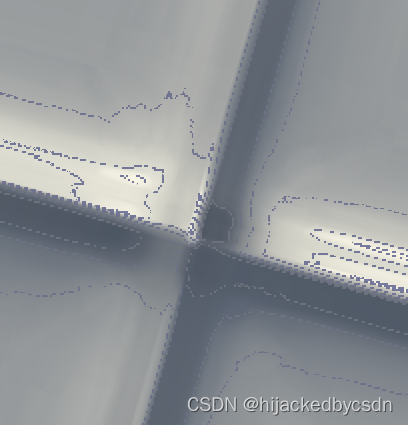
解决方法:之后才看到最后的代码讲解视频
他一下就发现了,是 mipmap 的精度问题
应该只生成一级 mipmap
在生成纹理的地方指定生成一级 mipmap
engine\source\runtime\function\render\render_resource.cpp
        // create color grading texture
        rhi->createGlobalImage(
            m_global_render_resource._color_grading_resource._color_grading_LUT_texture_image,
            m_global_render_resource._color_grading_resource._color_grading_LUT_texture_image_view,
            m_global_render_resource._color_grading_resource._color_grading_LUT_texture_image_allocation,
            color_grading_map->m_width,
            color_grading_map->m_height,
            color_grading_map->m_pixels,
            color_grading_map->m_format, 1);


 2336
2336

 被折叠的 条评论
为什么被折叠?
被折叠的 条评论
为什么被折叠?
 到【灌水乐园】发言


