


第二章节通过我们的不断训练,在模型训练完成后,将 ONNX 模型转换为RKNN模型( RKNN 模
型已经被编译进了 pt 权重文件),RKNN 模型是设备运行的最终模型文件,用于最新图片推理。
本人的设备是一个基于 Buildroot 嵌入式 Linux 系统的 Rockchip RK3568 开发板( MYIR 核心模
块),以下是设备的具体信息:
root@myd-lr3568x:/# cat /etc/os-release
NAME=Buildroot (轻量级嵌入式 Linux 生成工具)
VERSION=-ga9d013f03c-dirty
ID=buildroot
VERSION_ID=2021.11
PRETTY_NAME="Buildroot 2021.11"
ID_LIKE="buildroot"
RK_BUILD_INFO="lizhi@b42bd3ad846a Tue Jun 18 09:54:48 UTC 2024 - rockchip_rk3568_myir_core"
root@myd-lr3568x:/# uname -a
Linux myd-lr3568x 5.10.198 #18 SMP Mon Jun 17 10:06:58 UTC 2024 aarch64 GNU/Linux
root@myd-lr3568x:/# python3 --version
Python 3.10.5
验证硬件平台
uname -m
# 结果 aarch64
cat /proc/device-tree/model
# 结果 MYIR MYD-LR3568X Board

那么在 RK3568 设备上如何使用 RKNN 模型来推理验证新的图片或者视频呢?
一、硬件环境
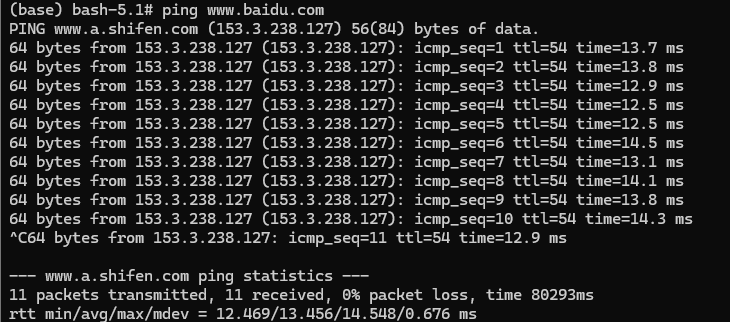
首先我们要确保硬件环境要有网络,后续我们的下载和安装都依赖于设备有网络
ping www.baidu.com 发现 ping 不通
有两种方式可以使之能够 ping 通:
1.使用 sim 卡 --- 暂时没使用,没有多余的 sim 卡
2.连接 wifi --- 采用
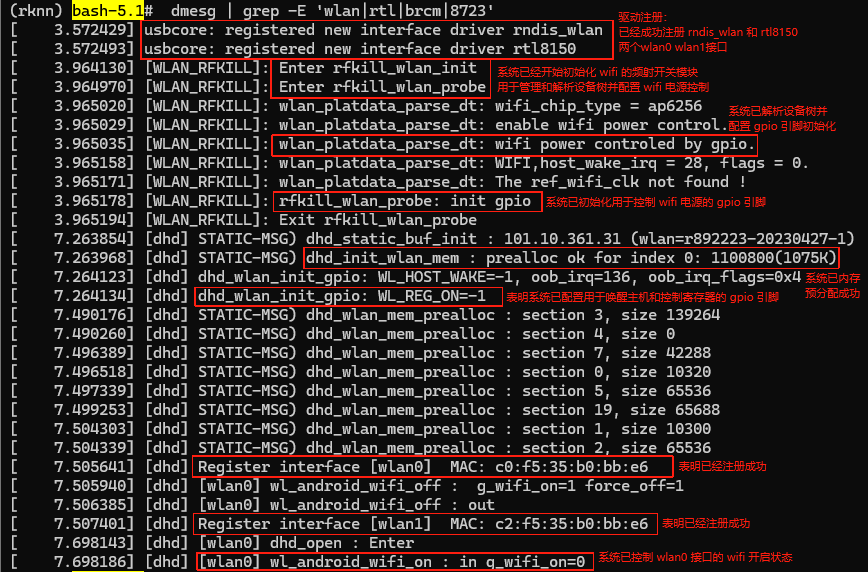
①查看 wifi 驱动的加载和初始化信息
需要使用 dmesg 命令并结合 grep 工具筛选包含关键字 "wlan"、"rtl"、"brcm" 或 "8723" 的日志行
dmesg | grep -E 'wlan|rtl|brcm|8723'
从打印来看,可以看到驱动已经正常加载,如下图:
②输入要连接的 wifi 到临时文件
wpa_passphrase "wifi名称" "密码" > /tmp/wpa.conf
③连接 wpa 加密无线网络的客户端程序
wpa_supplicant -B -i wlan0 -c /tmp/wpa.conf
如果出现 Match already configured,这是之前多次执行了 wpa_supplicant 而没有显式停掉,有多
个后台进程在同时运行。先把它们都 kill 掉,再重新启动一遍。
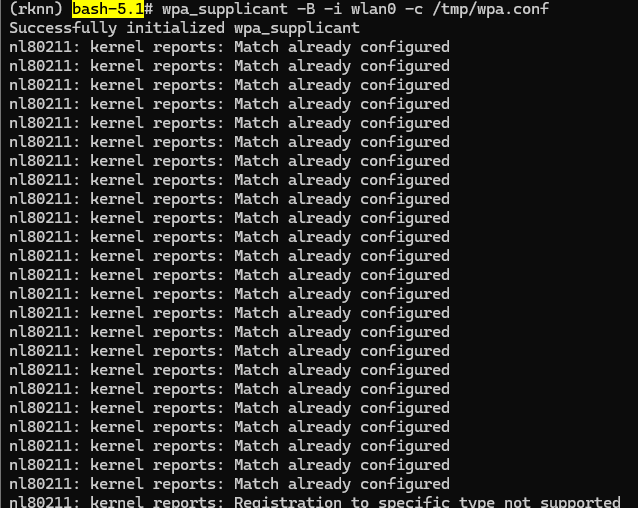
killall wpa_supplicant
wpa_supplicant -B -i wlan0 -c /tmp/wpa.conf
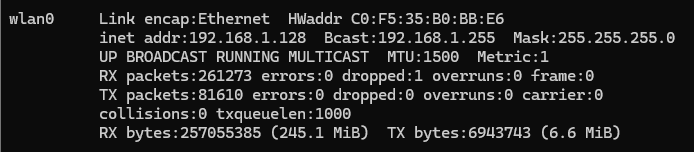
④通过 dhcp 客户端程序自动获取ip地址
udhcpc -i wlan0
之后就可以正常上网 ping www.baidu.com 成功
二、部署运行环境
1.下载依赖文件到 root
我第二章节训练出的RKNN模型是基于v2.3.2的,所以运行环境需要按照V2.3.2版本部署,不然可能会版本不兼容。
(运行环境需要和训练环境的版本保持一致,如果你训练环境是别的版本,也可以下载另外版本的文件导入设备)
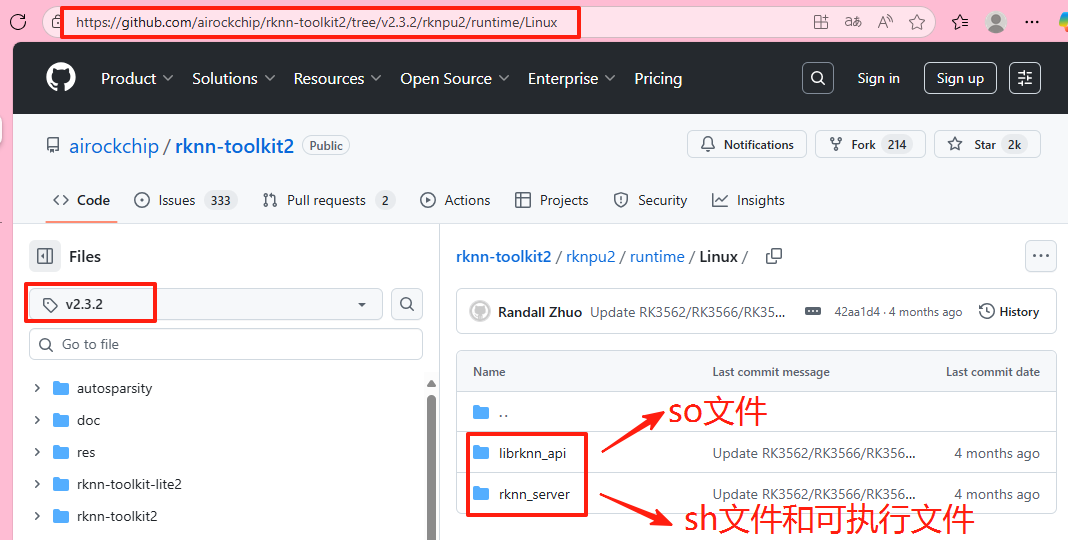
2.3.2版本的runtime:
https://github.com/airockchip/rknn-toolkit2/tree/v2.3.2/rknpu2/runtime/Linux这是一个 git 网页,找到以下四个文件,下载到本地,导入设备 root 路径下:
(1)librknnrt.so
(2)restart_rknn.sh
(3)start_rknn.sh
(4)rknn_server
2.复制文件到系统目录
# lib 文件
cd /root
cp ./librknnrt.so /usr/lib/
# sh 脚本和可执行文件
cd /root
cp ./restart_rknn.sh /usr/bin/
cp ./start_rknn.sh /usr/bin/
cp ./rknn_server /usr/bin/
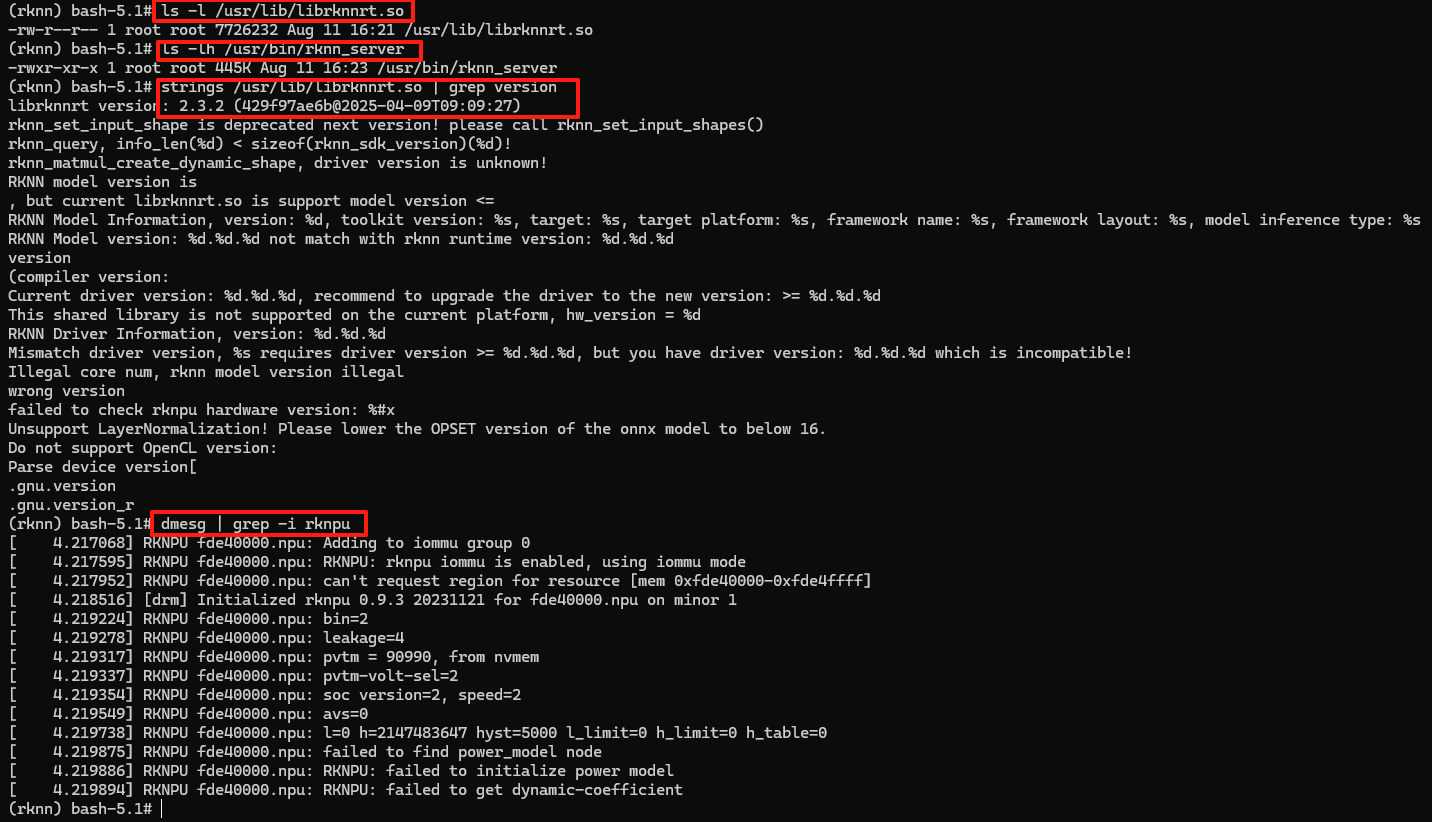
3.验证安装
# 检查文件是否存在
ls -l /usr/lib/librknnrt.so
ls -lh /usr/bin/rknn_server
# 查看库版本
strings /usr/lib/librknnrt.so | grep version
# 检查 NPU 驱动版本(若在真实设备)
dmesg | grep -i rknpu
4.添加环境变量和权限
export LD_LIBRARY_PATH=/usr/lib
chmod +x /usr/bin/rknn_server /usr/bin/start_rknn.sh
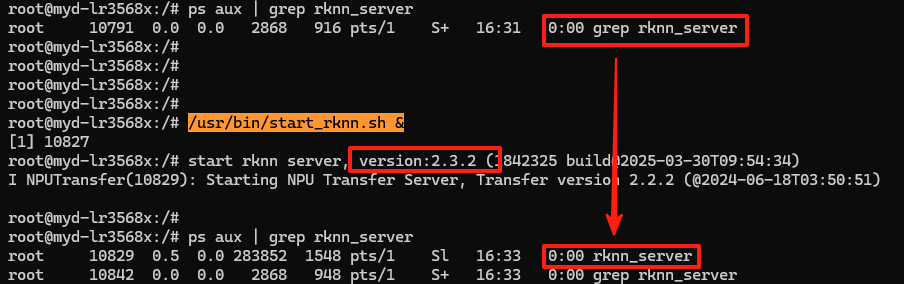
5.启动 rknn_server 服务(后台运行)
# 启动
/usr/bin/start_rknn.sh &
# 检查服务是否运行
ps aux | grep rknn_server# 如果之前已经有正在运行的了,导致 /usr/bin/start_rknn.sh & 失败
ps aux# 可以看到正在运行
root 3578 0.0 0.1 3472 2264 ? S 11:07 0:00 /bin/sh /usr/bin/start_rknn.sh
root 10705 0.5 0.0 283852 1540 ? Sl 16:28 0:00 rknn_server
# 使用 kill -9 强制删除
kill -9 3578
kill -9 10705
# 然后再次执行 /usr/bin/start_rknn.sh &
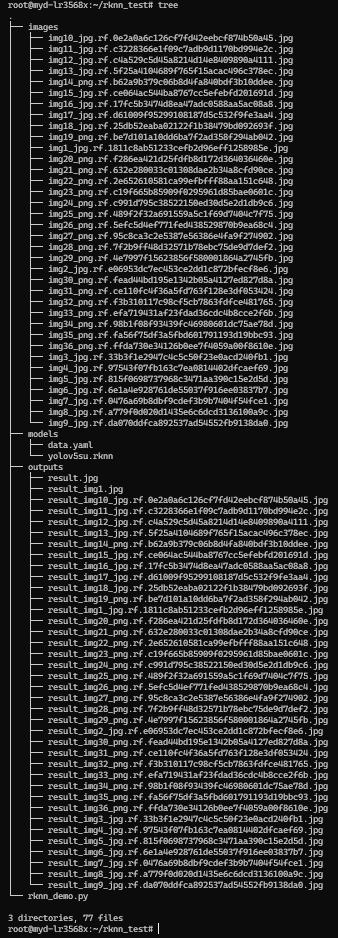
6.创建目录
mkdir -p ~/rknn_test/{models,images,outputs}
示例:
/root/rknn_test/
├── models/ # 存放 RKNN 模型文件
├── images/ # 存放测试图片
└── outputs/ # 存放推理结果# 目录加权限
chmod 755 -R ~/rknn_test
将我们训练出来的 RKNN 模型和 data.yaml 文件导入到 models 路径下
需要测试的图片和视频可以导入到 images 路径下
7.安装 Miniconda 并激活
# 使用 Python 3.8 版本的 Miniconda
wget https://repo.anaconda.com/miniconda/Miniconda3-py38_23.11.0-2-Linux-aarch64.shPS:
设备没办法使用 wget 指令,也安装不了,所以就在PC本地下载好,使用 adb 导进去
清华镜像源:
wget https://mirrors.tuna.tsinghua.edu.cn/anaconda/miniconda/Miniconda3-py38_23.11.0-2-Linux-aarch64.sh# 如果之前安装过 miniconda 版本不一致则需要先删除
rm -rf ~/miniconda
# 安装时添加 `-u` 参数强制覆盖(避免残留问题)
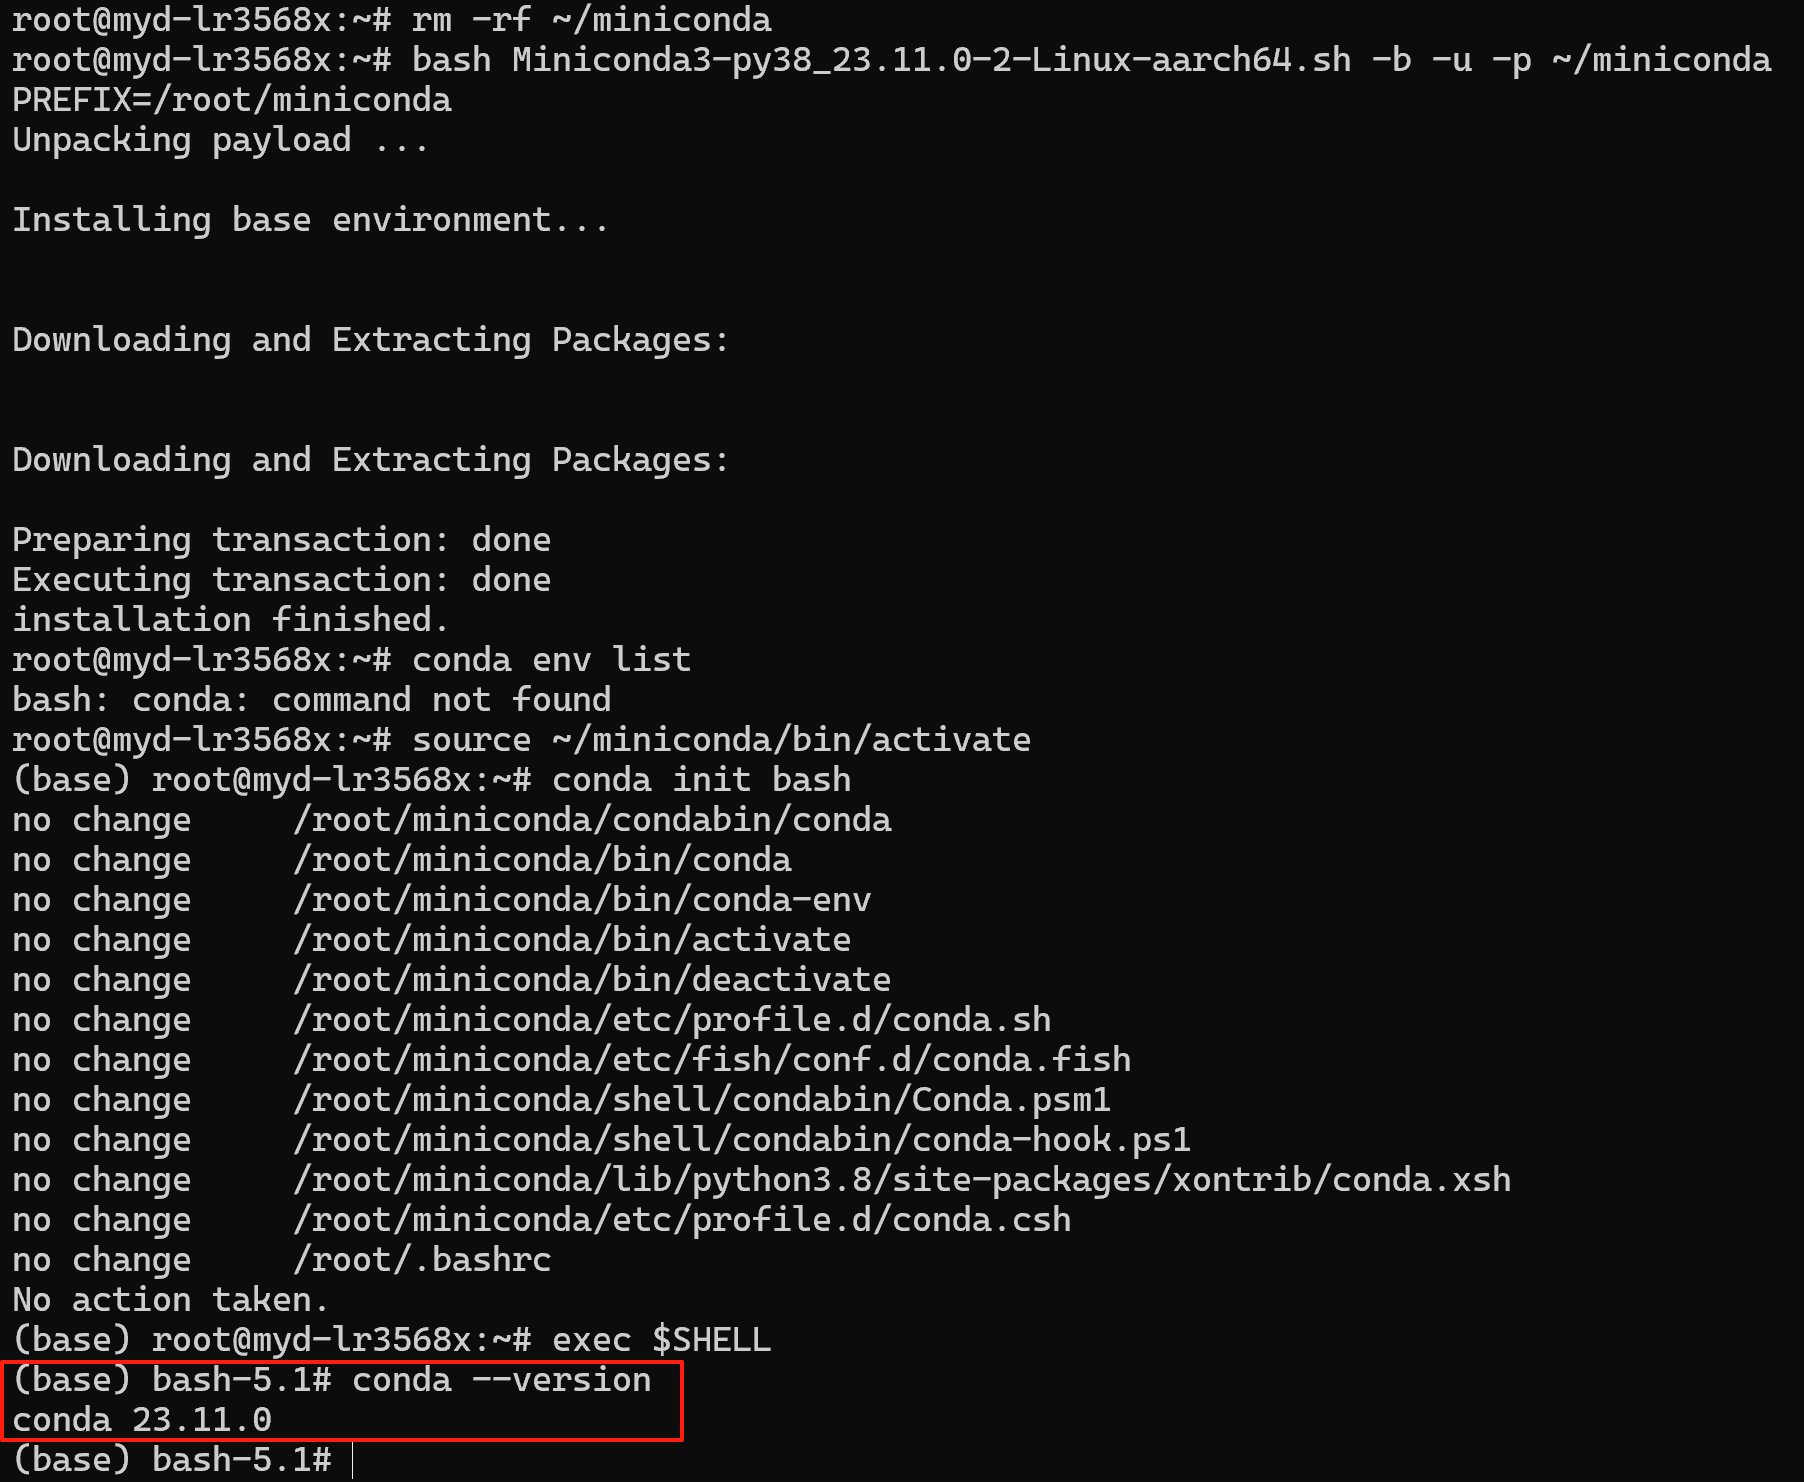
bash Miniconda3-py38_23.11.0-2-Linux-aarch64.sh -b -u -p ~/miniconda
# 初始化环境
source ~/miniconda/bin/activate
conda init bash# 重启shell生效
exec $SHELL#检查是否生效
conda --version
![]()
8.配置 canda 清华镜像源
conda config --add channels https://mirrors.tuna.tsinghua.edu.cn/anaconda/pkgs/main
conda config --add channels https://mirrors.tuna.tsinghua.edu.cn/anaconda/pkgs/r
conda config --set show_channel_urls yes
清除索引缓存
conda clean -i

如果出现这样的打印,说明之前已经配置过了
9.创建最小环境
# 更新为 3.8 版本
如果之前已经创建有 rknn canda 环境,版本不一致,则需要删除旧环境,重新创建新环境
# 先退出当前环境,退出到 base 环境
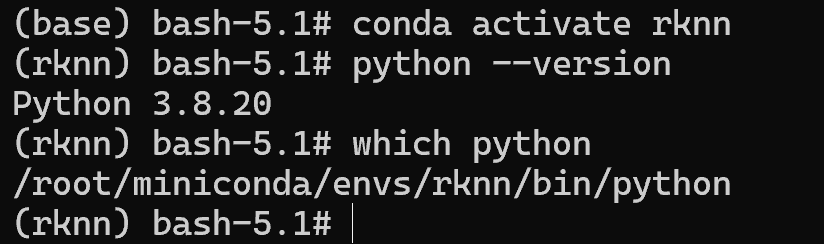
conda deactivate
# 删除所有旧的 rknn 环境
conda remove -n rknn --all -y# 创建 python 3.8
conda create -n rknn python=3.8 -y
# 激活
conda activate rknn
# 检查是否为 3.8.x
python --version
which python # 应显示 /root/miniconda/envs/rknn/bin/python
10.在 conda 环境中安装 pip
conda install -n rknn pip -y
11.在激活的 rknn 环境中执行
# git 下载 whl 文件到本地 PC 端
https://github.com/airockchip/rknn-toolkit2/blob/v2.3.2/rknn_toolkit_lite2/packages/rknn_toolkit_lite2-2.3.2-cp38-cp38-manylinux_2_17_aarch64.manylinux2014_aarch64.whl
# 将 whl 文件导入设备 root 路径下
# 在激活的 rknn 环境执行
unset PYTHONPATH
export PYTHONNOUSERSITE=1
export PYTHONHOME=/root/miniconda/envs/rknn# 安装必要组件
pip install /root/rknn_toolkit_lite2-2.3.2-cp38-cp38-manylinux_2_17_aarch64.manylinux2014_aarch64.whl# 验证 pip 安装成功
pip list | grep rknn
# 输出 rknn-toolkit-lite2 2.3.2

12.在 conda 环境安装必要的 python 包
# 永久修改pip源 ---会报错,详情见【BUG1】
pip config set global.index-url https://pypi.tuna.tsinghua.edu.cn/simple
pip install numpy opencv-python# 安装 PyYAML 包
如果代码中 import yaml 则需要安装,否则不需要
pip install pyyaml
# 安装 tqdm 进度条库
如果代码中 from tqdm import tqdm 则需要安装,否则不需要
pip install tqdm
13.开始推理
确保测试图片放入 ~/rknn_test/images/ 目录
RKNN模型文件(.rknn)和 data.yaml 文件放入 ~/rknn_test/models/ 目录
在 ~/rknn_test 目录中导入推理脚本 rknn_demo.py,代码如下:
#!/usr/bin/env python3
import os
import cv2
import numpy as np
from rknnlite.api import RKNNLite
import yaml
import time
from concurrent.futures import ThreadPoolExecutor
from tqdm import tqdm
import json
class BatchYOLOv5RKNN:
def __init__(self, model_path, yaml_path):
self.classes = self._load_classes(yaml_path)
self.rknn = self._init_rknn(model_path)
self.input_size = 640
self.conf_thres = 0.25
self.iou_thres = 0.45
self.total_time = 0
self.total_images = 0
self.detection_stats = {}
def _load_classes(self, yaml_path):
with open(yaml_path, 'r') as f:
return yaml.safe_load(f)['names']
def _init_rknn(self, model_path):
rknn = RKNNLite()
if rknn.load_rknn(model_path) != 0:
raise RuntimeError("Load RKNN model failed")
if rknn.init_runtime(target='rk3568', core_mask=RKNNLite.NPU_CORE_0_1_2) != 0:
raise RuntimeError("Init runtime failed")
return rknn
def process_image(self, img_path):
try:
img = cv2.imread(img_path)
if img is None:
print(f"Warning: Failed to read {img_path}")
return None, None
start_time = time.time()
blob, (scale, padding), orig_shape = self.preprocess(img)
outputs = self.inference(blob)
detections = self.postprocess(outputs, scale, padding, orig_shape)
result = self.visualize(img.copy(), detections)
process_time = time.time() - start_time
self.total_time += process_time
self.total_images += 1
# Update detection statistics
for det in detections:
cls_name = self.classes[int(det[5])]
self.detection_stats[cls_name] = self.detection_stats.get(cls_name, 0) + 1
return result, detections
except Exception as e:
print(f"Error processing {img_path}: {str(e)}")
return None, None
def process_batch(self, input_dir, output_dir, max_workers=4):
os.makedirs(output_dir, exist_ok=True)
image_paths = [os.path.join(input_dir, f) for f in os.listdir(input_dir)
if f.lower().endswith(('.jpg', '.jpeg', '.png'))]
results = []
with ThreadPoolExecutor(max_workers=max_workers) as executor:
futures = []
for img_path in image_paths:
futures.append(executor.submit(self.process_image, img_path))
for future, img_path in tqdm(zip(futures, image_paths), total=len(image_paths)):
result, detections = future.result()
if result is not None:
base_name = os.path.basename(img_path)
output_path = os.path.join(output_dir, f"det_{base_name}")
cv2.imwrite(output_path, result)
# Save detection results
json_path = os.path.join(output_dir, f"det_{os.path.splitext(base_name)[0]}.json")
with open(json_path, 'w') as f:
json.dump({
'image': base_name,
'detections': detections,
'classes': [self.classes[int(d[5])] for d in detections]
}, f, indent=2)
results.append((img_path, detections))
self.save_summary(output_dir)
return results
def save_summary(self, output_dir):
summary = {
"total_images": self.total_images,
"total_time": self.total_time,
"avg_time": self.total_time / max(1, self.total_images),
"detection_stats": self.detection_stats,
"classes": self.classes
}
with open(os.path.join(output_dir, "summary.json"), 'w') as f:
json.dump(summary, f, indent=2)
print(f"\nProcessing Summary:")
print(f"Total images processed: {self.total_images}")
print(f"Total processing time: {self.total_time:.2f}s")
print(f"Average time per image: {summary['avg_time']:.4f}s")
print("\nDetection Statistics:")
for cls, count in self.detection_stats.items():
print(f"{cls}: {count} detections")
# [保留原有的预处理、推理、后处理和可视化方法...]
def main():
detector = BatchYOLOv5RKNN(
"models/yolov5su.rknn",
"models/data.yaml")
input_dir = "images"
output_dir = "outputs"
if not os.path.exists(input_dir):
raise FileNotFoundError(f"Input directory {input_dir} not found")
print(f"Starting batch processing from {input_dir} to {output_dir}")
detector.process_batch(input_dir, output_dir)
print("Processing completed")
if __name__ == "__main__":
main()
# 舍弃了
#!/usr/bin/env python3
import os
import cv2
import numpy as np
from rknnlite.api import RKNNLite
import yaml
def load_classes(yaml_path):
"""从YOLOv5的yaml文件加载类别名称"""
with open(yaml_path, 'r') as f:
data = yaml.safe_load(f)
return data['names']
def preprocess(image, input_size=640):
"""
YOLOv5标准预处理:
1. letterbox保持宽高比
2. BGR转RGB
3. 归一化到0-1
4. 转NCHW格式
"""
# Letterbox缩放
h, w = image.shape[:2]
scale = min(input_size / w, input_size / h)
nw, nh = int(w * scale), int(h * scale)
resized = cv2.resize(image, (nw, nh))
# 创建画布
canvas = np.full((input_size, input_size, 3), 114, dtype=np.uint8)
dx = (input_size - nw) // 2
dy = (input_size - nh) // 2
canvas[dy:dy+nh, dx:dx+nw] = resized
# 预处理参数
padded = canvas.astype(np.float32) / 255.0
padded = padded.transpose(2, 0, 1)[np.newaxis, ...] # HWC to NCHW
return padded, (scale, (dx, dy)), (w, h)
def xywh2xyxy(x):
"""将中心坐标(x,y,w,h)转换为边界框坐标(x1,y1,x2,y2)"""
y = np.copy(x)
y[:, 0] = x[:, 0] - x[:, 2] / 2 # x1
y[:, 1] = x[:, 1] - x[:, 3] / 2 # y1
y[:, 2] = x[:, 0] + x[:, 2] / 2 # x2
y[:, 3] = x[:, 1] + x[:, 3] / 2 # y2
return y
def nms(boxes, scores, iou_threshold):
"""非极大值抑制"""
indices = cv2.dnn.NMSBoxes(
bboxes=boxes.tolist(),
scores=scores.tolist(),
score_threshold=0.25,
nms_threshold=iou_threshold
)
return np.array(indices).flatten() if len(indices) > 0 else []
def scale_coords(coords, scale, padding, orig_shape):
"""将坐标从预处理尺寸映射回原始图像尺寸"""
coords[:, [0, 2]] = (coords[:, [0, 2]] - padding[0]) / scale
coords[:, [1, 3]] = (coords[:, [1, 3]] - padding[1]) / scale
# 裁剪到图像边界内
coords[:, 0] = np.clip(coords[:, 0], 0, orig_shape[0])
coords[:, 1] = np.clip(coords[:, 1], 0, orig_shape[1])
coords[:, 2] = np.clip(coords[:, 2], 0, orig_shape[0])
coords[:, 3] = np.clip(coords[:, 3], 0, orig_shape[1])
return coords
def postprocess(outputs, scale, padding, orig_shape, classes, conf_thres=0.25, iou_thres=0.45):
"""
YOLOv5后处理:
1. 合并多尺度输出
2. 应用置信度阈值
3. 执行NMS
4. 缩放坐标
"""
# 合并输出层
predictions = []
for output in outputs:
# 输出形状: [1, 3, 80, 80, 85]
output = output.reshape((output.shape[0], 3, -1, output.shape[-1]))
predictions.append(output)
pred = np.concatenate(predictions, axis=2)[0] # [3, N, 85]
# 过滤低置信度检测
conf_mask = (pred[..., 4] > conf_thres)
pred = pred[conf_mask]
if len(pred) == 0:
return [], []
# 解析边界框
boxes = xywh2xyxy(pred[:, :4])
scores = pred[:, 4] * np.max(pred[:, 5:], axis=1) # obj_conf * cls_conf
class_ids = np.argmax(pred[:, 5:], axis=1)
# 应用NMS
indices = nms(boxes, scores, iou_thres)
if len(indices) == 0:
return [], []
# 提取最终检测
final_boxes = boxes[indices]
final_scores = scores[indices]
final_class_ids = class_ids[indices]
# 缩放坐标到原始图像
final_boxes = scale_coords(final_boxes, scale, padding, orig_shape)
# 组织检测结果
detections = []
detected_classes = set()
for i in range(len(final_boxes)):
x1, y1, x2, y2 = final_boxes[i]
conf = final_scores[i]
cls_id = final_class_ids[i]
detections.append([x1, y1, x2, y2, conf, cls_id])
detected_classes.add(classes[cls_id])
return detections, detected_classes
def draw_detections(image, detections, classes):
"""在图像上绘制检测结果"""
img_out = image.copy()
for det in detections:
x1, y1, x2, y2, conf, cls_id = det
label = f"{classes[cls_id]} {conf:.2f}"
# 绘制边界框
cv2.rectangle(img_out, (int(x1), int(y1)), (int(x2), int(y2)),
(0, 255, 0), 2)
# 绘制标签背景
(tw, th), _ = cv2.getTextSize(label, cv2.FONT_HERSHEY_SIMPLEX, 0.6, 1)
cv2.rectangle(img_out, (int(x1), int(y1) - 20),
(int(x1) + tw, int(y1)), (0, 255, 0), -1)
# 绘制文本
cv2.putText(img_out, label, (int(x1), int(y1) - 5),
cv2.FONT_HERSHEY_SIMPLEX, 0.6, (0, 0, 0), 2)
return img_out
def process_image(rknn, image_path, classes, input_size=640):
"""处理单张图像"""
# 读取图像
orig_img = cv2.imread(image_path)
if orig_img is None:
print(f"错误: 无法加载图像 {image_path}")
return None, set()
# 预处理
img, (scale, padding), orig_shape = preprocess(orig_img.copy(), input_size)
# 推理
try:
outputs = rknn.inference(inputs=[img])
except Exception as e:
print(f"推理失败: {str(e)}")
return orig_img, set()
# 后处理
detections, detected_classes = postprocess(
outputs, scale, padding, orig_shape, classes
)
# 绘制结果
result_img = draw_detections(orig_img, detections, classes)
return result_img, detected_classes
def main():
# 配置参数
MODEL_PATH = "models/yolov5su.rknn"
DATA_YAML = "models/data.yaml" # YOLOv5数据配置文件
IMAGE_DIR = "images"
OUTPUT_DIR = "outputs"
INPUT_SIZE = 640
# 加载类别
classes = load_classes(DATA_YAML)
print(f"加载类别: {classes}")
# 初始化RKNN
rknn = RKNNLite()
# 加载模型
if rknn.load_rknn(MODEL_PATH) != 0:
print("错误: 加载RKNN模型失败")
return
# 初始化运行时
ret = rknn.init_runtime()
if ret != 0:
print(f"错误: 初始化运行时失败 ({ret})")
return
# 确保输出目录存在
os.makedirs(OUTPUT_DIR, exist_ok=True)
# 处理所有图像
processed_count = 0
for filename in os.listdir(IMAGE_DIR):
if filename.lower().endswith(('.png', '.jpg', '.jpeg')):
image_path = os.path.join(IMAGE_DIR, filename)
output_path = os.path.join(OUTPUT_DIR, f"detect_{filename}")
print(f"\n处理: {filename}")
result_img, detected_classes = process_image(rknn, image_path, classes, INPUT_SIZE)
if result_img is not None:
cv2.imwrite(output_path, result_img)
print(f"保存结果: {output_path}")
if detected_classes:
print(f"检测到: {', '.join(detected_classes)}")
else:
print("未检测到目标")
processed_count += 1
# 释放资源
rknn.release()
print(f"\n处理完成! 共处理 {processed_count} 张图像")
if __name__ == '__main__':
main()
14.推理报错:
【BUG1】
错误表明 OpenCV (cv2) 需要系统图形库 libGL.so.1,但嵌入式环境可能缺少这个依赖
安装 headless 版 OpenCV(推荐)

修复步骤:
# 在 rknn 环境中操作
conda activate rknn# 先卸载现有 opencv
pip uninstall opencv-python -y# 安装 headless 版本(无GUI依赖)
pip install opencv-python-headless -i https://pypi.tuna.tsinghua.edu.cn/simple# 验证安装
python -c "import cv2; print(f'OpenCV version: {cv2.__version__}')"


 被折叠的 条评论
为什么被折叠?
被折叠的 条评论
为什么被折叠?
 到【灌水乐园】发言


