


在使用vscode+plateformio开发环境编译项目https://github.com/atuline/WLED时,报错:
PackageException: Package version 2.0.4+sha.dcfbcd7 doesn't satisfy requirements 2.9.2+sha.419d7b0 based on PackageMetadata <type=library name=arduinoFFT version=2.0.4+sha.dcfbcd7 spec={'owner': None, 'id': None, 'name': 'arduinoFFT', 'requirements': '2.9.2+sha.419d7b0', 'uri': 'git+https://github.com/kosme/arduinoFFT#develop'}
该错误表明 PlatformIO 管理的 arduinoFFT 库版本不符合项目所需版本。WLED 的音频响应功能依赖 arduinoFFT 库的特定版本 (commit 419d7b0),而当前安装的版本 (2.0.4+sha.dcfbcd7) 与之不符。这会导致编译过程无法继续wled.discourse.group。
解决方案:
修改 platformio.ini 中 两个地方出现 arduinoFFT 的 lib_deps 设置,以确保 PlatformIO 安装正确的版本(commit 419d7b0),从而解决报错:
步骤1:在 [env] 的公共依赖中修改 lib_deps
找到这一段(约在第 250 行):
lib_deps =
    fastled/FastLED @ ~3.6.0
    ...
    https://github.com/kosme/arduinoFFT#develop @ 1.9.2+sha.419d7b0
将这一行改为:
https://github.com/kosme/arduinoFFT.git#419d7b0
完整示例如下:
lib_deps =
    fastled/FastLED @ ~3.6.0
    IRremoteESP8266 @ ~2.8.2
    https://github.com/lost-hope/ESPAsyncWebServer.git#master
    https://github.com/kosme/arduinoFFT.git#419d7b0
步骤2:在 [esp32] 环境的 lib_deps 中做相同修改
找到这一段(约在第 400 行):
lib_deps =
  ...
  https://github.com/kosme/arduinoFFT#develop @ 2.9.2+sha.419d7b0
  ${env.lib_deps}
改为:
https://github.com/kosme/arduinoFFT.git#419d7b0
lib_deps =
  https://github.com/softhack007/LITTLEFS-threadsafe.git#master
  makuna/NeoPixelBus @ 2.7.1
  https://github.com/pbolduc/AsyncTCP.git @ 1.2.0
  https://github.com/kosme/arduinoFFT.git#419d7b0
  ${env.lib_deps}
修改后执行以下命令:
pio run -t clean
然后再重新编译:
pio run后续出现第二种报错:
Error: Multiple requests to rebuild the project "WLED-master" index have been received! Automatic index rebuilding process has been terminated for 10 minutes. at VA.requestRebuild (c:\Users\14778\.vscode\extensions\platformio.platformio-ide-3.3.4-win32-x64\node_modules\platformio-node-helpers\dist\index.js:1:966228) at JA.rebuildIndex (c:\Users\14778\.vscode\extensions\platformio.platformio-ide-3.3.4-win32-x64\node_modules\platformio-node-helpers\dist\index.js:1:968430) at JA.onDidChangeLibDirs (c:\Users\14778\.vscode\extensions\platformio.platformio-ide-3.3.4-win32-x64\node_modules\platformio-node-helpers\dist\index.js:1:969551) at Th.value (c:\Users\14778\.vscode\extensions\platformio....
重置 PlatformIO 配置缓存即可:
pio settings reset
pio run -t clean
这个报错并不是编译失败的核心原因,而是 PlatformIO IDE 的一个“安全机制”,用来防止系统资源被反复索引消耗掉。你可以安全忽略它10分钟。
最后仍有一个报错:
======================================================== Environment Status Duration --------------------------- -------- ------------ soundReactive_esp32dev SUCCESS 00:00:11.001 soundReactive_esp32_eth SUCCESS 00:00:12.394 soundReactive_m5StickC_Plus FAILED 00:00:12.515 esp32_4MB_S SUCCESS 00:00:13.085 esp32_4MB_S_debug SUCCESS 00:00:13.233 esp32_4MB_S_micdebug SUCCESS 00:00:12.580 esp32_4MB_M SUCCESS 00:00:14.859 esp32_16MB_M SUCCESS 00:00:15.105 wemos_shield_esp32_4MB_M SUCCESS 00:00:15.395 wemos_shield_esp32_16MB_M SUCCESS 00:00:15.151 esp32_pico_4MB_S SUCCESS 00:00:11.025 =================================================== 1 failed, 10 succeeded in 00:02:26.344 =============================================
其他环境都编译成功只有 soundReactive_m5StickC_Plus 环境失败,错误是:
fatal error: hal/gpio_ll.h: No such file or directory
使用的 M5StickCPlus 库引用了 In_eSPI.h,而这个头文件又试图引入 ESP-IDF v4.4+ 中才有的 hal/gpio_ll.h。
但是 platform_packages 使用的是:
framework-arduinoespressif32 @ https://github.com/Aircoookie/arduino-esp32.git#1.0.6.4
这个 WLED 自定义框架是 基于 Arduino-ESP32 v1.0.6,它底层使用的是 ESP-IDF v3.x,所以它根本没有 hal/gpio_ll.h,自然就会报错。
只需要替换掉 M5StickCPlus 库中不兼容的那部分,改用 WLED 自己推荐的显示驱动方式。
步骤一:避免使用 M5StickCPlus 官方库
在 platformio.ini 中找到这行:
lib_deps =
  ...
  https://github.com/m5stack/M5StickC-Plus.git @ ~0.1.0
把它改成注释掉或直接移除:
# https://github.com/m5stack/M5StickC-Plus.git @ ~0.1.0
步骤二:替换为兼容的 TFT_eSPI 配置
添加以下行,使用 WLED 推荐的 TFT_eSPI 版本:
lib_deps =
  ...
  bodmer/TFT_eSPI @ ^2.4.70
然后创建文件 .pio/libdeps/soundReactive_m5StickC_Plus/TFT_eSPI/User_Setup.h,内容如下(适配 M5StickC Plus):
#define ST7735_DRIVER
#define TFT_WIDTH  135
#define TFT_HEIGHT 240

#define CGRAM_OFFSET
#define TFT_INVERSION_ON

#define TFT_MOSI 15
#define TFT_SCLK 13
#define TFT_CS   5
#define TFT_DC   23
#define TFT_RST  18

#define LOAD_GLCD
#define LOAD_FONT2
#define LOAD_FONT4
#define LOAD_FONT6
#define LOAD_FONT7
#define LOAD_FONT8

#define SPI_FREQUENCY  40000000
#define SPI_READ_FREQUENCY  20000000
#define SPI_TOUCH_FREQUENCY  2500000
步骤三:清理并重新构建
执行以下命令:
pio run --target clean
pio run -e soundReactive_m5StickC_Plus
最后再:
pio run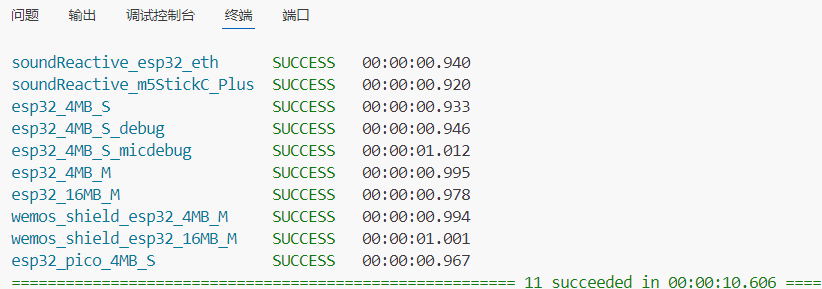
问题解决!


 1万+
1万+

 被折叠的 条评论
为什么被折叠?
被折叠的 条评论
为什么被折叠?
 到【灌水乐园】发言


