


 本文介绍了如何在Windows 10上启用和优化WSL2,包括安装Linux系统、设置默认版本、解决网络问题、通过WinSCP和Putty访问、配置自动启动、图形界面的实现以及备份与还原的方法。WSL2提供了一个高效且易恢复的Linux开发环境,尤其适合新手入门。
背景介绍:
Sugar 常用的笔记本昨天被推送了 Windows 2004 更新。
借此试用了一下 WSL2,简直太好用!
本文记录操作方法和一些细节,作为更多人的上车参考。
以 ardupilot 这个开源项目的编译时间为测试标准,WSL2 的成绩很出色。
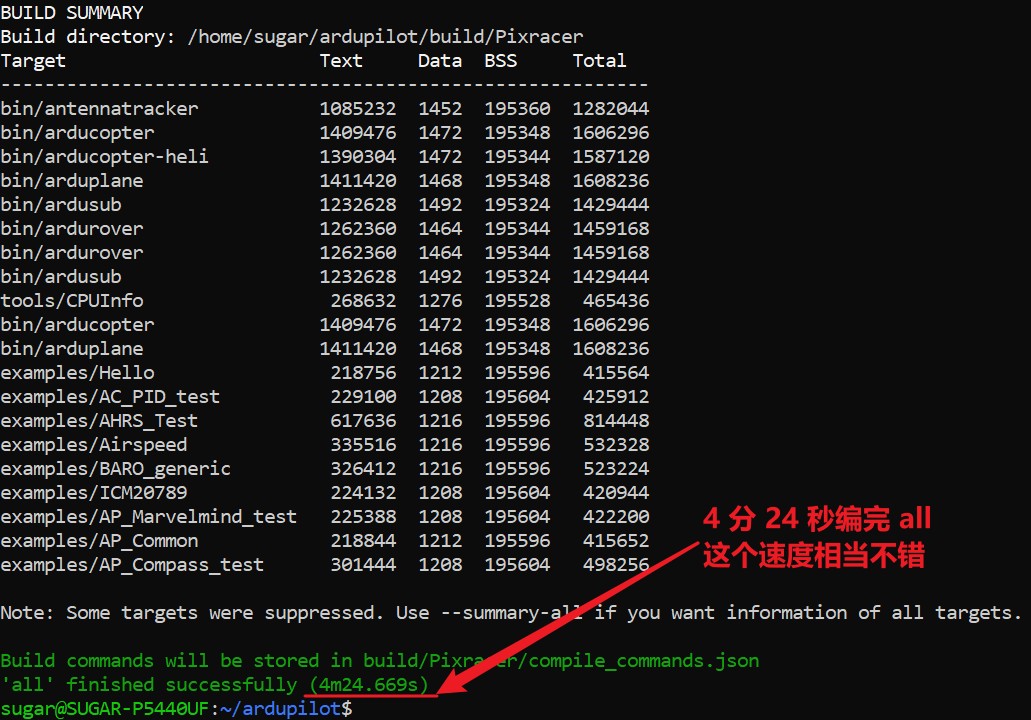
这个速度基本与 Sugar 做的 Linux2Go 一样,这可是在 Windows 上的哦!
启用 Windows 功能
下面两种方法,二选一。
方法一、以管理员身份打开 PowerShell 执行如下命令
dism.exe /online /enable-feature /featurename:Microsoft-Windows-Subsystem-Linux /all /norestart
dism.exe /online /enable-feature /featurename:VirtualMachinePlatform /all /norestart
方法二、
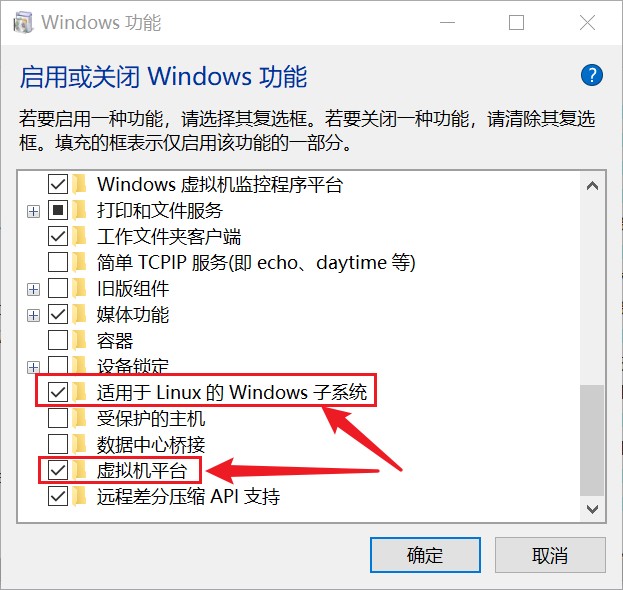
完成后重启电脑。
下载内核包
https://wslstorestorage.blob.core.windows.net/wslblob/wsl_update_x64.msi
设置默认 WSL2
wsl --set-default-version 2
安装 Linux 系统
在 Windows 商店中搜索 linux 选择一个操作系统进行安装。
其他操作
1、转换版本
wsl --set-version Ubuntu-18.04 2
2、查看版本
wsl -l -v
3、关机
直接在 WSL2 的窗口上点红叉并不会把 WSL2 关机。
wsl -t Ubuntu-18.04
或
wsl --shutdown
网络访问
参考《WSL2 的一些网络访问问题》
https://lengthmin.me/posts/wsl2-network-tricks/
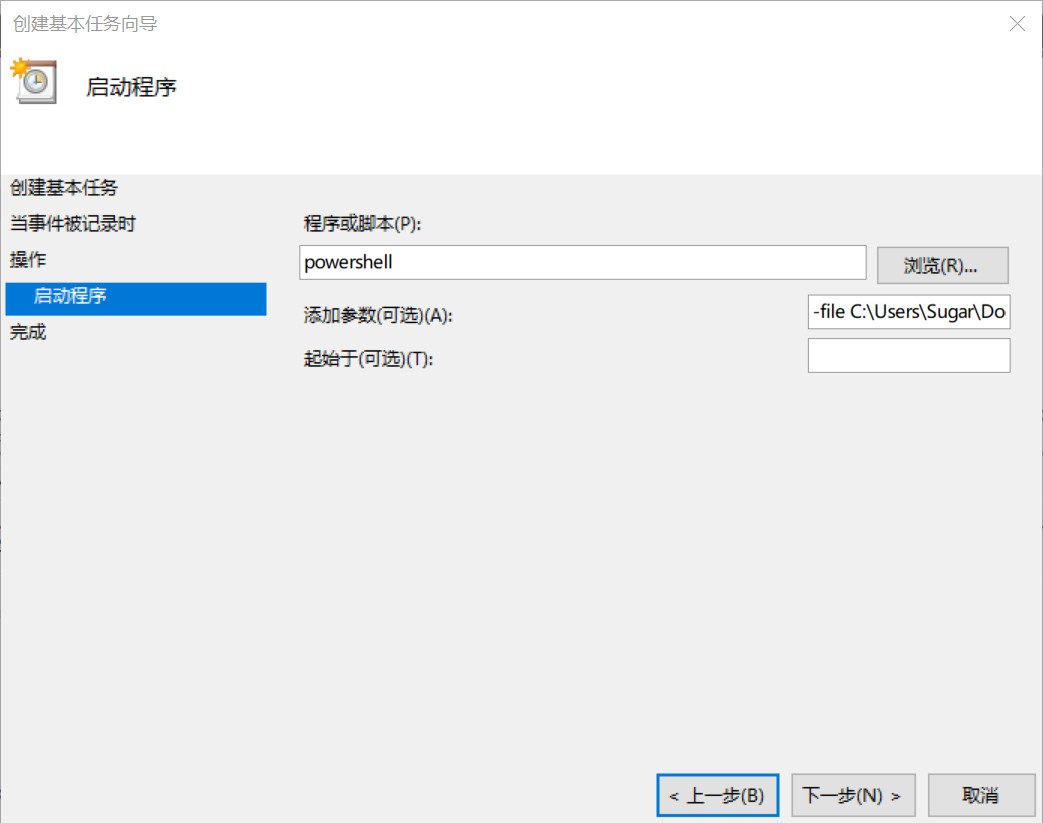
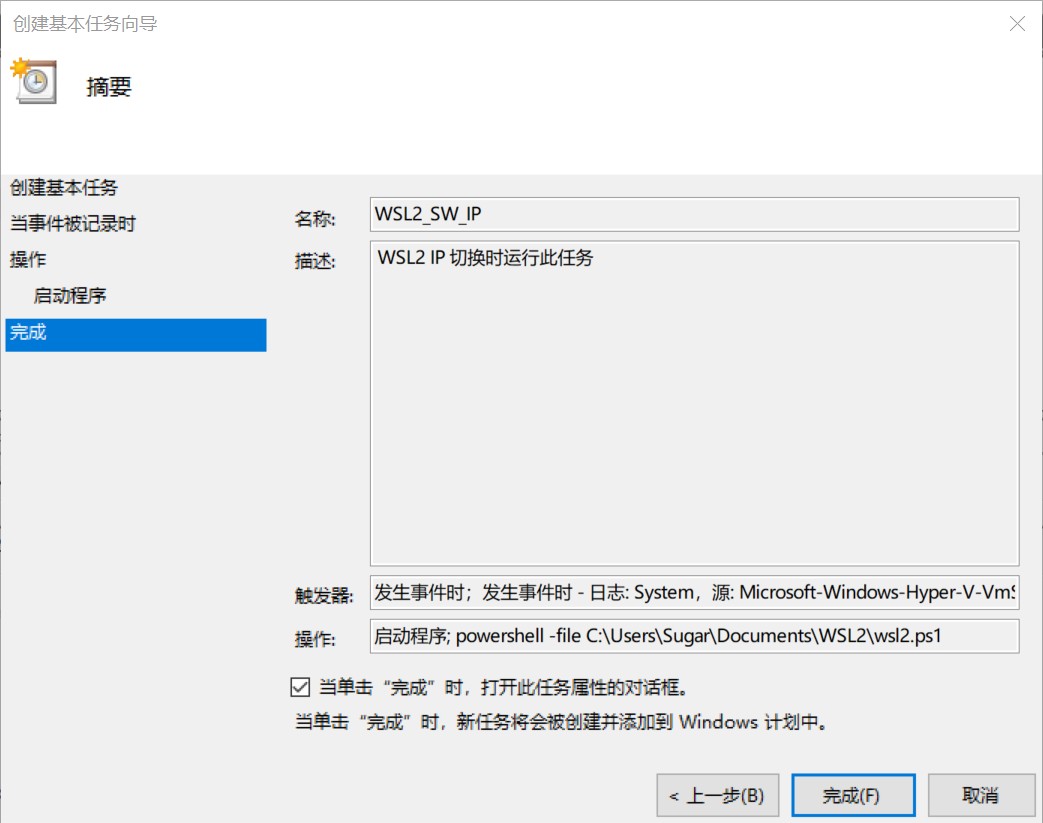
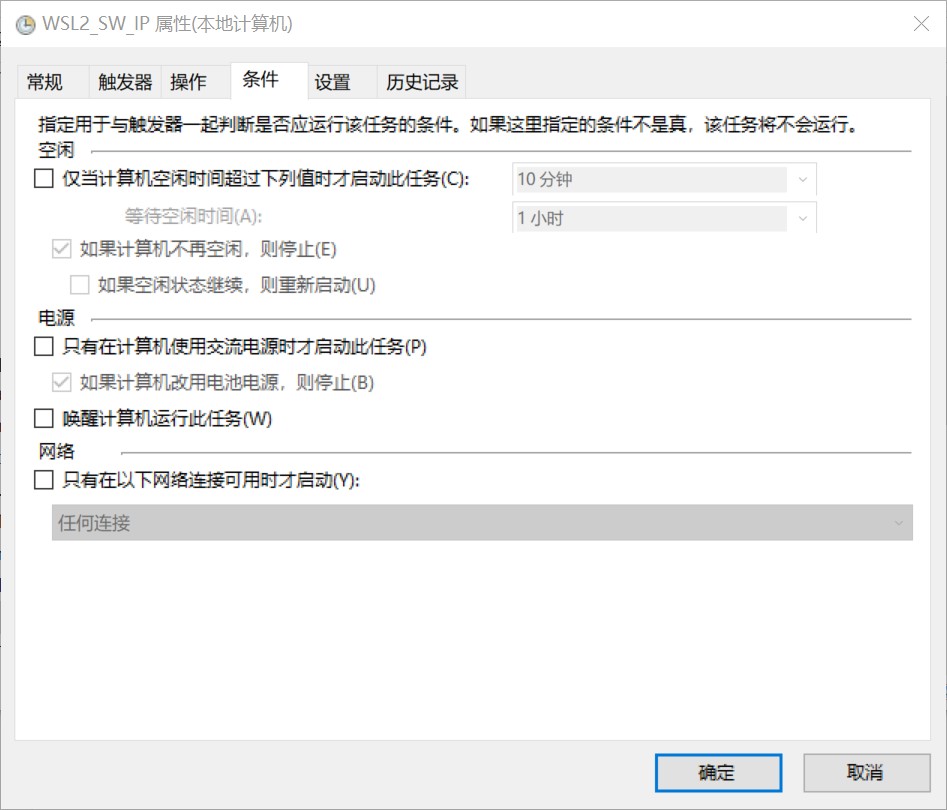
比较关键的是 Windows 10 上 wsl2.ps1 文件的内容,如下:
# [Config]
$wsl_hosts = "wsl.local"
$win_hosts = "win.local"
$HOSTS_PATH = "$env:windir\System32\drivers\etc\hosts"

# [Start]
$winip = (bash.exe -c "ip route | grep default | awk '{print \`$3}'")
$wslip = (bash.exe -c "hostname -I | awk '{print \`$1}'")
$found1 = $winip -match '\d{1,3}\.\d{1,3}\.\d{1,3}\.\d{1,3}';
$found2 = $wslip -match '\d{1,3}\.\d{1,3}\.\d{1,3}\.\d{1,3}';

if( !($found1 -and $found2) ){
  echo "The Script Exited, the ip address of WSL 2 cannot be found";
  exit;
}

# [Ports]
# control whether forward port from windows to wsl
$redirect_port = $FALSE

if ($redirect_port) {
  # All the ports you want to forward separated by coma
  $ports=@(80,443,8080);

  # [Static ip]
  # You can change the addr to your ip config to listen to a specific address
  $addr='0.0.0.0';
  $ports_a = $ports -join ",";

  # Remove Firewall Exception Rules
  iex "Remove-NetFireWallRule -DisplayName 'WSL 2 Firewall Unlock' " | Out-Null

  # Adding Exception Rules for inbound and outbound Rules
  iex "New-NetFireWallRule -DisplayName 'WSL 2 Firewall Unlock' -Direction Outbound -LocalPort $ports_a -Action Allow -Protocol TCP"  | Out-Null
  iex "New-NetFireWallRule -DisplayName 'WSL 2 Firewall Unlock' -Direction Inbound -LocalPort $ports_a -Action Allow -Protocol TCP"  | Out-Null

  for( $i = 0; $i -lt $ports.length; $i++ ){
    $port = $ports[$i];
    iex "netsh interface portproxy delete v4tov4 listenport=$port listenaddress=$addr"  | Out-Null
    iex "netsh interface portproxy add v4tov4 listenport=$port listenaddress=$addr connectport=$port connectaddress=$wslip"  | Out-Null
  }
}

# [Hosts]
# Get hosts file Content
$HOSTS_CONTENT = (Get-Content -Path $HOSTS_PATH) | ? {$_.trim() -ne "" } | Select-String -Pattern '# w(sl)|(in)_hosts' -NotMatch
# add custom hosts into hosts content
$HOSTS_CONTENT = $HOSTS_CONTENT + "`n$wslip $wsl_hosts # wsl_hosts`n$winip $win_hosts # win_hosts"
# write file
Out-File -FilePath $HOSTS_PATH -InputObject $HOSTS_CONTENT -Encoding ASCII

ipconfig /flushdns | Out-Null
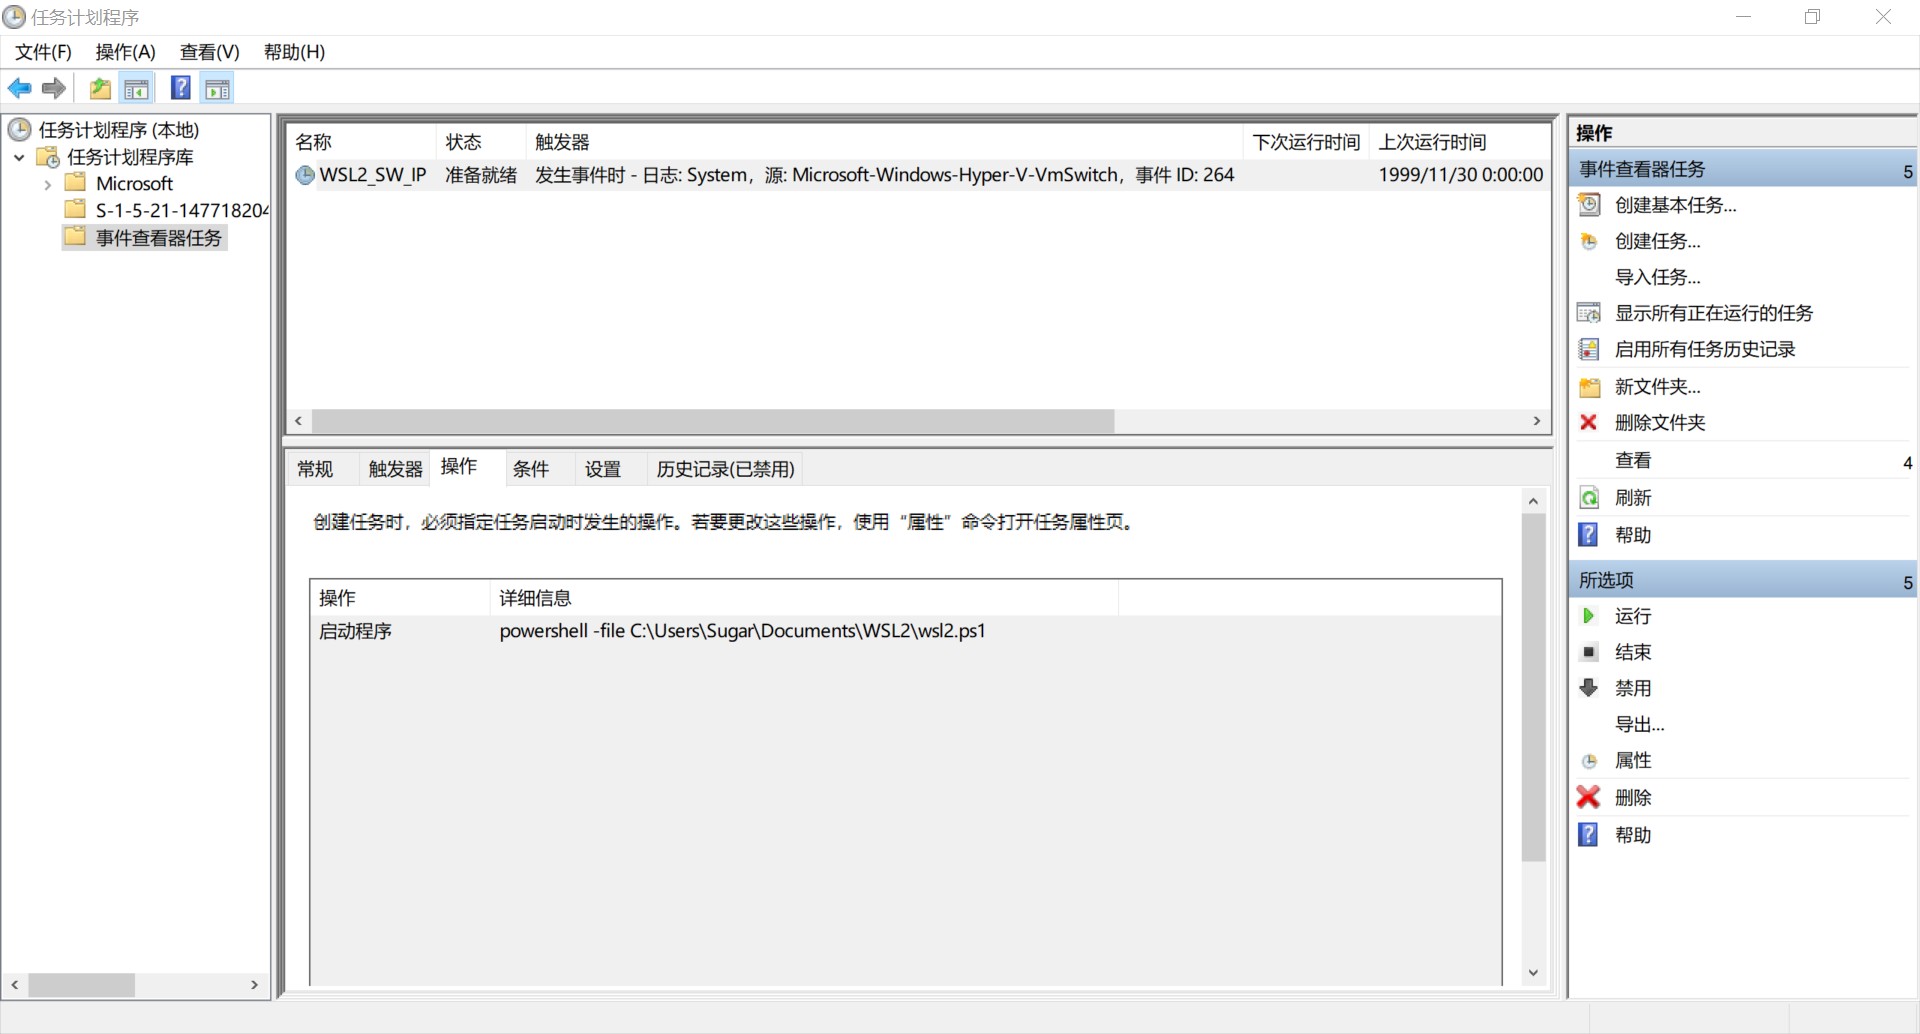
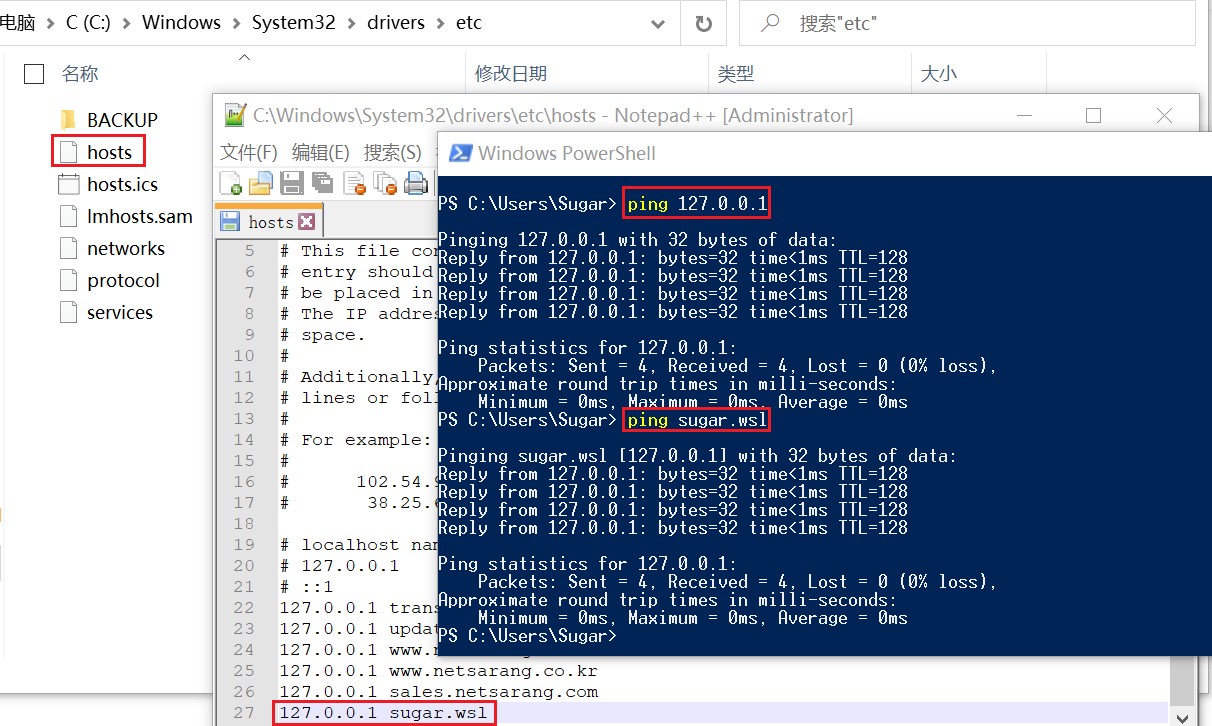
wsl2.ps1 文件的使用方法如下:


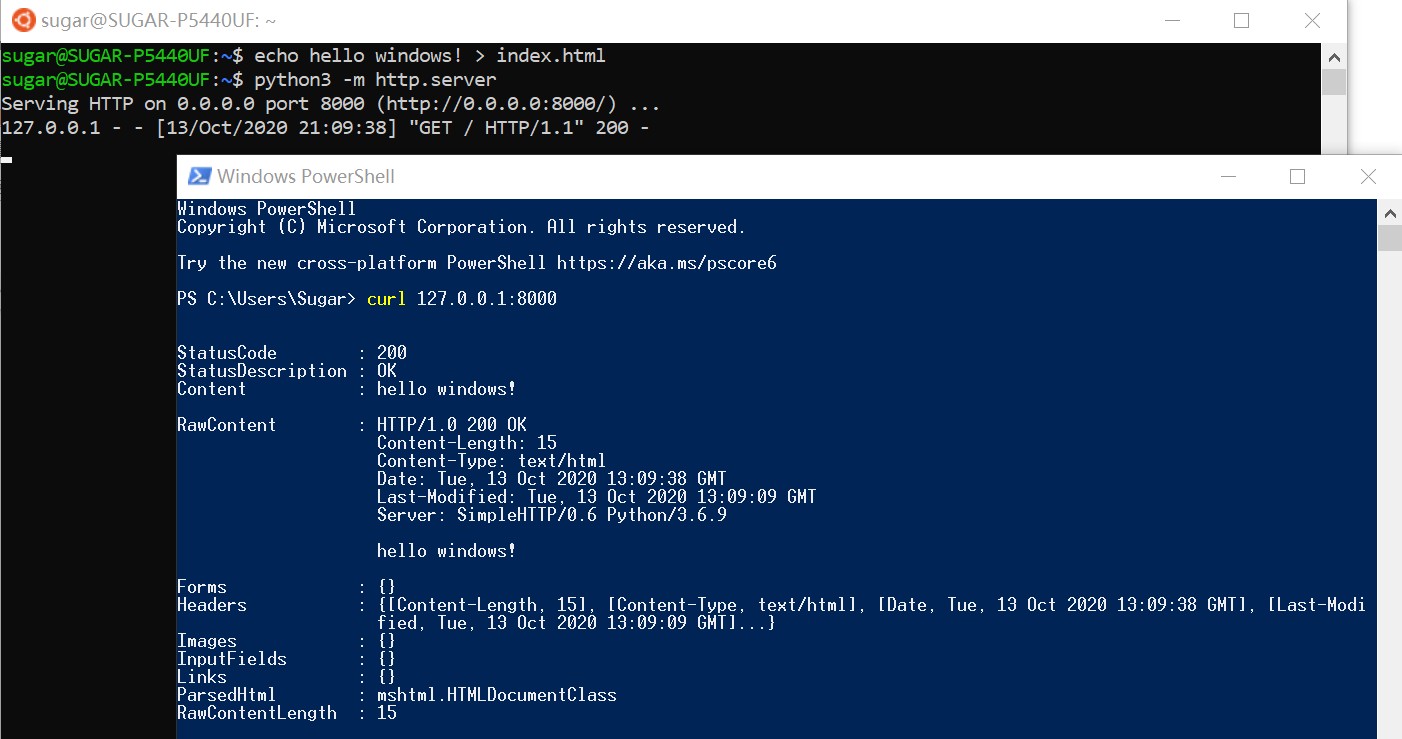
搞定之后测试一下,如下图:
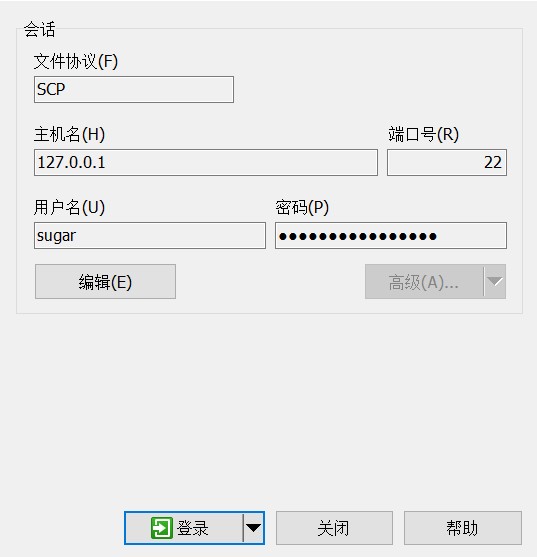
WinSCP(Putty)访问 WSL2
1、卸载、重装 WSL2 里的 openssh-server
sudo apt-get purge openssh-server
sudo apt-get install openssh-server
2、在sshd_config里把PasswordAuthentication这一项后面改为“yes”
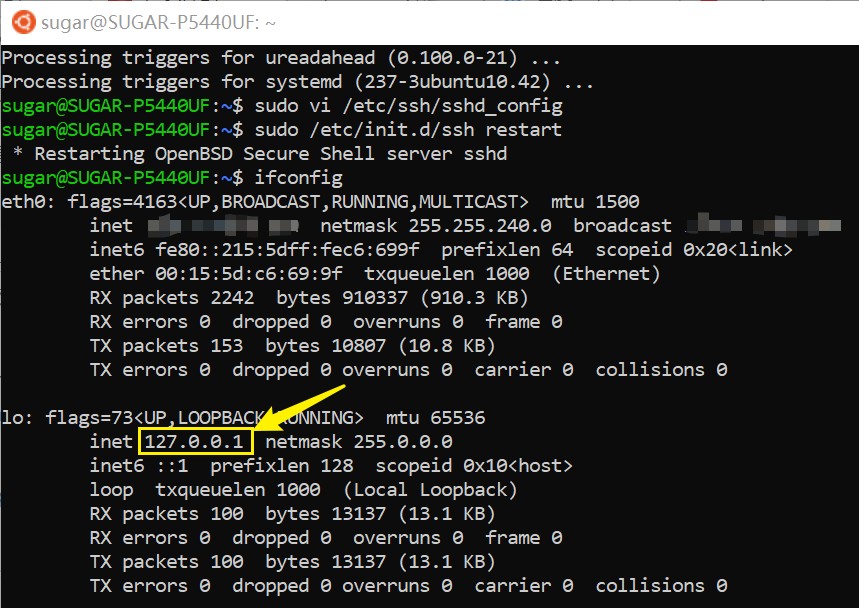
sudo vi /etc/ssh/sshd_config
3、重启 ssh
sudo /etc/init.d/ssh restart
4、输入 ifconfig 查询 Windows10 用的 IP 地址
5、用 WinSCP 通过用户名密码连接
注:每次启动 WSL2 后要手动开启 ssh 服务。开启命令如下:
sudo /etc/init.d/ssh start
或者
sudo service ssh start
为 127.0.0.1 配置域名
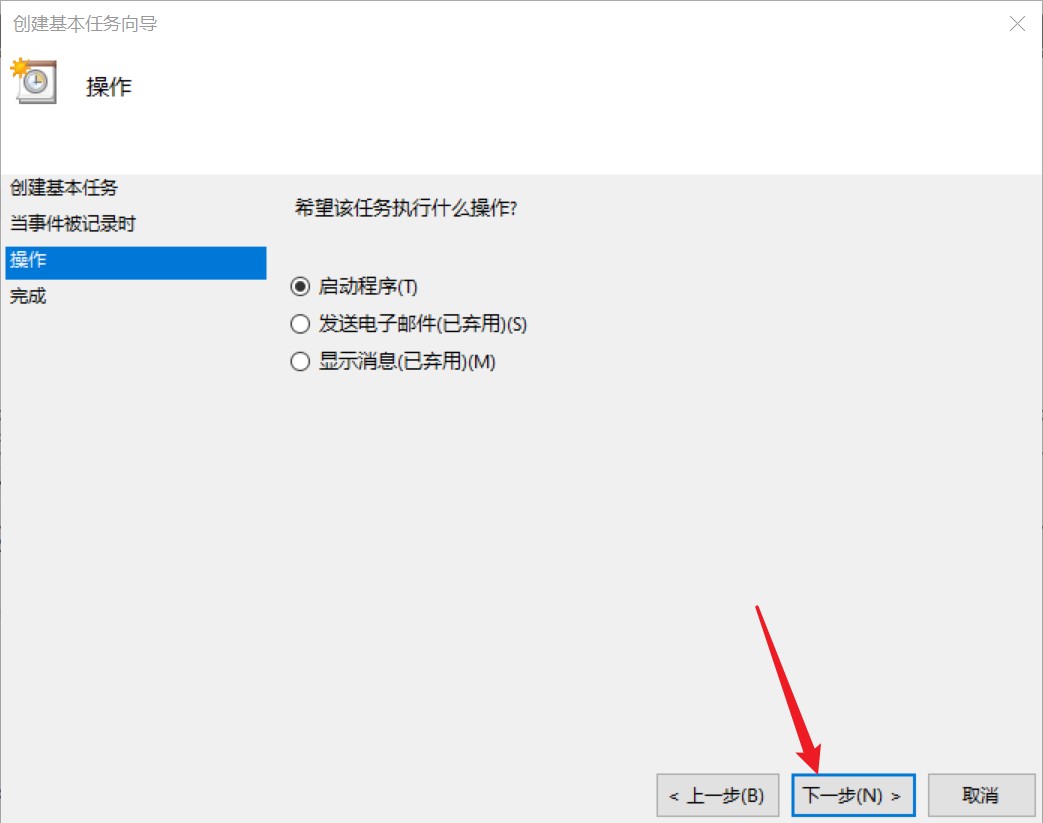
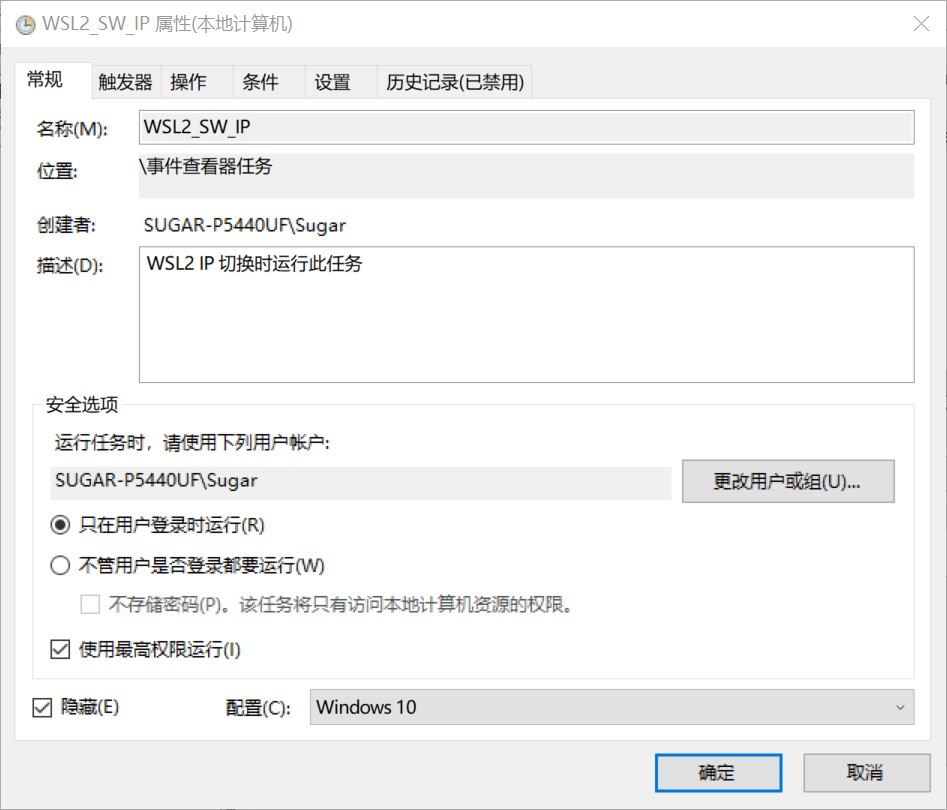
WSL2 随 Windows 自动启动
一、wsl2 Ubuntu-18.04 里的操作
1、新建 init.wsl 文件
sudo vim /etc/init.wsl
2、init.wsl 文件的内容
#! /bin/sh
service docker start
# 自动加载 ssh 服务
service ssh --full-restart
按 ESC 然后 :wq 保存退出。
3、授权
sudo chmod +x /etc/init.wsl
二、在 Window 10 里的操作
1、新建 linux-start.vbs 文件,内容如下:
Set ws = WScript.CreateObject("WScript.Shell")
ws.run "wsl -d Ubuntu-18.04 -u root /etc/init.wsl"
2、开机启动 linux-start.vbs
(1) Win+R 输入 shell:startup
(2) 将 linux-start.vbs 放到这里。
重启
在 Windows 10 中新建 reboot.bat,内容如下:
net stop LxssManager
net start LxssManager
需要的时候执行,然后再手动打开 Ubuntu-18.04 就可以了。
Windows 下看 WSL2 里的文件
打开文件夹,输入:\\wsl$ 即可。
WSL2 图形界面
这里对上面知乎中export DISPLAY部分的内容修改一下(自动获取 IP):
$ cd ~
$ vim .bashrc

export DISPLAY=$(cat /etc/resolv.conf | grep nameserver | awk '{print $2}'):0
安装配置好之后,在 Ubuntu-18.04 下通过如下命令启动 xfce4 就可以看到图形界面了:
startxfce4
退出图形界面在 Ubuntu-18.04 里按 Ctrl+C 就可以。
备份与还原
一、备份
一条命令即可备份,如下:
wsl --export Ubuntu-18.04 d:\wsl_backup\Ubuntu-18.04.tar
注意:要先在 D 盘建好 wsl_backup 文件夹。
二、还原
将 Ubuntu-18.04 的备份还原并重命名成
Ubuntu
wsl --import Ubuntu D:\wsl D:\wsl_backup\Ubuntu-18.04.tar
注意:要先在 D 盘建好 wsl 文件夹。
三、更多操作
1、删除
wsl --unregister Ubuntu
2、启动与关闭
1、启动Ubuntu:
(1) wsl -d Ubuntu 以 root 身份登陆。
(2) wsl -d Ubuntu -u sugar 通过 -u 指定登陆用户。
2、关闭Ubuntu: wsl -t Ubuntu
PS
WSL2 太适合 Linux 入门了,推荐的最大原因是“抗造”,新手玩 Linux 一不小心就搞错点什么东西弄坏了系统造成麻烦。WSL2 不怕造坏了,因为就算坏了恢复也就几分钟的事。
WSL2 从性能来说,已经完全可以当作很多老鸟的生产力工具了。
从便携角度讲,老鸟出差工作还是推荐 Linux2Go + git 这样的不带笔记本组合(在这个电脑随处有的时代随便找个电脑插上就用,工作成果提交 git 远程库不怕丢)。新手用 Sugar 的 Linux2Go 有点奢侈,但硬件不坏的情况下 Sugar 可以终生免费恢复(运费自理),奢侈的做法适合有大志向的新手。
关注作者
欢迎扫码关注我的公众号MultiMCU EDU。


 1269
1269


 到【灌水乐园】发言


