


 本文详细介绍如何在Docker环境中配置并使用TensorFlow,包括解决权限问题、安装依赖及运行物体识别、手写识别等模型。同时介绍了Google的Python代码规范和CycleGAN-TensorFlow项目。
前言
本文的原文连接是: https://blog.youkuaiyun.com/freewebsys/article/details/81665552
未经博主允许不得转载。
博主地址是:http://blog.youkuaiyun.com/freewebsys
1,关于
上次在 https://blog.youkuaiyun.com/freewebsys/article/details/84847904
中使用了jupyter的镜像。
可以直接运行python了。
但是这个镜像为了安全,使用的是 jovyan 账户。
要是使用apt-get进行安装的话,没有权限。
通过修改机几个参数就可以了。
https://github.com/jupyter/docker-stacks/issues/408
2,使用
docker run -itd --name tf -v ~/pythonWorkspace:/home/jovyan -p 8888:8888 \
	-e GRANT_SUDO="yes"  --user root \
	jupyter/tensorflow-notebook:latest  start-notebook.sh \
	--NotebookApp.token='' --notebook-dir=/home/jovyan
其中两个参数 -e GRANT_SUDO=“yes” --user root 得加上。
这样就能用 root 了。
同时把 token 去掉。本地使用方便。要是服务器上面可别去掉。
使用的是 jupyter tensorflow的镜像。Python 3.6.6
而TensorFlow 的 python 是 3.5 。
vim /etc/apt/sources.list
ubuntu 18.04(bionic) 配置如下
deb http://mirrors.aliyun.com/ubuntu/ bionic main restricted universe multiverse
deb-src http://mirrors.aliyun.com/ubuntu/ bionic main restricted universe multiverse

deb http://mirrors.aliyun.com/ubuntu/ bionic-security main restricted universe multiverse
deb-src http://mirrors.aliyun.com/ubuntu/ bionic-security main restricted universe multiverse

deb http://mirrors.aliyun.com/ubuntu/ bionic-updates main restricted universe multiverse
deb-src http://mirrors.aliyun.com/ubuntu/ bionic-updates main restricted universe multiverse

deb http://mirrors.aliyun.com/ubuntu/ bionic-proposed main restricted universe multiverse
deb-src http://mirrors.aliyun.com/ubuntu/ bionic-proposed main restricted universe multiverse

deb http://mirrors.aliyun.com/ubuntu/ bionic-backports main restricted universe multiverse
deb-src http://mirrors.aliyun.com/ubuntu/ bionic-backports main restricted universe multiverse
安装pip3
apt-get install python3-pip
pip3 install --user -r official/requirements.txt
3,tensorflow models
可以下载 google 官方的 models 代码。
https://github.com/tensorflow/models
安装依赖文件
pip3 install --user -r official/requirements.txt
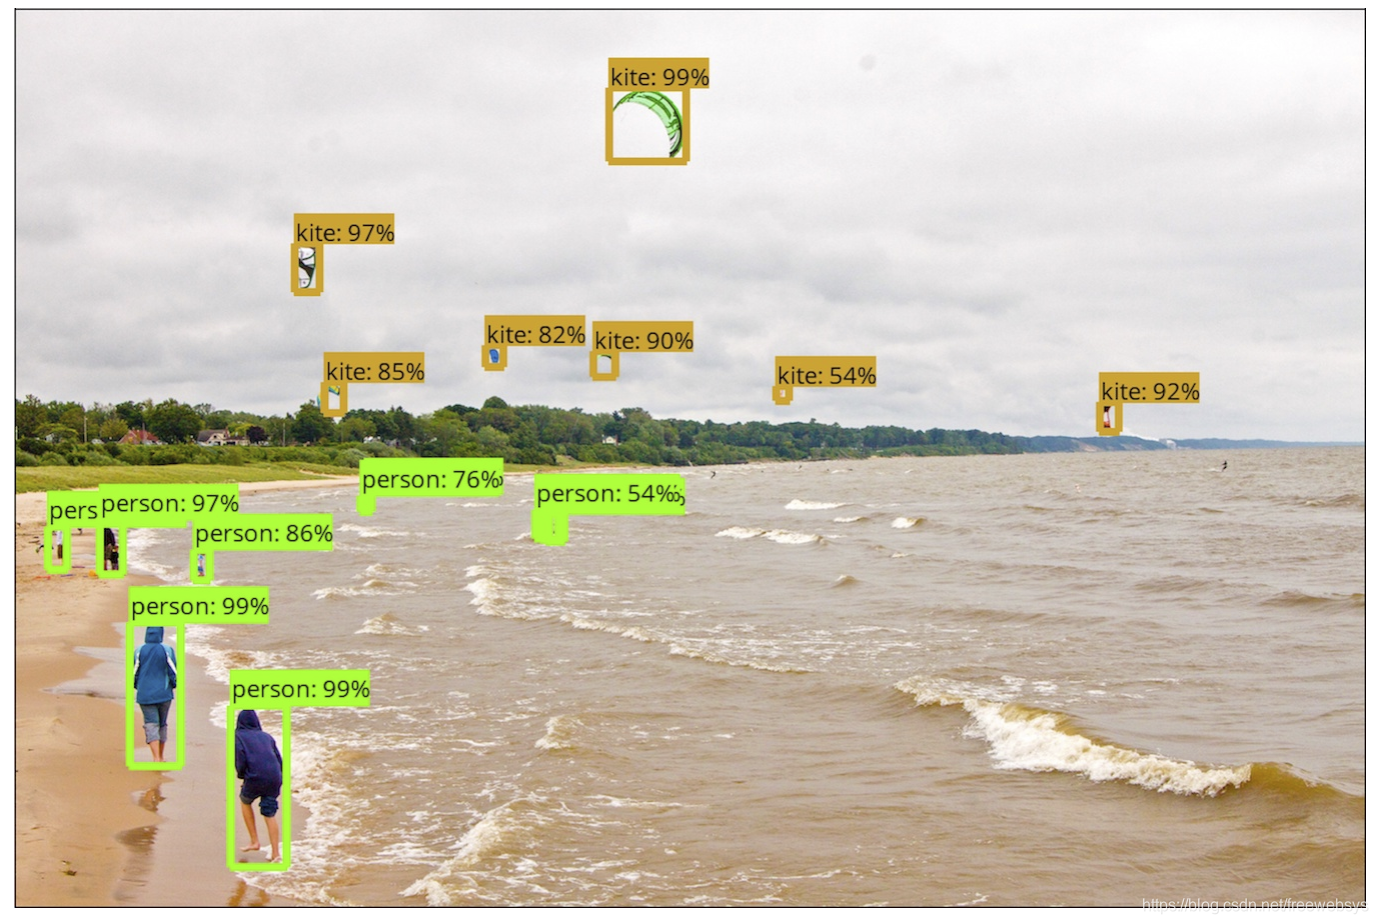
对物体识别进行运行:
https://github.com/tensorflow/models/tree/master/research/object_detection
对手写识别测试:
https://github.com/tensorflow/models/tree/master/official/mnist
resNet 网络:
https://github.com/tensorflow/models/tree/master/official/resnet
文章翻译:
https://github.com/tensorflow/models/tree/master/official/transformer
wide deep:
https://github.com/tensorflow/models/tree/master/official/wide_deep
思路都是先训练模型,然后用 saved_model_cli 把结果跑起来。
3,Google Python Style Guide
https://github.com/google/styleguide/blob/gh-pages/pyguide.md
google 发布的 python 代码规范。
3,CycleGAN-TensorFlow
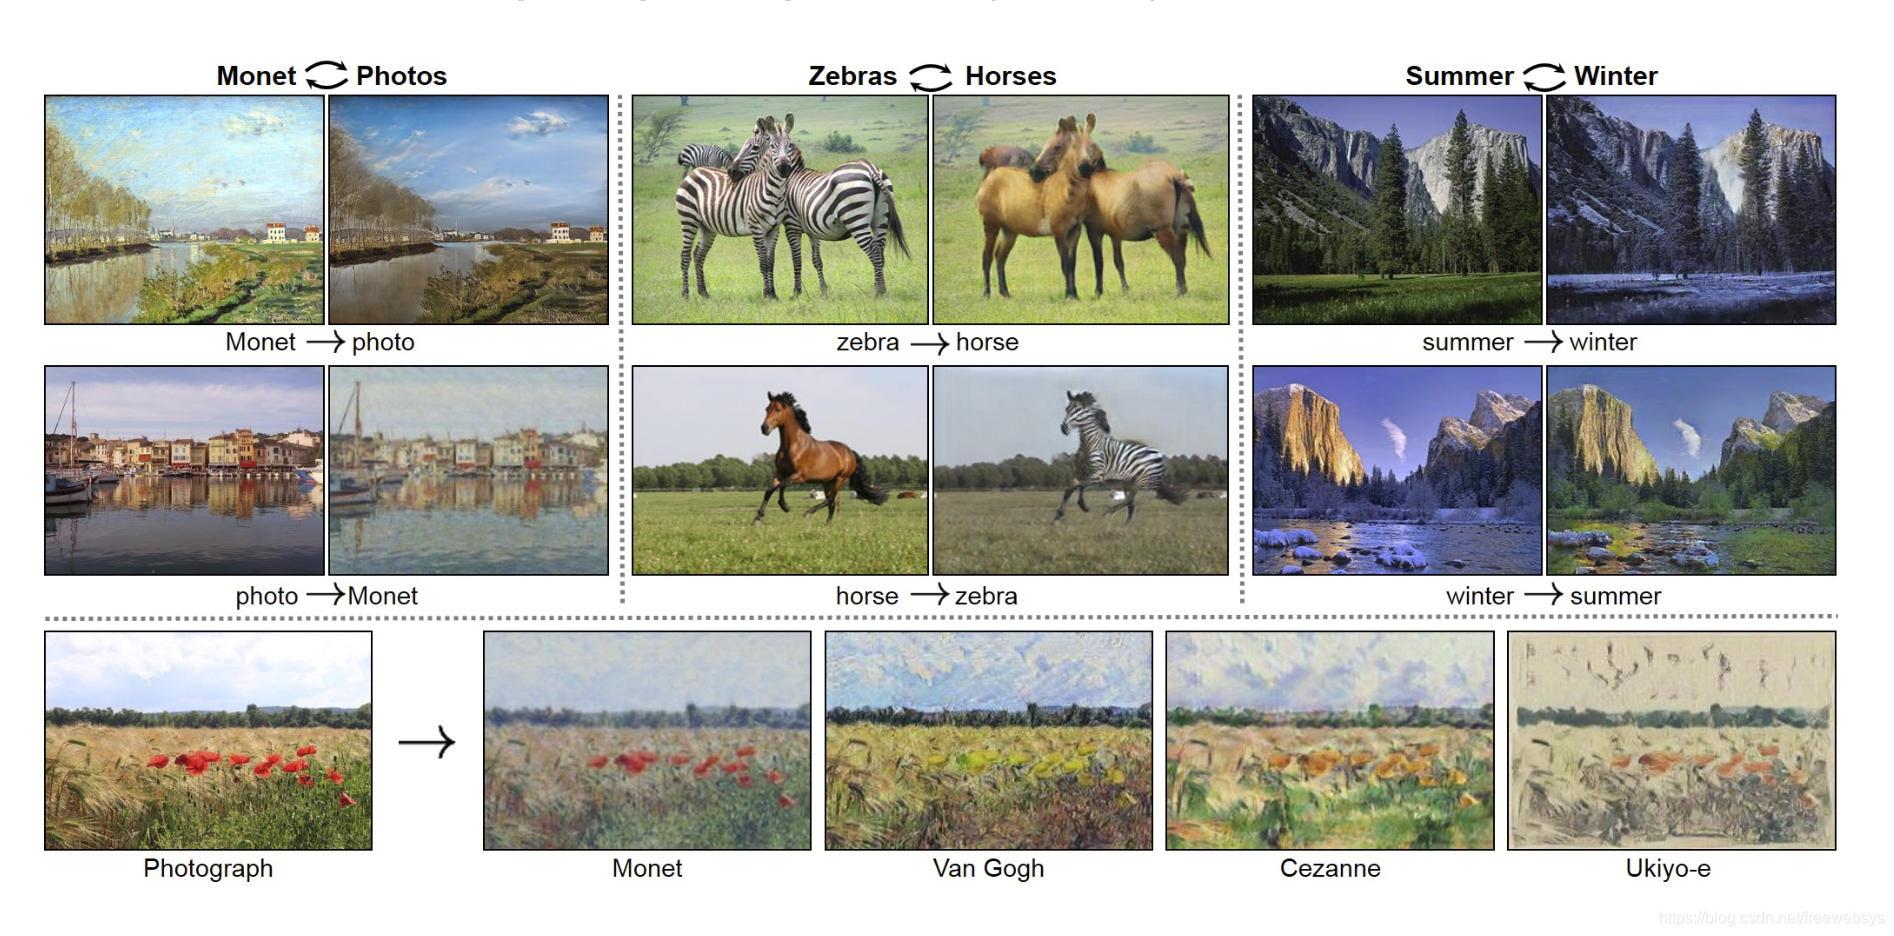
cycleGan 还是非常厉害的,让图片进行学习。
合成其他图片。
https://junyanz.github.io/CycleGAN/
说明:
https://github.com/junyanz/CycleGAN
这个是用lua 写的,也懒得看了。还是找个python版本的。
对抗模型的TensorFlow实现版本:
https://github.com/vanhuyz/CycleGAN-TensorFlow
https://github.com/tjwei/GANotebooks
3,总结
docker 镜像还是非常的方便的。
构建起python的程序还是非常的不错。学习TensorFlow 必备的工具呢。对快速学习非常有帮助的。
本文的原文连接是:
https://blog.youkuaiyun.com/freewebsys/article/details/81665552
博主地址是:http://blog.youkuaiyun.com/freewebsys


 555
555

 被折叠的 条评论
为什么被折叠?
被折叠的 条评论
为什么被折叠?
 到【灌水乐园】发言


