


1. 简介
SystemC 是一种基于 C++ 的硬件描述语言 (HDL),用于建模和模拟数字系统。它由 Open SystemC Initiative (OSCI) 开发和维护。
SystemC 的主要特点如下:
- 基于 C++ 语言:SystemC 是建立在 C++ 语言之上的,利用 C++ 的面向对象特性和丰富的标准库来描述硬件系统。这使得 SystemC 具有良好的可扩展性和可移植性。
- 多层次建模:SystemC 支持从系统级到寄存器传输级 (RTL) 的多层次硬件建模,可以在不同抽象层次之间进行转换。
- 并发建模:SystemC 提供了一个离散事件仿真内核,支持并发建模和仿真。这使得 SystemC 非常适合于建模和仿真复杂的硬件系统。
- 时间建模:SystemC 提供了丰富的时间建模机制,可以精确地描述硬件系统的时序行为。
- 可扩展性:SystemC 提供了一个可扩展的框架,允许用户定义自己的数据类型、接口和组件,以满足特定的建模需求。
- 仿真和验证:SystemC 提供了一个强大的仿真引擎,可以对硬件系统进行全面的仿真和验证。
SystemC 的主要应用场景包括:
- 系统级建模和仿真:SystemC 可用于建模和仿真复杂的系统级硬件,如 SoC (System-on-Chip)、嵌入式系统等。
- 硬件/软件协同设计:SystemC 支持硬件和软件的联合建模和仿真,有助于提高硬件/软件协同设计的效率。
- IP 核开发和集成:SystemC 可用于开发和集成可重用的 IP 核,以加快产品开发周期。
- 性能分析和优化:SystemC 的仿真引擎可用于对硬件系统的性能进行分析和优化。
2. 安装
# SystemC 2.3.3
curl -O https://www.accellera.org/images/downloads/standards/systemc/systemc-2.3.3.tar.gz
tar -xzf systemc-2.3.3.tar.gz
cd systemc-2.3.3
mkdir build
cd build
../configure --prefix=/usr/local/systemc-2.3.3
make -j8
sudo make install
3. 架构
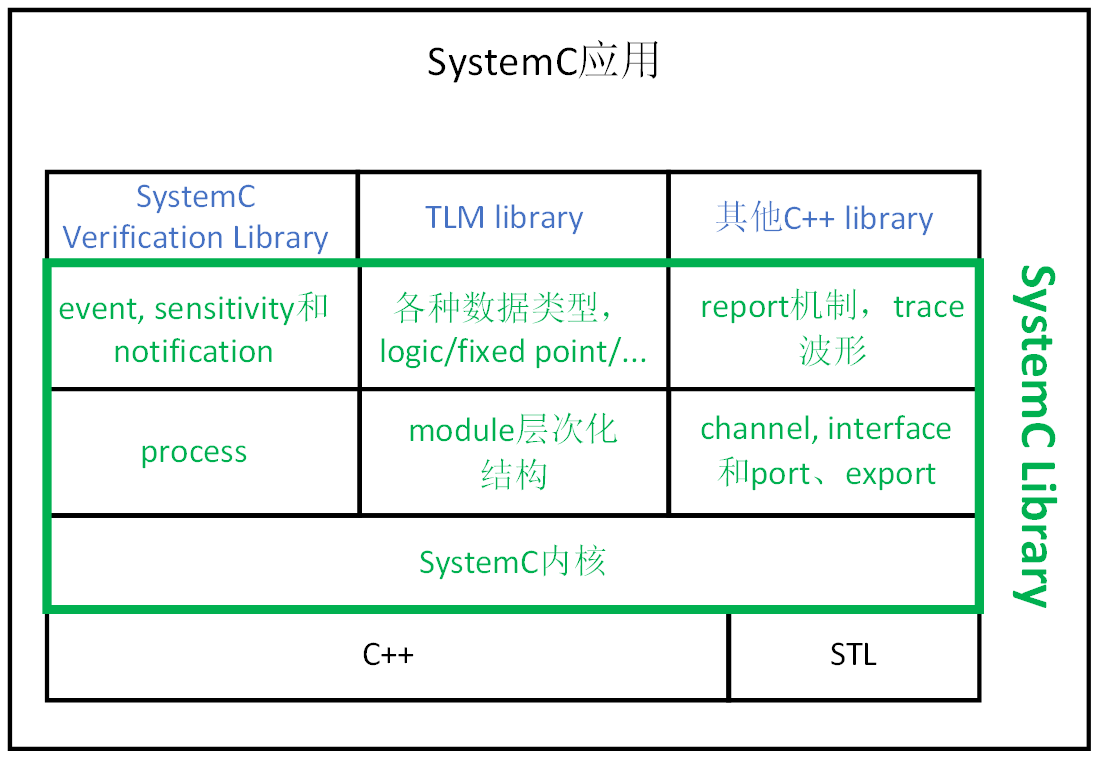
4. 构成
3.1. 头文件
systemc库包含了两个最基本和最重要的命名空间,一个是sc_ocre,一个是sc_dt。
sc_core是systemc基本的内核空间,sc_dt则定义了systemc的最基本数据类型。
systemc.h则包含了除了sc_core和sc_dt外的其他方针中所需要的名字,也包含了一些c++de命名空间,比如namespace std等。
3.2. 模块
模块是Systemc设计中最基本的单元,是完成一个特定功能的基本单元。模块与Verilog中的模块是对应的。
模块的实质是一个类,通过宏来包装简化。
SC_MODULE宏用来定义一个模块,其展开为:
#define SC_MODULE(user_module_name)                                           \
    struct user_module_name : ::sc_core::sc_module
SC_CTOR是用来定义构造函数,其展开为:
#define SC_CTOR(user_module_name)                                             \
typedef user_module_name SC_CURRENT_USER_MODULE;                          \
user_module_name( ::sc_core::sc_module_name )

// the SC_HAS_PROCESS macro call must be followed by a ;
#define SC_HAS_PROCESS(user_module_name)                                      \
typedef user_module_name SC_CURRENT_USER_MODULE
SC_THREAD是通过线程来模块硬件的并发。
SC_MODULE(Hello_SystemC)
{
    SC_CTOR(Hello_SystemC)//create a constructor
    {
        SC_THREAD(main_thread);//register the process
        SC_THREAD(second_thread);
        SC_THREAD(third_thread);
    }//end constructor

    void main_thread(void)
    {
        cout<<"Hello SystemC World!"<<endl;
        sc_lv<4> Lv1;//logic vector 多位的sc_logic
        Lv1=15;
        cout<<"Lv1="<<Lv1<<endl; //1111
        Lv1="zzzz";
        cout<<"Lv1="<<Lv1.to_string()<<endl;
        sc_lv<8> Lv2("0101xxzz");
        cout<<"Lv2="<<Lv2;//0101XXZZ
        cout<<endl;
    }
    void second_thread()
    {
        /*           前缀(prefix)     意义                   表示
		  SC_DEC     0d                 decimal                0d13/-0d13
		  SC_BIN     0b                 binary                 0b01101/0b10011
		  SC_BIN_US  0bus               binary unsigned        0bus1101/negative
		  SC_BIN_SM  0bsm             binary signed magnitude  0bsm01101/-0bsm01101
		  SC_OCT     0o                 octal                  0o15
		  SC_HEX     0x                 hex                    0x0d/0xf3
		*/
        sc_int<5> int1; //5-bit signed integer
        int1="-0d11";  //assign -11
        cout<<"Int1="<<int1<<endl; //-11
        cout<<"SC_BIN="<<int1.to_string(SC_BIN)<<endl; //-01011->取反10100->加1 0b10101
        cout<<"SC_BIN_SM="<<int1.to_string(SC_BIN_SM)<<endl; //-bsm01011
        cout<<"SC_HEX="<<int1.to_string(SC_HEX)<<endl; //10101 0xf5
    }
    void third_thread()
    {
        /*
		   sc_fixed<WL,IWL [,quant[,ovflw[,nbits]>   name;/sc_ufixed/sc_fixed_fast/sc_ufixed_fast
		   sc_fix name(WL,IWL [,quant[,ovflw[,nbits]); /sc_ufix/sc_fix_fast/sc_ufix_fast
		*/
        sc_fixed<5,3> fix1;//5 bit fixed point
        fix1=-3.3; //-011.011 总长度5bit,3bit整数字 为-011.01 -3.5
        cout<<"fix1="<<fix1<<endl;
        cout<<"SC_BIN="<<fix1.to_string(SC_BIN)<<endl;//011.011 取反后100.100 加1->0b100.101->0b100.10
        cout<<"SC_HEX="<<fix1.to_string(SC_HEX)<<endl;//-0011.0110 取反后1100.1001 加1->1100.1010->0x1100.10(0xc.8)
    }
};
3.3. 端口
输入端口:sc_in<类型> 名称;
输出端口:sc_out<类型> 名称;
双向端口:sc_inout<类型> 名称;
3.4. 信号
Systemc中信号有两种定义方式:sc_signal<类型> 和 sc_buffer<类型>。
3.5. 类型
systemc rtl支持的systemc数据类型
| 类型名 | 描述 |
| sc_bit | 位宽为 1,值为 0 或 1 之一的二值信号 |
| sc_bv<n> | 任意位宽的位向量 |
| sc_logic | 位宽为 1,值为 0、1、X 或 Z 之一的四值信号 |
| sc_lv<n> | 任意位宽的逻辑向量 |
| sc_int<n> | 最多可达 64 位的有符号整型数 |
| sc_uint<n> | 最多可达 64 位的无符号整型数 |
| sc_bigint<n> | 任意位宽的有符号整型数 |
| sc_biguint<n> | 任意位宽的无符号整型数 |
3.6. delta
Δ 延迟是硬件描述语言中一个非常重要的概念,它是模块的端口与模块内数据的重要区别之一,在硬件描述语言的仿真软件将一个时间点分为一个或者多个 Δ ,在 Δ 延迟之前完成赋值和值的读取,而 Δ 之后才对被赋值的信号和端口的值进行更新,请看下面的一段代码:
SC_MODULE(Writer) {
    SC_CTOR (Writer) {
        SC_METHOD(Write);
        sensitive << clk.pos();
        dont_initialize();
        }

        void Write() {
            val++;
            out_val.write(val);
            std::cout << "write " << sc_time_stamp() << " " << val << std::endl;
        }

        sc_in_clk clk;
        sc_out<int> out_val;
        int val{};
    };

    SC_MODULE(Reader) {
        SC_CTOR (Reader) {
            SC_METHOD(Read);
            sensitive << clk.pos();
            dont_initialize();
            }

            void Read() {
                std::cout << "read " << sc_time_stamp() << " " << in_val.read() << std::endl;
            }

            sc_in_clk clk;
            sc_in<int> in_val;
        };
Writer 每隔一个时钟向 out_val 写入一个数字,Reader 每隔一个时钟从 in_val 读取数字,那么所谓的 Δ 就是在第 1 个时钟 Writer 写入 1,但是 Reader 要在第 2 个时钟才能读到这个 1,也就是说赋值和拿到值相差了一个时钟
通过 Δ 延迟,仿真软件实现了赋值和更新的分离,保证了仿真结果与硬件一致
在SC_THREAD函数中,wait(1)即为等待一个一个时钟周期,注意此时SC_THREAD后面要添加clk的时钟敏感列表,否则wait(1)会一直阻塞。
5. 进程
在操作系统中,进程是程序在并发环境中的执行过程,它具有动态性、并发性、独立性、异步性和结构性五大特征。在systemc中,进程是一个基本的执行单元,被用来仿真目标系统的行为,systemc基本进程有三种:
- SC_METHOD
- SC_THREAD
- SC_CTHREAD
4.1. SC_METHOD
SC_METHOD 是一种简单且轻量级的进程类型。它的特点是:
- 事件驱动:SC_METHOD 进程被事件触发,当敏感列表(sensitive list)上的某个信号发生变化时,它会被立即调用。
- 无阻塞行为:调用后立刻返回,不允许使用
wait语句,因为 SC_METHOD 进程一旦被触发就必须执行到底。无法中途挂起等待其他事件。 - 时间进展依赖:SC_METHOD 的执行会立即完成,只有当它执行完毕后,仿真系统的时间才会继续推进。
举例说明:
假设我们有一个简单的组合逻辑电路,例如一个加法器,当输入 a 或 b 变化时,输出 sum 会立刻更新。此时可以用 SC_METHOD 实现:
SC_MODULE(Adder) {
    sc_in<int> a, b;
    sc_out<int> sum;

    SC_CTOR(Adder) {
        SC_METHOD(calculate_sum);
        sensitive << a << b; // 当 a 或 b 发生变化时触发
    }

    void calculate_sum() {
        sum.write(a.read() + b.read()); // 立即更新 sum
    }
};
4.2. SC_THREAD
SC_THREAD 是比 SC_METHOD 更灵活的进程类型,它能够中途暂停并等待信号或者时间。
- 挂起和重新激活:SC_THREAD 可以使用
wait来中途挂起当前进程,并等待其他信号或定时器到期。与 SC_METHOD 不同,SC_THREAD 可以通过多次调用wait来暂停仿真,直到敏感信号发生变化或超时后恢复执行。 - 不能重复进入:在一次仿真中,SC_THREAD 一旦退出,将不能重新进入。
举例说明:
例如,一个控制系统需要周期性地检查某个传感器值,我们可以使用 SC_THREAD 并使用 wait 函数来挂起一段时间:
SC_MODULE(SensorMonitor) {
    sc_in<bool> sensor;
    SC_CTOR(SensorMonitor) {
        SC_THREAD(monitor);
        sensitive << sensor;  // 当传感器信号变化时触发
    }

    void monitor() {
        while (true) {
            wait(10, SC_MS);  // 每10毫秒检查一次传感器
            if (sensor.read()) {
                std::cout << "Sensor is active" << std::endl;
            } else {
                std::cout << "Sensor is inactive" << std::endl;
            }
        }
    }
};
在该例子中,monitor 进程会每隔10毫秒暂停一次,再次激活时继续执行。
4.3. SC_CTHREAD
SC_CTHREAD 是专门用于时钟同步操作的一种线程进程。它的行为更接近实际硬件中的寄存器传输级(RTL)设计。
- 时钟触发:SC_CTHREAD 进程只能在时钟的上升沿或者下降沿触发或激活。这意味着它模拟了寄存器在每个时钟周期的行为。
- 适合综合:SC_CTHREAD 设计更符合硬件时序逻辑,因此常用于行为综合。
举例说明:
比如一个简单的计数器模块,每当时钟上升沿到来时计数器值增加:
SC_MODULE(Counter) {
    sc_in<bool> clk;
    sc_out<int> count;
    int internal_count;

    SC_CTOR(Counter) {
        SC_CTHREAD(counting, clk.pos());  // 在时钟上升沿触发
    }

    void counting() {
        internal_count = 0;
        while (true) {
            wait();  // 等待时钟上升沿
            internal_count++;
            count.write(internal_count);  // 更新计数器值
        }
    }
};
6. 通信
6.1. sc_interface
接口(Interface):派生自sc_interface的抽象类,包括一组虚拟函数集合。sc_interface相比sc_signal,将接口的具体实现封装起来,解耦并提升代码的利用性。sc_interface有抽象接口,基于抽象接口,提升代码的一致性。
示例:
#include <systemc.h>

// 定义一个自定义接口类型
class MyInterface : public sc_interface
{
public:
    virtual void write(int value) = 0;
    virtual int read() = 0;
};

// 实现接口类型的一个具体实现
class MyInterfaceImpl : public MyInterface
{
private:
    int data;

public:
    void write(int value) override
    {
        data = value;
    }

    int read() override
    {
        return data;
    }
};

// 定义一个生产者模块
SC_MODULE(Producer)
{
    sc_port<MyInterface> port;

    void produce()
    {
        for (int i = 0; i < 10; i++)
        {
            wait(10, SC_NS);
            port->write(i);
            std::cout << "Producer wrote: " << i << std::endl;
        }
    }

    SC_CTOR(Producer)
    {
        SC_THREAD(produce);
    }
};

// 定义一个消费者模块
SC_MODULE(Consumer)
{
    sc_port<MyInterface> port;

    void consume()
    {
        for (int i = 0; i < 10; i++)
        {
            int value = port->read();
            std::cout << "Consumer read: " << value << std::endl;
            wait(10, SC_NS);
        }
    }

    SC_CTOR(Consumer)
    {
        SC_THREAD(consume);
    }
};

int sc_main(int argc, char *argv[])
{
    // 创建接口实现
    MyInterfaceImpl interface_impl;

    // 创建生产者和消费者模块,并将它们连接到接口
    Producer producer("producer");
    producer.port(interface_impl);

    Consumer consumer("consumer");
    consumer.port(interface_impl);

    // 运行仿真
    sc_start(100, SC_NS);

    return 0;
}
6.2. sc_port
端口(port):负责提供module写数据的方法,因此一般同具体的实例独立。sc_port和sc_interface配合使用。sc_port 通信,数据立即更新。这与sc_out/sc_signal的数据在一个时钟周期后更新不同。
6.3. sc_export
无论是sc_in/sc_out,还是sc_port,都需要额外申请一个变量来完成两个Module之间的连线。而使用sc_export,则可以让两个Module直接相连,而不需要另外的连线。但是sc_signal移动到Module内部了。
- sc_export<sc_signal<int>> p; 声明信号可以在Module外部直接访问,但是内部需要通过sc_signal来访问。
- sc_port<sc_signal_in_if<int>> p;声明这是一个in的接口,可以接入外部信号。
示例:
#include <systemc>
using namespace sc_core;

SC_MODULE(MODULE1)
{                              // defines one module
  sc_export<sc_signal<int>> p; // an export for other modules to connect
  sc_signal<int> s;            // a signal (channel) inside the module. If not using export, the channel need to be defined outside module1.
  SC_CTOR(MODULE1)
  {
    p(s);              // bind an export to an internal channel
    SC_THREAD(writer); // a process to write to an internal channel
  }
  void writer()
  {
    int val = 1; // init value
    while (true)
    {
      s.write(val++); // write to an internal channel
      wait(1, SC_SEC);
    }
  }
};

SC_MODULE(MODULE2)
{                                  // a module that reads from an export
  sc_port<sc_signal_in_if<int>> p; // a port used to read from an export of another module
  SC_CTOR(MODULE2)
  {
    SC_THREAD(reader); // a process to read from an outside channel
    sensitive << p;    // triggered by value change on the channel
    dont_initialize();
  }

  void reader()
  {
    while (true)
    {
      std::cout << sc_time_stamp() << ": reads from outside channel, val=" << p->read() << std::endl; // use port to read from the channel, like a pointer.
      wait();                                                                                         // receives from port
    }
  }
};

int sc_main(int, char *[])
{
    MODULE1 module1("module1"); // instantiate module1
    MODULE2 module2("module2"); // instantiate module2
    module2.p(module1.p);       // connect module2's port to module1's export. No need to declare a channel outside module1 and module2.
    sc_start(2, SC_SEC);
    return 0;
}
6.4. sc_prim_channel
通道(channel):一个primitive channel应该实现一个或多个接口。sc_prim_channel是在sc_interface的基础上,提供多个抽象接口。示例:
#include <systemc>
#include <string>
using namespace sc_core;

class GENERATOR_IF : public sc_interface { // interface for interrupt generator
public:
  virtual void notify() = 0;
};
class RECEIVER_IF : public sc_interface { // interface for interrupt receiver
public:
  virtual const sc_event& default_event() const = 0; // needed for sensitive
};
class INTERRUPT : public sc_prim_channel, public GENERATOR_IF, public RECEIVER_IF { // interrupt class
public:
  INTERRUPT(sc_module_name name) : sc_prim_channel(name) {} // constructor, construct sc_prim_channel
  void notify() { // implement GENERATOR_IF
    e.notify();
  }
  const sc_event& default_event() const { // implement RECEIVER_IF
    return e;
  }
private:
  sc_event e; // private event for synchronization
};
SC_MODULE(GENERATOR) { // interrupt generator class
  sc_port<GENERATOR_IF> p; // port to generate interrupt
  SC_CTOR(GENERATOR) { // constructor
    SC_THREAD(gen_interrupt);
  }
  void gen_interrupt() {
    while (true) {
      p->notify(); // calls notify function of the INTERRUPT channel
      wait(1, SC_SEC);
    }
  }
};
SC_MODULE(RECEIVER) { // interrupt receiver class
  sc_port<RECEIVER_IF> p; // port to receive interrupt
  SC_CTOR(RECEIVER) { // constructor
    SC_THREAD(rcv_interrupt);
    sensitive << p; // monitors interrupt on port p
    dont_initialize();
  }
  void rcv_interrupt() { // triggered upon interrupt
    while (true) {
      std::cout << sc_time_stamp() << ": interrupt received" << std::endl;
      wait();
    }
  }
};

int sc_main(int, char*[]) {
  GENERATOR generator("generator"); // instantiate generator
  RECEIVER receiver("receiver"); // instantiate receiver
  INTERRUPT interrupt("interrupt"); // instantiate interrupt
  generator.p(interrupt); // port binding
  receiver.p(interrupt); // port binding
  sc_start(2, SC_SEC);
  return 0;
}
7. 时钟
时钟是同步数字逻辑中必不可少的基本元素,在 systemc 中,时钟被作为一个特殊的对象处理,它就是 sc_clock 类,构造函数如下:
sc_clock();
explicit sc_clock( const char* name_ );
sc_clock(const char* name_, const sc_time& period_, double duty_cycle_ = 0.5,
const sc_time& start_time_ = SC_ZERO_TIME, bool posedge_first_ = true );
sc_clock(const char* name_, double period_v_, sc_time_unit period_tu_,
double duty_cycle_ = 0.5 );
sc_clock(const char* name_, double period_v_, sc_time_unit period_tu_,
double duty_cycle_, double start_time_v_, sc_time_unit start_time_tu_,
bool posedge_first_ = true );
// for backward compatibility with 1.0
sc_clock(const char* name_,
double period_,            // in default time units
double duty_cycle_ = 0.5,
double start_time_ = 0.0,  // in default time units
bool posedge_first_ = true );
其中 name_ 是时钟的名字
period 和 period_v 是时钟的周期
period_tu_ 是时钟的时间单位
duty_cycle_ 是占空比
start_time_v_ 和 start_time_ 是时钟初始第一逻辑值的持续时间
posedge_first_ 是第一个逻辑值是高电平还是低电平,如果为true,则时钟初始化为false,并在开始时间更改为true。也就是说如果为 true,那么初始化第一逻辑为 false,然后在初始化第一逻辑值的持续时间之后更改为 true。
示例:
sc_clock clk("clk", 20, SC_NS);
SystemC 缺省的时间分辨率为 1ps,同时提供了 sc_set_time_resolution(double, sc_time_uint) 函数允许修改系统的时间分辨率
SystemC 对时间分辨率的设置有以下要求
- 时间分辨率必须是 10 的幂
- 时间分辨率只能在仿真开始之前设置
- 时间分辨率只能设置一次
- 时间分辨率必须在任何非零的 sc_time 声明之前设置
SystemC 缺省的时间单位是 SC_NS,同时允许通过 sc_set_default_time_unit(double, sc_time_uint) 来设置缺省的时间单位,但是最好的是我们在设置的时候就加上时间单位,这样可以更加清晰
SystemC 对缺省的时间单位的设置有以下的要求
- 缺省时间单位必须是 10 的幂
- 缺省时间单位必须大于时间分辨率
- 缺省时间单位只能设置一次
- 缺省时间单位只能在仿真开始之前设置
比如设置缺省时间单位为 100 ps
sc_set_default_time_uint(100, SC_PS);那么下面的一个 clk 时钟周期就是 10 * 100ps = 1 NS
sc_clock clk("clk", 10);8. 仿真控制
开始仿真:sc_start()
sc_start() 函数控制所有始终的产生并在适当的时刻激活 SystemC 调度器,SystemC 调度器控制整个仿真过程中的调度工作,包括激活进程,产生 delta 延迟,计算和更新变量和信号的值,一般来讲,sc_start() 只在 sc_main() 中调用
sc_start 函数原型为
void sc_start();
void sc_start(const sc_time& duration);
void sc_start(double duration, sc_time_unit unit);
void sc_start(int duration, sc_time_unit unit);
其中 sc_start() 没有参数,表示仿真一直进行直到遇到 sc_stop 函数,其它的 sc_start() 函数如果没有遇到 sc_stop 函数,那么会在时间执行完之后退出
结束仿真:sc_stop()
sc_stop 函数停止仿真并将控制权交给 sc_main。我们可以通过 void sc_set_stop_mode(sc_stop_mode mode) 来控制 sc_stop 的停止模式,sc_stop_mode 有 SC_STOP_IMMEDIATE 个 SC_STOP_FINISH_DELTA 两个值,其中
SC_STOP_IMMEDIATE:立即停止当前进程和其他任何进程,不再执行更新阶段
SC_STOP_FINISH_DELTA:在返回到 sc_main 之前将当前 delta 周期能够执行的进程都执行并且完成当前 delta 周期的更新阶段
9. 示例
9.1. 代码
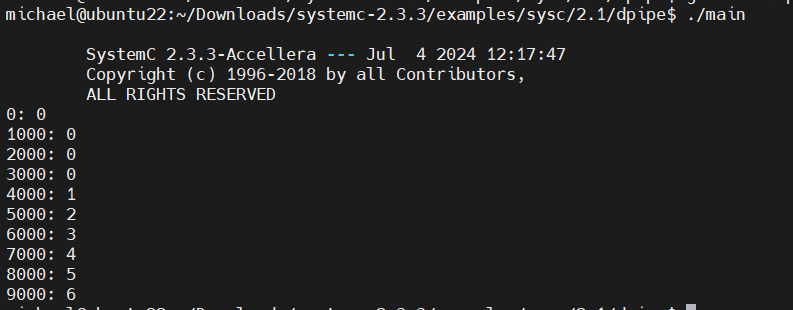
代码,下面的代码来自SystemC源码中的dpipe工程。
#include "systemc.h"

// This program implements a delay pipe which passes values through a fifo
// in a specified number of clocks. A value may be inserted at each clock
// edge and it will appear as the output of the pipe after the specified
// number of clocks. The template arguments to this class are:
//    T the class specifying the value to be piped.
//    N is the number of stages in the pipe, and should be >= 2.
//
// For this example change the typedef below to the class that you want a
// delay pipe for.

typedef sc_biguint<121> atom;  // Value to be pipe delayed.


//==============================================================================
// dpipe<T,N> - DELAY PIPELINE FOR AN ARBITRARY CLASS:
//==============================================================================
template<class T, int N>
SC_MODULE(dpipe) {
    typedef sc_export<sc_signal_inout_if<T> > in;   // To pipe port type.
    typedef sc_export<sc_signal_in_if<T> >    out;  // From pipe port type.

    SC_CTOR(dpipe)
    {
        m_in(m_pipe[0]);
        m_out(m_pipe[N-1]);
        SC_METHOD(rachet);
        sensitive << m_clk.pos();
    }

    void rachet()
    {
        for ( int i = N-1; i > 0; i-- )
            {
                m_pipe[i].write(m_pipe[i-1].read());
            }
    }

    sc_in_clk    m_clk;     // Pipe synchronization.
    in           m_in;      // Input to delay pipe.
    out          m_out;     // Output from delay pipe.
    sc_signal<T> m_pipe[N]; // Pipeline stages.
};


// Testbench reader of values from the pipe:

SC_MODULE(Reader)
{
    public:
    SC_CTOR(Reader)
    {
        SC_METHOD(extract)
        sensitive << m_clk.pos();
        dont_initialize();
    }

    protected:
    void extract()
    {
        cout << sc_time_stamp().to_double() << ": " << m_from_pipe.read()
            << endl;
    }

    public:
    sc_in_clk    m_clk;         // Module synchronization.
    sc_in<atom > m_from_pipe;   // Output from delay pipe.
};


// Testbench writer of values to the pipe:

SC_MODULE(Writer)
{
    SC_CTOR(Writer)
    {
        SC_METHOD(insert)
        sensitive << m_clk.pos();
        m_counter = 0;
    }

    void insert()
    {
        m_to_pipe.write(m_counter);
        m_counter++;
    }

    sc_in_clk       m_clk;       // Module synchronization.
    atom            m_counter;   // Write value.
    sc_inout<atom > m_to_pipe;   // Input for delay pipe.
};

// Main program

int sc_main( int, char* [] )
{
    sc_clock      clock;
    dpipe<atom,4> delay("pipe");
    Reader        reader("reader");
    Writer        writer("writer");

    delay.m_clk(clock);

    reader.m_clk(clock);
    reader.m_from_pipe(delay.m_out);

    writer.m_clk(clock);
    writer.m_to_pipe(delay.m_in);

    sc_start(10, SC_NS);

    return 0;
}
9.2. 编译
g++ main.cpp -I/usr/local/systemc-2.3.3/include -L/usr/local/systemc-2.3.3/lib-linux64 -o main -lsystemc
9.3. 仿真


 1753
1753

 被折叠的 条评论
为什么被折叠?
被折叠的 条评论
为什么被折叠?
 到【灌水乐园】发言


