


 博客围绕向QAbstractItemView子类(如QTreeView、QTableView)单元格插入窗体小部件的功能展开。介绍了适用的类条件,涉及Qt的model/view framework框架。以表格视图为例给出代码实现,并对关键函数如createCtrl、updateCtlGeometry等进行剖析,展示了完整效果。
目录
1.前言
工作中经常会遇到这样的需求:向QAbstractItemView子类如QTreeView、QTableView单元格插入窗体小部件,如:进度条、按钮、单行编辑框等。下面链接的系列博文就是讲解如何实现该功能的。
这些系列博文所说的技术点适用于同时满足下面条件的所有类:
-
模型类从 QAbstractItemModel派生。
-
代理类从QStyledItemDelegate或QItemDelegate派生。
-
视图类是QAbstractItemView的子类。
这些系列博文用到了Qt的model/view framework框架,如果对Qt的“模型/视图/代理”框架不懂,这些系列文章很难读懂。如果不懂这方面的知识,请在Qt Assistant 中输入Model/View Programming 学习了解。读者本机Qt安装目录下的Examples\Qt-XX.XX.XX\widgets\itemviews目录下有很多model/view framework的例子,可以进行自学了解,其中XX.XX.XX为Qt的版本号,如:5.14.1。
因为QColumnView、QHeaderView、QListView、QTableView、QTreeView、QListWidget 、QUndoView、QTableWidget、QTreeWidget都是从QAbstractItemView继承,故这些系列博文所说的技术点也适用于这些类。
本博文通过自己写代码来实现该功能。
2.实现详解
2.1.说明
-
限于篇幅的原因,后面的代码只贴出cpp文件代码,.h文件代码不贴出。
-
如果读者想运行本例子,请自行根据cpp代码提取出.h文件的类声明和成员函数。
-
.cpp文件中的所有以m_开头的都是类的成员变量。
-
QtWidgetsApplication1是本例子的主程序。该类的m_pModel是CModel类型指针成员变量;m_vtBtnWnd、m_vtCheckBoxWnd都是类型为vector<QWidget*>容器;ui.tableView是QTableView类对象;m_nVertCurScrollValue是垂直滚动条滚动的当前值。
2.2.代码实现
以表格视图为例说明,其它从QAbstractItemView派生的子类视图和表格视图类似。为了给QTableView提供数据,必须实现一个模型即从QAbstractTableModel.类派生出自己的模型类来,模型类model.cpp代码如下:
#include "model.h"
CModel::CModel(QObject *parent)
    : QAbstractTableModel(parent)
{}

CModel::~CModel()
{}

QVariant CModel::data(const QModelIndex& index, int role/* = Qt::DisplayRole*/) const
{
    return QVariant();
}

// 作为例子,假想QTableView有2列
int CModel::columnCount(const QModelIndex& parent/* = QModelIndex()*/) const
{
    return 2;
}

// 作为例子,假想QTableView有88行
int CModel::rowCount(const QModelIndex& parent/* = QModelIndex()*/) const
{
    return 88;
}

QVariant CModel::headerData(int section, Qt::Orientation orientation, int role /*= Qt::DisplayRole*/) const
{
    if (orientation != Qt::Horizontal) // 作为例子演示,我们只关心表头是水平的情况
        return QVariant();

    if (role != Qt::DisplayRole)// 作为例子演示,我们只关心 Qt::DisplayRole
        return QVariant();

    // 构造列,第1列列名为"button";第2列列名为"checkbox"
    if(0 == section)
     return "button";
    else if(1 == section)
        return "checkbox";

    return QVariant();
}
QtWidgetsApplication1.cpp实现如下:
#include "QtWidgetsApplication1.h"
#include "model.h"
#include<QPushButton>
#include<QScrollBar>
#include<QCheckBox>
QtWidgetsApplication1::QtWidgetsApplication1(QWidget *parent)
    : QWidget(parent)
{
    ui.setupUi(this);

    m_pModel = new CModel(this);
    ui.tableView->setModel(m_pModel);

    connect(ui.tableView->horizontalHeader(), &QHeaderView::sectionResized, this, &QtWidgetsApplication1::headerSectionResized);
    connect(ui.tableView->verticalScrollBar(), &QScrollBar::valueChanged, this, &QtWidgetsApplication1::viewScroll);

    createCtrl();

}

QtWidgetsApplication1::~QtWidgetsApplication1()
{}

// 滚动条滚动
void QtWidgetsApplication1::viewScroll(int nValue)
{
    m_nVertCurScrollValue = nValue;

    updateCtlGeometry();
}

// 按住鼠标左键,拖动表头列和列之间的分割线,从而改变列宽
void QtWidgetsApplication1::headerSectionResized(int logicalIndex, int oldSize, int newSize)
{
    updateCtlGeometry();
}
void QtWidgetsApplication1::createCtrl()
{
    auto nRowCount = m_pModel->rowCount();
    auto nColCount = m_pModel->columnCount();

    auto lastAllRowsTotalHeight = 0; // 统计本行之前的所有行高度总和
    auto nHorHeaderHeight = ui.tableView->horizontalHeader()->height();   // 水平表头列高度
    auto nVerticalHeaderWidth = ui.tableView->verticalHeader()->width();  // 垂直表头列宽度
    auto nTableViewFrameWidth = ui.tableView->frameWidth();               // QTableView对象边框宽度

    auto vertHeaderAndFrameWidth = nVerticalHeaderWidth + nTableViewFrameWidth; // 垂直表头列宽度和QTableView对象边框宽度之和
    auto horzHeaderAndFrameWidth = nHorHeaderHeight + nTableViewFrameWidth;     // 水平表头列高度和QTableView对象边框宽度之和

    for (auto nRowIndex = 0; nRowIndex < nRowCount; ++nRowIndex)
    {
        auto qsText(QString("button%1").arg(nRowIndex));
        auto pBtnWnd = new QPushButton(qsText, ui.tableView);
        m_vtBtnWnd.push_back(pBtnWnd);

        qsText = (QString("checkbox%1").arg(nRowIndex));
        auto pCheckBoxWnd = new QCheckBox(qsText, ui.tableView);
        m_vtCheckBoxWnd.push_back(pCheckBoxWnd);

        auto nCurRowHeight = ui.tableView->rowHeight(nRowIndex);  // 当前行高
        if (0 != nRowIndex)
        {
            auto lastRowIndex = (nRowIndex - 1);
            lastAllRowsTotalHeight += ui.tableView->rowHeight(lastRowIndex); // 累计本行之前的所有行高的和

            pBtnWnd->setGeometry(vertHeaderAndFrameWidth,
                horzHeaderAndFrameWidth + lastAllRowsTotalHeight, ui.tableView->columnWidth(0),
                nCurRowHeight);

            pCheckBoxWnd->setGeometry(vertHeaderAndFrameWidth + ui.tableView->columnWidth(0),
                horzHeaderAndFrameWidth + lastAllRowsTotalHeight, ui.tableView->columnWidth(1),
                nCurRowHeight);
        }
        else// 第一行要单独处理,第一行没有上一行,即nRowIndex - 1不存在,是负值
        {
            pBtnWnd->setGeometry(vertHeaderAndFrameWidth, horzHeaderAndFrameWidth, ui.tableView->columnWidth(0), nCurRowHeight);
            pCheckBoxWnd->setGeometry(vertHeaderAndFrameWidth + ui.tableView->columnWidth(0), horzHeaderAndFrameWidth, ui.tableView->columnWidth(1), nCurRowHeight);
        }
    }
}

// 更新单元格窗体部件几何尺寸
void QtWidgetsApplication1::updateCtlGeometry()
{
    auto nRowCount = m_pModel->rowCount();

    auto lastAllRowsTotalHeight = 0; // 统计本行之前的所有行高度总和
    auto nHorHeaderHeight = ui.tableView->horizontalHeader()->height();   // 水平表头列高度
    auto nVerticalHeaderWidth = ui.tableView->verticalHeader()->width();  // 垂直表头列宽度
    auto nTableViewFrameWidth = ui.tableView->frameWidth();               // QTableView对象边框宽度

    auto vertHeaderAndFrameWidth = nVerticalHeaderWidth + nTableViewFrameWidth; // 垂直表头列宽度和QTableView对象边框宽度之和
    auto horzHeaderAndFrameWidth = nHorHeaderHeight + nTableViewFrameWidth;     // 水平表头列高度和QTableView对象边框宽度之和
    auto xPos = vertHeaderAndFrameWidth;

    // 滚动条没有达到最大值
    if (m_nVertCurScrollValue != ui.tableView->verticalScrollBar()->maximum())
    {
        for (auto nRowIndex = 0; nRowIndex < nRowCount; ++nRowIndex)
        {
            auto pBtnWnd = m_vtBtnWnd[nRowIndex];
            auto pCheckBoxWnd = m_vtCheckBoxWnd[nRowIndex];
            auto nCurRowHeight = ui.tableView->rowHeight(nRowIndex); // 当前行的高度
            int yPos;
            if (0 != nRowIndex)
            {
                auto lastRowIndex = (nRowIndex - 1);
                lastAllRowsTotalHeight += ui.tableView->rowHeight(lastRowIndex); // 统计本行之前的所有行的高度和

                /* m_nVertCurScrollValue值是以单元格高度为单位的,即每次垂直滚动距离是单元格倍数
                   当鼠标单击滚动条向下滚动时,需要扣减 m_nCurScrollValue * ui.tableView->rowHeight(nRowIndex)距离
                */
                yPos = horzHeaderAndFrameWidth + lastAllRowsTotalHeight - m_nVertCurScrollValue * ui.tableView->rowHeight(nRowIndex);
                pBtnWnd->setGeometry(xPos, yPos, ui.tableView->columnWidth(0), nCurRowHeight);

                // CheckBox的横坐标就是第1列QPushButton的x坐标再加上QPushButton的宽度
                pCheckBoxWnd->setGeometry(xPos + ui.tableView->columnWidth(0), yPos, ui.tableView->columnWidth(1), nCurRowHeight);
            }
            else // 第一行要单独处理,第一行没有上一行,即nRowIndex - 1不存在,是负值
            {
                yPos = horzHeaderAndFrameWidth - m_nVertCurScrollValue * ui.tableView->rowHeight(0);
                pBtnWnd->setGeometry(xPos, yPos, ui.tableView->columnWidth(0), nCurRowHeight);
                pCheckBoxWnd->setGeometry(xPos + ui.tableView->columnWidth(0), yPos, ui.tableView->columnWidth(1), nCurRowHeight);
            }

            setCellWndVisible(pBtnWnd, pCheckBoxWnd, yPos, horzHeaderAndFrameWidth);
        } // end for
    }
    else // 拖动滚动条到达最大值要单独处理
    {
        auto nViewHeight = ui.tableView->viewport()->height();
        for (auto nRowIndex = nRowCount - 1; nRowIndex >= 0 ; --nRowIndex)
        {
            auto pBtnWnd = m_vtBtnWnd[nRowIndex];
            auto pCheckBoxWnd = m_vtCheckBoxWnd[nRowIndex];

            lastAllRowsTotalHeight += ui.tableView->rowHeight(nRowIndex);
            int yPos = nViewHeight + nHorHeaderHeight - lastAllRowsTotalHeight;
            pBtnWnd->setGeometry(xPos, yPos, ui.tableView->columnWidth(0),
                ui.tableView->rowHeight(nRowIndex));

            pCheckBoxWnd->setGeometry(xPos + ui.tableView->columnWidth(0), yPos, ui.tableView->columnWidth(1),
                ui.tableView->rowHeight(nRowIndex));

            setCellWndVisible(pBtnWnd, pCheckBoxWnd, yPos, horzHeaderAndFrameWidth);
        }
    }
}

// 设置单元格窗体部件的可见性
void QtWidgetsApplication1::setCellWndVisible(QWidget* pBtnWnd, QWidget* pCheckBoxWnd,
                                              int yPos, int nHorzHeaderAndFrameWidth)
{
    /* 如果单元格所在窗体部件的纵坐标比水平表头高度与QTableView的上边框之和还小,就隐藏
       窗体部件,防止向上拖动滚动条到最顶部时,最上面一行单元格所在窗体部件遮挡住水平表头
    */
    if (yPos < nHorzHeaderAndFrameWidth)
    {
        pBtnWnd->hide();
        pCheckBoxWnd->hide();
    }
    else // 这种情况是:向下拖动滚动条时,最上面一行单元格所在窗体部件在水平表头下方,即没遮挡住水平表头
    {
        pBtnWnd->show();
        pCheckBoxWnd->show();
    }
}

void QtWidgetsApplication1::resizeEvent(QResizeEvent* event)
{
    QWidget::resizeEvent(event);

    updateCtlGeometry();
}
2.3.代码剖析
QTableView有关的几个尺寸及对象说明:
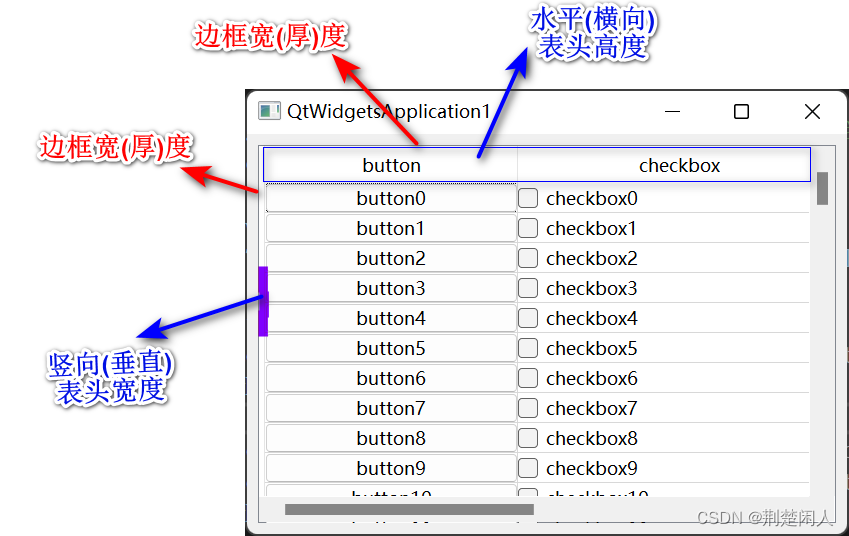
图1
QTableView类对象内部有个viewport对象,可通过如下代码获得:
ui.tableView->viewport();viewport对象在QTableView类对象中的位置如下蓝色方框所示:
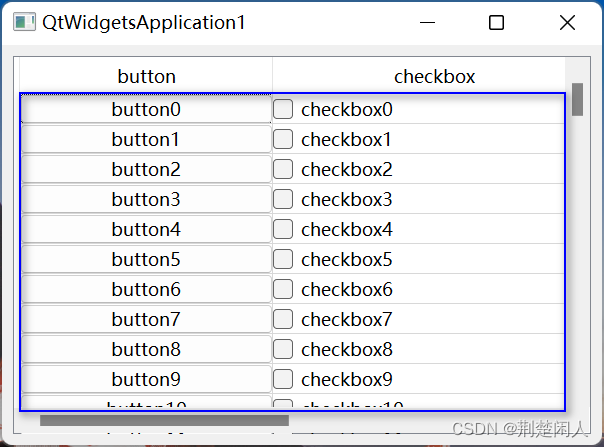
图2
即viewport对象是QTableView类对象剔除边框、垂直表头、水平表头的区域。
2.3.1.createCtrl函数分析
第39行:模型m_pModel获取QTableView的有多少行。
第50~79行:每行的第1列创建一个QPushButton;每行的第2列创建一个QCheckBox。其思路是:
根据QTableView的竖向表头列宽度和QTableView的边框宽(厚)度和单元格宽度(列宽)算出QPushButton、QCheckBox窗体部件的x坐标。
根据QTableView的水平表头列宽度和QTableView的边框宽(厚)度和当前行之前的所有单元格行高总值算出QPushButton、QCheckBox窗体部件的y坐标。
因为第1行没有上一行,即nRowIndex - 1不存在,是负值,所有第1行要单独处理。
然后调用setGeometry函数设置QPushButton、QCheckBox窗体部件的位置和宽高,这样QPushButton、QCheckBox窗体部件正好在每行的每个单元格的位置上了。
结合图1,就能很好理解createCtrl函数的nHorHeaderHeight、nVerticalHeaderWidth、nTableViewFrameWidth的含义了。
2.3.2.updateCtlGeometry函数分析
updateCtlGeometry函数在垂直滚动条滚动、按住鼠标左键,拖动水平表头列和列之间的分割线,从而改变列宽、窗体大小变化时会被调用。该函数和createCtrl函数思想类似,但考虑了:
垂直滚动条滚动的情况。m_nVertCurScrollValue值表示垂直滚动条当前的值,该值是以单元格高度为单位的,即每次垂直滚动条滚动的距离是单元格倍数。当鼠标单击滚动条向下滚动时,需要扣减 m_nCurScrollValue * ui.tableView->rowHeight(nRowIndex)距离,此时呈现的视觉效果是单元格及单元格内的QPushButton、QCheckButton向上移动。
垂直滚动条滚动到最大值时要单独处理,处理代码如129~147行所示。如果不单独处理,则当滚动条达到最大位置时,则有可能出现:1)最后一行单元格和底部不是严格封合的,即留有空隙;2):最后一行不能完全显示。3):当改变窗体大小(如:最大化)时,单元格中的QPushButton、QCheckButton消失了。如下图所示:
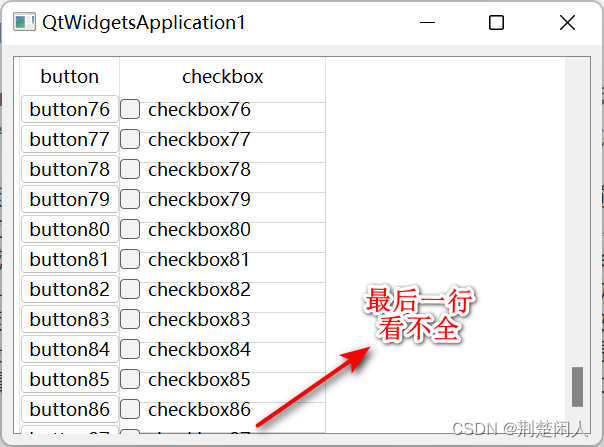
图3
图4
垂直滚动条滚动到最大位置单独处理的思路是:通过获取QTableView的viewport()高度(参见图2),按照行索引从大到小并从viewport()的底部向上设置行单元格的QPushButton、QCheckButton位置及几何尺寸。
2.3.3.setCellWndVisible函数分析
setCellWndVisible函数设置单元格窗体部件的可见性。在向上滚动垂直滚动条滚动到最顶部时,有如下情况:
图5
可以看到,最上面第1行的单元格遮挡住水平表头了。该函数就是处理这种情况的,其思路是:
如果单元格所在窗体部件的纵坐标比水平表头高度与QTableView的上边框之和还小,证明在水平表头上方靠近标题栏方向,就隐藏窗体部件,防止向上拖动滚动条到最顶部时,最上面一行单元格所在窗体部件遮挡住水平表头。
而当向下拖动滚动条时,如果单元格所在窗体部件的纵坐标比水平表头高度与QTableView的上边框之和还大,则单元格所在窗体部件证明在水平表头的下方,就将其显示。
2.3.4完整的效果
完整效果如下:

图6


 666
666

 被折叠的 条评论
为什么被折叠?
被折叠的 条评论
为什么被折叠?
 到【灌水乐园】发言


