怎么删除C盘中的window.old文件?

本文介绍了一种有效的方法来清除Windows 10系统更新后产生的Windows.old文件夹,通过磁盘清理工具进行操作,避免因权限问题导致的删除失败。

怎么删除C盘中的Window.old文件?

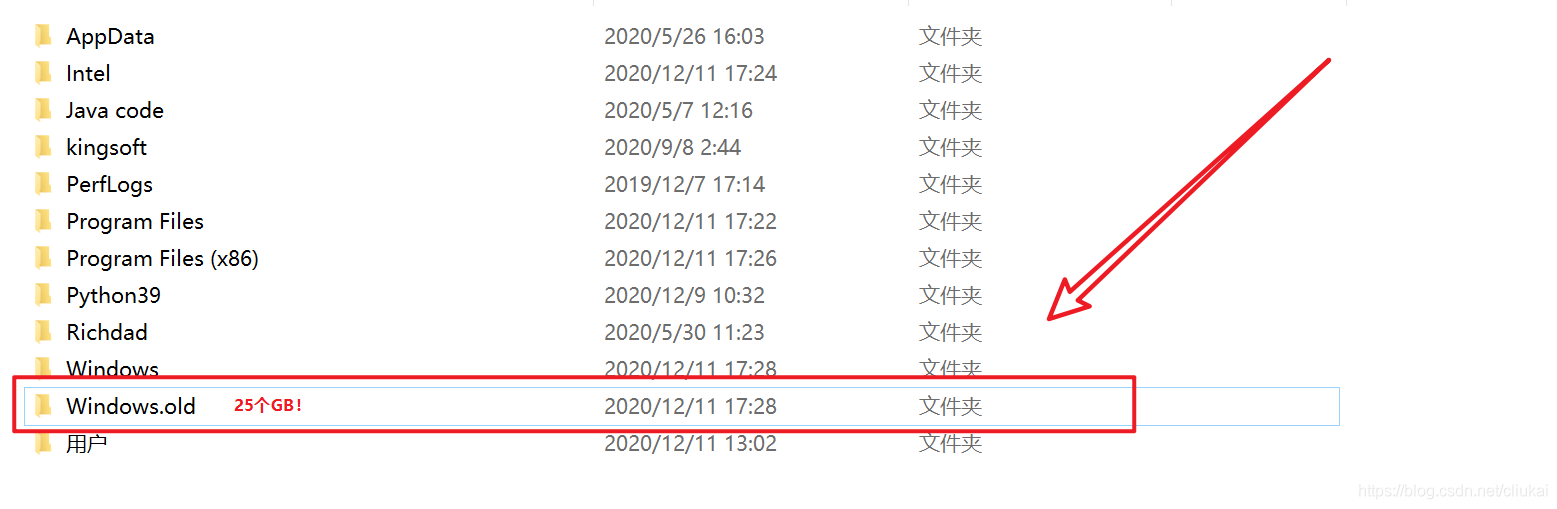
最近又自动更新了一次win10系统,开机后发现系统盘一下满了,郁闷之余打开C盘一看,好家伙,有个25个GB的Windows.old文件夹!兄弟别怪我不客气,回收站里见哈,我一个猛击删除,结果被告知权限不够无法删除,这是我的电脑还是你微软的电脑?心中一阵沸腾。。。

在这里插入图片描述
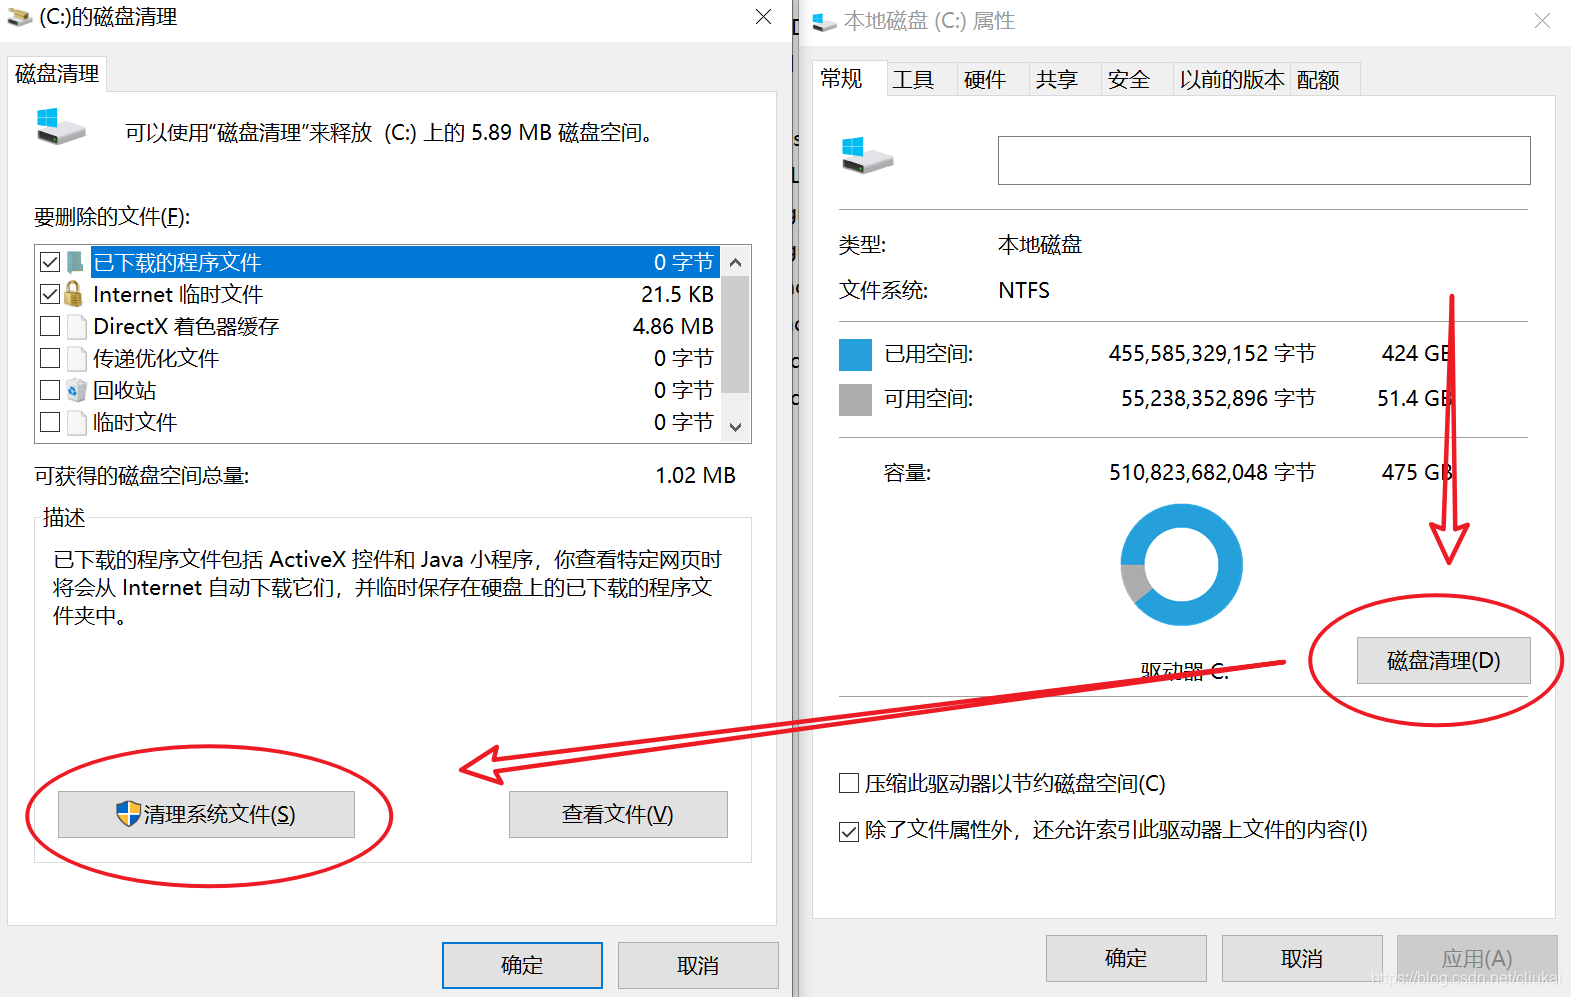
说干就干。首先在空白处右击打开属性,点击磁盘清理,但是在要删除的文件中,依然是找不到能清理windows更新文件这个选项的,我被欺骗了?别急,这时候再点击清理系统文件,然后,这个窗口就自动关闭了。。。没了?
在这里插入图片描述
莫慌,刚才只是虚晃一招,我们再次点击磁盘清理,这一次弹出的窗口中,终于出现了以前的Windows安装文件这个选项,勾选然后选择确定删除。
在这里插入图片描述
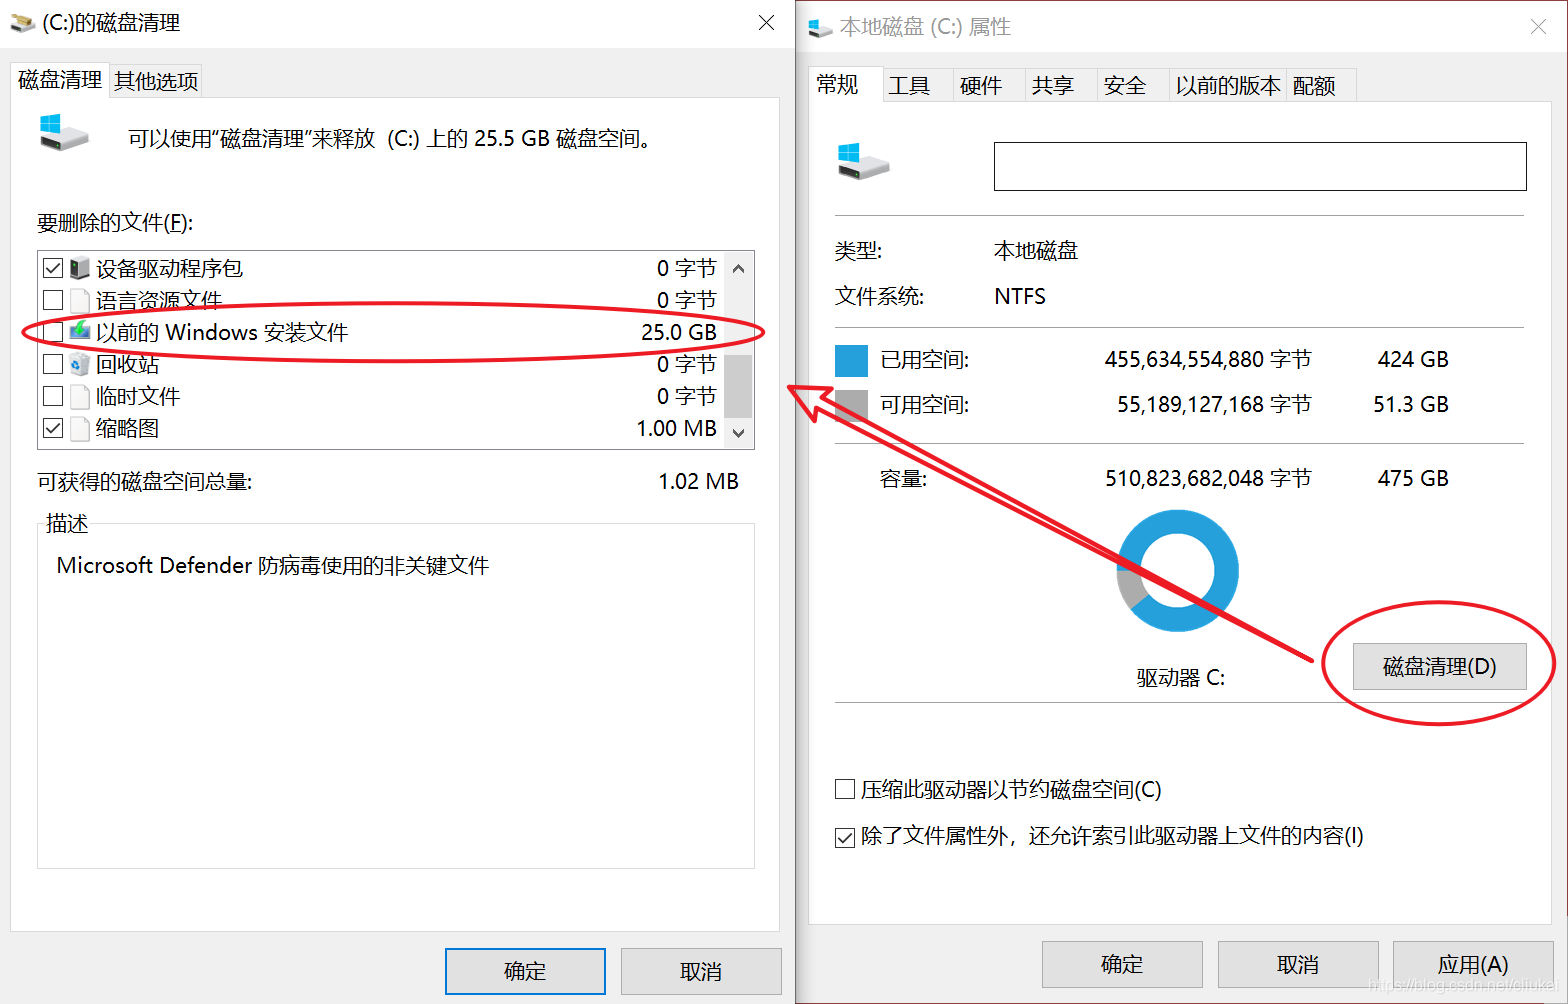
最后会跳出这个提示,意思是清理之后就无法版本回退了,如果对现在的系统还算满意,就直接点是吧。
在这里插入图片描述
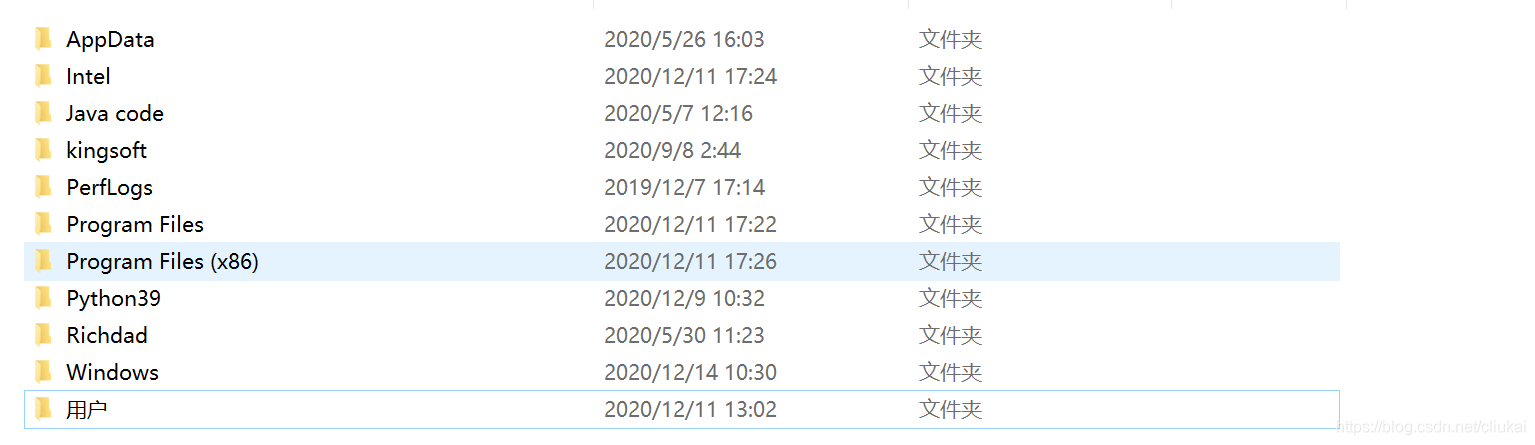
再次回到C盘看一下,Windows.old文件夹已经没有了,大功告成,YES!
在这里插入图片描述

<think> 我们有两个引用,引用[1]提到了在Windows和Linux下用Python读取CPU、GPU、硬温度的方法,并特别指出在Windows下有方法。引用[2]展示了一个使用`smartctl`命令(通常用于Linux)获取硬温度的代码片段,但该命令在Windows下并不直接可用。 用户的问题:在Windows系统下使用Python获取硬实时速度和温度的方法。 分析: 1. 温度获取:在Windows下,获取硬温度通常可以通过WMI(Windows Management Instrumentation)或第三方工具(如smartmontools)的Windows版来实现。 2. 实时速度:硬实时速度通常指读写速度,这可以通过监控磁活动来获取,例如使用性能计数器(Performance Counter)或WMI。 根据引用[1]和[2],引用[1]提到Windows下读取方法,引用[2]使用了smartctl(Linux命令),所以我们需要寻找Windows下的替代方案。 解决方案: 1.温度: - 方法一:使用WMI。Windows的WMI提供了访问硬件信息的接口。对于硬温度,需要硬支持S.M.A.R.T.,并且WMI中可能通过MSStorageDriver_ATAPISmartData类来获取。 - 方法二:使用smartmontools的Windows版本,然后通过Python调用命令行工具(如smartctl.exe)并解析输出。 2.实时速度: - 使用性能计数器(Performance Counter):Python可以使用`psutil`库来获取磁读写速度。 - 使用WMI:通过WMI查询实时磁性能数据。 具体步骤: ### 硬温度获取方法 #### 使用WMI(推荐,无需安装额外软件) 注意:不是所有硬都支持通过WMI读取温度,且WMI中的类可能因系统而异。常见的类为`MSStorageDriver_ATAPISmartData`,但需要确认。 示例代码: ```python import wmi c = wmi.WMI() t = wmi.WMI(namespace="root\\wmi") # 获取硬温度 try: smart_data = t.MSStorageDriver_ATAPISmartData()[0] # 解析温度值,通常位于VendorSpecific属性的某个位置(例如索引5或6) # 不同硬厂商位置可能不同,需要根据实际情况调整 # 通常,温度值在VendorSpecific的某个字节,常见的位置是第5个字节(索引4)或第6个字节(索引5) # 这里假设温度值在VendorSpecific[5](即第6个字节) if smart_data.VendorSpecific: # VendorSpecific是一个字节数组 # 我们取索引5的值(即第6个字节) # 注意:有些硬温度值在索引4或索引5,需要根据实际情况调整 temperature = smart_data.VendorSpecific[5] print(f"硬温度: {temperature} 摄氏度") else: print("无法获取硬温度信息") except Exception as e: print(f"获取硬温度失败: {e}") ``` 注意:上述代码中,温度值在VendorSpecific数组中的位置因硬厂商而异。通常需要查阅硬的S.M.A.R.T.属性定义。温度一般是S.M.A.R.T.属性的第194项(C2温度),但WMI的MSStorageDriver_ATAPISmartData中如何对应需要调试。 #### 使用smartmontools(需要安装) 1. 下载并安装smartmontools for Windows:https://www.smartmontools.org/ 2. 将smartctl.exe所在的目录添加到系统PATH,或者在代码中指定路径。 3. 使用Python调用smartctl.exe并解析输出。 示例代码: ```python import subprocess def get_hdd_temperature(): try: # 执行smartctl命令,这里假设硬为第一块硬,通常Windows下为\\.\PhysicalDrive0 result = subprocess.run(['smartctl', '-A', r'\\.\PhysicalDrive0'], capture_output=True, text=True, check=True) # 解析输出,查找温度行 for line in result.stdout.split('\n'): if 'Temperature_Celsius' in line: # 提取温度值 parts = line.split() # 温度值通常在倒数第二列(不同版本smartctl输出可能不同) # 通常输出格式为:194 Temperature_Celsius 0x0022 100 100 000 Old_age Always - 30 # 温度值是最后一列(30) if len(parts) >= 10: temperature = parts[9] print(f"硬温度: {temperature} 摄氏度") return print("未找到温度信息") except Exception as e: print(f"获取硬温度失败: {e}") get_hdd_temperature() ``` ### 硬实时速度获取方法 #### 使用psutil(推荐) `psutil`库可以方便地获取磁IO信息,包括读写速度。 安装:`pip install psutil` 示例代码(监控实时速度): ```python import psutil import time def monitor_disk_speed(interval=1): # 获取磁IO计数器 prev_io = psutil.disk_io_counters() time.sleep(interval) curr_io = psutil.disk_io_counters() # 计算读写速度(字节/秒) read_speed = (curr_io.read_bytes - prev_io.read_bytes) / interval write_speed = (curr_io.write_bytes - prev_io.write_bytes) / interval # 转换为MB/s read_speed_mb = read_speed / (1024 * 1024) write_speed_mb = write_speed / (1024 * 1024) return read_speed_mb, write_speed_mb # 示例:持续监控 while True: read_speed, write_speed = monitor_disk_speed() print(f"读取速度: {read_speed:.2f} MB/s, 写入速度: {write_speed:.2f} MB/s") time.sleep(1) # 监控间隔1秒 ``` #### 使用WMI(可选) WMI也可以获取实时性能数据,但相对复杂。 ### 总结 - 硬温度:推荐使用smartmontools(通过命令行调用)或WMI(如果支持)。 - 硬实时速度:推荐使用`psutil`库,简单高效。 注意:获取硬温度可能需要管理员权限。 ### 相关问题 根据以上内容,生成相关问题: </think> ### Windows系统下Python获取硬实时速度和温度的方法 在Windows系统下,可以通过以下两种方法获取硬实时速度和温度信息: #### 1. 使用WMI(Windows Management Instrumentation)获取硬温度 ```python import wmi def get_hdd_temperature(): c = wmi.WMI(namespace="root\\wmi") temperatures = [] for item in c.MSAcpi_ThermalZoneTemperature(): # 温度值以开尔文为单位,需转换为摄氏度 temp_celsius = (item.CurrentTemperature / 10) - 273.15 temperatures.append(round(temp_celsius, 1)) return temperatures # 调用示例 print("硬温度(℃):", get_hdd_temperature()) ``` #### 2. 使用第三方库获取实时传输速度(需安装psutil) ```python import psutil import time def monitor_disk_speed(interval=1): prev_read = psutil.disk_io_counters().read_bytes prev_write = psutil.disk_io_counters().write_bytes time.sleep(interval) curr_read = psutil.disk_io_counters().read_bytes curr_write = psutil.disk_io_counters().write_bytes read_speed = (curr_read - prev_read) / interval # 字节/秒 write_speed = (curr_write - prev_write) / interval return { "read_speed_MB/s": round(read_speed / (1024*1024), 2), "write_speed_MB/s": round(write_speed / (1024*1024), 2) } # 调用示例(持续监控) while True: speeds = monitor_disk_speed() print(f"读取速度: {speeds['read_speed_MB/s']} MB/s | 写入速度: {speeds['write_speed_MB/s']} MB/s") time.sleep(1) ``` #### 注意事项: 1. **权限要求**: - 需要以管理员身份运行脚本 - 安装依赖库:`pip install wmi psutil` 2. **硬件支持**: - 温度读取需要硬支持S.M.A.R.T.技术 - 部分NVMe硬可能需要使用`MSStorageDriver_ATAPISmartData`类[^1] 3. **速度监控原理**: - 通过计算单位时间内字节传输量的变化 - 可监控特定分区:`psutil.disk_io_counters(perdisk=True)` #### 完整示例(温度+速度监控): ```python import wmi, psutil, time def get_disk_info(): # 获取温度 c = wmi.WMI(namespace="root\\wmi") temp = [round((t.CurrentTemperature/10)-273.15, 1) for t in c.MSAcpi_ThermalZoneTemperature()] # 获取速度 prev = psutil.disk_io_counters() time.sleep(1) curr = psutil.disk_io_counters() return { "temperature": temp[0] if temp else "N/A", "read_speed": round((curr.read_bytes - prev.read_bytes)/(1024*1024), 2), "write_speed": round((curr.write_bytes - prev.write_bytes)/(1024*1024), 2) } while True: info = get_disk_info() print(f"温度: {info['temperature']}℃ | 读: {info['read_speed']}MB/s | 写: {info['write_speed']}MB/s") time.sleep(2) ```
评论
添加红包

请填写红包祝福语或标题

红包个数最小为10个

红包金额最低5元

当前余额3.43前往充值 >
需支付:10.00
成就一亿技术人!
领取后你会自动成为博主和红包主的粉丝 规则
hope_wisdom
发出的红包
实付
使用余额支付
点击重新获取
扫码支付
钱包余额 0

抵扣说明:

1.余额是钱包充值的虚拟货币,按照1:1的比例进行支付金额的抵扣。
2.余额无法直接购买下载,可以购买VIP、付费专栏及课程。

余额充值