


 本文提供了一个最简单的Spring整合Kafka的示例,包括安装zookeeper和kafka、设置JDK环境、创建topic,以及集成所需的5个类和配置文件。通过引入必要的依赖,配置application.yml,创建ConfigProperties、CommonConfiguration、Producer、Consumer和KafkaApplication,实现了基本的生产者和消费者功能。
这周到联调阶段,回顾项目的开发,之前在spring跟kafka这块吃了不少亏,网上的资料太繁琐、配置好了还各种报错,我今天整理一个最最简单的demo,以供参考。
前提条件:
- 安装zookeeper,下载解压,更改配置文件名称、配置环境变量,启动即可,资料比较全,搜一下就有
- 安装kafka, 更简单,下载解压,启动即可
- jdk8 + 的环境,现在的spring基本指spring boot
- 在kafka创建两个topic,wen.topic、wen.fooTopic
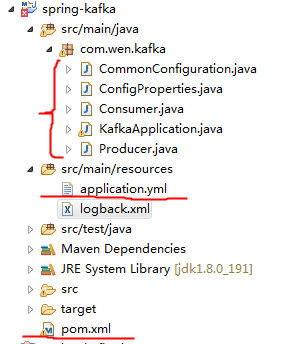
现在开始集成,只有5个类+一个配置文件+pom.xml
1.pom.xml 引进spring和kafka的包
<project xmlns="http://maven.apache.org/POM/4.0.0" xmlns:xsi="http://www.w3.org/2001/XMLSchema-instance"
  xsi:schemaLocation="http://maven.apache.org/POM/4.0.0 http://maven.apache.org/xsd/maven-4.0.0.xsd">
  <modelVersion>4.0.0</modelVersion>

  <groupId>com.wen</groupId>
  <artifactId>spring-kafka</artifactId>
  <version>0.0.1-SNAPSHOT</version>
  <packaging>jar</packaging>

  <name>spring-kafka</name>
  <url>http://maven.apache.org</url>

  <parent>
		<groupId>org.springframework.boot</groupId>
		<artifactId>spring-boot-starter-parent</artifactId>
		<version>2.0.0.RELEASE</version>
		<relativePath/>
	</parent>

	<properties>
		<project.build.sourceEncoding>UTF-8</project.build.sourceEncoding>
		<project.reporting.outputEncoding>UTF-8</project.reporting.outputEncoding>
		<java.version>1.8</java.version>
	</properties>

	<dependencies>
		<dependency>
			<groupId>org.springframework.kafka</groupId>
			<artifactId>spring-kafka</artifactId>
			<version>2.1.4.RELEASE</version>
		</dependency>
		<dependency>
			<groupId>org.springframework.boot</groupId>
			<artifactId>spring-boot-starter-web</artifactId>
		</dependency>
	</dependencies>

	<build>
		<plugins>
			<plugin>
				<groupId>org.springframework.boot</groupId>
				<artifactId>spring-boot-maven-plugin</artifactId>
			</plugin>
		</plugins>
	</build>
	<repositories>
		<repository>
			<id>spring-milestones</id>
			<name>Spring Milestones</name>
			<url>https://repo.spring.io/libs-milestone</url>
			<snapshots>
				<enabled>false</enabled>
			</snapshots>
		</repository>
	</repositories>
</project>
2.application.yml 配置文件
kafka:
  brokerAddress: localhost:9092
  topic: wen.topic
  fooTopic: wen.fooTopic
spring:
  jmx:
    enabled: false
- ConfigProperties ,这是配置类,将配置文件中的连接参数、主题名称转换为对象
package com.wen.kafka;

import org.springframework.boot.context.properties.ConfigurationProperties;

@ConfigurationProperties(prefix = "kafka")
public class ConfigProperties {

	private String brokerAddress;

	private String topic;

	private String fooTopic;

	public String getBrokerAddress() {
		return this.brokerAddress;
	}

	public void setBrokerAddress(String brokerAddress) {
		this.brokerAddress = brokerAddress;
	}

	public String getTopic() {
		return this.topic;
	}

	public void setTopic(String topic) {
		this.topic = topic;
	}

	public String getFooTopic() {
		return this.fooTopic;
	}

	public void setFooTopic(String fooTopic) {
		this.fooTopic = fooTopic;
	}

}
4.CommonConfiguration 配置消费者、生产者
package com.wen.kafka;

import java.util.HashMap;
import java.util.Map;

import org.apache.kafka.clients.consumer.ConsumerConfig;
import org.apache.kafka.clients.consumer.ConsumerRecord;
import org.apache.kafka.clients.producer.ProducerConfig;
import org.apache.kafka.common.serialization.StringDeserializer;
import org.apache.kafka.common.serialization.StringSerializer;

import org.springframework.beans.factory.annotation.Autowired;
import org.springframework.context.annotation.Bean;
import org.springframework.kafka.config.ConcurrentKafkaListenerContainerFactory;
import org.springframework.kafka.core.ConsumerFactory;
import org.springframework.kafka.core.DefaultKafkaConsumerFactory;
import org.springframework.kafka.core.DefaultKafkaProducerFactory;
import org.springframework.kafka.core.KafkaTemplate;
import org.springframework.kafka.core.ProducerFactory;
import org.springframework.kafka.listener.adapter.RecordFilterStrategy;
import org.springframework.kafka.support.converter.StringJsonMessageConverter;
import org.springframework.retry.support.RetryTemplate;


public class CommonConfiguration {

	@Autowired
	private ConfigProperties configProperties;

	@Bean
	public ProducerFactory<String, String> producerFactory() {
		Map<String, Object> props = new HashMap<>();
		props.put(ProducerConfig.BOOTSTRAP_SERVERS_CONFIG, this.configProperties.getBrokerAddress());
		props.put(ProducerConfig.RETRIES_CONFIG, 0);
		props.put(ProducerConfig.BATCH_SIZE_CONFIG, 16384);
		props.put(ProducerConfig.LINGER_MS_CONFIG, 1);
		props.put(ProducerConfig.BUFFER_MEMORY_CONFIG, 33554432);
		props.put(ProducerConfig.KEY_SERIALIZER_CLASS_CONFIG, StringSerializer.class);
		props.put(ProducerConfig.VALUE_SERIALIZER_CLASS_CONFIG, StringSerializer.class);
		return new DefaultKafkaProducerFactory<>(props);
	}

	@Bean
	public KafkaTemplate<String, String> kafkaTemplate() {
		return new KafkaTemplate<>(producerFactory());
	}

	@Bean
	public ConsumerFactory<String, String> consumerFactory() {
		return new DefaultKafkaConsumerFactory<>(consumerProperties());
	}

	@Bean
	public Map<String, Object> consumerProperties() {
		Map<String, Object> props = new HashMap<>();
		props.put(ConsumerConfig.BOOTSTRAP_SERVERS_CONFIG, this.configProperties.getBrokerAddress());
		props.put(ConsumerConfig.GROUP_ID_CONFIG, "s1pGroup");
		props.put(ConsumerConfig.ENABLE_AUTO_COMMIT_CONFIG, false);
		props.put(ConsumerConfig.SESSION_TIMEOUT_MS_CONFIG, 15000);
		props.put(ConsumerConfig.KEY_DESERIALIZER_CLASS_CONFIG, StringDeserializer.class);
		props.put(ConsumerConfig.VALUE_DESERIALIZER_CLASS_CONFIG, StringDeserializer.class);
		return props;
	}

	@Bean
	public ConcurrentKafkaListenerContainerFactory<String, String> kafkaListenerContainerFactory() {
		ConcurrentKafkaListenerContainerFactory<String, String> factory =
				new ConcurrentKafkaListenerContainerFactory<>();
		factory.setConsumerFactory(consumerFactory());
		return factory;
	}

	@Bean
	public ConcurrentKafkaListenerContainerFactory<String, String> jsonKafkaListenerContainerFactory() {
		ConcurrentKafkaListenerContainerFactory<String, String> factory =
				new ConcurrentKafkaListenerContainerFactory<>();
		factory.setConsumerFactory(consumerFactory());
		factory.setMessageConverter(new StringJsonMessageConverter());
		return factory;
	}

	@Bean
	public ConcurrentKafkaListenerContainerFactory<String, String> retryKafkaListenerContainerFactory() {
		ConcurrentKafkaListenerContainerFactory<String, String> factory =
				new ConcurrentKafkaListenerContainerFactory<>();
		factory.setConsumerFactory(consumerFactory());
		factory.setRetryTemplate(new RetryTemplate());
		return factory;
	}

}
5.Producer 生产者
package com.wen.kafka;

import org.springframework.beans.factory.annotation.Autowired;
import org.springframework.kafka.core.KafkaTemplate;
import org.springframework.stereotype.Component;

@Component
public class Producer {

	@Autowired
	private ConfigProperties configProperties;

	@Autowired
	private KafkaTemplate<String, String> template;

	public void send(String foo) {
		this.template.send(this.configProperties.getTopic(), foo);
	}
}
6.Consumer 消费者
package com.wen.kafka;

import java.util.concurrent.CountDownLatch;

import org.springframework.kafka.annotation.KafkaListener;
import org.springframework.stereotype.Component;

@Component
public class Consumer {

	public final CountDownLatch latch = new CountDownLatch(1);

	@KafkaListener(topics = "${kafka.topic}")
	public void listen(String foo) {
		System.out.println("Received: " + foo);
		this.latch.countDown();
	}

}
7.KafkaApplication 使用,我这边是传入一个字符串
package com.wen.kafka;

import java.util.concurrent.CountDownLatch;
import java.util.concurrent.TimeUnit;

import com.wen.kafka.CommonConfiguration;
import com.wen.kafka.ConfigProperties;

import org.springframework.beans.factory.annotation.Autowired;
import org.springframework.boot.WebApplicationType;
import org.springframework.boot.autoconfigure.SpringBootApplication;
import org.springframework.boot.builder.SpringApplicationBuilder;
import org.springframework.context.ConfigurableApplicationContext;
import org.springframework.context.annotation.Bean;
import org.springframework.context.annotation.Import;
import org.springframework.kafka.annotation.EnableKafka;
import org.springframework.kafka.annotation.KafkaListener;
import org.springframework.kafka.core.KafkaTemplate;

@SpringBootApplication
@Import({ CommonConfiguration.class, ConfigProperties.class })
@EnableKafka
public class KafkaApplication {

	public static void main(String[] args) throws Exception {
		ConfigurableApplicationContext context = new SpringApplicationBuilder(KafkaApplication.class)
			.web(WebApplicationType.NONE)
			.run(args);
		Producer producer = context.getBean(Producer.class);
		producer.send("stupid");
		context.getBean(Consumer.class).latch.await(10, TimeUnit.SECONDS);
		context.close();
	}

}
8.结果

以上是最基本的使用例子,至于在项目中怎么运用,灵活调用生产消费者即可


 2188
2188


 到【灌水乐园】发言


