


 本文介绍了使用Python和OpenCV进行图像轮廓检测和拟合的过程,包括图像轮廓查找与绘制、周长与面积计算、几何图形的最小外包与拟合,以及霍夫检测的应用,如直线和圆形检测。通过这些技术,可以获取图像目标的大小、位置和方向等信息。

python+opencv-16 图像轮廓检测和拟合
图像轮廓检测和拟合
边缘检测只能检测出图像边缘信息,并不能得到一幅图像的整体信息,而图像轮廓是指将边缘信息连接起来形成一个整体。通过对图像轮廓进行操作,可以获取目标图像的大小、位置和方向等信息。
图像轮廓的查找与绘制
图像轮廓由一系列点组成,这些点以某种方式表示图像中的一条曲线。图像的轮廓绘制就是将检测到的边缘信息图像的前景信息进行拟合,从而得到图像的轮廓。
import cv2 as cv

image = cv.imread("lena.jpg")
gray = cv.cvtColor(image, cv.COLOR_BGR2GRAY)

cv.imshow("image", image)

ret, binary = cv.threshold(gray, 127, 255, cv.THRESH_BINARY)

contours, hierarchy = cv.findContours(binary, cv.RETR_EXTERNAL, cv.CHAIN_APPROX_SIMPLE)

image = cv.drawContours(image, contours, -1, (0, 0, 255), 3)

cv.imshow("result", image)

cv.waitKey()
cv.destroyAllWindows()

提起一张图片的情景信息:
import cv2 as cv
import numpy as np

image = cv.imread("lena.jpg")
gray = cv.cvtColor(image, cv.COLOR_BGR2GRAY)

cv.imshow("image", image)

ret, binary = cv.threshold(gray, 127, 255, cv.THRESH_BINARY)

contours, hierarchy = cv.findContours(binary, cv.RETR_EXTERNAL, cv.CHAIN_APPROX_SIMPLE)

mask = np.zeros(image.shape, np.uint8)

mask = cv.drawContours(mask, contours, -1, (255, 255, 255), -1)

cv.imshow("mask", mask)

logimg = cv.bitwise_and(image, mask)
cv.imshow("logimg", logimg)

cv.waitKey()
cv.destroyAllWindows()

提取一幅图像的边缘信息:
import cv2 as cv
import numpy as np

image = cv.imread("lena.jpg")
cv.imshow("image", image)

binaryImg = cv.Canny(image, 50, 200)

h = cv.findContours(binaryImg, cv.RETR_TREE, cv.CHAIN_APPROX_NONE)

contours = h[0]

temp = np.ones(binaryImg.shape, np.uint8)*255

cv.drawContours(temp, contours, -1, (0, 255, 0), 1)

cv.imshow("contours", temp)
cv.imshow("canny", binaryImg)

cv.waitKey()
cv.destroyAllWindows()

轮廓的周长与面积
import cv2 as cv

image = cv.imread("lunkuo.jpeg")
cv.imshow("image", image)

gray = cv.cvtColor(image, cv.COLOR_BGR2GRAY)
ret, binary = cv.threshold(gray, 127, 255, cv.THRESH_BINARY)
contours, hierarchy = cv.findContours(binary, cv.RETR_LIST, cv.CHAIN_APPROX_SIMPLE)

n = len(contours)
cntLen = []

for i in range(n):
    cntLen.append(cv.arcLength(contours[i], True))
    print("第"+str(i)+"个轮廓长度为:%d" %cntLen[i])

cv.waitKey()
cv.destroyAllWindows()

第0个轮廓长度为:944
第1个轮廓长度为:1079
面积计算
import cv2 as cv

image = cv.imread("lunkuo.jpeg")
cv.imshow("image", image)

gray = cv.cvtColor(image, cv.COLOR_BGR2GRAY)
ret, binary = cv.threshold(gray, 127, 255, cv.THRESH_BINARY)
contours, hierarchy = cv.findContours(binary, cv.RETR_LIST, cv.CHAIN_APPROX_SIMPLE)

n = len(contours)
cntLen = []

for i in range(n):
    cntLen.append(cv.contourArea(contours[i]))
    print("第"+str(i)+"个轮廓面积为:%d" % cntLen[i])

cv.waitKey()
cv.destroyAllWindows()

第0个轮廓面积为:55671
第1个轮廓面积为:23783
几何图形的最小外包与拟合
通过阈值分割和边缘检测可以获得一幅图像的前景或边缘。一般通过拟合的方式获取可以近似这些图像轮廓的多边形或者最小外包,为之后的模板匹配打下基础。
最小外包矩形:
import cv2 as cv
import numpy as np

image = cv.imread("huzi.jpeg")
cv.imshow("image", image)
gray = cv.cvtColor(image, cv.COLOR_BGR2GRAY)
ret, binary = cv.threshold(gray, 127, 255, cv.THRESH_BINARY)

contours, hierarchy = cv.findContours(binary, cv.RETR_LIST, cv.CHAIN_APPROX_SIMPLE)

rect = cv.minAreaRect(contours[0])

points = cv.boxPoints(rect)
points = np.int0(points)

img = cv.drawContours(image, [points], 0, (255, 255, 255), 1)
cv.imshow("result", image)

cv.waitKey()
cv.destroyAllWindows()

最小外包圆形:
import cv2 as cv
import numpy as np

image = cv.imread("huzi.jpeg")
cv.imshow("image", image)
gray = cv.cvtColor(image, cv.COLOR_BGR2GRAY)
ret, binary = cv.threshold(gray, 127, 255, cv.THRESH_BINARY)

contours, hierarchy = cv.findContours(binary, cv.RETR_LIST, cv.CHAIN_APPROX_SIMPLE)

(x, y), rad = cv.minEnclosingCircle(contours[0])
center = (int(x), int(y))
rad = int(rad)

cv.circle(image, center, rad, (255, 255, 255), 1)
cv.imshow("result", image)

cv.waitKey()
cv.destroyAllWindows()

最小外包三角形:
import cv2 as cv
import numpy as np

image = cv.imread("huzi.jpeg")
cv.imshow("image", image)
gray = cv.cvtColor(image, cv.COLOR_BGR2GRAY)
ret, binary = cv.threshold(gray, 127, 255, cv.THRESH_BINARY)

contours, hierarchy = cv.findContours(binary, cv.RETR_LIST, cv.CHAIN_APPROX_SIMPLE)

area, trg = cv.minEnclosingTriangle(contours[0])

for i in range(0, 3):
    cv.line(image, tuple(trg[i][0]), tuple(trg[(i+1)%3][0]), (255, 255, 255), 1)
cv.imshow("result", image)

cv.waitKey()
cv.destroyAllWindows()

最小外包椭圆:
import cv2 as cv
import numpy as np

image = cv.imread("huzi.jpeg")
cv.imshow("image", image)
gray = cv.cvtColor(image, cv.COLOR_BGR2GRAY)
ret, binary = cv.threshold(gray, 127, 255, cv.THRESH_BINARY)

contours, hierarchy = cv.findContours(binary, cv.RETR_LIST, cv.CHAIN_APPROX_SIMPLE)

ellipse = cv.fitEllipse(contours[0])
cv.ellipse(image, ellipse, (255, 255, 0), 1)
cv.imshow("result", image)

cv.waitKey()
cv.destroyAllWindows()

最优拟合曲线:
import cv2 as cv
import numpy as np

image = cv.imread("huzi.jpeg")
cv.imshow("image", image)
gray = cv.cvtColor(image, cv.COLOR_BGR2GRAY)
ret, binary = cv.threshold(gray, 127, 255, cv.THRESH_BINARY)

contours, hierarchy = cv.findContours(binary, cv.RETR_LIST, cv.CHAIN_APPROX_SIMPLE)

row, col = image.shape[:2]
[vx, vy, x, y] = cv.fitLine(contours[0], cv.DIST_L2, 0, 0.01, 0.01)
ly = int((-x*vy/vx)+y)
ry = int(((col-x)*vy/vx)+y)
cv.line(image, (col-1, ry), (0, ly), (255, 0, 255), 2)
cv.imshow("result", image)

cv.waitKey()
cv.destroyAllWindows()

霍夫检测
霍夫变换是图像处理中的一种特征提取技术,该过程在一个参数空间中通过计算累计结果的局部最大值得到一个符合该特定形状的集合作为霍夫变换的结果。
最初的霍夫变换用来检测直线和曲线,起初的方法要求直到物体边界线的解析方程,但不需要有关区域位置的先验知识。之后霍夫变换扩展到任意形状物体的识别,多为圆和椭圆。霍夫变换运用两个坐标之间的变换将在一个空间中具有相同形状的曲线或直线映射到另一个坐标空间的一个点上形成峰值,从而把检测任意形状的问题转换为统计峰值的问题。
霍夫直线检测:
import cv2 as cv
import numpy as np


def HoughLine_s(img):
    lines = cv.HoughLines(edges, 1, np.pi/180, 100)
    for line in lines:
        rho, theta = line[0]
        a = np.cos(theta)
        b = np.sin(theta)
        x0 = a*rho
        y0 = b*rho
        x1 = int(x0 + 1000 * (-b))
        y1 = int(y0 + 1000 * (a))
        x2 = int(x0 - 1000 * (-b))
        y2 = int(y0 - 1000 * (a))
        cv.line(img, (x1, y1), (x2, y2), (255, 255, 255), 2)
        return img


def HoughLine_p(img):
    lines = cv.HoughLinesP(edges, 1, np.pi / 180, 1, minLineLength=50, maxLineGap=1)
    for line in lines:
        x1, y1, x2, y2 = line[0]
        cv.line(img, (x1, y1), (x2, y2), (255, 255, 255), 2)
        return img


image = cv.imread("jin.jpg")
gray = cv.cvtColor(image, cv.COLOR_BGR2GRAY)
edges = cv.Canny(gray, 10, 200)
cv.imshow("edges", edges)
cv.imshow("image", image)

hough_s = HoughLine_s(image)
hough_p = HoughLine_p(image)

cv.imshow("hough_s", hough_s)
cv.imshow("hough_p", hough_p)

cv.waitKey()
cv.destroyAllWindows()


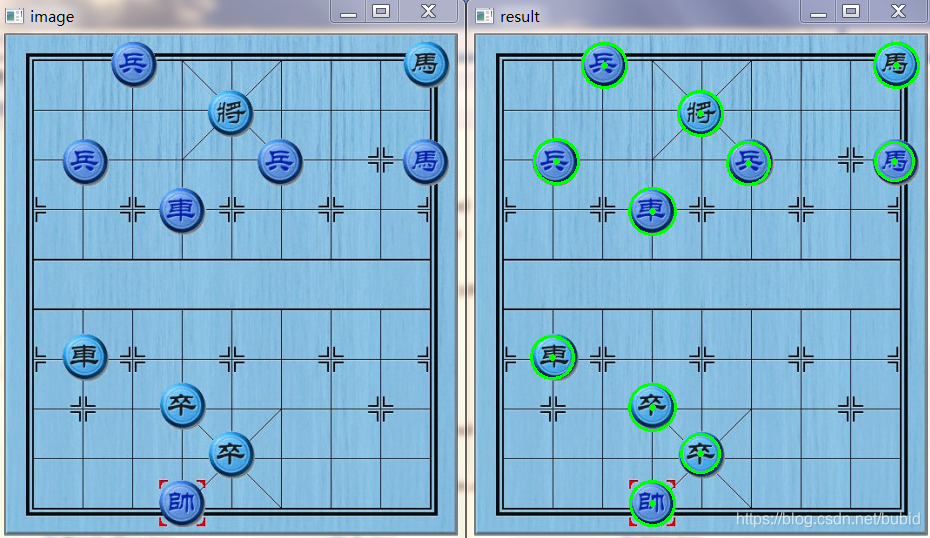
霍夫圆监测:
import cv2 as cv
import numpy as np

image = cv.imread("xiangqi.jpg")
gray = cv.cvtColor(image, cv.COLOR_BGR2GRAY)
image = cv.cvtColor(image, cv.COLOR_BGR2RGB)
cv.imshow("image", image)
gray = cv.medianBlur(gray, 5)

circles = cv.HoughCircles(gray, cv.HOUGH_GRADIENT, 1, 50, param1=50, param2=30, minRadius=5, maxRadius=25)
circles = np.uint16(np.around(circles))

for i in circles[0, :]:
    cv.circle(image, (i[0], i[1]), i[2], (0, 255, 0), 2)
    cv.circle(image, (i[0], i[1]), 2, (0, 255, 0), 2)

cv.imshow("result", image)

cv.waitKey()
cv.destroyAllWindows()


 3万+
3万+

 被折叠的 条评论
为什么被折叠?
被折叠的 条评论
为什么被折叠?
 到【灌水乐园】发言


