


 本文介绍SpringBoot的基础配置,包括POM文件的父项目与启动器,以及主程序类的注解配置。解析了@SpringBootApplication注解的作用,以及如何通过启动器自动导入所需组件。
1.解析
1、POM文件
1、父项目
    <parent>
        <groupId>org.springframework.boot</groupId>
        <artifactId>spring-boot-starter-parent</artifactId>
        <version>1.5.9.RELEASE</version>
    </parent>

    <!-- 他的父项目是:-->
    	<parent>
		<groupId>org.springframework.boot</groupId>
		<artifactId>spring-boot-dependencies</artifactId>
		<version>1.5.9.RELEASE</version>
		<relativePath>../../spring-boot-dependencies</relativePath>
	</parent>
	<artifactId>spring-boot-starter-parent</artifactId>
	<!-- 他来真正管理Spring Boot应用里面的所有依赖版本;-->
Spring Boot的版本仲裁中心;
以后我们导入依赖默认是不需要写版本;(没有在dependencies里面管理的依赖自然需要声明版本号)
2、启动器
	<dependencies>
        <dependency>
            <groupId>org.springframework.boot</groupId>
            <artifactId>spring-boot-starter-web</artifactId>
        </dependency>
    </dependencies>
spring-boot-starter-web:
帮我们导入了web模块正常运行所依赖的组件;
spring-boot-starter:
spring-boot场景启动器;
spring还有好多其他的启动器:
https://docs.spring.io/spring-boot/docs/1.5.9.RELEASE/reference/html/using-boot-build-systems.html#using-boot-starter

Spring Boot将所有的功能场景都抽取出来,做成一个个的starters(启动器),只需要在项目里面引入这些starter 相关场景的所有依赖都会导入进来。要用什么功能就导入什么场景的启动器
2、主程序类,主入口类,注解配置解析
/**
 * @SpringBootApplication 来标注一个主程序类,说明这是一个Spring Boot应用
 */
@SpringBootApplication
public class HelloWorld {
    public static void main(String[] args) {
        // Spring应用启动起来
        SpringApplication.run(HelloWorld.class,args);
    }
}
注解:
i @SpringBootApplication:
Spring Boot应用标注在某个类上说明这个类是SpringBoot的主配置类,SpringBoot 就应该运行这个类的main方法来启动SpringBoot应用;
其是一个组合注解,源码为:
@Target({ElementType.TYPE})
@Retention(RetentionPolicy.RUNTIME)
@Documented
@Inherited
@SpringBootConfiguration
@EnableAutoConfiguration
@ComponentScan(
    excludeFilters = {@Filter(
    type = FilterType.CUSTOM,
    classes = {TypeExcludeFilter.class}
), @Filter(
    type = FilterType.CUSTOM,
    classes = {AutoConfigurationExcludeFilter.class}
)}
)
public @interface SpringBootApplication {
    @AliasFor(
        annotation = EnableAutoConfiguration.class,
        attribute = "exclude"
    )
    Class<?>[] exclude() default {};

    @AliasFor(
        annotation = EnableAutoConfiguration.class,
        attribute = "excludeName"
    )
    String[] excludeName() default {};

    @AliasFor(
        annotation = ComponentScan.class,
        attribute = "basePackages"
    )
    String[] scanBasePackages() default {};

    @AliasFor(
        annotation = ComponentScan.class,
        attribute = "basePackageClasses"
    )
    Class<?>[] scanBasePackageClasses() default {};
}
i-1 @SpringBootConfiguration:
Spring Boot的配置类; 标注在某个类上,表示这是一个Spring Boot的配置类;其包含:
- i-1-1@Configuration:配置类上来标注这个注解;
配置类 ----- 配置文件;配置类也是容器中的一个组件;@Component
i-2 @EnableAutoConfiguration:
开启自动配置功能;
以前我们需要配置的东西,Spring Boot帮我们自动配置;@EnableAutoConfiguration告诉SpringBoot开启自
动配置功能;这样自动配置才能生效;
@AutoConfigurationPackage
@Import(EnableAutoConfigurationImportSelector.class)
public@interfaceEnableAutoConfiguration{
- i-2-1 @AutoConfigurationPackage:自动配置包
@Import({Registrar.class})
public @interface AutoConfigurationPackage {
}
Spring的底层注解@Import,给容器中导入一个组件;
导入的组件由 Registrar.class将主配置类(@SpringBootApplication标注的类)的所在包及下面所有子包里面的所有组件扫描到Spring容器;

- i-2-2 @Import(EnableAutoConfigurationImportSelector.class)
给容器中导入组件?
EnableAutoConfigurationImportSelector:导入哪些组件的选择器; 将所有需要导入的组件以全类名的方式返回;这些组件就会被添加到容器中;
会给容器中导入非常多的自动配置类(xxxAutoConfiguration);
就是给容器中导入这个场景需要的所有组件, 并配置好这些组件;


spring-boot-autoconfigure包中可以看到待导入的包
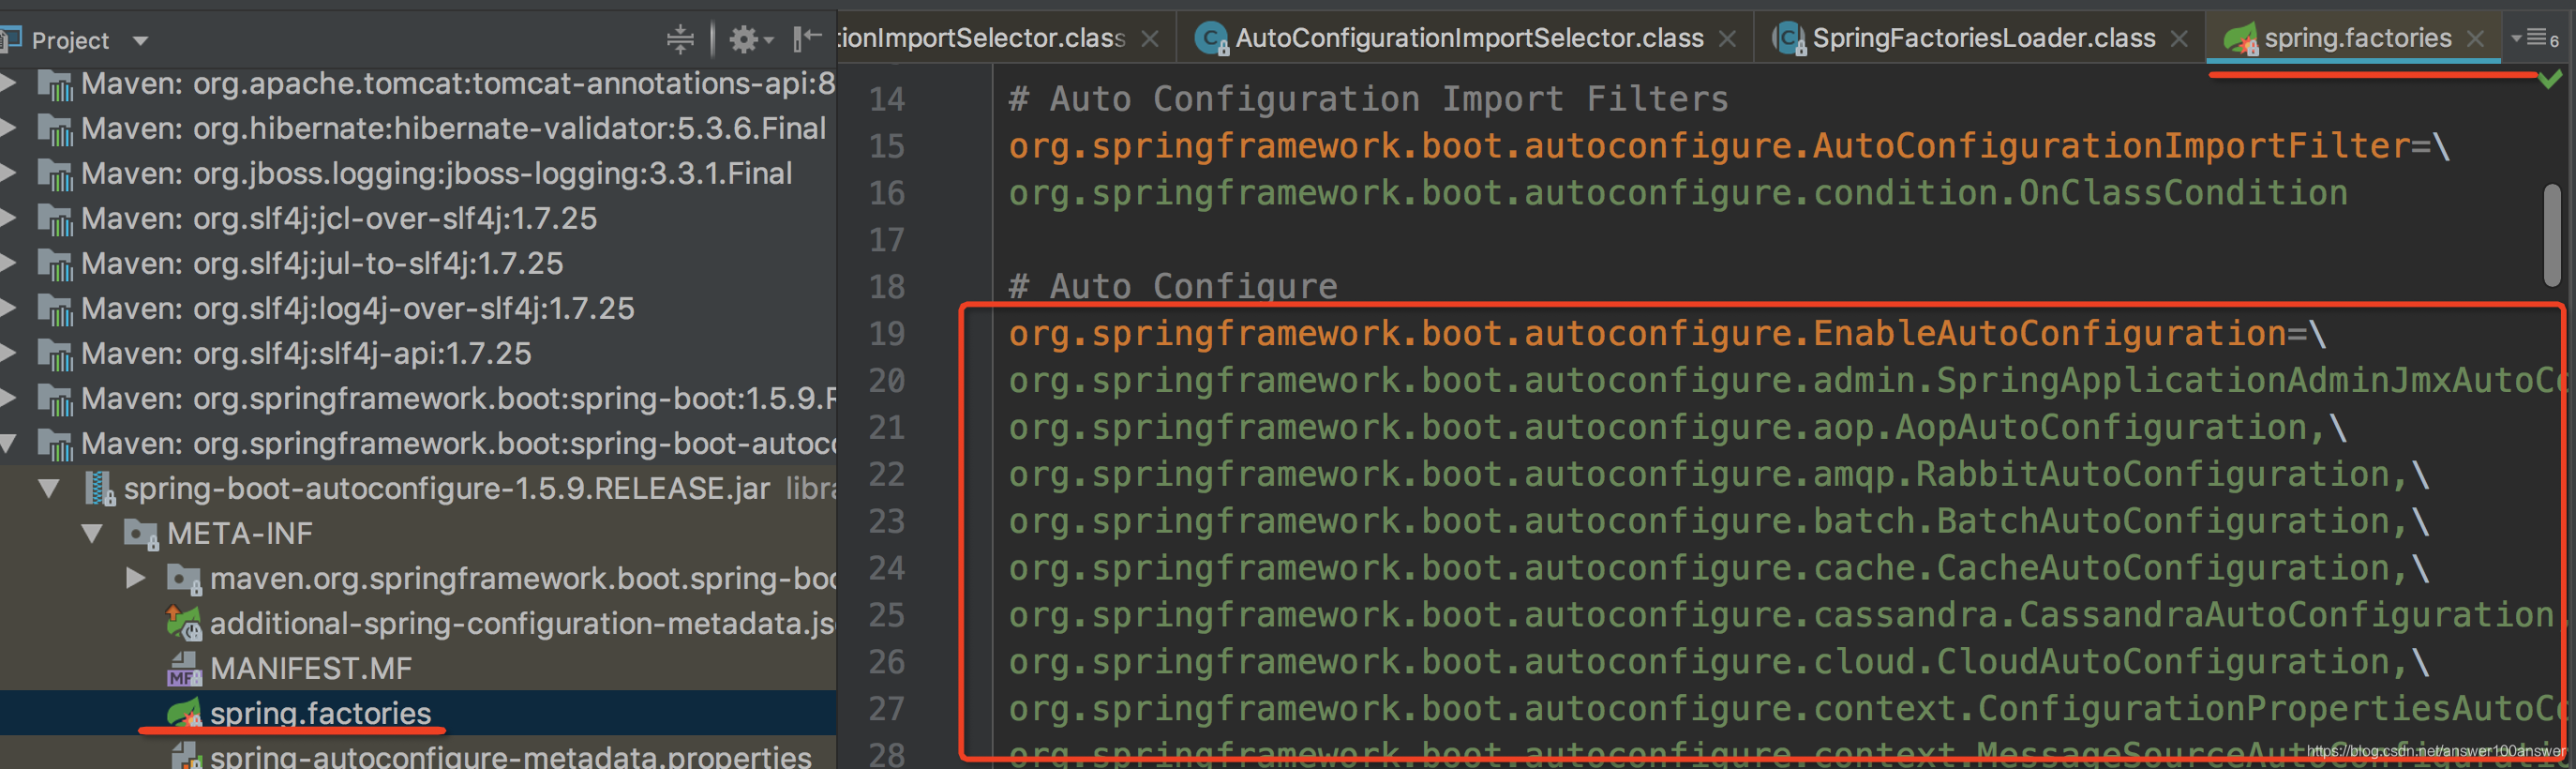
有了自动配置类,免去了我们手动编写配置注入功能组件等的工作;SpringFactoriesLoader.loadFactoryNames(EnableAutoConfiguration.class,classLoader);
Spring Boot在启动的时候从类路径下的META-INF/spring.factories中获取EnableAutoConfiguration指定的值,将这些值作为自动配置类导入到容器中,自动配置类就生效,帮我们进行自动配置工作。
以前我们需要自己配置的东西,J2EE的整体整合解决方案和自动配置都在spring-boot-autoconfigure-1.5.9.RELEASE.jar;


 327
327

 被折叠的 条评论
为什么被折叠?
被折叠的 条评论
为什么被折叠?
 到【灌水乐园】发言


