


1 实验任务
本实验任务是使用PL端的AXI DMA IP核从从PS端的DDR3中读取数据,并将数
据写回到PS端的DDR3中。
2 系统框图
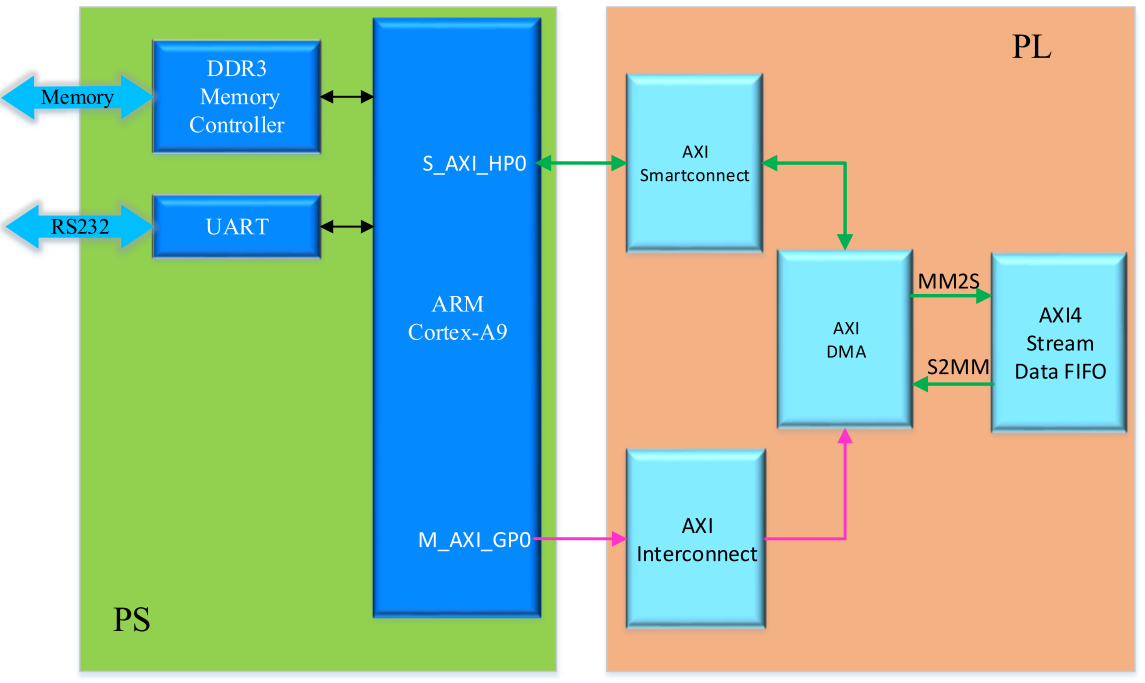
3 硬件设计
3.1 Block Design
- 添加ZYNQ7 Processing System IP核
- (1)在PS-PL Configuration页面
- 1)勾选FCLK_RESET0_N
- 2)勾选M AXI GP0 interface
- 3)勾选S AXI HP0 interface
- (2)在Peripheral I/O页面
- 1)勾选UART
- 2)正确选择Bank 0和Bank 1的电压
- (3)在Clock Configuration页面
- 1)勾选FCLK_CLK0
- 2)勾选FCLK_CLK1
- (4)在DDR Configuration页面
- 1)DDR Controller Configuration下,合理配置Memory Type、Memory Part和Bus Width等参数
- (5)在Interrupts页面
- 勾选IRQ_F2P[15:0]
- (1)在PS-PL Configuration页面
- 添加Clocking Wizard IP核
- 添加AXI Direct Memory Access IP核
- 添加AXI4-Stream Data FIFO IP核
- 添加Concat IP核
- 添加System ILA IP核
- 自动连线

3.2 IP核配置
- AXI DMA IP配置
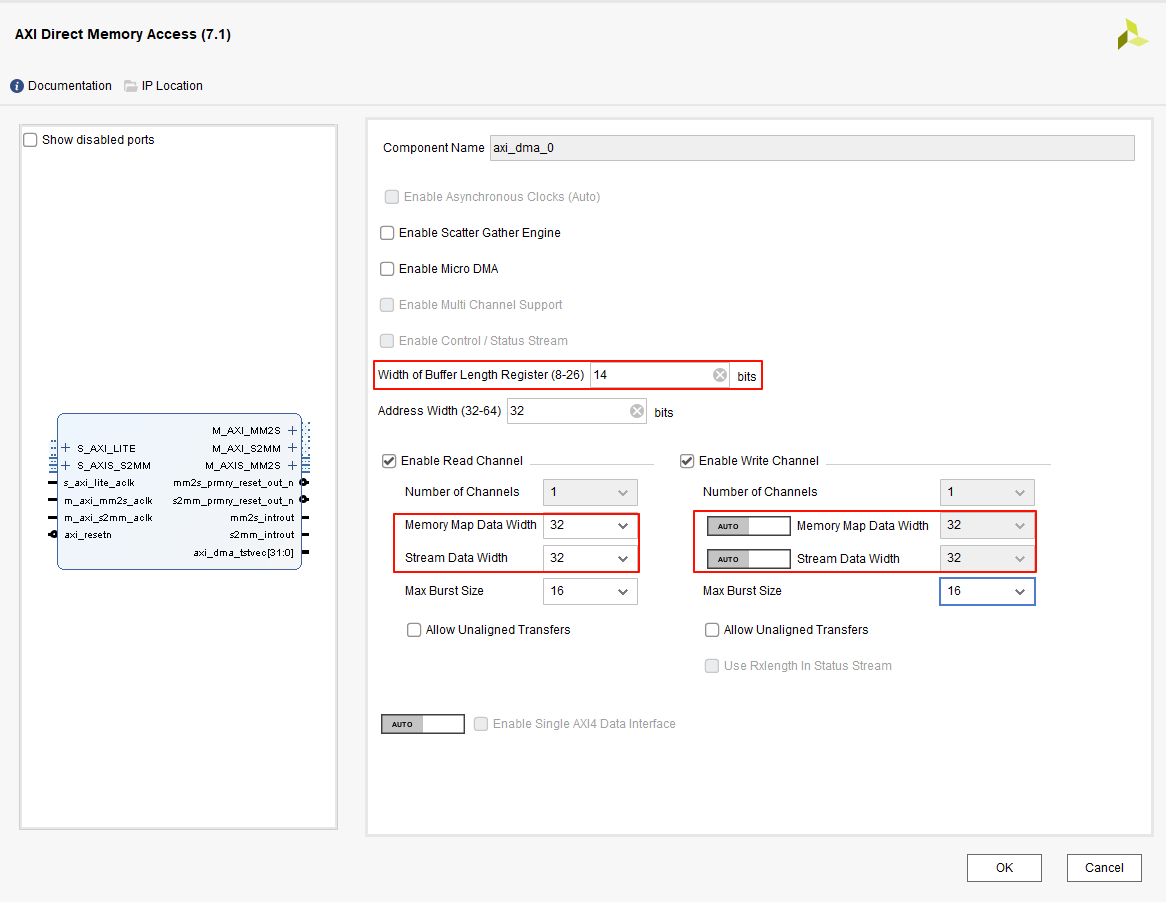
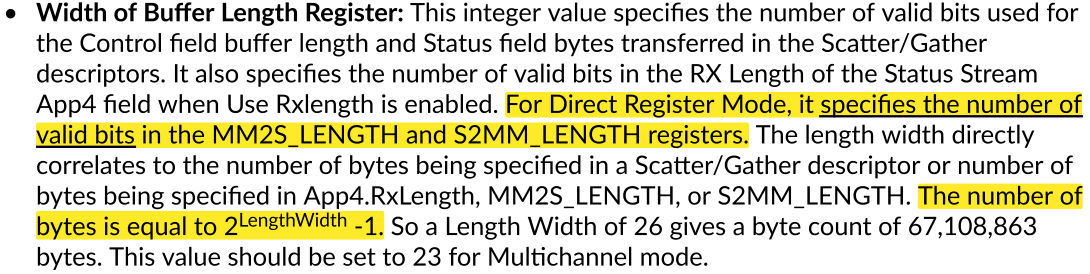
- (1)Width of Buffer Length Register选项:指定DMA传输的最大长度
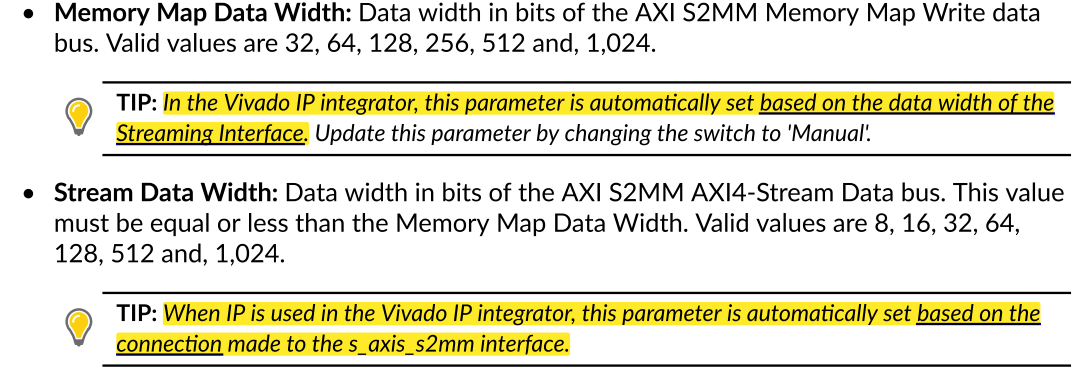
- (2)读通道:作为主接口,其Memory Map Data Width和Stream Data Width都是可设置的
- (3)写通道:作为从接口,其Memory Map Data Width和Stream Data Width默认是Auto的(当然,用户可以改为Manual,手动指定)
- 1)Memory Map Data Width基于Stream Data Width
- 2)Stream Data Width由s_axis_s2mm接口所连接的主接口决定
- (1)Width of Buffer Length Register选项:指定DMA传输的最大长度
- AXI4-Stream Data FIFO IP配置
- (1)General页面
- 1)FIFO Depth:选择4096,FIFO容量为4096x4B=16KB,足够容纳一次DMA读写操作的数据量(PS侧设计为8KB);
- 2)Memory Tyoe:选择Block RAM
- 3)Independent Clocks:选择Yes,即读写接口的时钟不同
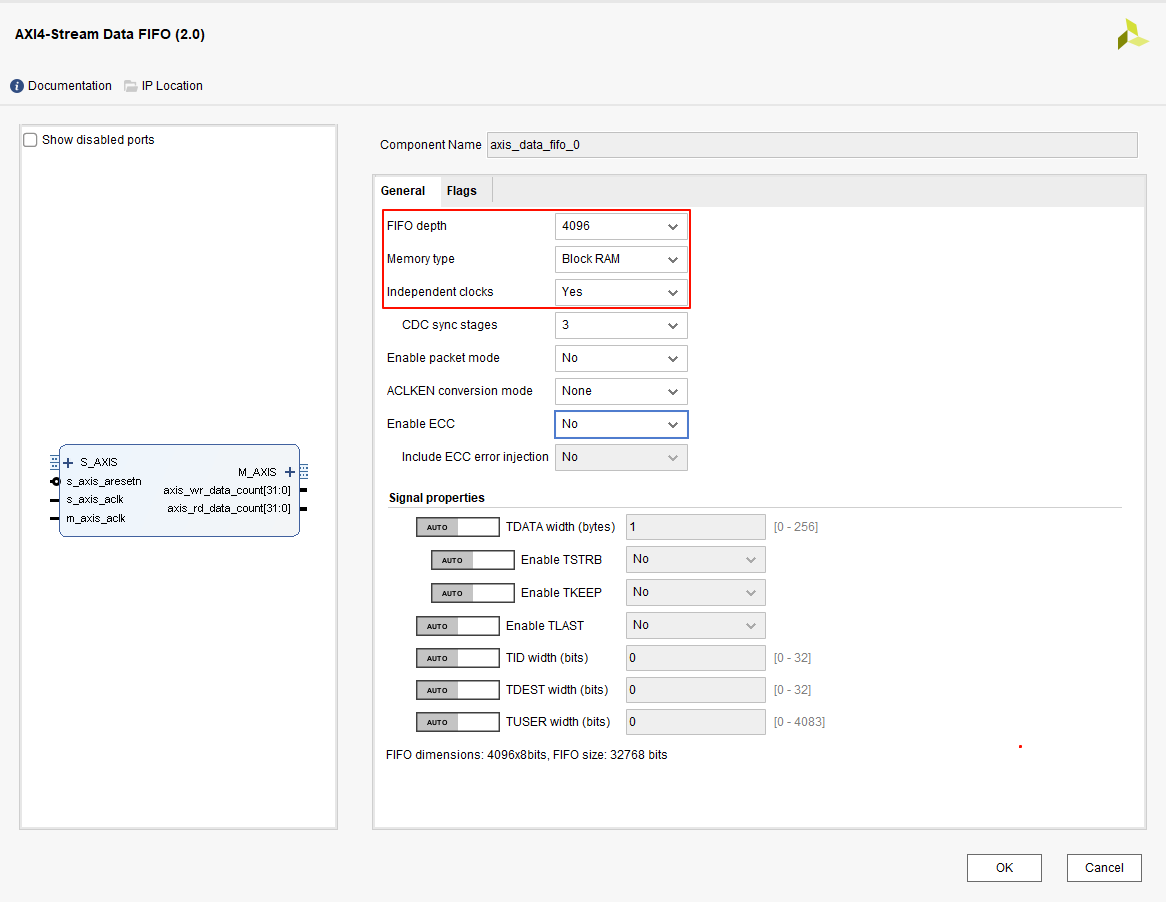
- (2)Flags页面
- 1)Enable write data count:选择Yes
- 2)Enable read data count:选择Yes

- (1)General页面
3.3 注意事项
- 本设计共有4个时钟,PS和外部晶振各提供两个时钟
- (1)PS FCLK_CLK0:50MHz,为PS的配置接口M_AXI_GP0提供时钟
- (2)PS FCLK_CLK1:100MHz,为PS的数据接口S_AXI_GP0提供时钟
- (3)晶振clk_out1:120MHz,为AXI DMA的MM2S数据流提供时钟(AXI DMA读-下行)
- (4)晶振clk_out2:150MHz,为AXI DMA的S2MM数据流提供时钟(AXI DMA写-上行)
- (5)目的:各个接口有各自的时钟,且频率不一样,模拟实际使用场景
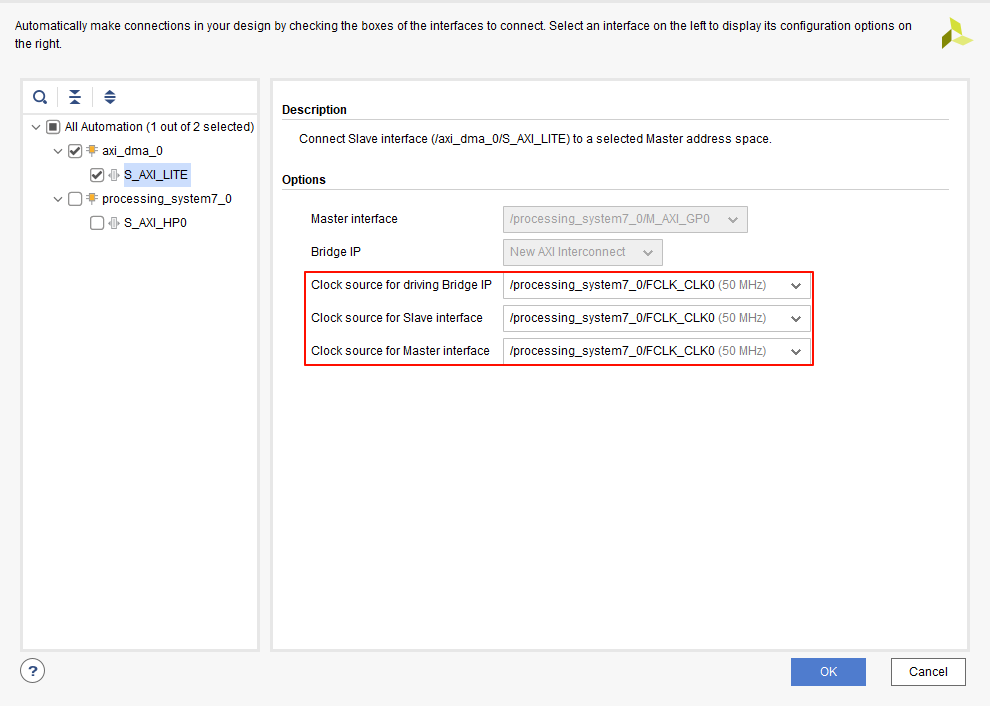
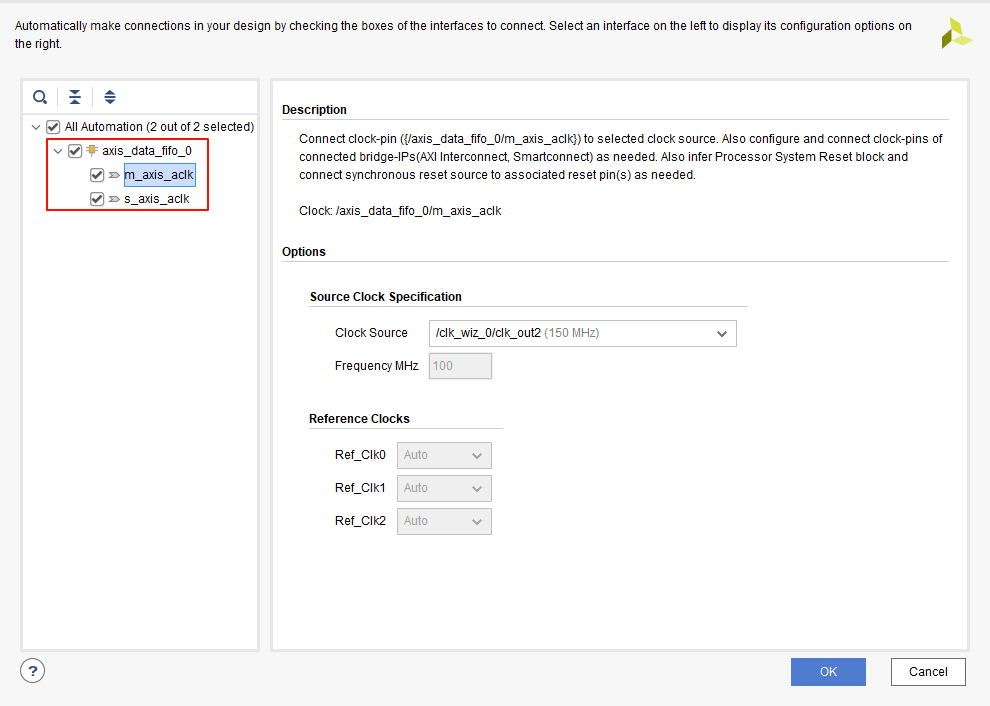
- 为各个接口自动连线:必须手动指定主从接口和互联模块的时钟
- (1)为AXI DMA IP的S_AXI_LITE接口连线:主接口是PS的M_AXI_GP0接口
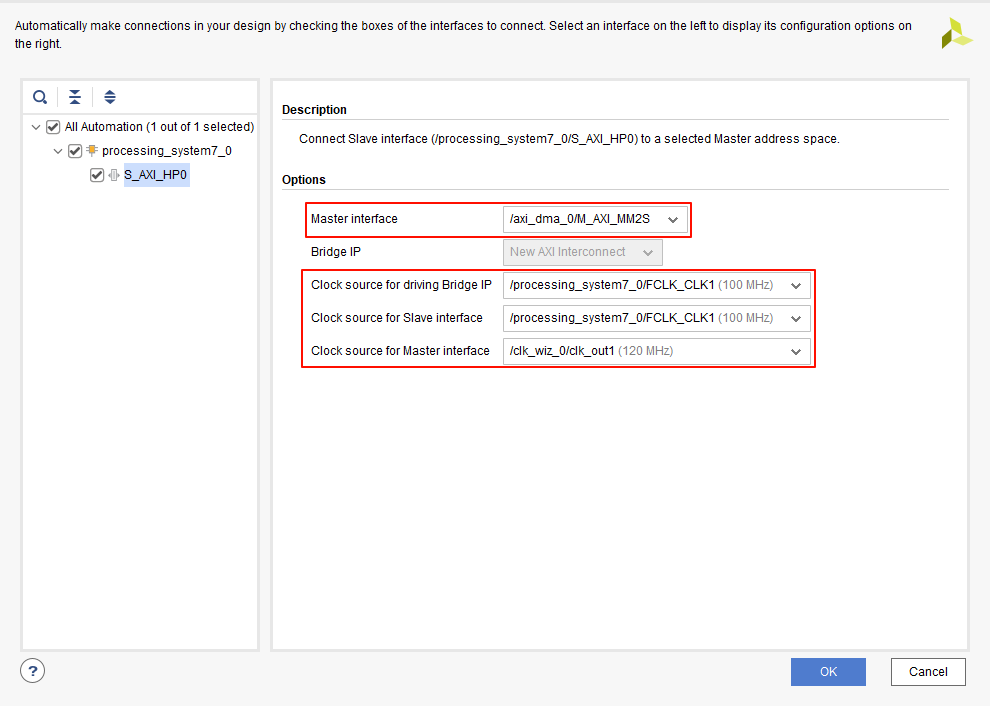
- (2)为PS的S_AXI_HP0接口连线:主接口是AXI DMA IP的M_AXI_MM2S接口
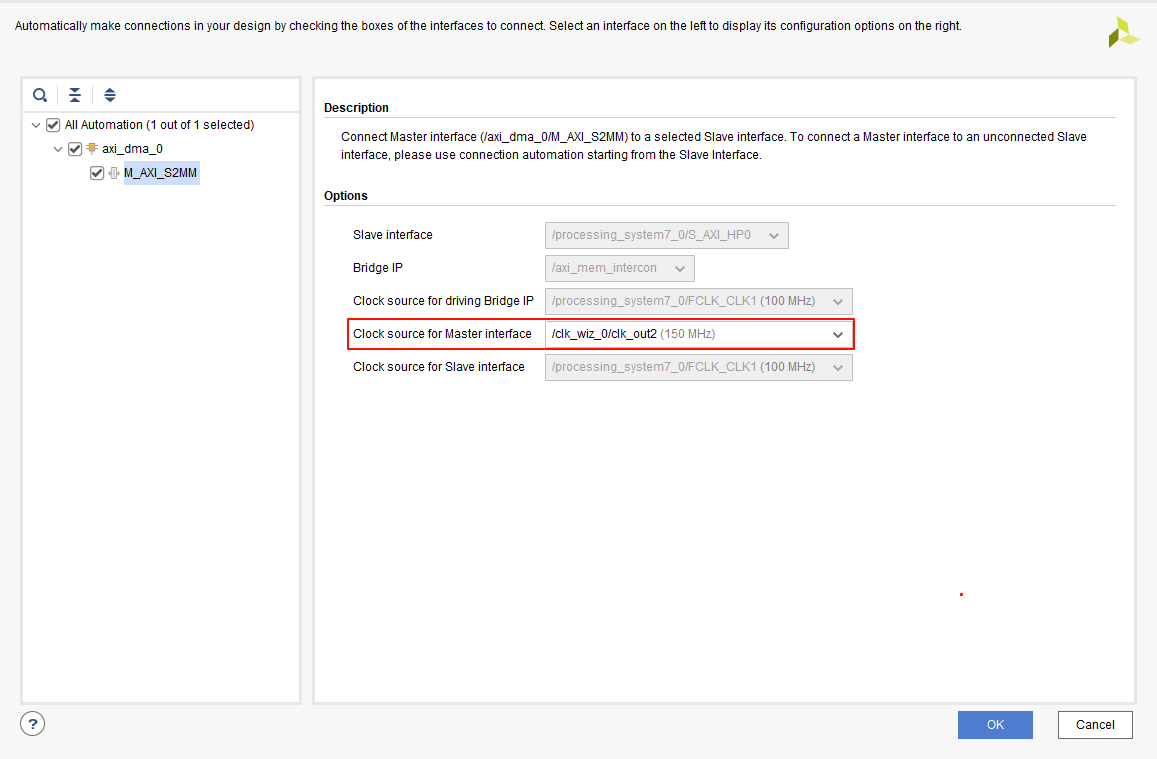
- (3)为AXI DMA IP的M_AXI_S2MM接口连线:从接口是PS的S_AXI_HP0接口
- (4)手动连接AXI DMA IP和AXI4-Stream Data FIFO IP的Stream接口,然后运行Run Connection Automation,工具会自动为AXI4-Stream Data FIFO的读写接口时钟连线
- (1)为AXI DMA IP的S_AXI_LITE接口连线:主接口是PS的M_AXI_GP0接口
4 软件设计
4.1 注意事项
- 缓存一致性问题:在进行PS-PL之间的DMA传输时,不可避免会遇到Cache问题
- (1)产生原因:
- 1)PS访问DDR时,为了提高访问速度,通常会将数据缓存在Data Cache中
- 2)好处:加快下一次访问速度
- 3)坏处:Data Cache中的数据与DDR中的数据不一致
- (2)解决办法
- 1)方法1:使用Xil_DCacheDisable函数禁用Cache(简单粗暴)
- 2)方法2:使用Xil_DCacheFlushRange函数和Xil_DCacheInvalidateRange函数
- 在AXIDMA发送前,使用Xil_DCacheFlushRange函数,将Data Cache中缓存的数据强制写回到DDR中去
- 在AXIDMA接收后,使用Xil_DCacheInvalidateRange,使Data Cache中缓存的数据无效,直接从DDR中读取数据
- (1)产生原因:
- 在Simple模式 下,XAxiDma_SimpleTransfer() 函数每次只完成一次DMA传输,传输完成后DMA会自动停止,不会持续传输。
4.2 工程源码
/***************************** Include Files *********************************/

#include "stdio.h"
#include "xparameters.h"
#include "xscugic.h"
#include "xaxidma.h"

/************************** Constant Definitions *****************************/

#define AXIDMA_DEVICE_ID          	XPAR_AXIDMA_0_DEVICE_ID
#define INTC_DEVICE_ID      		XPAR_SCUGIC_SINGLE_DEVICE_ID

#define AXIDMA_RX_INTR_ID          	XPAR_FABRIC_AXIDMA_0_S2MM_INTROUT_VEC_ID
#define AXIDMA_TX_INTR_ID          	XPAR_FABRIC_AXIDMA_0_MM2S_INTROUT_VEC_ID

#define DDR_BASE_ADDR       		XPAR_PS7_DDR_0_S_AXI_BASEADDR   //0x00100000
#define MEM_BASE_ADDR       		(DDR_BASE_ADDR + 0x01000000)    //0x01100000
#define TX_BUFFER_BASE      		(MEM_BASE_ADDR + 0x00100000)    //0x01200000
#define RX_BUFFER_BASE      		(MEM_BASE_ADDR + 0x00300000)    //0x01400000

#define RESET_TIMEOUT_COUNTER   	10000    //复位时间
#define TEST_START_VALUE        	0x0      //测试起始值
#define AXIDMA_LENGTH             	0x2000   //DMA长度 = 8192Byte

/************************** Function Prototypes ******************************/

int  AxiDmaInit(XAxiDma* AxiDmaInstPtr);
int  SetupIntrSystem(XScuGic* IntcInstPtr, XAxiDma* AxiDmaInstPtr, u16 AxiDmaTxIntrId, u16 AxiDmaRxIntrId);
void AxiDmaTxIntrHandler(void* Callback);
void AxiDmaRxIntrHandler(void* Callback);
int  CheckData(u32* RxBuffer);

/************************** Variable Definitions *****************************/

XAxiDma AxiDmaInst;     //XAxiDma实例
XScuGic IntcInst;       //中断控制器的实例

int AxiDmaTxDone;      //发送完成标志
int AxiDmaRxDone;      //接收完成标志
int AxiDmaTxError;     //发送出错标志
int AxiDmaRxError;     //接收出错标志

/************************** Function Definitions *****************************/

 int main(void)
 {
	 //
     int  Status;
     u32  TestValue;
     u32* AxiDmaTxBufferPtr;
     u32* AxiDmaRxBufferPtr;

     //
     AxiDmaTxBufferPtr = (u32 *) TX_BUFFER_BASE;
     AxiDmaRxBufferPtr = (u32 *) RX_BUFFER_BASE;

     //
     printf("AXI DMA Read and Write Loop Test.\n");

     // 初始化AXIDMA
     Status = AxiDmaInit(&AxiDmaInst);
	 if (Status != XST_SUCCESS) {
	     printf("Error : axi dma initialization failed.\n");
	     return XST_FAILURE;
	 }

     // 设置中断系统
     Status = SetupIntrSystem(&IntcInst, &AxiDmaInst, AXIDMA_TX_INTR_ID, AXIDMA_RX_INTR_ID);
     if (Status != XST_SUCCESS) {
         printf("Error : axi dma setup interrupt system failed.\n");
         return XST_FAILURE;
     }

     // 初始化标志信号
     AxiDmaTxDone  = 0;
     AxiDmaRxDone  = 0;
     AxiDmaTxError = 0;
     AxiDmaRxError = 0;

     // 注意:在嵌入式系统中,程序直接运行在硬件上,内存地址由硬件设计确定,开发者可以直接访问这些地址,而不需要动态申请内存
     TestValue = TEST_START_VALUE;
     for (int i = 0; i < AXIDMA_LENGTH / sizeof(u32); i++) {
    	 AxiDmaTxBufferPtr[i] = TestValue;
    	 TestValue++;
     }

     // 在启动AXIDMA发送之前,将Data Cache中缓存的数据强制写回到DDR中去
     Xil_DCacheFlushRange((INTPTR)AxiDmaTxBufferPtr, AXIDMA_LENGTH);

     //
     char ch;
     while(1)
     {
    	 //
    	 printf("Enter 'T' to start axi dma tx :>\n");
    	 scanf(" %c", &ch);
    	 if (ch == 'T') {
    		 // AXIDMA读操作:DDR -> FPGA
    	     Status = XAxiDma_SimpleTransfer(&AxiDmaInst, (UINTPTR)AxiDmaTxBufferPtr, AXIDMA_LENGTH, XAXIDMA_DMA_TO_DEVICE);
    	     if (Status != XST_SUCCESS) {
    	    	 printf("Error : axi dma simple transfer tx failed.\n");
    	         return XST_FAILURE;
    	     }

    	     //
    	     while(!AxiDmaTxDone && !AxiDmaTxError);

    	     if (AxiDmaTxDone == 1) {
    	    	 printf("Axi dma tx done.\n");
    	    	 AxiDmaTxDone = 0;
    	     }
    	     else if (AxiDmaTxError == 1) {
    	    	 printf("Error : axi dma tx error.\n");
    	    	 AxiDmaTxError = 0;
    	     }
    	 }
    	 else {
    		 break;
    	 }

    	 //
    	 printf("Enter 'R' to start axi dma rx :>\n");
    	 scanf(" %c", &ch);
    	 if (ch == 'R') {
    		 //
    	     Status = XAxiDma_SimpleTransfer(&AxiDmaInst, (UINTPTR)AxiDmaRxBufferPtr, AXIDMA_LENGTH, XAXIDMA_DEVICE_TO_DMA);
    	     if (Status != XST_SUCCESS) {
    	    	 printf("Error : axi dma simple transfer rx failed.\n");
    	         return XST_FAILURE;
    	     }

    	     //
    	     while(!AxiDmaRxDone && !AxiDmaRxError);

    	     if (AxiDmaRxDone == 1) {
    	    	 printf("Axi dma rx done.\n");
    	    	 AxiDmaRxDone = 0;
    	     }
    	     else if (AxiDmaRxError == 1) {
    	    	 printf("Error : axi dma rx error.\n");
    	    	 AxiDmaRxError = 0;
    	     }

    	     // 在启动AXIDMA接收之后,使Data Cache中缓存的数据无效,直接从DDR中读取数据
    	     Xil_DCacheInvalidateRange((INTPTR)AxiDmaRxBufferPtr, AXIDMA_LENGTH);

    	     // 检查数据是否正确
    	     Status = CheckData(AxiDmaRxBufferPtr);
    	     if (Status != XST_SUCCESS) {
    	         printf("Error : axi dma rx data check failed.\n");
    	         return XST_FAILURE;
    	     }
    	     else {
    	    	 printf("Axi dma rx data check succeeded.\n");
    	     }
    	 }
    	 else {
    		 break;
    	 }
     }

     //
     return XST_SUCCESS;
 }

 /*****************************************************************************/

 int AxiDmaInit(XAxiDma* AxiDmaInstPtr)
 {
	 //
	 int Status;
	 XAxiDma_Config* AxiDmaConfigPtr;

	 // 初始化AXIDMA
	 AxiDmaConfigPtr = XAxiDma_LookupConfig(AXIDMA_DEVICE_ID);
	 if (AxiDmaConfigPtr == NULL) {
		 return XST_FAILURE;
	 }

	 Status = XAxiDma_CfgInitialize(AxiDmaInstPtr, AxiDmaConfigPtr);
	 if (Status != XST_SUCCESS) {
	     return XST_FAILURE;
	 }

     // 判断AXIDMA模式:S/G或Simple DMA
     if (XAxiDma_HasSg(AxiDmaInstPtr)) {
         printf("Axi dma configured as sg mode.\n");
         return XST_FAILURE;
     }

     // 使能AXIDMA中断
     XAxiDma_IntrEnable(AxiDmaInstPtr, XAXIDMA_IRQ_ALL_MASK, XAXIDMA_DMA_TO_DEVICE);
     XAxiDma_IntrEnable(AxiDmaInstPtr, XAXIDMA_IRQ_ALL_MASK, XAXIDMA_DEVICE_TO_DMA);

	 //
	 return XST_SUCCESS;
 }

 /*****************************************************************************/

 int  SetupIntrSystem(XScuGic* IntcInstPtr, XAxiDma* AxiDmaInstPtr, u16 AxiDmaTxIntrId, u16 AxiDmaRxIntrId)
{
	//
    int Status;
    XScuGic_Config* IntcConfigPtr;

    // step1. 初始化中断控制器GIC
    IntcConfigPtr = XScuGic_LookupConfig(INTC_DEVICE_ID);
    if (IntcConfigPtr == NULL) {
    	return XST_FAILURE;
    }

    Status = XScuGic_CfgInitialize(IntcInstPtr, IntcConfigPtr, IntcConfigPtr->CpuBaseAddress);
    if (Status != XST_SUCCESS) {
        return XST_FAILURE;
    }

    // step2. 在处理器中初始化异常处理功能
    Xil_ExceptionInit();

    // step3. 在处理器中为IRQ中断异常注册处理程序
    Xil_ExceptionRegisterHandler(XIL_EXCEPTION_ID_INT, (Xil_ExceptionHandler) XScuGic_InterruptHandler,(void *) IntcInstPtr);

    // step4. 在处理器中使能IRQ中断异常
    Xil_ExceptionEnable();

    // step5. 在GIC中为外设注册中断处理程序
    Status = XScuGic_Connect(IntcInstPtr, AxiDmaTxIntrId, (Xil_InterruptHandler) AxiDmaTxIntrHandler, AxiDmaInstPtr);
    if (Status != XST_SUCCESS) {
        return XST_FAILURE;
    }

    // step5. 在GIC中为外设注册中断处理程序
    Status = XScuGic_Connect(IntcInstPtr, AxiDmaRxIntrId, (Xil_InterruptHandler) AxiDmaRxIntrHandler, AxiDmaInstPtr);
    if (Status != XST_SUCCESS) {
        return XST_FAILURE;
    }

    // step6. 在GIC中设置外设中断的优先级和触发类型
    XScuGic_SetPriorityTriggerType(IntcInstPtr, AxiDmaTxIntrId, 0xA0, 0x3); // Rising Edge
    XScuGic_SetPriorityTriggerType(IntcInstPtr, AxiDmaRxIntrId, 0xA0, 0x3); // Rising Edge

    // step7. 在GIC中使能外设中断
    XScuGic_Enable(IntcInstPtr, AxiDmaTxIntrId);
    XScuGic_Enable(IntcInstPtr, AxiDmaRxIntrId);

    //
    return XST_SUCCESS;
}

 /*****************************************************************************/

void AxiDmaTxIntrHandler(void *Callback)
{
	//
	XAxiDma* AxiDmaInstPtr = (XAxiDma*)Callback;
	u32 IsrStatus ;
    int AxiDmaResetTimeOut;

    // 获取中断状态
    IsrStatus = XAxiDma_IntrGetIrq(AxiDmaInstPtr, XAXIDMA_DMA_TO_DEVICE);

    // 清除中断状态
    XAxiDma_IntrAckIrq(AxiDmaInstPtr, IsrStatus, XAXIDMA_DMA_TO_DEVICE);

    // AXIDMA发送出错
    if ((IsrStatus & XAXIDMA_IRQ_ERROR_MASK)) {
    	AxiDmaTxError = 1;
        XAxiDma_Reset(AxiDmaInstPtr);
        AxiDmaResetTimeOut = RESET_TIMEOUT_COUNTER;
        while (AxiDmaResetTimeOut) {
            if (XAxiDma_ResetIsDone(AxiDmaInstPtr)) {
            	break;
            }
            AxiDmaResetTimeOut -= 1;
        }
        return;
    }

    //  AXIDMA发送完成
    if ((IsrStatus & XAXIDMA_IRQ_IOC_MASK)) {
    	AxiDmaTxDone = 1;
    }

    //
    return;
}

/*****************************************************************************/

void AxiDmaRxIntrHandler(void *Callback)
{
	//
	XAxiDma* AxiDmaInstPtr = (XAxiDma*)Callback;
	u32 IsrStatus ;
    int AxiDmaResetTimeOut;

    // 获取中断状态
    IsrStatus = XAxiDma_IntrGetIrq(AxiDmaInstPtr, XAXIDMA_DEVICE_TO_DMA);

    // 清除中断状态
    XAxiDma_IntrAckIrq(AxiDmaInstPtr, IsrStatus, XAXIDMA_DEVICE_TO_DMA);

    // AXIDMA接收出错
    if ((IsrStatus & XAXIDMA_IRQ_ERROR_MASK)) {
    	AxiDmaRxError = 1;
        XAxiDma_Reset(AxiDmaInstPtr);
        AxiDmaResetTimeOut = RESET_TIMEOUT_COUNTER;
        while (AxiDmaResetTimeOut) {
            if (XAxiDma_ResetIsDone(AxiDmaInstPtr)) {
                break;
            }
            AxiDmaResetTimeOut -= 1;
        }
        return;
    }

    // AXIDMA接收完成
    if ((IsrStatus & XAXIDMA_IRQ_IOC_MASK)) {
    	AxiDmaRxDone = 1;
    }

    return;
}

/*****************************************************************************/

int CheckData(u32* RxBuffer)
{
	//
    u32 TestValue;

    //
    TestValue = TEST_START_VALUE;

    //
    for (int i = 0; i < AXIDMA_LENGTH / sizeof(u32); i++) {
        if (RxBuffer[i] != TestValue) {
            return XST_FAILURE;
        }
        TestValue++;
    }

    //
    return XST_SUCCESS;
}

/*****************************************************************************/


 4139
4139

 被折叠的 条评论
为什么被折叠?
被折叠的 条评论
为什么被折叠?
 到【灌水乐园】发言


