 Python 3使用docxtpl渲染docx文档


docxtpl包是一个以jinja2模版来渲染docx文档的Python 3包。我不懂jinja2,我就仅就这个包的用法来进行介绍了。
这个包用来处理docx文档用的是python-docx包,所以DocxTemplate对象跟Document对象兼容性很高,我使用体感是基本上可以套着用1。我也写了python-docx包的博文,请参考:深入解析Python-docx库:轻松玩转Word文档自动化
官方文档:Welcome to python-docx-template’s documentation! — python-docx-template 0.20.x documentation
官方GitHub项目:https://github.com/elapouya/python-docx-template
1. 用pip安装包
pip install docxtpl
2. 渲染docx文档
1. 普通tag
一般的规范是在docx文档中用{{ var }}这种格式(tag)来写动态参数,然后在Python 3代码中渲染。最简单的直接赋值(模版中需要有{{ company_name }}字样):
from docxtpl import DocxTemplate

tpl = DocxTemplate("my_word_template.docx")
context = { 'company_name' : "World company" }
tpl.render(context)
tpl.save("generated_doc.docx")
需要注意的是变量值如果是纯字符串,里的\n在Word里呈现出来是向下的箭头(Shift + Enter),\a是带拐弯的箭头(Enter),\f是分页。
渲染图片:
myimage = InlineImage(tpl, image_descriptor='test_files/python_logo.png', width=Mm(20), height=Mm(10))
2. 特殊tag
跨段、表格按行/列渲染、跨run
{%p jinja2_tag %} for paragraphs
{%tr jinja2_tag %} for table rows
{%tc jinja2_tag %} for table columns
{%r jinja2_tag %} for runs
if语句(这3行最好跨paragraph):
{%p if display_paragraph %}
One or many paragraphs
{%p endif %}
注释:
{#p this is a comment as a paragraph #}
{#tr this is a comment as a table row #}
{#tc this is a comment as a table cell #}
渲染列表和字典:
## 迭代列表
{% for var in list %}
    {{ var }}
{% endfor %}

## 迭代字典
{% for key, value in dict.items() %}
    {{ key }} {{ value }}
{% endfor %}

## 另一种迭代字典的方法,这种用的比较多
{% for var in dict %}
    {{ var.key }} #key为字典的键
{% endfor %}
3. 表格
Word文档模版:

Python 3代码:
from docxtpl import DocxTemplate, RichText

tpl = DocxTemplate('templates/cellbg_tpl.docx')

context = {
    'alerts': [
        {
            'date': '2015-03-10',
            'desc': RichText('Very critical alert', color='FF0000', bold=True),
            'type': 'CRITICAL',
            'bg': 'FF0000',
        },
        {
            'date': '2015-03-11',
            'desc': RichText('Just a warning'),
            'type': 'WARNING',
            'bg': 'FFDD00',
        },
        {
            'date': '2015-03-12',
            'desc': RichText('Information'),
            'type': 'INFO',
            'bg': '8888FF',
        },
        {
            'date': '2015-03-13',
            'desc': RichText('Debug trace'),
            'type': 'DEBUG',
            'bg': 'FF00FF',
        },
    ],
}

tpl.render(context)
tpl.save('output/cellbg.docx')
渲染效果:

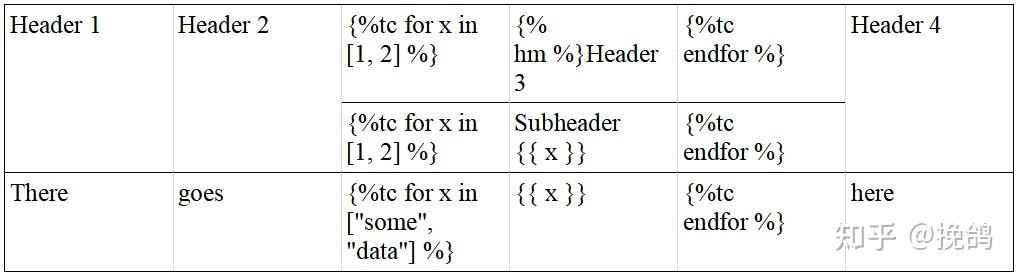
1. 合并单元格
{% hm %}表示水平合并单元格
{% vm %}表示垂直合并单元格
Word模版:
代码:
from docxtpl import DocxTemplate

tpl = DocxTemplate('templates/less_cells_after_loop_tpl.docx')
tpl.render({})
tpl.save('output/less_cells_after_loop.docx')
渲染效果:

跨越标记:{% colspan count %},这样被标记生成的文本会占据count列(count为数值)
3. 本文撰写过程中参考的其他网络资料
DocxTemplate对象的docx属性就是内置的Document对象,对DocxTemplate对象进行Document的函数操作会自动映射到docx对象上。但需要注意的是需要先经过
init_docx()才会给docx属性赋值一个Document对象,init_docx()函数会在render()时自动调用,如果在render()之前就想对DocxTemplate对象进行Document对象的操作,需要先init_docx()↩︎


 1540
1540

 被折叠的 条评论
为什么被折叠?
被折叠的 条评论
为什么被折叠?
 到【灌水乐园】发言


