 AutoLUT代码详解与实现


本文是对AutoLUT技术的代码讲解,原文解读请看AutoLUT文章讲解。
1、原文概要
AutoLUT 框架核心是AutoSample(自动采样) 和AdaRL(自适应残差学习) 两个即插即用模块,可集成到现有 LUT-based SR 网络中。
整体流程图如下所示:

图中可以看出核心模块是AutoLUT Group和残差连接,从输入
X
0
X_0
X0一直到输出
X
n
X_n
Xn。而AutoLUT Group如下所示:
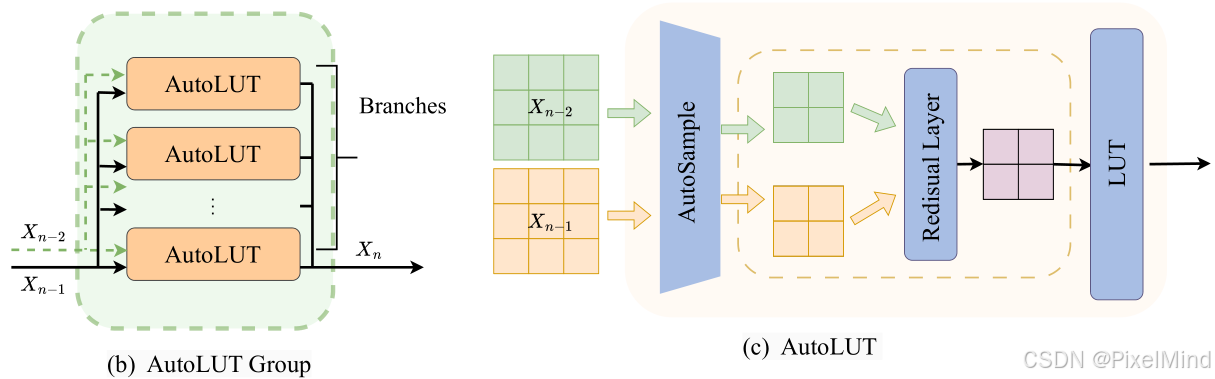
由多个AutoLUT构成,输入有2个包含上一个AutoLUT Group的输入和输出,其中AutoLUT的个数定义为Branches,AutoLUT是最核心的模块,包含了前面讲到的AutoSample和Residual,两个输入经过这两个模块后,特征图的分辨率会减小,最后经过LUT查表得到结果。
这里需要大家读者类比MuLUT的过程,此为论文最核心的部分,MuLUT的输入只有一个,这个输入经过3个不同的LUT查表后得到一个输出,也就是说AutoLUT是1个LUT+AutoSample+Residual Layer替换了3个LUT,这个Residual Layer可能不存在,当输入为最开始的输入时。
更具体的AutoLUT模块流程如下所示,包含以下几步:
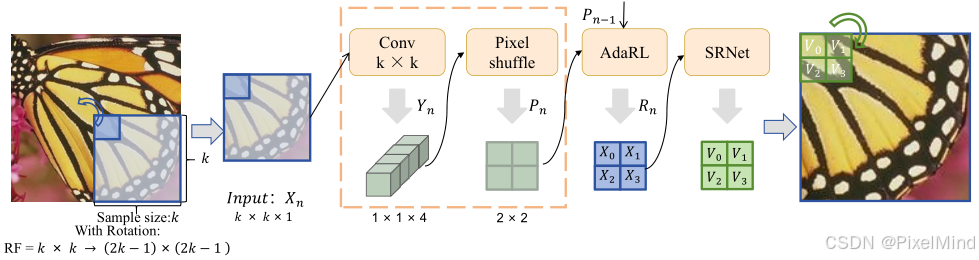
- 选取一个sample size k,使用一个unfold操作,对图像进行折叠,折叠后我们只需要观察其中一个窗口即可(其他的同理),因此此时图中显示 I n p u t : X n Input:X_n Input:Xn的shape是 k × k × 1 k\times k \times 1 k×k×1。
- 使用一个 C o n v k × k Conv \ k \times k Conv k×k对图像进行处理,这里的输出通道个数会是4,因此卷积完的输出 Y n Y_n Yn会变成 1 × 1 × 4 1\times 1 \times 4 1×1×4。
- 使用Pixelshuffle处理后,可以将通道给到空间上输出是 P n P_n Pn,shape会是 2 × 2 × 1 2\times 2 \times 1 2×2×1,该步处理完完成了AutoSample,可以看到这步通过结合卷积完成了感受野的扩展。
- 使用AdaRL,融合前一个AutoSample模块的输入 P n − 1 P_{n-1} Pn−1,得到 R n R_n Rn,这里shape保持不变。
- 最后经过一个标准的SRNet,是一个标准的LUT模块,在这个模块中可以做放大或者不放大,图中显示的是放大的LUT。
2、代码结构
代码整体结构如下:
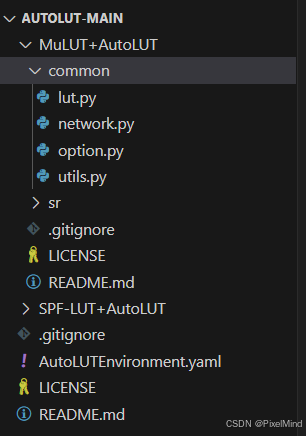
这里以MuLUT为例进行讲解,由于本文是模块改进,所以作者源码是在MuLUT和SPFLUT上进行的补充。
3 、核心代码模块
network.py 文件
1. AutoSample类
这里是AutoSample类的实现。
class AutoSample(nn.Module):
    def __init__(self, input_size: int):
        super().__init__()
        self.input_shape=input_size
        self.sampler=nn.Conv2d(1,4,input_size)
        self.shuffel=nn.PixelShuffle(2)
        self.nw=input_size**2

    def forward(self, x):
        assert len(x.shape)==4 and x.shape[-2:]==(self.input_shape,self.input_shape), f"Unexpected shape: {x.shape}"
        # x = self.sampler(x)
        # logger.debug(self.sampler.weight)
        w = F.softmax(self.sampler.weight.view(-1, self.nw), dim=1).view_as(self.sampler.weight)
        x = F.conv2d(x, w, bias=self.sampler.bias*0)
        x = self.shuffel(x)
        return x
前面也讲到了,需要对w进行softmax处理,处理后进行卷积(卷积的bias需要置0),此时我们能够保证范围不变。最后进行pixelshuffle。
2. Residual类
是残差类的实现。
class Residual(nn.Module):
    def __init__(self, input_shape):
        assert len(input_shape)==2
        super().__init__()
        self.shape=input_shape
        self.weights=nn.Parameter(torch.zeros(self.shape))

    def forward(self, x, prev_x):
        assert x.shape[-2:]==self.shape and prev_x.shape[-2:]==self.shape
        with torch.no_grad():
            self.weights.data=torch.clamp(self.weights,0,1)

        averaged=self.weights*prev_x+(1-self.weights)*x

        return averaged
可以看到处理前会对卷积的权重进行0-1的clamp,这样保证了范围的不变,后续就是简单的加权融合过程得到输出结果。
3. MuLUTUnit类
AutoLUT中实现的MuLUTUnit类多添加了一个残差的模块。
class MuLUTUnit(nn.Module):
    """ Generalized (spatial-wise)  MuLUT block. """

    def __init__(self, mode, nf, upscale=1, out_c=1, dense=True, residual=False, act='relu'):
        super(MuLUTUnit, self).__init__()
        if act=='relu':
            self.act = nn.ReLU()
        elif act=='gelu':
            self.act = nn.GELU()
        else:
            raise AttributeError(f"Unknown activate function: {act}")
        self.upscale = upscale
        self.has_residual=residual

        if mode == '2x2':
            self.input_shape = (2,2)
            self.conv1 = Conv(1, nf, 2)
        elif mode == '2x2d':
            self.input_shape = (3,3)
            self.conv1 = Conv(1, nf, 2, dilation=2)
        elif mode == '2x2d3':
            self.input_shape = (4,4)
            self.conv1 = Conv(1, nf, 2, dilation=3)
        elif mode == '1x4':
            self.input_shape = (1,4)
            self.conv1 = Conv(1, nf, (1, 4))
        else:
            raise AttributeError

        if residual:
            self.residual = Residual(self.input_shape)

        if dense:
            self.conv2 = DenseConv(nf, nf, act=act)
            self.conv3 = DenseConv(nf + nf * 1, nf, act=act)
            self.conv4 = DenseConv(nf + nf * 2, nf, act=act)
            self.conv5 = DenseConv(nf + nf * 3, nf, act=act)
            self.conv6 = Conv(nf * 5, 1 * upscale * upscale, 1)
        else:
            self.conv2 = ActConv(nf, nf, 1, act=act)
            self.conv3 = ActConv(nf, nf, 1, act=act)
            self.conv4 = ActConv(nf, nf, 1, act=act)
            self.conv5 = ActConv(nf, nf, 1, act=act)
            self.conv6 = Conv(nf, upscale * upscale, 1)
        if self.upscale > 1:
            self.pixel_shuffle = nn.PixelShuffle(upscale)

    def forward(self, x, prev_x=None):
        if self.has_residual:
            x = self.residual(x, prev_x)
        x = self.act(self.conv1(x))
        x = self.conv2(x)
        x = self.conv3(x)
        x = self.conv4(x)
        x = self.conv5(x)
        x = torch.tanh(self.conv6(x))
        if self.upscale > 1:
            x = self.pixel_shuffle(x)
        return x
可以参考Mu-LUT中基础模块的代码讲解。
4. SRNet类
是前面讲到的AutoLUT Group,前面所有模块的组合。
class SRNet(nn.Module):
    """ Wrapper of a generalized (spatial-wise) MuLUT block.
        By specifying the unfolding patch size and pixel indices,
        arbitrary sampling pattern can be implemented.
    """

    def __init__(self, sample_size, nf=64, upscale=1, dense=True, residual=False, act='relu'):
        super(SRNet, self).__init__()
        self.residual = residual

        self.K = sample_size
        self.S = upscale

        self.sampler = AutoSample(sample_size)
        self.model = MuLUTUnit('2x2', nf, upscale, dense=dense, residual=residual, act=act)

        self.P = self.K - 1

    def unfold(self, x):
        """
        Do the convolution sampling
        """
        if x is None: return x, None
        B, C, H, W = x.shape
        x = F.unfold(x, self.K)  # B,C*K*K,L
        x = x.view(B, C, self.K * self.K, (H - self.P) * (W - self.P))  # B,C,K*K,L
        x = x.permute((0, 1, 3, 2))  # B,C,L,K*K
        x = x.reshape(B * C * (H - self.P) * (W - self.P),
                      self.K, self.K)  # B*C*L,K,K
        x = x.unsqueeze(1)  # B*C*L,l,K,K

        return x, (B, C, H, W)

    def put_back(self, x, ori_shape):
        B, C, H, W=ori_shape
        x = x.squeeze(1)
        x = x.reshape(B, C, (H - self.P) * (W - self.P), -1)  # B,C,K*K,L
        x = x.permute((0, 1, 3, 2))  # B,C,K*K,L
        x = x.reshape(B, -1, (H - self.P) * (W - self.P))  # B,C*K*K,L
        x = F.fold(x, ((H - self.P) * self.S, (W - self.P) * self.S),
                   self.S, stride=self.S)
        return x


    def forward(self, x, prev_x=None):
        # Here, prev_x is unfolded multiple times (previously unfolded as x)
        # TODO: Maybe we can do a speedup here
        # logger.debug(f"SRNet got {x.shape}")
        x, shape=self.unfold(x)
        prev_x, _=self.unfold(prev_x)

        x = self.sampler(x)
        # logger.debug(f"after sample {x}")
        if prev_x is not None:
            prev_x = self.sampler(prev_x)

        x = self.model(x, prev_x)   # B*C*L,K,K
        # logger.debug(f"shape after model: {x.shape}")

        x=self.put_back(x, shape)

        return x
输入先进行unfold进行折叠,折叠后送入AutoSample处理,最后给到MuLUTUnit进行处理后再回到原始的shape。
3、总结
代码实现核心的部分讲解完毕,AutoLUT兼顾性能、存储与推理效率,特别适合资源受限的边缘设备部署,功耗上可能会存在一些劣势。
感谢阅读,欢迎留言或私信,一起探讨和交流。
如果对你有帮助的话,也希望可以给博主点一个关注,感谢。


 1244
1244

 被折叠的 条评论
为什么被折叠?
被折叠的 条评论
为什么被折叠?
 到【灌水乐园】发言


