


中断分为同步中断和异步中断,X86手册中经常将同步中断叫做异常,而异步中断叫做中断。这里也使用这样的概念。
中断是由间隔定时器和IO设备产生的,异常是由程序的错误产生的,或者是由内核必须处理的异常条件产生的。
1:中断信号的作用
中断信号让处理器转去执行正常控制流之外的代码。因此,CPU必须停止他当前正在做的事情,在内核态堆栈中保存程序计数器的值(eip和cs寄存器的内容),并且把与中断类型相关的地址放入程序计数器。
中断和进程切换有一个明显的差异。中断或者异常处理程序执行的代码不是一个进程,而是一个内核控制路径,代替中断发生时候的进程去执行。中断比进程要轻(中断的上下文很少,建立或终止中断需要的时间很少)。
中断需要满足下列约束:
1:内核响应中断后需要进行的操作分成两部分,一部分是关键而紧急的部分,内核立即执行;其余的部分,内核随后执行。例如,一个数据块到达了网线,当硬件中断内核的时候,内核标识数据到来,然后恢复到之前的进程继续执行,其余的操作稍后处理(例如将数据移入缓冲区等)。
2:中断应该允许嵌套执行。不过现在好像都不会嵌套。
3:在内核中,可能存在一些临界区,在临界区中,中断必须禁止。必须尽量限制这样的临界区。因为按照要求,内核应该大部分时间在开中断中运行。
2:中断和异常
中断分为可屏蔽中断与不可屏蔽中断。IRQ(外设发出的中断)都是可屏蔽中断。如果一个可屏蔽中断被屏蔽,系统就忽略它。还有几个危急事件是不可屏蔽中断。类似于ppc中的普通中断和critical中断。
异常分为处理器探测异常和可编程异常。处理器探测异常是由CPU产生的,也是我们之前认识的那些异常。可编程异常是编程者发出请求产生的,一般是通过int指令实现的。系统调用就是一种可编程异常。
每个中断和异常都是由0~255之间的一个数来标识的。每个数都叫做一个向量。非屏蔽中断的向量和异常向量是固定的,而可屏蔽中断的向量(外部中断)可以通过中断控制器改变。
2.1:IRQ和中断
每个可以发出中断请求的硬件设备都有一条IRQ输出线。所有IRQ输出线都和可编程中断控制器相连。可编程中断控制器(PIC)执行以下操作:
1:监视IRQ,检测产生的信号(不同的IRQ线有优先级)
2:如果一个信号出现在IRQ线上,进入步骤3.
3:将接收到的信号转化成相应的向量(中断和异常是由0~255之间的一个数标示的,把这个8位无符号数叫做一个向量)。
4:把这个向量放在中断控制器的IO口,CPU可以通过数据总线读这个向量。
5:中断控制器发一个信号给CPU的INTR引脚。
6:等待,直到CPU取走向量,并且清除INTR引脚上的信号。
7:回到步骤1.
IRQ线是从0开始编号的,与IRQ0相对应的中断向量是n+32。不过可以通过中断控制器修改IRQ和向量之间的关系。
可以通过对中断控制器PIC有选择性的禁止某一条IRQ线。禁止的中断是不会被丢失的,一旦这些IRQ线被激活,PIC又将他们产生的中断传递给CPU。
也可以通过将eflags寄存器的IF标志清0(cli和sti汇编指令),这样会忽略所有的可屏蔽中断。
2.1.1:高级可编程中断控制器
随着时代发展,中断控制器已经从PIC发展到了IO APIC。主板上包含了这两种中断控制器。此外,每个cpu都有一个本地APIC。
2.2:异常
对于某些异常,在开始执行异常处理程序前会产生一个硬件错误码,并且压入内核态堆栈中。每个异常都由专门的异常处理程序来处理。他们通常将一个Unix信号发送到引起异常的进程。
注意,异常不仅包含系统调用,还包含了很多其他的异常情况,例如除0异常等。
2.3:中断描述符表
IDT——中断描述符表中,每一个向量都有对应的中断或者异常处理程序的入口。内核在中断发生前必须初始化IDT。需要注意的是,x86-64和i386架构都需要使用IDT,其他架构则是使用自己的中断异常向量表。
在保护模式下,中断描述符表中的表项由8个字节组成。其中的每个表项叫做一个门描述符,意味着当中断发生时,必须先通过这些门,然后才能进入相应的处理程序。表项的格式如下:
任务门:当中断信号发生的时候,必须取代当前进程的那个进程的TSS选择符存放在任务门中。type=5。
中断门:包含段选择符和偏移量,用于指向中断或者异常处理程序。通过中断门的时候,处理器会清除IF标志,从而关可屏蔽中断。type=14。
陷阱门:和中断门相似,但是不会清除IF标志。type=15。
可见,当发生中断的时候,找到对应的中断描述符表中的表项,在从中通过段选择符和偏移找到对应的中断处理程序的位置。
Linux使用在描述符中的40~43位的type字段描述这个描述符的类型。中断门处理中断,用陷阱门处理异常。使用任务门处理double fault异常。
后面我们会看到,初始化中断的时候,都设置为type=14,也就是说,通过外部中断的中段描述符时,硬件就会自动关中断。
2.4:中断和异常的硬件处理
当执行完一条指令的时候,cs和eip这对寄存器包含了下一条要执行指令的逻辑地址。但是在执行这条指令之前,需要先检查上一条执行指令是否产生了中断。或者异常。如果有,这有以下步骤:
1:确定中断或者异常相关的向量,为i。
2:读由寄存器idtr确定的中断向量表,找到其中的第i项,假设为描述符A。
3:读由寄存器gdtr确定的GDT,在GDT中找到A中段选择符对应的段描述符。这个描述符就是中断处理程序所在代码段的段基址。再加上描述符A中的偏移量,这时候我们已经得到了中断或者异常处理程序的地址。
4:中断异常处理中必须保证两点:
a:中断异常处理程序的访问级别需要比引起中断异常的程序的访问级别高;(因此,检查当前段寄存器中的CPL,以及GDT中段描述符中的DPL。要求DPL<=CPL)
b:避免用户恶意通过中断门访问内核信息。(检查当前段寄存器中的CPL,以及IDT中,中断描述符中的DPL,要求DPL>=CPL)
5:如果发生了特权级的切换,那么必须切换栈。首先将TSS段中存储的ss、esp寄存器值填入寄存器中,也就是切换到内核栈。将用户态的栈指针值填入内核栈中。
6:在内核栈中保存引起异常的指令地址(cs,eip,eflags)等值。装入cs,eip是为了之后能够恢复执行引起故障的指令。如果是通过的中断门,那么还需要关闭中断(设置寄存器eflags.IF=0)。通过陷阱门则不需要关中断。
7:如果异常产生一个硬件错误码,就在栈中保存硬件错误码的值。(对于缺页异常等异常,有错误码的情况,硬件会自动保存错误码到栈上。但是如果是硬件没有自动保存错误码的情况,则是由软件压入一个值)
8:用描述符A中的段选择符和偏移量填充cs和eip寄存器。开始执行中断处理程序。
总之,通过idt的瞬间,硬件帮助我们从用户态栈切换到内核栈,然后依次保存ss(用户态栈段寄存器),esp(用户态栈指针),eflags,cs(用户态代码段寄存器),eip(用户态代码段指针),并且根据通过的是中断门还是陷阱门决定是否关闭中断。
中断处理程序通过指令iret返回。返回步骤如下:
1:弹出栈中的硬件错误码;
2:弹出栈中保存的cs,eip和eflags到相应的寄存器中。
3:检查中断处理程序的CPL是否等于此时的cs段寄存器中的CPL。如果相等,说明进入中断时没有发生用户态到内核态的切换,因此直接返回。如果不等,说明发生了状态切换,此时还需要将栈切回到用户态,因此执行下一步。
4:从栈中弹出ss,esp到相应的寄存器中。
5:检查段寄存器ds,es,fs,gs的值,是否匹配当前状态,如果特权级不匹配,将相应的段寄存器清0。
3:中断和异常程序的嵌套执行
中断处理过程中是关中断的,因此,中断不会被打断。不过也有例外,就是IRQ中断被NMI中断打断。因为,cpu屏蔽中断只能屏蔽IRQ中断,而不能屏蔽NMI中断。但是异常处理程序可能被中断处理程序打断。
在x86_64架构中,通过syscall指令会关中断。但是在真正执行异常处理函数之前,会开中断。
|
#ifdef CONFIG_X86_64 __visible noinstr void do_syscall_64(unsigned long nr, struct pt_regs *regs) { nr = syscall_enter_from_user_mode(regs, nr); //开中断 instrumentation_begin(); if (likely(nr < NR_syscalls)) { nr = array_index_nospec(nr, NR_syscalls); regs->ax = sys_call_table[nr](regs); } instrumentation_end(); syscall_exit_to_user_mode(regs); //关中断 } #endif |
同样,在arm64架构中,也会在通过中断异常向量表的时候关中断。然后在真正处理异常前开中断。
|
static void el0_svc_common(struct pt_regs *regs, int scno, int sc_nr, const syscall_fn_t syscall_table[]) { …… local_daif_restore(DAIF_PROCCTX); //DAIF全部设置为0,打开 …… } |
在处理缺页异常的时候,可能发生进程切换
4:初始化中段描述符表
内核启用中断之前,初始化中断描述符表中的每一项,然后将中段描述符表的地址放在idtr寄存器中。
int指令可以让用户态进程发出一个中断信号,其值可以是0~255中的任意一个向量。因此,必须严格控制中断门中的DPL字段,防止用户态进程恶意进入内核态。
4.1:i386——IDT的初始化
i386的IDT通过下面的数据定义:
|
idt_descr: .word IDT_ENTRIES*8-1 # idt contains 256 entries .long idt_table |
|
struct desc_struct idt_table[256] __attribute__((__section__(".data.idt"))) = { {0, 0}, }; |
前面已经说过,IDT的基地址由idtr寄存器指定。因此,初始化的时候,首先是向数组idt_table中完成赋值,然后将IDT的地址放入寄存器idtr中。i386架构下会进行两次初始化。第一次初始化由setup_idt完成,他的目的是在操作系统内核引导阶段,建立一个基本的中断处理机制。第二次初始化由trap_init完成,他的目的是建立完整的IDT。

4.1.1:IDT的第一次初始化
初始化有两步,一是将空的处理程序ignore_int填入IDT的256项。代码如下。
|
setup_idt: lea ignore_int,%edx //ignore_int是一个无意义的打印函数 movl $(__KERNEL_CS << 16),%eax movw %dx,%ax /* selector = 0x0010 = cs */ movw $0x8E00,%dx //--------------------------------------------------- 此时eax的值是中断门描述符中0~31位的值,分别是段描述符+处理函数的低位地址。而edx中的值就是处理函数的高位地址+0x8E00 //--------------------------------------------------- lea idt_table,%edi mov $256,%ecx //总共设置256项 rp_sidt: movl %eax,(%edi) movl %edx,4(%edi) addl $8,%edi dec %ecx jne rp_sidt ret |
在设置好idt表的内容后,将idt的地址赋给寄存器:
|
lidt idt_descr |
在这里补充汇编中经常用到的一些指令,如下所示:
|
ENTRY(cpu_gdt_table) .quad 0x0000000000000000 |
这些指令都是ARM伪汇编指令:
|
.text |
以下是代码段 |
|
.data |
以下是数据段 |
|
.global |
定义一个全局变量,比如 .global _start |
|
.ascii |
定义一个字符串,并且为它分配空间 .asciz "Unknown interrupt or fault at EIP %p %p %p\n" |
|
.byte |
定义一个字节 |
|
.short |
定义一个short类型变量(2字节) |
|
.int |
定义一个int类型变量(4字节) |
|
.long |
定义一个长整形变量(4字节) |
|
.word |
定义一个字(4字节) |
|
.quad |
定义一个变量(8字节) |
|
.align |
定义首地址对齐,如:.align PAGE_SIZE_asm |
|
_start |
汇编程序的缺省入口,没有指定其他入口时,就从这儿开始执行 |
|
.fill |
反复拷贝字节,每次拷贝4字节,将他填成0,总共拷贝1024次.fill 1024,4,0 |
4.1.2:IDT的第二次初始化
使用函数trap_init实现IDT的第二次初始化。这次,将真正的异常中断处理函数添加到IDT中,函数实现如下所示:
|
void __init trap_init(void) { set_trap_gate(0,÷_error); set_intr_gate(1,&debug); set_intr_gate(2,&nmi); set_system_intr_gate(3, &int3); /* int3-5 can be called from all */ set_system_gate(4,&overflow); set_system_gate(5,&bounds); set_trap_gate(6,&invalid_op); set_trap_gate(7,&device_not_available); set_task_gate(8,GDT_ENTRY_DOUBLEFAULT_TSS); set_trap_gate(9,&coprocessor_segment_overrun); set_trap_gate(10,&invalid_TSS); set_trap_gate(11,&segment_not_present); set_trap_gate(12,&stack_segment); set_trap_gate(13,&general_protection); set_intr_gate(14,&page_fault); //type=14,会关中断 set_trap_gate(15,&spurious_interrupt_bug); set_trap_gate(16,&coprocessor_error); set_trap_gate(17,&alignment_check); set_trap_gate(19,&simd_coprocessor_error); set_system_gate(SYSCALL_VECTOR,&system_call); //type=15,所以进入系统调用是不会关中断的。注意,在i386架构下,系统调用是通过IDT实现的 cpu_init(); //这里面包含语句__asm__ __volatile__("lidt %0" : : "m" (idt_descr)),作用就是将IDT的大小与起始地址放入寄存器idtr中 trap_init_hook(); } |
|
/* * This routine sets up an interrupt gate at directory privilege level 3. */ static inline void set_system_intr_gate(unsigned int n, void *addr) { _set_gate(idt_table+n, 14, 3, addr, __KERNEL_CS); } static void __init set_trap_gate(unsigned int n, void *addr) { _set_gate(idt_table+n,15,0,addr,__KERNEL_CS); } static void __init set_system_gate(unsigned int n, void *addr) { _set_gate(idt_table+n,15,3,addr,__KERNEL_CS); } static void __init set_task_gate(unsigned int n, unsigned int gdt_entry) { _set_gate(idt_table+n,5,0,0,(gdt_entry<<3)); } //----------------------------------------------------------------- 上面的5,14,15表示type,也就是这个门描述符是任务,陷阱还是中断门。而第三个参数表示了这个门描述符的访问权限。设置为0时,表示只有在内核态下可以访问这个描述符;设置为3时,表示内核态用户态都可以访问这个描述符。它的作用就是防止用户态程序恶意进入内核态。 //----------------------------------------------------------------- |
可以看到他们都调用了汇编函数_set_gate。参数gate_addr表示这个中断描述符放在IDT中的哪个位置,type表示这是个中断门,任务门还是陷阱门,要放入中断描述符中的第37~44位,dpl要放入中段描述符的DPL处,表示能够通过这个门的特权级。P处设置为1(基本都是,没有按着细看)。addr是中断处理函数的地址,他的高16位放入中断门的0~15位,低16位放入中断门上方的48~63位。中断处理函数所在段的段选择符放入16~31位。
|
#define _set_gate(gate_addr,type,dpl,addr,seg) \ do { \ int __d0, __d1; \ __asm__ __volatile__ ("movw %%dx,%%ax\n\t" \//代码部 "movw %4,%%dx\n\t" \ "movl %%eax,%0\n\t" \ "movl %%edx,%1" \ :"=m" (*((long *) (gate_addr))), \//输出部 "=m" (*(1+(long *) (gate_addr))), "=&a" (__d0), "=&d" (__d1) \ :"i" ((short) (0x8000+(dpl<<13)+(type<<8))), \//输入部 "3" ((char *) (addr)),"2" ((seg) << 16)); \ } while (0) |
|
代码部中,%4指第四个变量(从0开始数),也就是((short) (0x8000+(dpl<<13)+(type<<8))),同理,%0指(*((long *) (gate_addr))),%1指(*(1+(long *) (gate_addr))) |
|
输入部中,“3”指输出部中的第三个寄存器(也是从0开始数),也就是"=&d ":edx |
由输入部可知,addr绑定了edx寄存器,_KERNEL_CS左移16位后与eax寄存器绑定。第一行代码要求将edx低16位的数据拷贝进eax寄存器的低16位中。此条指令之前eax本身高16位保存着__KERNEL_CS的数值。但是低16位并没有设置。所以,第一条指令完成后eax的高16位为_KERNEL_CS,低16位为入口地址的低16位。
第二行代码将按照intel要求构造的数据(0x8000+.....)装入dx,也就是edx寄存器的低16位。此时edx的高16位装着入口地址的高16位。
第三行第四行分别将eax中的值放在gate_addr指示的内存处,将edx的值放在1+(long *) (gate_addr)指示的内存处。
结合这几个门的格式,可知这些门已经设置完成。
4.2:x86-64——IDT的初始化
x86-64架构同样使用IDT来实现中断和异常。
下面的宏定义了中断门和陷阱门的内容。
|
INTG(X86_TRAP_DE, asm_exc_divide_error) //X86_TRAP_DE是这个向量在IDT中的位置,asm_exc_divide_error是处理函数的地址 |
|
/* Interrupt gate */ #define INTG(_vector, _addr) \//中断门。只有内核态可以通过这个门 G(_vector, _addr, DEFAULT_STACK, GATE_INTERRUPT, DPL0, __KERNEL_CS) /* System interrupt gate */ #define SYSG(_vector, _addr) \//系统中断门。DPL3表示用户态或者内核态都可以通过这个门 G(_vector, _addr, DEFAULT_STACK, GATE_INTERRUPT, DPL3, __KERNEL_CS) /* * Interrupt gate with interrupt stack. The _ist index is the index in * the tss.ist[] array, but for the descriptor it needs to start at 1. */ #define ISTG(_vector, _addr, _ist) \ G(_vector, _addr, _ist + 1, GATE_INTERRUPT, DPL0, __KERNEL_CS) |
我们可以看到,现在的x86_64架构中,已经不使用陷阱门了。中断描述符表如下所示。也就是说,要先设置好idt_table中的内容,然后通过指令load_idt设置寄存器
|
load_idt(&idt_descr); //通过这个语句(实质是lidt汇编指令),设置寄存器idtr的值 |
|
/* Must be page-aligned because the real IDT is used in the cpu entry area */ static gate_desc idt_table[IDT_ENTRIES] __page_aligned_bss; //中断描述符表
static struct desc_ptr idt_descr __ro_after_init = { .size = IDT_TABLE_SIZE - 1, .address = (unsigned long) idt_table, }; |
IDT中包含了256个异常中断。异常通过函数trap_init初始化idt_table中的内容。
|
void __init trap_init(void) { /* Init cpu_entry_area before IST entries are set up */ setup_cpu_entry_areas(); /* Init GHCB memory pages when running as an SEV-ES guest */ sev_es_init_vc_handling(); idt_setup_traps(); //将def_idts中的表项设置到idt_table中。注释中说,这时候中断栈还不能使用。因此,在调用函数cpu_init后,需要再设置要使用中断栈的异常 /* * Should be a barrier for any external CPU state: */ cpu_init(); idt_setup_ist_traps(); //将ist_idts中的表项设置到idt_table中。这些异常使用的是中断栈 } |
在异常表项设置好之后,会设置中断表项。中断通过调用链start_kernel -> init_IRQ -> native_init_IRQ完成初始化。主要描述一下native_init_IRQ中调用的函数idt_setup_apic_and_irq_gates,在这个函数中注册了中断异常向量表中,中断的处理函数。
|
/** * idt_setup_apic_and_irq_gates - Setup APIC/SMP and normal interrupt gates */ void __init idt_setup_apic_and_irq_gates(void) { int i = FIRST_EXTERNAL_VECTOR; void *entry; idt_setup_from_table(idt_table, apic_idts, ARRAY_SIZE(apic_idts), true); //apic_idts中的内容应该是cpu本地APIC中断的处理函数
for_each_clear_bit_from(i, system_vectors, FIRST_SYSTEM_VECTOR) { //这里做一个循环操作,system_vectors中未设置的位表示idt_table中还没有初始化的门,我们将他们全部初始化,对应的处理函数都是asm_common_interrupt entry = irq_entries_start + 8 * (i - FIRST_EXTERNAL_VECTOR); //irq_entries_start数组的内容在/arch/x86/include/asm/idtentry.h中定义。它对应的就是我们通常而言的外设中断,也就是从32开始的中断向量号对应的中断。由于irq号和中断向量号之间保持着32的关系,因此,irq0对应的就是irq_entries_start第一个元素的中断向量号 set_intr_gate(i, entry); } #ifdef CONFIG_X86_LOCAL_APIC for_each_clear_bit_from(i, system_vectors, NR_VECTORS) { /* * Don't set the non assigned system vectors in the * system_vectors bitmap. Otherwise they show up in * /proc/interrupts. */ entry = spurious_entries_start + 8 * (i - FIRST_SYSTEM_VECTOR); set_intr_gate(i, entry); } #endif /* Map IDT into CPU entry area and reload it. */ idt_map_in_cea(); load_idt(&idt_descr); //这里使能我们初始化好的中断表 /* Make the IDT table read only */ set_memory_ro((unsigned long)&idt_table, 1); idt_setup_done = true; } |
也就是说,除了一些定义好了的中断处理函数,其他中断的处理函数都是asm_common_interrupt。IRQ中断处理函数都是asm_common_interrupt。我们会在后面描述异常以及普通IRQ中断的处理。
4.3:arm64——异常向量表的初始化
和i386以及x86-64不同,arm64架构不是使用idt,而是使用自己架构定义的异常向量表。通过命令
|
make ./arch/arm64/kernel/entry.o |
将entry.S编译成.o,然后使用objdump将其反汇编成txt。我们就可以得到arm64架构的异常向量表如下所示:改变
|
//current EL with SP0,实际上不使用 kernel_ventry 1, irq_invalid // IRQ EL1t kernel_ventry 1, fiq_invalid // FIQ EL1t kernel_ventry 1, error_invalid // Error EL1t kernel_ventry 1, sync // Synchronous EL1h kernel_ventry 1, irq // IRQ EL1h kernel_ventry 1, fiq_invalid // FIQ EL1h kernel_ventry 1, error // Error EL1h kernel_ventry 0, sync // Synchronous 64-bit EL0 kernel_ventry 0, irq // IRQ 64-bit EL0 kernel_ventry 0, fiq_invalid // FIQ 64-bit EL0 kernel_ventry 0, error // Error 64-bit EL0 kernel_ventry 0, sync_compat, 32 // Synchronous 32-bit EL0 kernel_ventry 0, irq_compat, 32 // IRQ 32-bit EL0 kernel_ventry 0, fiq_invalid_compat, 32 // FIQ 32-bit EL0 kernel_ventry 0, error_compat, 32 // Error 32-bit EL0 |
上面有四段。每一段分别用在不同的情况。不同的情况在上面用注释说明。
sync表示是同步中断,也就是异常的入口,它是由执行指令造成的,包含缺页异常以及系统调用。而irq与fiq是异步中断,也就是中断的入口,它是由外部设备造成的。
在系统启动的初始化阶段,在函数__primary_switched,我们就会将异常中断向量表的地址传递给寄存器vbar_el1
|
adr_l x8, vectors // load VBAR_EL1 with virtual msr vbar_el1, x8 // vector table address |
5:异常处理
大部分异常都是发生错误,比如说除0操作。当这类异常发生的时候,内核向进程发送一个信号。进程将根据这个信号执行恢复操作或者停止运行。
但是也有少部分情况,硬件使用异常对资源执行管理,比如缺页异常。
异常处理程序有一个标准的结构,分别是以下三步:
1:在内核栈中保存大部分寄存器的值;
2:使用C函数进行处理。
3:通过ret_from_exception函数从异常处理程序退出。
5.1:为异常处理程序保存寄存器的值
不同的异常会进入IDT中设置的不同入口。通过前面我们已经知道,在这个时候,硬件已经自动的切换到了内核栈,并且将之前的cs,ip,eflags保存到内核栈上,并且根据通过的门选择关或者不关中断(设置eflags的IF位,现在都会关中断)。之后,我们进入软件处理。每种异常的入口格式类似,我们可以通过反汇编entry_64.o查看异常入口的代码。一个例子如下
|
ffffffff81e00880 <asm_exc_overflow>: ffffffff81e00880: 90 nop ffffffff81e00881: 90 nop ffffffff81e00882: 90 nop ffffffff81e00883: 6a ff push $0xffffffffffffffff //在栈中压入硬件错误码(硬件不自动压入的时候,软件就会压入一个值) ffffffff81e00885: e8 36 08 00 00 call ffffffff81e010c0 <error_entry> //在进程的内核栈中,保存所有的寄存器 ffffffff81e0088a: 48 89 e7 mov %rsp,%rdi //rsp->rdi。这时候,asm_exc_overflow的入参就是一个pt_regs指针 ffffffff81e0088d: e8 0e 03 ec ff call ffffffff81cc0ba0 <exc_overflow> //这里调用exc_overflow。作为使用宏DEFINE_IDTENTRY定义的函数,它具有类似的格式。会在5.2节中分析 ffffffff81e00892: e9 09 09 00 00 jmp ffffffff81e011a0 <error_return> ffffffff81e00897: 66 0f 1f 84 00 00 00 nopw 0x0(%rax,%rax,1) ffffffff81e0089e: 00 00 |
总之,发生中断异常的时候,硬件自动切换到内核栈,保存了部分寄存器,并且关中断。然后,又在error_entry中保存了所有寄存器。最后进入相应的异常处理函数。需要注意的是,此时内核栈中存储的是寄存器的值。并且rdi作为处理函数的参数传入,这个参数的形式就是pt_regs结构体。
|
struct pt_regs { /* * C ABI says these regs are callee-preserved. They aren't saved on kernel entry * unless syscall needs a complete, fully filled "struct pt_regs". */ unsigned long r15; unsigned long r14; unsigned long r13; unsigned long r12; unsigned long bp; unsigned long bx; /* These regs are callee-clobbered. Always saved on kernel entry. */ unsigned long r11; unsigned long r10; unsigned long r9; unsigned long r8; unsigned long ax; unsigned long cx; unsigned long dx; unsigned long si; unsigned long di; /* * On syscall entry, this is syscall#. On CPU exception, this is error code. * On hw interrupt, it's IRQ number: *///从注释可以看到,这个值,系统调用中是系统调用号,异常中是错误码,中断中是IRQ号。某些情况下,硬件不会自动保存这个值的时候,就是软件保存一个值 unsigned long orig_ax; /* Return frame for iretq *///下面是发生中断或者异常的时候,硬件保存的值 unsigned long ip; unsigned long cs; unsigned long flags; unsigned long sp; unsigned long ss; /* top of stack page */ }; |
5.2:进入和离开异常处理程序
大部分异常处理程序将硬件错误码和异常向量保存在当前进程的进程描述符中,然后向进程发送一个信号。一般情况下,当异常退出的时候,进程就会处理这个信号。
异常处理程序返回后,跳转到error_return执行。这个流程在后面叙述。
6:中断处理
异常处理和中断处理不同。如前所述,很多异常处理是内核向进程发送一个信号,然后等到进程重新执行的时候,再处理这个信号。因此,异常的处理被延迟了。但是这种方式并不适用于中断。
中断分成三种:
IO中断:某些IO设备需要关注,相应的中断处理程序必须查询设备来确定相应的操作过程。
时钟中断;处理器间中断
6.1:IO中断处理
同一条IRQ线可能连接着几个外设,因此,这几个外设发出中断的时候,会在CPU上触发同一个中断向量。因此,每个中断向量应该绑定多个中断服务例程ISR,发生中断的时候,执行每一个ISR。
当中断发生的时候,并不需要完全执行中断处理的所有操作。因为一个中断在执行的时候,相应的IRQ线上的信号被忽略。此外,中断处理程序是代表进程执行的,被代表的进程必须始终处于running状态,所以中断处理过程中一定不能发生阻塞。需要时间长,并且不重要的操作应该推后执行。
因此,将中断后要执行的操作分成三类:
1:紧急的:例如对PIC进行应答,或者修改设备和处理器都要访问的数据结构。这些操作都要很快被执行,需要在一个中断处理程序内立即执行。是在禁止可屏蔽中断的情况下完成的。
2:非紧急的:例如修改只有CPU要访问的数据结构。这些操作也要很快完成,但是这些操作是在开中断的情况下执行的。
3:可延后的:例如将缓冲区中的数据拷贝到进程的地址空间中。这些操作由软中断和tasklet执行。
所有的IO中断处理都执行四个相同的操作:
1:在内核态堆栈中保存IRQ的值和寄存器(被中断的进程上下文)的内容;
2:给正在给IRQ服务的PIC发出一个应答,允许PIC发出下一个中断
3:执行共享这个IRQ的所有设备的中断服务例程
4:跳到ret_from_intr的地址后终止
6.1.1:中断向量
中断向量中,32~238范围留给IRQ,不过要去除128,这个中断向量用于系统调用。同样,不同的IRQ号也需要分配给不同的外设。
不过也要注意,有时候同一个IRQ号会被分给不同的几个外设。IRQ和外设的对应关系是在初始化每个驱动设备程序的时候建立的。也就是,在外设初始化的时候,要建立属于自己的irq_desc结构体。
第n条IRQ线,对应了中断向量32+n。
6.1.2:IRQ数据结构
从上面可知,我们使用中断描述符struct irq_desc描述一个中断向量。
|
/** * struct irq_desc - interrupt descriptor …… * @action: the irq action chain …… */ struct irq_desc { …… struct irqaction *action; /* IRQ action list */ //有时候IRQ线会对应多个外设,每个外设的中断处理函数不同。irqaction描述符对应了一个特定的硬件和一个特定的中断处理例程。 …… } ____cacheline_internodealigned_in_smp; |
所有的irq_desc_t描述符构成了一个数组
|
struct irq_desc irq_desc[NR_IRQS] __cacheline_aligned_in_smp = { [0 ... NR_IRQS-1] = { .handle_irq = handle_bad_irq, .depth = 1, .lock = __RAW_SPIN_LOCK_UNLOCKED(irq_desc->lock), } }; |
我们可以通过函数disable_irq来禁用某一条中断线,或者使用enable_irq打开某一条中断线。这两个函数实际上会调用中断编程控制器PIC的操作函数,通过修改PIC芯片上寄存器的值,实现关闭或者打开中断:
|
/** * disable_irq - disable an irq and wait for completion * @irq: Interrupt to disable * * Disable the selected interrupt line. Enables and Disables are * nested. * This function waits for any pending IRQ handlers for this interrupt * to complete before returning. If you use this function while * holding a resource the IRQ handler may need you will deadlock. * * This function may be called - with care - from IRQ context. */ void disable_irq(unsigned int irq) { if (!__disable_irq_nosync(irq)) synchronize_irq(irq); } EXPORT_SYMBOL(disable_irq); |
|
/** * enable_irq - enable handling of an irq * @irq: Interrupt to enable * * Undoes the effect of one call to disable_irq(). If this * matches the last disable, processing of interrupts on this * IRQ line is re-enabled. * * This function may be called from IRQ context only when * desc->irq_data.chip->bus_lock and desc->chip->bus_sync_unlock are NULL ! */ void enable_irq(unsigned int irq) { unsigned long flags; struct irq_desc *desc = irq_get_desc_buslock(irq, &flags, IRQ_GET_DESC_CHECK_GLOBAL); if (!desc) return; if (WARN(!desc->irq_data.chip, KERN_ERR "enable_irq before setup/request_irq: irq %u\n", irq)) goto out; __enable_irq(desc); out: irq_put_desc_busunlock(desc, flags); } EXPORT_SYMBOL(enable_irq); |
6.1.3:i386-IRQ数据结构
在系统初始化的时候,init_IRQ函数通过替换setup_idt建立的中断门。
|
void __init init_IRQ(void) { int i; //在此处替换中断门的处理函数,interrupt[i]中存储的是各中断处理函数的地址。设置的是idt中,从FIRST_EXTERNAL_VECTOR(32)开始的中断门。异常门在trap_init中设置 for (i = 0; i < (NR_VECTORS - FIRST_EXTERNAL_VECTOR); i++) { int vector = FIRST_EXTERNAL_VECTOR + i; if (i >= NR_IRQS) break; if (vector != SYSCALL_VECTOR) set_intr_gate(vector, interrupt[i]); //注意,这里使用的接口,会将中断描述符表中的项的type设置为14。也就是说,通过这个中断描述符表,就会关中断。 } intr_init_hook(); setup_pit_timer(); if (boot_cpu_data.hard_math && !cpu_has_fpu) setup_irq(FPU_IRQ, &fpu_irq); irq_ctx_init(smp_processor_id()); } |
全局数组interrupt如下初始化的:
|
.data //表示放在数据段中 ENTRY(interrupt) //全局数组interrupt .text //表示放在代码段中 vector=0 ENTRY(irq_entries_start) //函数或者是代码段入口 .rept NR_IRQS //将.rept和.endr中的内容重复展开NR_IRQS次 ALIGN 1: pushl $vector-256 //这里将中断号保存在栈上。这时候已经切换到了被中断的进程的内核栈 jmp common_interrupt .data //这部分放在数据段中的内容与前一段放在数据段中的内容,在内存上是相邻的,也就是说,.long 1b是放在interrupt指向的地址处(interrupt是一个ENTRY而不是一个数据)。由于要展开NR_IRQS次,因此interrupt实际上是NR_IRQS个地址构成的数组 .long 1b //一个数据,表示的是1处的地址 .text vector=vector+1 //同理,这句话和jmp common_interrupt在内存上是相邻的 .endr |
因此,在经过上面的初始化过程之后,interrupt数组存储的是NR_IRQS个1处的地址。再结合之前的中断门描述符的设置,发生中断时,会跳转到标号为1处的代码执行。在镜像中的结构如下图所示:
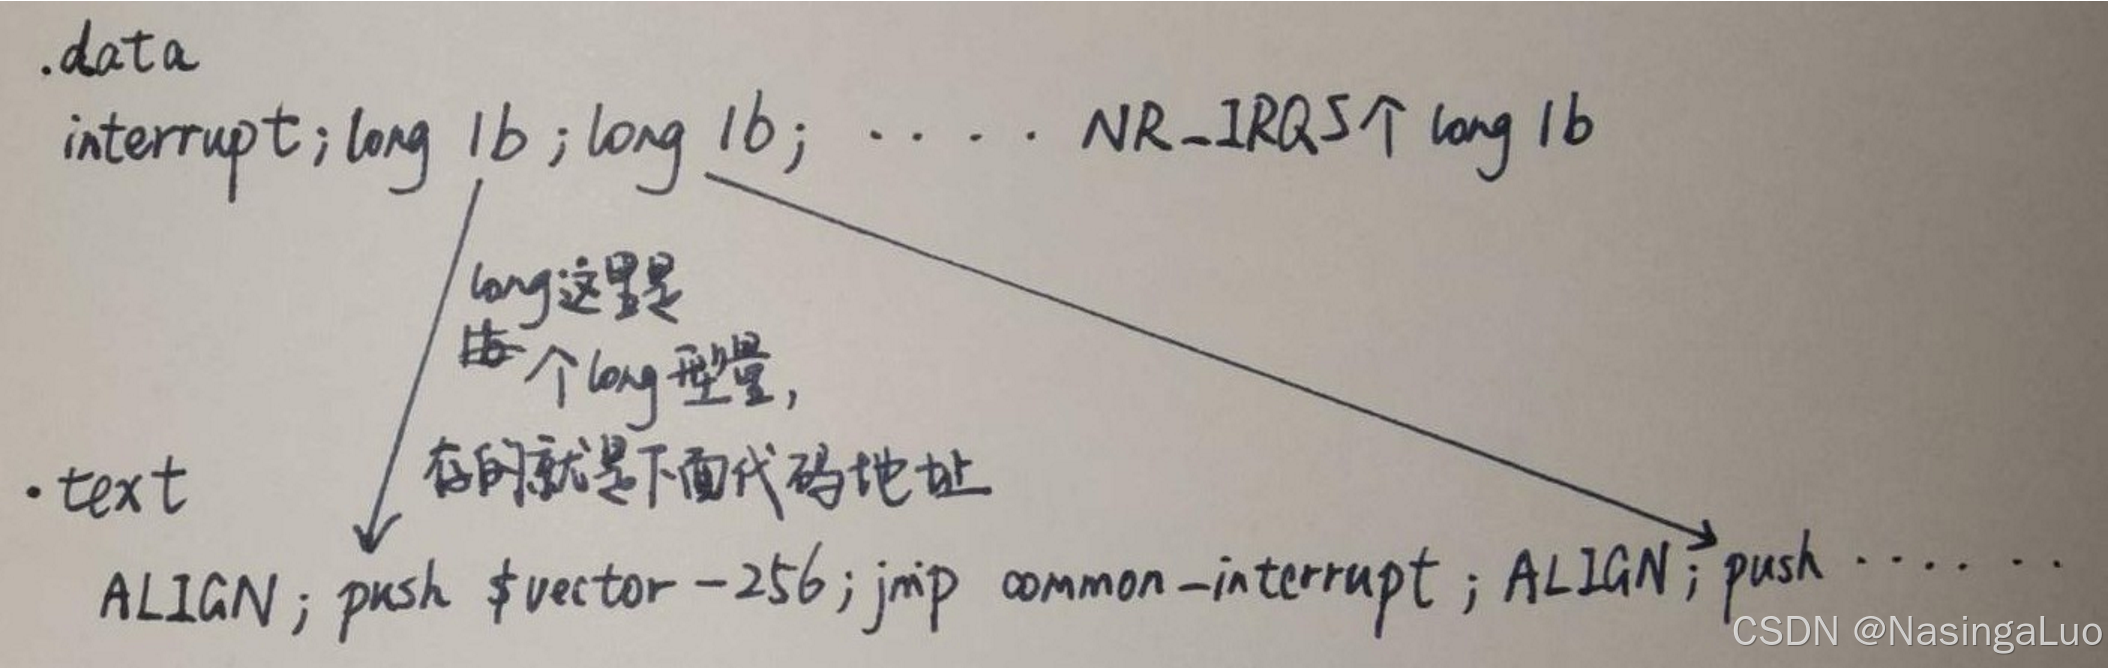
虽然,所有的中断处理函数都是一致的。但是,不同的中断线IRQn会对应不同的中断号n+32。不同的中断号n+32会在进程的内核栈中push一个值n+32-256。因此,我们在进入common_interrupt的时候,内核栈上的值,除了之前硬件保存的寄存器的值以外,还多了一个描述中断号的值。
common_interrupt的具体处理我们会在后面描述。
6.1.4:x86-64-IRQ数据结构
同样,通过函数init_IRQ初始化x86-64中和中断相关的idt。函数实现如下所示:
|
void __init init_IRQ(void) { int i; /* * On cpu 0, Assign ISA_IRQ_VECTOR(irq) to IRQ 0..15. * If these IRQ's are handled by legacy interrupt-controllers like PIC, * then this configuration will likely be static after the boot. If * these IRQs are handled by more modern controllers like IO-APIC, * then this vector space can be freed and re-used dynamically as the * irq's migrate etc. */ for (i = 0; i < nr_legacy_irqs(); i++) per_cpu(vector_irq, 0)[ISA_IRQ_VECTOR(i)] = irq_to_desc(i); BUG_ON(irq_init_percpu_irqstack(smp_processor_id())); x86_init.irqs.intr_init(); } |
|
void __init native_init_IRQ(void) { /* Execute any quirks before the call gates are initialised: */ x86_init.irqs.pre_vector_init(); idt_setup_apic_and_irq_gates(); lapic_assign_system_vectors(); if (!acpi_ioapic && !of_ioapic && nr_legacy_irqs()) { /* IRQ2 is cascade interrupt to second interrupt controller */ if (request_irq(2, no_action, IRQF_NO_THREAD, "cascade", NULL)) pr_err("%s: request_irq() failed\n", "cascade"); } } |
|
/** * idt_setup_apic_and_irq_gates - Setup APIC/SMP and normal interrupt gates */ //------------------------------------------------- 我们看这个函数的注释,就是设置APIC/SMP和普通中断门。其中,APIC/SMP中断门都放在数组apic_idts(idt.c)中。而普通中断门和我们上面看到的i386中普通中断门的来源类似,都是通过汇编语言定义的 //------------------------------------------------- void __init idt_setup_apic_and_irq_gates(void) { int i = FIRST_EXTERNAL_VECTOR; void *entry; idt_setup_from_table(idt_table, apic_idts, ARRAY_SIZE(apic_idts), true);//设置APIC/SMP中断门 //------------------------------------------------- irq_entries_start就是普通中断门的地址,在文件idtentry.h中设置。通过预编译,我们可以看到,irq_entries_start数组中的内容如下所示: <irq_entries_start>: push $0x20 jmp ffffffff81e00bc0 <asm_common_interrupt> nop push $0x21 jmp ffffffff81e00bc0 <asm_common_interrupt> nop push $0x22 jmp ffffffff81e00bc0 <asm_common_interrupt> nop …… //------------------------------------------------- for_each_clear_bit_from(i, system_vectors, FIRST_SYSTEM_VECTOR) { entry = irq_entries_start + 8 * (i - FIRST_EXTERNAL_VECTOR); set_intr_gate(i, entry); } #ifdef CONFIG_X86_LOCAL_APIC for_each_clear_bit_from(i, system_vectors, NR_VECTORS) { /* * Don't set the non assigned system vectors in the * system_vectors bitmap. Otherwise they show up in * /proc/interrupts. */ entry = spurious_entries_start + 8 * (i - FIRST_SYSTEM_VECTOR); set_intr_gate(i, entry); } #endif /* Map IDT into CPU entry area and reload it. */ idt_map_in_cea(); load_idt(&idt_descr); /* Make the IDT table read only */ set_memory_ro((unsigned long)&idt_table, 1); idt_setup_done = true; } |
可以看到,这时候,是将irq+32放入被中断进程的内核栈中。后续也会根据内核栈中的数据,确定使用的中断处理例程。
结合之前的描述,在通过中断门的瞬间,硬件会帮我们从用户态栈切换到内核栈,然后,在内核栈中保存ss,esp,eflags,cs,ip。我们在idt中,会在栈上保存中断向量号(中断向量号=irq号+32)。因此,栈上保存的中断向量号能够帮助我们确定,我们要执行的中断处理例程。
因此,和i386类似,我们也在内核栈上多保存了描述中断号的值。然后进入了函数asm_common_interrupt。这个函数我们也会在后面描述。
6.1.5:irqaction
我们已经从IRQ号到了中断向量号,后续还会从中断向量号到中断处理函数。已经说过,不同的设备可能使用同一条IRQ线,因此他们激发同样的中断。因此,我们需要对同一个中断号注册多个irqaction结构体,每个结构体实际上对应了这个IRQ线上的某一个特定设备。
|
/** * struct irqaction - per interrupt action descriptor * @handler: interrupt handler function * @name: name of the device * @dev_id: cookie to identify the device * @percpu_dev_id: cookie to identify the device * @next: pointer to the next irqaction for shared interrupts * @irq: interrupt number * @flags: flags (see IRQF_* above) * @thread_fn: interrupt handler function for threaded interrupts * @thread: thread pointer for threaded interrupts * @secondary: pointer to secondary irqaction (force threading) * @thread_flags: flags related to @thread * @thread_mask: bitmask for keeping track of @thread activity * @dir: pointer to the proc/irq/NN/name entry */ struct irqaction { irq_handler_t handler; //中断处理函数 void *dev_id; void __percpu *percpu_dev_id; struct irqaction *next; //指向下一个共享此IRQ线的设备描述符 irq_handler_t thread_fn; struct task_struct *thread; struct irqaction *secondary; unsigned int irq; unsigned int flags; unsigned long thread_flags; unsigned long thread_mask; const char *name; struct proc_dir_entry *dir; } ____cacheline_internodealigned_in_smp; |
6.1.6:IRQ在多处理系统上的分发
SMP,Symmetric Multiprocessing(对称多处理模型),是一种多处理器计算机架构,其中多个处理器核心共享同一物理内存和外部设备。在 SMP 系统中,每个处理器核心都具有相似的体系结构,可以独立执行指令,而且操作系统采用对称调度策略,以充分利用系统中的每个核心。SMP 提供了并行处理能力,可以显著提高系统性能,适用于服务器、工作站和高性能计算等各种领域。这种架构消除了单一 CPU 时代的性能瓶颈,允许多个任务并行执行,从而提高了计算机系统的处理能力。
6.1.7:多种类型的内核栈
1:异常栈:用于处理异常(包括系统调用)。这个栈就是进程的内核栈。每个进程的异常栈都是自己独有的;
2:硬中断请求栈:用于处理中断,每个CPU对应一个栈,这个栈占据一个单独的页框;
3:软中断请求栈:每个CPU有一个占据一个页框的软中断请求栈。
|
/* Per CPU interrupt stacks */ struct irq_stack { char stack[IRQ_STACK_SIZE]; //就是4096。也就是每个中断栈都占了一个page } __aligned(IRQ_STACK_SIZE);
|
|
DEFINE_PER_CPU(struct irq_stack *, hardirq_stack_ptr); DEFINE_PER_CPU(struct irq_stack *, softirq_stack_ptr); //中断栈(软硬中断都有中断栈),每CPU变量 |
异常栈是每个进程有一个这样的结构体,软中断栈和硬中断栈是每个CPU有一个这样的结构体。
6.1.8:为中断处理程序保存寄存器的值
我们在上面介绍了,在x86-64架构下,中断处理函数最终进入了asm_common_interrupt。我们在这一小节中,描述从这里开始,一直到真正根据中断号开始处理中断之间,所做的操作。
x86-64:
源码中有太多的宏,不利于观察,我们直接看反汇编出来的指令。
|
<asm_common_interrupt>: nop nop nop call <error_entry> //已经说过,在这里将所有寄存器保存在进程的内核栈中 mov %rsp,%rdi //第一个参数,就是栈指针的值,也是结构体pt_regs的首地址 mov 0x78(%rsp),%rsi //第二个参数,中断号,是中断线号IRQ+32。rsp是pt_regs结构体,偏移0x78是orig_ax成员 movq $0xffffffffffffffff,0x78(%rsp) call <common_interrupt> //通过预编译irq.c可以得到这个函数实现。他相关的宏DEFINE_IDTENTRY_IRQ在文件idtentry.h中定义 jmp <error_return> data16 cs nopw 0x0(%rax,%rax,1) data16 cs nopw 0x0(%rax,%rax,1) nopl 0x0(%rax) |
函数common_interrupt是在文件/arch/x86/kernel/irq.c中通过DEFINE_IDTENTRY_IRQ(common_interrupt)定义的。DEFINE_IDTENTRY_IRQ展开如下
|
/** * DEFINE_IDTENTRY_IRQ - Emit code for device interrupt IDT entry points * @func: Function name of the entry point * * The vector number is pushed by the low level entry stub and handed * to the function as error_code argument which needs to be truncated * to an u8 because the push is sign extending. * * irq_enter/exit_rcu() are invoked before the function body and the * KVM L1D flush request is set. Stack switching to the interrupt stack * has to be done in the function body if necessary. */ #define DEFINE_IDTENTRY_IRQ(func) \ static __always_inline void __##func(struct pt_regs *regs, u8 vector); \ \ __visible noinstr void func(struct pt_regs *regs, \ unsigned long error_code) \ { \ irqentry_state_t state = irqentry_enter(regs); \ \ instrumentation_begin(); \ irq_enter_rcu(); \//增加抢占计数 kvm_set_cpu_l1tf_flush_l1d(); \ __##func (regs, (u8)error_code); \ irq_exit_rcu(); \//这个函数中,会处理软中断 instrumentation_end(); \ irqentry_exit(regs, state); \ //中断退出的时候,会调用irqentry_exit } \ \ static __always_inline void __##func(struct pt_regs *regs, u8 vector) |
在上面的流程中,通过asm_common_interrupt -> common_interrupt -> __common_interrupt -> handle_irq -> run_irq_on_irqstack_cond -> handle_level_irq -> handle_irq_event调用链,开始中断处理。这个过程我们不做分析,只需要知道,他切换到了硬中断栈,增加了preempt_count中的计数,然后通过中断控制器的驱动,响应了中断,并最终通过handle_irq_event,开始处理中断。
|
/* * common_interrupt() handles all normal device IRQ's (the special SMP * cross-CPU interrupts have their own entry points). */ DEFINE_IDTENTRY_IRQ(common_interrupt) //实际上带有两个参数:struct pt_regs *regs, u8 vector { struct pt_regs *old_regs = set_irq_regs(regs); struct irq_desc *desc; /* entry code tells RCU that we're not quiescent. Check it. */ RCU_LOCKDEP_WARN(!rcu_is_watching(), "IRQ failed to wake up RCU"); desc = __this_cpu_read(vector_irq[vector]); //根据中断向量号找到struct irq_desc if (likely(!IS_ERR_OR_NULL(desc))) { handle_irq(desc, regs); } else { ack_APIC_irq(); if (desc == VECTOR_UNUSED) { pr_emerg_ratelimited("%s: %d.%u No irq handler for vector\n", __func__, smp_processor_id(), vector); } else { __this_cpu_write(vector_irq[vector], VECTOR_UNUSED); } } set_irq_regs(old_regs); } |
6.1.9:IRQ线的动态分配
在系统中,除了几个向量留给特定的设备,其他的向量都动态的处理。同一条irq线可以让几个硬件设备使用,即使这些设备不允许IRQ共享。技巧是让这些硬件设备的活动串行化,以便一次只能有一个设备拥有这个IRQ线。通过函数request_irq注册一个指定的IRQ线对应的中断处理例程
|
request_irq (IRQ_NETWINDER_BUTTON, button_handler, 0, "nwbutton", NULL //一个注册中断的例子 |
|
/** * request_irq - Add a handler for an interrupt line * @irq: The interrupt line to allocate * @handler: Function to be called when the IRQ occurs. * Primary handler for threaded interrupts * If NULL, the default primary handler is installed * @flags: Handling flags * @name: Name of the device generating this interrupt * @dev: A cookie passed to the handler function * * This call allocates an interrupt and establishes a handler; see * the documentation for request_threaded_irq() for details. */ static inline int __must_check request_irq(unsigned int irq, irq_handler_t handler, unsigned long flags, const char *name, void *dev) { return request_threaded_irq(irq, handler, NULL, flags, name, dev); } |
|
/** * request_threaded_irq - allocate an interrupt line * @irq: Interrupt line to allocate * @handler: Function to be called when the IRQ occurs. * Primary handler for threaded interrupts * If NULL and thread_fn != NULL the default * primary handler is installed * @thread_fn: Function called from the irq handler thread * If NULL, no irq thread is created * @irqflags: Interrupt type flags * @devname: An ascii name for the claiming device * @dev_id: A cookie passed back to the handler function * * This call allocates interrupt resources and enables the * interrupt line and IRQ handling. From the point this * call is made your handler function may be invoked. Since * your handler function must clear any interrupt the board * raises, you must take care both to initialise your hardware * and to set up the interrupt handler in the right order. * * If you want to set up a threaded irq handler for your device * then you need to supply @handler and @thread_fn. @handler is * still called in hard interrupt context and has to check * whether the interrupt originates from the device. If yes it * needs to disable the interrupt on the device and return * IRQ_WAKE_THREAD which will wake up the handler thread and run * @thread_fn. This split handler design is necessary to support * shared interrupts. * * Dev_id must be globally unique. Normally the address of the * device data structure is used as the cookie. Since the handler * receives this value it makes sense to use it. * * If your interrupt is shared you must pass a non NULL dev_id * as this is required when freeing the interrupt. * * Flags: * * IRQF_SHARED Interrupt is shared * IRQF_TRIGGER_* Specify active edge(s) or level * */ int request_threaded_irq(unsigned int irq, irq_handler_t handler, irq_handler_t thread_fn, unsigned long irqflags, const char *devname, void *dev_id) { struct irqaction *action; struct irq_desc *desc; int retval; if (irq == IRQ_NOTCONNECTED) return -ENOTCONN; /* * Sanity-check: shared interrupts must pass in a real dev-ID, * otherwise we'll have trouble later trying to figure out * which interrupt is which (messes up the interrupt freeing * logic etc). * * Also IRQF_COND_SUSPEND only makes sense for shared interrupts and * it cannot be set along with IRQF_NO_SUSPEND. */ if (((irqflags & IRQF_SHARED) && !dev_id) || (!(irqflags & IRQF_SHARED) && (irqflags & IRQF_COND_SUSPEND)) || ((irqflags & IRQF_NO_SUSPEND) && (irqflags & IRQF_COND_SUSPEND))) return -EINVAL; desc = irq_to_desc(irq); //通过irq_desc + irq,在数组struct irq_desc irq_desc[NR_IRQS]找到中断号irq对应的irq_desc,中断描述符 ……
action = kzalloc(sizeof(struct irqaction), GFP_KERNEL); //分配struct irqaction结构体 if (!action) return -ENOMEM; action->handler = handler; action->thread_fn = thread_fn; //如果thread_fn有值的话,就会创建一个irq内核线程 action->flags = irqflags; action->name = devname; action->dev_id = dev_id; retval = irq_chip_pm_get(&desc->irq_data); if (retval < 0) { kfree(action); return retval; } retval = __setup_irq(irq, desc, action); //这个函数非常复杂,涉及到中断线程化等内容。总之,这个函数通过中断控制器驱动,激活了我们注册的中断线,并且将desc和action绑定起来 if (retval) { irq_chip_pm_put(&desc->irq_data); kfree(action->secondary); kfree(action); } return retval; } EXPORT_SYMBOL(request_threaded_irq); |
总之,在上面的操作中,我们分配并初始化了irq对应的irq_desc中的irqaction。然后,通过调用中断控制器中对应的函数,激活了对应的irq线。之后,就可以通过此irq线发送中断了。
我们注意到,上面的操作中并没有设置irq和中断向量之间的关系。因此,可以认为,主板上一个设备插在哪里,那个插槽的irq线就是固定的。我们在函数request_irq中传入的irq号,就是设备插入的插槽对应的irq号。
6.2:处理器间中断
7:软中断及tasklet
我们将中断处理分成上半部和下半部的目的,不是为了让中断处理例程快速结束;而是为了,让系统有快速的响应时间(也就是关中断的时间不能太长)。因此,虽然执行软中断的时候,会导致当前进程得不到执行;但是,在软中断时间中,我们是开中断的,能够快速相应外部中断,和用户交互。
通过可延迟函数(也就是软中断和tasklet)或者工作者队列可以实现可延迟中断。tasklet是在软中断的基础上实现的。软中断的分配是静态的(在编译时定义),而tasklet的分配是动态的,可以在系统运行时进行。
软中断(即使是同一类型的软中断)可以并发的运行在多个CPU上,因此必须是可重入函数(也叫多线程安全函数),并且有自旋锁保护其数据结构,但是,在同一个CPU上,软中断必须是串行执行的。tasklet不用担心这些问题。因为相同类型的tasklet总是串行执行,也就是说,不能在两个CPU上同时运行相同类型的tasklet,但是,不同类型的tasklet可以在几个CPU上并发执行。因此,tasklet是不可重入的。
对可延迟函数一般包括四种操作:
1:初始化:定义一个可延迟函数,这个操作通常在内核初始化或者加载模块的时候完成。
2:激活:标记一个可延迟函数为挂起。被激活的可延迟函数会在下次调度的时候执行。
3:屏蔽:有选择的屏蔽一个可延迟函数。当他被激活的时候也不会执行它。
4:执行:执行一个挂起的可延迟函数和其他同类型的所有挂起的可延迟函数。
7.1:软中断
7.1.1:软中断使用的数据结构
如前所述,软中断在系统编译的时候就确定了。因此,软中断需要提前注册,注册到软中断数组中
|
static struct softirq_action softirq_vec[NR_SOFTIRQS] __cacheline_aligned_in_smp; |
struct softirq_action结构体通过open_softirq实现注册。
|
void open_softirq(int nr, void (*action)(struct softirq_action *)) { softirq_vec[nr].action = action; //指向软中断函数 } |
还有一个关键数据是preempt_count。
|
DEFINE_PER_CPU(int, __preempt_count) = INIT_PREEMPT_COUNT; EXPORT_PER_CPU_SYMBOL(__preempt_count); |
|
0~7位 |
抢占计数器 |
|
8~15位 |
软中断计数器 |
|
16~27位 |
硬中断计数器 |
|
28位 |
PREEMPT_ACTIVE标志 |
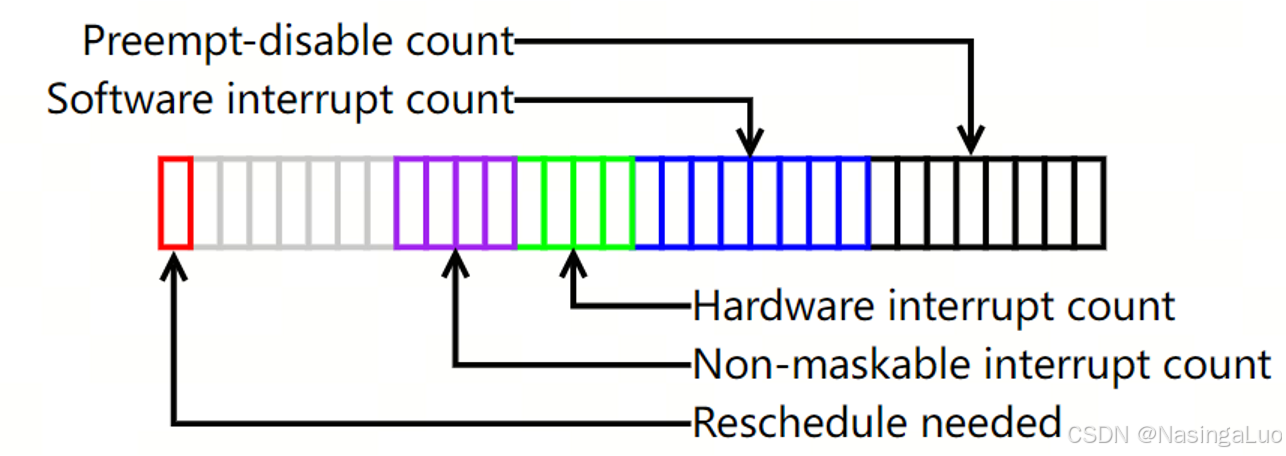
因此,当preempt_count的低位不为0的时候,表示这个进程不能被抢占(可能原因是这个进程被显示指定不能被抢占,或者当前CPU正在为中断服务),并且也不能睡眠。
此外,还有一个数据结构,记录了每个CPU上面挂起的软中断。
|
DEFINE_PER_CPU_SHARED_ALIGNED(irq_cpustat_t, irq_stat); EXPORT_PER_CPU_SYMBOL(irq_stat); |
|
typedef struct { u16 __softirq_pending; } ____cacheline_aligned irq_cpustat_t; |
当一个编号为n软中断在某一个CPU上面激活的时候,会将对应的irq_cpustat_t中的
__softirq_pending的第i位设置为1。
7.1.2:处理软中断
在注册完成一个软中断后(也就是将相应的数据结构填入数组softirq_vec之中后),raise_softirq函数用于激活软中断。
|
void raise_softirq(unsigned int nr) { unsigned long flags; local_irq_save(flags);//拿到现在的eflags寄存器的值,并且关本地中断 raise_softirq_irqoff(nr); local_irq_restore(flags); //恢复之前eflags的值 } |
其中,函数raise_softirq_irqoff的实现如下:
|
/* * This function must run with irqs disabled!必须在关中断环境下运行 */ inline void raise_softirq_irqoff(unsigned int nr) { __raise_softirq_irqoff(nr); /*这句话设置每CPU变量,类型为 typedef struct { unsigned int __softirq_pending; } ____cacheline_aligned irq_cpustat_t; 这里将__softirq_pending的第nr位设置为1。 */
/* * If we're in an interrupt or softirq, we're done * (this also catches softirq-disabled code). We will * actually run the softirq once we return from * the irq or softirq. * * Otherwise we wake up ksoftirqd to make sure we * schedule the softirq soon. *///如果当前我们在中断或者软中断环境中(也就是preempt_count中设置了软硬中断的值的时候),直接返回。因为我们会在中断和软中断退出的时候执行软中断。如果我们不在软硬中断中,我们会唤醒内核线程ksoftirqd去处理软中断 if (!in_interrupt())//这里判断是否在硬中断或者软中断环境中。注意在这个环境和开关中断是两码事(后者通过改变eflags实现) wakeup_softirqd(); } |
这个函数的最终作用是将一个软中断激活,也就是将其挂起。只需要将一个全局每CPU变量irq_cpustat_t irq_stat[CPU number]. __softirq_pending的第nr位置1即可。这样就表示了存在一个待处理的软中断。
在激活了软中断后,应该在多个点上检查是否有软中断待处理,并且对软中断进行处理。可能处理软中断的位置有(随版本变化)
1:调用local_bh_enable激活本地CPU的软中断。
2:硬中断退出的时候。
3:当内核线程ksoftirqd被唤醒的时候。
7.1.3:do_softirq函数
在检查点检查到有软中断待处理后,就会调用do_softirq来处理软中断。检查软中断的函数是:
|
#define local_softirq_pending() (__this_cpu_read(local_softirq_pending_ref)) //判断每CPU变量的irq_stat[cpu_id]. __softirq_pending成员是否不为0,不为0则说明有软中断。这个值会被之前介绍的接口raise_softirq设置 #define local_softirq_pending_ref irq_stat.__softirq_pending |
do_softirq函数如下所示:
|
asmlinkage __visible void do_softirq(void) { __u32 pending; unsigned long flags;
if (in_interrupt()) //如果是在中断上下文中,不能处理软中断。这时候要么在中断上下文中,要么禁用软中断。只有在preempt_count中表示硬中断与软中断的位都为0的时候,才能执行软中断处理函数。这里保证了软中断串行执行 return;
local_irq_save(flags);//关本地中断。这里关中断的原因是要处理全局变量。等进入软中断的中断处理例程中,就会开中断 pending = local_softirq_pending(); if (pending && !ksoftirqd_running(pending))//判断是否有已激活的软中断 do_softirq_own_stack(); local_irq_restore(flags); } |
|
void do_softirq_own_stack(void) //这个函数名告诉我们,使用当前栈处理软中断 { run_on_irqstack_cond(__do_softirq, NULL); } |
|
static __always_inline void run_on_irqstack_cond(void (*func)(void), struct pt_regs *regs) { lockdep_assert_irqs_disabled(); if (irq_needs_irq_stack(regs)) __run_on_irqstack(func); else func(); //执行func,也就是__do_softirq } |
7.1.4:__do_softirq函数
软中断的处理实际上是在__do_softirq中。
|
asmlinkage __visible void __softirq_entry __do_softirq(void) { unsigned long end = jiffies + MAX_SOFTIRQ_TIME; //我们只使用2ms来处理软中断,多的软中断还是在softirqd内核线程中处理 unsigned long old_flags = current->flags; int max_restart = MAX_SOFTIRQ_RESTART; struct softirq_action *h; bool in_hardirq; __u32 pending; int softirq_bit; /* * Mask out PF_MEMALLOC as the current task context is borrowed for the * softirq. A softirq handled, such as network RX, might set PF_MEMALLOC * again if the socket is related to swapping. */ current->flags &= ~PF_MEMALLOC; pending = local_softirq_pending(); //获得挂起的软中断 account_irq_enter_time(current); __local_bh_disable_ip(_RET_IP_, SOFTIRQ_OFFSET); //我们在这里增加preempt_count中的软中断计数。这样,在我们开中断处理软中断的时候,如果发生了硬中断,并且硬中断结束时,要再次处理软中断的时候,也会因为我们这里增加了软中断计数而无法进入软中断处理流程,从而实现了软中断在cpu上的串行执行 in_hardirq = lockdep_softirq_start(); restart: /* Reset the pending bitmask before enabling irqs */ set_softirq_pending(0); local_irq_enable(); //在开中断的条件下执行软中断 h = softirq_vec; while ((softirq_bit = ffs(pending))) { unsigned int vec_nr; int prev_count; h += softirq_bit - 1; vec_nr = h - softirq_vec; prev_count = preempt_count(); kstat_incr_softirqs_this_cpu(vec_nr); trace_softirq_entry(vec_nr); h->action(h); trace_softirq_exit(vec_nr); if (unlikely(prev_count != preempt_count())) { pr_err("huh, entered softirq %u %s %p with preempt_count %08x, exited with %08x?\n", vec_nr, softirq_to_name[vec_nr], h->action, prev_count, preempt_count()); preempt_count_set(prev_count); } h++; pending >>= softirq_bit; } if (__this_cpu_read(ksoftirqd) == current) rcu_softirq_qs(); local_irq_disable(); pending = local_softirq_pending(); if (pending) { if (time_before(jiffies, end) && !need_resched() && //如果执行的时间过长,或者需要调度,或者处理超过10次软中断,那么就不再处理软中断了,然后唤醒ksoftirqd内核线程处理软中断 --max_restart) goto restart; wakeup_softirqd(); } lockdep_softirq_end(in_hardirq); account_irq_exit_time(current); __local_bh_enable(SOFTIRQ_OFFSET); WARN_ON_ONCE(in_interrupt()); current_restore_flags(old_flags, PF_MEMALLOC); } |
总之,软中断的处理例程执行的时候,是开中断的。但是一次软中断执行的流程中,是通过增加preempt_count的值,保证软中断的串行执行的。
7.1.5:ksoftirqd内核线程
ksoftirqd是每个cpu都有的内核线程,用于处理软中断。执行的函数如下:
|
static void run_ksoftirqd(unsigned int cpu) { local_irq_disable(); if (local_softirq_pending()) { /* * We can safely run softirq on inline stack, as we are not deep * in the task stack here. */ __do_softirq(); local_irq_enable(); cond_resched(); return; } local_irq_enable(); } |
ksoftirqd内核线程有效的解决了软中断代码的负载问题。软中断处理例程中可能再次激活这个软中断。
假设我们不这样做,而是处理完一轮软中断后就返回。这时候,就算系统中还有非常多的软中断待处理,并且CPU空闲,我们也无事可做,只有等到下一次能激活软中断的地方(比如时钟中断退出),继续处理软中断。这降低了软中断的处理效率,直观感受就是网卡接受数据这种产生大量软中断的场景,收的很慢。
如果我们不使用内核线程,而是不断地检查是否有新的软中断产生。如果有就处理他的话,也会导致一个问题,就是我们的用户程序完全停滞,得不到运行。
总之,综合这两种情况,使用内核线程是一个非常好的做法。我们会处理十轮软中断。之后,我们唤醒内核线程。内核线程的优先级很低,不会阻碍用户程序的执行。但是,当机器空闲的时候,我们又会马上处理挂起的软中断。
7.1.6:软中断处理时机
前面描述了可能处理软中断的位置有(随版本变化)
1:调用local_bh_enable激活本地CPU的软中断。
2:硬中断退出的时候。
3:当内核线程ksoftirqd被唤醒的时候。
当前,只有DEFINE_IDTENTRY_IRQ和DEFINE_IDTENTRY_SYSVEC定义的中断异常处理函数结束的时候,会处理软中断。软中断的调用链如下:irq_exit_rcu -> __irq_exit_rcu -> invoke_softirq。
|
/** * DEFINE_IDTENTRY_IRQ - Emit code for device interrupt IDT entry points * @func: Function name of the entry point * * The vector number is pushed by the low level entry stub and handed * to the function as error_code argument which needs to be truncated * to an u8 because the push is sign extending. * * irq_enter/exit_rcu() are invoked before the function body and the * KVM L1D flush request is set. Stack switching to the interrupt stack * has to be done in the function body if necessary. */ #define DEFINE_IDTENTRY_IRQ(func) \ static __always_inline void __##func(struct pt_regs *regs, u8 vector); \ \ __visible noinstr void func(struct pt_regs *regs, \ unsigned long error_code) \ { \ irqentry_state_t state = irqentry_enter(regs); \ \ instrumentation_begin(); \ irq_enter_rcu(); \ kvm_set_cpu_l1tf_flush_l1d(); \ __##func (regs, (u8)error_code); \ irq_exit_rcu(); \ instrumentation_end(); \ irqentry_exit(regs, state); \ } |
|
/** * DEFINE_IDTENTRY_SYSVEC - Emit code for system vector IDT entry points * @func: Function name of the entry point * * irqentry_enter/exit() and irq_enter/exit_rcu() are invoked before the * function body. KVM L1D flush request is set. * * Runs the function on the interrupt stack if the entry hit kernel mode */ #define DEFINE_IDTENTRY_SYSVEC(func) \ static void __##func(struct pt_regs *regs); \ \ __visible noinstr void func(struct pt_regs *regs) \ { \ irqentry_state_t state = irqentry_enter(regs); \ \ instrumentation_begin(); \ irq_enter_rcu(); \ kvm_set_cpu_l1tf_flush_l1d(); \ run_sysvec_on_irqstack_cond(__##func, regs); \ irq_exit_rcu(); \ instrumentation_end(); \ irqentry_exit(regs, state); \ } |
函数invoke_softirq的实现如下:
|
static inline void invoke_softirq(void) { if (ksoftirqd_running(local_softirq_pending())) return; if (!force_irqthreads) { #ifdef CONFIG_HAVE_IRQ_EXIT_ON_IRQ_STACK /* * We can safely execute softirq on the current stack if * it is the irq stack, because it should be near empty * at this stage. */ __do_softirq(); #else /* * Otherwise, irq_exit() is called on the task stack that can * be potentially deep already. So call softirq in its own stack * to prevent from any overrun. */ do_softirq_own_stack(); #endif } else { wakeup_softirqd(); } } |
7.2:tasklet
tasklet现在已经弃用。似乎已经被中断线程化替代。
tasklet是IO驱动程序中实现可延迟函数的首选方法。建立在HI_SOFTIRQ和TASKLET_SOFTIRQ两种软中断上。do_softirq先执行HI_SOFTIRQ软中断,也就先执行建立在这种软中断上面的tasklet,然后执行另一种tasklet。
两种tasklet分别存放在数组中,这两个数组都是每CPU变量。数组中每个元素是一个链表指针,指向了由tasklet描述符构成的链表。
|
/* * Tasklets */ struct tasklet_head { struct tasklet_struct *head; struct tasklet_struct **tail; }; static DEFINE_PER_CPU(struct tasklet_head, tasklet_vec); static DEFINE_PER_CPU(struct tasklet_head, tasklet_hi_vec); |
也就是说,通过当前CPU的ID可以在这两个数组中查到对应的链表指针,通过链表可以查到对应的tasklet结构体。
tasklet结构体如下所示:
|
struct tasklet_struct { struct tasklet_struct *next; //指向下一个tasklet的描述符 unsigned long state; //tasklet状态 atomic_t count; //锁计数器,大于等于1表示这个tasklet被锁住 bool use_callback; union { void (*func)(unsigned long data); //tasklet处理函数 void (*callback)(struct tasklet_struct *t); //tasklet处理函数的处理参数 }; unsigned long data; }; |
因此,如果我们在某一个设备驱动上要使用tasklet,和在这个设备驱动上使用中断一样,首先要注册一个tasklet
|
void tasklet_init(struct tasklet_struct *t, void (*func)(unsigned long), unsigned long data) { t->next = NULL; t->state = 0; atomic_set(&t->count, 0); t->func = func; t->data = data; } |
然后,要激活tasklet,也就是将我们通过tasklet_init创建的tasklet描述符加到前面所说的链表中(这样CPU就可以通过链表指针找到对应的tasklet结构体)。然后在处理那两个软中断中,就会处理到相应的tasklet。
因此,要通过tasklet_schedule和tasklet_hi_schedule完成tasklet激活。
|
static inline void tasklet_schedule(struct tasklet_struct *t) { if (!test_and_set_bit(TASKLET_STATE_SCHED, &t->state)) //检测tasklet结构体的state成员是否被设置为TASKLET_STATE_SCHED,如果被设置,说明此tasklet已经被加入到链表中。 __tasklet_schedule(t); } |
__tasklet_schedule函数将tasklet结构体加到链表中。
|
void fastcall __tasklet_schedule(struct tasklet_struct *t) { unsigned long flags; local_irq_save(flags); //关中断。访问全局变量要注意关中断 t->next = __get_cpu_var(tasklet_vec).list; // tasklet_vec[CPU_ID].list __get_cpu_var(tasklet_vec).list = t; raise_softirq_irqoff(TASKLET_SOFTIRQ); //将表示软中断的pending位中,标志TASKLET_SOFTIRQ这种软中断产生。tasklet是借助软中断实现的,我们激活tasklet时,必须将这个tasklet对应的软中断激活,才能处理我们注册的tasklet local_irq_restore(flags); } |
我们将初始化完成的tasklet插入链表中,并且挂起了一个TASKLET_SOFTIRQ软中断。之后,系统就会处理这个软中断。并在这个软中断的处理例程中,执行我们注册的tasklet。软中断TASKLET_SOFTIRQ的处理函数tasklet_action如下所示。我们将会看到它是如何走到处理tasklet这一步的
|
static void tasklet_action(struct softirq_action *a) { struct tasklet_struct *list; local_irq_disable(); //和之前看到的类似,除了真正进入处理例程的时候,其他时候都是关中断 list = __get_cpu_var(tasklet_vec).list; __get_cpu_var(tasklet_vec).list = NULL; //将链表清空 local_irq_enable(); //开中断。我们开始执行tasklet的处理例程 while (list) { struct tasklet_struct *t = list; list = list->next; if (tasklet_trylock(t)) { //检查tasklet的status位是否被设置为TASKLET_STATE_RUN,如果被设置,说明这个tasklet正在被执行,那么此处不执行这个tasklet。 if (!atomic_read(&t->count)) { //检查这个tasklet是否被锁 if (!test_and_clear_bit(TASKLET_STATE_SCHED, &t->state)) BUG(); t->func(t->data); //处理tasklet tasklet_unlock(t); continue; } tasklet_unlock(t); } local_irq_disable(); //如果有各种原因,导致这个tasklet没有被处理,那么将这个tasklet重新加入到链表中。可以看到,原因有: 1:这个tasklet正在被执行; 2:这个tasklet被锁 t->next = __get_cpu_var(tasklet_vec).list; __get_cpu_var(tasklet_vec).list = t; __raise_softirq_irqoff(TASKLET_SOFTIRQ); //重新激活TASKLET_SOFTIRQ软中断 local_irq_enable(); } } |
总之,tasklet是通过两种软中断实现的。这两种软中断的处理例程会遍历挂在有激活的tasklet的链表,然后执行所有的tasklet。
8:工作队列
软中断(可延迟函数)和工作队列是Linux内核中用于处理异步事件的两种不同机制。
软中断是一种处理器中断的扩展,用于处理一些和网络、定时器、磁盘等相关的异步事件。软中断的优先级较高,可以抢占进程或者内核线程的执行。他们在中断上下文中执行,因此不能阻塞。软中断实现了异步处理一些高频事件,不必在这些事件每次发生的时候都引发一个硬中断。
工作队列也是一种用于延迟处理工作的机制,通常用于处理后台任务。它不具有软中断的高响应性,高优先级,不会抢占其他内核线程或者进程的执行。并且在执行过程中可以阻塞。
简单的来说,工作队列的机制就是,向一个工作队列中插入工作,这个工作队列对应的内核工作线程就会在合适的时候,去执行这些工作。
在Linux-5.10.110中,对工作队列进行了较大的修改。这是因为,原有的工作队列有两方面的缺陷:1:多线程wq中,每个cpu都有一个工作线程。由于wq的创建过多,并且cpu数目变多,导致工作线程的数目过多,占用了pid资源。2:多线程wq中,实际上每个cpu上只有一个可以执行工作的工作线程上下文。也就是说,当某个cpu的wq上的进程执行任务卡住后,这个wq上的所有其他任务都必须等待。我们希望一个cpu上有多个可以执行工作的工作线程上下文。
因此,在Linux-5.10.110中,我们引入了Concurrency Managed Workqueue (cmwq)
8.1:工作队列数据结构
系统中,还有很多工作线程参与调度。工作线程是在内核中创建的内核线程,他们和其它进程或者线程的特点是,他们没有预定义的执行功能,而是选择一个在内核中注册的work,执行这个work。这些工作线程也就是我们俗称的kworker
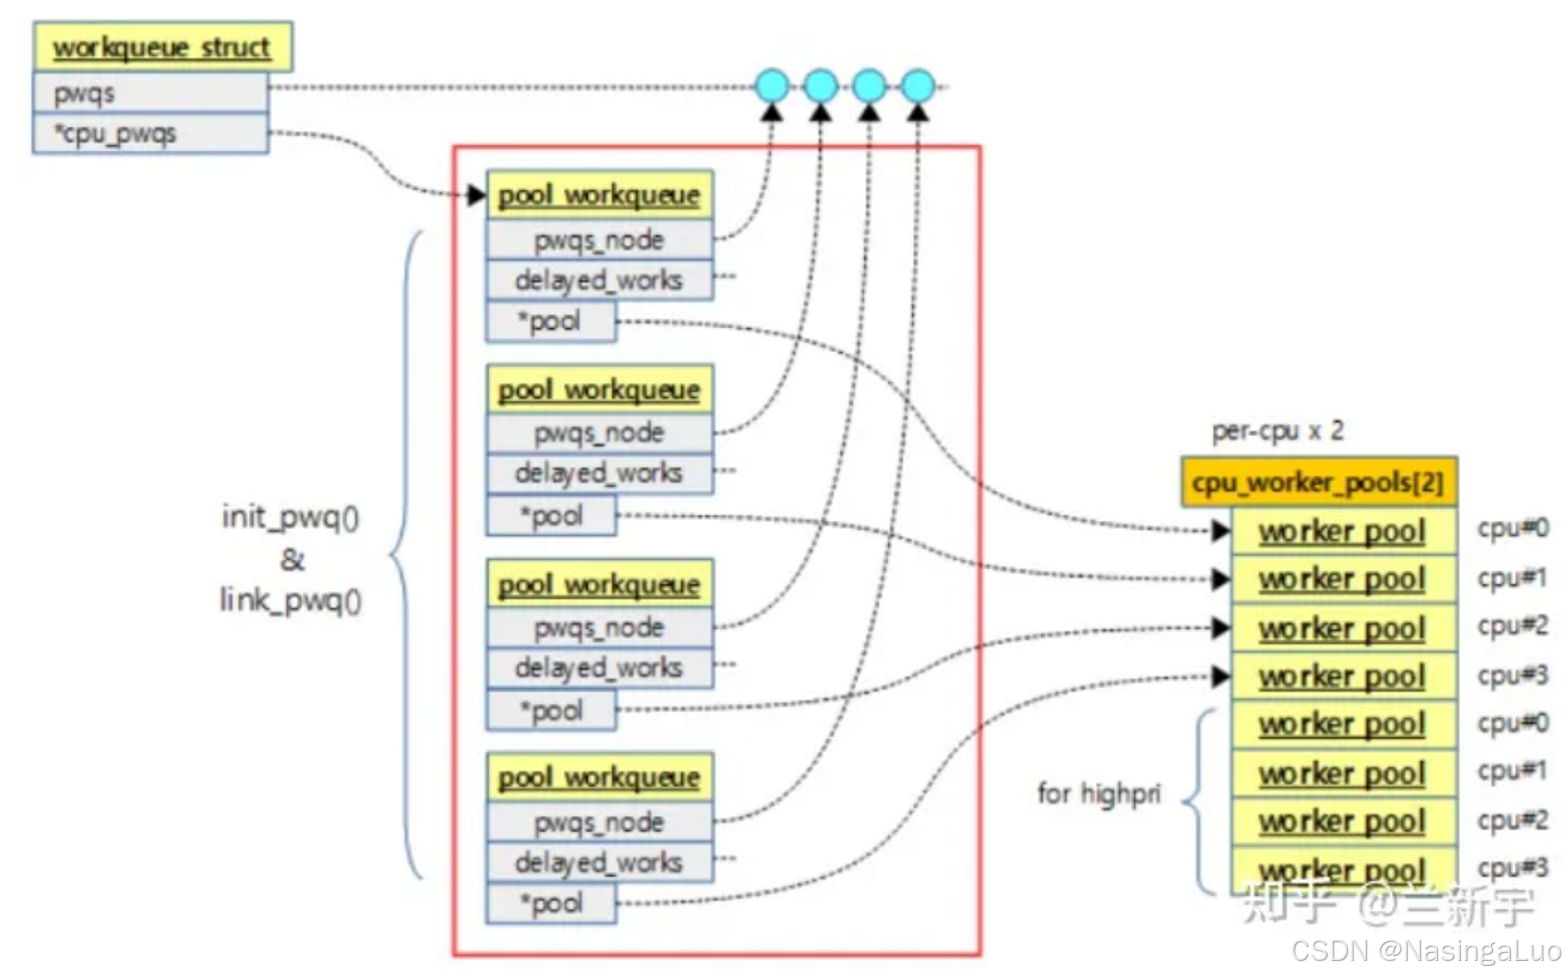
上面的图显示了和工作队列相关的数据结构之间的关系。要说明的是,系统中有多个workqueue,例如system_wq,system_highpri_wq等。
|
system_wq = alloc_workqueue("events", 0, 0); system_highpri_wq = alloc_workqueue("events_highpri", WQ_HIGHPRI, 0); system_long_wq = alloc_workqueue("events_long", 0, 0); |
我们需要对上面的数据结构有一个简单的了解。首先,通过alloc_workqueue创建一个workqueue_struct,对应每个cpu建立一个pool_workqueue。而cpu_worker_pools是系统中早就创建好了的数据结构,里面存放的是工作线程。cpu_worker_pools分成两个部分,分别放的是普通优先级和高优先级的工作线程。pool_workqueue作为中间结构,将workqueue_struct和cpu_worker_pools联系起来。
之后,我们每创建一个work,也就是一个任务的时候,就会将创建的任务添加到某个pool_workqueue中。这时,这个pool_workqueue都对应cpu的worker_pool中的工作线程,就会处理我们添加的工作。
8.2:工作队列初始化——workqueue_init_early
通过调用链start_kernel -> workqueue_init_early,我们做工作队列的第一次初始化。这时,我们也会创建几个系统默认的工作队列。当然,这时候还没有创建工作线程,因此还不能向这个工作队列上挂工作。这是工作队列初始化上半部。
|
/** * workqueue_init_early - early init for workqueue subsystem * * This is the first half of two-staged workqueue subsystem initialization * and invoked as soon as the bare basics - memory allocation, cpumasks and * idr are up. It sets up all the data structures and system workqueues * and allows early boot code to create workqueues and queue/cancel work * items. Actual work item execution starts only after kthreads can be * created and scheduled right before early initcalls. */ void __init workqueue_init_early(void) { int std_nice[NR_STD_WORKER_POOLS] = { 0, HIGHPRI_NICE_LEVEL }; int hk_flags = HK_FLAG_DOMAIN | HK_FLAG_WQ; int i, cpu; BUILD_BUG_ON(__alignof__(struct pool_workqueue) < __alignof__(long long)); BUG_ON(!alloc_cpumask_var(&wq_unbound_cpumask, GFP_KERNEL)); cpumask_copy(wq_unbound_cpumask, housekeeping_cpumask(hk_flags));
pwq_cache = KMEM_CACHE(pool_workqueue, SLAB_PANIC); //创建了pool_workqueue类型的slub /* initialize CPU pools */ for_each_possible_cpu(cpu) { struct worker_pool *pool; i = 0; for_each_cpu_worker_pool(pool, cpu) { //初始化数据结构cpu_worker_pool。这个数据结构中存放了每个cpu的工作线程 BUG_ON(init_worker_pool(pool)); pool->cpu = cpu; cpumask_copy(pool->attrs->cpumask, cpumask_of(cpu)); pool->attrs->nice = std_nice[i++]; pool->node = cpu_to_node(cpu); /* alloc pool ID */ mutex_lock(&wq_pool_mutex); BUG_ON(worker_pool_assign_id(pool)); mutex_unlock(&wq_pool_mutex); } }
……
//创建了系统默认的工作队列 system_wq = alloc_workqueue("events", 0, 0); system_highpri_wq = alloc_workqueue("events_highpri", WQ_HIGHPRI, 0); system_long_wq = alloc_workqueue("events_long", 0, 0); system_unbound_wq = alloc_workqueue("events_unbound", WQ_UNBOUND, WQ_UNBOUND_MAX_ACTIVE); system_freezable_wq = alloc_workqueue("events_freezable", WQ_FREEZABLE, 0); system_power_efficient_wq = alloc_workqueue("events_power_efficient", WQ_POWER_EFFICIENT, 0); system_freezable_power_efficient_wq = alloc_workqueue("events_freezable_power_efficient", WQ_FREEZABLE | WQ_POWER_EFFICIENT, 0); …… } |
我们关注函数alloc_workqueue,他创建了工作队列。等工作线程初始化好后,我们就能够向这个工作队列上挂任务了。
|
__printf(1, 4) struct workqueue_struct *alloc_workqueue(const char *fmt, unsigned int flags, int max_active, ...) { size_t tbl_size = 0; va_list args; struct workqueue_struct *wq; struct pool_workqueue *pwq;
……
wq = kzalloc(sizeof(*wq) + tbl_size, GFP_KERNEL); //创建workqueue_struct结构体 if (!wq) return NULL; if (flags & WQ_UNBOUND) { wq->unbound_attrs = alloc_workqueue_attrs(); if (!wq->unbound_attrs) goto err_free_wq; } va_start(args, max_active); vsnprintf(wq->name, sizeof(wq->name), fmt, args); va_end(args); max_active = max_active ?: WQ_DFL_ACTIVE; max_active = wq_clamp_max_active(max_active, flags, wq->name); /* init wq */ wq->flags = flags; wq->saved_max_active = max_active; mutex_init(&wq->mutex); atomic_set(&wq->nr_pwqs_to_flush, 0); INIT_LIST_HEAD(&wq->pwqs); INIT_LIST_HEAD(&wq->flusher_queue); INIT_LIST_HEAD(&wq->flusher_overflow); INIT_LIST_HEAD(&wq->maydays); wq_init_lockdep(wq); INIT_LIST_HEAD(&wq->list);
if (alloc_and_link_pwqs(wq) < 0) //在这里,针对每个cpu都创建一个struct pool_workqueue。将这个pool_workqueue和每个cpu的worker_pool联系起来,也和这个workqueue_struct联系起来。我们从上面的图中可以看到,cpu_worker_pool中有两种,分别是普通和高优先级worker。这里会根据workqueue的属性中,是否带有WQ_HIGHPRI,将pool_workqueue和不同的worker_pool联系起来 goto err_unreg_lockdep; if (wq_online && init_rescuer(wq) < 0) goto err_destroy; if ((wq->flags & WQ_SYSFS) && workqueue_sysfs_register(wq)) //对应目录/sys/devices/virtual/workqueue/ goto err_destroy; /* * wq_pool_mutex protects global freeze state and workqueues list. * Grab it, adjust max_active and add the new @wq to workqueues * list. */ mutex_lock(&wq_pool_mutex); mutex_lock(&wq->mutex); for_each_pwq(pwq, wq) pwq_adjust_max_active(pwq); mutex_unlock(&wq->mutex); list_add_tail_rcu(&wq->list, &workqueues); mutex_unlock(&wq_pool_mutex); return wq; …… } EXPORT_SYMBOL_GPL(alloc_workqueue); |
8.3:创建工作线程——workqueue_init
我们已经说过,cpu_worker_pools不和任一workqueue绑定,而是和所有workqueue共用的。因此,在初始化阶段,我们就会初始化cpu_worker_pools结构。这个数据结构中,存放的是执行工作任务的工作线程。这是工作队列初始化下半部。
|
/* the per-cpu worker pools */ static DEFINE_PER_CPU_SHARED_ALIGNED(struct worker_pool [NR_STD_WORKER_POOLS], cpu_worker_pools); //每个cpu对应了两个struct worker_pool |
|
/** * workqueue_init - bring workqueue subsystem fully online * * This is the latter half of two-staged workqueue subsystem initialization * and invoked as soon as kthreads can be created and scheduled. * Workqueues have been created and work items queued on them, but there * are no kworkers executing the work items yet. Populate the worker pools * with the initial workers and enable future kworker creations. */ void __init workqueue_init(void) { struct workqueue_struct *wq; struct worker_pool *pool; int cpu, bkt; /* * It'd be simpler to initialize NUMA in workqueue_init_early() but * CPU to node mapping may not be available that early on some * archs such as power and arm64. As per-cpu pools created * previously could be missing node hint and unbound pools NUMA * affinity, fix them up. * * Also, while iterating workqueues, create rescuers if requested. */ wq_numa_init(); mutex_lock(&wq_pool_mutex); ……
mutex_unlock(&wq_pool_mutex); /* create the initial workers */ for_each_online_cpu(cpu) { for_each_cpu_worker_pool(pool, cpu) { pool->flags &= ~POOL_DISASSOCIATED; BUG_ON(!create_worker(pool)); //遍历每个cpu,以及他们对应的两个struct worker_pool,对每个struct worker_pool创建工作线程 } } hash_for_each(unbound_pool_hash, bkt, pool, hash_node) BUG_ON(!create_worker(pool)); wq_online = true; wq_watchdog_init(); } |
|
/** * create_worker - create a new workqueue worker * @pool: pool the new worker will belong to * * Create and start a new worker which is attached to @pool. * * CONTEXT: * Might sleep. Does GFP_KERNEL allocations. * * Return: * Pointer to the newly created worker. */ static struct worker *create_worker(struct worker_pool *pool) { struct worker *worker = NULL; int id = -1; char id_buf[16]; /* ID is needed to determine kthread name */ id = ida_simple_get(&pool->worker_ida, 0, 0, GFP_KERNEL); if (id < 0) goto fail; worker = alloc_worker(pool->node); if (!worker) goto fail; worker->id = id; if (pool->cpu >= 0) snprintf(id_buf, sizeof(id_buf), "%d:%d%s", pool->cpu, id, pool->attrs->nice < 0 ? "H" : ""); else snprintf(id_buf, sizeof(id_buf), "u%d:%d", pool->id, id); worker->task = kthread_create_on_node(worker_thread, worker, pool->node, "kworker/%s", id_buf); //创建工作线程kworker。工作线程的函数是worker_thread if (IS_ERR(worker->task)) goto fail; set_user_nice(worker->task, pool->attrs->nice); kthread_bind_mask(worker->task, pool->attrs->cpumask); /* successful, attach the worker to the pool */ worker_attach_to_pool(worker, pool); //将这个worker添加到对应的pool中,struct worker.node链接在链表struct worker_pool.workers上 /* start the newly created worker */ raw_spin_lock_irq(&pool->lock); worker->pool->nr_workers++; //struct worker_pool.nr_workers记录了这个struct worker_pool总工作线程数目 worker_enter_idle(worker); //这个函数的解析见下 wake_up_process(worker->task); //唤醒创建的工作线程 raw_spin_unlock_irq(&pool->lock); return worker; } |
我们已经说过,为了节省pid资源,并且提供更好的并发性能,我们使用了cmwq。它的一个重要特点就是,动态的创建释放工作线程。这就是通过worker_enter_idle实现的。
|
/** * worker_enter_idle - enter idle state * @worker: worker which is entering idle state * * @worker is entering idle state. Update stats and idle timer if * necessary. * * LOCKING: * raw_spin_lock_irq(pool->lock). */ static void worker_enter_idle(struct worker *worker) { struct worker_pool *pool = worker->pool; if (WARN_ON_ONCE(worker->flags & WORKER_IDLE) || WARN_ON_ONCE(!list_empty(&worker->entry) && (worker->hentry.next || worker->hentry.pprev))) return; /* can't use worker_set_flags(), also called from create_worker() */ worker->flags |= WORKER_IDLE; pool->nr_idle++; worker->last_active = jiffies;
/* idle_list is LIFO */ list_add(&worker->entry, &pool->idle_list); //将worker加入struct worker_pool.idle_list链表
if (too_many_workers(pool) && !timer_pending(&pool->idle_timer)) //函数too_many_workers判断当前pool中是否空闲工作线程过多。如果空闲工作线程过多,并且没有激活idle_timer的话,就激活此定时器,超时时间设置为5min mod_timer(&pool->idle_timer, jiffies + IDLE_WORKER_TIMEOUT); //定时器处理函数是idle_worker_timeout …… } |
8.4:插入并激活一个工作
可以通过多种接口来插入一个工作。例如queue_work_on。不过,这些接口最终都是调用函数__queue_work。当进入这个函数的时候,是在关中断环境下进行的。
|
static void __queue_work(int cpu, struct workqueue_struct *wq, struct work_struct *work) { struct pool_workqueue *pwq; struct worker_pool *last_pool; struct list_head *worklist; unsigned int work_flags; unsigned int req_cpu = cpu; /* * While a work item is PENDING && off queue, a task trying to * steal the PENDING will busy-loop waiting for it to either get * queued or lose PENDING. Grabbing PENDING and queueing should * happen with IRQ disabled. */ lockdep_assert_irqs_disabled(); rcu_read_lock(); retry: /* pwq which will be used unless @work is executing elsewhere */ if (wq->flags & WQ_UNBOUND) { if (req_cpu == WORK_CPU_UNBOUND) cpu = wq_select_unbound_cpu(raw_smp_processor_id()); pwq = unbound_pwq_by_node(wq, cpu_to_node(cpu)); } else { if (req_cpu == WORK_CPU_UNBOUND) cpu = raw_smp_processor_id(); pwq = per_cpu_ptr(wq->cpu_pwqs, cpu); } //在上面的过程中,选择一个合适的struct pool_workqueue。我们已经知道,一个workqueue_struct中,有cpu数目个struct pool_workqueue。我们从这些pool_workqueue中选择一个合适的。实际上也就是这个work要哪个cpu处理
/* * If @work was previously on a different pool, it might still be * running there, in which case the work needs to be queued on that * pool to guarantee non-reentrancy. *///根据work->data,我们可以知道这个work之前被哪个struct worker_pool中的worker处理。在第一次处理这个work的时候,我们会在insert_work中,给这个work->data赋值 last_pool = get_work_pool(work); if (last_pool && last_pool != pwq->pool) { struct worker *worker; raw_spin_lock(&last_pool->lock); worker = find_worker_executing_work(last_pool, work); if (worker && worker->current_pwq->wq == wq) { pwq = worker->current_pwq; } else { /* meh... not running there, queue here */ raw_spin_unlock(&last_pool->lock); raw_spin_lock(&pwq->pool->lock); } } else { raw_spin_lock(&pwq->pool->lock); }
trace_workqueue_queue_work(req_cpu, pwq, work); if (WARN_ON(!list_empty(&work->entry))) goto out; pwq->nr_in_flight[pwq->work_color]++; work_flags = work_color_to_flags(pwq->work_color); if (likely(pwq->nr_active < pwq->max_active)) { trace_workqueue_activate_work(work); pwq->nr_active++; worklist = &pwq->pool->worklist; //这里拿到对应的worker_pool的worklist。我们会将新的工作插入这个链表 if (list_empty(worklist)) pwq->pool->watchdog_ts = jiffies; } else { work_flags |= WORK_STRUCT_DELAYED; worklist = &pwq->delayed_works; } debug_work_activate(work); insert_work(pwq, work, worklist, work_flags); out: raw_spin_unlock(&pwq->pool->lock); rcu_read_unlock(); } |
从上面可以看到,insert_work将work插入到选好的struct worker_pool->worklist中。
|
/** * insert_work - insert a work into a pool * @pwq: pwq @work belongs to * @work: work to insert * @head: insertion point * @extra_flags: extra WORK_STRUCT_* flags to set * * Insert @work which belongs to @pwq after @head. @extra_flags is or'd to * work_struct flags. * * CONTEXT: * raw_spin_lock_irq(pool->lock). */ static void insert_work(struct pool_workqueue *pwq, struct work_struct *work, struct list_head *head, unsigned int extra_flags) { struct worker_pool *pool = pwq->pool; /* we own @work, set data and link */ set_work_pwq(work, pwq, extra_flags); //我们在这个函数中设置work->data。设置为这个work使用的struct pool_workqueue的地址,地址低位为一些标志位 list_add_tail(&work->entry, head); get_pwq(pwq); //增加struct pool_workqueue的refcnt /* * Ensure either wq_worker_sleeping() sees the above * list_add_tail() or we see zero nr_running to avoid workers lying * around lazily while there are works to be processed. */ smp_mb(); if (__need_more_worker(pool)) //如果当前pool->nr_running为0,也就是现在没有可运行的worker内核线程,就唤醒一个worker线程 wake_up_worker(pool); } |
总之,我们将一个work插入到了某个cpu对应的pool_workqueue后,稍后就会由pool_workqueue对应的worker_pool中的worker去处理他。
8.5:工作任务
工作任务worker是一个内核线程,是我们定义的工作work的执行载体。他的执行函数如下:
|
/** * worker_thread - the worker thread function * @__worker: self * * The worker thread function. All workers belong to a worker_pool - * either a per-cpu one or dynamic unbound one. These workers process all * work items regardless of their specific target workqueue. The only * exception is work items which belong to workqueues with a rescuer which * will be explained in rescuer_thread(). * * Return: 0 */ static int worker_thread(void *__worker) { struct worker *worker = __worker; struct worker_pool *pool = worker->pool; /* tell the scheduler that this is a workqueue worker */ set_pf_worker(true); woke_up: raw_spin_lock_irq(&pool->lock); //关中断。在process_one_work中,真正开始执行work的func的时候才会开中断
/* am I supposed to die? */ if (unlikely(worker->flags & WORKER_DIE)) {//工作任务是动态增减的。当我们要删除一个工作任务的时候,就会设置WORKER_DIE标志。他就会在下面的流程中,死去。在函数idle_worker_timeout -> destroy_worker中设置这个标志。也就是说,定时器周期性的检查是否worker_pool中的idle工作线程过多,是的话,就删除一些工作线程 raw_spin_unlock_irq(&pool->lock); WARN_ON_ONCE(!list_empty(&worker->entry)); set_pf_worker(false); set_task_comm(worker->task, "kworker/dying"); ida_simple_remove(&pool->worker_ida, worker->id); worker_detach_from_pool(worker); kfree(worker); return 0; }
worker_leave_idle(worker); recheck: /* no more worker necessary? */ if (!need_more_worker(pool)) //我们不需要更多的工作线程 goto sleep; * ->scheduled list can only be filled while a worker is * preparing to process a work or actually processing it. * Make sure nobody diddled with it while I was sleeping. */ WARN_ON_ONCE(!list_empty(&worker->scheduled)); /* * Finish PREP stage. We're guaranteed to have at least one idle * worker or that someone else has already assumed the manager * role. This is where @worker starts participating in concurrency * management if applicable and concurrency management is restored * after being rebound. See rebind_workers() for details. */ worker_clr_flags(worker, WORKER_PREP | WORKER_REBOUND); do { struct work_struct *work = //pool->worklist是等待的worker组成的链表头。我们找到一个work list_first_entry(&pool->worklist, struct work_struct, entry); pool->watchdog_ts = jiffies; if (likely(!(*work_data_bits(work) & WORK_STRUCT_LINKED))) { /* optimization path, not strictly necessary */ process_one_work(worker, work); //使用函数process_one_work处理工作 if (unlikely(!list_empty(&worker->scheduled))) process_scheduled_works(worker); } else { move_linked_works(work, &worker->scheduled, NULL); process_scheduled_works(worker); } } while (keep_working(pool)); //处理工作。只要这个strict worker_pool -> worklist上有工作,就继续处理 worker_set_flags(worker, WORKER_PREP); sleep: /* * pool->lock is held and there's no work to process and no need to * manage, sleep. Workers are woken up only while holding * pool->lock or from local cpu, so setting the current state * before releasing pool->lock is enough to prevent losing any * event. *///这个worker不需要执行 worker_enter_idle(worker); //我们设置worker->flags |= WORKER_IDLE,并将他插入struct worker_pool的idle_list中。同样,我们唤醒一个worker的时候,也是在这里换新 __set_current_state(TASK_IDLE); //设置worker的状态 raw_spin_unlock_irq(&pool->lock); schedule(); //调度。请记住,当一个进程被阻塞时,被调度后,他就不在就绪队列上了 goto woke_up; } |
因此,我们观察函数process_one_work。看他是如何处理一个工作的。
|
/** * process_one_work - process single work * @worker: self * @work: work to process * * Process @work. This function contains all the logics necessary to * process a single work including synchronization against and * interaction with other workers on the same cpu, queueing and * flushing. As long as context requirement is met, any worker can * call this function to process a work. * * CONTEXT: * raw_spin_lock_irq(pool->lock) which is released and regrabbed. */ static void process_one_work(struct worker *worker, struct work_struct *work) __releases(&pool->lock) __acquires(&pool->lock) { struct pool_workqueue *pwq = get_work_pwq(work); //一个struct workqueue_struct中,有cpu数目个struct pool_workqueue。每个struct pol_workqueue对应了一个struct worker_pool。将一个work插入了struct worker_pool->work_list。这里,我们找到这个work现在对应的struct pool_workqueue struct worker_pool *pool = worker->pool; bool cpu_intensive = pwq->wq->flags & WQ_CPU_INTENSIVE; int work_color; struct worker *collision; /* ensure we're on the correct CPU */ WARN_ON_ONCE(!(pool->flags & POOL_DISASSOCIATED) && raw_smp_processor_id() != pool->cpu); /* * A single work shouldn't be executed concurrently by * multiple workers on a single cpu. Check whether anyone is * already processing the work. If so, defer the work to the * currently executing one. */ collision = find_worker_executing_work(pool, work); //这里找是否有worker正在处理此work。有的话返回worker地址。但是一般都不会发生这种情况 if (unlikely(collision)) { move_linked_works(work, &collision->scheduled, NULL); return; } /* claim and dequeue */ debug_work_deactivate(work); hash_add(pool->busy_hash, &worker->hentry, (unsigned long)work); //将worker加入pool->busy_hash中,表示现在这个worker是一个忙worker worker->current_work = work; worker->current_func = work->func; worker->current_pwq = pwq; work_color = get_work_color(work); /* * Record wq name for cmdline and debug reporting, may get * overridden through set_worker_desc(). */ strscpy(worker->desc, pwq->wq->name, WORKER_DESC_LEN); list_del_init(&work->entry); //将work从worker_pool->work_list中删除 /* * CPU intensive works don't participate in concurrency management. * They're the scheduler's responsibility. This takes @worker out * of concurrency management and the next code block will chain * execution of the pending work items. */ if (unlikely(cpu_intensive)) worker_set_flags(worker, WORKER_CPU_INTENSIVE); /* * Wake up another worker if necessary. The condition is always * false for normal per-cpu workers since nr_running would always * be >= 1 at this point. This is used to chain execution of the * pending work items for WORKER_NOT_RUNNING workers such as the * UNBOUND and CPU_INTENSIVE ones. */ if (need_more_worker(pool)) wake_up_worker(pool); /* * Record the last pool and clear PENDING which should be the last * update to @work. Also, do this inside @pool->lock so that * PENDING and queued state changes happen together while IRQ is * disabled. */ set_work_pool_and_clear_pending(work, pool->id); raw_spin_unlock_irq(&pool->lock); //在这里开中断。也就是说,kworker在工作过程中,除了真正执行work的func的时候是开中断的,其余时候都是关中断的 lock_map_acquire(&pwq->wq->lockdep_map); lock_map_acquire(&lockdep_map); /* * Strictly speaking we should mark the invariant state without holding * any locks, that is, before these two lock_map_acquire()'s. * * However, that would result in: * * A(W1) * WFC(C) * A(W1) * C(C) * * Which would create W1->C->W1 dependencies, even though there is no * actual deadlock possible. There are two solutions, using a * read-recursive acquire on the work(queue) 'locks', but this will then * hit the lockdep limitation on recursive locks, or simply discard * these locks. * * AFAICT there is no possible deadlock scenario between the * flush_work() and complete() primitives (except for single-threaded * workqueues), so hiding them isn't a problem. */ lockdep_invariant_state(true); trace_workqueue_execute_start(work); worker->current_func(work); //处理工作 /* * While we must be careful to not use "work" after this, the trace * point will only record its address. */ trace_workqueue_execute_end(work, worker->current_func); lock_map_release(&lockdep_map); lock_map_release(&pwq->wq->lockdep_map); if (unlikely(in_atomic() || lockdep_depth(current) > 0)) { pr_err("BUG: workqueue leaked lock or atomic: %s/0x%08x/%d\n" " last function: %ps\n", current->comm, preempt_count(), task_pid_nr(current), worker->current_func); debug_show_held_locks(current); dump_stack(); } /* * The following prevents a kworker from hogging CPU on !PREEMPTION * kernels, where a requeueing work item waiting for something to * happen could deadlock with stop_machine as such work item could * indefinitely requeue itself while all other CPUs are trapped in * stop_machine. At the same time, report a quiescent RCU state so * the same condition doesn't freeze RCU. */ cond_resched(); raw_spin_lock_irq(&pool->lock); /* clear cpu intensive status */ if (unlikely(cpu_intensive)) worker_clr_flags(worker, WORKER_CPU_INTENSIVE); /* tag the worker for identification in schedule() */ worker->last_func = worker->current_func; /* we're done with it, release */ hash_del(&worker->hentry); worker->current_work = NULL; worker->current_func = NULL; worker->current_pwq = NULL; pwq_dec_nr_in_flight(pwq, work_color); } |
9:从中断和异常返回
9.1:i386架构
经过这么多内容,我们几乎已经忘了中断和异常的处理流程。我们回想汇编中的代码:
i386的异常:
|
ENTRY(overflow) pushl $0 //中断中是硬件错误码,异常中是0 pushl $do_overflow//将中断或者异常处理函数的地址压入栈中 jmp error_code |
|
error_code: …… //保存寄存器部分 call *%edi //调用异常处理函数(.c) jmp ret_from_exception //异常退出函数 |
i386的中断:
|
common_interrupt: SAVE_ALL movl %esp,%eax call do_IRQ jmp ret_from_intr |
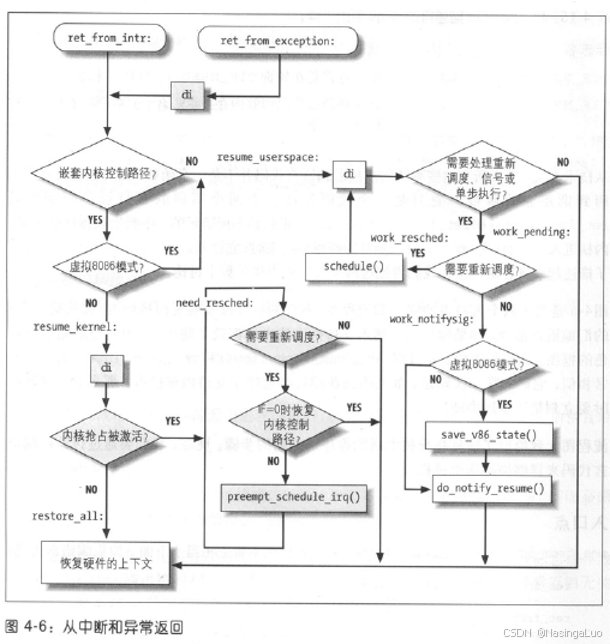
中断和异常返回分别使用两个不同的入口点:ret_from_exception和ret_from_intr。此外,我们还要考虑,我们的退出流程需要做些什么。他们的实现如下所示:
|
ret_from_exception: preempt_stop //关中断。我们在异常处理的整个通用流程中,都是在开中断环境中进行的。但是在中断处理例程结束时是关中断的。因此,ret_from_intr不需要要关中断 ret_from_intr: GET_THREAD_INFO(%ebp) //当前的thread_info结构体地址放入ebp中。如果这是最后一个内核控制路径,此时的thread_info是进程的内核栈 movl EFLAGS(%esp), %eax //esp是进程的内核栈。EFLAGS(%esp)是进程在用户态时候的eflags movb CS(%esp), %al //混合当前的eflags和cs testl $(VM_MASK | 3), %eax //如果是在用户态发生中断那么就会跳到resume_userspace开始执行 jz resume_kernel //恢复到内核态(我们的内核控制路径还没有结束) ENTRY(resume_userspace) //恢复到用户态 cli # make sure we don't miss an interrupt # setting need_resched or sigpending # between sampling and the iret movl TI_flags(%ebp), %ecx andl $_TIF_WORK_MASK, %ecx //如果thread_info的flags只设置了TRACE,SYSCALL_AUDIT,SINGLESTEP这三个位,那么执行restore_all jne work_pending //恢复到用户态进程的话,要检测是否发生进程切换。非抢占式内核也有这个特性 jmp restore_all #ifndef CONFIG_PREEMPT //如果是非抢占式内核,那么直接恢复所有寄存器 #define resume_kernel restore_all #endif ENTRY(resume_kernel) //如果是抢占式内核,就会走到这里 cli cmpl $0,TI_preempt_count(%ebp) //是否能发生抢占,不能抢占直接恢复寄存器。拿取当前的thread_info.preempt_count。当前的thread_info可能是软硬中断栈上的thread_info。不过,软硬中断栈上的preempt_count一定不为0(在初始化软硬中断栈的时候就会赋值)。因此,只有在返回内核线程,并且preempt_count值为0的时候,才可能会发生抢占 jnz restore_all //如果禁止发生抢占的话,那么会直接恢复寄存器 need_resched: //可以发生抢占。这里preempt_count等于0,说明所有没执行完的内核控制路径都不是中断处理程序,并且没有禁止抢占。因此,可能返回到系统调用或者内核线程 movl TI_flags(%ebp), %ecx testb $_TIF_NEED_RESCHED, %cl //检查TIF_ NEED_RESCHED标志。为0,则无需切换 jz restore_all testl $IF_MASK,EFLAGS(%esp) //恢复的内核路径禁用本地中断。这里很大可能是因为我们要返回到一个临界区,这时候不切换 jz restore_all call preempt_schedule_irq //在这个函数中进行切换 jmp need_resched //重新执行need_resched。jmp不会设置将返回地址和栈指针压栈,只有call会 work_pending: //从内核控制路径返回到用户态时,检查是否进行任务切换 testb $_TIF_NEED_RESCHED, %cl //如果进程设置了要执行调度程序,那么就执行调度 jz 1f //不切换,恢复被中断的用户态进程 work_resched: call schedule cli movl TI_flags(%ebp), %ecx andl $_TIF_WORK_MASK, %ecx jz restore_all testb $_TIF_NEED_RESCHED, %cl jnz work_resched 1: xorl %edx, %edx //返回到被中断的用户态进程,不需要进行进程切换 call do_notify_resume //处理挂起的信号 jmp restore_all //恢复寄存器,返回到用户态 |
逻辑图如下图所示:
介绍在中断中进行任务切换的函数preempt_schedule_irq
|
//要求在关中断,开内核抢占的情况下运行这个函数 asmlinkage void __sched preempt_schedule_irq(void) { #ifdef CONFIG_PREEMPT_BKL //这个宏的作用是,打开了之后,就算一个进程持有大内核锁,这个进程也会被抢占 #endif need_resched: add_preempt_count(PREEMPT_ACTIVE); local_irq_enable(); schedule(); //进行调度,这个函数会在调度章节中分析 local_irq_disable(); sub_preempt_count(PREEMPT_ACTIVE); barrier(); if (unlikely(test_thread_flag(TIF_NEED_RESCHED))) goto need_resched; } |
9.2:x86-64架构
x86-64架构使用较为一致的格式来定义中断和异常。当执行完中断或者异常处理程序后,在恢复寄存器之前,首先会调用函数irqentry_exit。并且我们要关注的是,在抢占内核中,不止是从内核态返回用户态过程中可能发生进程切换,中断结束后,返回内核态也可能发生进程切换
|
noinstr void irqentry_exit(struct pt_regs *regs, irqentry_state_t state) { lockdep_assert_irqs_disabled(); /* Check whether this returns to user mode */ if (user_mode(regs)) { irqentry_exit_to_user_mode(regs); //我们要返回到用户态 } else if (!regs_irqs_disabled(regs)) { //返回内核态,并且之前的状态不是关中断 /* * If RCU was not watching on entry this needs to be done * carefully and needs the same ordering of lockdep/tracing * and RCU as the return to user mode path. */ if (state.exit_rcu) { instrumentation_begin(); /* Tell the tracer that IRET will enable interrupts */ trace_hardirqs_on_prepare(); lockdep_hardirqs_on_prepare(CALLER_ADDR0); instrumentation_end(); rcu_irq_exit(); lockdep_hardirqs_on(CALLER_ADDR0); return; } instrumentation_begin(); if (IS_ENABLED(CONFIG_PREEMPTION)) irqentry_exit_cond_resched(); //如果是抢占内核中,这里会做进程切换 /* Covers both tracing and lockdep */ trace_hardirqs_on(); instrumentation_end(); } else { /* * IRQ flags state is correct already. Just tell RCU if it * was not watching on entry. */ if (state.exit_rcu) rcu_irq_exit(); } } |
函数irqentry_exit_to_user_mode的实现如下所示:
|
noinstr void irqentry_exit_to_user_mode(struct pt_regs *regs) { instrumentation_begin(); exit_to_user_mode_prepare(regs); instrumentation_end(); exit_to_user_mode(); } |
|
static void exit_to_user_mode_prepare(struct pt_regs *regs) { unsigned long ti_work = READ_ONCE(current_thread_info()->flags); lockdep_assert_irqs_disabled(); if (unlikely(ti_work & EXIT_TO_USER_MODE_WORK)) //EXIT_TO_USER_MODE_WORK = _TIF_SIGPENDING | _TIF_NOTIFY_RESUME | _TIF_UPROBE | _TIF_NEED_RESCHED | _TIF_PATCH_PENDING | ARCH_EXIT_TO_USER_MODE_WORK。如果struct thread_info. flags与这个值不为0,说明这个进程在回到用户态之前,还有一些事情需要处理 ti_work = exit_to_user_mode_loop(regs, ti_work); arch_exit_to_user_mode_prepare(regs, ti_work); //一些和架构相关的函数。arm64架构中,这个函数无操作。这个函数实际上也不包含通用操作,无需关心 /* Ensure that the address limit is intact and no locks are held */ addr_limit_user_check(); lockdep_assert_irqs_disabled(); lockdep_sys_exit(); } |
|
//当进程从内核态返回用户态的时候,需要在这个函数中执行很多重要操作,例如切换,处理信号等 static unsigned long exit_to_user_mode_loop(struct pt_regs *regs, unsigned long ti_work) { /* * Before returning to user space ensure that all pending work * items have been completed. */ while (ti_work & EXIT_TO_USER_MODE_WORK) { local_irq_enable_exit_to_user(ti_work); //开中断 if (ti_work & _TIF_NEED_RESCHED) //如果进程用完了他的时间片,或者他唤醒了一个进程,那么在这里,有可能需要切换这个进程 schedule(); if (ti_work & _TIF_UPROBE) uprobe_notify_resume(regs); if (ti_work & _TIF_PATCH_PENDING) klp_update_patch_state(current); if (ti_work & _TIF_SIGPENDING) //如果这个进程有信号。那么我们要处理这个信号 arch_do_signal(regs); //信号的处理见第十一章 if (ti_work & _TIF_NOTIFY_RESUME) { tracehook_notify_resume(regs); rseq_handle_notify_resume(NULL, regs); } /* Architecture specific TIF work */ arch_exit_to_user_mode_work(regs, ti_work); /* * Disable interrupts and reevaluate the work flags as they * might have changed while interrupts and preemption was * enabled above. */ local_irq_disable_exit_to_user(); ti_work = READ_ONCE(current_thread_info()->flags); } /* Return the latest work state for arch_exit_to_user_mode() */ return ti_work; } |
总之,当我们从中断或者异常返回的时候,需要根据中断异常函数的宏定义中,是否包含:1:irq_exit_rcu:在这个函数中会处理软中断。2:irqentry_exit:在这个函数中,返回用户态会做进程切换,或者信号处理。返回内核态会做进程切换(要求是抢占式内核)


 1万+
1万+

 被折叠的 条评论
为什么被折叠?
被折叠的 条评论
为什么被折叠?
 到【灌水乐园】发言


