import cv2
import numpy as np
from PIL import Image, ImageDraw, ImageFont
# 参数设置
image_path = '2.jpg'
num_levels = 7 #等高线层数
contour_thickness = 2 #等高线粗细
blur_size = (9, 9) # 统一使用高斯模糊尺寸
clahe_params = {'clipLimit': 4.0, 'tileGridSize': (8, 8)} #可优化对比度增强效果
# 1. 图像预处理
def preprocess_image(image_path):
image = cv2.imread(image_path)
if image is None:
raise FileNotFoundError(f"无法加载图像: {image_path}")
# 转换为灰度图并降噪
gray = cv2.cvtColor(image, cv2.COLOR_BGR2GRAY)
blurred = cv2.GaussianBlur(gray, blur_size, 0)
# 对比度增强
clahe = cv2.createCLAHE(**clahe_params)
enhanced = clahe.apply(blurred)
# 存储图像数据
image_data['original'] = image
image_data['display'] = image.copy()
image_data['gray'] = gray
image_data['enhanced'] = enhanced
return image, enhanced,image_data['original'],image_data['display'],image_data['gray'],image_data['enhanced']
# 2. 亮度分析
def analyze_intensity(enhanced):
min_intensity = np.min(enhanced)
max_intensity = np.max(enhanced)
normalized = cv2.normalize(enhanced.astype('float'), None, 0, 1, cv2.NORM_MINMAX)
return min_intensity, max_intensity, normalized
# 3. 热力图生成
def generate_heatmap(image, normalized):
heatmap = cv2.applyColorMap((normalized * 255).astype(np.uint8), cv2.COLORMAP_JET)
blended = cv2.addWeighted(image, 0.7, heatmap, 0.3, 0)
return heatmap, blended
# 4. 等高线处理
def process_contours(image, enhanced, min_intensity, max_intensity, num_levels):
height, width = image.shape[:2]
contour_image = np.zeros_like(image)
color_intensity_map = []
# 计算亮度层级
levels = np.linspace(min_intensity, max_intensity, num_levels).astype(np.uint8)
kernel = np.ones((3, 3), np.uint8)
for i, level in enumerate(levels):
# 创建当前亮度层级的掩膜
lower_val = max(int(level) - 10, 0)
upper_val = min(int(level) + 10, 255)
mask = cv2.inRange(enhanced, lower_val, upper_val)
# 形态学处理
mask = cv2.morphologyEx(mask, cv2.MORPH_CLOSE, kernel)
# 查找等高线
contours, _ = cv2.findContours(mask, cv2.RETR_EXTERNAL, cv2.CHAIN_APPROX_SIMPLE)
# 计算颜色(冷色调到暖色调渐变)
normalized_level = (level - min_intensity) / (max_intensity - min_intensity)
if normalized_level < 0.5:
hue = 120 + 60 * normalized_level * 2
else:
hue = 60 * (1 - (normalized_level - 0.5) * 2)
hue = np.clip(hue, 0, 180)
# 转换为BGR颜色
color = cv2.cvtColor(np.uint8([[[hue, 255, 255]]]), cv2.COLOR_HSV2BGR)[0][0]
color = tuple(map(int, color))
# 存储颜色-亮度映射
color_intensity_map.append((color, level))
# 绘制等高线
cv2.drawContours(contour_image, contours, -1, color, contour_thickness)
return contour_image, color_intensity_map
# 5. 创建颜色条
def create_color_bar(image, color_intensity_map, min_intensity, max_intensity):
height, width = image.shape[:2]
bar_width = int(width * 0.03)
bar_height = int(height * 0.3)
bar_x = width - int(width * 0.05) - bar_width
bar_y = int(height * 0.05)
# 生成颜色条
color_bar = np.zeros((bar_height, bar_width, 3), dtype=np.uint8)
for i in range(bar_height):
idx = int((1 - i / bar_height) * (len(color_intensity_map) - 1))
color_bar[i, :] = color_intensity_map[idx][0]
# 添加到图像
result = image.copy()
result[bar_y:bar_y + bar_height, bar_x:bar_x + bar_width] = color_bar
# 添加边框
cv2.rectangle(result, (bar_x, bar_y),
(bar_x + bar_width, bar_y + bar_height), (255, 255, 255), 1)
# 添加刻度和标签
num_ticks = 5
for i, pos in enumerate(np.linspace(0, bar_height, num_ticks)):
y_pos = int(bar_y + pos)
cv2.line(result, (bar_x - 5, y_pos), (bar_x, y_pos), (255, 255, 255), 1)
# 计算标签位置
value = int(min_intensity + (max_intensity - min_intensity) * (1 - pos / bar_height))
text_x = bar_x - 50
text_y = y_pos + (15 if i == 0 else -10 if i == num_ticks - 1 else 0)
# 添加带描边的文本
cv2.putText(result, str(value), (text_x, text_y),
cv2.FONT_HERSHEY_SIMPLEX, 0.4, (0, 0, 0), 2)
cv2.putText(result, str(value), (text_x, text_y),
cv2.FONT_HERSHEY_SIMPLEX, 0.4, (255, 255, 255), 1)
# 添加标题
cv2.putText(result, 'Light Intensity', (bar_x - 100, bar_y - 10),
cv2.FONT_HERSHEY_SIMPLEX, 0.4, (0, 0, 0), 2)
cv2.putText(result, 'Light Intensity', (bar_x - 100, bar_y - 10),
cv2.FONT_HERSHEY_SIMPLEX, 0.4, (255, 255, 255), 1)
return result
# 全局变量存储图像数据和状态
current_point = None
image_data = {
'original': None,
'gray': None,
'display': None
}
def mouse_callback(event, x, y, flags, param):
"""鼠标事件回调函数,用于捕获点击位置并显示亮度值"""
global current_point
if event == cv2.EVENT_LBUTTONDOWN:
# 保存当前选定的点
current_point = (x, y)
# 获取该点的亮度值
if image_data['gray'] is not None:
intensity = image_data['gray'][y, x]
print(f"点 ({x}, {y}) 的亮度值: {intensity}")
# 在图像上显示亮度值
display_image = image_data['display'].copy()
# 绘制标记点
cv2.circle(display_image, (x, y), 5, (0, 0, 255), -1) # 红色圆点
# 绘制坐标和亮度文本
text = f"({x}, {y}): {intensity}"
cv2.putText(display_image, text, (x + 10, y - 10),
cv2.FONT_HERSHEY_SIMPLEX, 0.5, (0, 255, 255), 2)
# 显示更新后的图像
cv2.imshow("Interactive Light Intensity", display_image)
image_data['display'] = display_image
def put_chinese_text(image, text, position, font_size=20, color=(255, 255, 255)):
"""
在图像上添加中文文本
参数:
image: OpenCV图像 (BGR格式)
text: 要添加的中文文本
position: 文本位置 (x, y)
font_size: 字体大小
color: 文本颜色 (B, G, R)
返回:
添加文本后的OpenCV图像
"""
# 转换为PIL图像 (RGB格式)
pil_img = Image.fromarray(cv2.cvtColor(image, cv2.COLOR_BGR2RGB))
draw = ImageDraw.Draw(pil_img)
# 使用支持中文的字体
try:
# 尝试使用系统字体
font = ImageFont.truetype("simhei.ttf", font_size)
except:
try:
# 尝试其他常见中文字体
font = ImageFont.truetype("msyh.ttc", font_size)
except:
# 如果找不到中文字体,使用默认字体(可能不支持中文)
font = ImageFont.load_default()
print("警告:未找到中文字体,中文可能显示为方框")
# 添加文本
draw.text(position, text, font=font, fill=color)
# 转换回OpenCV格式
return cv2.cvtColor(np.array(pil_img), cv2.COLOR_RGB2BGR)
# 主流程
def main():
# 1. 图像预处理
image, enhanced ,image_data['original'],image_data['display'],image_data['gray'],image_data['enhanced'] = preprocess_image(image_path)
# 2. 亮度分析
min_intensity, max_intensity, normalized = analyze_intensity(enhanced)
# 3. 生成热力图
heatmap, blended = generate_heatmap(image, normalized)
# 4. 处理等高线
contour_image, color_intensity_map = process_contours(
image, enhanced, min_intensity, max_intensity, num_levels
)
pil_img = put_chinese_text(image, text, position, font_size=20, color=(255, 255, 255))
# 5. 创建最终结果
base_image = cv2.addWeighted(image, 0.7, contour_image, 0.3, 0)
final_result = create_color_bar(base_image, color_intensity_map, min_intensity, max_intensity)
# 保存结果
cv2.imwrite("result.png", final_result)
cv2.imwrite("Contours.png", contour_image)
cv2.imwrite('Heatmap.png', heatmap)
cv2.imwrite('Blended.png', blended)
print("处理完成! 对比度图像结果已保存")
# 创建窗口并设置鼠标回调
cv2.namedWindow("Interactive Light Intensity")
cv2.setMouseCallback("Interactive Light Intensity", mouse_callback)
# 显示初始图像
cv2.imshow("Interactive Light Intensity", pil_img)
# 添加帮助文本
help_text = "点击图像任意位置查看亮度值 | 按ESC退出"
cv2.putText(image_data['display'], help_text, (10, 30),
cv2.FONT_HERSHEY_SIMPLEX, 0.7, (0, 255, 0), 2)
# 主循环
while True:
key = cv2.waitKey(1) & 0xFF
if key == 27: # ESC键退出
break
cv2.destroyAllWindows()
if __name__ == "__main__":
main()
中文文本显示添加失败


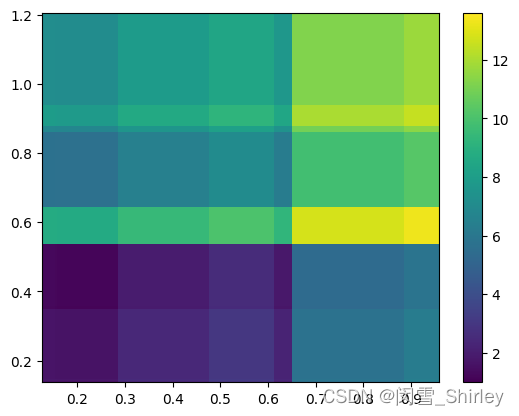
 该文详细描述了从数据筛选到绘制热力图的过程,包括数据的归一化处理,使用模糊处理增强热力图的视觉效果,以及如何进行多元线性回归分析和绘制等高线图。通过示例展示了如何在Python中利用matplotlib和sklearn库实现这些操作。
 最低0.47元/天 解锁文章


 665
665


 到【灌水乐园】发言


