


目录
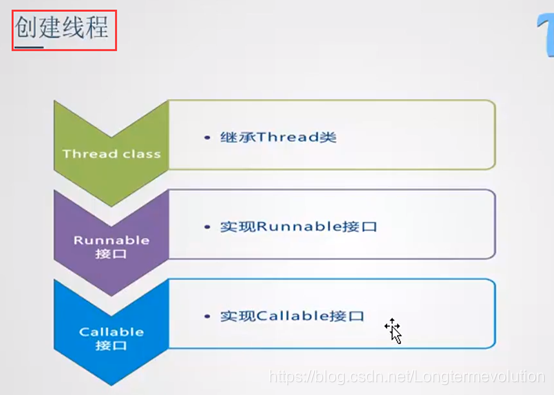
实现方式
三种方式实现多线程
-
1)继承Thread类
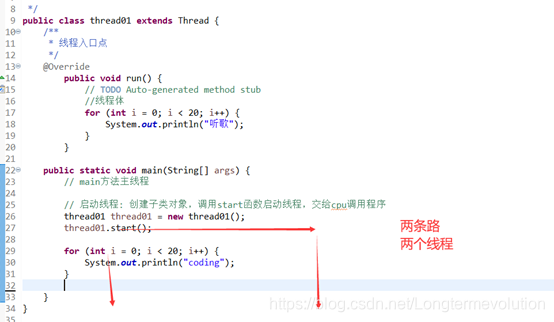
创建线程方式一
* 1、创建:继承Thread + 重写run
* 2、启动:创建子类对象 + 调用start函数启动(开启线程)
package com.pt.thread;
/**
 * 创建线程方式一
 * 1、创建:继承Thread + 重写run
 * 2、启动:创建子类对象 + 调用start函数启动(开启线程)
 * @author tyler
 *
 */
public class thread01 extends Thread {
	/**
	 * 线程入口点
	 */
	@Override
		public void run() {
			// TODO Auto-generated method stub
			//线程体
			for (int i = 0; i < 20; i++) {
				System.out.println("听歌");
			}
		}

	public static void main(String[] args) {
		// main方法主线程

		// 启动线程: 创建子类对象,调用start函数启动线程,交给cpu调用程序,不能保证立即运行
		thread01 thread01 = new thread01();
		thread01.start();

		for (int i = 0; i < 20; i++) {
			System.out.println("coding");
		}

	}
}
线程的图解(方便理解):
-
2)实现Runnable接口(推荐使用接口)
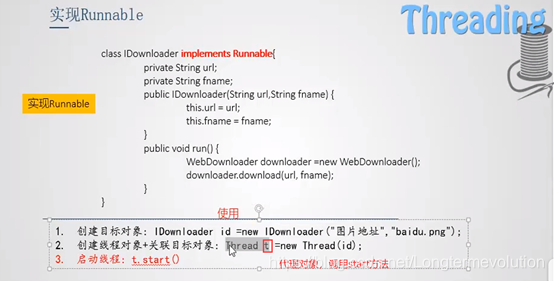
创建线程方式二
* 1、创建:实现Runnable接口 + 重写run
* 2、启动:创建实现类对象 + Thread对象+调用start函数启动
* 推荐:避免单继承的局限性,优先使用接口,方便共享资源
package com.pt.thread;
/**
 * 创建线程方式二
 * 1、创建:实现Runnable接口  + 重写run
 * 2、启动:创建实现类对象 + Thread对象+调用start函数启动
 * 推荐:避免单继承的局限性,优先使用接口,方便共享资源
 * @author tyler
 *
 */
public class StartThread2 implements Runnable{	// 实现Runnable接口

	/**
	 * 线程入口点:重写run函数
	 */
	@Override
		public void run() {
			// TODO Auto-generated method stub
			//线程体
			for (int i = 0; i < 20; i++) {
				System.out.println("听歌");
			}
		}

	public static void main(String[] args) {
		// main方法主线程

		// 创建实现类对象
		StartThread2 thread01 = new StartThread2();
		// 创建代理类对象
		Thread t = new Thread();
		//  启动线程:调用start函数启动线程,交给cpu调用程序,不能保证立即运行
		t.start();

		// ---另一种写法,三步封装(提高效率)-----
		//new Thread(new StartThread2()).start(); // 对于只使用一次的对象,可以不命名

		for (int i = 0; i < 20; i++) {
			System.out.println("coding");
		}

	}
}
3)实现callable接口
4)线程池


 7182
7182

 被折叠的 条评论
为什么被折叠?
被折叠的 条评论
为什么被折叠?
 到【灌水乐园】发言


