


需求描述:在 arm64 架构(M 系列芯片)的 MacOS 上,通过 Lima 搭建 ubuntu 虚拟机,以支持拉取/构建/上传跨平台(主要是面向 x86_64 架构)docker 镜像
参考文献
一、安装 brew(macos 上的包管理工具,类似于 apt)
- 官网地址:https://brew.sh/
- 直接运行官网上的安装命令(需要挂代理):
/bin/bash -c "$(curl -fsSL https://raw.githubusercontent.com/Homebrew/install/HEAD/install.sh)" - 安装成功后按照提示依次执行以下指令配置环境:
echo >> /Users/${USER}/.zprofile
echo 'eval "$(/opt/homebrew/bin/brew shellenv)"' >> /Users/${USER}/.zprofile
eval "$(/opt/homebrew/bin/brew shellenv)"
二、安装 Lima
- 运行以下指令安装 Lima:
brew install lima --HEAD - 安装完成后,运行以下指令验证是否安装成功:
limactl --version - Lima 通过模版(templates)构建虚拟机,在官网的文档中可以查询 Lima 的所有内置模版:https://lima-vm.io/docs/templates/
- 此外,也可以运行 --help 查看模版文件的本地目录(默认是 /opt/homebrew/share/lima/templates):
limactl --help - 其中每个模版会对应一个 yaml 文件,例如以下是所有可选的 ubuntu 虚拟机内置模版:
ubuntu-20.04.yaml ubuntu-22.04.yaml ubuntu-24.04.yaml ubuntu-24.10.yaml ubuntu-25.04.yaml ubuntu-lts.yaml ubuntu.yaml - 运行以下指令基于指定模版构建虚拟机:
limactl create --name=ubuntu template://ubuntu-20.04- 其中:
- --name:(任意指定)虚拟机名称
- template://ubuntu-20.04:指定模版
- 其中:
- 通过这种方法,Lima 会自动基于当前处理器架构构建虚拟机(例如 M 系列芯片的 MacOS 对应 arm64 架构)
Tips:通过 Lima 构建跨平台镜像
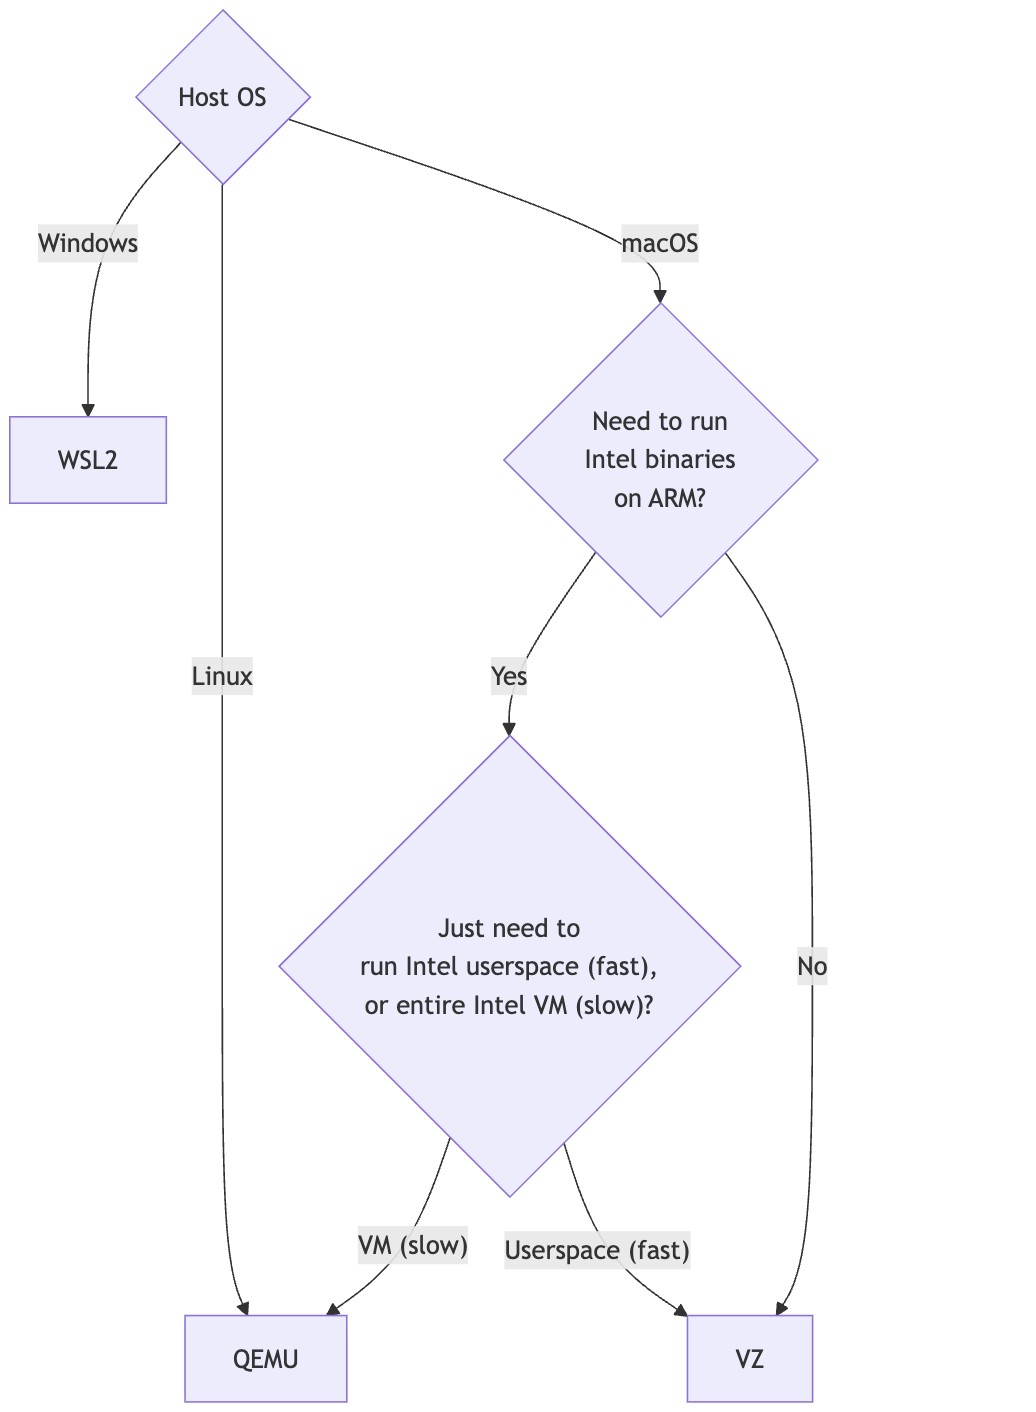
- 借由 QEMU、VZ、WSL2 等处理器模拟软件的支持,Lima 还可以用于跨平台构建虚拟机:https://lima-vm.io/docs/config/vmtype/
- 访问 yaml 文件可以找到每个模版支持的平台架构:
- location: "https://cloud-images.ubuntu.com/releases/plucky/release-20250701/ubuntu-25.04-server-cloudimg-amd64.img" arch: "x86_64" digest: "sha256:92ad8714338b1d3be605b7981137a7c356b23527ff1aba8e80cf44bc3aa2f8da" - location: "https://cloud-images.ubuntu.com/releases/plucky/release-20250701/ubuntu-25.04-server-cloudimg-arm64.img" arch: "aarch64" digest: "sha256:26d0ac2236f12954923eb35ddfee8fa9fff3eab6111ba84786b98ab3b972c6d8" - location: "https://cloud-images.ubuntu.com/releases/plucky/release-20250701/ubuntu-25.04-server-cloudimg-riscv64.img" arch: "riscv64" digest: "sha256:66f420cb992e3076207ce933b7f96550d27b05ead561b7a5e48d281d01b151de" - location: "https://cloud-images.ubuntu.com/releases/plucky/release-20250701/ubuntu-25.04-server-cloudimg-armhf.img" arch: "armv7l" digest: "sha256:f37d82f55df80bdb09bbeb403f84e6921b8e4435610fed22ffec436af2e4dd6d" - location: "https://cloud-images.ubuntu.com/releases/plucky/release-20250701/ubuntu-25.04-server-cloudimg-s390x.img" arch: "s390x" digest: "sha256:1d03fedf3aea85438ce70d745edf611b80c6f88a049bb44167c24ae2ec9d4fda" - location: "https://cloud-images.ubuntu.com/releases/plucky/release-20250701/ubuntu-25.04-server-cloudimg-ppc64el.img" arch: "ppc64le" digest: "sha256:5922f8ea7958f15af5a5d8a4efec38d66af31c0a853fba5fb0790ec25562b53a"- 以在 M 系列芯片的 MacOS(arm64 架构)上构建 x86_64 架构的 ubuntu 虚拟机为例,只需要运行以下指令:
limactl create --name=ubuntu_amd64 --vm-type=qemu template://ubuntu-20.04 --arch=x86_64
- 如果出现报错,可以尝试安装/更新以下依赖:
brew install qemu
brew install lima-additional-guestagents
- 列出所有 Lima 虚拟机:
limactl list - 启动虚拟机:
limactl start ${vm_name} - 通过命令行进入虚拟机:
limactl shell ${vm_name} - 其它常用 Lima 指令
- 停止/删除虚拟机:
# stop vm limactl stop ${vm_name} # delete vm limactl delete ${vm_name} - 保护(禁用 stop 命令)/解除保护虚拟机:
# protect vm limactl protect ${vm_name} # unprotect vm limactl unprotect ${vm_name} - 虚拟机和宿主机之间传输文件
# copy from guest to host
limactl cp ${vm_name}:${path} ${target_path}

limactl cp -r ${vm_name}:${dictionary} ${target_path}

# copy from host to guest
limactl cp ${path} ${vm_name}:${target_path}

limactl cp -r ${path} ${vm_name}:${dictionary}
- 停止/删除虚拟机:


 756
756

 被折叠的 条评论
为什么被折叠?
被折叠的 条评论
为什么被折叠?
 到【灌水乐园】发言


