


 本文详细介绍了如何在Ubuntu 14.04 LTS系统中安装最新版本的OpenCV 2.4.9,包括更新系统、安装依赖包、下载源代码、配置、编译与安装等步骤,以及如何使用viz模块进行3D可视化、Python、Java、TBB、OpenGL、视频和Qt支持的功能。
The latest Long Term Support version of Ubuntu(14.04 LTS) is out and a new version of OpenCV was recently released as well. This means that now is a great opportunity to update my OpenCV installation guide to the latest versions, Ubuntu 14.04 LTS and OpenCV 2.4.9.
One of the great additions in this new release of OpenCV is the new viz module, which offers a nice 3D visualizer. This module is based on the great Visualization Toolkit library (VTK) and nicely prepares the users for the upcoming OpenCV 3.
In this guide, I will show you how to install OpenCV with a lot of the features it provides. Here are some of the things that are going to be enabled when you are finished following through with this installation tutorial:
- viz module (3D visualization)
- Qt version of the HighGUI module (Better 2D window interface with zoom, image saving capabilities, etc)
- OpenGL support
- C++ interface and examples
- C interface and examples
- Python interface and examples
- Java interface and examples
- Intel Threading Building Blocks (TBB)
Note: I have noticed some copies of my posts elsewhere, so make sure that you are reading this from the original source, at samontab dot com, accessible from here so that you don’t miss the comments.
OK, so the first step is to make sure that everything in the system is updated and upgraded. Open the terminal and write this:
1 | sudo apt-get update |
2 | sudo apt-get upgrade |
Now, you need to install many dependencies, such as support for reading and writing image files, drawing on the screen, some needed tools, other libraries, etc… This step is very easy, you only need to write the following command in the Terminal:
1 | sudo apt-get install build-essential libgtk2.0-dev libjpeg-dev libtiff4-dev libjasper-dev libopenexr-dev cmake python-dev python-numpy python-tk libtbb-dev libeigen3-dev yasm libfaac-dev libopencore-amrnb-dev libopencore-amrwb-dev libtheora-dev libvorbis-dev libxvidcore-dev libx264-dev libqt4-dev libqt4-opengl-dev sphinx-common texlive-latex-extra libv4l-dev libdc1394-22-dev libavcodec-dev libavformat-dev libswscale-dev default-jdk ant libvtk5-qt4-dev |
Time to get the OpenCV 2.4.9 source code:
1 | cd ~ |
3 | unzip opencv-2.4.9.zip |
4 | cd opencv-2.4.9 |
Now we have to generate the Makefile by using cmake. In here we can define which parts of OpenCV we want to compile. Since we want to use the viz module, Python, Java, TBB, OpenGL, Qt, work with videos, etc, here is where we need to set that. Just execute the following line at the terminal to create the appropriate Makefile. Note that there are two dots at the end of the line, it is an argument for the cmake program and it means the parent directory (because we are inside the build directory, and we want to refer to the OpenCV directory, which is its parent).
1 | mkdir build |
2 | cd build |
3 | cmake -D WITH_TBB=ON -D BUILD_NEW_PYTHON_SUPPORT=ON -D WITH_V4L=ON -D INSTALL_C_EXAMPLES=ON -D INSTALL_PYTHON_EXAMPLES=ON -D BUILD_EXAMPLES=ON -D WITH_QT=ON -D WITH_OPENGL=ON -D WITH_VTK=ON .. |
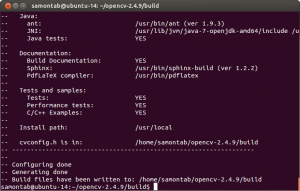
Check that the above command produces no error and that in particular it reports FFMPEG as YES. If this is not the case you will not be able to read or write videos. Check that Java, Python, TBB, OpenGL, V4L, OpenGL and Qt are all detected correctly.
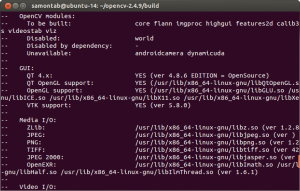
Make sure you scroll up and check that the modules that are going to be built are these:
core flann imgproc highgui features2d calib3d ml video legacy objdetect photo gpu ocl nonfree contrib java python stitching superres ts videostab viz.
If anything is wrong, go back, correct the errors by maybe installing extra packages and then run cmake again.
Now, you are ready to compile and install OpenCV 2.4.9:
1 | make |
2 | sudo make install |
Now you have to configure OpenCV. First, open the opencv.conf file with the following code:
1 | sudo gedit /etc/ld.so.conf.d/opencv.conf |
Add the following line at the end of the file(it may be an empty file, that is ok) and then save it:
1 | /usr/local/lib |

Run the following code to configure the library:
1 | sudo ldconfig |
Now you have to open another file:
1 | sudo gedit /etc/bash.bashrc |
Add these two lines at the end of the file and save it:
1 | PKG_CONFIG_PATH=$PKG_CONFIG_PATH:/usr/local/lib/pkgconfig |
2 | export PKG_CONFIG_PATH |

Finally, close the console and open a new one, restart the computer or logout and then login again. OpenCV will not work correctly until you do this.
Now you have OpenCV 2.4.9 installed in your computer with 3D visualization, Python, Java, TBB, OpenGL, video, and Qt support.
Check out the cool Qt interface which provides image viewing capabilities with zoom, as well as the ability to save the current image with just one click.

If you zoom in enough, you can see the RGB (or intensity) values for each pixel.

Now let’s build some samples included in OpenCV:
1 | cd ~/opencv-2.4.9/samples/c |
2 | chmod +x build_all.sh |
3 | ./build_all.sh |
These examples use the old C interface:
1 | ./facedetect --cascade="/usr/local/share/OpenCV/haarcascades/haarcascade_frontalface_alt.xml"--scale=1.5 lena.jpg |

1 | ./facedetect --cascade="/usr/local/share/OpenCV/haarcascades/haarcascade_frontalface_alt.xml"--nested-cascade="/usr/local/share/OpenCV/haarcascades/haarcascade_eye.xml" --scale=1.5 lena.jpg |

The following examples use the new C++ interface:
1 | ~/opencv-2.4.9/build/bin/cpp-example-grabcut ~/opencv-2.4.9/samples/cpp/lena.jpg |

1 | ~/opencv-2.4.9/build/bin/cpp-example-calibration_artificial |

Now let’s run some Python code:
1 | python ~/opencv-2.4.9/samples/python2/turing.py |

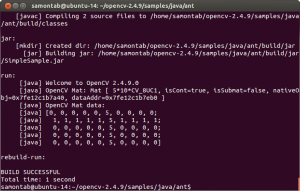
Now you can build a Java sample using ant for example. (Make sure that you change/home/samontab/ with your actual home directory):
1 | cd ~/opencv-2.4.9/samples/java/ant |
2 | ant -DocvJarDir=/home/samontab/opencv-2.4.9/build/bin -DocvLibDir=/home/samontab/opencv-2.4.9/build/lib |
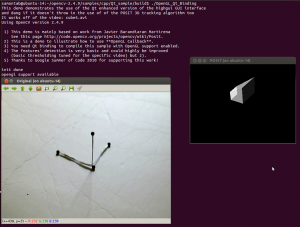
Now let’s read a video and use OpenGL with Qt through this great sample that detects the features from the video, then estimates the 3D location of the structure using POSIT, and finally uses OpenGL to draw in 3D (great sample Javier):
1 | cd ~/opencv-2.4.9/samples/cpp/Qt_sample |
2 | mkdir build |
3 | cd build |
4 | cmake .. |
5 | make |
6 | ./OpenGL_Qt_Binding |
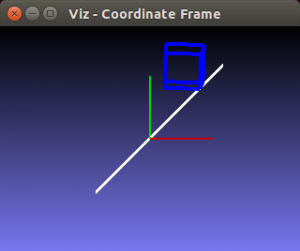
And finally, let’s build a sample using the 3D visualization module viz:
1 | cd ~/opencv-2.4.9/samples/cpp/tutorial_code/viz |
2 | g++ -o widget_pose `pkg-config opencv --cflags` widget_pose.cpp `pkg-config opencv --libs` |
3 | ./widget_pose |
As you can see, now you can use OpenCV with C++, C, Python, and Java. The Qt enhanced 2D interface is enabled, 3D data can be displayed using OpenGL directly, or using the new viz module. Multi threading functionality is enabled using TBB. Also, video support is enabled as well.
If you correctly finished this tutorial, you are now ready to do some nice computer vision work.


 4万+
4万+

 被折叠的 条评论
为什么被折叠?
被折叠的 条评论
为什么被折叠?
 到【灌水乐园】发言


