


 本文详述了使用ViewPager和Fragment在Android应用中实现顶部导航界面滑动效果的步骤。从创建FragmentActivity和Fragment,到添加Adapter及实现监听事件,最后添加指示标签,全过程深入浅出。
ViewPager+Fragment一步步打造顶部导航界面滑动效果
在许多应用中,我们常常用到这么一个效果:

可以看到,由于现在的应用数据经常需要涉及到多个模块,所以常常需要使用滑动标签在多个页面之间跳转,实现这样的效果有很多种方式(比如系统自带的tabhost控件),但android-support-v4包中还为我们提供了另外一个专门实现滑动页面的控件——ViewPager,ViewPager中提供了很多接口,能让我们用很少的代码就能实现分屏页面滑动,本文也将分享如何一步一步实现ViewPager+fragment组合来轻松实现分页滑动效果,先上最终效果图(由于gif总是录制失败,此处使用静态图):

实现这样一个效果,主要分为以下几步:
1.创建一个FragmentActivity作为主页面,并设计好对应的布局文件
2.创建几个fragment作为每个子页面的容器,并创建对应的布局文件
3.为ViewPager添加一个Adapter,将所有fragment添加进去
4.实现ViewPager的OnPageChangeListener监听事件,重写onPageSelected()方法,实现左右滑动页面
5.实现每个标题的onClick事件,点击跳转到相应页面
6.添加指示标签块,也就是标题栏下面那个红色的指示,计算指示标签的位移,使其与标题同步变化
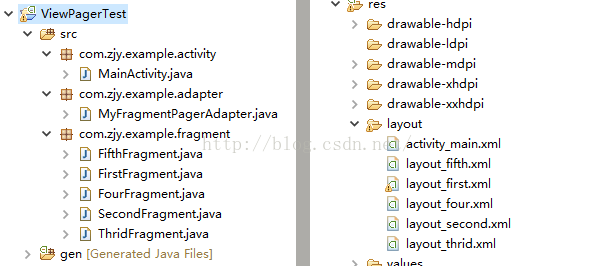
工程目录如下:
接下来我们开始一步一步实现这个效果:
1.创建一个FragmentActivity作为主页面,并设计好对应的布局文件
先来看一下布局文件activity_main.xml:
-
<LinearLayout xmlns:android="http://schemas.android.com/apk/res/android" -
xmlns:tools="http://schemas.android.com/tools" -
android:layout_width="match_parent" -
android:layout_height="match_parent" -
android:orientation="vertical" > -
<LinearLayout -
android:id="@+id/bottomlinear" -
android:layout_width="fill_parent" -
android:layout_height="0dp" -
android:layout_weight="1" -
android:orientation="horizontal" -
android:background="#DCDCDC"> -
<Button -
android:id="@+id/btn_first" -
android:layout_width="0dp" -
android:layout_height="fill_parent" -
android:layout_weight="1" -
android:padding="-5dp" -
android:textSize="14sp" -
android:text="最新" -
/> -
<Button -
android:id="@+id/btn_second" -
android:layout_width="0dp" -
android:layout_height="fill_parent" -
android:layout_weight="1" -
android:textSize="14sp" -
android:text="前端"/> -
<Button -
android:id="@+id/btn_third" -
android:layout_width="0dp" -
android:layout_height="fill_parent" -
android:layout_weight="1.5" -
android:textSize="14sp" -
android:text="移动开发"/> -
<Button -
android:id="@+id/btn_four" -
android:layout_width="0dp" -
android:layout_height="fill_parent" -
android:layout_weight="1" -
android:textSize="14sp" -
android:text="语言"/> -
<Button -
android:id="@+id/btn_fifth" -
android:layout_width="0dp" -
android:layout_height="fill_parent" -
android:layout_weight="1.5" -
android:textSize="14sp" -
android:text="游戏&图像"/> -
</LinearLayout> -
<LinearLayout -
android:id="@+id/cursorarea" -
android:layout_width="fill_parent" -
android:background="#CDCDCD" -
android:orientation="horizontal" -
android:layout_height="2dp"> -
<ImageView -
android:id="@+id/cursor_btn" -
android:layout_width="fill_parent" -
android:layout_height="fill_parent"> -
</ImageView> -
</LinearLayout> -
<android.support.v4.view.ViewPager -
android:id="@+id/myviewpager" -
android:layout_width="fill_parent" -
android:layout_height="0dp" -
android:layout_weight="12"> -
</android.support.v4.view.ViewPager> -
</LinearLayout>
其中,创建了五个按钮作为标题栏的5个标题,创建一个ImageView作为指示标签,再导入一个ViewPager位于标题栏下面
MainActivity.java(注意是继承自FragmentActivity类):
-
public class MainActivity extends FragmentActivity{ -
private ViewPager myviewpager; -
//选项卡中的按钮 -
private Button btn_first; -
private Button btn_second; -
private Button btn_third; -
private Button btn_four; -
private Button btn_fifth; -
//作为指示标签的按钮 -
private ImageView cursor; -
//标志指示标签的横坐标 -
float cursorX = 0; -
//所有按钮的宽度的数组 -
private int[] widthArgs; -
//所有标题按钮的数组 -
private Button[] btnArgs; -
@Override -
protected void onCreate(Bundle savedInstanceState) { -
super.onCreate(savedInstanceState); -
setContentView(R.layout.activity_main); -
initView(); -
} -
//初始化布局 -
public void initView(){ -
myviewpager = (ViewPager)this.findViewById(R.id.myviewpager); -
btn_first = (Button)this.findViewById(R.id.btn_first); -
btn_second = (Button)this.findViewById(R.id.btn_second); -
btn_third = (Button)this.findViewById(R.id.btn_third); -
btn_four = (Button)this.findViewById(R.id.btn_four); -
btn_fifth = (Button)this.findViewById(R.id.btn_fifth); -
//初始化按钮数组 -
btnArgs = new Button[]{btn_first,btn_second,btn_third,btn_four,btn_fifth}; -
//指示标签设置为红色 -
cursor = (ImageView)this.findViewById(R.id.cursor_btn); -
cursor.setBackgroundColor(Color.RED); -
btn_first.setOnClickListener(this); -
btn_second.setOnClickListener(this); -
btn_third.setOnClickListener(this); -
btn_four.setOnClickListener(this); -
btn_fifth.setOnClickListener(this); -
//先重置所有按钮颜色 -
resetButtonColor(); -
//再将第一个按钮字体设置为红色,表示默认选中第一个 -
btn_first.setTextColor(Color.RED); -
} -
//重置所有按钮的颜色 -
public void resetButtonColor(){ -
btn_first.setBackgroundColor(Color.parseColor("#DCDCDC")); -
btn_second.setBackgroundColor(Color.parseColor("#DCDCDC")); -
btn_third.setBackgroundColor(Color.parseColor("#DCDCDC")); -
btn_four.setBackgroundColor(Color.parseColor("#DCDCDC")); -
btn_fifth.setBackgroundColor(Color.parseColor("#DCDCDC")); -
btn_first.setTextColor(Color.BLACK); -
btn_second.setTextColor(Color.BLACK); -
btn_third.setTextColor(Color.BLACK); -
btn_four.setTextColor(Color.BLACK); -
btn_fifth.setTextColor(Color.BLACK); -
} -
}
2.创建几个fragment作为每个子页面的容器,并创建对应的布局文件
layout_first.xml:
-
<?xml version="1.0" encoding="utf-8"?> -
<LinearLayout xmlns:android="http://schemas.android.com/apk/res/android" -
android:layout_width="match_parent" -
android:layout_height="match_parent" -
android:orientation="vertical" > -
<TextView -
android:layout_width="fill_parent" -
android:layout_height="fill_parent" -
android:gravity="center" -
android:layout_gravity="center" -
android:text="这是第一个Fragment"/> -
</LinearLayout>
FirstFragment.java:
-
public class FirstFragment extends Fragment{ -
@Override -
public View onCreateView(LayoutInflater inflater,ViewGroup container,Bundle savedInstanceState) { -
// TODO Auto-generated method stub -
View v = inflater.inflate(R.layout.layout_first, container,false); -
return v; -
} -
}
layout_second.xml:
-
<?xml version="1.0" encoding="utf-8"?> -
<LinearLayout xmlns:android="http://schemas.android.com/apk/res/android" -
android:layout_width="match_parent" -
android:layout_height="match_parent" -
android:orientation="vertical" > -
<TextView -
android:layout_width="fill_parent" -
android:layout_height="fill_parent" -
android:gravity="center" -
android:layout_gravity="center" -
android:text="这是第二个Fragment"/> -
</LinearLayout>
SecondFragment.java:
-
public class SecondFragment extends Fragment{ -
@Override -
public View onCreateView(LayoutInflater inflater,ViewGroup container,Bundle savedInstanceState) { -
// TODO Auto-generated method stub -
View v = inflater.inflate(R.layout.layout_second, container,false); -
return v; -
} -
}
layout_thrid.xml:
-
<?xml version="1.0" encoding="utf-8"?> -
<LinearLayout xmlns:android="http://schemas.android.com/apk/res/android" -
android:layout_width="match_parent" -
android:layout_height="match_parent" -
android:orientation="vertical" > -
<TextView -
android:layout_width="fill_parent" -
android:layout_height="fill_parent" -
android:gravity="center" -
android:layout_gravity="center" -
android:text="这是第三个Fragment"/> -
</LinearLayout>
ThridFragment.java:
-
public class ThridFragment extends Fragment{ -
@Override -
public View onCreateView(LayoutInflater inflater,ViewGroup container,Bundle savedInstanceState) { -
// TODO Auto-generated method stub -
View v = inflater.inflate(R.layout.layout_thrid, container,false); -
return v; -
} -
}
layout_four.xml:
-
<?xml version="1.0" encoding="utf-8"?> -
<LinearLayout xmlns:android="http://schemas.android.com/apk/res/android" -
android:layout_width="match_parent" -
android:layout_height="match_parent" -
android:orientation="vertical" > -
<TextView -
android:layout_width="fill_parent" -
android:layout_height="fill_parent" -
android:gravity="center" -
android:layout_gravity="center" -
android:text="这是第四个Fragment"/> -
</LinearLayout>
FourFragment.java:
-
public class FourFragment extends Fragment{ -
@Override -
public View onCreateView(LayoutInflater inflater,ViewGroup container,Bundle savedInstanceState) { -
// TODO Auto-generated method stub -
View v = inflater.inflate(R.layout.layout_four, container,false); -
return v; -
} -
}
layout_fifth.xml:
-
<?xml version="1.0" encoding="utf-8"?> -
<LinearLayout xmlns:android="http://schemas.android.com/apk/res/android" -
android:layout_width="match_parent" -
android:layout_height="match_parent" -
android:orientation="vertical" > -
<TextView -
android:layout_width="fill_parent" -
android:layout_height="fill_parent" -
android:gravity="center" -
android:layout_gravity="center" -
android:text="这是第五个Fragment"/> -
</LinearLayout>
FifthFragment.java:
-
public class FifthFragment extends Fragment{ -
@Override -
public View onCreateView(LayoutInflater inflater,ViewGroup container,Bundle savedInstanceState) { -
// TODO Auto-generated method stub -
View v = inflater.inflate(R.layout.layout_fifth, container,false); -
return v; -
} -
}
每个Fragment的内容布局基本一致,这里只是简单地用一个TextView来表示当前页面是哪个页面,在onCreateView中使用inflate加载对应的布局文件
3.为ViewPager添加一个Adapter,将所有fragment添加进去
上面已经创建好了每个子页面对应的fragment,接下来要做的便是将这些fragment装载到ViewPager中去,android.support.v4.app包为我们提供了一个特别的迭代器——FragmentPagerAdapter,我们重写它的getItem()和getCount()方法,分别返回第几个fragment以及fragment的数量,可以这么理解:此步相当于让ViewPager能够控制管理我们的fragment
MyFragmentPagerAdapter.java:
-
public class MyFragmentPagerAdapter extends FragmentPagerAdapter{ -
//存储所有的fragment -
private List<Fragment> list; -
public MyFragmentPagerAdapter(FragmentManager fm, ArrayList<Fragment> list){ -
super(fm); -
this.list = list; -
} -
@Override -
public Fragment getItem(int arg0) { -
// TODO Auto-generated method stub -
return list.get(arg0); -
} -
@Override -
public int getCount() { -
// TODO Auto-generated method stub -
return list.size(); -
} -
}
创建完adapter后,我们还要在MainActivity中将所有fragment添加到一个list并作为构造参数传到adapter中去:
-
//fragment的集合,对应每个子页面 -
private ArrayList<Fragment> fragments; -
fragments = new ArrayList<Fragment>(); -
fragments.add(new FirstFragment()); -
fragments.add(new SecondFragment()); -
fragments.add(new ThridFragment()); -
fragments.add(new FourFragment()); -
fragments.add(new FifthFragment()); -
MyFragmentPagerAdapter adapter = new MyFragmentPagerAdapter(getSupportFragmentManager(),fragments);
将装载了数据的adapter设置给viewpager
myviewpager.setAdapter(adapter);
4.实现ViewPager的OnPageChangeListener监听事件,重写onPageSelected()方法,实现左右滑动页面
让Activity实现监听接口:

为myviewpager注册监听:
myviewpager.setOnPageChangeListener(this);
实现三个接口方法,这里关键在于重写onPageSelected方法,onPageSelected会在每次滑动ViewPager的时候触发,所以所有滑动时的变化都可以在这里面定义,比如标题按钮的颜色随着滑动的变化等
-
@Override -
public void onPageScrollStateChanged(int arg0) { -
// TODO Auto-generated method stub -
} -
@Override -
public void onPageScrolled(int arg0, float arg1, int arg2) { -
// TODO Auto-generated method stub -
} -
@Override -
public void onPageSelected(int arg0) { -
// TODO Auto-generated method stub -
//每次滑动首先重置所有按钮的颜色 -
resetButtonColor(); -
//将滑动到的当前按钮颜色设置为红色 -
btnArgs[arg0].setTextColor(Color.RED); -
}
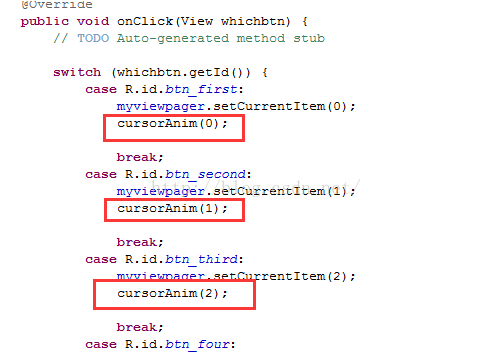
5.实现每个标题的onClick事件,点击跳转到相应页面
在上一步,已经实现了左右滑动切换页面效果,但发现点击标题栏并无响应,所以我们需要为每个button添加一个点击事件:
让Activity实现监听接口:

为所有标题按钮注册监听:
-
btn_first.setOnClickListener(this); -
btn_second.setOnClickListener(this); -
btn_third.setOnClickListener(this); -
btn_four.setOnClickListener(this); -
btn_fifth.setOnClickListener(this);
重写onclick:
-
@Override -
public void onClick(View whichbtn) { -
// TODO Auto-generated method stub -
switch (whichbtn.getId()) { -
case R.id.btn_first: -
myviewpager.setCurrentItem(0); -
break; -
case R.id.btn_second: -
myviewpager.setCurrentItem(1); -
break; -
case R.id.btn_third: -
myviewpager.setCurrentItem(2); -
break; -
case R.id.btn_four: -
myviewpager.setCurrentItem(3); -
break; -
case R.id.btn_fifth: -
myviewpager.setCurrentItem(4); -
break; -
} -
}
可以看到,只是一句简单的setCurrentItem方法的调用,就能实现跳转到对应的子页面,所以才说ViewPager非常的方便
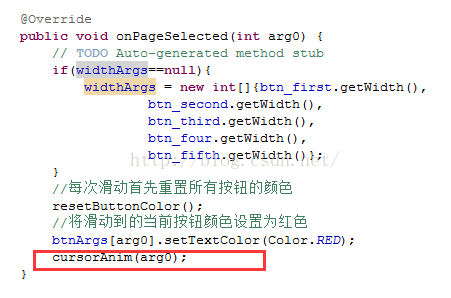
6.添加指示标签块,也就是标题栏下面那个红色的指示,计算指示标签的位移,使其与标题同步变化
上面的步骤其实已经实现了大部分功能,但为了让我们的界面更加友好一些,需要再添加一个指示器,用来指示当前处于哪个页面,要实现这种功能,要注意以下几点:
【在滑动到某个子页面时,指示器需要横向跳到相应的位置】
【在滑动到某个子页面时,指示器需要变化到与当前标题一样的大小】
如图:

首先创建两个数组,便于根据下标得到某个按钮以及对应的宽度:
-
//所有按钮的宽度的集合 -
private int[] widthArgs; -
//所有按钮的集合 -
private Button[] btnArgs;
注意两个数组实例化的位置不同,btnArgs是像平常一样在onCreate方法中实例化,而widthArgs在滑动的时候再实例化,因为在onCreate方法中获取不了所有按钮的宽度,因为系统还未测量它们的宽度
btnArgs的实例化:
btnArgs = new Button[]{btn_first,btn_second,btn_third,btn_four,btn_fifth};
widthArgs的实例化:
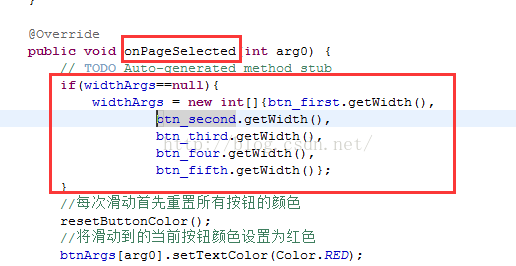
初始化指示器位置和大小:
-
btn_first.post(new Runnable(){ -
@Override -
public void run() { -
LinearLayout.LayoutParams lp = (LinearLayout.LayoutParams)cursor.getLayoutParams(); -
//减去边距*2,以对齐标题栏文字 -
lp.width = btn_first.getWidth()-btn_first.getPaddingLeft()*2; -
cursor.setLayoutParams(lp); -
cursor.setX(btn_first.getPaddingLeft()); -
} -
});
这里需要解释一下,为什么不直接cursor.setWidth()和cursor.setX()?因为Android系统绘制原理是只有全部遍历测量之后才会布局,只有在整个布局绘制完毕后,视图才能得到自身的高和宽。所以在正常情况下,在OnCreate()方法中直接获取控件的宽度和高度取得值是0。而我们此处设置指示器的大小和位置都需要用到第一个按钮的大小作为参考值,所以可以通过post将一个runnable投递到消息队列的尾部,然后等待UI线程Looper调用此runnable的时候,view也已经初始化好了。这个时候就能成功获取控件的宽高。
指示器的动态变化方法如下,注释得已经很清楚:
-
//指示器的跳转,传入当前所处的页面的下标 -
public void cursorAnim(int curItem){ -
//每次调用,就将指示器的横坐标设置为0,即开始的位置 -
cursorX = 0; -
//再根据当前的curItem来设置指示器的宽度 -
LinearLayout.LayoutParams lp = (LinearLayout.LayoutParams)cursor.getLayoutParams(); -
//减去边距*2,以对齐标题栏文字 -
lp.width = widthArgs[curItem]-btnArgs[0].getPaddingLeft()*2; -
cursor.setLayoutParams(lp); -
//循环获取当前页之前的所有页面的宽度 -
for(int i=0; i<curItem; i++){ -
cursorX = cursorX + btnArgs[i].getWidth(); -
} -
//再加上当前页面的左边距,即为指示器当前应处的位置 -
cursor.setX(cursorX+btnArgs[curItem].getPaddingLeft()); -
}
接下来只需要在刚才的那些onClick以及onPageSelected方法中调用它就可以了:
好了,总算完成所要的效果,完整的MainActivity代码如下:
-
public class MainActivity extends FragmentActivity implements OnClickListener, OnPageChangeListener{ -
private ViewPager myviewpager; -
//fragment的集合,对应每个子页面 -
private ArrayList<Fragment> fragments; -
//选项卡中的按钮 -
private Button btn_first; -
private Button btn_second; -
private Button btn_third; -
private Button btn_four; -
private Button btn_fifth; -
//作为指示标签的按钮 -
private ImageView cursor; -
//标志指示标签的横坐标 -
float cursorX = 0; -
//所有按钮的宽度的集合 -
private int[] widthArgs; -
//所有按钮的集合 -
private Button[] btnArgs; -
@Override -
protected void onCreate(Bundle savedInstanceState) { -
super.onCreate(savedInstanceState); -
setContentView(R.layout.activity_main); -
initView(); -
} -
public void initView(){ -
myviewpager = (ViewPager)this.findViewById(R.id.myviewpager); -
btn_first = (Button)this.findViewById(R.id.btn_first); -
btn_second = (Button)this.findViewById(R.id.btn_second); -
btn_third = (Button)this.findViewById(R.id.btn_third); -
btn_four = (Button)this.findViewById(R.id.btn_four); -
btn_fifth = (Button)this.findViewById(R.id.btn_fifth); -
btnArgs = new Button[]{btn_first,btn_second,btn_third,btn_four,btn_fifth}; -
cursor = (ImageView)this.findViewById(R.id.cursor_btn); -
cursor.setBackgroundColor(Color.RED); -
myviewpager.setOnPageChangeListener(this); -
btn_first.setOnClickListener(this); -
btn_second.setOnClickListener(this); -
btn_third.setOnClickListener(this); -
btn_four.setOnClickListener(this); -
btn_fifth.setOnClickListener(this); -
fragments = new ArrayList<Fragment>(); -
fragments.add(new FirstFragment()); -
fragments.add(new SecondFragment()); -
fragments.add(new ThridFragment()); -
fragments.add(new FourFragment()); -
fragments.add(new FifthFragment()); -
MyFragmentPagerAdapter adapter = new MyFragmentPagerAdapter(getSupportFragmentManager(),fragments); -
myviewpager.setAdapter(adapter); -
resetButtonColor(); -
btn_first.setTextColor(Color.RED); -
} -
//重置所有按钮的颜色 -
public void resetButtonColor(){ -
btn_first.setBackgroundColor(Color.parseColor("#DCDCDC")); -
btn_second.setBackgroundColor(Color.parseColor("#DCDCDC")); -
btn_third.setBackgroundColor(Color.parseColor("#DCDCDC")); -
btn_four.setBackgroundColor(Color.parseColor("#DCDCDC")); -
btn_fifth.setBackgroundColor(Color.parseColor("#DCDCDC")); -
btn_first.setTextColor(Color.BLACK); -
btn_second.setTextColor(Color.BLACK); -
btn_third.setTextColor(Color.BLACK); -
btn_four.setTextColor(Color.BLACK); -
btn_fifth.setTextColor(Color.BLACK); -
} -
@Override -
public void onClick(View whichbtn) { -
// TODO Auto-generated method stub -
switch (whichbtn.getId()) { -
case R.id.btn_first: -
myviewpager.setCurrentItem(0); -
cursorAnim(0); -
break; -
case R.id.btn_second: -
myviewpager.setCurrentItem(1); -
cursorAnim(1); -
break; -
case R.id.btn_third: -
myviewpager.setCurrentItem(2); -
cursorAnim(2); -
break; -
case R.id.btn_four: -
myviewpager.setCurrentItem(3); -
cursorAnim(3); -
break; -
case R.id.btn_fifth: -
myviewpager.setCurrentItem(4); -
cursorAnim(4); -
break; -
} -
} -
@Override -
public void onPageScrollStateChanged(int arg0) { -
// TODO Auto-generated method stub -
} -
@Override -
public void onPageScrolled(int arg0, float arg1, int arg2) { -
// TODO Auto-generated method stub -
} -
@Override -
public void onPageSelected(int arg0) { -
// TODO Auto-generated method stub -
if(widthArgs==null){ -
widthArgs = new int[]{btn_first.getWidth(), -
btn_second.getWidth(), -
btn_third.getWidth(), -
btn_four.getWidth(), -
btn_fifth.getWidth()}; -
} -
//每次滑动首先重置所有按钮的颜色 -
resetButtonColor(); -
//将滑动到的当前按钮颜色设置为红色 -
btnArgs[arg0].setTextColor(Color.RED); -
cursorAnim(arg0); -
} -
//指示器的跳转,传入当前所处的页面的下标 -
public void cursorAnim(int curItem){ -
//每次调用,就将指示器的横坐标设置为0,即开始的位置 -
cursorX = 0; -
//再根据当前的curItem来设置指示器的宽度 -
LinearLayout.LayoutParams lp = (LinearLayout.LayoutParams)cursor.getLayoutParams(); -
//减去边距*2,以对齐标题栏文字 -
lp.width = widthArgs[curItem]-btnArgs[0].getPaddingLeft()*2; -
cursor.setLayoutParams(lp); -
//循环获取当前页之前的所有页面的宽度 -
for(int i=0; i<curItem; i++){ -
cursorX = cursorX + btnArgs[i].getWidth(); -
} -
//再加上当前页面的左边距,即为指示器当前应处的位置 -
cursor.setX(cursorX+btnArgs[curItem].getPaddingLeft()); -
} -
}


 1169
1169

 被折叠的 条评论
为什么被折叠?
被折叠的 条评论
为什么被折叠?
 到【灌水乐园】发言


