


1. 写在前面
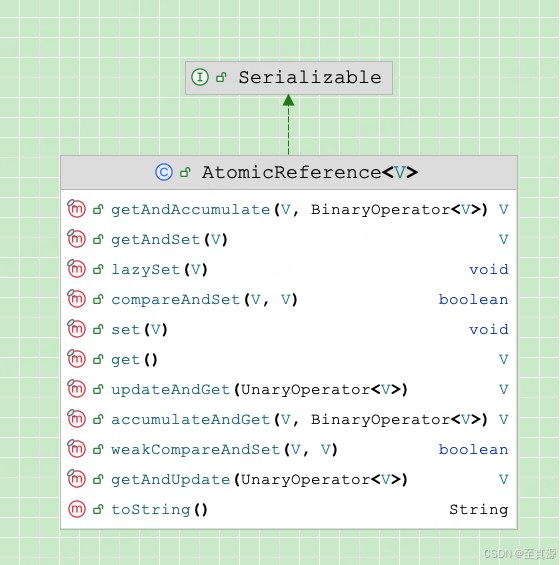
AtomicReference 是 Java 中提供的一种用于处理对象引用的原子操作类。它在并发编程中非常有用,可以确保对对象引用的操作是原子的,避免了使用锁的开销。下面的问题不知道大家在日常工作中是否思考过:
- AtomicReference 是如何实现原子操作的?
- AtomicReference 的 compareAndSet 方法是如何工作的?
- AtomicReference 的应用场景有哪些?
- AtomicReference 和 synchronized 的区别是什么?
- AtomicReference 是否支持泛型?
- AtomicReference 和 AtomicInteger 之间的区别是什么?
2. 从使用说起
2.1 基本使用
AtomicReference 可以用来实现对对象引用的原子更新。
import java.util.concurrent.atomic.AtomicReference;

public class AtomicReferenceBasicUsage {
    public static void main(String[] args) {
        AtomicReference<String> atomicString = new AtomicReference<>("initial value");

        // 获取当前值
        String currentValue = atomicString.get();
        System.out.println("Current Value: " + currentValue);

        // 更新值
        atomicString.set("new value");
        System.out.println("Updated Value: " + atomicString.get());

        // 比较并设置值
        boolean isUpdated = atomicString.compareAndSet("new value", "updated value");
        System.out.println("Is Updated: " + isUpdated);
        System.out.println("Final Value: " + atomicString.get());
    }
}
2.2 实现非阻塞栈
使用 AtomicReference 可以实现一个简单的非阻塞栈。
import java.util.concurrent.atomic.AtomicReference;

public class NonBlockingStack<T> {
    private static class Node<T> {
        final T value;
        final Node<T> next;

        Node(T value, Node<T> next) {
            this.value = value;
            this.next = next;
        }
    }

    private final AtomicReference<Node<T>> top = new AtomicReference<>(null);

    public void push(T value) {
        Node<T> newNode = new Node<>(value, null);
        Node<T> oldTop;
        do {
            oldTop = top.get();
            newNode.next = oldTop;
        } while (!top.compareAndSet(oldTop, newNode));
    }

    public T pop() {
        Node<T> oldTop;
        Node<T> newTop;
        do {
            oldTop = top.get();
            if (oldTop == null) {
                return null; // Stack is empty
            }
            newTop = oldTop.next;
        } while (!top.compareAndSet(oldTop, newTop));
        return oldTop.value;
    }

    public static void main(String[] args) {
        NonBlockingStack<Integer> stack = new NonBlockingStack<>();
        stack.push(1);
        stack.push(2);
        stack.push(3);

        System.out.println(stack.pop()); // 3
        System.out.println(stack.pop()); // 2
        System.out.println(stack.pop()); // 1
    }
}
2.3 实现非阻塞单例模式
使用 AtomicReference 可以实现一个简单的非阻塞单例模式。
import java.util.concurrent.atomic.AtomicReference;

public class NonBlockingSingleton {
    private static final AtomicReference<NonBlockingSingleton> instance = new AtomicReference<>();

    private NonBlockingSingleton() {
        // Private constructor to prevent instantiation
    }

    public static NonBlockingSingleton getInstance() {
        NonBlockingSingleton currentInstance = instance.get();
        if (currentInstance == null) {
            currentInstance = new NonBlockingSingleton();
            if (!instance.compareAndSet(null, currentInstance)) {
                currentInstance = instance.get();
            }
        }
        return currentInstance;
    }

    public static void main(String[] args) {
        NonBlockingSingleton singleton1 = NonBlockingSingleton.getInstance();
        NonBlockingSingleton singleton2 = NonBlockingSingleton.getInstance();
        System.out.println(singleton1 == singleton2); // true
    }
}
2.4 实现多线程安全的缓存
使用 AtomicReference 可以实现一个简单的多线程安全缓存。
import java.util.concurrent.atomic.AtomicReference;

public class AtomicReferenceCache<K, V> {
    private final AtomicReference<Entry<K, V>> cache = new AtomicReference<>();

    private static class Entry<K, V> {
        final K key;
        final V value;

        Entry(K key, V value) {
            this.key = key;
            this.value = value;
        }
    }

    public V get(K key) {
        Entry<K, V> entry = cache.get();
        if (entry != null && entry.key.equals(key)) {
            return entry.value;
        }
        return null;
    }

    public void put(K key, V value) {
        Entry<K, V> newEntry = new Entry<>(key, value);
        cache.set(newEntry);
    }

    public static void main(String[] args) {
        AtomicReferenceCache<String, String> cache = new AtomicReferenceCache<>();
        cache.put("key1", "value1");
        System.out.println(cache.get("key1")); // value1
    }
}
2.5 实现非阻塞队列
使用 AtomicReference 可以实现一个简单的非阻塞队列。
import java.util.concurrent.atomic.AtomicReference;

public class NonBlockingQueue<T> {
    private static class Node<T> {
        final T value;
        final AtomicReference<Node<T>> next;

        Node(T value) {
            this.value = value;
            this.next = new AtomicReference<>(null);
        }
    }

    private final AtomicReference<Node<T>> head;
    private final AtomicReference<Node<T>> tail;

    public NonBlockingQueue() {
        Node<T> dummy = new Node<>(null);
        head = new AtomicReference<>(dummy);
        tail = new AtomicReference<>(dummy);
    }

    public void enqueue(T value) {
        Node<T> newNode = new Node<>(value);
        Node<T> oldTail;
        Node<T> tailNext;
        while (true) {
            oldTail = tail.get();
            tailNext = oldTail.next.get();
            if (oldTail == tail.get()) {
                if (tailNext == null) {
                    if (oldTail.next.compareAndSet(null, newNode)) {
                        tail.compareAndSet(oldTail, newNode);
                        return;
                    }
                } else {
                    tail.compareAndSet(oldTail, tailNext);
                }
            }
        }
    }

    public T dequeue() {
        Node<T> oldHead;
        Node<T> oldTail;
        Node<T> headNext;
        while (true) {
            oldHead = head.get();
            oldTail = tail.get();
            headNext = oldHead.next.get();
            if (oldHead == head.get()) {
                if (oldHead == oldTail) {
                    if (headNext == null) {
                        return null; // Queue is empty
                    }
                    tail.compareAndSet(oldTail, headNext);
                } else {
                    T value = headNext.value;
                    if (head.compareAndSet(oldHead, headNext)) {
                        return value;
                    }
                }
            }
        }
    }

    public static void main(String[] args) {
        NonBlockingQueue<Integer> queue = new NonBlockingQueue<>();
        queue.enqueue(1);
        queue.enqueue(2);
        queue.enqueue(3);

        System.out.println(queue.dequeue()); // 1
        System.out.println(queue.dequeue()); // 2
        System.out.println(queue.dequeue()); // 3
    }
}
3. AtomicReference 和 synchronized 的区别是什么?
AtomicReference 和 synchronized 都是用于在多线程环境下确保操作安全的机制,但它们在实现方式、性能和适用场景上有很大的区别。
3.1 实现方式
- AtomicReference:使用底层的 CAS(Compare-And-Swap)操作来实现原子性。CAS 是一种硬件级别的原子操作,可以确保在多线程环境下对内存的修改是安全的。
- synchronized:使用内置的锁机制来确保同一时间只有一个线程可以执行被 synchronized 修饰的代码块或方法。
3.2 性能
- AtomicReference:由于使用的是无锁的 CAS 操作,通常比 synchronized 更高效,尤其是在高并发环境下。它避免了线程上下文切换和阻塞问题。
- synchronized:使用锁机制,在高并发环境下可能会导致线程阻塞和上下文切换,性能相对较低。
3.3 适用场景
- AtomicReference:适用于简单的原子操作,如更新对象引用、计数器等。
- synchronized:适用于更复杂的同步需求,如需要在一个代码块中进行多个操作,并且这些操作需要保持原子性。
3.4 使用 AtomicReference 实现线程安全的计数器
import java.util.concurrent.atomic.AtomicReference;

public class AtomicCounter {
    private final AtomicReference<Integer> count = new AtomicReference<>(0);

    public void increment() {
        Integer oldValue, newValue;
        do {
            oldValue = count.get();
            newValue = oldValue + 1;
        } while (!count.compareAndSet(oldValue, newValue));
    }

    public int getCount() {
        return count.get();
    }

    public static void main(String[] args) throws InterruptedException {
        AtomicCounter counter = new AtomicCounter();
        Runnable task = counter::increment;

        Thread[] threads = new Thread[1000];
        for (int i = 0; i < 1000; i++) {
            threads[i] = new Thread(task);
            threads[i].start();
        }

        for (Thread thread : threads) {
            thread.join();
        }

        System.out.println("Final count: " + counter.getCount()); // Should print 1000
    }
}
3.5 使用 synchronized 实现线程安全的计数器
public class SynchronizedCounter {
    private int count = 0;

    public synchronized void increment() {
        count++;
    }

    public synchronized int getCount() {
        return count;
    }

    public static void main(String[] args) throws InterruptedException {
        SynchronizedCounter counter = new SynchronizedCounter();
        Runnable task = counter::increment;

        Thread[] threads = new Thread[1000];
        for (int i = 0; i < 1000; i++) {
            threads[i] = new Thread(task);
            threads[i].start();
        }

        for (Thread thread : threads) {
            thread.join();
        }

        System.out.println("Final count: " + counter.getCount()); // Should print 1000
    }
}
4. AtomicReference 的 ABA 问题是什么?如何解决?
ABA 问题是指在多线程环境下,一个变量的值从 A 变成 B,然后又变回 A。在这种情况下,使用 CAS(Compare-And-Swap)操作可能会误认为变量的值没有变化,从而导致逻辑上的错误。
4.1 ABA 问题示例
让我们通过一个简单的示例来演示 ABA 问题:
import java.util.concurrent.atomic.AtomicReference;

public class ABADemo {
    private static class Node {
        int value;
        Node next;

        Node(int value) {
            this.value = value;
            this.next = null;
        }
    }

    public static void main(String[] args) throws InterruptedException {
        AtomicReference<Node> head = new AtomicReference<>(new Node(1));
        head.get().next = new Node(2);

        Thread t1 = new Thread(() -> {
            Node oldHead = head.get();
            // Simulate some work with the old head
            try { Thread.sleep(100); } catch (InterruptedException e) {}
            // Try to swap the head
            head.compareAndSet(oldHead, oldHead.next);
        });

        Thread t2 = new Thread(() -> {
            Node oldHead = head.get();
            // Simulate ABA problem: A -> B -> A
            Node next = oldHead.next;
            head.compareAndSet(oldHead, next); // A -> B
            head.compareAndSet(next, oldHead); // B -> A
        });

        t1.start();
        t2.start();

        t1.join();
        t2.join();

        System.out.println("Head value: " + head.get().value); // Expected: 1, Actual: 1
    }
}
在这个示例中,两个线程 t1 和 t2 试图修改 head。线程 t2 模拟了 ABA 问题,先将 head 从 A 变为 B,然后又变回 A。线程 t1 的 compareAndSet 操作可能会误认为 head 没有变化,从而导致逻辑上的错误。
4.2 解决 ABA 问题
Java 提供了 AtomicStampedReference 和 AtomicMarkableReference 来解决 ABA 问题。它们在引用的同时存储一个额外的标记或版本号,以检测是否发生了 ABA 问题。
使用 AtomicStampedReference 解决 ABA 问题:
import java.util.concurrent.atomic.AtomicStampedReference;

public class ABADemo {
    private static class Node {
        int value;
        Node next;

        Node(int value) {
            this.value = value;
            this.next = null;
        }
    }

    public static void main(String[] args) throws InterruptedException {
        Node initialNode = new Node(1);
        initialNode.next = new Node(2);
        AtomicStampedReference<Node> head = new AtomicStampedReference<>(initialNode, 0);

        Thread t1 = new Thread(() -> {
            int[] stampHolder = new int[1];
            Node oldHead = head.get(stampHolder);
            int oldStamp = stampHolder[0];
            // Simulate some work with the old head
            try { Thread.sleep(100); } catch (InterruptedException e) {}
            // Try to swap the head
            head.compareAndSet(oldHead, oldHead.next, oldStamp, oldStamp + 1);
        });

        Thread t2 = new Thread(() -> {
            int[] stampHolder = new int[1];
            Node oldHead = head.get(stampHolder);
            int oldStamp = stampHolder[0];
            // Simulate ABA problem: A -> B -> A
            Node next = oldHead.next;
            head.compareAndSet(oldHead, next, oldStamp, oldStamp + 1); // A -> B
            head.compareAndSet(next, oldHead, oldStamp + 1, oldStamp + 2); // B -> A
        });

        t1.start();
        t2.start();

        t1.join();
        t2.join();

        int[] stampHolder = new int[1];
        System.out.println("Head value: " + head.get(stampHolder).value); // Expected: 1, Actual: 1
        System.out.println("Stamp: " + stampHolder[0]); // Should be greater than 0
    }
}
在这个示例中,AtomicStampedReference 用于存储节点的引用和一个整数标记(版本号)。每次 compareAndSet 操作不仅检查引用是否相同,还检查版本号是否匹配,从而避免了 ABA 问题。
系列文章
7.jdk源码阅读之ConcurrentHashMap(上)
8.jdk源码阅读之ConcurrentHashMap(下)
17.jdk源码阅读之LinkedBlockingQueue
18.jdk源码阅读之CopyOnWriteArrayList
26.jdk源码阅读之ConcurrentLinkedQueue
27.jdk源码阅读之ConcurrentLinkedDeque


 539
539

 被折叠的 条评论
为什么被折叠?
被折叠的 条评论
为什么被折叠?
 到【灌水乐园】发言


