


C++入门-提高编程
- 本阶段主要针对C++的泛型编程和STL技术做详细学习,探讨C++更深层的使用
模版
模版的概念
模版就是建立通用的模具,大大提高复用性。
函数模版
- C++另一种编程思想称为泛型编程,主要利用的技术就是模版
- C++ 提供两种模版机制: 函数模版和类模版
函数模版的基本语法
函数模版作用: 建立一个通用函数,其函数返回值类型和形参类型可以不具体定制,用一个虚拟的类型来代表。
语法:
template<typename T>
函数声明或定义
解释:
- template: 声明创建模版
- typename : 表面其后面的符号是一种数据类型, 可以用
class代替 - T: 通用的数据类型, 名称可以替换, 通常为大写字母。
#include <iostream>
using namespace std;

// 实现整数类型的交换函数
void swapInt(int& a, int& b) {
	int temp = a;
	a = b;
	b = temp;
}

// 实现一个double类型数据的交换函数
void swapDouble(double &a, double&b) {
	double temp = a;
	a = b;
	b = temp;
}

// 函数模版
template<typename T> // 声明一个模版,告诉编译器后面代码中紧跟着的T不要报错,T是一个通用数据类型
void mySwap(T& a, T& b) {
	T temp = a;
	a = b;
	b = temp;
}

int main() {

	int a = 10;
	int b = 20;
	// 利用函数模版交换, 有如下两种方式使用函数模版
	// 1、自动推到类型
	//mySwap(a, b);

	// 2、第二中方式是显示指定类型
	mySwap<int>(a, b);
	cout << "a = " << a << endl;
	cout << "b = " << b << endl;

	system("pause");
	return 0;
}
总结:
- 函数模版利用关键字
template - 使用函数模版有两种方式: 自动类型推导、显示指定类型
- 模版的目的是为了提高复用性,将类型参数化
函数模版的注意事项
注意事项:
-
自动类型推导,必须推导出一致的数据类型T,才
可以使用
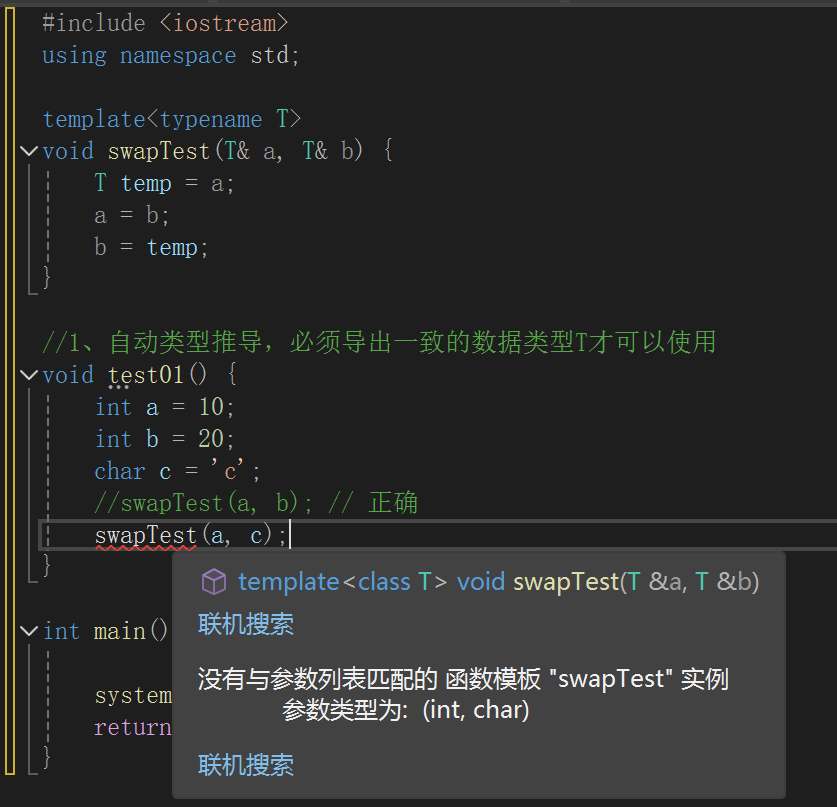
-
模版必须要确定出T的数据类型, 才可以使用。
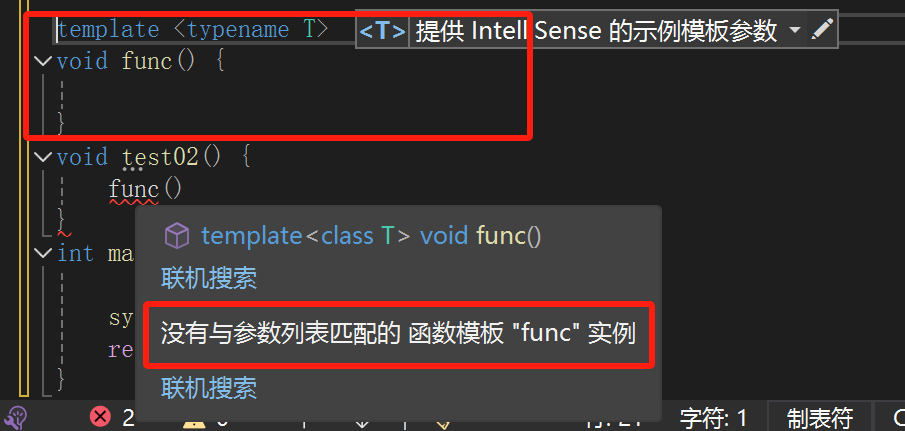
如果 想要调用这个函数, 需要指定T的类型
template <typename T>
void func() {

}
void test02() {
// func(); 错误, 模版不能独立使用,必须确定出T的类型
	func<int>();// 利用显示指定类型的方式,给T一个类型,才可以使用该模版
}
总结:使用模版时必须确定通用数据类型T,并且能够推导出一致的类型
函数模版案例
案例描述:
- 利用函数模版封装一个排序的函数, 可以对不
同数据类型数组进行排序 - 排序规则从大到小, 排序算法为选择排序
- 分别利用char数组和int数组进行测试
#include <iostream>
using namespace std;

template<typename T>
void mySort(T arr[], int len) {
	for (int i = 0; i < len; i++)
	{
		int max = i; // 设定第一个数是最大值的下表
		for (int j = i + 1; j < len; j++)
		{
			if (arr[max] < arr[j]) {
				// 那么需要交换下标
				max = j;
			}
		}

		if (max != i)
		{
			// 交换元素
			T temp = arr[max];
			arr[max] = arr[i];
			arr[i] = temp;
		}
	}
}


int main() {

	int arrary[] = { 4, 9, 1, 3, 8, 5 ,2};
	int len = sizeof(arrary) / sizeof(arrary[0]);
	mySort(arrary, len);

	for (int i = 0; i < len; i++)
	{
		cout << arrary[i];
	}

	cout << "*********************************" << endl;
	char chs[] = "mzqsfde";
	int chLen = sizeof(chs) / sizeof(chs[0]);
	mySort(chs, chLen);
	for (int i = 0; i < chLen; i++)
	{
		cout << chs[i];
	}


	system("pause");
	return 0;
}
普通函数和函数模版的区别
普通函数与函数模版区别:
- 普通函数调用时可以发生自动类型转换(隐式类型转换)
- 函数模版调用时,如果利用自动类型推导,不会发生隐式类型抓换
- 如果利用显示指定类型的方式, 可以发生隐式类型转换
#include <iostream>
using namespace std;

// 普通函数
int myAdd01(int a, int b) {
	return a + b;
}

// 函数模版
template <typename T>
T myAdd02(T a, T b) {
	return a + b;
}


// 使用函数模版时,如果使用自我推导类型, 不会发生自动类型转换, 即隐式类型转换
void test03() {
	int a = 10;
	int b = 20;
	char c = 'c';

	cout << myAdd01(a, c) << endl;
	//cout << myAdd02(a, c) << endl;   会报错没有匹配模版参数

// 2显示指定类型调用
cout << myAdd02<int>(a, c) << endl; // 显示指定会发生隐式类型转换,不会报错
}

int main() {

	test03();

	system("pause");
	return 0;
}
总结:建议使用显示指定的方式,调用函数模版, 因为可以自己确定通用类型T
普通函数和函数模版的调用规则
调用规则如下:
- 如果函数模版和普通函数都可以实现,优先使用普通函数
- 可以通过空模版参数列表来强制调用函数模版
- 函数模版也可以发生重载
- 如果哈数模版可以产生更好的匹配, 优先调用函数模版
#include <iostream>
using namespace std;
// 普通函数
void myPrint(int a, int b) {
cout << "调用的普通函数" << endl;
}
template<typename T>
void myPrint(T a, T b) {
cout << "调用的函数模版" << endl;
}
template<typename T>
void myPrint(T a, T b, T c) {
cout << "函数模版的重载 " << endl;
}
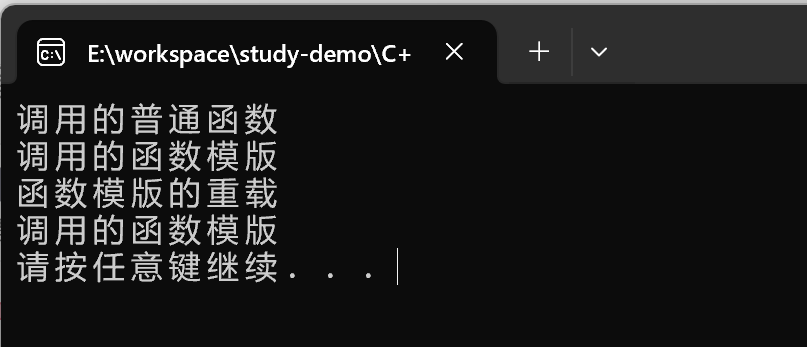
void test_01() {
int a = 10;
int b = 20;
// 直接这样调用, 调用的是普通函数
myPrint(a, b);
// 通过空模版列表, 强制调用模版函数
myPrint<>(a, b);
//函数模版重载调用
myPrint(a, b, 100);
// 如果函数模版产生更好的匹配, 优先使用函数模版
char c1 = 'a';
char c2 = 'b';
myPrint(c1, c2); // 调用的是函数模版
}
int main() {
test_01();
system("pause");
return 0;
}
输出结果:
模版的局限性
局限性:
- 模版的通用性并不是万能的
例如:
template<typename T>
void f(T a, T b) {
	a = b;
}
在上述代码中提供的赋值操作,如果传入的a和b是一个数组,就无法实现了。
下面的示例展示了如何解决这种通过模版的局限性:
#include <iostream>
using namespace std;
#include <string>
class Person
{
public:
Person(string name, int age)
{
this->name = name;
this->age = age;
};
string name;
int age;
};
// 普通模版
template<typename T>
bool myCompare(T& a, T& b) {
if (a == b)
{
return true;
}
else
{
return false;
}
}
// 具体化, 显示具体化的原型和定义以template<>开头, 并通过名称来支出类型
// 具体化优先于常规模版
template<> bool myCompare(Person& p1, Person& p2)
{
if (p1.name == p2.name && p1.age == p2.age)
{
return true;
}
else
{
return false;
}
}
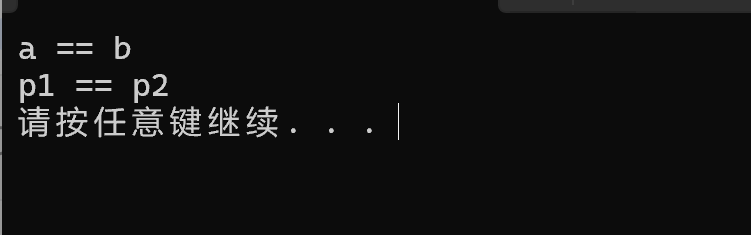
void test_02() {
int a = 10;
int b = 10;
// 内置数据类型可以直接使用通用函数模版
bool ret = myCompare(a, b);
if (ret)
{
cout << "a == b" << endl;
}
else
{
cout << "a != b" << endl;
}
}
void test_03()
{
Person p1("Tom", 10);
Person p2("Tom", 10);
// 自定义数据类型, 不会调用普通的函数模版
// 可以创建具体化的Person数据类型的模版, 用于特殊处理这个类型
bool ret = myCompare(p1, p2);
if (ret)
{
cout << "p1 == p2" << endl;
}
else
{
cout << "p1 != p2" << endl;
}
}
int main() {
test_02();
test_03();
system("pause");
return 0;
}
输出结果:
总结:
- 利用具体化的模版, 可以解决自定义类型的通用化
- 学习模版并不是为了写模版, 而是在STL能够运用系统提供的模版。
类模版
类模版语法
类模版作用:
- 建立一个通用类,类中的成员, 数据类型可以不具体定制, 用一个虚拟的类型来代表。
语法:
template<typename T>
类
解释:
template: 声明创建模版typename: 表明其后的符号是一种数据类型, 可以用class来代替- T : 通用数据类型, 名称可以替换, 通常为大写字母
#include <iostream>
using namespace std;
#include <string>

// 创建一个类模版
template <class NameType, class AgeType>
class Person {
public:
	Person(NameType name, AgeType age) {
		this->m_Name = name;
		this->m_Age = age;
	}

	void showPerson() {
		cout << "name: " << this->m_Name << " age: " << this->m_Age << endl;
	}

	NameType m_Name;
	AgeType m_Age;
};

void test01() {
	Person<string, int> p1("张三", 90);
	p1.showPerson();
}

int main() {

	test01();

	system("pause");
	return 0;
}
总结:类模版和函数版语法相似, 在声明模版template后面加类, 此类称为类模版。
类模版与函数模版的区别
类模版与函数模版区别主要有两点:
- 类模版没有自动类型推导的使用方式
- 类模版在模版参数列表中可以有默认参数
#include <iostream>
using namespace std;
// 定义一个类模版
template<class NameType, class AgeType>
class Person01 {
public:
Person01(NameType name, AgeType age) {
this->m_Name = name;
this->m_Age = age;
}
void showPerson01() {
cout << "name: " << this->m_Name << " age: " << this->m_Age << endl;
}
NameType m_Name;
AgeType m_Age;
};
// 1、类模版没有自动类型推导方式
void test02() {
// Person01 p("zhangsan", 999); 错误: 报错缺少Person01类模版的参数列表,
// 因为类模版没有自动推导类型
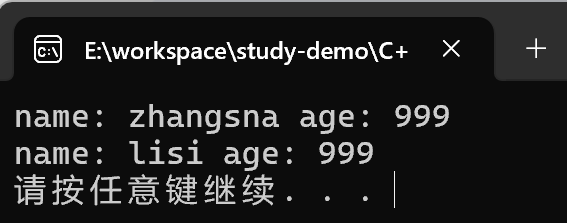
Person01<string, int> p("zhangsna", 999);// 正确,只能使用指定类型
p.showPerson01();
}
// 类模版与函数模版的区别
template<class NameType, class AgeType = int>
class Person02 {
public:
Person02(NameType name, AgeType age) {
this->m_Name = name;
this->m_Age = age;
}
void showPerson02() {
cout << "name: " << this->m_Name << " age: " << this->m_Age << endl;
}
NameType m_Name;
AgeType m_Age;
};
// 类模版在参数列表中可以有默认参数
void test03() {
Person02<string> p("lisi", 999);
p.showPerson02();
}
int main() {
test02();
test03();
system("pause");
return 0;
}
输出结果:
总结:
- 类模版使用只能用显示指定类型方式
- 类模版中的模版参数列表可以有默认参数
类模版中成员函数创建时机
类模版中成员函数和普通类中成员函数创建时机是有区别的:
- 普通类中的成员函数一开始就可以创建
- 类模版中的成员函数在调用时才创建
#include <iostream>
using namespace std;

class Person03 {
public:
	void showPerson03() {
		cout << "Person03 show" << endl;
	}
};

class Person04 {
public:
	void showPerson04() {

		cout << "Person4 show" << endl;
	}
};

template<class T>
class MyClass {
public:

	T obj;

	// 类模版中成员函数,并不是一开始就创建的,而是调用时在生成
	void func1() {
		obj.showPerson03();
	}

	void func2() {
		obj.showPerson04();
	}
};

void test04() {
	MyClass<Person03> m;
	m.func1();

	//m.func2(); 编译会出错, 说明函数调用时才会去创建成员函数
}

int main() {

	system("pause");
	return 0;
}
类模版对象做函数参数
类模版实例化的对象, 向函数传参的方式
一共有三种传参方式:
- 指定传入的类型, 直接显示对象的数据类型
- 参数模块化 将对象中参数变为模版进行传递
- 整个类模板化 将这个对象类型 模版化进行传递。
#include <iostream>
using namespace std;
#include <string>

// 定义一个类模版
template<class T1, class T2>
class Person05 {
public:

	Person05(T1 name, T2 age) {
		this->m_Name = name;
		this->m_Age = age;
	}

	void showPerson() {
		cout << "name: " << this->m_Name << " age: " << this->m_Age << endl;
	}

	T1 m_Name;
	T2 m_Age;
};

// 1、指定传入类型
void printPerson1(Person05<string, int>& p) {
	p.showPerson();
}

void test05() {
	Person05<string, int> p("zhangsna", 888);
	printPerson1(p);
}

// 2、参数模板化
template<class T1, class T2>
void printPerson2(Person05<T1, T2> &p) {
	p.showPerson();
	cout << "T1的类型为: " << typeid(T1).name() << endl;
	cout << "T2的类型为: " << typeid(T2).name() << endl;
}

void test06() {
	Person05<string, int> p("zhubajie", 90);
	printPerson2(p);
}

//3、整个类模板化
template<class T>
void printPerson3(T& p) {
	p.showPerson();
}

void test07() {
	Person05<string, int> p("tangsneg", 30);
	printPerson3(p);
}

int main() {

	test05();
	test06();
	test07();

	system("pause");
	return 0;
}
输出结果:

总结:
- 通过类模版创建的对象, 可以有三种方式向函数中进行传参
- 使用比较广泛的是第一种: 指定传入的类型
类模版与继承
当类模版碰到继承时,需要注意一下几点:
- 当子类继承的父类是一个类模版时, 子类在声明的时候, 需要指出父类中T的类型
- 如果不指定, 编译器无法给子类分配内存
- 如果想灵活指定出父类中T的类型,子类也需要变为类模版。
#include <iostream>
using namespace std;

// 模版与继承
template<class T>
class Base {
	T m;
};

// class Son : public Base
// // 错误, C++编译器需要给子类分配内存,必须知道父类中T的类型才可以向下选择
class Son : public Base<int> // 必须指定一个类型
{

};

void test08() {
	Son s;
}

// 如果想灵活指定父类中T类型, 子类也需要变为类模版
template<class T1, class T2>
class Son2 : public Base<T2>
{
	T1 obj;
};

void test09() {
	Son2<int, char> s2;
}

int main() {

	test08();
	test09();


	system("pause");
	return 0;
}
总结:如果父类是类模版, 子类需要指定出父类中T的数据模型。
类模版成员函数类外实现
目标:能够掌握类模版中的成员函数类外实现
#include <iostream>
using namespace std;
#include <string>
template<class T1, class T2>
class Person06_01
{
public:
// 内类实现
Person06_01(T1 name, T2 age)
{
this->m_Name = name;
this->m_Age = age;
}
void showPerson() {
cout << "姓名:" << this->m_Name << " 年龄:" << this->m_Age << endl;
}
public:
T1 m_Name;
T2 m_Age;
};
// 类外实现
template<class T1, class T2>
class Person06_02 {
public:
Person06_02(T1 name, T2 age);
void showPerson();
public:
T1 m_Name;
T2 m_Age;
};
// 类外实现类模版的成员构造函数和成员函数
template<class T1, class T2>
Person06_02<T1, T2>::Person06_02(T1 name, T2 age) {
this->m_Name = name;
this->m_Age = age;
}
template<class T1, class T2>
void Person06_02<T1, T2>::showPerson() {
cout << "姓名:" << this->m_Name << " 年龄:" << this->m_Age << endl;
}
void test06_01() {
// 创建person6_01
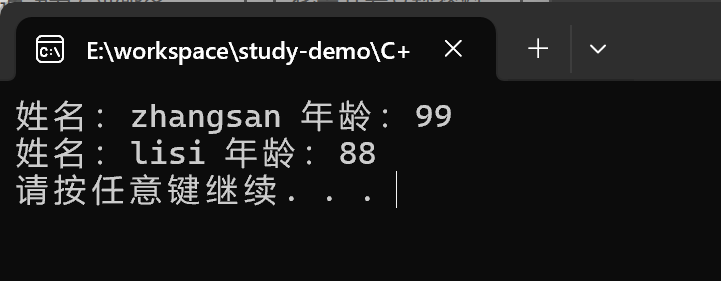
Person06_01<string, int> p1("zhangsan", 99);
p1.showPerson();
// 创建Person6_02
Person06_02<string, int> p2("lisi", 88);
p2.showPerson();
}
int main() {
test06_01();
system("pause");
return 0;
}
输出结果:
总结: 类模版中成员函数类外实现时,需要加上模版参数列表
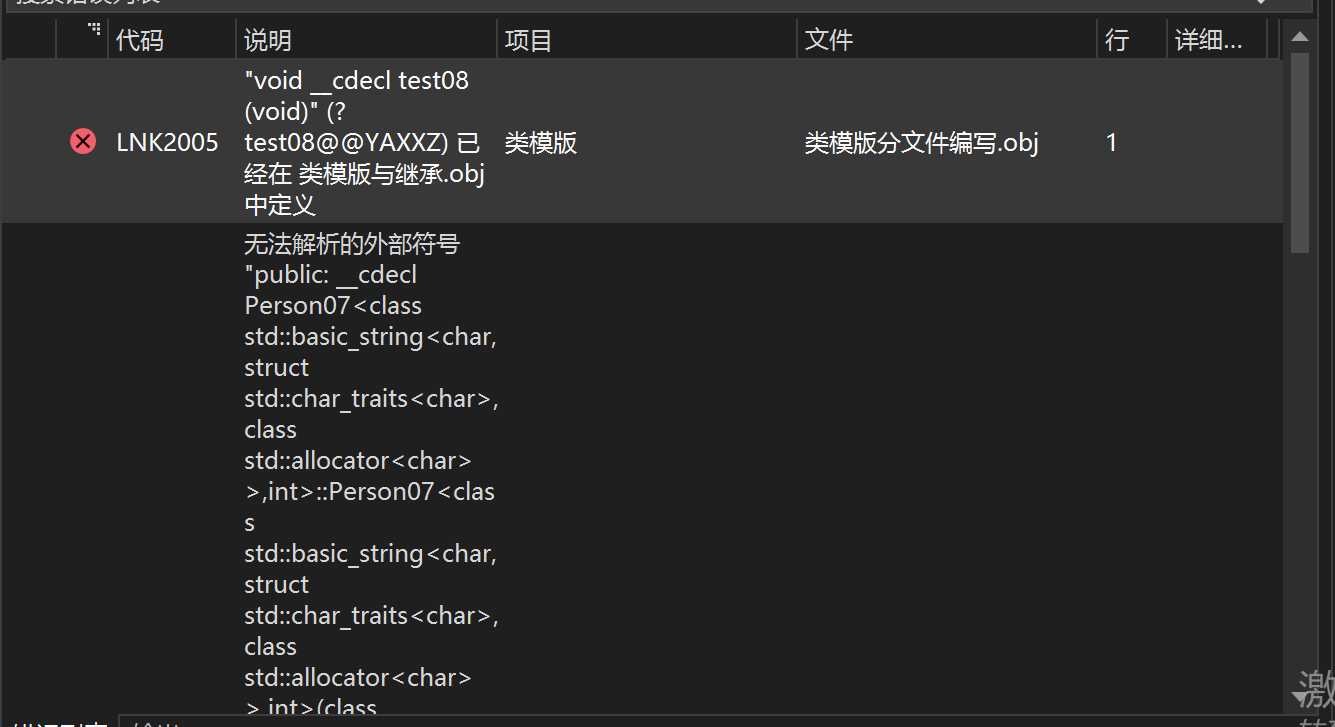
类模版分文件编写
问题:
- 类模版中成员函数创建时机在调用阶段,导致份文件编写时链接不到
解决:
- 解决方式1: 直接包含.cpp文件
- 解决方式2: 将声明和实现写到同一个文件, 并更改后缀名为
.hpp,.hpp是约定的名称,并不是强制
// Person07.h头文件代码
#pragma once
#include <iostream>
using namespace std;
#include <string>
template<class T1, class T2>
class Person07 {
public:
Person07(T1 name, T2 age);
void showPerson07();
public:
T1 m_Name;
T2 m_Age;
};
// Person07.cpp
#include "Person07.h"
template<class T1, class T2>
Person07<T1, T2>::Person07(T1 name, T2 age) {
this->m_Name = name;
this->m_Age = age;
}
template<class T1, class T2>
void Person07<T1, T2>::showPerson07() {
cout << "姓名:" << this->m_Name << " 年龄:" << this->m_Age << endl;
}
// 测试代码:
#include <iostream>
using namespace std;
#include "Person07.h"
void test08() {
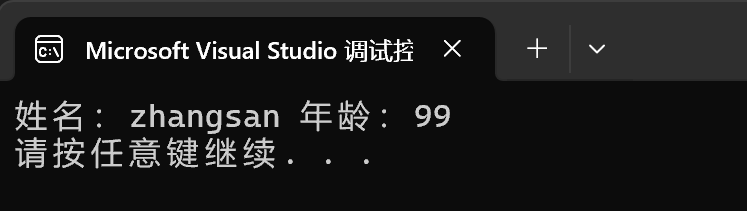
Person07<string, int> p("zhangsan", 99);
p.showPerson07();
}
int main() {
test08();
system("pause");
return 0;
}
运行结果报如下错误:
解决方案如下:
#include <iostream>
using namespace std;
//#include "Person07.h"

//第一种解决方式直接导入.cpp文件
#include "Person07.cpp"

void test10() {
	Person07<string, int> p("zhangsan", 99);

	p.showPerson07();
}

int main() {

	test10();

	system("pause");
	return 0;
}
运行结果:
第二种解决方案:
//Person07.hpp文件代码
//#include "Person07.h"
#include <iostream>
using namespace std;
#include<string>

template<class T1, class T2>
class Person07 {
public:
	Person07(T1 name, T2 age);
	void showPerson07();

public:
	T1 m_Name;
	T2 m_Age;
};

template<class T1, class T2>
Person07<T1, T2>::Person07(T1 name, T2 age) {
	this->m_Name = name;
	this->m_Age = age;
}


template<class T1, class T2>
void Person07<T1, T2>::showPerson07() {
	cout << "姓名:" << this->m_Name << " 年龄:" << this->m_Age << endl;
}

//测试代码:

#include <iostream>
using namespace std;
// 第二种解决方式,降.h和.cpp中的内容写到一起,将后缀名改为.hpp文件
#include "Person07.hpp"

void test10() {
	Person07<string, int> p("lisi", 88);

	p.showPerson07();
}

int main() {

	test10();

	system("pause");
	return 0;
}
总结:主流的解决方式是第二种, 将类模版和成员函数写到一起,并将后缀改名为.hpp
类模版与友元
学习目标:掌握类模版配合友元
全局函数类内实现 - 直接在类内申明友元即可
全局函数类外实现 - 需要提前让编译器知道全局函数的存在
#include <iostream>
using namespace std;
#include <string>

// 这段代码是提前让编译器知道Person类的存在
template<class T1, class T2>
class Person08;


// 类外实现全局函数做友元
template<class T1, class T2>
void printPerson08_02(Person08<T1, T2> p) {
	cout << "类外实现---姓名:" << p.m_Name << " 年龄:" << p.m_Age << endl;
}

// 通过全局函数,打印Person信息
template<class T1, class T2>
class Person08 {

	// 全局函数做友元,类内实现
	friend void printPerson08(Person08<T1, T2> p) {
		cout << "类内实现---姓名:" << p.m_Name << " 年龄:" << p.m_Age << endl;
	}

	// 全局函数做友元, 类外实现
	// 建一个<> 空模版的参数列表, 表示是一个模版函数, 不是一个普通的函数
	// 如果我们的全局函数是类外实现的话, 需要让编译器提前知道这个函数的存在,
	// 可以把全局函数的视线提前到类前面
	friend void printPerson08_02<>(Person08<T1, T2> p);

public:
	Person08(T1 name, T2 age) {
		this->m_Name = name;
		this->m_Age = age;
	}

private:
	T1 m_Name;
	T2 m_Age;
};

void test11() {
	Person08<string, int> p("zhangsan", 99);
	printPerson08(p);
}


void test12() {
	Person08<string, int> p("lisi", 22);
	printPerson08_02(p);
}


int main() {

	test11();
	test12();

	system("pause");
	return 0;
}
输出结果:
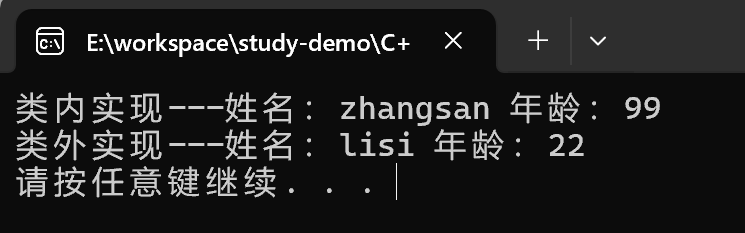
总结:建一全局函数做类内实现, 用法简单, 而且编译器可以直接识别
类模版案例
案例描述:实现一个通用的数组类,要求如下:
- 可以对内置数据类型以及自定义数据类型的数据进行存储
- 将数组中的数据存储到堆区
- 构造函数中可以传入数组的容量
- 提供对应的拷贝构造函数以及operator=防止浅拷贝问题
- 提供尾插法和尾删法对数组中的数据进行增加和删除
- 可以通过下标的方式访问数组中的元素
- 可以获取数组中当前元素个数和数组的容量
#pragma once
#include <iostream>
using namespace std;

template<class T>
class MyArray
{
public:
	// 构造函数
	MyArray(int capacity)
	{
		cout << "MyArray的构造函数被调用============" << endl;
		this->m_Capacity = capacity;
		this->m_Size = 0;
		this->pAddress = new T[this->m_Capacity];
	}

	// 拷贝构造函数
	MyArray(const MyArray& arr)
	{
		this->m_Capacity = arr.m_Capacity;
		this->m_Size = arr.m_Size;
		// 深拷贝
		this->pAddress = new T[arr.m_Capacity];
		// 拷贝数据
		for (int i = 0; i < this->m_Size; i++)
		{
			this->pAddress[i] = arr.pAddress[i];
		}
	}

	// 重载 operation= 防止浅拷贝, 如果还需要可以在
	MyArray& operator= (const MyArray & arr)
	{
		// 先判断原先的堆区是否有数据, 如果有先释放
		if (this->pAddress != NULL)
		{
			delete[] this->pAddress;
			this->pAddress = NULL;
			this->m_Capacity = 0;
			this->m_Size = 0;
		}

		// 深拷贝
		this->m_Capacity = arr.m_Capacity;
		this->m_Size = arr.m_Size;
		this->pAddress = new T[arr.m_Capacity];
		for (int i = 0; i < arr.m_Size; i++)
		{
			this->pAddress[i] = arr.pAddress[i];
		}

		return *this;  // 返回这个对象本身
	}

	// 尾插法
	void push(const T& val)
	{
		// 判断容量是否足够
		if (this->m_Capacity == this->m_Size)
		{
			return;
		}
		this->pAddress[this->m_Size]; // 在数组尾部插入数据
		this->m_Size++; // 更新数组大小
	}

	// 尾删法
	void pop()
	{
		// 直接让用户无法访问到最后一个元素,即为尾删, 逻辑删除
		if (this->m_Size == 0)
		{
			return;
		}

		this->m_Size--;
	}

	// 通过下标方式访问数组中的元素 arr[0] = 100
	T& operator[](int index) {
		if (index >= this->m_Size)
		{
			return;
		}
		return this->pAddress[index];
	}

	// 返回数组容量
	int getCapacity()
	{
		return this->m_Capacity;
	}

	// 返回数组大小
	int getSize()
	{
		return this->m_Size;
	}

	// 析构函数
	~MyArray()
	{
		cout << "MyArray的析构函数被调用======" << endl;
		if (this->pAddress != NULL)
		{
			delete[] this->pAddress;
			this->pAddress = NULL;
		}
	}

private:
	T* pAddress; // 指针指向堆区开辟的真实数组

	int m_Capacity; // 数组容量

	int m_Size; // 数组大小
};
STL初识
STL的基本概念
- STL(Standard Template Library标准模板库)
- STL 从广义上分为:容器(Container)算法(algorithm)迭代器(iterator)
- 容器和算法之间通过迭代器进行无缝衔接
- STL几乎所有的代码都采用了模版或者模版函数
STL六大组件
STL大体分为六大组件,分别是容器、算法、迭代器、仿函数、适配器(配接器)、空间配置器
- 容器: 各种数据结构,如vector、list、deque、set、map等,用来存放数据
- 算法: 各种常用的算法, 如sort、find、copy、for_each等
- 迭代器: 扮演了容器与算法之间的胶合剂。
- 仿函数:行为类似函数,可作为算法的某种策略
- 适配器: 一种用来修饰容器或者仿函数或迭代器接口的东西
- 空间适配器:负责空间的配置与管理。
STL中容器、算法、迭代器
STL容器就是将运用最广泛的一些数据结构实现出来
常用的数据结构: 数组、链表、树、栈、队列、集合、映射表等
这些容器分为序列式容器和关联式容器两种:
- 序列式容器:强调值的排序,序列式容器中的每个元素均有 固定的位置
- 关联式容器:二叉树结构,各个元素之间没有严格的物理上的顺序关系
算法:问题之解法也
有限的步骤,解决逻辑或数学上的问题,这一门学科我们叫做算法(Algorithms)
算法分为:质变算法和非质变算法。
- 质变算法: 是指运算过程中会更改区间的元素的内容,例如拷贝、替换、删除等
- 非质变算法: 是指运算过程中不会更改区间内的元素内容,例如查找、计数、遍历、寻找极值等等。
迭代器:容器和算法之间粘合剂
提供一种方法,便之能够依序寻访某个容器所含的各个元素,而又无需暴露该容器内部表示方式。
每个容器都有自己的专属的迭代器
迭代器使用非常类似于指针,初学阶段我们可以先理解迭代器为指针。
迭代器种类:

常用的容器中迭代器种类为双向迭代器,和随机访问迭代器。
容器算法迭代器初识
了解STL中容器、算法、迭代器概念之后,我们利用代码感受STL的魅力。
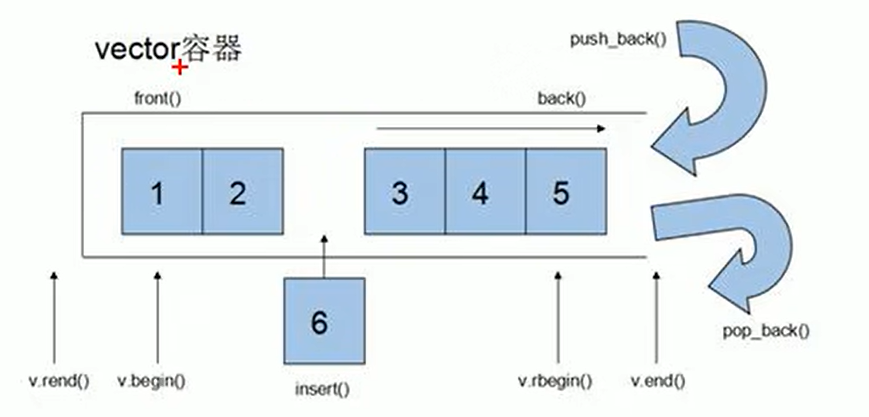
STL中最常用的容器为Vector,可以理解为数组, 下面我们将学习如何向这个容器中插入数据,并遍历这个容器。
Vector存放内置数据模型
容器: vector
算法:for_each
迭代器:vector<int>::iterator
#include <iostream>
using namespace std;
#include <vector>
#include <algorithm>
void myPrint(int val) {
cout << val;
}
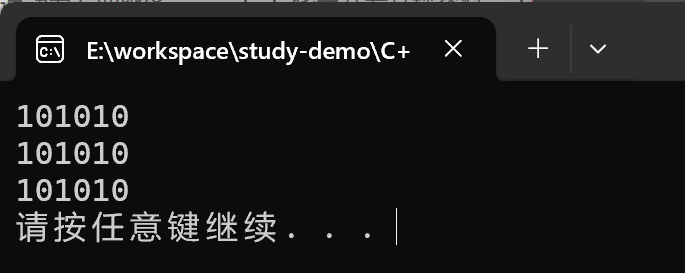
void test01() {
// 创建一个vector容器,数组
vector<int> v;
// 向容器中插入数据
v.push_back(10);
v.push_back(10);
v.push_back(10);
// 通过迭代器访问容器的数据
vector<int>::iterator itBegin = v.begin(); // 起始迭代器
vector<int>::iterator itEnd = v.end();// 结束迭代器,指向容器中最后一个元素的下一个位置
// 第一种遍历方式
while (itBegin != itEnd)
{
cout << *itBegin ;
itBegin++;
}
cout << endl;
// 第二种遍历方式
for (vector<int>::iterator it = v.begin(); it != v.end(); it++)
{
cout << *it;
}
cout << endl;
// 第三中遍历方式
for_each(v.begin(), v.end(), myPrint);
cout << endl;
}
int main() {
test01();
system("pause");
return 0;
}
输出结果:
Vector存放自定义的数据类型
#include <iostream>
using namespace std;
#include <vector>
#include <string>
class Person
{
public:
Person(string name, int age)
{
this->name = name;
this->age = age;
}
public:
string name;
int age;
};
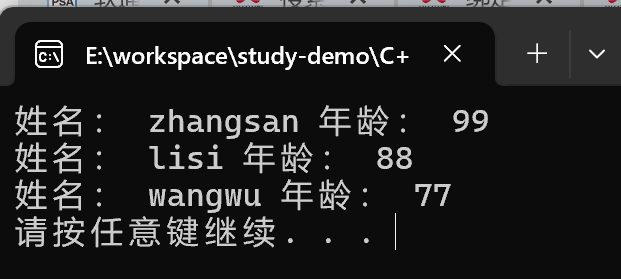
void test02()
{
vector<Person> v;
Person p("zhangsan", 99);
Person p1("lisi", 88);
Person p2("wangwu", 77);
v.push_back(p);
v.push_back(p1);
v.push_back(p2);
// 遍历
for (vector<Person>::iterator it = v.begin(); it != v.end(); it++)
{
cout << "姓名: " << it->name << " 年龄: " << it->age << endl;
}
}
int main() {
test02();
system("pause");
return 0;
}
输出结果:
Vector容器嵌套容器
#include <iostream>
using namespace std;
#include <vector>
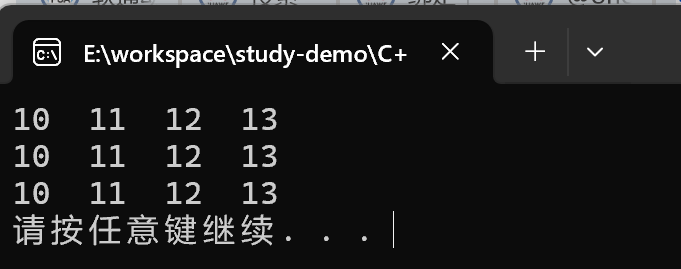
void test03() {
vector<vector<int>> v;
for (int i = 0; i < 3; i++)
{
vector<int> v1;
for (int k = 0; k < 4; k++)
{
v1.push_back(10 + k);
}
v.push_back(v1);
}
// 遍历
for (vector<vector<int>>::iterator it = v.begin(); it != v.end(); it++)
{
for (vector<int>::iterator it_inner = (*it).begin(); it_inner != (*it).end(); it_inner++)
{
cout << *it_inner << " ";
}
cout << endl;
}
}
int main() {
test03();
system("pause");
return 0;
}
输出结果:
STL - 常用容器
string容器
string的基本概念
本质: string是C++风格的字符串,而string本质上是一个类
*string和char 的区别:
- char* 是一个指针
- string是一个类, 内部封装了char*,管理这个字符串,是一个char*型的容器
特点:
string类内部封装了很多成员方法
例如: 查找find,拷贝copy、删除delete、替换replace、插入insert
string管理char*所分配的内存,不用担心复制越界和取值越界等,由类内部进行负责。
string构造函数
#include <iostream>
using namespace std;
#include <string>
// string的构造函数
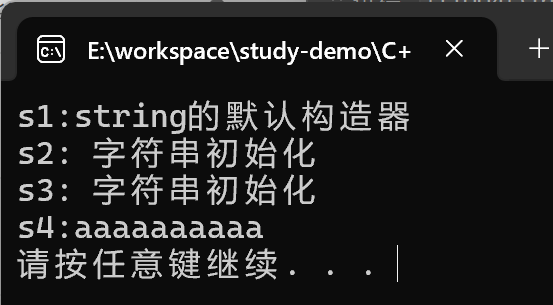
void test01() {
// string()创建一个空的字符串 默认构造器
string s1;
s1 = "string的默认构造器";
cout << "s1:" << s1 << endl;
// 直接使用字符串初始化 string(const char* s)
const char* str = "字符串初始化";
string s2(str);
cout << "s2: " << s2 << endl;
//string(const string& str) 使用一个string对象初始化另外一个string对象
string s3(s2);
cout << "s3: " << s3 << endl;
// string(int n, char c) 使用n个字符c初始化
string s4(10, 'a');
cout << "s4:" << s4 << endl;
}
int main()
{
test01();
system("pause");
return 0;
}
输出结果:
总结: string的多构造方式没有可比性,灵活使用即可
string赋值操作
功能描述:
- 给string字符串进行赋值
赋值的函数原型:
string& operator=(const char* s);//char*类型字符串 赋值给当前的字符串string& operator=(const string &s);//把字符串s赋给当前的字符串string& operator=(char c);//字符赋值给当前的字符串string& assign(const char *s);//把字符串s赋给当前的字符串string& assign(const char *s, int n);//把字符串s的前n个字符赋给当前的字符串string& assign(const string &s);//把字符串s赋给当前字符串string& assign(int n, char c);//用n个字符c赋给当前字符串
部分方法示例:
#include <iostream>
using namespace std;
#include <string>
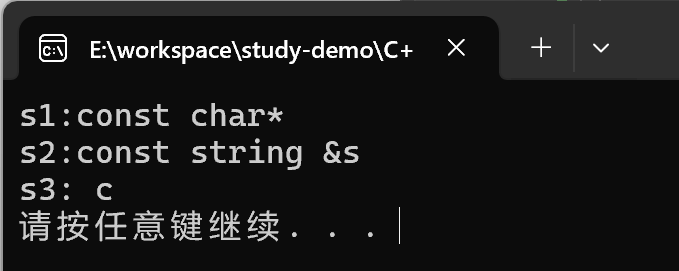
void test02() {
string s1;
s1 = "const char*";
cout << "s1:" << s1 << endl;
string s2;
string test("const string &s");
s2 = test;
cout << "s2:" << s2 << endl;
char c = 'c';
string s3;
s3 = c;
cout << "s3: " << s3 << endl;
}
int main()
{
test02();
system("pause");
return 0;
}
输出结果:
总结:string的赋值方式很多, operator=这种方式是比较实用
string字符串拼接
功能描述:
- 实现在字符串末尾拼接字符串
函数原型:
string& operator+=(const char* str);//重载+=操作符string& operator+=(const char c);//重载+=操作符string& operator+=(const string& str);//重载+=操作符string& append(const char *s);//把字符串s连接到当前字符串结尾string& append(const char *s, int n);//把字符串s的前n个字符连接到当前字符串结尾string& append(const string &s);//同operator+=(const string& str)string& append(const string &s, int pos, int n);//字符串s中从pos开始的n个字符连接到字符串结尾
#include <iostream>
using namespace std;
#include <string>
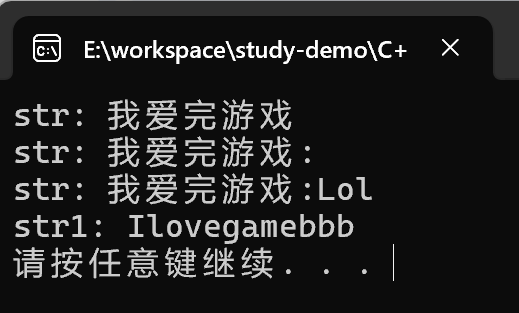
void test03() {
string str = "我";
str += "爱完游戏";
cout << "str: " << str << endl;
str += ':';
cout << "str: " << str << endl;
string s2 = "Lol";
str += s2;
cout << "str: " << str << endl;
string str1 = "I";
str1.append("love");
str1.append("game abcde", 4);
string str2 = "aaaabbbccc";
str1.append(str2, 4, 3);
cout << "str1: " << str1 << endl;
}
int main()
{
test03();
system("pause");
return 0;
}
输出结果:
string查找和替换
功能描述:
- 查找:查找指定字符串是否存在
- 替换:在指定的位置替换字符串
函数原型:
int find(const string& str, int pos = 0) const;//查找str第一次出现位置,从pos开始查找int find(const char* s, int pos = 0) const;//查找s第一次出现位置,从pos开始查找int find(const char* s, int pos, int n) const;//从pos位置查找s的前n个字符第一次位置int find(const char c, int pos = 0) const;//查找字符c第一次出现位置int rfind(const string& str, int pos = npos) const;//查找str最后一次位置,从pos开始查找int rfind(const char* s, int pos = npos) const;//查找s最后一次出现位置,从pos开始查找int rfind(const char* s, int pos, int n) const;//从pos查找s的前n个字符最后一次位置int rfind(const char c, int pos = 0) const;//查找字符c最后一次出现位置string& replace(int pos, int n, const string& str);//替换从pos开始n个字符为字符串strstring& replace(int pos, int n,const char* s);//替换从pos开始的n个字符为字符串s
#include <iostream>
using namespace std;
#include <string>
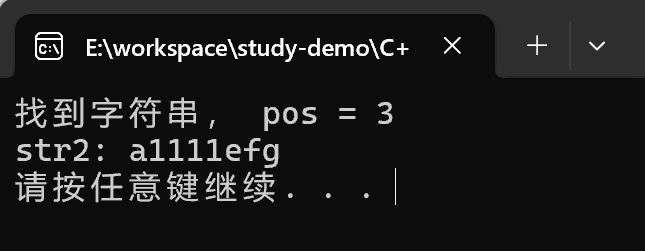
void test04()
{
// 查找
string str1 = "abcdefg";
int pos = str1.find("de");
if (pos == -1)
{
cout << "未能找到字符串" << endl;
}else
{
cout << "找到字符串, pos = " << pos << endl;
}
// 替换
string str2 = "abcdefg";
str2.replace(1, 3, "1111");
cout << "str2: " << str2 << endl;
}
int main()
{
test04();
system("pause");
return 0;
}
输出结果:
总结:
- find查找是从左往右,rfind是从右往左
- find找到字符串后返回查找的第一个字符位置,找不到返回-1
- replace在替换时,要指定从哪个位置起,多少个字符,替换成什么样的字符串
string字符串比较
功能描述:字符串之间的比较
比较方式:
- 字符串是按照字符的ASCII码进行对比的
- = 返回0
-
返回1
- < 返回 -1
函数原型
int compare(const string &s) const;//与字符串s比较int compare(const char *s) const;//与字符串s比较
#include <iostream>
using namespace std;
#include <string>
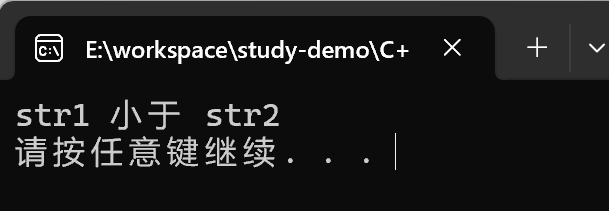
void test05() {
string str1 = "heelo";
string str2 = "xello";
if (str1.compare(str2) == 0)
{
cout << "str1 等于 str2" << endl;
}
else if (str1.compare(str2) > 0)
{
cout << "str1 大于 str2" << endl;
}
else
{
cout << "str1 小于 str2" << endl;
}
}
int main()
{
test05();
system("pause");
return 0;
}
输出结果:
总结: 字符串对比主要是用于比较两个字符串是否相等,判断谁大谁小的意义不是很大。
string字符串存取
string中单个字符存取方式有两种
char& operator[] (int n);:通过[]方式获取字符串char& at(int n);: 通过at方式获取字符
#include <iostream>
using namespace std;
#include <string>
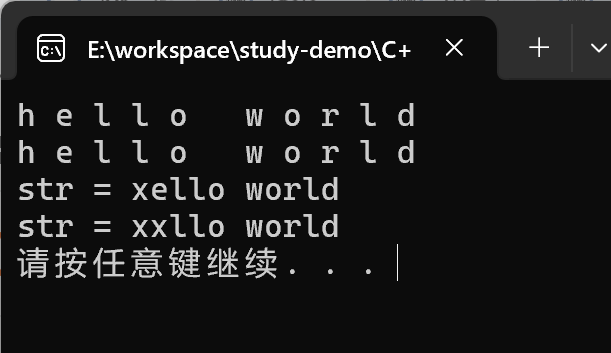
void test06()
{
string str = "hello world";
for (int i = 0; i < str.size(); i++)
{
cout << str[i] << " ";
}
cout << endl;
for (int i = 0; i < str.size(); i++)
{
cout << str.at(i) << " ";
}
cout << endl;
// 修改单个字符串
str[0] = 'x';
cout << "str = " << str << endl;
str.at(1) = 'x';
cout << "str = " << str << endl;
}
int main()
{
test06();
system("pause");
return 0;
}
输出结果:
总结:string字符串中单个字符存取有两种方式, 利用[]或at
string插入和删除
功能描述:
- 对string字符串进行插入和删除字符操作
函数原型:
string& insert(int pos, const char* s);//插入字符串string& insert(int pos, const string& str);//插入字符串string& insert(int pos, int n, char c);//在指定位置插入n个字符cstring& erase(int pos, int n = npos);//删除从Pos开始的n个字符
#include <iostream>
using namespace std;
#include <string>
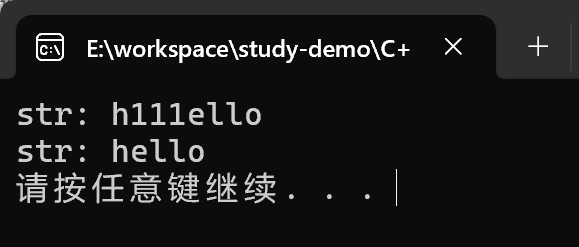
void test07()
{
string str = "hello";
str.insert(1, "111");
cout << "str: " << str << endl;
// 删除
str.erase(1, 3);
cout << "str: " << str << endl;
}
int main()
{
test07();
system("pause");
return 0;
}
输出结果:
总结: 插入和删除的起始下标都是0开始
string子串
功能描述:
- 从字符串中获取想要的子串
函数原型:
string substr(int pos = 0, int n = npos) const;//返回由pos开始的n个字符组成的字符串
#include <iostream>
using namespace std;
#include <string>
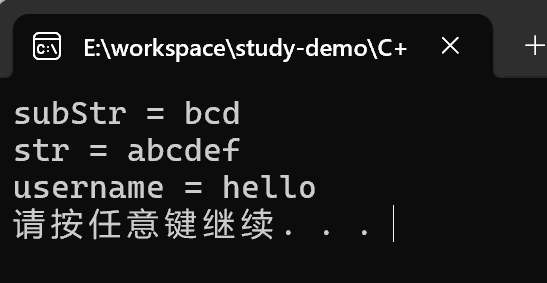
void test08()
{
string str = "abcdef";
string subStr = str.substr(1, 3);
cout << "subStr = " << subStr << endl;
cout << "str = " << str << endl;
string email = "hello@sina.com";
int pos = email.find("@");
string username = email.substr(0, pos);
cout << "username = " << username << endl;
}
int main()
{
test08();
system("pause");
return 0;
}
输出结果:
总结: 灵活的运用求子串功能, 可以在实际开发中获取有效的信息
vector容器
vector的基本概念
功能:
- vector数据结构和数组非常相似,也称为单端数组
vector与普通数组区别:
- 不同之处在于数组是静态空间,而vector可以动态扩展
动态扩展:
- 并不是在原空间之后续接新空间,而是找更大的内存空间,然后将原数据拷贝新空间,释放原空间
- vector容器的迭代器是支持随机访问的迭代器。
vector构造函数
功能描述:
- 创建vector容器
函数原型:
vector<T> v;//采用模板实现类实现,默认构造函数vector(v.begin(), v.end());//将v[begin(), end())区间中的元素拷贝给本身。vector(n, elem);//构造函数将n个elem拷贝给本身。vector(const vector &vec);//拷贝构造函数。
#include <iostream>
using namespace std;
#include<vector>
void printVector(const vector<int> &v)
{
for (vector<int>::const_iterator it = v.begin(); it != v.end(); it++)
{
cout << *it << " ";
}
cout << endl;
}
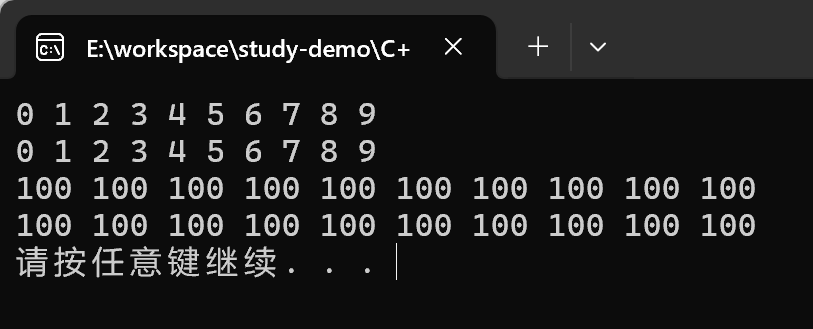
void test01()
{
// 默认构造函数
vector<int> v;
for (int i = 0; i < 10; i++)
{
v.push_back(i);
}
printVector(v);
// 通过区间方式进行构造
vector<int> v2(v.begin(), v.end());
printVector(v2);
//n个elem方式构造
vector<int> v3(10, 100);
printVector(v3);
// 拷贝构造
vector<int> v4(v3);
printVector(v4);
}
int main()
{
test01();
system("pause");
return 0;
}
输出结果:
vector复制操作
功能描述:
- 给vector容器进行赋值
函数原型:
vector& operator=(const vector &vec);//重载等号操作符assign(beg, end);//将[beg, end)区间中的数据拷贝赋值给本身。assign(n, elem);//将n个elem拷贝赋值给本身。
#include <iostream>
using namespace std;
#include <vector>
void printVector02(const vector<int>& v)
{
for (vector<int>::const_iterator it = v.begin(); it != v.end(); it++)
{
cout << *it << " ";
}
cout << endl;
}
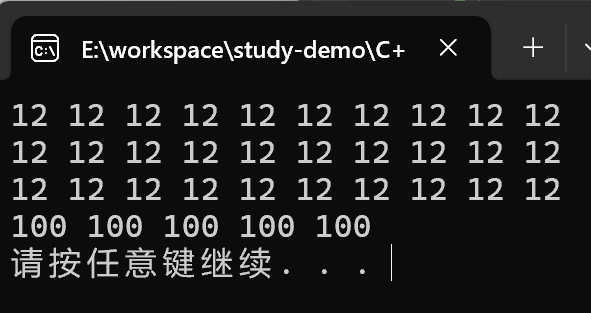
void test02()
{
vector<int> v(10, 12);
printVector02(v);
vector<int> v2;
v2 = v;
printVector02(v2);
vector<int> v3;
v3.assign(v.begin(), v.end());
printVector02(v3);
vector<int> v4;
v4.assign(5, 100);
printVector02(v4);
}
int main()
{
test02();
system("pause");
return 0;
}
输出结果:
vector容量和大小
功能描述:
- 对vector容器的容量和大小操作
函数原型:
empty();//判断容器是否为空capacity();//容器的容量size();//返回容器中元素的个数resize(int num);//重新指定容器的长度为num,若容器变长,则以默认值填充新位置。
//如果容器变短,则末尾超出容器长度的元素被删除。resize(int num, elem);//重新指定容器的长度为num,若容器变长,则以elem值填充新位置。
//如果容器变短,则末尾超出容器长度的元素被删除
#include <iostream>
using namespace std;
#include <vector>
void printVector03(const vector<int>& v)
{
for (vector<int>::const_iterator it = v.begin(); it != v.end(); it++)
{
cout << *it << " ";
}
cout << endl;
}
// vector容器的容量和大小操作
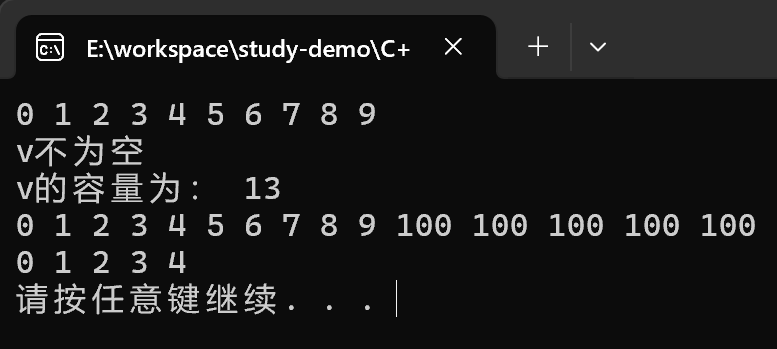
void test03()
{
vector<int> v;
for (int i = 0; i < 10; i++)
{
v.push_back(i);
}
printVector03(v);
if (v.empty())
{
// 为真, 代表容器为空
cout << "v为空" << endl;
}
else
{
cout << "v不为空" << endl;
cout << "v的容量为: " << v.capacity() << endl;
}
// 重新制定大小
v.resize(15, 100);// 利用重载版本,可以制定默认填充值, 参数2
printVector03(v);// 如果重新制定比原来长了, 默认用0填充新的位置
v.resize(5);
printVector03(v);// 如果重新制定的比原来的短了, 超出的那部分会删除
}
int main()
{
test03();
system("pause");
return 0;
}
输出结果:
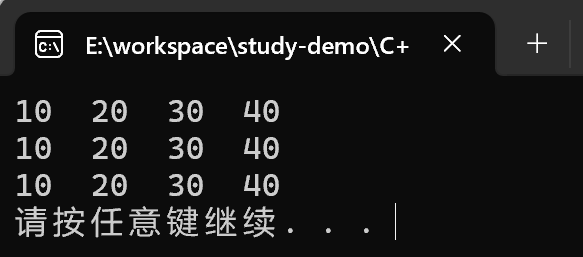
vector的插入和删除
功能描述:
- 对vector容器进行插入、删除操作
函数原型:
push_back(ele);//尾部插入元素elepop_back();//删除最后一个元素insert(const_iterator pos, ele);//迭代器指向位置pos插入元素eleinsert(const_iterator pos, int count, ele);//迭代器指向位置pos插入count个元素eleerase(const_iterator pos);//删除迭代器指向的元素erase(const_iterator start, const_iterator end);//删除迭代器从start到end之间的元素clear();//删除容器中所有元素
#include <iostream>
using namespace std;
#include <vector>
void printVector04(const vector<int>& v)
{
for (vector<int>::const_iterator it = v.begin(); it != v.end(); it++)
{
cout << *it << " ";
}
cout << endl;
}
void test04()
{
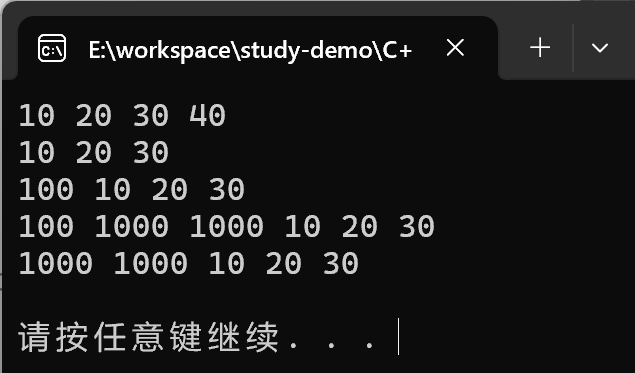
vector<int> v;
// 尾插法
v.push_back(10);
v.push_back(20);
v.push_back(30);
v.push_back(40);
printVector04(v);
//尾删
v.pop_back();
printVector04(v);
// 插入 第一个参数是迭代器
v.insert(v.begin(), 100);
printVector04(v);
v.insert(v.begin() + 1, 2, 1000);
printVector04(v);
// 删除也是迭代器
v.erase(v.begin());
printVector04(v);
v.erase(v.begin(), v.end());
printVector04(v);
}
int main()
{
test04();
system("pause");
return 0;
}
输出结果:
vector数据存储
功能描述:
- 对vector中的数据的存取操作
函数原型:
at(int idx);//返回索引idx所指的数据operator[];//返回索引idx所指的数据front();//返回容器中第一个数据元素back();//返回容器中最后一个数据元素
#include <iostream>
using namespace std;
#include <vector>
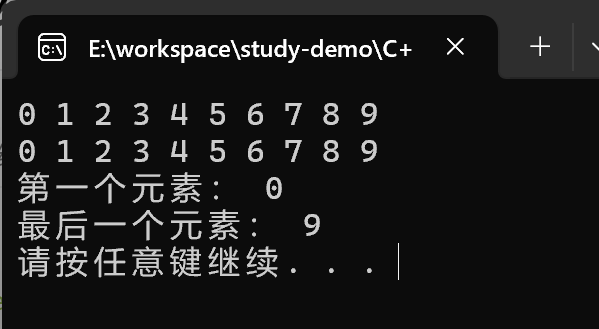
void test05()
{
vector<int> v;
for (int i = 0; i < 10; i++)
{
v.push_back(i);
}
// 利用[]方式访问数组元素
for (int i = 0; i < v.size(); i++)
{
cout << v[i] << " ";
}
cout << endl;
// 利用at方式访问元素
for (int i = 0; i < v.size(); i++)
{
cout << v.at(i) << " ";
}
cout << endl;
cout << "第一个元素: " << v.front() << endl;
cout << "最后一个元素: " << v.back() << endl;
}
int main()
{
test05();
system("pause");
return 0;
}
输出结果:
vector互换容器
功能描述: 实现两个容器元素进行互换
函数原型:
- swap(vec); : 将vec与本身的元素互换
#include <iostream>
using namespace std;
#include <vector>
void printVector06(const vector<int> &v)
{
for (vector<int>::const_iterator it = v.begin(); it != v.end(); it++)
{
cout << *it << " ";
}
cout << endl;
}
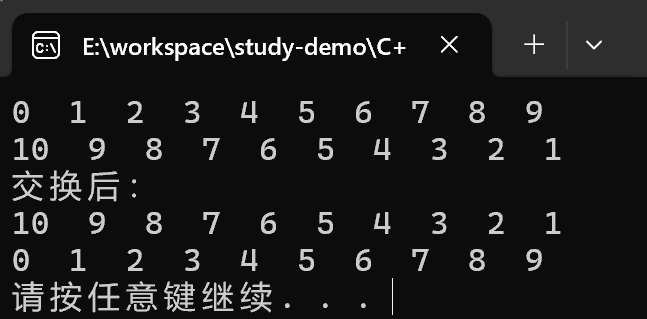
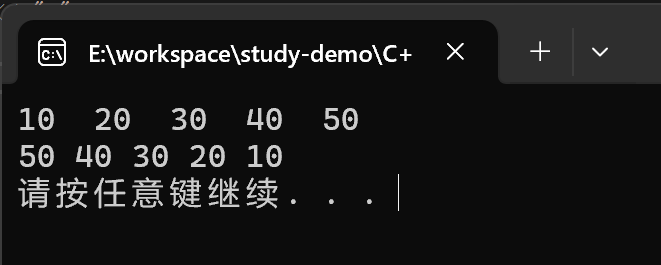
void test06()
{
vector<int> v;
for (int i = 0; i < 10; i++)
{
v.push_back(i);
}
printVector06(v);
vector<int> v2;
for (int i = 10; i > 0; i--)
{
v2.push_back(i);
}
printVector06(v2);
cout << "交换后:" << endl;
v.swap(v2);
printVector06(v);
printVector06(v2);
}
int main()
{
test06();
system("pause");
return 0;
}
输出结果:
这个交换函数也可以实现收缩空间的目的,使用匿名函数 + 拷贝构造函数
void test06_02()
{
	vector<int> v;
	for (int i = 0; i < 100000; i++)
	{
		v.push_back(i);
	}

	cout << "v的容量为:" << v.capacity() << endl;
	cout << "v的大小为:" << v.size() << endl;

	v.resize(3);

	cout << "v的容量为:" << v.capacity() << endl;
	cout << "v的大小为:" << v.size() << endl;

	// 收缩内存
	vector<int>(v).swap(v); // 匿名对象


	cout << "v的容量为:" << v.capacity() << endl;
	cout << "v的大小为:" << v.size() << endl;
}
输出结果:

总结:swap可以使两个容器互换, 可以达到实现的收缩内存效果。
vector预留空间
功能描述:
- 减少vector在动态扩展容量时的扩展次数
函数原型:
reserve(int len);//容器预留len个元素长度,预留位置不初始化,元素不可访问。
#include <iostream>
using namespace std;
#include<vector>
void test07()
{
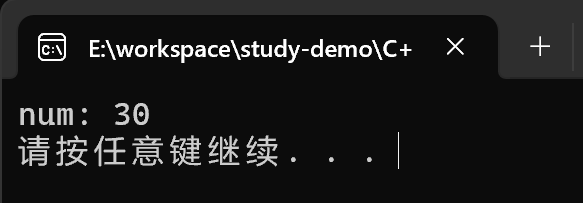
vector<int> v;
// 预留空间
v.reserve(100000);
int num = 0;
int* p = NULL;
for (int i = 0; i < 100000; i++)
{
v.push_back(i);
if (p != &v[0])
{
p = &v[0];
num++;
}
}
cout << "num: " << num << endl;
}
int main()
{
test07();
system("pause");
return 0;
}
没有提前分配空间打印结果:
提前分配好空间:v.reserve(100000):
总结:如果数量较大,可以一开始利用reserve预留空间
deque容器
deque容器的基本概念
功能:
- 双端数组,可以对头端进行插入删除操作
deque与vector区别:
- vector对于头部的插入删除效率低,数据量越大,效率越低
- deque相对而言,对头部的插入删除速度回比vector快
- vector访问元素时的速度会比deque快,这和两者内部实现有关

deque内部工作原理:
- deque内部有个中空器,维护每段缓冲区的内容,缓冲区中存放真实数据
- 中空器维护每个缓冲区的地址,使得使用deque时像一片连续的空间
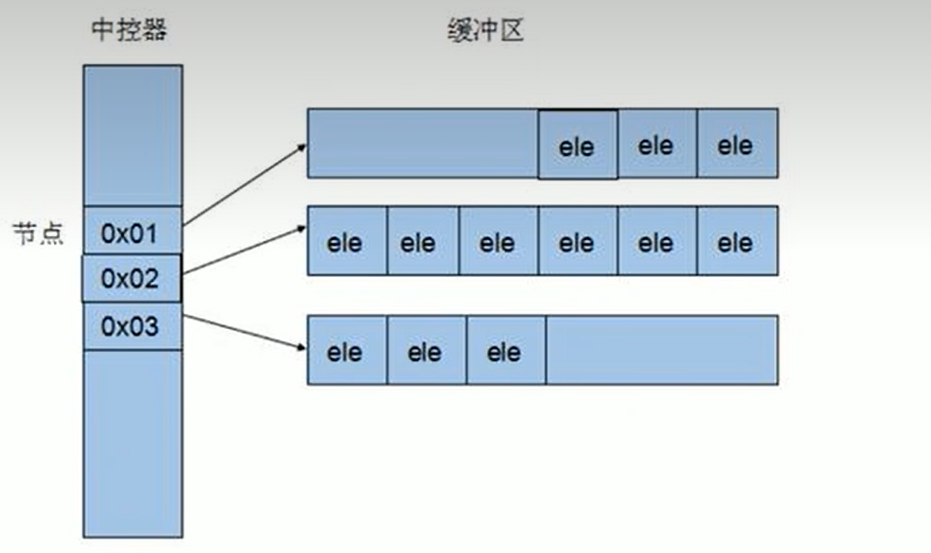
注意: deque容器的迭代器也是支持随机访问的
deque构造函数
功能描述:
- deque容器构造
函数原型:
deque<T> deqT;//默认构造形式deque(beg, end);//构造函数将[beg, end)区间中的元素拷贝给本身。deque(n, elem);//构造函数将n个elem拷贝给本身。deque(const deque &deq);//拷贝构造函数
#include <iostream>
using namespace std;
#include <deque>

// 如果闲置传入的deque是只读状态, 那么便利的迭代器 也需要改变成对应的cons_iterator
void printDeque(const deque<int>& d)
{
	for (deque<int>::const_iterator it = d.begin(); it != d.end(); it++)
	{
		cout << *it << "  ";
	}
	cout << endl;
}

void test01()
{
	deque<int> d;
	for (int i = 0; i < 10; i++)
	{
		d.push_back(i);
	}
	printDeque(d);

	deque<int> d2(d.begin(), d.end());
	printDeque(d2);


	deque<int> d3(10, 100);
	printDeque(d3);

	deque<int>d4(d3);
	printDeque(d4);
}

int main()
{
	test01();
	system("pause");
	return 0;
}
输出结果:
deque复制操作
功能描述:
- 给deque容器进行赋值
函数原型:
deque& operator=(const deque &deq);//重载等号操作符assign(beg, end);//将[beg, end)区间中的数据拷贝赋值给本身。assign(n, elem);//将n个elem拷贝赋值给本身。
#include <iostream>
using namespace std;
#include <deque>

void printDeque02(const deque<int>& d)
{
	for (deque<int>::const_iterator it = d.begin(); it != d.end(); it++)
	{
		cout << *it << "  ";
	}
	cout << endl;
}

void test02()
{
	deque<int>d;
	for (int i = 0; i < 10; i++)
	{
		d.push_back(i);
	}

	printDeque02(d);

	deque<int> d2;
	d2 = d;
	printDeque02(d2);

	deque<int> d3;
	d3.assign(d2.begin(), d2.end());
	printDeque02(d3);

	deque<int> d4;
	d4.assign(10, 123);
	printDeque02(d4);

}

int main()
{
	test02();
	system("pause");
	return 0;
}
输出结果:
deque大小操作
功能描述:
- 对deque容器的大小进行操作
函数原型:
deque.empty();//判断容器是否为空deque.size();//返回容器中元素的个数deque.resize(num);//重新指定容器的长度为num,若容器变长,则以默认值填充新位置。
//如果容器变短,则末尾超出容器长度的元素被删除。deque.resize(num, elem);//重新指定容器的长度为num,若容器变长,则以elem值填充新位置。
//如果容器变短,则末尾超出容器长度的元素被删除。
#include <iostream>
using namespace std;
#include <deque>
void printDeque03(const deque<int>& d)
{
for (deque<int>::const_iterator it = d.begin(); it != d.end(); it++)
{
cout << *it << " ";
}
cout << endl;
}
void test03()
{
deque<int> d;
for (int i = 0; i < 10; i++)
{
d.push_back(i);
}
printDeque03(d);
if (d.empty())
{
cout << "deque容器为空 为空" << endl;
}
else
{
cout << "deque容器不为空" << endl;
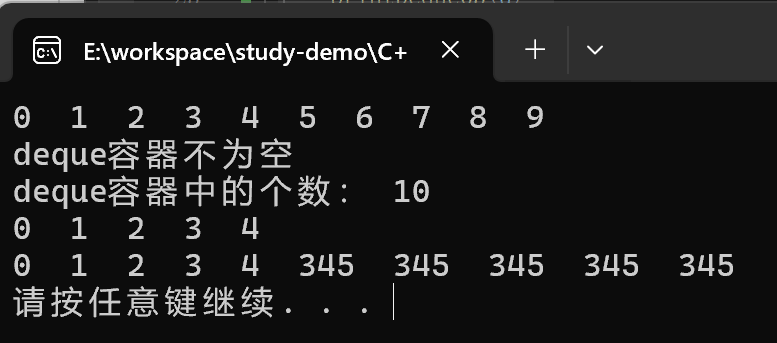
cout << "deque容器中的个数: " << d.size() << endl;
}
d.resize(5);
printDeque03(d);
d.resize(10, 345);
printDeque03(d);
}
int main()
{
test03();
system("pause");
return 0;
}
输出结果:
deque插入和删除
功能描述:
- 向deque容器中插入和删除数据
函数原型:
两端插入操作:
push_back(elem);//在容器尾部添加一个数据push_front(elem);//在容器头部插入一个数据pop_back();//删除容器最后一个数据pop_front();//删除容器第一个数据
指定位置操作:
insert(pos,elem);//在pos位置插入一个elem元素的拷贝,返回新数据的位置。insert(pos,n,elem);//在pos位置插入n个elem数据,无返回值。insert(pos,beg,end);//在pos位置插入[beg,end)区间的数据,无返回值。clear();//清空容器的所有数据erase(beg,end);//删除[beg,end)区间的数据,返回下一个数据的位置。erase(pos);//删除pos位置的数据,返回下一个数据的位置。
#include<iostream>
using namespace std;
#include<deque>
void printDeque04(const deque<int>& d)
{
for (deque<int>::const_iterator it = d.begin(); it != d.end(); it++)
{
cout << *it << " ";
}
cout << endl;
}
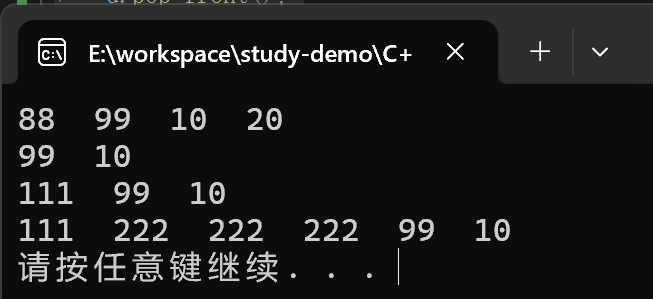
void test04()
{
deque<int> d;
d.push_back(10);
d.push_back(20);
d.push_front(99);
d.push_front(88);
printDeque04(d);
d.pop_back();
d.pop_front();
printDeque04(d);
d.insert(d.begin(), 111);
printDeque04(d);
d.insert(d.begin() + 1, 3, 222);
printDeque04(d);
}
int main()
{
test04();
system("pause");
return 0;
}
输出结果:
deque数据存储
功能描述:
- 对deque中的数据的存取操作
函数原型:
at(int idx);//返回索引idx所指的数据operator[];//返回索引idx所指的数据front();//返回容器中第一个数据元素back();//返回容器中最后一个数据元素
#include <iostream>
using namespace std;
#include<deque>
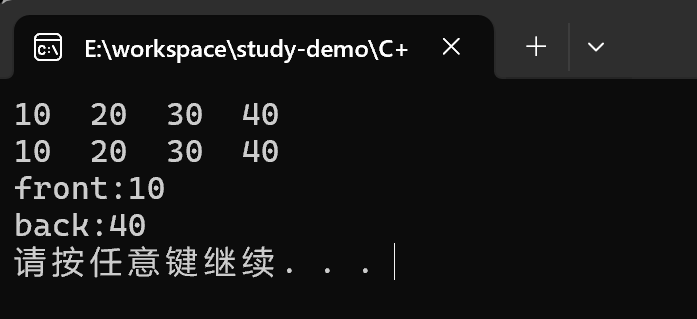
void test05()
{
deque<int> d;
d.push_back(10);
d.push_back(20);
d.push_back(30);
d.push_back(40);
for (int i = 0; i < d.size(); i++)
{
cout << d[i] << " ";
}
cout << endl;
for (int i = 0; i < d.size(); i++)
{
cout << d.at(i) << " ";
}
cout << endl;
cout << "front:" << d.front() << endl;
cout << "back:" << d.back() << endl;
}
int main()
{
test05();
system("pause");
return 0;
}
输出结果:
总结:
- 除了用迭代器获取deque容器中元素,
[]和at也可以 - front返回容器第一个元素
- back返回容器最后一个元素
deque排序
功能描述:
- 利用算法实现对deque容器进行排序
算法:
sort(iterator beg, iterator end)//对beg和end区间内元素进行排序
#include <iostream>
using namespace std;
#include <deque>
#include <random>
#include <algorithm>
void printDeque06(const deque<int>& d)
{
for (deque<int>::const_iterator it = d.begin(); it != d.end(); it++)
{
cout << *it << " ";
}
cout << endl;
}
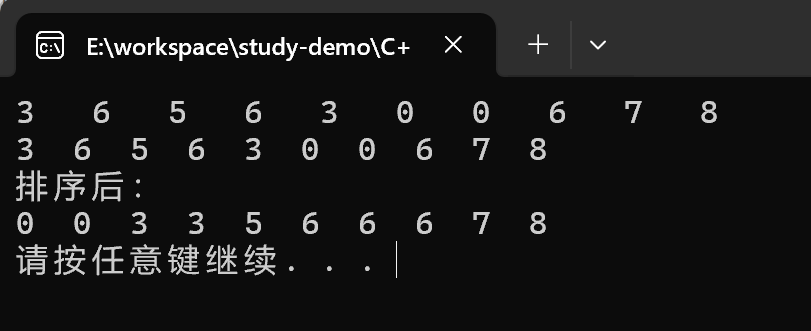
void test06()
{
deque<int> d;
for (int i = 0; i < 10; i++)
{
std::random_device rd;
std::mt19937 gen(rd());
std::uniform_real_distribution<> dis(0.0, 1.0);
int random_num = dis(gen) * 10;
cout << random_num << " ";
d.push_back(random_num);
}
cout << endl;
printDeque06(d);
// 排序 默认排序规则, 从小到大 升序
// 对于支持随机访问的迭代器的容器, 都可以利用sort算法直接对其进行排序
// vector容器也可以利用sort进行排序
sort(d.begin(), d.end());
cout << "排序后:" << endl;
printDeque06(d);
}
int main()
{
test06();
system("pause");
return 0;
}
输出结果:
总结:sort算法非常实用, 使用时包含头文件algorithm即可
Stack
Stack基本概念
概念: stack是一种先进后出的数据结构, 它只有一个出口
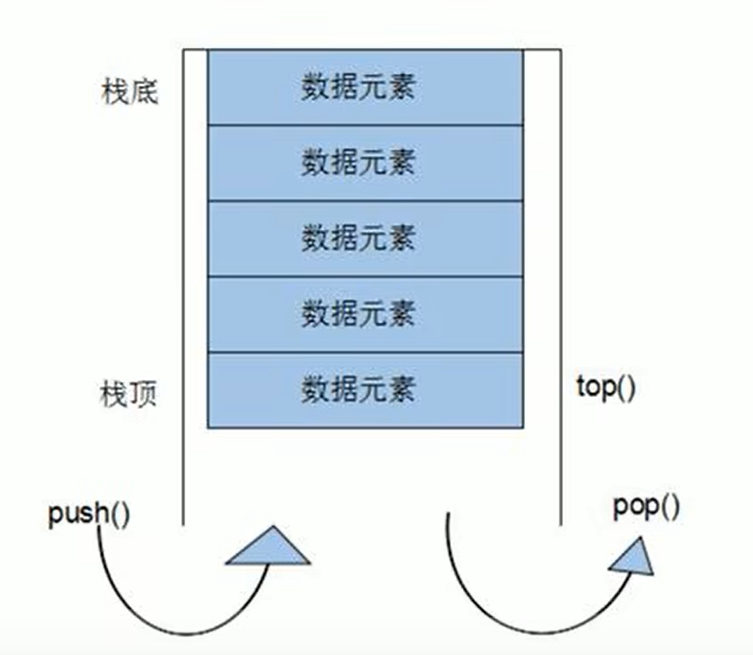
栈中只有顶端的元素才可以被外界使用, 因此栈不允许有遍历行为
- 栈中进入数据行为 — 入栈
push - 栈中弹出数据行为 —出栈
pop
Stack常用接口
功能描述:栈容器常用的对外接口
构造函数:
stack<T> stk;//stack采用模板类实现,stack对象的默认构造形式stack(const stack &stk);//拷贝构造函数
赋值操作:
stack& operator=(const stack &stk);//重载等号操作符
数据存取:
push(elem);//向栈顶添加元素pop();//从栈顶移除第一个元素top();//返回栈顶元素
大小操作:
empty();//判断堆栈是否为空size();//返回栈的大小
#include <iostream>
using namespace std;
#include <stack>
void test01()
{
stack<int> s;
s.push(10);
s.push(20);
s.push(30);
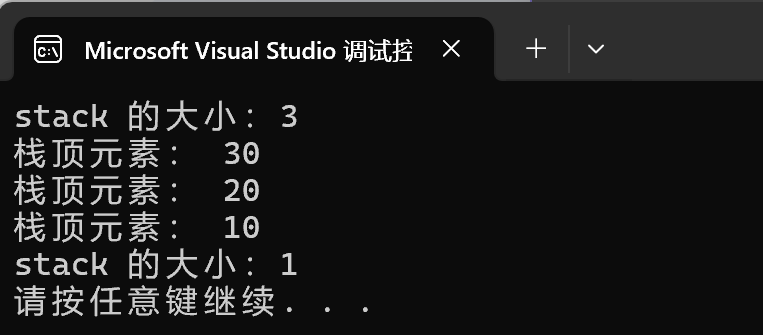
cout << "stack 的大小:" << s.size() << endl;
cout << "栈顶元素: " << s.top() << endl;
s.pop();
cout << "栈顶元素: " << s.top() << endl;
s.pop();
cout << "栈顶元素: " << s.top() << endl;
cout << "stack 的大小:" << s.size() << endl;
}
int main()
{
test01();
system("pause");
return 0;
}
输出结果:
queue容器
queue的基本概念
概念: Queue是一种先进先出的数据结构,它有两个出口
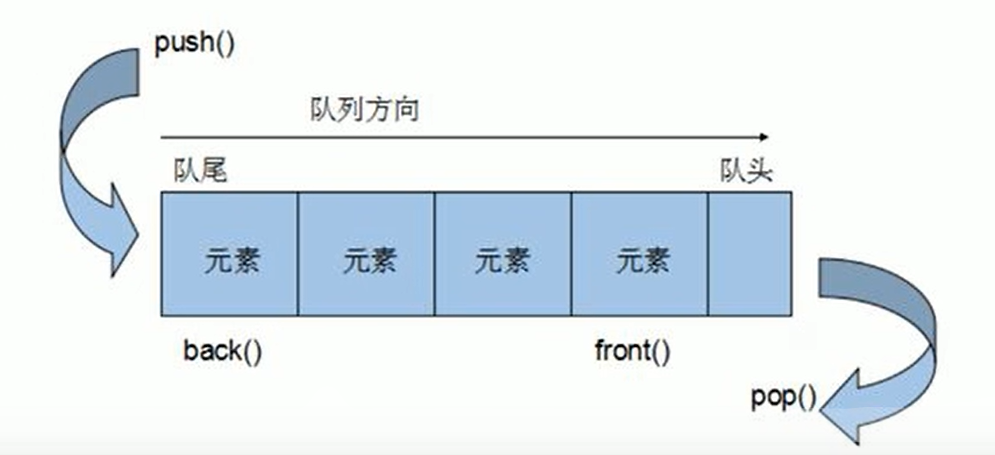
- 队列容器允许一端新增元素, 从另外一端移除元数
- 队列中只有队头和队尾才可以被外界使用,因此队列不允许有遍历行为
- 队列中进数据称为 ----- 入队
push
queue的常用接口
功能描述:栈容器常用的对外接口
构造函数:
queue<T> que;//queue采用模板类实现,queue对象的默认构造形式queue(const queue &que);//拷贝构造函数
赋值操作:
queue& operator=(const queue &que);//重载等号操作符
数据存取:
push(elem);//往队尾添加元素pop();//从队头移除第一个元素back();//返回最后一个元素front();//返回第一个元素
大小操作:
empty();//判断堆栈是否为空size();//返回栈的大小
#include <iostream>
using namespace std;
#include <queue>
#include <string>
class Person
{
public:
Person(string name, int age)
{
this->m_Age = age;
this->m_Name = name;
}
public:
string m_Name;
int m_Age;
};
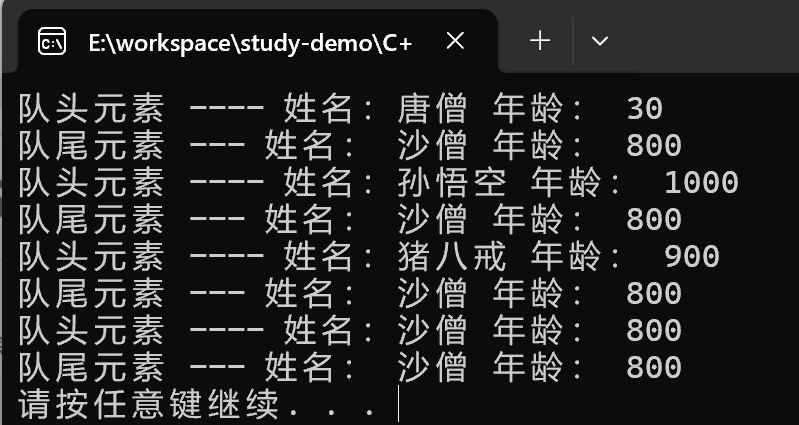
void test()
{
queue<Person> q;
// 准备数据
Person p1("唐僧", 30);
Person p2("孙悟空", 1000);
Person p3("猪八戒", 900);
Person p4("沙僧", 800);
// 入队
q.push(p1);
q.push(p2);
q.push(p3);
q.push(p4);
while (!q.empty())
{
// 查看队列
cout << "队头元素 ---- 姓名:" << q.front().m_Name << " 年龄: " << q.front().m_Age << endl;
// 查看队尾
cout << "队尾元素 --- 姓名: " << q.back().m_Name << " 年龄: " << q.back().m_Age << endl;
// 出队
q.pop();
}
}
int main()
{
test();
system("pause");
return 0;
}
输出结果:
list容器
list容器的概念
功能:将数据进行链式存储
链表(list)是一种物理存储单元上非连续的存储结构,数据元素的逻辑顺序是通过链表中的指针链接实现的
链表的组成:链表由一系列结点组成
结点的组成:一个是存储数据元素的数据域,另一个是存储下一个结点地址的指针域
STL中的链表是一个双向循环链表
上图中没有画出循环的一个操作
由于链表的存储方式并不是连续的内存空间,因此链表list中的迭代器只支持前移和后移,属于双向迭代器
list的优点:
- 采用动态存储分配,不会造成内存浪费和溢出
- 链表执行插入和删除操作十分方便,修改指针即可,不需要移动大量元素
list的缺点:
- 链表灵活,但是空间(指针域)和时间(遍历)额外耗费较大
List有一个重要的性质,插入操作和删除操作都不会造成原有list迭代器的失效,这在vector是不成立的。
list构造函数
功能描述:
- 创建list容器
函数原型:
list<T> lst;//list采用模板类实现,对象的默认构造形式:list(beg,end);//构造函数将[beg, end)区间中的元素拷贝给本身。list(n,elem);//构造函数将n个elem拷贝给本身。list(const list &lst);//拷贝构造函数。
#include <iostream>
using namespace std;
#include <list>
void printList(const list<int>& l1)
{
for (list<int>::const_iterator it = l1.begin(); it != l1.end(); it++)
{
cout << *it << " ";
}
cout << endl;
}
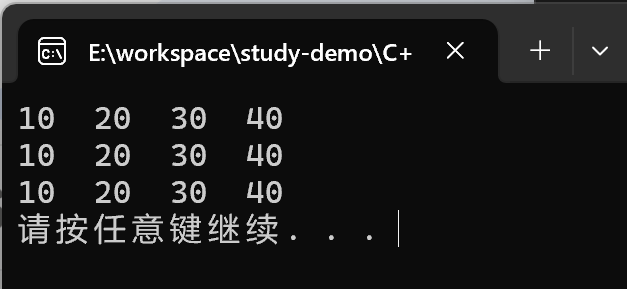
void test01()
{
// 创建list容器
list<int> l1; // 默认构造器
l1.push_back(10);
l1.push_back(20);
l1.push_back(30);
l1.push_back(40);
// 遍历
printList(l1);
// 区间方式构造
list<int> l2(l1.begin(), l1.end());
printList(l2);
// 拷贝构造
list<int> l3(l2);
printList(l3);
}
int main()
{
test01();
system("pause");
return 0;
}
输出结果:
list赋值和交换
功能描述:
- 给list容器进行赋值,以及交换list容器
函数原型:
assign(beg, end);//将[beg, end)区间中的数据拷贝赋值给本身。assign(n, elem);//将n个elem拷贝赋值给本身。list& operator=(const list &lst);//重载等号操作符swap(lst);//将lst与本身的元素互换。
示例:
#include <iostream>
using namespace std;
#include <list>
void printList2(const list<int>& L) {
for (list<int>::const_iterator it = L.begin(); it != L.end(); it++) {
cout << *it << " ";
}
cout << endl;
}
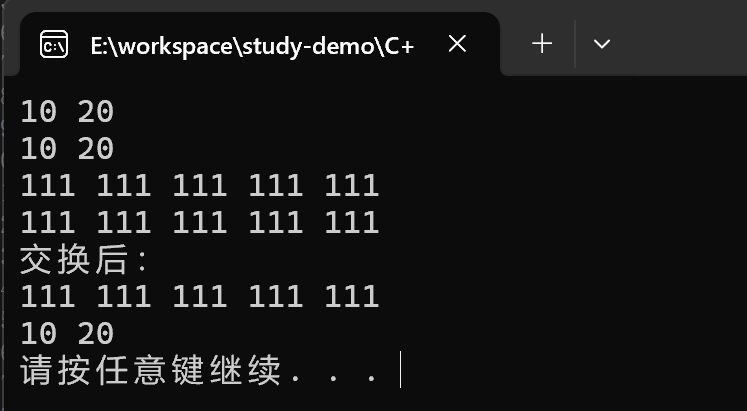
void test02()
{
list<int> l;
l.push_back(10);
l.push_back(20);
printList2(l);
// assign赋值
list<int> l2;
l2.assign(l.begin(), l.end());
printList2(l2);
list<int> l3;
l3.assign(5, 111);
printList2(l3);
list<int> l4;
l4 = l3;
printList2(l4);
cout << "交换后:" << endl;
l.swap(l4);
printList2(l);
printList2(l4);
}
int main()
{
test02();
system("pause");
return 0;
}
输出结果:
list大小操作
功能描述:
- 对list容器的大小进行操作
函数原型:
size();// 返回容器中元素的个数empty();// 判断容器是否为空resize(num);// 重新指定容器的长度为num,若容器变长,则以默认值填充新位置。
// 如果容器变短,则末尾超出容器长度的元素被删除。resize(num, elem);// 重新指定容器的长度为num,若容器变长,则以elem值填充新位置。
// 如果容器变短,则末尾超出容器长度的元素被删除。
#include<iostream>
using namespace std;
#include<list>
void printList03(const list<int>& L) {
for (list<int>::const_iterator it = L.begin(); it != L.end(); it++) {
cout << *it << " ";
}
cout << endl;
}
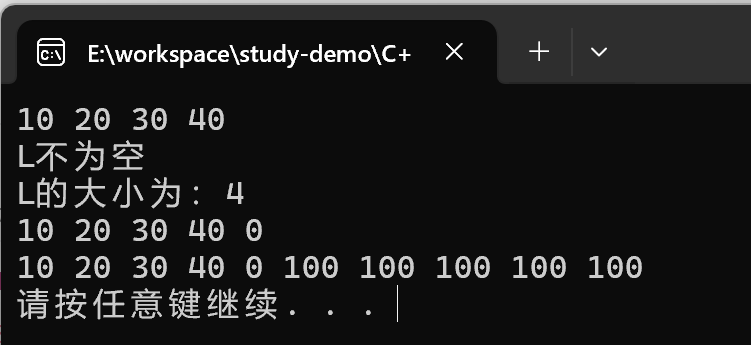
void test03()
{
list<int> L;
L.push_back(10);
L.push_back(20);
L.push_back(30);
L.push_back(40);
printList03(L);
if (L.empty())
{
cout << "L 为空" << endl;
}
else
{
cout << "L不为空" << endl;
cout << "L的大小为:" << L.size() << endl;
}
L.resize(5);
printList03(L);
L.resize(10, 100);
printList03(L);
}
int main()
{
test03();
system("pause");
return 0;
}
输出结果:
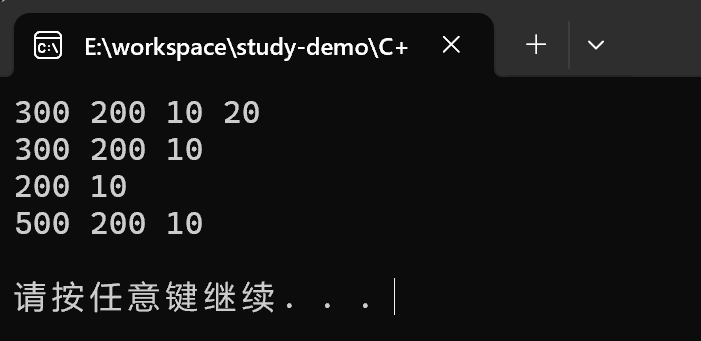
list插入和删除
功能描述:
- 对list容器进行数据的插入和删除
函数原型:
push_back(elem);// 在容器尾部加入一个元素pop_back();// 删除容器中最后一个元素push_front(elem);// 在容器开头插入一个元素pop_front();// 从容器开头移除第一个元素insert(pos, elem);// 在pos位置插elem元素的拷贝,返回新数据的位置。insert(pos, n, elem);// 在pos位置插入n个elem数据,无返回值。insert(pos, beg, end);// 在pos位置插入[beg, end)区间的数据,无返回值。clear();// 移除容器的所有数据erase(beg, end);// 删除[beg, end)区间的数据,返回下一个数据的位置。erase(pos);// 删除pos位置的数据,返回下一个数据的位置。remove(elem);// 删除容器中所有与elem值匹配的元素。
#include <iostream>
using namespace std;
#include <list>

void printList04(const list<int>& L) {
    for (list<int>::const_iterator it = L.begin(); it != L.end(); it++) {
        cout << *it << " ";
    }
    cout << endl;
}

void test04()
{
    list<int> L;
    L.push_back(300);
    L.push_back(200);
    L.push_back(10);
    L.push_back(20);
    printList04(L);

    // 尾删
    L.pop_back();
    printList04(L);

    // 头删
    L.pop_front();
    printList04(L);

    // insert插入
    L.insert(L.begin(), 500);
    printList04(L);

    // 清空
    L.clear();
    printList04(L);


}

int main()
{
    test04();
    system("pause");
    return 0;
}
输出结果:
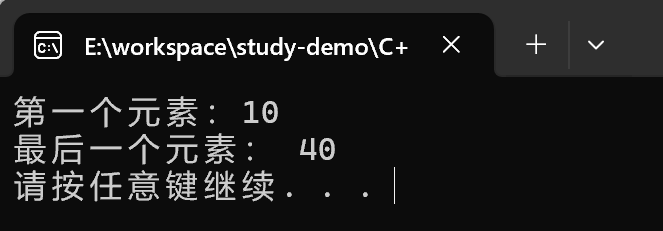
list的数据存储
功能描述:
- 对list容器中数据进行存取
函数原型:
front();// 返回第一个元素。back();// 返回最后一个元素。
注意:ist底层是链表,不是一段连续的空间,所以不能直接使用[] 或 at的方式来访问数据, list的迭代器是不支持随机访问的
#include <iostream>
using namespace std;
#include <list>

void test05()
{
    list<int>L;
    L.push_back(10);
    L.push_back(20);
    L.push_back(30);
    L.push_back(40);

    //L[0];  不可以用[]访问list容器中的元素
    //L.at(0); 不可以用at方式访问list容器中的元素

    // 原因是list本质是链表, 不是用连续性空间存储数据,迭代器也是不支持随机访问的
    cout << "第一个元素:" << L.front() << endl;
    cout << "最后一个元素: " << L.back() << endl;

    // 验证迭代器是不是支持随机访问的
    list<int>::iterator it = L.begin();
    // 双向支持
    it++;
    it--;

    //it = it + 1;报错:  不支持随机访问
}

int main()
{
    test05();
    system("pause");
    return 0;
}
输出结果:
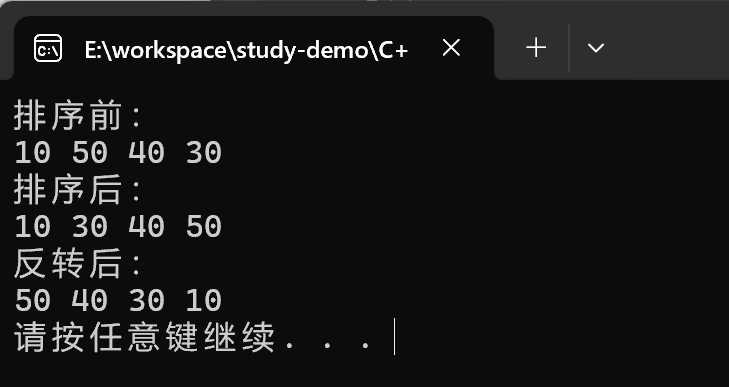
list反转和排序
功能描述:
- 将容器中的元素反转,以及将容器中的数据进行排序
函数原型:
reverse();// 反转链表sort();// 链表排序
#include <iostream>
using namespace std;
#include <list>

void printList06(const list<int>& L) {
    for (list<int>::const_iterator it = L.begin(); it != L.end(); it++) {
        cout << *it << " ";
    }
    cout << endl;
}

void test06()
{
    list<int> L;
    L.push_back(10);
    L.push_back(50);
    L.push_back(40);
    L.push_back(30);

    // 排序
    cout << "排序前:" << endl;
    printList06(L);

    // 所有不支持随机访问的迭代器,不可以使用标准算法
    // 不支持随机访问迭代器的容器,内部会提供对应的一些算法
    // sort(L.begin(), L.end());

    L.sort();
    cout << "排序后:" << endl;
    printList06(L);


    //反转
    cout << "反转后:" << endl;
    L.reverse();
    printList06(L);
}

int main()
{
	test06();
	system("pause");
	return 0;
}
输出结果:
set/multiset容器
set基本概念
简介:
- 所有元素都会在插入时自动被排序
本质:
- set/multiset属于关联式容器,底层结构是用二叉树实现。
set和multiset区别:
- set不允许容器中有重复的元素
- multiset允许容器中有重复的元素
set构造和赋值
功能描述:创建set容器以及赋值
构造:
set<T> st;//默认构造函数:set(const set &st);//拷贝构造函数
赋值:
set& operator=(const set &st);//重载等号操作符
#include <iostream>
using namespace std;
#include <set>

void printSet(const set<int>& s1)
{
	for (set<int>::const_iterator it = s1.begin(); it != s1.end(); it++)
	{
		cout << *it << "  ";
	}
	cout << endl;
}

void test01()
{
	set<int> s1;
	// 插入数据 只有insert方式
	s1.insert(10);
	s1.insert(40);
	s1.insert(30);
	s1.insert(20);
	s1.insert(30);

	// 遍历容器
	// set容器特点: 所有元素插入时候自动被排序
	// set容器不允许插入重复值
	printSet(s1);


	// 拷贝构造
	set<int> s2(s1);
	printSet(s2);

	// 复制
	set<int> s3;
	s3 = s2;
	printSet(s3);

}

int main()
{
	test01();
	system("pause");
	return 0;
}
输出结果:
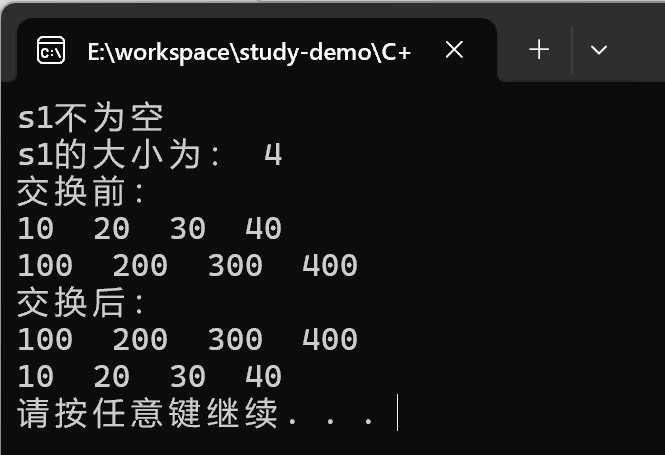
set大小和交换
功能描述:
- 统计set容器大小以及交换set容器
函数原型:
size();//返回容器中元素的数目empty();//判断容器是否为空swap(st);//交换两个集合容器
#include <iostream>
using namespace std;
#include <set>

void printSet02(const set<int>& s1)
{
	for (set<int>::const_iterator it = s1.begin(); it != s1.end(); it++)
	{
		cout << *it << "  ";
	}
	cout << endl;
}


void test02()
{
	set<int> s1;

	s1.insert(10);
	s1.insert(30);
	s1.insert(20);
	s1.insert(40);

	if (s1.empty())
	{
		cout << "s1为空" << endl;
	}
	else
	{
		cout << "s1不为空" << endl;
		cout << "s1的大小为: " << s1.size() << endl;
	}

	set<int> s2;
	s2.insert(100);
	s2.insert(200);
	s2.insert(300);
	s2.insert(400);

	cout << "交换前: " << endl;
	printSet02(s1);
	printSet02(s2);

	cout << "交换后: " << endl;
	s1.swap(s2);
	printSet02(s1);
	printSet02(s2);
}

int main()
{
	test02();
	system("pause");
	return 0;
}
输出结果:
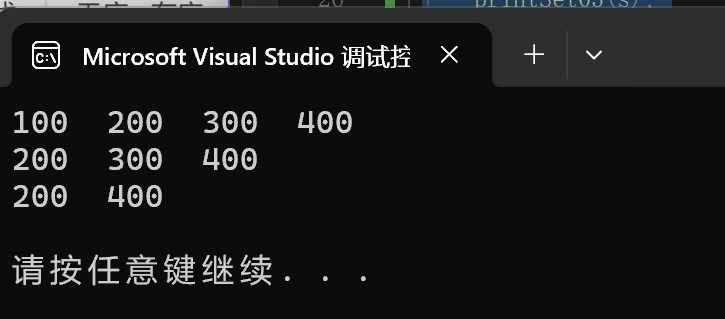
set插入和删除
功能描述:
- set容器进行插入数据和删除数据
函数原型:
insert(elem);//在容器中插入元素。clear();//清除所有元素erase(pos);//删除pos迭代器所指的元素,返回下一个元素的迭代器。erase(beg, end);//删除区间[beg,end)的所有元素,返回下一个元素的迭代器。erase(elem);//删除容器中值为elem的元素。
#include<iostream>
using namespace std;
#include<set>

void printSet03(const set<int>& s1)
{
	for (set<int>::const_iterator it = s1.begin(); it != s1.end(); it++)
	{
		cout << *it << "  ";
	}
	cout << endl;
}

void test03()
{
	set<int> s;
	s.insert(100);
	s.insert(200);
	s.insert(300);
	s.insert(400);

	printSet03(s);

	// 删除
	s.erase(s.begin());
	printSet03(s);

	// 删除重载版本
	s.erase(300);
	printSet03(s);

	// 清空
	s.erase(s.begin(), s.end());
	// s.clear();
	printSet03(s);
}

int main()
{
	test03();
	system("pause");
	return 0;
}
输出结果:
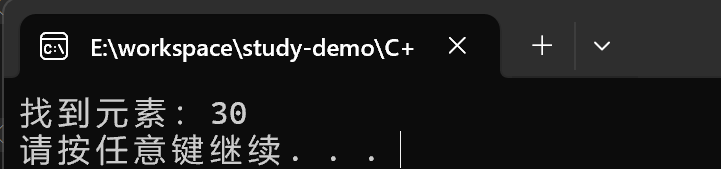
set查找和统计
功能描述:
- 对set容器进行查找数据以及统计数据
函数原型:
find(key);//查找key是否存在,若存在,返回该键的元素的迭代器;若不存在,返回set.end();count(key);//统计key的元素个数
#include<iostream>
using namespace std;
#include<set>

void test04()
{
	set<int> s;
	s.insert(10);
	s.insert(20);
	s.insert(30);
	s.insert(40);

	set<int>::iterator pos = s.find(30);
	if (pos != s.end())
	{
		cout << "找到元素:" << *pos << endl;
	}
	else
	{
		cout << "未找到元素" << endl;
	}

}

int main()
{
	test04();
	system("pause");
	return 0;
}
输出结果:
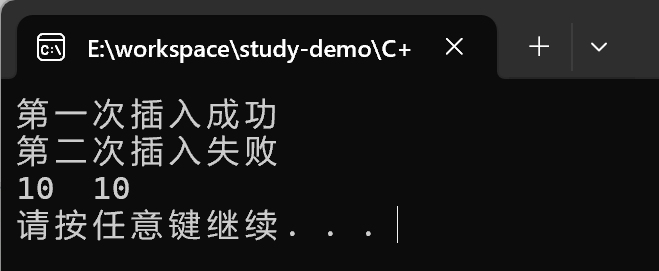
set和multiset区别
区别:
- set不可以插入重复数据,而multiset可以
- set插入数据的同时会返回插入结果,表示插入是否成功
- multiset不会检测数据,因此可以插入重复数据
#include<iostream>
using namespace std;
#include<set>

void test()
{
	set<int> s;
	pair<set<int>::iterator, bool> ret = s.insert(10);

	if (ret.second)
	{
		cout << "第一次插入成功" << endl;
	}
	else
	{
		cout << "第一次插入失败" << endl;
	}

	ret = s.insert(10);

	if (ret.second)
	{
		cout << "第二次插入成功" << endl;
	}
	else
	{
		cout << "第二次插入失败" << endl;
	}

	multiset<int> ms;
	ms.insert(10);
	ms.insert(10);

	for (multiset<int>::iterator it = ms.begin(); it != ms.end(); it++)
	{
		cout << *it << "  ";
	}

	cout << endl;

}

int main()
{
	test();
	system("pause");
	return 0;
}
输出结果:
总结:
- 如果不允许插入重复数据可以利用set
- 如果需要插入重复数据利用multiset
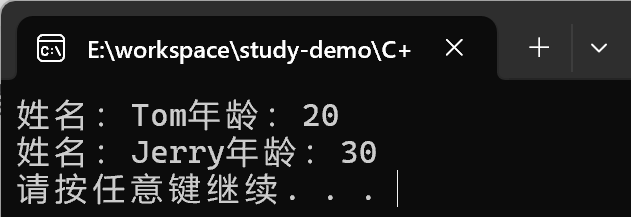
pair对组创建
功能描述:
- 成对出现的数据,利用对组可以返回两个数据
两种创建方式:
pair<type, type> p ( value1, value2 );pair<type, type> p = make_pair( value1, value2 );
#include<iostream>
using namespace std;
#include<set>
#include<string>

void test06()
{
	// 第一种方式:
	pair<string, int> p("Tom", 20);

	cout << "姓名:" << p.first << "年龄:" << p.second << endl;


	// 第二种方式
	pair<string, int>p2 = make_pair("Jerry", 30);
	cout << "姓名:" << p2.first << "年龄:" << p2.second << endl;
}

int main()
{
	test06();
	system("pause");
	return 0;
}
输出结果:
容器排序
学习目标:
- set容器默认排序规则为从小到大,掌握如何改变排序规则
主要技术点:
- 利用仿函数,可以改变排序规则
示例一 set存放内置数据类型
#include<iostream>
using namespace std;
#include<set>

// 定义一个伪函数
class MyCompare
{
public:
	bool operator()(int a, int b) const
	{
		return a > b; // 从大到小排序
	}
};

void test07()
{
	set<int> s;
	s.insert(10);
	s.insert(40);
	s.insert(20);
	s.insert(50);
	s.insert(30);

	// 打印结果默认是升序排列 从小到大
	for (set<int>::iterator it = s.begin(); it != s.end(); it++)
	{
		cout << *it << "  ";
	}
	cout << endl;

	// 指定排序规则从大到小
	//指定排序规则为从大到小
	set<int, MyCompare>s2;

	s2.insert(10);
	s2.insert(40);
	s2.insert(20);
	s2.insert(50);
	s2.insert(30);

	for (set<int, MyCompare>::iterator it = s2.begin(); it != s2.end(); it++)
	{
		cout << *it << " ";
	}
	cout << endl;
}

int main()
{
	test07();
	system("pause");
	return 0;
}
输出结果:
总结: 利用仿函数可以指定容器的排序规则
注意:仿函数本质上是重载的()
class Person07
{
public:
	Person07(string name, int age) {
		this->m_Name = name;
		this->m_Age = age;
	}

public:
	string m_Name;
	int m_Age;
};

class comparePerson {
public:

	bool operator()(const Person07& p1, const Person07& p2) const
	{
		// 按照年龄降序
		return p1.m_Age > p2.m_Age;
	}
};


void test07_1()
{
	Person07 p1("刘备", 24);
	Person07 p2("关羽", 18);
	Person07 p3("张飞", 25);
	Person07 p4("赵云", 21);

	set<Person07, comparePerson> s;
	s.insert(p1);
	s.insert(p2);
	s.insert(p3);
	s.insert(p4);

	for (set<Person07, comparePerson>::iterator it = s.begin(); it != s.end(); it++)
	{
		cout << "姓名:" << (*it).m_Name << " 年龄: " << (*it).m_Age << endl;
	}
}
输出结果:
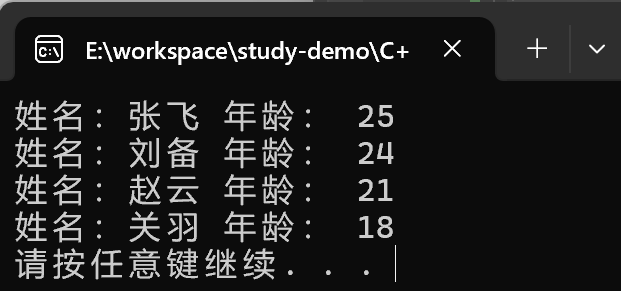
总结:对于自定义数据类型,set必须指定排序规则才可以插入数据
map/multimap容器
map的基本概念
简介:
- map中所有元素都是pair
- pair中第一个元素为key(键值),起到索引作用,第二个元素为value(实值)
- 所有元素都会根据元素的键值自动排序
本质:
- map/multimap属于关联式容器,底层结构是用二叉树实现。
优点:
- 可以根据key值快速找到value值
map和multimap区别:
- map不允许容器中有重复key值元素
- multimap允许容器中有重复key值元素
map的构造和赋值
功能描述:
- 对map容器进行构造和赋值操作
函数原型:
构造:
map<T1, T2> mp;//map默认构造函数:map(const map &mp);//拷贝构造函数
赋值:
map& operator=(const map &mp);//重载等号操作符
#include<iostream>
using namespace std;
#include<map>
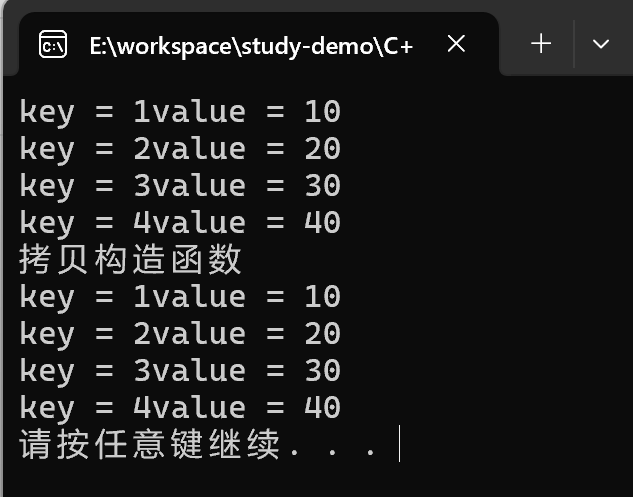
void printMap(map<int, int>& m)
{
for (map<int, int>::iterator it = m.begin(); it != m.end(); it++)
{
cout << "key = " << (*it).first << "value = " << it->second << endl;
}
}
void test01()
{
// 创建map容器
map <int, int> m;
m.insert(pair<int, int>(1, 10));
m.insert(pair<int, int>(3, 30));
m.insert(pair<int, int>(2, 20));
m.insert(pair<int, int>(4, 40));
printMap(m);
cout << "拷贝构造函数 " << endl;
// 拷贝构造函数
map<int, int> m2(m);
printMap(m2);
}
int main()
{
test01();
system("pause");
return 0;
}
输出结果:
总结: map中所有元素都是成对出现的,插入数据要使用对组
map的大小和交换
功能描述:
- 统计map容器大小以及交换map容器
函数原型:
size();//返回容器中元素的数目empty();//判断容器是否为空swap(st);//交换两个集合容器
#include<iostream>
using namespace std;
#include<map>

void printMap02(map<int, int>& m)
{
	for (map<int, int>::iterator it = m.begin(); it != m.end(); it++)
	{
		cout << "key = " << (*it).first << "value = " << it->second << endl;
	}
}

void test02()
{
	map<int, int> m;
	m.insert(pair<int, int>(1, 10));
	m.insert(pair<int, int>(2, 20));
	m.insert(pair<int, int>(3, 30));

	if (m.empty())
	{
		cout << "m为空" << endl;
	}
	else
	{
		cout << "m 不为空" << endl;
		cout << "m 的大小:" << m.size() << endl;
	}


	map<int, int>m2;
	m2.insert(pair<int, int>(4, 40));
	m2.insert(pair<int, int>(5, 50));
	m2.insert(pair<int, int>(6, 60));


	cout << "交换前:" << endl;
	printMap02(m);
	printMap02(m2);

	cout << "交换后:" << endl;
	m.swap(m2);
	printMap02(m);
	printMap02(m2);


}

int main()
{
	test02();
	system("pause");
	return 0;
}
输出结果:

map的插入和删除
功能描述:
- map容器进行插入数据和删除数据
函数原型:
insert(elem);//在容器中插入元素。clear();//清除所有元素erase(pos);//删除pos迭代器所指的元素,返回下一个元素的迭代器。erase(beg, end);//删除区间[beg,end)的所有元素,返回下一个元素的迭代器。erase(key);//删除容器中值为key的元素。
#include<iostream>
using namespace std;
#include<map>
void printMap03(map<int, int>& m)
{
for (map<int, int>::iterator it = m.begin(); it != m.end(); it++)
{
cout << "key = " << (*it).first << "value = " << it->second << endl;
}
}
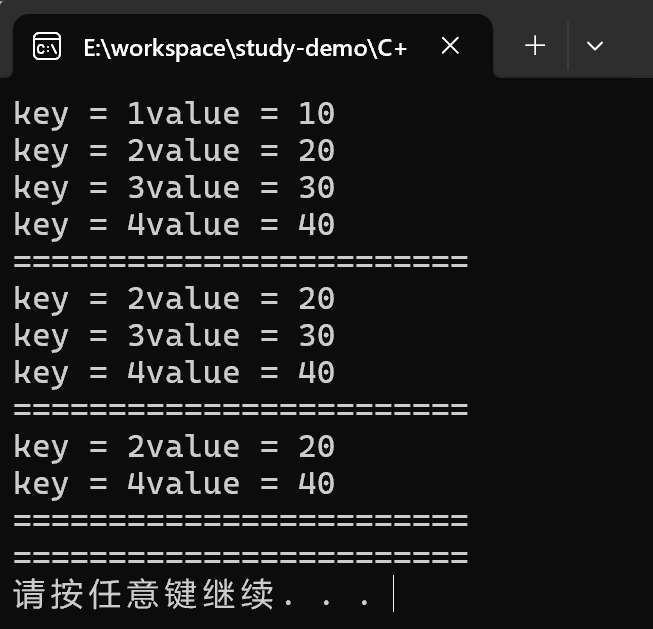
void test03()
{
map<int, int>m;
//插入
m.insert(pair<int, int>(1, 10));
// 第二种
m.insert(make_pair(2, 20));
// 第三种
m.insert(map<int, int>::value_type(3, 30));
// 第四种
m[4] = 40;
printMap03(m);
cout << "========================" << endl;
// 删除
m.erase(m.begin());
printMap03(m);
cout << "========================" << endl;
// 按照key删除
m.erase(3);
printMap03(m);
cout << "========================" << endl;
// 清空
//m.erase(m.begin(), m.end());
m.clear();
printMap03(m);
cout << "========================" << endl;
}
int main()
{
test03();
system("pause");
return 0;
}
输出结果:
map的查找和统计
功能描述:
- 对map容器进行查找数据以及统计数据
函数原型:
find(key);//查找key是否存在,若存在,返回该键的元素的迭代器;若不存在,返回set.end();count(key);//统计key的元素个数
#include<iostream>
using namespace std;
#include<map>
void printMap04(map<int, int>& m)
{
for (map<int, int>::iterator it = m.begin(); it != m.end(); it++)
{
cout << "key = " << (*it).first << "value = " << it->second << endl;
}
}
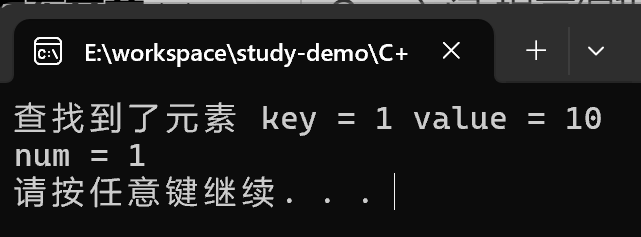
void test04()
{
map<int, int>m;
m.insert(pair<int, int>(1, 10));
m.insert(pair<int, int>(2, 20));
m.insert(pair<int, int>(3, 30));
map<int, int>::iterator pos = m.begin();
if (pos != m.end())
{
cout << "查找到了元素 key = " << (*pos).first << " value = " << (*pos).second << endl;
}
else
{
cout << "未找到元素" << endl;
}
// 统计
int num = m.count(3);
cout << "num = " << num << endl;
}
int main()
{
test04();
system("pause");
return 0;
}
输出结果:
map的容器排序
- map容器默认排序规则为,按照key值进行从小到大排序
- 主要技术点:利用仿函数,可以改变排序规则
#include<iostream>
using namespace std;
#include<map>
class MyCompare
{
public:
bool operator()(int v1, int v2) const
{
// 降序
return v1 > v2;
}
};
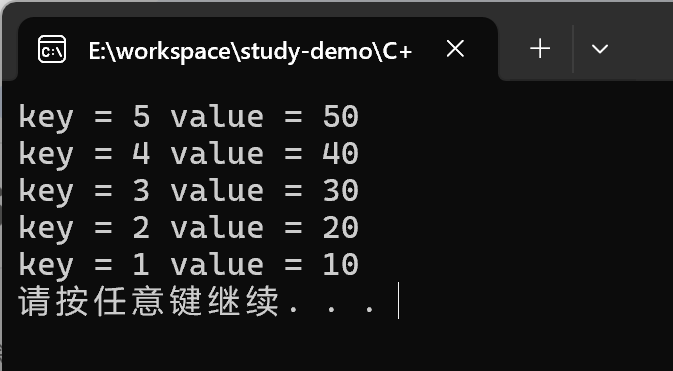
void test05()
{
map<int, int, MyCompare> m;
m.insert(pair<int, int>(1, 10));
m.insert(pair<int, int>(2, 20));
m.insert(pair<int, int>(3, 30));
m.insert(pair<int, int>(4, 40));
m.insert(pair<int, int>(5, 50));
for (map<int, int, MyCompare>::iterator it = m.begin(); it != m.end(); it++)
{
cout << "key = " << (*it).first << " value = " << (*it).second << endl;
}
}
int main()
{
test05();
system("pause");
return 0;
}
输出结果:
总结:
- 利用仿函数可以指定map容器的排序规则
- 对于自定义数据类型, map必须要指定排序规则,同set容器
STL - 函数对象
函数对象
函数对象的概念
概念:
- 重载函数调用操作符的类,其对象常称为函数对象
- 函数对象使用重载的
()时,行为类似函数调用,也叫仿函数
本质:
函数对象(仿函数)是一个类,不是一个函数
函数对象的使用
特点:
- 函数对象在使用时, 可以像普通函数那样调用, 可以有参数, 可以有返回值
- 函数对象超出普通函数的概念, 函数对象可以有自己的态度
- 函数对象可以作为参数传递
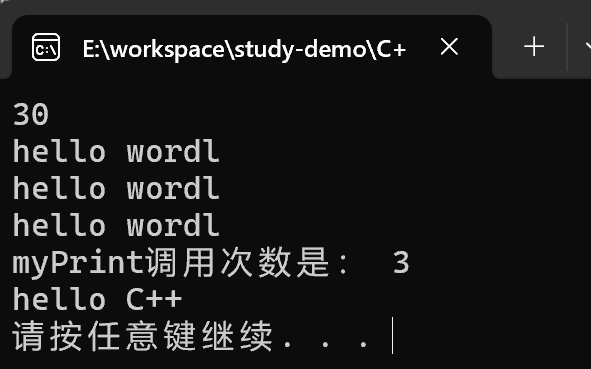
#include<iostream>
using namespace std;
#include<string>

class MyAdd
{
public:
	int operator()(int v1, int v2)
	{
		return v1 + v2;
	}
};

class MyPrint
{

public:

	MyPrint()
	{
		this->count = 0;
	}

	void operator()(string test)
	{
		cout << test << endl;
		count++; // 统计调用次数
	}

	int count; // 内部自己的状态
};

// 函数对象作为参数传递
void doPrint(MyPrint& mp, string test)
{
	mp(test);
}

// 函数作为对象在使用时, 可以像函数那样调用, 可以有返回值
void test01()
{
	MyAdd myAdd;
	cout << myAdd(10, 20) << endl;

	MyPrint myPrint;
	myPrint("hello wordl");
	myPrint("hello wordl");
	myPrint("hello wordl");

	cout << "myPrint调用次数是: " << myPrint.count << endl;

	doPrint(myPrint, "hello C++");
}

int main()
{
	test01();
	system("pause");
	return 0;
}
输出结果:
总结:
- 仿函数写法非常灵活, 可以作为参数进行传递。
谓词
谓词概念
概念:
- 返回bool类型的仿函数称为谓词
- 如果operator()接受一个参数,那么叫做一元谓词
- 如果operator()接受两个参数,那么叫做二元谓词
一元谓词
#include<iostream>
using namespace std;
#include<vector>

struct GreaterFive
{
	bool operator()(int val) {
		return val > 5;
	}
};


void test02()
{
	vector<int> v;
	for (int i = 0; i < 10; i++)
	{
		v.push_back(i);
	}

	vector<int>::iterator it = find_if(v.begin(), v.end(), GreaterFive());

	if (it == v.end())
	{
		cout << "没找到" << endl;
	}
	else
	{
		cout << "找到" << *it <<  endl;
	}
}

int main()
{
	test02();
	system("pause");
	return 0;
}
输出结果:
总结: 参数只有一个的谓词, 称为一元谓词
二元谓词
#include<iostream>
using namespace std;
#include<vector>
#include<algorithm>


class MyCompare
{
public:
	bool operator()(int val1, int val2)
	{
		return val1 > val2;
	}

};

void test03()
{
	vector<int>v;
	v.push_back(10);
	v.push_back(40);
	v.push_back(20);
	v.push_back(30);
	v.push_back(50);

	// 默认从小到大
	sort(v.begin(), v.end());
	for (vector<int>::iterator it = v.begin(); it != v.end(); it++)
	{
		cout << *it << "  ";
	}
	cout << endl;

	cout << "-------------------------------" << endl;

	// 使用函数对象改变算法排序, 排序从大到小
	sort(v.begin(), v.end(), MyCompare());
	for (vector<int>::iterator it = v.begin(); it != v.end(); it++)
	{
		cout << *it << "  ";
	}
	cout << endl;
}

int main()
{
	test03();
	system("pause");
	return 0;
}
输出结果:
总结:参数只有两个的谓词, 称为二元谓词
内建函数对象
内建函数对象意义
概念:
- STL内建了一些函数对象
分类:
- 算术仿函数
- 关系仿函数
- 逻辑仿函数
用法:
- 这些仿函数所产生的对象,用法和一般函数完全相同
- 使用内建函数对象,需要引入头文件
#include<functional>
算数仿函数
功能描述:
- 实现四则运算
- 其中negate是一元运算,其他都是二元运算
仿函数原型:
template<class T> T plus<T>//加法仿函数template<class T> T minus<T>//减法仿函数template<class T> T multiplies<T>//乘法仿函数template<class T> T divides<T>//除法仿函数template<class T> T modulus<T>//取模仿函数template<class T> T negate<T>//取反仿函数
#include<iostream>
using namespace std;
#include<functional>


void test04()
{
	// negate<int> n 取反函数
	negate<int> n;
	cout << n(50) << endl;

	// 二元仿函数 加法
	plus<int> p;

	cout << p(10, 20) << endl;


}

int main()
{
	test04();
	system("pause");
	return 0;
}
输出结果:
总结:使用内建函数对象时,需要引入头文件#include<functional>
关系仿函数
功能描述:
- 实现关系对比
仿函数原型:
template<class T> bool equal_to<T>//等于template<class T> bool not_equal_to<T>//不等于template<class T> bool greater<T>//大于template<class T> bool greater_equal<T>//大于等于template<class T> bool less<T>//小于template<class T> bool less_equal<T>//小于等于
#include<iostream>
using namespace std;
#include<functional>
#include<vector>
#include<algorithm>

void test05()
{
	vector<int> v;

	v.push_back(10);
	v.push_back(30);
	v.push_back(50);
	v.push_back(40);
	v.push_back(20);

	for (vector<int>::iterator it = v.begin(); it != v.end(); it++)
	{
		cout << *it << "  ";
	}
	cout << endl;

	//STL 内仿函数,大于函数 , 如果不适用内建仿函数, 则需要自己写仿函数
	sort(v.begin(), v.end(), greater<int>());

	for (vector<int>::iterator it = v.begin(); it != v.end(); it++)
	{
		cout << *it << "  ";
	}
	cout << endl;
}

int main()
{
	test05();
	system("pause");
	return 0;
}
输出结果:
总结: 关系仿函数中最常用的就是greater<>大于
逻辑仿函数
功能描述:
- 实现逻辑运算
函数原型:
template<class T> bool logical_and<T>//逻辑与template<class T> bool logical_or<T>//逻辑或template<class T> bool logical_not<T>//逻辑非
#include<iostream>
using namespace std;
#include<functional>
#include<vector>
#include<algorithm>

void test06()
{
	vector<bool> v;
	v.push_back(true);
	v.push_back(false);
	v.push_back(true);
	v.push_back(false);

	for (vector<bool>::iterator it = v.begin(); it != v.end(); it++)
	{
		cout << *it << "  ";
	}
	cout << endl;

	// 逻辑非, 将v容器中搬运到v2中, 并执行逻辑非运算
	vector<bool> v2;
	v2.resize(v.size());
	transform(v.begin(), v.end(), v2.begin(), logical_not<bool>());

	for (vector<bool>::iterator it = v2.begin(); it != v2.end(); it++)
	{
		cout << *it << "  ";
	}
	cout << endl;

}

int main()
{
	test06();
	system("pause");
	return 0;
}
输出结果:

STL - 常用算法

常用遍历算法
for_each
- 作用: 实现遍历容器
- 函数原型:
fro_each(iterator 北馆, iterator end, _func);- 遍历算法, 遍历容器元素
- beg: 开始迭代器
- end:结束迭代器
- _func: 函数或者函数对象
#include<iostream>
using namespace std;
#include<vector>
#include<algorithm>

// 普通函数
void myPrint(int val) {
	cout << val << "  ";
}

// 仿函数
class Print {

public:
	// 重写操作符()
	void operator()(int val) {
		cout << val << "  ";
	}

};

void test_for_each() {
	vector<int> vector;
	for (int i = 0; i < 10; i++)
	{
		vector.push_back(i);
	}

	cout << "普通方法打印=================" << endl;
	for_each(vector.begin(), vector.end(), myPrint);
	cout << endl;

	cout << "仿函数打印========================" << endl;
	for_each(vector.begin(), vector.end(), Print());
	cout << endl;
}

int main() {
	test_for_each();
	system("pause");
	return 0;
}
注意: 普通函数是传入函数名, 仿函数是传入对象
transform
- 功能描述: 搬运容器到另一个容器中
- 函数原型:
transform(iterator beg1, iterator end1, iterator beg2, _func);:给出了transform函数的原型。- beg1:源容器的开始迭代器,用于指定源容器中需要处理的第一个元素的位置。
- end1:源容器的结束迭代器,用于指定源容器中需要处理的最后一个元素的下一个位置。
- beg2:目标容器的开始迭代器,用于指定变换后的元素要存放的目标容器的起始位置。
- _func:函数或者函数对象,用于对源容器中的每个元素进行变换操作。
#include<iostream>
using namespace std;
#include<vector>
#include<algorithm>

class Transform {
public:
	int operator()(int val) {
		return val;
	}
};

class MyPrintTransform {
public:
	void operator()(int val) {
		cout << val << "  ";
	}
};

void test_trasnform() {

	vector<int> v;
	for (int i = 0; i < 10; i++)
	{
		v.push_back(i);
	}

	vector<int> vTarget;// 目标容器
	vTarget.resize(v.size()); // 目标容器,必须要提前开辟空间

	transform(v.begin(), v.end(), vTarget.begin(), Transform());

	// 循环打印
	for_each(vTarget.begin(), vTarget.end(), MyPrintTransform());
	cout << endl;
}

int main() {
	test_trasnform();
	system("pause");
	return 0;
}
输出结果:
我们再使用这个搬运算法的时候,在这个过程中可以对这个数据进行操作。
示例:
class Transform {
public:
	int operator()(int val) {
		return val + 100;
	}
};
输出结果:
总结: 搬运目标容器必须提前开辟空间,否则无法正常搬运
常用查找算法
find
- 功能描述 : 查找指定元素,找到返回指定元素的迭代器,找不到返回结束迭代器
end() - 函数原型:
find(iterator beg, iterator end, int value)- beg : 开始迭代器
- end: 结束迭代器
- value: 查找的元素
#include<iostream>
using namespace std;
#include<vector>
#include<algorithm>
#include<string>
class PersonFind {
public:
PersonFind(string name, int age) {
this->m_Name = name;
this->m_Age = age;
}
// 重载== 运算符
bool operator==(const PersonFind& p) {
if (this->m_Name == p.m_Name && this->m_Age == p.m_Age)
{
return true;
}
else
{
return false;
}
}
public:
string m_Name;
int m_Age;
};
void test_find() {
vector<int> v;
for (int i = 0; i < 10; i++)
{
v.push_back(i);
}
// 查找元素
vector<int>::iterator pos = find(v.begin(), v.end(), 5);
if (pos == v.end())
{
cout << "没有找到" << endl;
}
else
{
cout << "找到:" << *pos << endl;
}
}
void test_find_custom() {
vector<PersonFind> v;
PersonFind p("aaa", 20);
PersonFind p1("bbb", 30);
PersonFind p2("ccc", 40);
PersonFind p3("ddd", 50);
v.push_back(p);
v.push_back(p1);
v.push_back(p2);
v.push_back(p3);
//查找元素
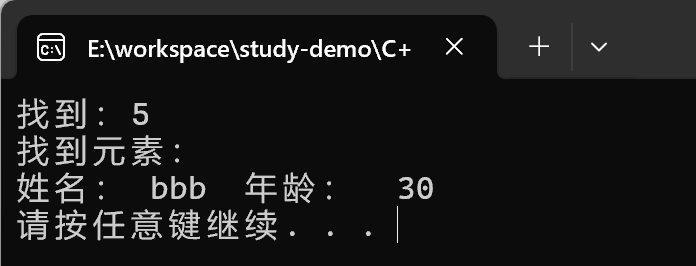
vector<PersonFind>::iterator pos = find(v.begin(), v.end(), p1);
if (pos == v.end())
{
cout << "未找到" << endl;
}
else
{
cout << "找到元素: " << endl;
cout << "姓名: " << pos->m_Name << " 年龄: " << pos->m_Age << endl;
}
}
int main() {
test_find();
test_find_custom();
system("pause");
return 0;
}
输出结果:
总结:利用find可以在容器中找指定的元素, 返回值是迭代器, 并且不管能否找到都会返回一个迭代器
find_if
- 函数原型:
- find_if(iterator beg, iterator end, _Pred);
- 按值查找元素,找到返回指定位置迭代器,找不到返回结束迭代器位置
- beg 开始迭代器
- end 结束迭代器
- _Pred 函数或者谓词(返回bool类型的仿函数)
- find_if(iterator beg, iterator end, _Pred);
#include<iostream>
using namespace std;
#include<vector>
#include<algorithm>
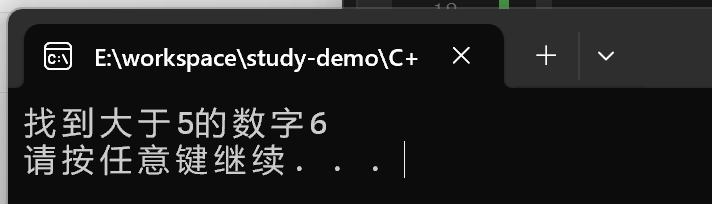
class GreaterFive {
public:
bool operator()(int val) {
return val > 5;
}
};
void testFindIf() {
vector<int>v;
for (int i = 0; i < 10; i++)
{
v.push_back(i);
}
vector<int>::iterator pos = find_if(v.begin(), v.end(), GreaterFive());
if (pos == v.end())
{
cout << "未找到!" << endl;
}
else
{
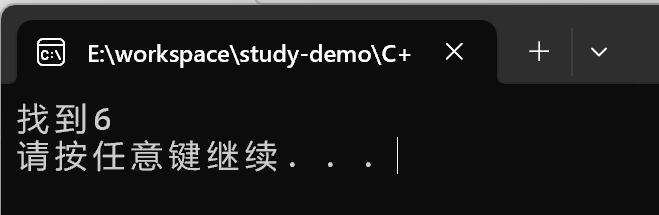
cout << "找到大于5的数字" << *pos << endl;
}
}
int main() {
testFindIf();
system("pause");
return 0;
}
输出结果:
adjacent_find
- 函数原型:
adjacent_find(iterator beg, iterator end);: 查找相邻重复元素,返回相邻元素的第一个位置的迭代器- beg 开始迭代器
- end 结束迭代器
#include<iostream>
using namespace std;
#include<vector>
#include<algorithm>

void test_adjacent_find() {
	vector<int> v;
	v.push_back(1);
	v.push_back(2);
	v.push_back(5);
	v.push_back(2);
	v.push_back(4);
	v.push_back(4);
	v.push_back(3);

	// 查找相邻重复元素
	vector<int>::iterator pos = adjacent_find(v.begin(), v.end());
	if (pos == v.end())
	{
		cout << "找不到" << endl;
	}
	else
	{
		cout << "找到相邻重复元素:" << *pos << endl;
	}
}

int main() {
	test_adjacent_find();
	system("pause");
	return 0;
}
输出结果:
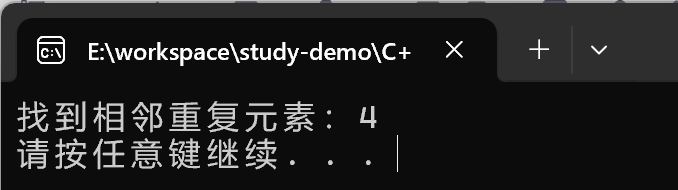
binary_search
函数原型:
bool binary_search(iterator beg, iterator end, value);- 查找指定的元素,查到返回true 否则false
- 注意: 在无序序列中不可用
- beg 开始迭代器
- end 结束迭代器
- value 查找的元素
#include<iostream>
using namespace std;
#include<vector>
#include<algorithm>

void test_binary_search() {
	vector<int>v;
	for (int i = 0; i < 10; i++)
	{
		v.push_back(i);
	}

	// 二分查找
	bool ret = binary_search(v.begin(), v.end(), 2);
	if (ret)
	{
		cout << "找到了" << endl;
	}
	else
	{
		cout << "未找到" << endl;
	}
}

int main() {
	test_binary_search();
	system("pause");
	return 0;
}
总结:二分查找效率高, 值得注意的是查找的容器中元素必须是有序序列
count
函数原型:
count(iterator beg, iterator end, value);:统计元素出现次数- beg 开始迭代器
- end 结束迭代器
- value 统计的元素
#include<iostream>
using namespace std;
#include<vector>
#include<algorithm>

void test_count() {
	vector<int>v;
	v.push_back(1);
	v.push_back(2);
	v.push_back(4);
	v.push_back(5);
	v.push_back(3);
	v.push_back(4);
	v.push_back(4);
	v.push_back(4);

	int num = count(v.begin(), v.end(), 4);

	cout << "4的个数为:" << num << endl;
}

int main() {
	test_count();
	system("pause");
	return 0;
}
输出结果:
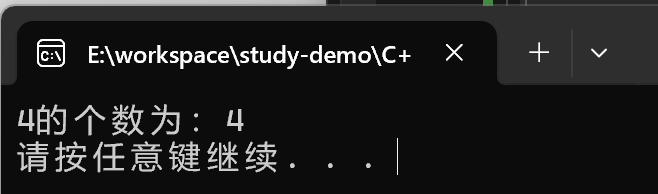
count_if
函数原型:
count_if(iterator beg, iterator end, _Pred);:按条件统计元素出现次数- beg 开始迭代器
- end 结束迭代器
- _Pred 谓词
#include<iostream>
using namespace std;
#include<vector>
#include<algorithm>
#include<string>

class GreaterSix {
public:
	bool operator()(int val) {
		return val > 6;
	}
};

void test_count_if() {
	vector<int>v;
	for (int i = 0; i < 10; i++)
	{
		v.push_back(i);
	}

	int num = count_if(v.begin(), v.end(), GreaterSix());

	cout << "大于6的个数: " << num << endl;

}

class PersonCountIf {
public:
	PersonCountIf(string name, int age) {
		this->m_Name = name;
		this->m_Age = age;
	}

public:
	string m_Name;
	int m_Age;
};

class AgeGreater20 {
public:
	bool operator()(const PersonCountIf& p) {

		return p.m_Age > 20;
	}
};

void test_count_if_custom() {
	vector<PersonCountIf> v;
	PersonCountIf p("刘备", 35);
	PersonCountIf p1("关羽", 35);
	PersonCountIf p2("张飞", 35);
	PersonCountIf p3("赵云", 40);
	PersonCountIf p4("曹操", 20);

	v.push_back(p);
	v.push_back(p1);
	v.push_back(p2);
	v.push_back(p3);
	v.push_back(p4);

	int num = count_if(v.begin(), v.end(), AgeGreater20());

	cout << "大于20岁人员个数为:" << num << endl;
}


int main() {
	test_count_if();
	test_count_if_custom();

	system("pause");
	return 0;
}
输出结果:
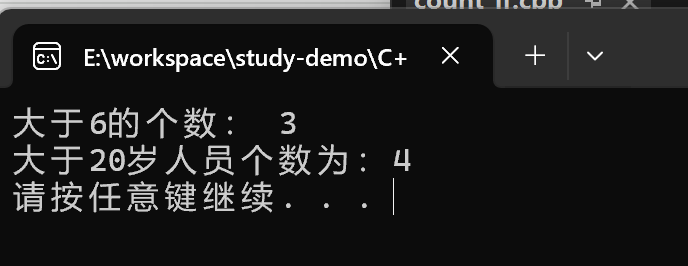
常用排序算法
sort
函数原型:
sort(iterator beg, iterator end, _Pred);- 按值查找元素,找到返回指定位置迭代器,找不到返回结束迭代器位置
- beg 开始迭代器
- end 结束迭代器
- _Pred 谓词
#include<iostream>
using namespace std;
#include<vector>
#include<algorithm>

void MyPrintSort(int val) {
	cout << val << "   ";
}

void test_sort() {
	vector<int>v;
	v.push_back(10);
	v.push_back(90);
	v.push_back(120);
	v.push_back(30);
	v.push_back(5);
	v.push_back(100);
	v.push_back(80);

	cout << "排序前:" << endl;
	for_each(v.begin(), v.end(), MyPrintSort);
	cout << endl;

	sort(v.begin(), v.end());

	cout << "排序后:" << endl;
	for_each(v.begin(), v.end(), MyPrintSort);
	cout << endl;
}

int main() {
	test_sort();
	system("pause");
	return 0;
}
输出结果:
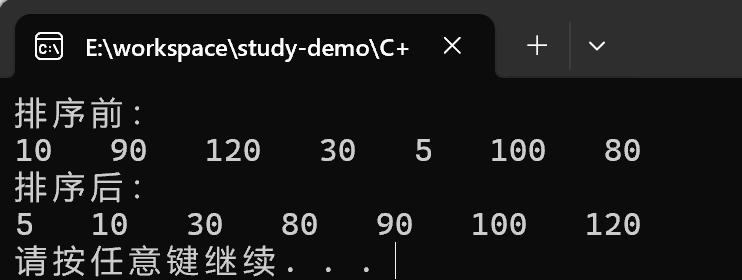
random_shuffle
函数原型:
random_shuffle(iterator beg, iterator end);指定范围内的元素随机调整次序- beg 开始迭代器
- end 结束迭代器
#include<iostream>
using namespace std;
#include<vector>
#include<algorithm>

void MyPrintRandomShuffle(int val) {
	cout << val << "  ";
}

void test_random_shuffle() {
	// 添加随机种子, 保证每次乱序的顺序是不一致的, 如果不添加的话,每次乱序的顺序是一样的
	srand((unsigned int)time(NULL));
	vector<int> v;
	for (int i = 0; i < 10; i++)
	{
		v.push_back(i);
	}

	cout << "乱序前:" << endl;
	for_each(v.begin(), v.end(), MyPrintRandomShuffle);
	cout << endl;

	random_shuffle(v.begin(), v.end());


	cout << "乱序后:" << endl;
	for_each(v.begin(), v.end(), MyPrintRandomShuffle);
	cout << endl;
}

int main() {
	test_random_shuffle();
	system("pause");
	return 0;
}
输出结果:
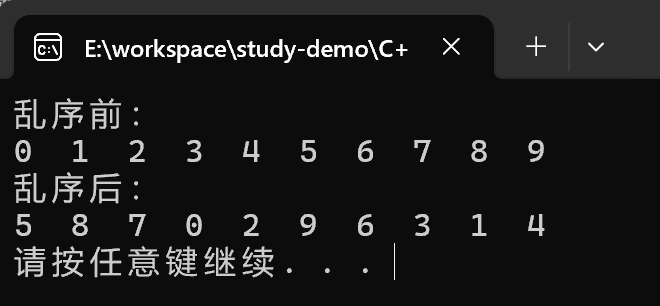
总结:random_shuffle算法在使用之前记得添加随机种子
merge
函数原型:
merge(iterator beg1, iterator end1, iterator beg2, iterator end2, iterator dest);: 两个元素容器合并,并存储到另一容器中- 注意: 两个容器必须是有序的
- beg1 容器1开始迭代器
- end1 容器1结束迭代器
- beg2 容器2开始迭代器
- end2 容器2结束迭代器
- dest 目标容器开始迭代器
#include<iostream>
using namespace std;
#include<vector>
#include<algorithm>

class MyPrintMerge
{
public:
	void operator() (int val) {
		cout << val << " ";
	}
};

void test_merge()
{
	vector<int> v1;
	vector<int> v2;

	for (int i = 0; i < 10; i++)
	{
		v1.push_back(i);
		v2.push_back(i + 1);
	}

	vector<int> vTarget;
	// 目标容器需要提前分配空间
	vTarget.resize(v1.size() + v2.size());
	// 合并  需要两个有序的序列
	merge(v1.begin(), v1.end(), v2.begin(), v2.end(), vTarget.begin());

	for_each(vTarget.begin(), vTarget.end(), MyPrintMerge());
	cout << endl;
}

int main()
{
	test_merge();
	system("pause");
	return 0;
}
输出结果:

总结: merge合并的两个容器必须是有序序列
reverse
函数原型:
reverse(iterator beg, iterator end);反转指定范围的元素- beg 开始迭代器
- end 结束迭代器
#include<iostream>
using namespace std;
#include<vector>
#include<algorithm>

class MyPrintReverse
{
public:
	void operator() (int val) {
		cout << val << "  ";
	}
};

void test_reverse()
{
	vector<int> v;
	v.push_back(50);
	v.push_back(20);
	v.push_back(40);
	v.push_back(90);
	v.push_back(10);

	cout << "反转前:" << endl;
	for_each(v.begin(), v.end(), MyPrintReverse());
	cout << endl;

	reverse(v.begin(), v.end());

	cout << "反转后:" << endl;
	for_each(v.begin(), v.end(), MyPrintReverse());
	cout << endl;
}

int main()
{
	test_reverse();
	system("pause");
	return 0;
}
输出结果:
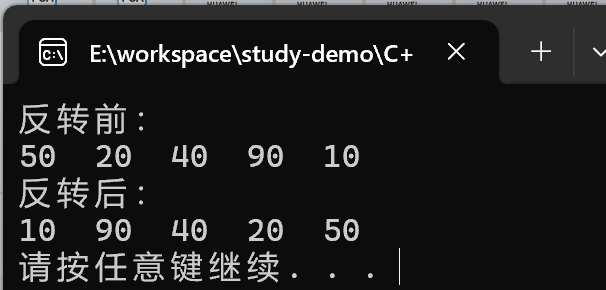
常用拷贝和替换算法
copy
函数原型:
copy(iterator beg, iterator end, iterator dest);容器内指定范围的元素拷贝到另一容器中- beg 开始迭代器
- end 结束迭代器
- dest 目标起始迭代器
#include<iostream>
using namespace std;
#include<vector>
#include<algorithm>

class MyPrintCopy
{
public:
	void operator() (int val) {
		cout << val << "  ";
	}
};

void test_copy()
{
	vector<int> v;
	for (int i = 0; i < 10; i++)
	{
		v.push_back(i);
	}

	vector<int> v2;
	v2.resize(v.size());

	copy(v.begin(), v.end(), v2.begin());

	for_each(v2.begin(), v2.end(), MyPrintCopy());
	cout << endl;
}

int main()
{
	test_copy();
	system("pause");
	return 0;
}
输出结果:
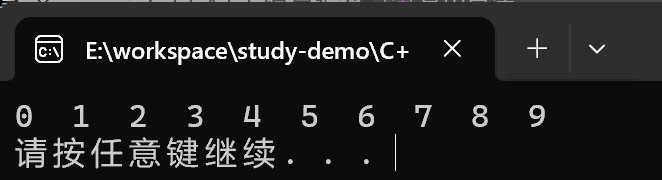
replace
函数原型:
replace(iterator beg, iterator end, oldvalue, newvalue);将容器内的指定范围内的旧元素修改为新元素- beg 开始迭代器
- end 结束迭代器
- oldvalue 旧元素
- newvalue 新元素
#include<iostream>
using namespace std;
#include<vector>
#include<algorithm>

class MyPrintReplace
{
public:
	void operator() (int val)
	{
		cout << val << "  ";
	}
};

void test_replace()
{
	vector<int> v;
	v.push_back(20);
	v.push_back(30);
	v.push_back(20);
	v.push_back(40);
	v.push_back(50);
	v.push_back(20);
	v.push_back(20);

	cout << "替换前:" << endl;
	for_each(v.begin(), v.end(), MyPrintReplace());
	cout << endl;

	// 将容器中的20 替换成2000
	replace(v.begin(), v.end(), 20, 2000);

	cout << "替换后:" << endl;
	for_each(v.begin(), v.end(), MyPrintReplace());
	cout << endl;

}

int main()
{
	test_replace();
	system("pause");
	return 0;
}
输出结果:
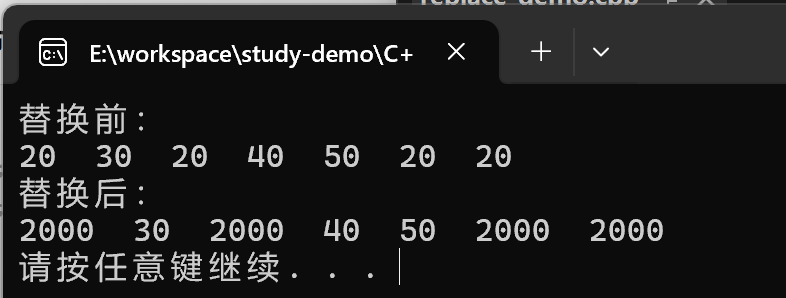
总结: replace会替换区间满足条件的元素
replace_if
函数原型:
replace_if(iterator beg, iterator end, _pred, newvalue);将区间的满足条件的元素,替换成指定元素- beg 开始迭代器
- end 结束迭代器
- _pred 谓词
- newvalue 替换的新元素
#include<iostream>
using namespace std;
#include<vector>
#include<algorithm>

class MyPrintReplaceIf
{
public:
	void operator() (int val)
	{
		cout << val << "  ";
	}
};

class ReplaceIf
{
public:
	bool operator() (int val)
	{
		return val < 5;
	}
};

void test_replace_if()
{
	vector<int> v;
	for (int i = 0; i < 10; i++)
	{
		v.push_back(i);
	}

	// 替换前
	cout << "替换前:" << endl;
	for_each(v.begin(), v.end(), MyPrintReplaceIf());
	cout << endl;

	replace_if(v.begin(), v.end(), ReplaceIf(), 5000);

	cout << "替换后:" << endl;
	for_each(v.begin(), v.end(), MyPrintReplaceIf());
	cout << endl;

}

int main()
{
	test_replace_if();
	system("pause");
	return 0;
}
输出结果:
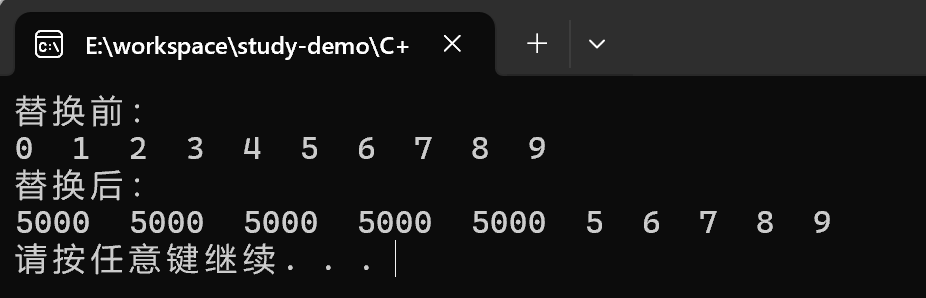
总结:replace_if按条件查找, 可以利用反函数灵活筛选满足的条件
swap
函数原型:
swap(container c1, container c2): 互换两个容器的元素- c1: 容器1
- c2: 容器2
#include<iostream>
using namespace std;
#include<vector>
#include<algorithm>

void MyPrintSwap(int val)
{
	cout << val << "  ";
}

void test_swap()
{
	vector<int> v;
	vector<int> v2;

	for (int i = 0; i < 10; i++)
	{
		v.push_back(i);
		v2.push_back(i + 100);
	}

	cout << "交换前:" << endl;
	for_each(v.begin(), v.end(), MyPrintSwap);
	cout << endl;
	for_each(v2.begin(), v2.end(), MyPrintSwap);
	cout << endl;

	swap(v, v2);

	cout << "交换后:" << endl;
	for_each(v.begin(), v.end(), MyPrintSwap);
	cout << endl;
	for_each(v2.begin(), v2.end(), MyPrintSwap);
	cout << endl;
}

int main()
{
	test_swap();
	system("pause");
	return 0;
}
输出结果:
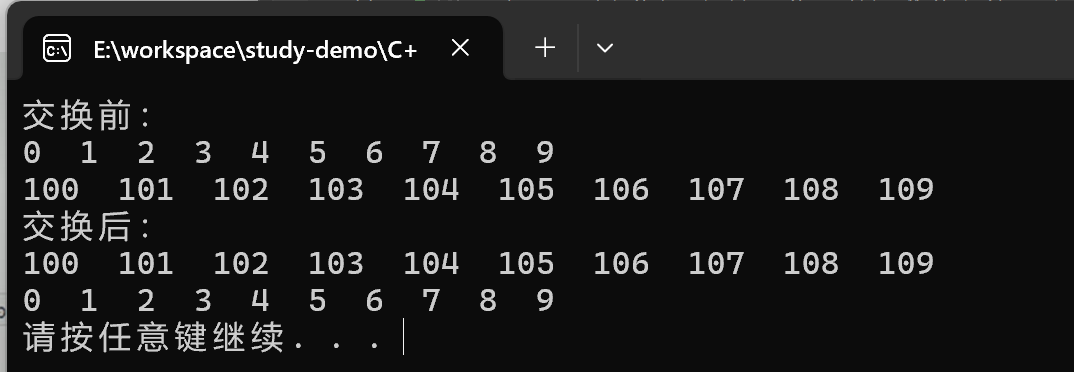
总结: swap交换容器时,注意交换的容器要同种类型
常用算术生成算法
算术法简介:
accumulate: 计算器容器元素累计总和fill: 向容器中添加元素
注意: 算数生成算法属于小型算法, 使用时包含的头文件为#include<numeric>
accumulate
函数原型:
accumulate(iterator beg, iterator end, value);计算区间内容器元素累计总和- beg 开始迭代器
- end 结束迭代器
- value 起始值
#include<iostream>
using namespace std;
#include<vector>
#include<numeric>

void test_accumulate()
{
	vector<int> v;
	for (int i = 0; i < 10; i++)
	{
		v.push_back(i);
	}

	// 参数3: 起始累加值
	int total = accumulate(v.begin(), v.end(), 100);

	cout << "total = " << total << endl;
}

int main()
{
	test_accumulate();
	system("pause");
	return 0;
}
输出结果:
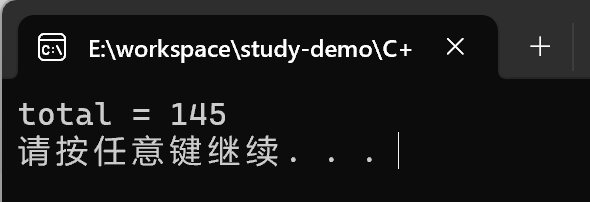
总结:accumulate使用时头文件注意是numeric,这个算法很实用
fill
函数原型:
fill(iterator beg, iterator end, value);向容器中填充元素- beg 开始迭代器
- end 结束迭代器
- value 填充的值
#include<iostream>
using namespace std;
#include<vector>
#include<numeric>
#include<algorithm>

void MyPrintFill(int val)
{
	cout << val << "  ";
}

void test_fill()
{
	vector<int> v;
	v.resize(10);

	// 填充
	fill(v.begin(), v.end(), 100);

	for_each(v.begin(), v.end(), MyPrintFill);
	cout << endl;
}

int main()
{
	test_fill();
	system("pause");
	return 0;
}
输出结果:

总结:利用fill可以将容器区间内元素填充为 指定的值
常用集合算法
set_intersection
函数原型:
set_intersection(iterator beg1, iterator end1, iterator beg2, iterator end2, iterator dest);求两个集合- 注意两个集合必须是有序集合
- beg1 容器1开始迭代器
- end1 容器1结束迭代器
- beg2 容器2开始迭代器
- end2 容器2结束迭代器
- dest 目标容器开始迭代器
#include<iostream>
using namespace std;
#include<vector>
#include<algorithm>

void myPrintSetIntersection(int val)
{
	cout << val << "  ";
}

void test_set_intersection()
{
	vector<int> v1;
	vector<int> v2;

	for (int i = 0; i < 10; i++)
	{
		v1.push_back(i);
		v2.push_back(i + 5);
	}

	vector<int> vTarget;
	// 求交集 , 最极端的情况是 全包含情况 所以取两个容器小的值的大小为目标容器的空间
	vTarget.resize(min(v1.size(), v2.size()));

	// 返回目标容器的最后一个元素的迭代器地址
	vector<int>::iterator itEnd = set_intersection(v1.begin(), v1.end(), v2.begin(), v2.end(), vTarget.begin());

	for_each(vTarget.begin(), itEnd, myPrintSetIntersection);
	cout << endl;
}

int main()
{
	test_set_intersection();
	system("pause");
	return 0;
}
输出结果:
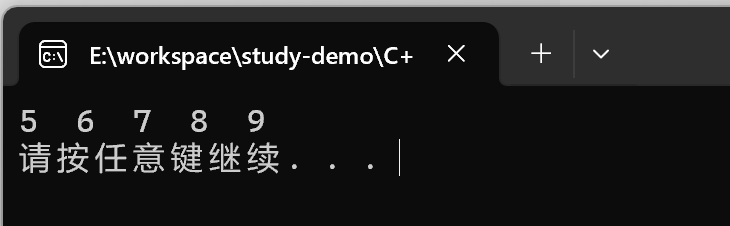
总结:
- 求交集的两个集合必须是有序集合
- 目标容器开辟空间需要从两个容器中取小值
set_intersection返回值即是交集中最后一个元素的位置
set_union
函数原型:
set_union(iterator beg1, iterator end1, iterator beg2, iterator end2, iterator dest);求两个集合的并集- 注意:两个集合必须是有序序列
- beg1 容器1开始迭代器
- end1 容器1结束迭代器
- beg2 容器2开始迭代器
- end2 容器2结束迭代器
- dest 目标容器开始迭代器
#include<iostream>
using namespace std;
#include<vector>
#include<algorithm>

void myPrintSetunion(int val)
{
	cout << val << "  ";
}


void test_set_union()
{
	vector<int> v1;
	vector<int> v2;

	for (int i = 0; i < 10; i++)
	{
		v1.push_back(i);
		v2.push_back(i + 5);
	}

	vector<int> vTarget;
	// 求并集 , 最极端的情况是 两个集合没有交集,
	vTarget.resize(v1.size() + v2.size());

	// 返回目标容器的最后一个元素的迭代器地址
	vector<int>::iterator itEnd = set_union(v1.begin(), v1.end(), v2.begin(), v2.end(), vTarget.begin());

	for_each(vTarget.begin(), itEnd, myPrintSetunion);
	cout << endl;
}

int main()
{
	test_set_union();
	system("pause");
	return 0;
}
输出结果:
总结:
- 求并集的两个集合必须是有序序列
- 目标容器开辟空间需要两个容器相加
- set_union返回值是并集中最后一个元素的位置
set_difference
函数原型:
set_difference(iterator beg1, iterator end1, iterator beg2, iterator end2, iterator dest);求两个集合的差集- 注意:两个集合必须是有序序列
- beg1 容器1开始迭代器
- end1 容器1结束迭代器
- beg2 容器2开始迭代器
- end2 容器2结束迭代器
- dest 目标容器开始迭代器
#include<iostream>
using namespace std;
#include<vector>
#include<algorithm>

void testSetFifference(int val)
{
	cout << val << "  ";
}

void test_difference()
{
	vector<int> v1;
	vector<int> v2;
	for (int i = 0; i < 10; i++)
	{
		v1.push_back(i);
		v2.push_back(i + 5);
	}

	vector<int> vTarget;

	// 取两个里面较大的值为目标容器开启空间
	vTarget.resize(max(v1.size(), v2.size()));

	cout << "v1与v2的差集为:" << endl;
	vector<int>::iterator itEnd = set_difference(v1.begin(), v1.end(), v2.begin(), v2.end(), vTarget.begin());
	for_each(vTarget.begin(), itEnd, testSetFifference);
	cout << endl;


	cout << "v2与v1的差集为:" << endl;
	itEnd = set_difference(v2.begin(), v2.end(), v1.begin(), v1.end(), vTarget.begin());
	for_each(vTarget.begin(), itEnd, testSetFifference);
	cout << endl;
}

int main()
{
	test_difference();
	system("pause");
	return 0;
}
输出结果:
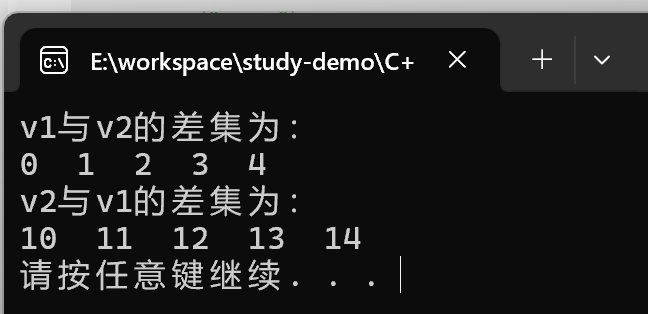
总结:
- 求差集的两个集合必须是有序序列
- 目标容器开辟空间需从两个容器取较大值
- set_difference返回值即是差集中最后一个元素的位置


 26万+
26万+

 被折叠的 条评论
为什么被折叠?
被折叠的 条评论
为什么被折叠?
 到【灌水乐园】发言


