目录
一、引言
二、背景知识
2.1 Nvidia genAI 生态
2.2 CPU 与 GPU 的关系
2.3 NVLink 与 RDMA
三、部署 DeepSeek-R1-Distill-Qwen-1.5B
3.1 搭建 GPU 集群
GPU Operator 各组件职责
GPU 管理与分配
3.2 部署清单
一、引言
当前,大型语言模型 (LLM) 已处于尖端应用的最前沿,它们理解和生成类人文本的能力已经彻底改变了各个行业。有效部署和测试这些 LLM 对于发挥其能力至关重要。
而 Kubernetes 由于其无与伦比的可扩展性、可移植性、灵活性以及强大的资源管理能力,已经成为 LLM 部署的首选平台。OpenAI 的 Kubernetes 集群就是一个很好的例子,其单集群管理的节点数量在 2021 年就已突破到惊人的 7500 个。
本文将探讨如何在 Kubernetes 集群上部署 一个蒸馏模型 DeepSeek-R1-Distill-Qwen-1.5B。
出于演示的目的,我们首先将部署一个蒸馏模型 DeepSeek-R1-Distill-Qwen-1.5B,之后,我们再进一步讨论 671B 版本的 DeepSeek-R1 的部署与优化,以实现最佳性能。
二、部署硬件相关的背景知识
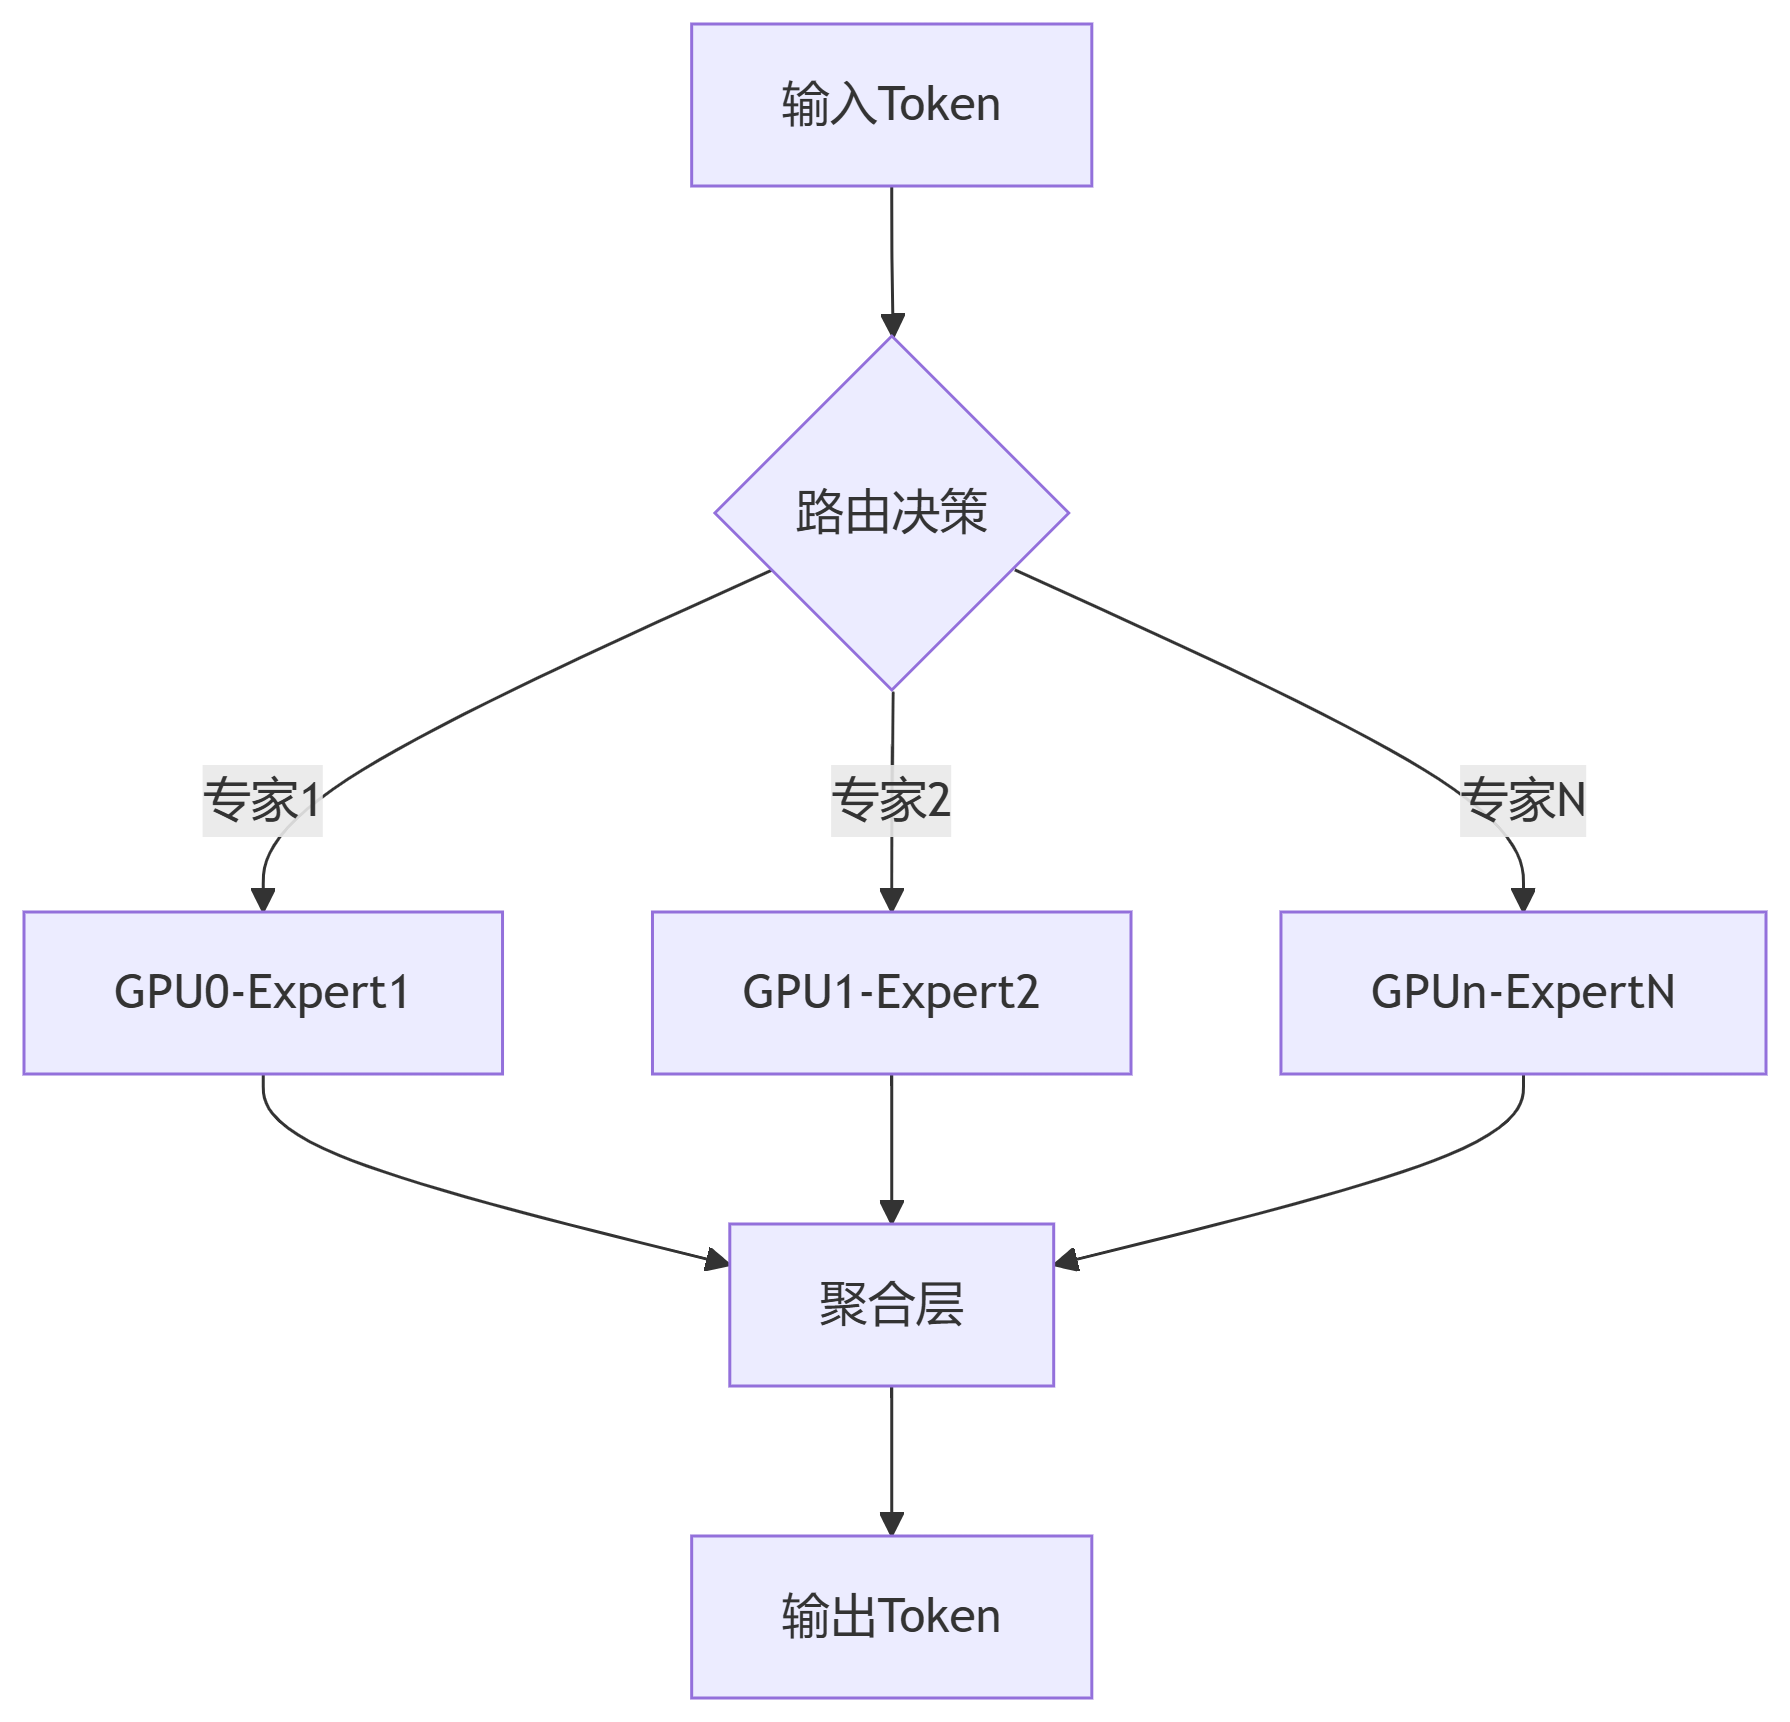
2.1 Deepseek并行专家架构
2.2 Nvidia genAI 生态
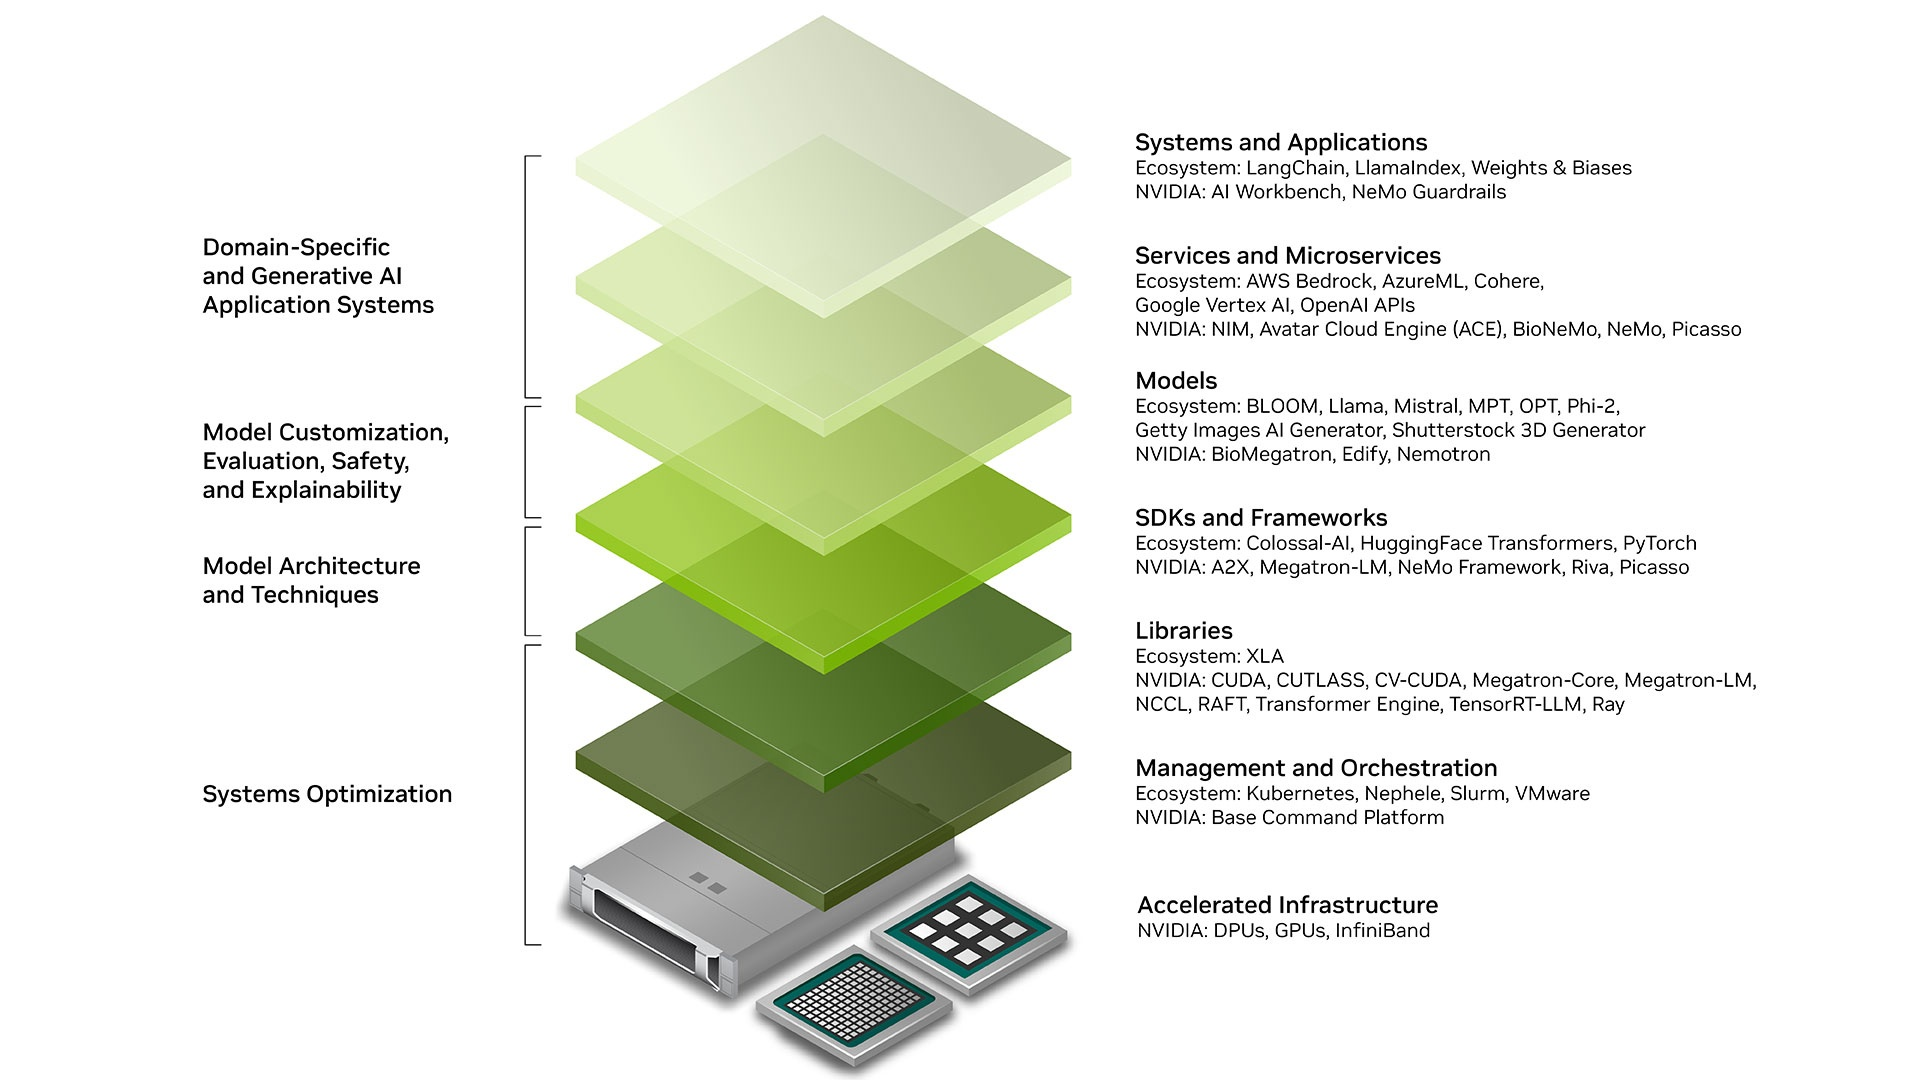
图片来源:https://developer.nvidia.com/topics/ai/generative-ai
- 基础设施
- GPUs:并行计算核心,提供大规模浮点运算能力,支撑 AI 模型训练与推理;
- InfiniBand:高速网络技术,确保分布式计算节点间低延迟通信;
- 管理与编排
- 核心库
- SDK 与框架
- 模型
- Deepseek Qwen Llama 等开源模型
- 服务
- 应用
- Cursor 为代表的 AI IDE
- GitHub Copilot 代码插件
- Dify
2.3 CPU 与 GPU 的关系
大学教授与成千上万的小学生
GPU 通常可以被看作 CPU 的协处理器,用于处理 CPU 不擅长的领域。
在物理层面上,GPU 更适合处理大规模、高度并行的计算任务,而 CPU 更适合处理顺序和串行任务。这种差异反映在它们在不同类型工作负载下的性能表现上。
在实际应用中,通常会使用 CPU 和 GPU 协同工作,以充分发挥它们各自的优势。
在 CUDA API 模型中,CPU和内存资源被称为 Host,而 GPU 和显存资源则被称为 Device。
下面,我们以一段 Python 脚本来感受一下两个之间的差异:
Python 实现的传统的矩阵乘法:
import time
import numpy as np

def matrix_mult_cpu(A, B):
    rows_A = A.shape[0]
    cols_A = A.shape[1]
    cols_B = B.shape[1]
    C = np.zeros((rows_A, cols_B), dtype=np.float32)

    for i in range(rows_A):
        for j in range(cols_B):
            sum_val = 0.0
            for k in range(cols_A):
                sum_val += A[i, k] * B[k, j]
            C[i, j] = sum_val
    return C

# 生成随机矩阵
N = 512
A = np.random.rand(N, N).astype(np.float32)
B = np.random.rand(N, N).astype(np.float32)

# 执行并计时
start = time.time()
C_cpu = matrix_mult_cpu(A, B)
cpu_time = time.time() - start
print(f"CPU Time: {cpu_time:.4f} seconds")
Python 实现的基于 CUDA 的矩阵乘法:
from numba import cuda
import numpy as np
import time

@cuda.jit
def matrix_mult_gpu(A, B, C):
    row, col = cuda.grid(2)
    if row < C.shape[0] and col < C.shape[1]:
        sum_val = 0.0
        for k in range(A.shape[1]):
            sum_val += A[row, k] * B[k, col]
        C[row, col] = sum_val

# 生成随机矩阵
N = 512
A = np.random.rand(N, N).astype(np.float32)
B = np.random.rand(N, N).astype(np.float32)
C_gpu = np.zeros((N, N), dtype=np.float32)

# 配置 CUDA 核函数参数
threads_per_block = (16, 16)
blocks_per_grid_x = (N + threads_per_block[0] - 1) // threads_per_block[0]
blocks_per_grid_y = (N + threads_per_block[1] - 1) // threads_per_block[1]
blocks_per_grid = (blocks_per_grid_x, blocks_per_grid_y)

# 将数据传输到 GPU
d_A = cuda.to_device(A)
d_B = cuda.to_device(B)
d_C = cuda.to_device(C_gpu)

# 执行并计时
start = time.time()
matrix_mult_gpu[blocks_per_grid, threads_per_block](d_A, d_B, d_C)
cuda.synchronize()
gpu_time = time.time() - start
print(f"GPU Time: {gpu_time:.4f} seconds")

# 将结果拷贝回主机
C_gpu = d_C.copy_to_host()
两者耗时为:
| CPU Time: 12.3456 seconds
GPU Time: 0.0567 seconds
|
2.4 NVLink 与 RDMA
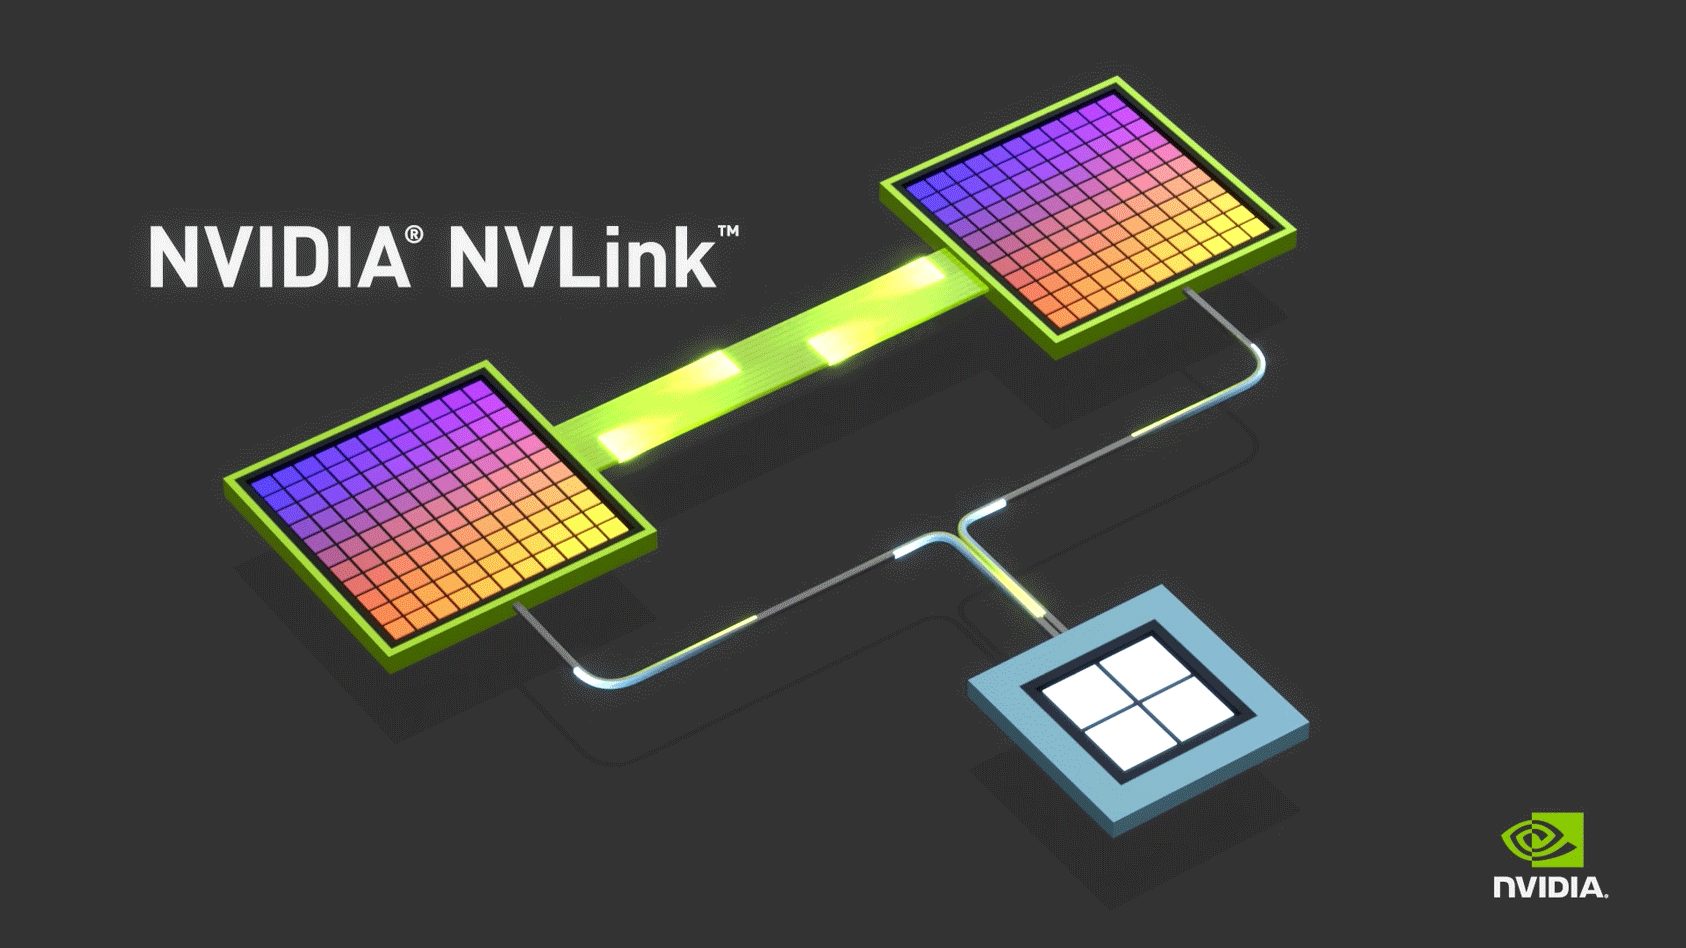
图片来源:https://www.nvidia.cn/design-visualization/nvlink-bridges/
NVLink 是一种 NVIDIA 推出的 GPU 互连技术,主要解决的是节点内的多 GPU 实例之间的通信问题,能够实现显存和性能扩展。与传统的 PCIe 系统解决方案相比,能为多 GPU 系统提供更快速的替代方案。
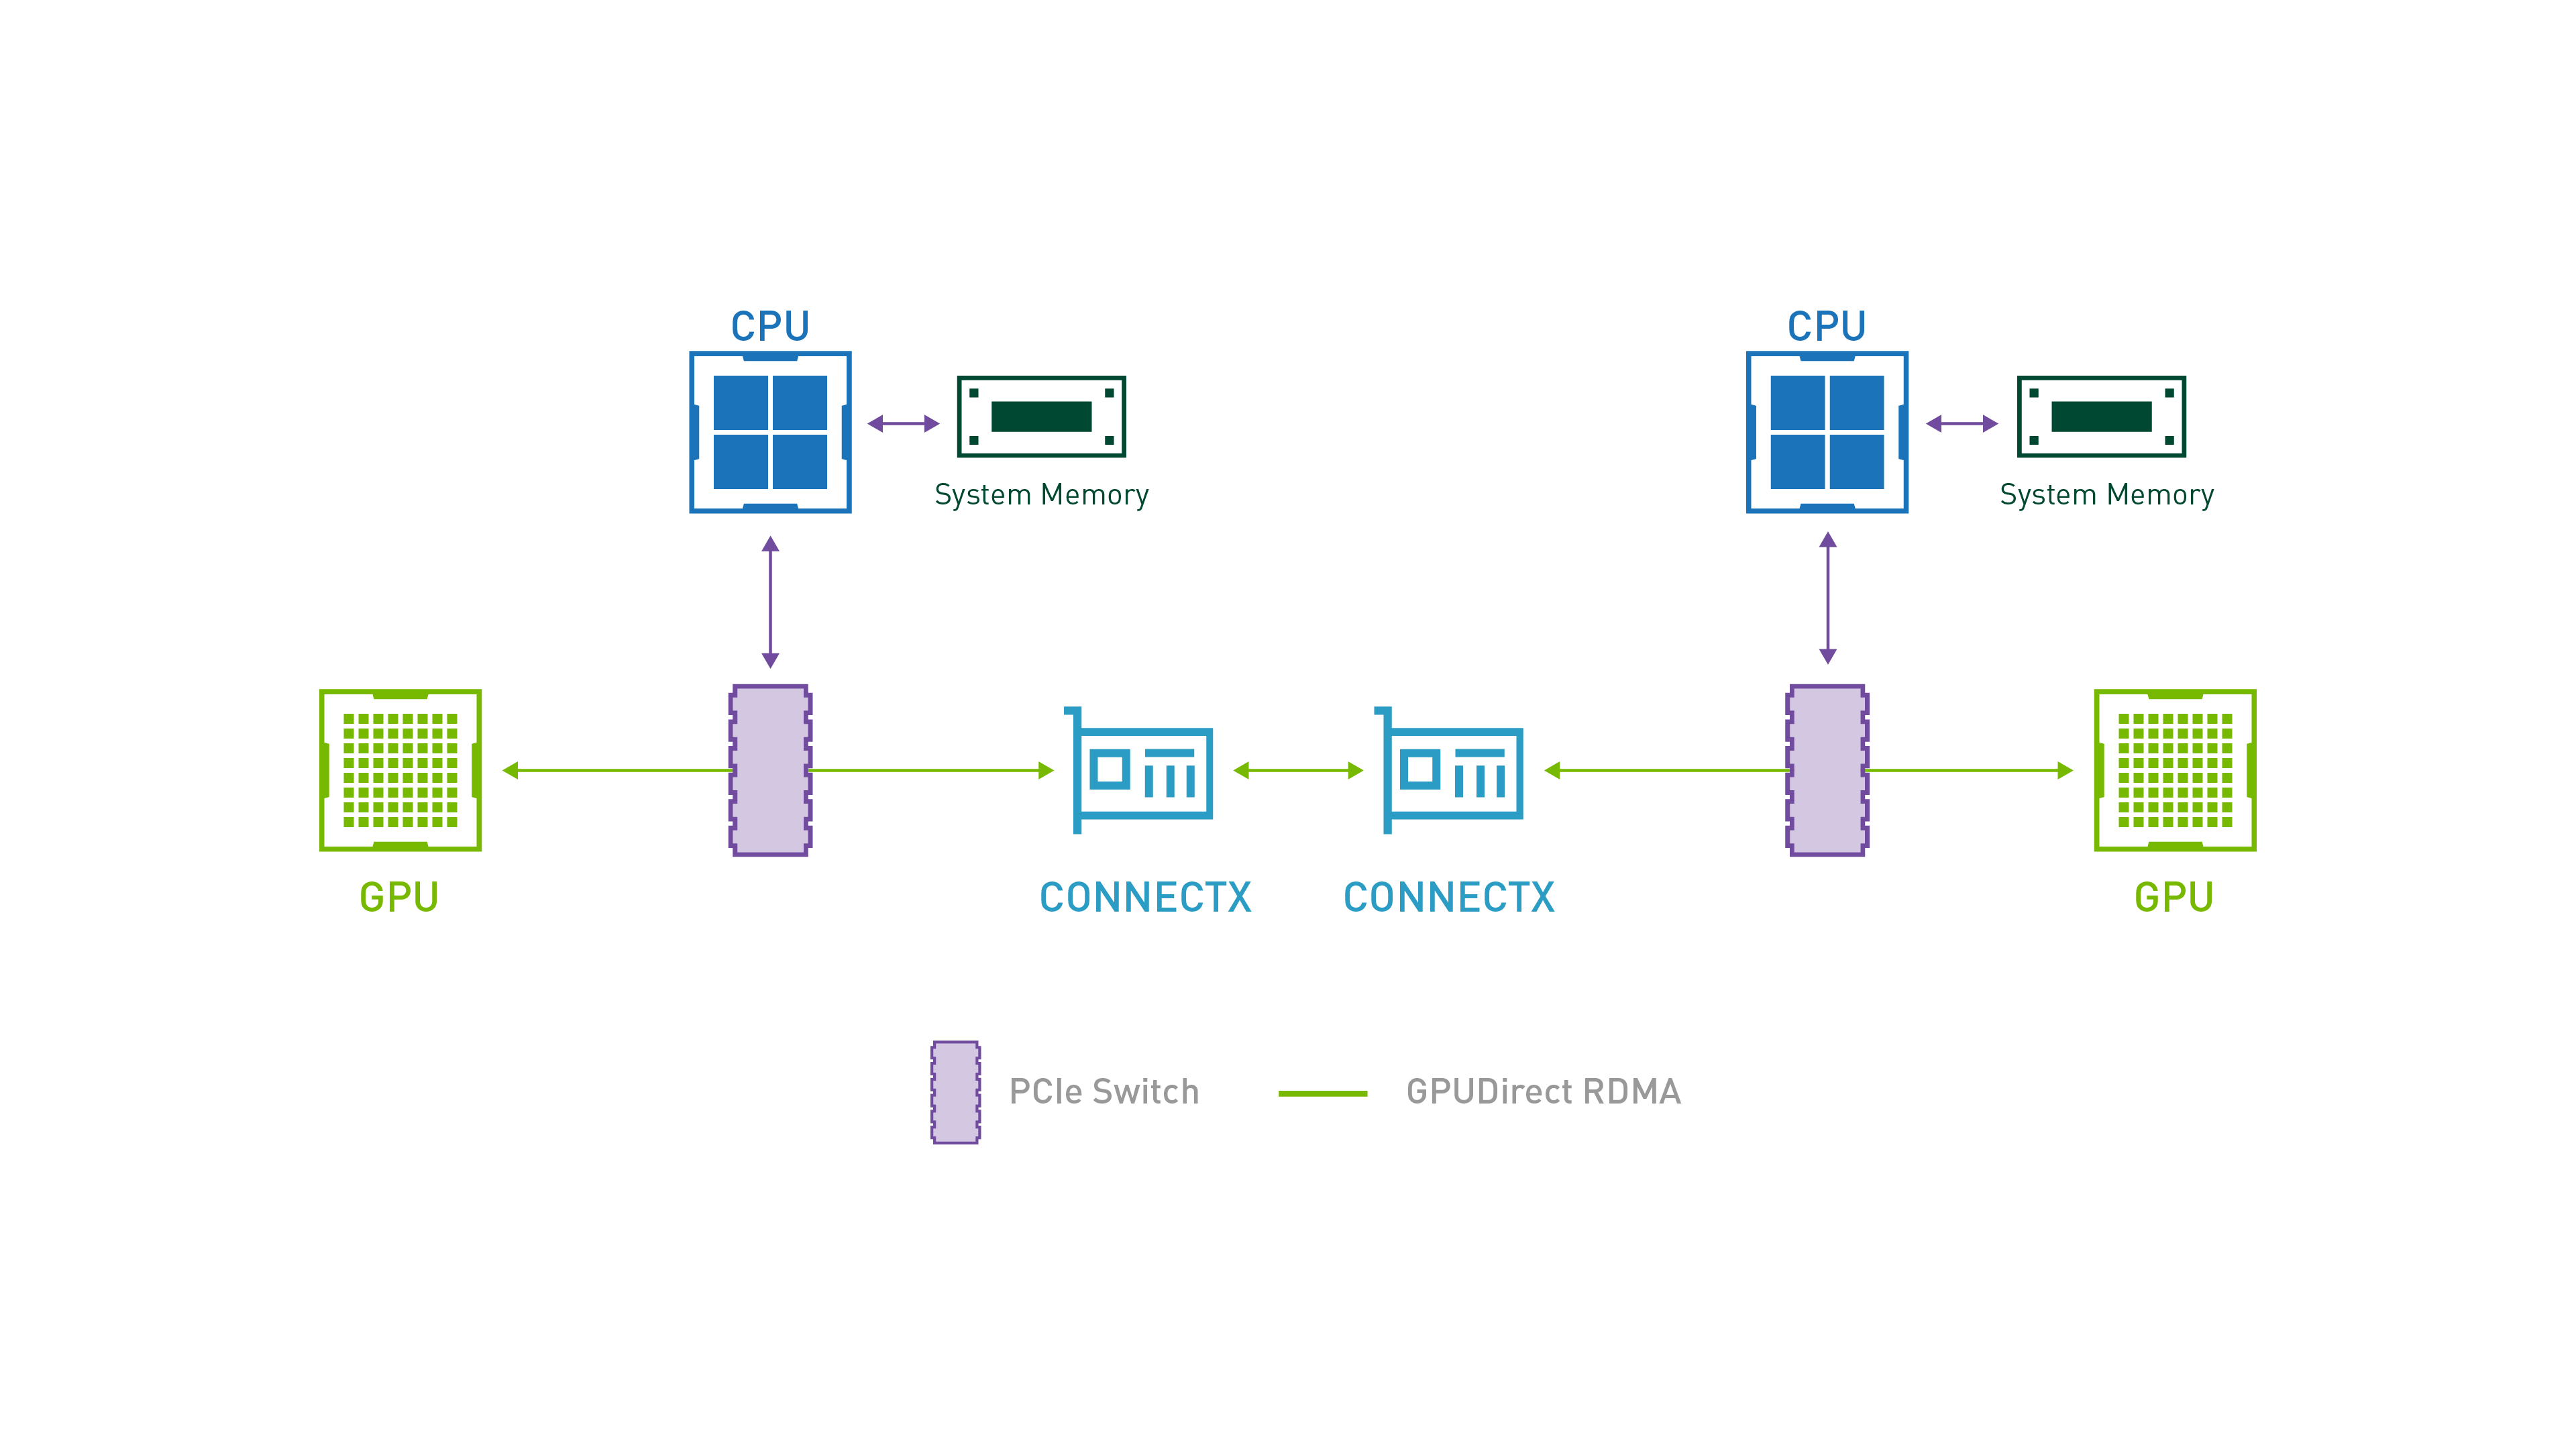
图片来源:GPUDirect | NVIDIA Developer
RDMA(远程直接内存访问) 协议主要解决跨节点的 GPU 实例之间的通信问题,通过绕过 host cpu 和内存,gpu 之间可以交换数据。
在高性能集群的最佳实践中,会结合 NVLink(节点内)+ RDMA(节点间)两项技术,充分发挥两者优势。
而这两者也是llm 引擎高效运行张量并行和流水线并行的基础。
三、部署 DeepSeek-R1-Distill-Qwen-1.5B
首先,我们需要一台 Linux 开发机作为 Kubernetes 集群的管理节点(也是唯一节点),且已安装好 GPU 驱动。
本文用于演示的开发机配置如下:
- 操作系统:Ubuntu Desktop 24.04 LTS
- 内核版本:Linux 6.8.0-52-generic
- 型号:Lenovo ThinkStation P720
- 内存:32GB
- 处理器:Intel Xeon Silver 4210R x 40
- 显卡:NVIDIA GeForce RTX 3080
- 磁盘:3TB SSD
3.1 搭建 GPU 集群
与标准的集群不同,我们需要让 Kubernetes 集群识别并调度 GPU 资源。Kubernetes 是用 k8s-device-plugin(设备插件)或者 DRA(Dynamic Resource Allocation,动态资源分配)的方式来识别和管理异构的硬件资源。其中,k8s-device-plugin 一般是设备厂商支持,而 DRA 则更加灵活,适合一些不同厂商 GPU 混搭的大规模集群。
我们可以通过最小安装来配置 GPU 资源:
- 安装 NVIDIA GPU Unix Driver
- 安装 NVIDIA container-toolkit
- 安装 NVIDIA k8s-device-plugin
当然,这里我们还是推荐使用 NVIDIA GPU Operator 来自动管理集群节点上的 GPU 资源及所有 NVIDIA 软件组件,手动安装上述组件维护困难且容易出错:
| # 禁用交换分区和防火墙
sudo swapoff -a
sudo sed -ri 's/.*swap.*/#&/' /etc/fstab
sudo ufw disable
# 配置网络
cat <<EOF | sudo tee /etc/modules-load.d/k8s.conf
overlay
br_netfilter
EOF
sudo modprobe overlay
sudo modprobe br_netfilter
cat <<EOF | sudo tee /etc/sysctl.d/k8s.conf
net.bridge.bridge-nf-call-iptables = 1
net.bridge.bridge-nf-call-ip6tables = 1
net.ipv4.ip_forward = 1
EOF
sudo sysctl --system
# 安装 containerd runc cni-plugins nerdctl
curl -LO https://github.com/containerd/containerd/releases/download/v1.7.25/containerd-1.7.25-linux-amd64.tar.gz
tar Cxzvf /usr/local/ containerd-1.7.25-linux-amd64.tar.gz
mkdir -p /usr/local/lib/systemd/system/
curl https://raw.githubusercontent.com/containerd/containerd/main/containerd.service > /usr/local/lib/systemd/system/containerd.service
systemctl daemon-reload
systemctl enable --now containerd
curl -LO https://github.com/opencontainers/runc/releases/download/v1.2.4/runc.amd64
install -m 755 runc.amd64 /usr/local/sbin/runc
curl -LO https://github.com/containernetworking/plugins/releases/download/v1.6.2/cni-plugins-linux-amd64-v1.6.2.tgz
mkdir -p /opt/cni/bin
tar Cxzvf /opt/cni/bin/ cni-plugins-linux-amd64-v1.6.2.tgz
curl -LO https://github.com/containerd/nerdctl/releases/download/v2.0.3/nerdctl-2.0.3-linux-amd64.tar.gz
tar Cxzvvf /usr/local/bin nerdctl-2.0.3-linux-amd64.tar.gz
mkdir -p /etc/containerd/
containerd config default > /etc/containerd/config.toml
sed -i 's/SystemdCgroup = false/SystemdCgroup = true/' /etc/containerd/config.toml
sed -i 's/pause:3.8/pause:3.10/' /etc/containerd/config.toml
sudo systemctl restart containerd
# 安装 kubelet kubeadm kubectl
sudo apt-get update
sudo apt-get install -y apt-transport-https ca-certificates curl gpg
curl -fsSL https://pkgs.k8s.io/core:/stable:/v1.32/deb/Release.key | sudo gpg --dearmor -o /etc/apt/keyrings/kubernetes-apt-keyring.gpg
echo 'deb [signed-by=/etc/apt/keyrings/kubernetes-apt-keyring.gpg] https://pkgs.k8s.io/core:/stable:/v1.32/deb/ /' | sudo tee /etc/apt/sources.list.d/kubernetes.list
sudo apt-get update
sudo apt-get install -y kubelet kubeadm kubectl
sudo apt-mark hold kubelet kubeadm kubectl
# 初始化集群
kubeadm config images pull
kubeadm init --pod-network-cidr=192.168.0.0/16 -v 5
# 安装 calico 网络插件
kubectl create ns calico-system
kubectl create -f https://raw.githubusercontent.com/projectcalico/calico/v3.26.0/manifests/tigera-operator.yaml
kubectl -n tigera-operator set image deployments/tigera-operator tigera-operator=quay.io/tigera/operator:v1.30.3
curl https://raw.githubusercontent.com/projectcalico/calico/v3.26.0/manifests/custom-resources.yaml -O
kubectl apply -f custom-resources.yaml
# 安装 nvidia gpu operator
kubectl create ns gpu-operator
kubectl label --overwrite ns gpu-operator pod-security.kubernetes.io/enforce=privileged
curl -fsSL -o get_helm.sh https://raw.githubusercontent.com/helm/helm/master/scripts/get-helm-3 \
&& chmod 700 get_helm.sh \
&& ./get_helm.sh
helm repo add nvidia https://helm.ngc.nvidia.com/nvidia \
&& helm repo update
helm install --generate-name \
-n gpu-operator --create-namespace \
nvidia/gpu-operator \
--version=v24.9.2 \
--set driver.enabled=false
|
依次执行上述命令后,可查看集群服务状态:
如返回以下信息,即表明集群已经部署成功:
| NAMESPACE NAME READY STATUS RESTARTS AGE
calico-apiserver calico-apiserver-5c4d69f497-hbkhq 1/1 Running 0 19h
calico-apiserver calico-apiserver-5c4d69f497-jcswg 1/1 Running 0 19h
calico-system calico-kube-controllers-5bdcc548dd-7cdmn 1/1 Running 0 19h
calico-system calico-node-fhdpr 1/1 Running 0 19h
calico-system calico-typha-59db789d4c-6tptb 1/1 Running 0 19h
calico-system csi-node-driver-txtdq 2/2 Running 0 19h
gpu-operator gpu-feature-discovery-s6gkt 2/2 Running 0 112m
gpu-operator gpu-operator-1738914559-node-feature-discovery-gc-765cd56ddjmzs 1/1 Running 0 19h
gpu-operator gpu-operator-1738914559-node-feature-discovery-master-85bc7kb85 1/1 Running 0 19h
gpu-operator gpu-operator-1738914559-node-feature-discovery-worker-kx66l 1/1 Running 0 19h
gpu-operator gpu-operator-75cfd7bb7f-jxh9v 1/1 Running 0 19h
gpu-operator nvidia-container-toolkit-daemonset-x4x4q 1/1 Running 0 19h
gpu-operator nvidia-cuda-validator-cn2h8 0/1 Completed 0 18h
gpu-operator nvidia-dcgm-exporter-fdbph 1/1 Running 0 19h
gpu-operator nvidia-device-plugin-daemonset-xqzgl 2/2 Running 0 112m
gpu-operator nvidia-operator-validator-pjt4l 1/1 Running 0 18h
kube-system coredns-668d6bf9bc-jblvd 1/1 Running 0 19h
kube-system coredns-668d6bf9bc-zbzwk 1/1 Running 0 19h
kube-system etcd-th201966497 1/1 Running 1 19h
kube-system kube-apiserver-th201966497 1/1 Running 1 19h
kube-system kube-controller-manager-th201966497 1/1 Running 6 19h
kube-system kube-proxy-k9gbr 1/1 Running 1 19h
kube-system kube-scheduler-th201966497 1/1 Running 6 19h
tigera-operator tigera-operator-65ddd55d95-wq8gv 1/1 Running 2 19h |
至此,我们的 GPU 集群已经搭建完成。
GPU Operator 各组件职责
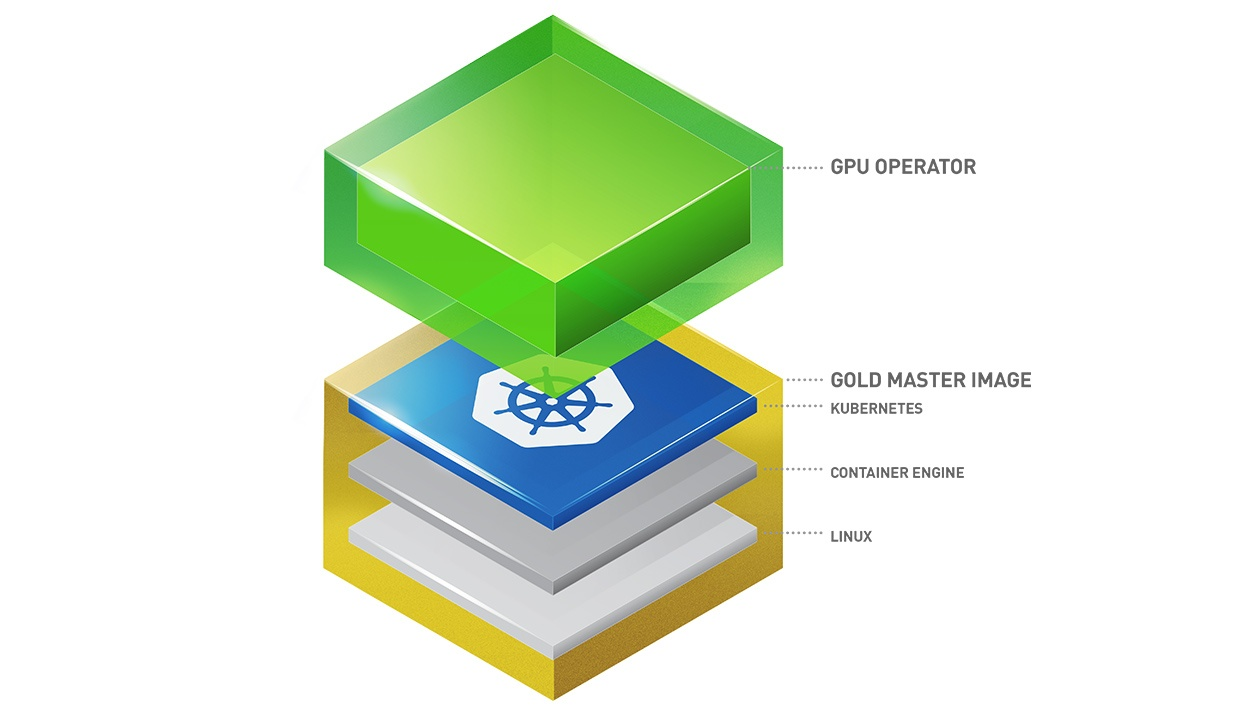
图片来源:https://docs.nvidia.com/datacenter/cloud-native/gpu-operator/latest/index.html
我们结合上图,并观察一下 gpu-operator 空间下的 Pods,其中:
- gpu-operator 是 NVIDIA GPU Operator,它负责调谐管理 GPU 资源及相关服务;
- nvidia-container-toolkit-daemonset 作为特权容器,可修改 containerd 配置文件并重启 containerd,将其安装的 nvidia 容器运行时暴露给高级容器运行时 containerd;
- gpu-feature-discovery 利用了 Kubernetes Node Feature Discovery (NFD) 来自动发现所有启用 GPU 的节点并为其打标签;
- nvidia-device-plugin-daemonset 为每个节点提供了 NVIDIA GPU 的设备插件,让 Pod 可以访问这类特殊的硬件功能特性;
- nvidia-dcgm-exporter 暴露 GPU 的相关指标,如温度、功耗、利用率等;
GPU 管理与分配
在 Kubernetes 中,GPU 资源的分配和管理是通过 NVIDIA Device Plugin 来实现的:
申请 GPU 资源:当用户创建 Pod 并申请 GPU 时,Pod 的资源需求通过 limits 或 requests 指定 GPU 数量。例如,用户可以在 Pod 定义中指定 nvidia.com/gpu: 1,表示需要分配一张 GPU 卡。Kubernetes 调度器会根据该资源需求,将 Pod 调度到具备足够 GPU 资源的节点上。
申请显存(可选):部分高性能计算或机器学习任务不仅需要 GPU 卡本身,还需要大量的显存。通过 NVIDIA 的虚拟化技术,用户可以指定所需的显存大小,Kubernetes 和 Device Plugin 会根据显存需求合理分配 GPU 资源,确保每个 Pod 的显存使用符合预期。
GPU 资源共享与分片:NVIDIA Device Plugin 支持多实例 GPU(MIG,需要 NVIDIA Ampere 架构及更高版本,如 A100 及以上)和时间切片(Time-Slicing)两种方式来提供资源利用率,允许多个 Pod 共享同一张物理 GPU。通过资源配额配置,用户可以指定 Pod 使用 GPU 的一部分,允许多个任务并发运行,提高 GPU 资源的利用率。
3.2 部署清单
接下来,我们将基于这个单节点集群,部署 DeepSeek-R1-Distill-Qwen-1.5B 模型推理服务。
部署 DeepSeek-R1-Distill-Qwen-1.5B 相对简单,LLM 推理服务作为标准的无状态服务,我们只需要标准的 Deployment 和 Service 即可。
以下是完整的部署清单:
- StorageClass、PersistentVolume、PersistentVolumeClaim 存储三件套:用于存储模型权重和缓存;
- Secret:用于存储 Hugging Face Hub Token;
- Deployment:部署 DeepSeek-R1-Distill-Qwen-1.5B 模型推理服务;
- Service:暴露 DeepSeek-R1-Distill-Qwen-1.5B 模型推理服务;
| apiVersion: v1
kind: Namespace
metadata:
name: vllm
---
apiVersion: storage.k8s.io/v1
kind: StorageClass
metadata:
name: local-storage
provisioner: kubernetes.io/no-provisioner
volumeBindingMode: WaitForFirstConsumer
---
apiVersion: v1
kind: PersistentVolume
metadata:
name: local-pv
spec:
capacity:
storage: 100Gi
volumeMode: Filesystem
accessModes:
- ReadWriteOnce
persistentVolumeReclaimPolicy: Delete
storageClassName: local-storage
local:
path: /data/vllm/shared-data
nodeAffinity:
required:
nodeSelectorTerms:
- matchExpressions:
- key: kubernetes.io/hostname
operator: In
values:
- <NODE_HOSTNAME>
---
apiVersion: v1
kind: PersistentVolumeClaim
metadata:
name: deepseek-r1-distill-qwen-1point5b
namespace: vllm
spec:
accessModes:
- ReadWriteOnce
resources:
requests:
storage: 100Gi
storageClassName: local-storage
volumeName: local-pv
---
apiVersion: v1
kind: Secret
metadata:
name: hf-token-secret
namespace: vllm
type: Opaque
stringData:
token: <HUGGINGFACE_TOKEN>
---
apiVersion: apps/v1
kind: Deployment
metadata:
name: deepseek-r1-distill-qwen-1point5b
namespace: vllm
labels:
app: deepseek-r1-distill-qwen-1point5b
spec:
replicas: 1
selector:
matchLabels:
app: deepseek-r1-distill-qwen-1point5b
template:
metadata:
labels:
app: deepseek-r1-distill-qwen-1point5b
spec:
volumes:
- name: cache-volume
persistentVolumeClaim:
claimName: deepseek-r1-distill-qwen-1point5b
# vLLM 可能需要访问主机的共享内存进行张量并行推理
- name: shm
emptyDir:
medium: Memory
sizeLimit: "2Gi"
containers:
- name: deepseek-r1-distill-qwen-1point5b
image: vllm/vllm-openai:v0.7.2
command: ["/bin/sh", "-c"]
args: [
"vllm serve deepseek-ai/DeepSeek-R1-Distill-Qwen-1.5B --trust-remote-code --tensor-parallel-size 1 --max-model-len 1024"
]
env:
- name: HUGGING_FACE_HUB_TOKEN
valueFrom:
secretKeyRef:
name: hf-token-secret
key: token
ports:
- containerPort: 8000
resources:
limits:
nvidia.com/gpu: "1"
volumeMounts:
- mountPath: /root/.cache/huggingface
name: cache-volume
- name: shm
mountPath: /dev/shm
livenessProbe:
httpGet:
path: /health
port: 8000
initialDelaySeconds: 60
periodSeconds: 10
readinessProbe:
httpGet:
path: /health
port: 8000
initialDelaySeconds: 60
periodSeconds: 5
---
apiVersion: v1
kind: Service
metadata:
name: deepseek-r1-distill-qwen-1point5b
namespace: vllm
spec:
ports:
- name: http-deepseek-r1-distill-qwen-1point5b
port: 80
protocol: TCP
targetPort: 8000
selector:
app: deepseek-r1-distill-qwen-1point5b
type: ClusterIP
|
将上述清单保存为 deepseek-r1-distill-qwen-1point5b.yaml,然后执行以下命令部署 DeepSeek-R1-Distill-Qwen-1.5B 模型:
| kubectl apply -f deepseek-r1-distill-qwen-1point5b.yaml
|
即可部署完毕,我们来观察一下 vllm 空间下的 Pod:
如返回以下信息,则表明,推理服务已经就绪:
| NAME READY STATUS RESTARTS AGE
deepseek-r1-distill-qwen-1point5b-6c4448cdfc-646nn 1/1 Running 0 2m51s |
此外,为了加速部署(可选),我们可提前下载镜像和模型:
| nerdctl --namespace k8s.io image pull vllm/vllm-openai:v0.7.2 huggingface-cli download --force-download deepseek-ai/DeepSeek-R1-Distill-Qwen-1.5B |
DeepSeek-R1介绍及部署:https://blog.youkuaiyun.com/xiucaiyao/article/details/148189156 https://blog.youkuaiyun.com/xiucaiyao/article/details/148189156


 1526
1526

 被折叠的 条评论
为什么被折叠?
被折叠的 条评论
为什么被折叠?
 到【灌水乐园】发言


