


 本文介绍了Mybatis作为持久层框架的主要优势,对比了JDBC的缺点,详细阐述了Mybatis的快速入门步骤,包括环境配置、POJO类、Mapper接口和XML映射文件的创建。此外,还探讨了Mybatis配置文件的环境配置、类型别名和映射器设置。文章总结了Mybatis的一些常见问题和解决方法,如SQL映射文件导入、实体类属性与字段映射等,并提供了增删改查的配置示例。
Mybatis
简介:
- MyBatis 是一款优秀的 持久层框架,用于简化 JDBC 开发
- MyBatis 本来是 Apache 的一个开源项目 iBatis,2010 年这个项目由 apache software foundation 迁移到了 google code,并且改名为 MyBatis。2013年 11 月迁移到了 Github
- 官网:MyBatis
建议:Mybatis 是用来简化 JDBC 的开发的,需要学习完 JDBC 操纵数据库的方法,然后再来学习 Mybatis 才能看到它的优点。在官网学习 Mybatis 是一件很不错的事情,官网写的很精简。
JDBC 的缺点
先说说 JDBC 的缺点,传统使用 JDBC 操纵数据库,可以看到很多结构差不多的代码,并且 url、username、password 这些字段都是硬编码的,如果更改了这些数据,代码就要做出大量的改动,成本是很高的;使用 JDBC 操纵数据库还很繁琐,需要手动设置参数,手动封装结果集等。
上面说的 JDBC 的两个缺点:
- 硬编码
- 操作繁琐
使用了 Mybatis 之后就会迎刃而解。
Mybatis 快速入门
查找 user 表中所有的数据
-
创建 user 表,添加数据
DROP TABLE IF EXISTS user; CREATE TABLE user ( id INT PRIMARY KEY AUTO_INCREMENT, username VARCHAR(20), password VARCHAR(20), gender CHAR(1), addr VARCHAR(30) ); INSERT INTO user(username, password, gender, addr) VALUES ('Struggle', 'yxxx11280420', '男', '深圳'), ('Ava', '15814431935', '女', '湛江'), ('BugMaker', 'debug', '男', '广州'); SELECT * FROM user; -
创建 maven 项目,导入依赖坐标(Mysql 驱动 + MyBatis 依赖 + Junit 测试依赖),并建立好项目的结构
<!-- MySQL 驱动依赖 -->
<dependency>
    <groupId>mysql</groupId>
    <artifactId>mysql-connector-java</artifactId>
    <version>5.1.48</version>
</dependency>
<!-- MyBatis 依赖 -->
<dependency>
    <groupId>org.mybatis</groupId>
    <artifactId>mybatis</artifactId>
    <version>3.5.6</version>
</dependency>
<!-- junit 依赖 -->
<dependency>
    <groupId>junit</groupId>
    <artifactId>junit</artifactId>
    <version>4.13.1</version>
    <scope>test</scope>
</dependency>

-
配置 mybatis,创建 mybatis-config.xml 文件在 ressources 目录下(这里通过 environment 标签配置,需要修改的就是数据库连接信息部分)
<?xml version="1.0" encoding="UTF-8" ?> <!DOCTYPE configuration PUBLIC "-//mybatis.org//DTD Config 3.0//EN" "http://mybatis.org/dtd/mybatis-3-config.dtd"> <configuration> <!-- 类型别名 --> <typeAliases> <typeAlias alias="User" type="com.bugmaker.pojo.User"/> </typeAliases> <!-- 可配置多个 environment 通过 default 属性切换 --> <environments default="development"> <environment id="development"> <transactionManager type="JDBC"/> <dataSource type="POOLED"> <!-- 数据库连接信息 --> <property name="driver" value="com.mysql.jdbc.Driver"/> <property name="url" value="jdbc:mysql://localhost:3306/mybatis?useSSL=false"/> <property name="username" value="root"/> <property name="password" value="fan1229417754"/> </dataSource> </environment> </environments> <mappers> <mapper resource="com/bugmaker/mapper/UserMapper.xml"/> </mappers> </configuration> -
定义 POJO 类(里面的属性对应数据库表中的字段)
package com.bugamker.pojo; /** * User 实体类 */ public class User { private Integer id; private String username; private String password; private String gender; private String address; public Integer getId() { return id; } public void setId(Integer id) { this.id = id; } public String getUsername() { return username; } public void setUsername(String username) { this.username = username; } public String getPassword() { return password; } public void setPassword(String password) { this.password = password; } public String getGender() { return gender; } public void setGender(String gender) { this.gender = gender; } public String getAddress() { return address; } public void setAddress(String address) { this.address = address; } @Override public String toString() { return "User{" + "id=" + id + ", username='" + username + '\'' + ", password='" + password + '\'' + ", gender='" + gender + '\'' + ", address='" + address + '\'' + '}'; } } -
编写 UserMapper 接口
package com.bugamker.mapper; import com.bugamker.pojo.User; import java.util.List; public interface UserMapper { List<User> selectAll(); } -
编写 UserMapper.xml 映射文件
<?xml version="1.0" encoding="UTF-8" ?>
<!DOCTYPE mapper
        PUBLIC "-//mybatis.org//DTD Mapper 3.0//EN"
        "http://mybatis.org/dtd/mybatis-3-mapper.dtd">
<mapper namespace="com.bugmaker.mapper.UserMapper">
    <resultMap id="userResultMap" type="User">
        <result column="addr" property="address"/>
    </resultMap>
    <select id="selectAll" resultMap="userResultMap">
        select * from user
    </select>
</mapper>
现在整个项目的结构如下:

-
编码
@Test
public void testMybatis() throws IOException {
    // 加载 mybatis-config 配置文件 获取 SqlSessionFactory
    String resource = "mybatis-config.xml";
    InputStream is = Resources.getResourceAsStream(resource);
    SqlSessionFactory factory = new SqlSessionFactoryBuilder().build(is);
    // 获取 SqlSession 对象 (用来执行 SQL)
    try (SqlSession session = factory.openSession()) {
        // 获取 UserMapper 接口代理对象
        UserMapper mapper = session.getMapper(UserMapper.class);
        // 执行 sql
        List<User> users = mapper.selectAll();
        for (User u :
             users) {
            System.out.println(u);
        }
    }
}
User{id=1, username='Struggle', password='yxxx11280420', gender='男', address='深圳'} User{id=2, username='Ava', password='15814431935', gender='女', address='湛江'} User{id=3, username='BugMaker', password='debug', gender='男', address='广州'}
按照上述这个步骤,是没有问题的,需要注意的地方是 mybatis-config.xml 配置文件中,配置 UserMapper.xml 的路径问题,很容易出错,可以使用以下技巧,在 IDEA 中右键点击 UserMapper.xml 获取相对于 Source root 的路径
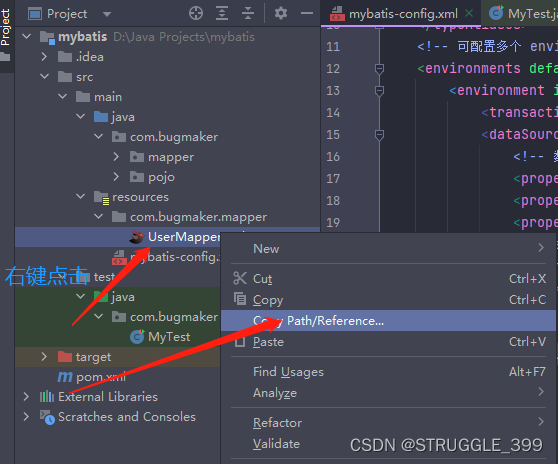
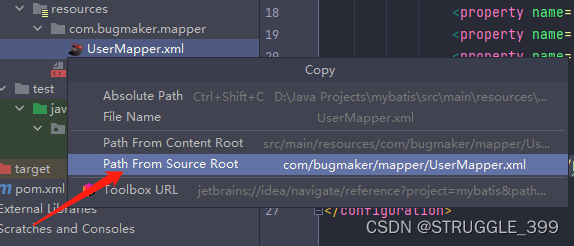
拷贝后复制,然后到 mybatis 中配置 mapper 映射文件即可
<mappers>
    <mapper resource="com/bugmaker/mapper/UserMapper.xml"/>
</mappers>
【总结】这个入门的案例使用的是 Mapper 代理开发,这是常用的方式,在使用 Mybatis 开发时,只要完成了上面的步骤即可,顺序不一定要一致。
学过 JDBC 的应该都会知道 JDBC 编码的繁琐性以及硬编码缺点,而使用了 Mybatis ,从这个案例就可以看到,mybatis 为我们解决了 JDBC 的硬编码,数据库连接信息写入配置文件,修改时不需要修改源代码,系统耦合性大大降低;除此之外,mybatis 还帮我们包装好数据,非常方便。
接下来就是介绍 Mybatis 的一些使用细节
Mybatis 配置文件
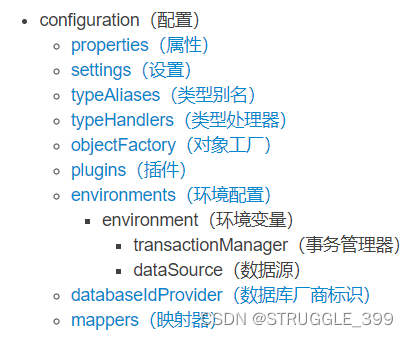
配置各个标签时,需要遵循前后顺序
下面只介绍三个标签:typeAliases、encironments、mappers
环境配置(environments)
MyBatis 可以配置成适应多种环境,这种机制有助于将 SQL 映射应用于多种数据库之中, 现实情况下有多种理由需要这么做。例如,开发、测试和生产环境需要有不同的配置;或者想在具有相同 Schema 的多个生产数据库中使用相同的 SQL 映射。还有许多类似的使用场景。
environments(环境配置):environments 配置数据库连接环境信息,可以配置 environment,通过default属性切换到不同的 environment
Example:
<environments default="development">
    <environment id="development">
        <transactionManager type="JDBC"/>
        <dataSource type="POOLED">
            <!--                数据库连接信息 -->
            <property name="driver" value="com.mysql.jdbc.Driver"/>
            <property name="url" value="jdbc:mysql://localhost:3306/db?useSSL=false"/>
            <property name="username" value="root"/>
            <property name="password" value="fan1229417754"/>
        </dataSource>
    </environment>

    <environment id="test">
        <transactionManager type="JDBC"/>
        <dataSource type="POOLED">
            <!--                数据库连接信息 -->
            <property name="driver" value="com.mysql.jdbc.Driver"/>
            <property name="url" value="jdbc:mysql://localhost:3306/db_test?useSSL=false"/>
            <property name="username" value="root"/>
            <property name="password" value="fan1229417754"/>
        </dataSource>
    </environment>
</environments>
类型别名(typeAliases)
typeAliases(类型别名):类型别名可以为 Java 类型设置一个缩写名字。仅用于 XML 配置,旨在降低冗余的全限定类名书写,例如:
<typeAliases>
  <typeAlias alias="Author" type="domain.blog.Author"/>
  <typeAlias alias="Blog" type="domain.blog.Blog"/>
  <typeAlias alias="Comment" type="domain.blog.Comment"/>
  <typeAlias alias="Post" type="domain.blog.Post"/>
  <typeAlias alias="Section" type="domain.blog.Section"/>
  <typeAlias alias="Tag" type="domain.blog.Tag"/>
</typeAliases>
当这样配置时,Blog 可以用在任何使用 domain.blog.Blog 的地方。
也可以指定一个包名,MyBatis 会在包名下面搜索需要的 Java Bean,比如:
<typeAliases>
  <package name="domain.blog"/>
</typeAliases>
每一个在包 domain.blog 中的 Java Bean,在没有注解的情况下,会使用 Bean 的首字母小写的非限定类名来作为它的别名。 比如 domain.blog.Author 的别名为 author;若有注解,则别名为其注解值。见下面的例子:
@Alias("author")
public class Author {
    ...
}
映射器(mappers)
这些配置会告诉 MyBatis 去哪里找映射文件
<!-- 使用相对于类路径的资源引用 -->
<mappers>
  <mapper resource="org/mybatis/builder/AuthorMapper.xml"/>
  <mapper resource="org/mybatis/builder/BlogMapper.xml"/>
  <mapper resource="org/mybatis/builder/PostMapper.xml"/>
</mappers>
<!-- 使用完全限定资源定位符(URL) -->
<mappers>
  <mapper url="file:///var/mappers/AuthorMapper.xml"/>
  <mapper url="file:///var/mappers/BlogMapper.xml"/>
  <mapper url="file:///var/mappers/PostMapper.xml"/>
</mappers>
<!-- 使用映射器接口实现类的完全限定类名 -->
<mappers>
  <mapper class="org.mybatis.builder.AuthorMapper"/>
  <mapper class="org.mybatis.builder.BlogMapper"/>
  <mapper class="org.mybatis.builder.PostMapper"/>
</mappers>
<!-- 将包内的映射器接口实现全部注册为映射器 -->
<mappers>
  <package name="org.mybatis.builder"/>
</mappers>
Mybatis 中一些常见的问题及使用建议
-
mapper 映射文件导入出错
一般是路径问题,上面的入门案例有解决方案
-
实体类属性名与数据库表的字段名不一致
-
解决方案一是 SQL 语句中为不一致的字段起别名,但是这样会比较繁琐,不推荐
-
解决方案二是 Mapper 配置文件中添加
ResultMap标签,将不一致的字段产生映射关系- result 标签中 column 属性对应数据库表中字段名,property 对应 实体类的属性名
- id 标签是类似的,如果 id (主键)名称不一致,使用这个标签表示映射关系
<?xml version="1.0" encoding="UTF-8" ?>
<!DOCTYPE mapper
        PUBLIC "-//mybatis.org//DTD Mapper 3.0//EN"
        "http://mybatis.org/dtd/mybatis-3-mapper.dtd">
<mapper namespace="com.bugmaker.mapper.BrandMapper">
    <resultMap id="brandResultMap" type="Brand">
        <result column="brand_name" property="brandName"/>
        <result column="company_name" property="companyName"/>
<!--        <id column="id" property="id"/>-->
    </resultMap>
</mapper>
-
-
对于一些 type 属性,往往是需要使用全限定名的,比如
com.bugmaker.pojo.User,非常繁琐,因此可以在 mybaits-config.xml 配置文件中声明别名:<!-- 类型别名 --> <typeAliases> <typeAlias alias="User" type="com.bugmaker.pojo.User"/> </typeAliases> -
如何获取自增主键?
比如插入一个品牌数据,获取其自增主键的方式在 insert 标签中添加
useGeneratedKeys="true",并且keyProperty="id"(用来存放获取的自增主键的位置)public interface BrandMapper { /** * 添加一个品牌 * @param brand brand */ void insert(Brand brand); }<insert id="insert" useGeneratedKeys="true" keyProperty="id"> insert into tb_brand(brand_name, company_name, ordered, description, status) values(#{brandName}, #{companyName}, #{ordered}, #{description}, #{status}) </insert>经过上面的配置,在调用了 insert 方法后,brand 对象的 id 不再为 null,而是返回的自增主键。
-
Mybatis 中 SQL 映射文件的
${}和#{}有什么区别- 这两个都是充当一个占位符,用来获取传入的参数
#{}可以防止 SQL 注入攻击,而${}不可以防止 SQL 注入攻击- 这是因为使用了
#{},会跟 JDBC 的 PreparedStatement 的预编译 SQL 语句类似,开启了预编译功能,会对敏感字符进行转义。
- 这是因为使用了
#{}的效率更高,因为采用了预编译
-
编写 SQL 映射文件,一些特殊字符出错如何处理?
-
比如遇到 < 号,这在 xml 中是标签的开始标志,因此如果编写出下面的 SQL 语句是会报错的
<select id="select" type="Brand"> select * from tb_brand where ordered < #{ordered} </select> -
解决方案:
-
可以使用转义字符
<select id="select" type="Brand"> select * from tb_brand where ordered $lt; #{ordered} </select> -
使用 CDATA 区
<select id="select" type="Brand">
	select * from tb_brand where ordered <![CDATA[<]]> #{ordered}
</select>
-
-
-
SQL 语句设置多个参数的方式
- 散装参数:需要使用
@Param("SQL中的参数占位符名称")(推荐,可读性高) - 实体类封装参数 :只需要保证 SQL 中的参数名和实体类的属性名对应上,即可设置成功
- Map 集合:只需要保证 SQL 中的参数名 和 map 集合的
key对应上,即可设置成功
- 散装参数:需要使用
-
Mybatis 动态 SQL 使用
SQL 语句会随着用户的输入或者外部条件的变化而变化,称为 动态 SQL
MyBatis 对动态 SQL 有强大的支撑:
-
if:条件判断-
test属性:逻辑表达式<!-- 动态 SQL --> <select id="selectByCondition" resultMap="brandResultMap"> select * from tb_brand where <if test="status != null"> status=#{status} </if> <if test="companyName != null and companyName != ''"> and company_name like #{companyName} </if> <if test="brandName != null and brandName != ''"> and brand_name like #{brandName} </if> </select> -
问题:当第第一个参数为空时,SQL语句可能出现语法错误
-
恒等式:
1=1,在前面添加一个恒等式,SQL语句语法始终语法正确<!-- 动态 SQL --> <select id="selectByCondition" resultMap="brandResultMap"> select * from tb_brand where 1=1 <if test="status != null"> and status=#{status} </if> <if test="companyName != null and companyName != ''"> and company_name like #{companyName} </if> <if test="brandName != null and brandName != ''"> and brand_name like #{brandName} </if> </select> -
<where>标签替换where关键字(常用)原理:配置了 where 标签,mybatis 会去除一些语法错误,如果 where 关键字跟了一个 and ,mybatis 回去除这个 and。
<!-- 动态 SQL -->
<select id="selectByCondition" resultMap="brandResultMap">
    select *
    from tb_brand
    <where>
        <if test="status != null">
            and status=#{status}
        </if>
        <if test="companyName != null and companyName != ''">
            and company_name like #{companyName}
        </if>
        <if test="brandName != null and brandName != ''">
            and brand_name like #{brandName}
        </if>
    </where>
</select>
类似的标签还有
<set>
-
-
-
配置文件完成增删改查
需要完成的功能:
- 查询
- 查询所有数据
- 查看详情
- 条件查询
- 添加
- 修改
- 修改全部字段
- 修改动态字段
- 删除
- 删除一个
- 批量删除
环境准备
新建表:
DROP TABLE IF EXISTS tb_brand;

CREATE TABLE tb_brand (
	id INT PRIMARY KEY AUTO_INCREMENT,
	brand_name VARCHAR(32),
	company_name VARCHAR(32),
	ordered INT,
	description VARCHAR(128),
	status INT
);

INSERT INTO tb_brand(brand_name, company_name, ordered, description, status)
VALUES
	('三只松鼠', '三只松鼠股份有限公司', 5, '好吃不上火', 0),
	('华为', '华为技术有限公司', 100, '是中国人就用华为手机',1),
	('小米', '小米科技有限公司', 50, '你没事吧?', 1);

SELECT * FROM tb_brand;
新建实体类 Brand:
package com.bugmaker.pojo;

public class Brand {

    private Integer id;
    private String brandName;
    private String companyName;
    private String ordered;
    private String description;
    private String status;

    public Integer getId() {
        return id;
    }

    public void setId(Integer id) {
        this.id = id;
    }

    public String getBrandName() {
        return brandName;
    }

    public void setBrandName(String brandName) {
        this.brandName = brandName;
    }

    public String getCompanyName() {
        return companyName;
    }

    public void setCompanyName(String companyName) {
        this.companyName = companyName;
    }

    public String getOrdered() {
        return ordered;
    }

    public void setOrdered(String ordered) {
        this.ordered = ordered;
    }

    public String getDescription() {
        return description;
    }

    public void setDescription(String description) {
        this.description = description;
    }

    public String getStatus() {
        return status;
    }

    public void setStatus(String status) {
        this.status = status;
    }

    @Override
    public String toString() {
        return "Brand{" +
                "id=" + id +
                ", brandName='" + brandName + '\'' +
                ", companyName='" + companyName + '\'' +
                ", ordered='" + ordered + '\'' +
                ", description='" + description + '\'' +
                ", status='" + status + '\'' +
                '}';
    }
}
查询-查询所有数据
-
编写接口
/** * 查询所有品牌 * @return 品牌集合 */ List<Brand> selectAll(); -
编写 SQL 语句:SQL 映射文件(BrandMapper.xml)
<select id="selectAll" resultMap="brandResultMap"> select * from tb_brand; </select> -
执行方法,测试(成功)
@Test
public void testSelectAll() throws IOException {
    // 1. 加载 MyBatis 的核心配置文件, 获取 SqlSessionFactory
    String resource = "mybatis-config.xml";
    InputStream inputStream = Resources.getResourceAsStream(resource);
    SqlSessionFactory sqlSessionFactory = new SqlSessionFactoryBuilder().build(inputStream);

    // 2. 获取 SqlSession 对象 用它来执行 sql
    try (SqlSession sqlSession = sqlSessionFactory.openSession()) {
        // 3.1 获取 BrandMapper 接口代理对象
        BrandMapper brandMapper = sqlSession.getMapper(BrandMapper.class);
        // 3.2 执行 SQL 语句
        List<Brand> brands = brandMapper.selectAll();
        for (Brand brand :
             brands) {
            System.out.println(brand);
        }
    }
}
查询-查询详情
-
编写接口方法:Mapper 接口
- 参数:id
- 结果:Brand
-
编写SQL 语句:SQL映射文件
<select id="selectById" parameterType="int" resultMap="brandResultMap"> select * from tb_brand where id=#{id} </select> -
执行方法,测试
@Test
public void testSelectById() throws IOException {
    // 1. 加载 MyBatis 的核心配置文件, 获取 SqlSessionFactory
    String resource = "mybatis-config.xml";
    InputStream inputStream = Resources.getResourceAsStream(resource);
    SqlSessionFactory sqlSessionFactory = new SqlSessionFactoryBuilder().build(inputStream);

    // 2. 获取 SqlSession 对象 用它来执行 sql
    try (SqlSession sqlSession = sqlSessionFactory.openSession()) {
        // 3.1 获取 BrandMapper 接口代理对象
        BrandMapper brandMapper = sqlSession.getMapper(BrandMapper.class);
        // 3.2 执行 SQL 语句
        Brand brand = brandMapper.selectById(3);
        System.out.println(brand);
    }
}
查询-条件查询
-
编写接口方法:Mapper 接口
-
参数:所有查询条件
-
结果:
List<Brand>
// param 注解: List<Brand> selectByCondition( @Param("status") int status, @Param("companyName") String companyName, @Param("brandName") String brandName); -
-
编写 SQL 语句:SQL 映射文件
<select id="selectByCondition" resultMap="brandResultMap"> select * from tb_brand where status=#{status} and company_name like #{companyName} and brand_name like #{brandName} </select> -
编码
@Test
public void testSelectByCondition() throws IOException {
    // 1. 加载 MyBatis 的核心配置文件, 获取 SqlSessionFactory
    String resource = "mybatis-config.xml";
    InputStream inputStream = Resources.getResourceAsStream(resource);
    SqlSessionFactory sqlSessionFactory = new SqlSessionFactoryBuilder().build(inputStream);
	// 接收参数
    String companyName = "华为";
    String brandName = "华为";
    // 处理参数(模糊查询)
    companyName = "%" + companyName + "%";
    brandName = "%" + brandName + "%";
    // 2. 获取 SqlSession 对象 用它来执行 sql
    try (SqlSession sqlSession = sqlSessionFactory.openSession()) {
        // 3.1 获取 BrandMapper 接口代理对象
        BrandMapper brandMapper = sqlSession.getMapper(BrandMapper.class);
        // 3.2 执行 SQL 语句
        List<Brand> brands = brandMapper.selectByCondition(1, companyName, brandName);
        System.out.println(brands);
    }
}
【注】:在 Mybatis 中,传递多个参数除了使用散装参数配合 @Param("SQL中参数占位符的名称") 使用之外,还可以,传递一个 Brand 对象,只要保证 SQL 中的参数名和实体类的属性名对应上即可;也可以使用 Map 集合,SQL 中参数名与 Map 的 key 对应上即可
对应的 SQL 是不需要更改的。
【Mapper 接口】:
List<Brand> selectByCondition(Brand brand);

List<Brand> selectByCondition(Map map);
【实体类封装参数】:
@Test
public void testSelectByConditionBrand() throws IOException {
    // 1. 加载 MyBatis 的核心配置文件, 获取 SqlSessionFactory
    String resource = "mybatis-config.xml";
    InputStream inputStream = Resources.getResourceAsStream(resource);
    SqlSessionFactory sqlSessionFactory = new SqlSessionFactoryBuilder().build(inputStream);

    // 模拟接收参数
    int status = 1;
    String companyName = "华为";
    String brandName = "华为";
    // 处理参数(模糊查询)
    companyName = "%" + companyName + "%";
    brandName = "%" + brandName + "%";
    Brand brand = new Brand();
    brand.setStatus(status);
    brand.setBrandName(brandName);
    brand.setCompanyName(companyName);

    // 2. 获取 SqlSession 对象 用它来执行 sql
    try (SqlSession sqlSession = sqlSessionFactory.openSession()) {
        // 3.1 获取 BrandMapper 接口代理对象
        BrandMapper brandMapper = sqlSession.getMapper(BrandMapper.class);
        // 3.2 执行 SQL 语句
        //            List<Brand> brands = brandMapper.selectByCondition(1, companyName, brandName);
        List<Brand> brands = brandMapper.selectByCondition(brand);
        System.out.println(brands);
    }
}
【Map 集合】
@Test
public void testSelectByConditionBrand() throws IOException {
    // 1. 加载 MyBatis 的核心配置文件, 获取 SqlSessionFactory
    String resource = "mybatis-config.xml";
    InputStream inputStream = Resources.getResourceAsStream(resource);
    SqlSessionFactory sqlSessionFactory = new SqlSessionFactoryBuilder().build(inputStream);

    // 模拟接收参数
    int status = 1;
    String companyName = "华为";
    String brandName = "华为";
    // 处理参数(模糊查询)
    companyName = "%" + companyName + "%";
    brandName = "%" + brandName + "%";
    Map<String, Object> map = new HashMap<>();
    map.put("status", status);
    map.put("brandName", brandName);
    map.put("companyName", companyName);

    // 2. 获取 SqlSession 对象 用它来执行 sql
    try (SqlSession sqlSession = sqlSessionFactory.openSession()) {
        // 3.1 获取 BrandMapper 接口代理对象
        BrandMapper brandMapper = sqlSession.getMapper(BrandMapper.class);
        // 3.2 执行 SQL 语句
        //            List<Brand> brands = brandMapper.selectByCondition(1, companyName, brandName);
        //            List<Brand> brands = brandMapper.selectByCondition(brand);
        List<Brand> brands = brandMapper.selectByCondition(map);
        System.out.println(brands);
    }
}
查询-动态条件查询-动态SQL
根据 status、companyName、brandName 三个属性进行查询,可允许为空
-
编写接口:Mapper接口(就是我们刚刚编写的
selecetByCondition接口) -
编写动态 SQL
<select id="selectByCondition" resultMap="brandResultMap"> select * from tb_brand <where> <if test="status != null"> and status=#{status} </if> <if test="companyName != null and companyName != ''"> and company_name like #{companyName} </if> <if test="brandName != null and brandName != ''"> and brand_name like #{brandName} </if> </where> </select> -
测试代码如前面所示(条件查询),只需要把某些数据不设置即可测试动态 SQL
假如 status、companyName、brandName 三个属性中的一个进行查询,对应的动态 SQL 语句如下:使用了 <where>、<choose>、<when>,其中 <choose> 相当于 Switch 语句,when 相当于 case
<select id="selectBySingleCondition" resultMap="brandResultMap">
    select *
    from tb_brand
    <where>
        <choose><!-- 相当于 switch  -->
            <when test="status != null"><!-- 相当于 Case -->
                and status=#{status}
            </when>
            <when test="brandName != null and brandName != ''"><!-- 相当于 Case -->
                and brand_name like #{brandName}
            </when>
            <when test="companyName != null and companyName != ''"><!-- 相当于 Case -->
                and company_name like #{companyName}
            </when>
        </choose>
    </where>
</select>
添加品牌(获取自增主键)
-
编写接口方法:Mapper接口
- 参数:除了 id 之外的所有数据(因为 id 是自增主键)
- 结果:
void
void addBrand(Brand brand) void addBrand( @Param("brandName") String brandName, @Param("companyName") String companyName, @Param("ordered") int ordered, @Param("description") String description, @Param("status") int status); void addBrand(Map<String, Object> map) -
编写 SQL 语句:SQL 映射文件
<insert id="addBrand" useGeneratedKeys="true"> insert into tb_brand(brand_name, company_name, ordered, description, status) values(#{brandName}, #{companyName}, #{ordered}, #{description}, #{status}) </insert> -
编码
    @Test
    public void testAddBrand() throws IOException {
        // 1. 加载 MyBatis 的核心配置文件, 获取 SqlSessionFactory
        String resource = "mybatis-config.xml";
        InputStream inputStream = Resources.getResourceAsStream(resource);
        SqlSessionFactory sqlSessionFactory = new SqlSessionFactoryBuilder().build(inputStream);
        // 模拟接收参数
        String brandName = "飞利浦";
        String companyName = "飞利浦有限公司";
        int ordered = 20;
        String description = "飞利浦剃须刀, 就是好用";
        int status = 1;
        Brand brand = new Brand();
        brand.setBrandName(brandName);
        brand.setCompanyName(companyName);
        brand.setDescription(description);
        brand.setStatus(status);
        brand.setOrdered(ordered);
        // 2. 获取 SqlSession 对象 用它来执行 sql
        try (SqlSession sqlSession = sqlSessionFactory.openSession()) {
            // 3. 获取 BrandMapper 接口代理对象
            BrandMapper brandMapper = sqlSession.getMapper(BrandMapper.class);
            // 4. 执行 SQL
//            brandMapper.addBrand(brandName, companyName, ordered, description, status);
            brandMapper.addBrand(brand);
            // 获取自增主键
            int insertedKey = brand.getId();
            System.out.println("自增主键: " + insertedKey);
            System.out.println(brandMapper.selectById(insertedKey));
        }
    }
修改-修改全部
-
修改接口方法:Mapper 接口
- 参数:所有数据
- 结果:void
void update(Brand brand); -
编写SQL语句
<update id="updateBrand"> update tb_brand set brand_name=#{brandName}, company_name=#{companyName}, ordered=#{ordered}, description=#{description}, status=#{status} where id={#id} </update> -
编写测试代码:
    @Test
    public void testUpdateBrand() throws IOException {
        // 1. 加载 MyBatis 的核心配置文件, 获取 SqlSessionFactory
        String resource = "mybatis-config.xml";
        InputStream inputStream = Resources.getResourceAsStream(resource);
        SqlSessionFactory sqlSessionFactory = new SqlSessionFactoryBuilder().build(inputStream);
        // 模拟接收参数
        int id = 1;
        String brandName = "华为";
        String companyName = "华为技术有限公司";
        int ordered = 2000;
        String description = "我们中国的华为真的太厉害了";
        int status = 1;
        Brand brand = new Brand();
        brand.setId(id);
        brand.setBrandName(brandName);
        brand.setCompanyName(companyName);
        brand.setDescription(description);
        brand.setStatus(status);
        brand.setOrdered(ordered);
        // 2. 获取 SqlSession 对象 用它来执行 sql
        try (SqlSession sqlSession = sqlSessionFactory.openSession()) {
            // 3. 获取 BrandMapper 接口代理对象
            BrandMapper brandMapper = sqlSession.getMapper(BrandMapper.class);
            // 4. 执行 SQL
            brandMapper.update(brand);
            System.out.println(brandMapper.selectById(id));
        }
    }
修改-修改动态字段
使用 <set> 标签避免错误:
- 当所有内容均为空时,保证 SQL 正确(去掉 set )
- 当
status为空,前面不为空,也会出现语法错误
-
修改接口方法:Mapper 接口
- 参数:所有数据
- 结果:void
void updateBrand(Brand brand); -
编写SQL语句
<update id="updateBrand"> update tb_brand <set> <if test="brandName != null"> brand_name=#{brandName}, </if> <if test="companyName != null"> company_name=#{companyName}, </if> <if test="ordered != null"> ordered=#{ordered}, </if> <if test="description != null"> description=#{description}, </if> <if test="status != null"> status=#{status} </if> </set> where id=#{id} </update> -
编写测试代码:
    @Test
    public void testUpdateBrand() throws IOException {
        // 1. 加载 MyBatis 的核心配置文件, 获取 SqlSessionFactory
        String resource = "mybatis-config.xml";
        InputStream inputStream = Resources.getResourceAsStream(resource);
        SqlSessionFactory sqlSessionFactory = new SqlSessionFactoryBuilder().build(inputStream);
        // 模拟接收参数
        int id = 1;
        String brandName = "华为";
        String companyName = "华为技术有限公司";
        int ordered = 20000;
        String description = "我们中国的华为真的太厉害了";
        int status = 1;
        Brand brand = new Brand();
        brand.setId(id);
//        brand.setBrandName(brandName);
//        brand.setCompanyName(companyName);
        brand.setDescription(description);
        brand.setStatus(status);
        brand.setOrdered(ordered);
        // 2. 获取 SqlSession 对象 用它来执行 sql
        try (SqlSession sqlSession = sqlSessionFactory.openSession()) {
            // 3. 获取 BrandMapper 接口代理对象
            BrandMapper brandMapper = sqlSession.getMapper(BrandMapper.class);
            // 4. 执行 SQL
            brandMapper.update(brand);
            System.out.println(brandMapper.selectById(id));
        }
    }
删除-删除一个
-
编写接口方法:Mapper接口
- 参数:id
- 结果:void 或者 int(删除的行数)
void deleteById(int id) -
编写 SQL,SQL 映射文件
<delete id="deleteById"> delete from tb_brand where id=#{id} </delete> -
编写测试文件
@Test
public void testDeleteById() throws IOException {
    // 1. 加载 MyBatis 的核心配置文件, 获取 SqlSessionFactory
    String resource = "mybatis-config.xml";
    InputStream inputStream = Resources.getResourceAsStream(resource);
    SqlSessionFactory sqlSessionFactory = new SqlSessionFactoryBuilder().build(inputStream);
    // 模拟接收参数
    int deletedId = 48;
    // 2. 获取 SqlSession 对象 用它来执行 sql
    try (SqlSession sqlSession = sqlSessionFactory.openSession()) {
        // 3. 获取 BrandMapper 接口代理对象
        BrandMapper brandMapper = sqlSession.getMapper(BrandMapper.class);
        // 4. 执行 SQL
        System.out.println(brandMapper.selectById(deletedId));
        brandMapper.deleteById(deletedId);
        System.out.println("成功删除...");
    }
}
删除-批量删除
使用 foreach 标签
-
编写接口方法:Mapper接口
- 参数:
id数组 - 返回值:void
void deleteByIds(int[] ids) void deleteByIds(@Param("ids") int[] ids) - 参数:
-
编写 SQL 语句
<delete id="deleteByIds"> delete from tb_brand where <foreach collection="array" item="id" separator="," open="(" close=")"> #{id} </foreach> </delete> -
编码
@Test
public void testDeleteByIds() throws IOException {
    // 1. 加载 MyBatis 的核心配置文件, 获取 SqlSessionFactory
    String resource = "mybatis-config.xml";
    InputStream inputStream = Resources.getResourceAsStream(resource);
    SqlSessionFactory sqlSessionFactory = new SqlSessionFactoryBuilder().build(inputStream);
    // 模拟接收参数
    int[] deletedIds = new int[] { 30, 31, 32};
    // 2. 获取 SqlSession 对象 用它来执行 sql
    try (SqlSession sqlSession = sqlSessionFactory.openSession()) {
        // 3. 获取 BrandMapper 接口代理对象
        BrandMapper brandMapper = sqlSession.getMapper(BrandMapper.class);
        // 4. 执行 SQL
        brandMapper.deleteByIds(deletedIds);
        System.out.println("成功删除...");
    }
}
注解开发
使用注解开发会比配置文件开发更加高效,配置文件是万能的。
- 查询:
@Select - 添加:
@Insert - 修改:
@Update - 删除:
@Delete
将上面的增删改查案例的所有 SQL 映射文件的编写转换为注解方式
    /**
     * 查询所有品牌
     * @return 品牌集合
     */
    @Select("select * from tb_brand")
    @ResultMap("brandResultMap")
    List<Brand> selectAll();

    /**
     * 根据 id 查询
     * @param id id
     * @return brand
     */
    @Select("select * from tb_brand where id=#{id}")
    @ResultMap("brandResultMap")
    Brand selectById(int id);

    /**
     * 根据条件查询
     * @param status 状态
     * @param companyName 公司名
     * @param brandName 品牌名
     * @return brands
     */
    @Select("select * from tb_brand where status=#{status} and company_name like #{companyName} and brand_name like #{brandName}")
    @ResultMap("brandResultMap")
    List<Brand> selectByCondition(@Param("status") int status,
                            @Param("companyName") String companyName,
                            @Param("brandName") String brandName);

    /**
     * 添加品牌 (主键返回)
     * @param brand 品牌名
     */
    @Insert("insert into tb_brand(brand_name, company_name, ordered, description, status)" +
            " values(#{brandName}, #{companyName}, #{ordered}, #{description}, #{status})")
    @Options(useGeneratedKeys = true, keyProperty = "id")
    void addBrand(Brand brand);
【问题】:使用注解配置动态 SQL 会显得力不从心。
使用注解来映射简单语句会使代码显得更加简洁,但对于稍微复杂一点的语句,Java 注解不仅力不从心,还会让本就复杂的 SQL 语句更加混乱不堪。 因此,如果你需要做一些很复杂的操作,最好用 XML 来映射语句。
最佳实践:
- 注解完成简单功能
- 配置文件完成复杂功能(如动态 SQL)


 260
260

 被折叠的 条评论
为什么被折叠?
被折叠的 条评论
为什么被折叠?
 到【灌水乐园】发言


