


| 环境 | 简述 |
|---|---|
| python3.7 Tensorflow | 卷积神经网络对花卉图片进行识别 |
VGG.py
这一部分包括数据处理,模型定义,模型训练。
1、第26行的名称为数据集文件夹每一类花的文件夹名字
2、第27行到44行的内容在运行一次后可以添上注释,这是数据处理的部分,处理后保存到了npy文件,后续直接读取就行。
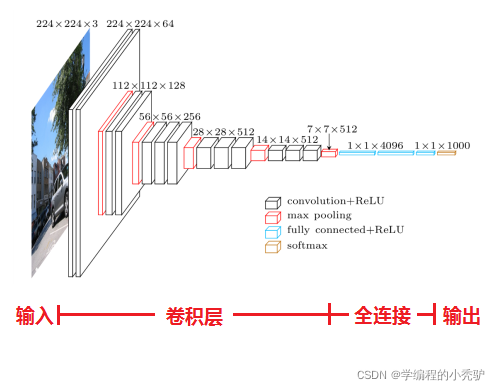
3、选择VGG16作为基础模型,再次基础上进行训练,通过设计include_top=False,可以获得不含全连接层的基础网络。
import pandas as pd
import numpy as np
from tensorflow.keras.models import *
from tensorflow.keras.applications import ResNet50,VGG16,MobileNet,InceptionV3,NASNetLarge
import os
from tensorflow.keras import layers, optimizers, models
from tensorflow.keras.callbacks import ModelCheckpoint
from tensorflow.keras.layers import *
from tensorflow.keras.models import Model
from sklearn.model_selection import train_test_split
from tensorflow.keras.utils import to_categorical
import tensorflow as tf
from sklearn.metrics import confusion_matrix, classification_report
from sklearn.tree import DecisionTreeClassifier
import cv2
import glob
import sklearn.metrics as metrics
import matplotlib.pyplot as plt
import warnings
from tensorflow.keras.models import load_model
warnings.filterwarnings("ignore")

print("Num GPUs Available: ", len(tf.config.experimental.list_physical_devices('GPU')))
tf.debugging.set_log_device_placement(True)

names = ['bee_balm','blackberry_lily','blanket_flower','bougainvillea','bromelia', 'foxglove']
X = []
Y = []
for i in names:
    # 遍历文件夹,读取图片
    for f in os.listdir(r"./data/train_data/{}".format(i)):
        print(f)
        Images = cv2.imread(r"./data/train_data/{}/{}".format(i, f))  # images[i,j,k]
        # resize函数图像缩放
        image = cv2.resize(Images, (256, 256), interpolation=cv2.INTER_CUBIC)  # INTER_CUBIC-基于4x4像素邻域的3次插值法
        X.append(image)
        Y.append(i)
X = np.array(X)
Y = np.array(Y)
print(X)
print(Y)
print("结束了")
np.save('x.npy',X)
np.save('y.npy',Y)
X_path = 'x.npy'
Y_path = 'y.npy'
X = np.load(X_path)
Y = np.load(Y_path)
labels= {'bee_balm':0,'blackberry_lily':1, 'blanket_flower':2,'bougainvillea':3,'bromelia':4, 'foxglove':5}
Y = pd.DataFrame(Y)
Y[0]=Y[0].map(labels)
Y = Y.values.flatten()
Y = to_categorical(Y, 6)
X = X/255
# print(X.shape)
# print(X)
# print(Y)
# print("结束")
x_train, x_test, y_train, y_test = train_test_split(X, Y,
                                                    test_size=0.2, random_state=1)


def model():
    conv_base = VGG16(weights='imagenet', include_top=False, input_shape=(256, 256, 3))
    model = models.Sequential()
    model.add(conv_base)
    # model.add(GlobalAveragePooling2D())
    model.add(Dropout(0.3))
    model.add(layers.Flatten())
    model.add(Dense(512, activation='relu'))
    model.add(layers.Dense(6, activation='softmax'))
    conv_base.trainable = True
    model.compile(loss='categorical_crossentropy', optimizer=optimizers.Adam(lr=0.0001),
                  metrics=['categorical_accuracy'])
    model.summary()
    return model
# model=model()
# early_stop = tf.keras.callbacks.EarlyStopping(monitor='val_loss', patience=6)
# model_checkpoint = ModelCheckpoint('model2.hdf5', monitor='loss', verbose=1, save_best_only=True)
# history = model.fit(x_train, y_train, epochs=20, batch_size=32,validation_data=(x_test,y_test),callbacks=[early_stop,model_checkpoint])
# model.save("model1.h5")

model=load_model('model1.h5')
pred = model.predict(x_test)
y = np.argmax(pred, axis=-1)
y_test = np.argmax(y_test, axis=-1)
print(confusion_matrix(y_test, y))
print(classification_report(y_test, y))
cm = confusion_matrix(y_test, y)
print(cm)
plt.imshow(cm, cmap=plt.cm.BuPu)
# ticks 坐标轴的坐标点
# label 坐标轴标签说明
indices = range(len(cm))
# 第一个是迭代对象,表示坐标的显示顺序,第二个参数是坐标轴显示列表
#plt.xticks(indices, [0, 1, 2])
#plt.yticks(indices, [0, 1, 2])
label_name = ['bee_balm','blackberry_lily','blanket_flower','bougainvillea','bromelia', 'foxglove']
ax = plt.gca()
plt.xticks(indices,label_name,fontsize=8)
ax.xaxis.set_ticks_position("top")
plt.yticks(indices, label_name,fontsize=8)
plt.colorbar()
plt.xlabel('预测值')
plt.ylabel('真实值')
plt.title('混淆矩阵')
# plt.rcParams两行是用于解决标签不能显示汉字的问题
plt.rcParams['font.sans-serif']=['SimHei']
plt.rcParams['axes.unicode_minus'] = False
#
# 显示数据
for first_index in range(len(cm)):    #第几行
    for second_index in range(len(cm[first_index])):    #第几列
        plt.text(first_index, second_index, cm[first_index][second_index],fontdict={'size':6})
# 显示
plt.show()
plt.savefig("混淆矩阵.png");
# ----------------------------------------------------------------------------------------------
main.py
先跑vgg.py进行训练,然后用main.py读取训练的模型进行预测
from tensorflow.keras.models import *
import pandas as pd
import cv2
import numpy as np
def model():
    model = load_model('model1.h5')
    return model

def read(path):

    img = cv2.imread(path)
    img = cv2.resize(img, (256, 256), interpolation=cv2.INTER_CUBIC)
    img = img / 255
    img = img.reshape(1, 256, 256, 3)
    return img
def pre(model,img):
    pred = model.predict(img)
    y = np.argmax(pred, axis=-1)
    labels= {0:'bee_balm',1:'blackberry_lily', 2:'blanket_flower',3:'bougainvillea',4:'bromelia', 5:'foxglove'}
    y = pd.DataFrame(y)
    y[0]=y[0].map(labels)
    y = y.values.flatten()
    print('此花为:',y)
    return y

if __name__ =='__main__':
    path = r'./data/test/test6.jpg'
    img = read(path)
    model = model()
    pred = pre(model,img)
UI.py
进行UI界面的设计。
from PyQt5 import QtCore, QtGui, QtWidgets
import sys
from PyQt5 import QtCore,QtWidgets
from PyQt5.QtWidgets import QApplication,  QFileDialog
from PyQt5.QtGui import QPixmap
import main as sb
from tensorflow.keras.models import load_model
class Ui_Form(object):
    def setupUi(self, Form):
        Form.setObjectName("Form")
        Form.resize(765, 402)
        self.centralwidget = QtWidgets.QWidget(Form)
        self.label = QtWidgets.QLabel(Form)
        self.label.setGeometry(QtCore.QRect(70, 50, 256, 256))
        self.label.setObjectName("label")
        self.pushButton = QtWidgets.QPushButton(Form)
        self.pushButton.setGeometry(QtCore.QRect(560, 300, 151, 61))
        self.pushButton.setObjectName("pushButton")
        self.textBrowser = QtWidgets.QTextBrowser(Form)
        self.textBrowser.setGeometry(QtCore.QRect(420, 50, 256, 51))
        self.textBrowser.setStyleSheet("border:0px;\n""")
        self.textBrowser.setObjectName("textBrowser")
        self.pushButton_2 = QtWidgets.QPushButton(Form)
        self.pushButton_2.setGeometry(QtCore.QRect(380, 300, 151, 61))
        self.pushButton_2.setObjectName("pushButton_2")
        self.textBrowser_1 = QtWidgets.QTextBrowser(Form)
        self.textBrowser_1.setGeometry(QtCore.QRect(420, 140, 261, 101))
        self.textBrowser_1.setObjectName("textBrowser1")
        self.retranslateUi(Form)
        QtCore.QMetaObject.connectSlotsByName(Form)
        self.pushButton.clicked.connect(self.prediction)
        self.pushButton_2.clicked.connect(self.openimg)

    def openimg(self):
        self.img_file, _ = QFileDialog.getOpenFileName(self.centralwidget, 'Open file',
                                                         r'xhsb\\',
                                                         'Image files (*.jpg)')
        print(self.img_file)
        self.img = QPixmap(self.img_file)
        self.label.setPixmap(self.img)
        self.label.setScaledContents(True)

    def prediction(self):
        str = self.img_file.split('/')[-1]
        str = './data/test/' + str
        self.image=sb.read(str)
        model = sb.model()
        pred = sb.pre(model,self.image)
        pred = str(pred)
        self.textBrowser_1.append("<font size=\"8\" color=\"#000000\">" + '此花为:' + pred + "</font>")
        QtWidgets.QApplication.processEvents()  # 防止进程卡死

    def retranslateUi(self, Form):
        _translate = QtCore.QCoreApplication.translate
        Form.setWindowTitle(_translate("Form", "花卉识别"))
        self.label.setText(_translate("Form", "请上传图片"))
        self.pushButton.setText(_translate("Form", "开始识别"))
        self.textBrowser.setHtml(_translate("Form", "<!DOCTYPE HTML PUBLIC \"-//W3C//DTD HTML 4.0//EN\" \"http://www.w3.org/TR/REC-html40/strict.dtd\">\n"
"<html><head><meta name=\"qrichtext\" content=\"1\" /><style type=\"text/css\">\n"
"p, li { white-space: pre-wrap; }\n"
"</style></head><body style=\" font-family:\'SimSun\'; font-size:9pt; font-weight:400; font-style:normal;\">\n"
"<p align=\"center\" style=\" margin-top:0px; margin-bottom:0px; margin-left:0px; margin-right:0px; -qt-block-indent:0; text-indent:0px;\"><span style=\" font-size:20pt;\">花卉识别系统</span></p></body></html>"))
        self.pushButton_2.setText(_translate("Form", "加载图片"))
if __name__ == '__main__':
    import PyQt5
    app = QApplication(sys.argv)
    ex = Ui_Form()
    window = PyQt5.QtWidgets.QMainWindow()
    ex.setupUi(window)
    window.show()
    sys.exit(app.exec_())


 2154
2154

 被折叠的 条评论
为什么被折叠?
被折叠的 条评论
为什么被折叠?
 到【灌水乐园】发言


