


GNDnet代码学习记录
GNDNET 自动驾驶车辆的快速地平面估计和点云分割 这篇文章的主要工作是在pointpillar上进行延伸来进行地面点和非地面的划分。
GNGnet数据生成部分
主要是在dataset_utils部分
gnd_data_generator/semKitti_morph_data.py
这个文件是作者魔改了python调用semkitti数据集的api,相当于一个semKitti到python的parser,可以使得semkitti数据集的数据被numpy所使用。同时使用了morph方法生成了数据集。
简单理解
semKitti_morph_data.py:
输入为semkitti原始数据(包括点云,label,pose等)
通过ros发布到了 节点自动驾驶车辆的快速地平面估计和点云分割
全部的点云发布到了 /kitti/raw/pointcloud
论文中的划分的网格发布 /kitti/ground_marker
这两个节点随后被dataset_generate调用用于生成数据集
详细来看
从数据集提取出数据
for f in range(len(frames)):
    points_path = os.path.join(velodyne_dir, "%06d.bin" % f)
    points = np.fromfile(points_path, dtype=np.float32).reshape(-1, 4)

    label_path = os.path.join(label_dir, "%06d.label" % f)
    label = np.fromfile(label_path, dtype=np.uint32)
    label = label.reshape((-1))
    if label.shape[0] == points.shape[0]:
        sem_label = label & 0xFFFF  # semantic label in lower half
    label = np.expand_dims(label, axis = 1)
    points = np.concatenate((points,label), axis = 1)

    if angle > 5.0:
        increase = False
    elif angle < -5.0:
        increase = True


    if increase:
        angle +=0.1
    else:
        angle -=0.1
随机旋转,增加样本随机性(上坡,下坡)
points = rotate_cloud(points, theta = [0,5,angle]) #zyx
morph方法生成height-map
height-map是100*100网格(可以调整),其中每个网格的点的高度平均值来作为height,用作后面的标签
cloud = process_cloud(points)
gnd_data_generator\dataset_generator.py
这个文件主要是将前面semKitti_morph_data.py发布到ros的数据转化为np数组并存储起来作为训练数据。
初始化函数,当有消息进入是触发回调函数
# self.point_cloud_sub = message_filters.Subscriber("/kitti/classified_cloud", PointCloud2)
self.point_cloud_sub = message_filters.Subscriber("/kitti/raw/pointcloud", PointCloud2)#点云选取的是所有的点,包括gnd和non-gnd
self.ground_marker_sub = message_filters.Subscriber('/kitti/ground_marker', Marker)#以及生成的高度地图利用gnd的点
# 选取这两种来生成数据

ts = ApproximateTimeSynchronizer([self.point_cloud_sub, self.ground_marker_sub],10, 0.1, allow_headerless=True)
# 时间同步器,它接收来自多个源的不同类型的消息,并且仅当它们在具有相同时间戳的每个源上接收到消息时才输出它们,也就是起到了一个消息同步输出的效果。
#分别订阅不同的需要融合的传感器的主题,通过TimeSynchronizer 统一接收多个主题,并产生一个同步结果的回调函数,在回调函数里处理同步时间后的数据。
ts.registerCallback(self.callback)
#使用registerCallback()方法注册多个回调,他们将会按照注册的顺序依次进行调用。N个单独的过滤器,每个过滤器都有签名回调(msg)
# 接收到消息传给回调callback
得到数据并储存
gnd_label = process_label(ground_msg) #针对gnd map 此方法提取出 gnd的z值
# label_time = time.time()

#@imp: We are subscribing classified cloud which is wrt base_link so no need to shift the point cloud.in z direction
cloud = process_cloud(cloud_msg)
# cloud_time = time.time()

# print("label_process: ", label_time- start_time)
# print("cloud_process: ", cloud_time- label_time)

recorder(cloud, gnd_label, self.count)
end_time = time.time()
print("total_process: ", end_time- start_time, self.count)
self.count += 1
GroundEstimatorNet 主干网络
如论文中的流程,可得
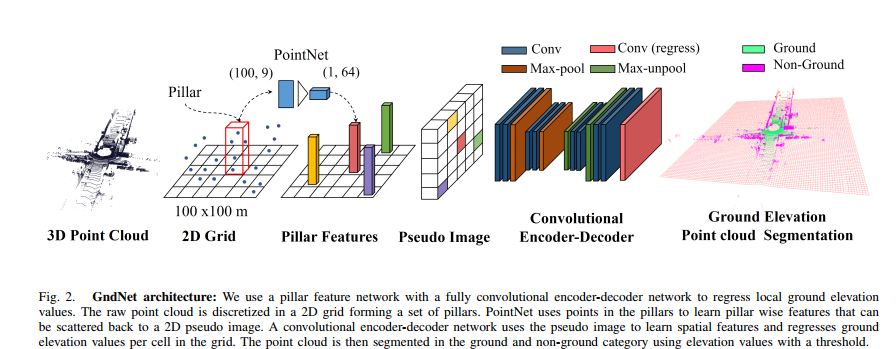
网络结构分为三部分
利用PillarFeatureNet提取feature
PillarFeatureNet:
输入为voxel 的点云 其中 feature为4 x,y,z和强度 得到voxel 提取feature
        Pillar Feature Net.
        The network prepares the pillar features and performs forward pass through PFNLayers. This net performs a
        similar role to SECOND's second.pytorch.voxelnet.VoxelFeatureExtractor.
        :param num_input_features: <int>. Number of input features, either x, y, z or x, y, z, r.
        :param use_norm: <bool>. Whether to include BatchNorm.
        :param num_filters: (<int>: N). Number of features in each of the N PFNLayers.
        :param with_distance: <bool>. Whether to include Euclidean distance to points.
        :param voxel_size: (<float>: 3). Size of voxels, only utilize x and y size.
        :param pc_range: (<float>: 6). Point cloud range, only utilize x and y min.
        """
利用PointPillarsScatter网络将输入变为伪图像
"""
Point Pillar's Scatter.
Converts learned features from dense tensor to sparse pseudo image. This replaces SECOND's
second.pytorch.voxelnet.SparseMiddleExtractor.
:param output_shape: ([int]: 4). Required output shape of features.
:param num_input_features: <int>. Number of input features.
"""
利用segnetGndEst作为编码器实现分割
# Forked from https://github.com/meetshah1995/pytorch-semseg
将伪图像进行分割 得到最终的结果
前向传播为三者的传递
训练过程
数据集读取
train_loader = get_train_loader(cfg.data_dir, cfg.batch_size, skip = 4)
具体来说,从data文件夹读取data和label
def __init__(self, data_dir, train = True, skip_frames = 1):
   self.train = train

   if self.train:
      self.train_data = []
      self.train_labels = []
      print('loading training data ')
      seq_folders = os.listdir(data_dir +"training/")
      for seq_num in seq_folders:
         seq_path = data_dir +"training/"+ "seq_"+ "%03d" % int(seq_num.split("_")[1])
         files_in_seq = os.listdir(seq_path + '/reduced_velo/')

         for data_num in range(0, len(files_in_seq),skip_frames): # too much of dataset we skipping files
            data_path = seq_path + '/reduced_velo/' + "%06d.npy" % data_num
            point_set = np.load(data_path) #(N,3) point set
            self.train_data.append(point_set)

            label_path = seq_path + '/gnd_labels/' + "%06d.npy" % data_num
            label = np.load(label_path) # (W x L)
            self.train_labels.append(label)
def get_train_loader(data_dir, batch = 4, skip = 1):

   use_cuda = torch.cuda.is_available()
   if use_cuda:
      print("using cuda")
      num_workers = 1
      pin_memory = True
   else:
      num_workers = 4
      pin_memory = True

   train_loader = DataLoader(kitti_gnd(data_dir,train = True, skip_frames = skip),
               batch_size= batch, num_workers=num_workers, pin_memory=pin_memory,shuffle=True,drop_last=True)

   print("Train Data size ",len(train_loader)*batch)

   return train_loader
点云 到 voxel voxel就是把所有的点划分到不同的区域
输出为原始的点(每一组个数相同 如果有多的就随机选取,有少的就补0)
中心点坐标
及个数
v, c, n = points_to_voxel(data[i], cfg.voxel_size, cfg.pc_range, cfg.max_points_voxel, True, cfg.max_voxels)
ef points_to_voxel(points,
                     voxel_size,
                     coors_range,
                     max_points=35,
                     reverse_index=True,
                     max_voxels=20000):
    """convert kitti points(N, >=3) to voxels. This version calculate
    everything in one loop. now it takes only 4.2ms(complete point cloud)
    with jit and 3.2ghz cpu.(don't calculate other features)
    Note: this function in ubuntu seems faster than windows 10.

    Args:
        points: [N, ndim] float tensor. points[:, :3] contain xyz points and
            points[:, 3:] contain other information such as reflectivity.
        voxel_size: [3] list/tuple or array, float. xyz, indicate voxel size
        coors_range: [6] list/tuple or array, float. indicate voxel range.
            format: xyzxyz, minmax
        max_points: int. indicate maximum points contained in a voxel.
        reverse_index: boolean. indicate whether return reversed coordinates.
            if points has xyz format and reverse_index is True, output
            coordinates will be zyx format, but points in features always
            xyz format.
        max_voxels: int. indicate maximum voxels this function create.
            for second, 20000 is a good choice. you should shuffle points
            before call this function because max_voxels may drop some points.

    Returns:
        voxels: [M, max_points, ndim] float tensor. only contain points.
        coordinates: [M, 3] int32 tensor.
        num_points_per_voxel: [M] int32 tensor.
    """
从数据来说,输入为data[i] 10000*4的矩阵
输出为
voxels :3142x100x4
coordinate:3142*3
num_points_per_voxel 100
for循环完得到所有的data
voxels = torch.cat(voxels).float().cuda()
coors = torch.cat(coors).float().cuda()
num_points = torch.cat(num_points).float().cuda()
labels = labels.float().cuda()
loss 及反向传播
num_points_per_voxel
loss = cfg.alpha * lossHuber(output, labels) + cfg.beta * lossSpatial(output)
loss.backward()
losses.update(loss.item(), B)
evaluate_SemanticKITTI.py 评估模型
提供了三种评价指标
iou
prec
recall
以及 可视化
(未完) 手推一遍反向传播过程
loss = cfg.alpha * lossHuber(output, labels) + cfg.beta * lossSpatial(output)
引用自https://blog.youkuaiyun.com/qq_40520596/article/details/105299987
Huber Loss 是用于回归问题的带参损失函数, 优点是能增强平方误差损失函数(MSE, mean square error)对离群点的鲁棒性。
- 当预测偏差小于 δ 时,它采用平方误差,
- 当预测偏差大于 δ 时,采用的线性误差。
具体定义如下:

其中 a 表示误差,即
y
−
y
或
是
y
−
f
(
x
)
y− y或是 y − f ( x )
y−y或是y−f(x)
或者 y − f ( x ) y-f(x)y−f(x),因此上式可变为:

SmoothL1 Loss
出自论文:https://arxiv.org/abs/1504.08083
采用该Loss的模型(Faster RCNN,SSD,,)
SmoothL1 Loss是在Fast RCNN论文中提出来的,依据论文的解释,是因为smooth L1 loss让loss对于离群点更加鲁棒,即:相比于L2 Loss,其对离群点、异常值(outlier)不敏感,梯度变化相对更小,训练时不容易跑飞。
假设x是预测框与 groud truth 之间 elementwise 的差异,那么对比L1/L2/SmoothL1 Loss如下:

对应的曲线图如下:

对三个loss的x求导得到:

由(4)可以看到,当x值很大,即遇到的是离群点,异常值时,导数很大。所以在训练初期,预测值与 groud truth 差异过于大时,L2 Loss对预测值的梯度十分大,训练不稳定。
由(5)知道,L1 Loss的导数是常数,那么在训练后期,当预测值与 ground truth 差异很小时, L1 Loss 损失对预测值的导数的绝对值仍然为 1,而 learning rate 如果不变,损失函数将在稳定值附近波动,难以继续收敛以达到更高精度。
而(6)可以看出,smooth L1在 x 较小时,对x 的梯度也会变小,而在 x 很大时,对 x 的梯度的绝对值达到上限 1,也不会太大以至于破坏网络参数。 smooth L1完美地避开了 L1 loss 和 L2 loss 损失的缺陷。
引自:https://blog.youkuaiyun.com/c2250645962/article/details/106023381


 被折叠的 条评论
为什么被折叠?
被折叠的 条评论
为什么被折叠?
 到【灌水乐园】发言


