


简介:本文介绍在Ascend 310平台对MindSpore框架实现的网络进行推理的流程。以CV语义分割网络(HRNet)为例,使用的数据集是Cityscapes,数据文件为PNG图片。使用的中间原语为MindIR,数据格式为二进制流。
建议:可以参考MindSpore ModelZoo master分支下的ResNet系列网络的310推理脚本,是一个不错的完整示例。
注:本文目前仅介绍基于MindIR和二进制流文件的310推理,其他方法随缘更新。仅涉及实际操作流程,具体原理请查阅其他资料。
总体流程
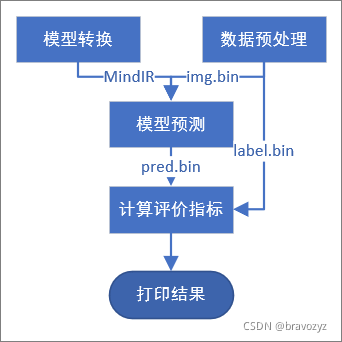
相关脚本
推理过程涉及到一下相关脚本:
export.pypreprocess.pymain.ccpostprocess.py
接下来分别介绍各个脚本的作用。
Export
这一步的工作是将训练得到的checkpoint文件和网络模型转换为MindIR。
相关脚本:export.py
输入:checkpoint文件
输出(*.mindir)位置:自定义
def main():
    """Export mindir for 310 inference."""
    parser = argparse.ArgumentParser("HRNet Semantic Segmentation exporting.")
    parser.add_argument("--device_id", type=int, default=0, help="Device ID. ")
    parser.add_argument("--checkpoint_file", type=str, help="Checkpoint file path. ")
    parser.add_argument("--file_name", type=str, help="Output file name. ")
    parser.add_argument("--file_format", type=str, default="MINDIR",
                        choices=["AIR", "MINDIR"], help="Output file format. ")
    parser.add_argument("--device_target", type=str, default="Ascend",
                        choices=["Ascend", "GPU", "CPU"], help="Device target.")

    args = parser.parse_args()

    context.set_context(mode=context.GRAPH_MODE, device_target=args.device_target)
    if args.device_target == "Ascend":
        context.set_context(device_id=args.device_id)
    # 将此前训练得到的checkpoint导入网络
    net = get_seg_model(config)
    params_dict = load_checkpoint(args.checkpoint_file)
    load_param_into_net(net, params_dict)
    net.set_train(False)
    # 构造一个推理时的模型输入
    height, width = config.eval.image_size[0], config.eval.image_size[1]
    input_data = Tensor(np.zeros([1, 3, height, width], dtype=np.float32))
    # 导出mindir文件
    export
最低0.47元/天 解锁文章


 1530
1530

 被折叠的 条评论
为什么被折叠?
被折叠的 条评论
为什么被折叠?
 到【灌水乐园】发言


