【UVM练习】实验lab0

本文详细介绍了UVM代码编译流程,包括uvm_compile示例,SV和UVM间的联系,验证顶层的区别,以及搭建验证平台和编写测试用例的方法。通过实例展示了如何查看对象和组件继承,以及UVM验证的启动步骤。

摘要生成于 C知道 ,由 DeepSeek-R1 满血版支持, 前往体验 >

1、如何编译UVM代码

首先添加文件,然后编译文件,在work库里面进行模块仿真uvm_compile,命令窗口中运行“run -all” 查看输出仿真语句。

uvm_compile代码:

module uvm_compile;

  import uvm_pkg::*;
  `include "uvm_macros.svh"

  initial begin
    `uvm_info("UVM", "Hello, welcome to RKV UVM training!", UVM_LOW)
    #1us;
    `uvm_info("UVM", "Bye, and more gifts waiting for you!", UVM_LOW)
  end

endmodule

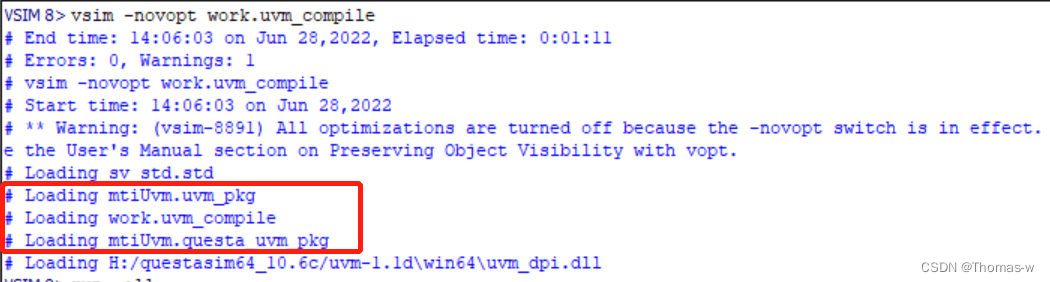
 编译了uvm_compile,但是同样也加载了uvm_pkg,这是因为  import uvm_pkg::*; 已经默认把他编译到mtiuvm里面了,默认已经编译好的库。

sv_std.std:指的是systemverilog的内建包,定义了一些class、task、function和变量;
mtiUvm.uvm_pkg:表示mentor已经编译好的库
mtiUvm.questa_uvm_pkg:是questa专门针对uvm定制的库

无论在什么地方,我们的验证顶层都需要这两句话,代表的是从预编译的UVM库

  import uvm_pkg::*;
  `include "uvm_macros.svh";

2、SV和UVM之间的联系

sv_class_inst代码:

module sv_class_inst;

  import uvm_pkg::*;
  `include "uvm_macros.svh"

  class top;
    function new();
      `uvm_info("SV_TOP", "SV TOP creating", UVM_LOW)
    endfunction
  endclass

  initial begin
    top t; 
    `uvm_info("SV_TOP", "test started", UVM_LOW)
    t = new();
    `uvm_info("SV_TOP", "test finished", UVM_LOW)
  end

endmodule

 运行结果:

 如何查看窗口中t指向的对象,object窗口无法查看,可以通过打开local窗口查看软件变量,方法:首先设置断点,然后运行仿真,最后在local窗口查看。

 除此之外还可以在class instance里面运行。打开class instance窗口,进行仿真,然后设置断点。

vsim -novopt work.sv_class_inst -classdebug

uvm_class_inst代码: 

module uvm_class_inst;

  import uvm_pkg::*;
  `include "uvm_macros.svh"

  class top extends uvm_component;
    `uvm_component_utils(top)
    function new(string name = "top", uvm_component parent = null);
      super.new(name, parent);
      `uvm_info("UVM_TOP", "SV TOP creating", UVM_LOW)
    endfunction
  endclass


  initial begin
    top t; 
    `uvm_info("UVM_TOP", "test started", UVM_LOW)
    t = new("t", null);
    `uvm_info("UVM_TOP", "test finished", UVM_LOW)
  end

endmodule

 使用上面相同的方法,观察top的继承关系。

vsim -novopt work.uvm_class_inst -classdebug

 3、UVM验证顶层和SV验证顶层


package test_pkg;
  import uvm_pkg::*;
  `include "uvm_macros.svh"

  class top extends uvm_test;
    `uvm_component_utils(top)
    function new(string name = "top", uvm_component parent = null);
      super.new(name, parent);
      `uvm_info("UVM_TOP", "SV TOP creating", UVM_LOW)
    endfunction
    task run_phase(uvm_phase phase);
      phase.raise_objection(this);
      `uvm_info("UVM_TOP", "test is running", UVM_LOW)
      phase.drop_objection(this);
    endtask
  endclass

endpackage

module uvm_test_inst;

  import uvm_pkg::*;
  `include "uvm_macros.svh"
  import test_pkg::*;


  initial begin
    `uvm_info("UVM_TOP", "test started", UVM_LOW)
    run_test("top");
    `uvm_info("UVM_TOP", "test finished", UVM_LOW)
  end

endmodule

 运行结果:

 代码中存在四个“uvm_TOP”,但是打印显示只有三个,原因是最后一个并没有被执行,运行是从initial开始的,首先执行的是“test_started”,然后开始执行class top中的function new ,然后是task run_phase,包含的两个UVM_TOP分别被执行,raise_objection被拉高以后,并没有执行其他的phase,然后代码执行结束,并没有执行最后一个代码。

 uvm验证顶层与sv验证顶层的对比:sv只会有硬件层次,而uvm会有双顶层结构。

4、启动UVM验证的步骤

1:如何搭建验证平台:

2::验证组件之间的连接和通信

3:如何编写测试用例,继而完成复用和覆盖率收敛

评论
添加红包

请填写红包祝福语或标题

红包个数最小为10个

红包金额最低5元

当前余额3.43前往充值 >
需支付:10.00
成就一亿技术人!
领取后你会自动成为博主和红包主的粉丝 规则
hope_wisdom
发出的红包
实付
使用余额支付
点击重新获取
扫码支付
钱包余额 0

抵扣说明:

1.余额是钱包充值的虚拟货币,按照1:1的比例进行支付金额的抵扣。
2.余额无法直接购买下载,可以购买VIP、付费专栏及课程。

余额充值