


隶属于:
C:\Users\Public\Documents\MVTec\HALCON-23.05-Progress\examples\hdevelop\Deep-Learning\Classification
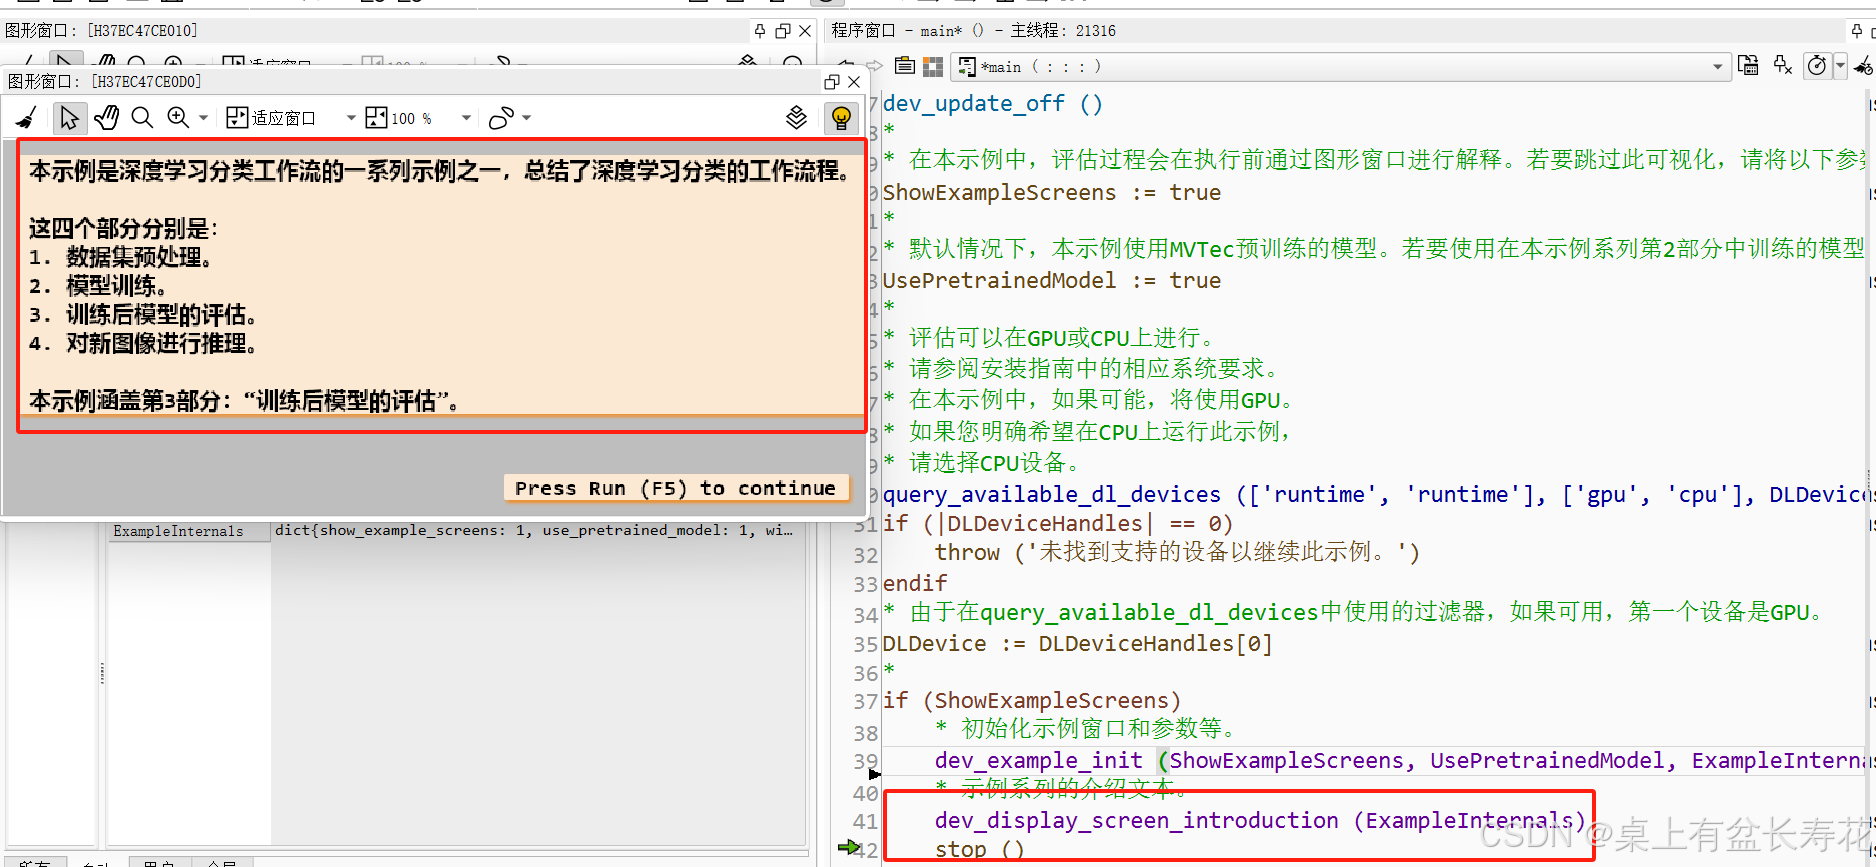
- 本示例是深度学习分类工作流的一系列示例之一,总结了深度学习分类的工作流程。它使用了MVTec药片数据集。
- 这四个部分分别是:
-
- 数据集预处理
-
- 模型训练。
-
- 训练后模型的评估。
-
- 对新图像进行推理。
- 本示例包含第3部分:“训练后模型的评估”。
- 注意:本示例需要第1部分的输出:
- classify_pill_defects_deep_learning_1_preprocess.hdev。
- 如果将UsePretrainedModel设置为false,则还需要第2部分的输出,
- classify_pill_defects_deep_learning_2_train.hdev。


](https://i-blog.csdnimg.cn/direct/c04e0bd18cd04c398d8d2c3b60c11ad7.png)
*
* 本示例是深度学习分类工作流的一系列示例之一,总结了深度学习分类的工作流程。它使用了MVTec药片数据集。
* 这四个部分分别是:
* 1. 数据集预处理
* 2. 模型训练。
* 3. 训练后模型的评估。
* 4. 对新图像进行推理。
*
* 本示例包含第3部分:“训练后模型的评估”。
*
* 注意:本示例需要第1部分的输出:
* classify_pill_defects_deep_learning_1_preprocess.hdev。
* 如果将UsePretrainedModel设置为false,则还需要第2部分的输出,
* classify_pill_defects_deep_learning_2_train.hdev。
*
dev_update_off ()
*
* 在本示例中,评估过程会在执行前通过图形窗口进行解释。若要跳过此可视化,请将以下参数设置为false。
ShowExampleScreens := true
*
* 默认情况下,本示例使用MVTec预训练的模型。若要使用在本示例系列第2部分中训练的模型,请将以下变量设置为false。
UsePretrainedModel := true
*
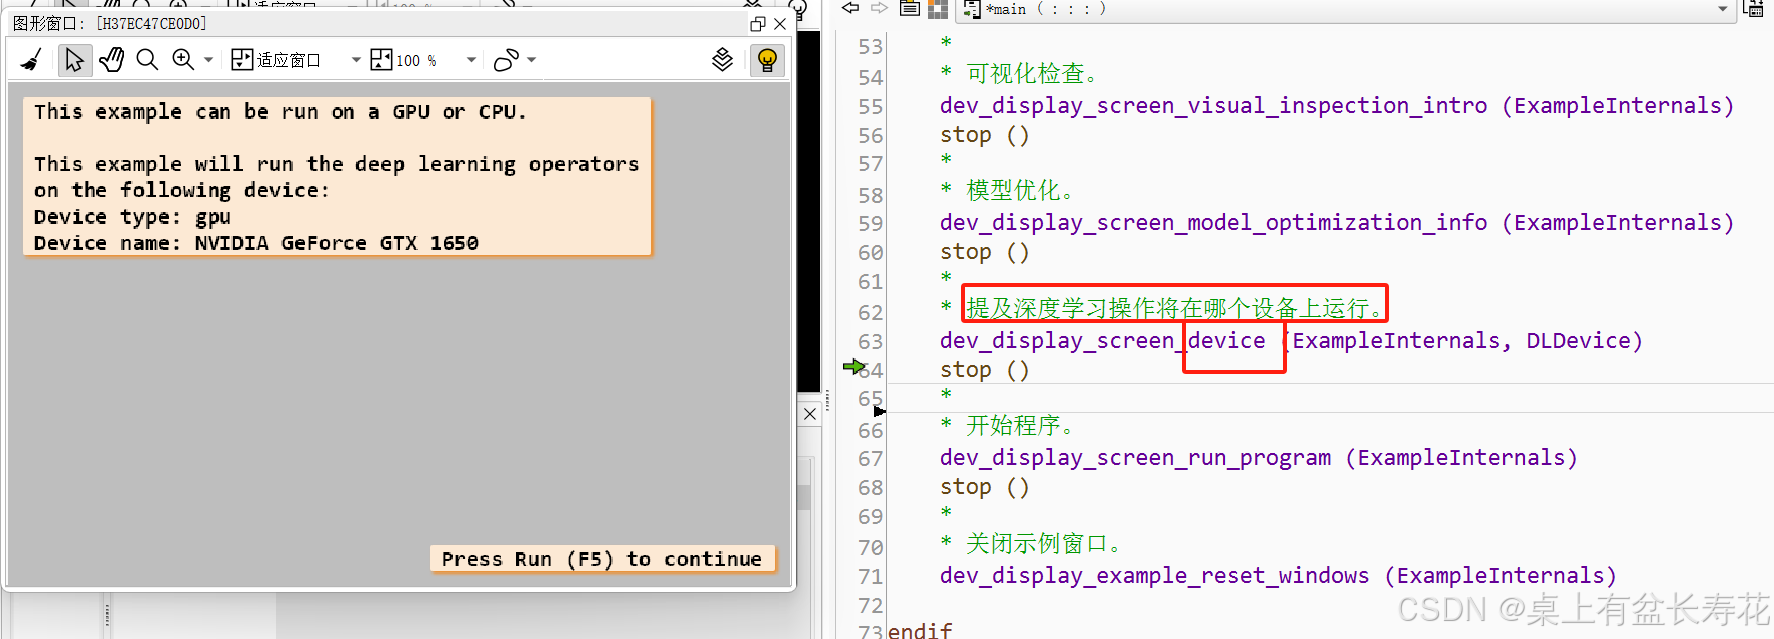
* 评估可以在GPU或CPU上进行。
* 请参阅安装指南中的相应系统要求。
* 在本示例中,如果可能,将使用GPU。
* 如果您明确希望在CPU上运行此示例,
* 请选择CPU设备。
query_available_dl_devices (['runtime', 'runtime'], ['gpu', 'cpu'], DLDeviceHandles)
if (|DLDeviceHandles| == 0)
throw ('未找到支持的设备以继续此示例。')
endif
* 由于在query_available_dl_devices中使用的过滤器,如果可用,第一个设备是GPU。
DLDevice := DLDeviceHandles[0]
*
if (ShowExampleScreens)
* 初始化示例窗口和参数等。
dev_example_init (ShowExampleScreens, UsePretrainedModel, ExampleInternals)
*
* 示例系列的介绍文本。
dev_display_screen_introduction (ExampleInternals)
stop ()
*
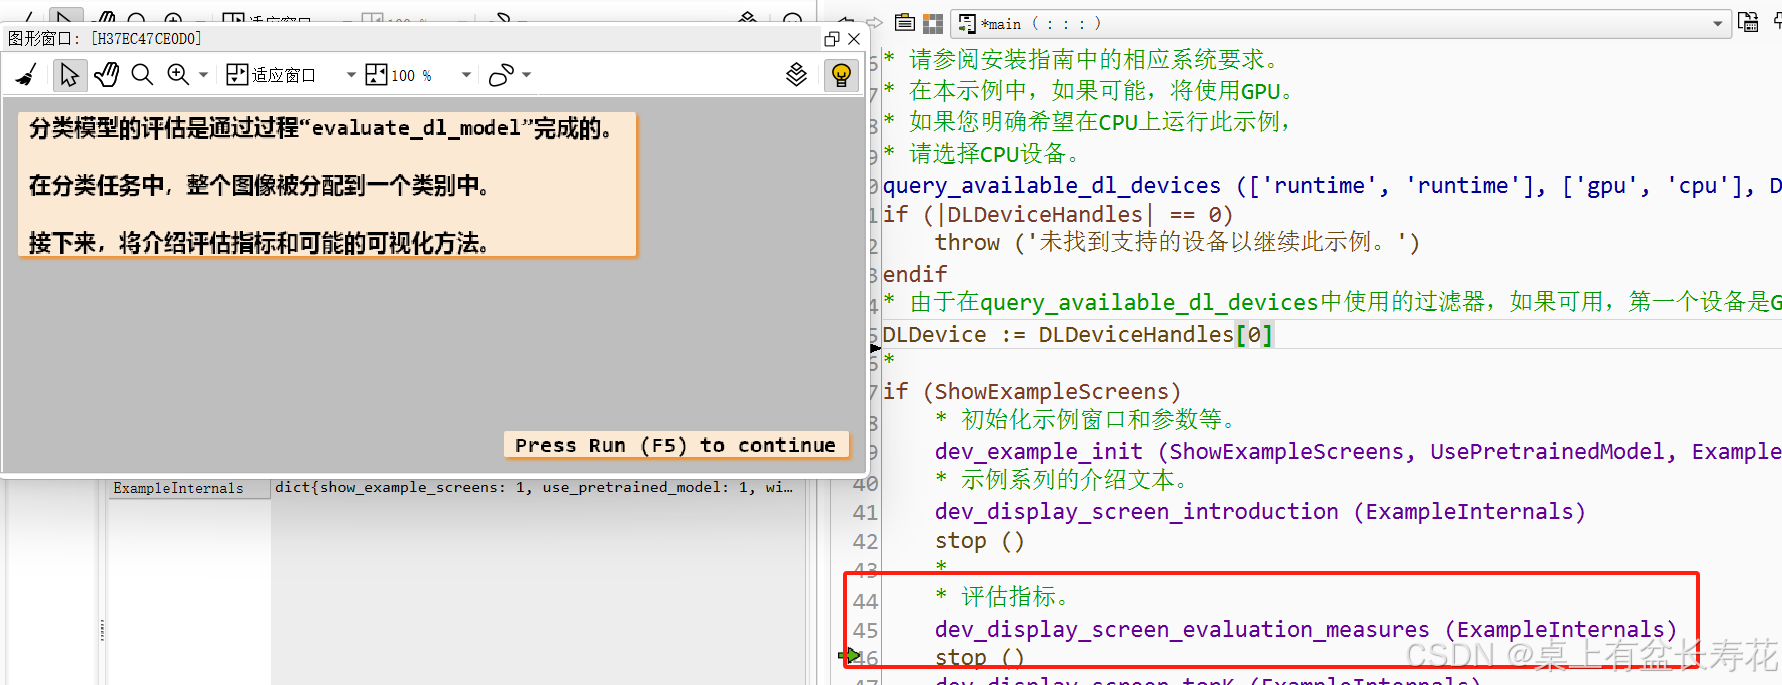
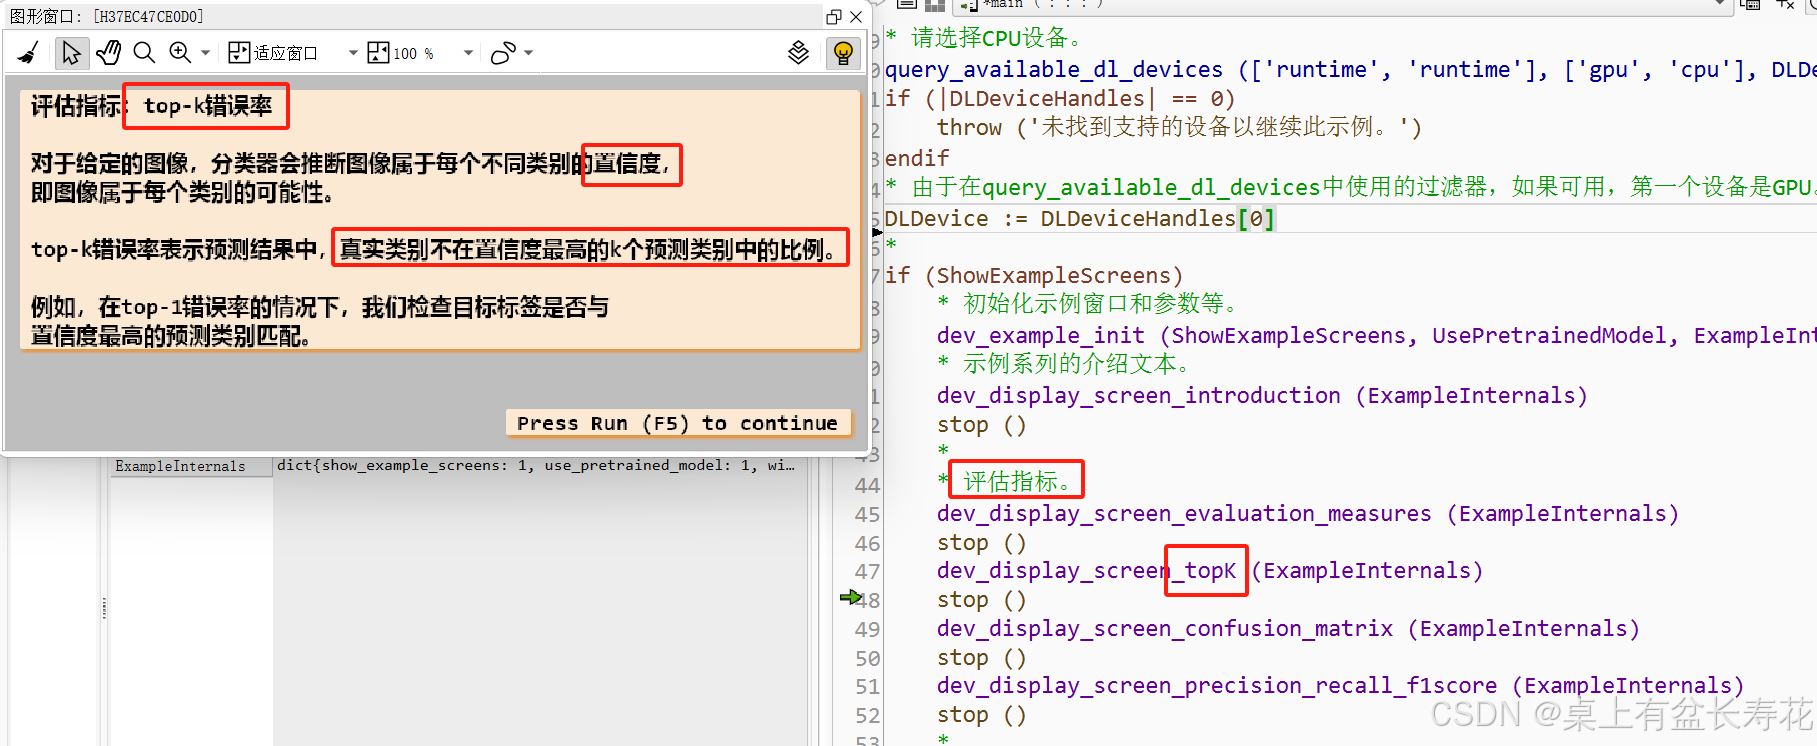
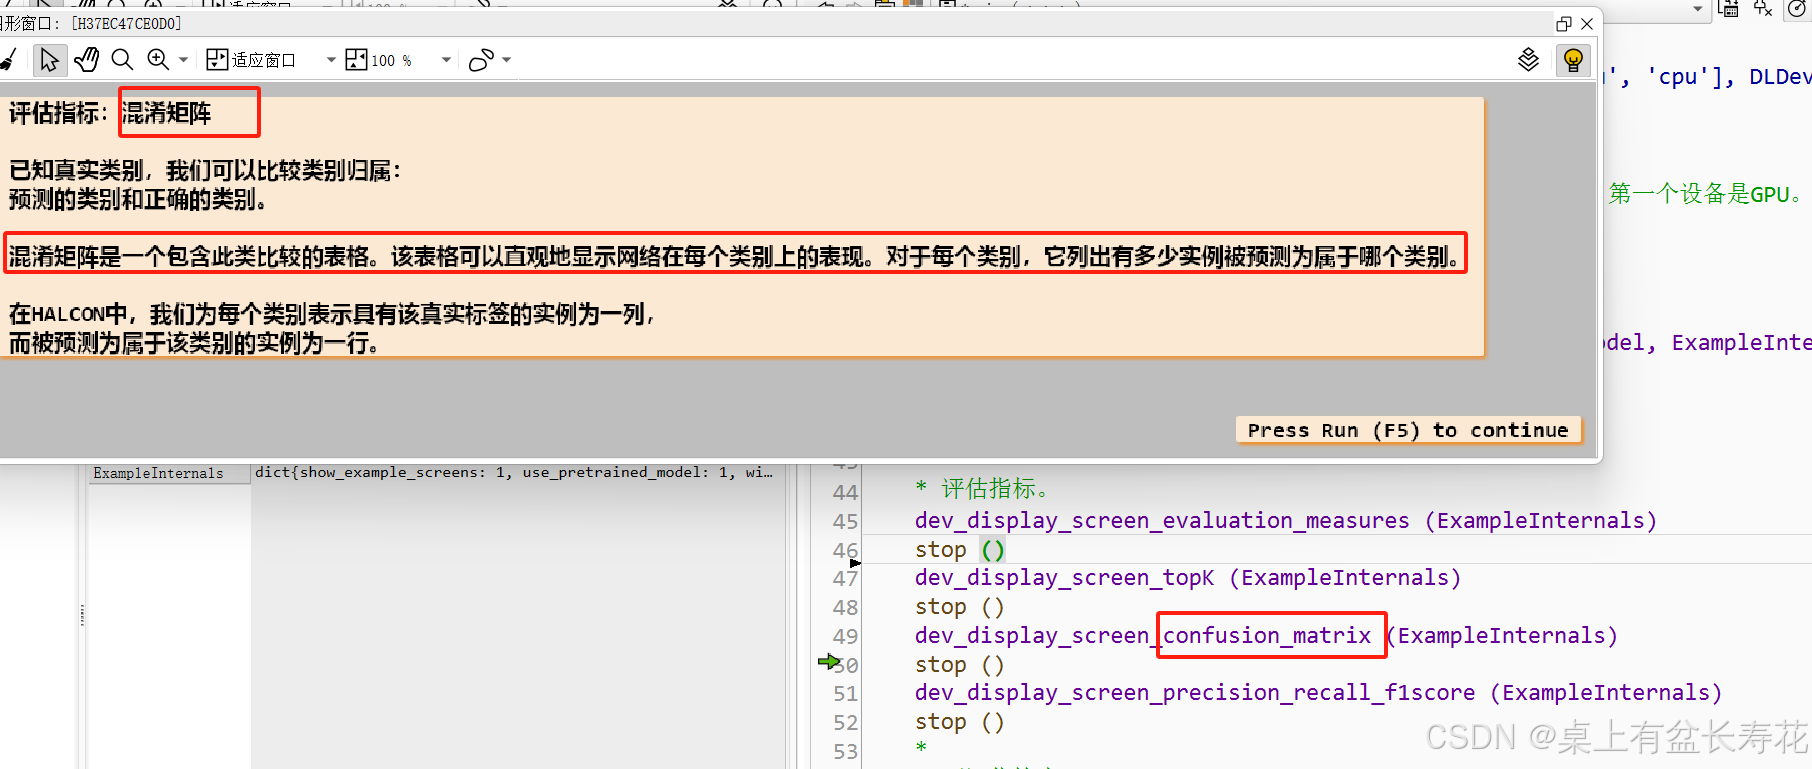
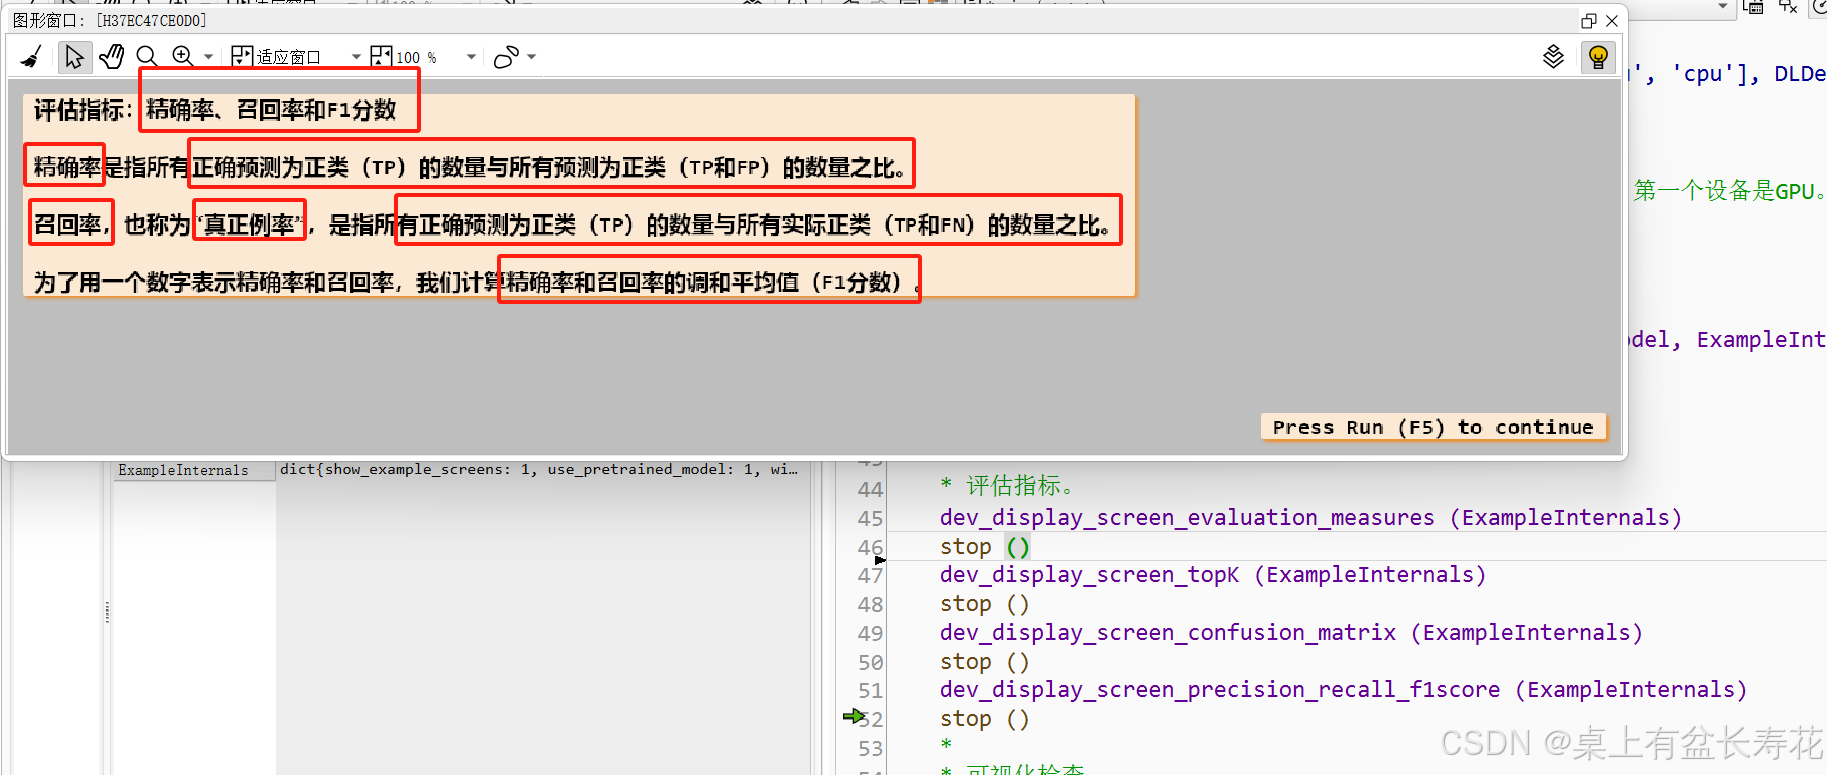
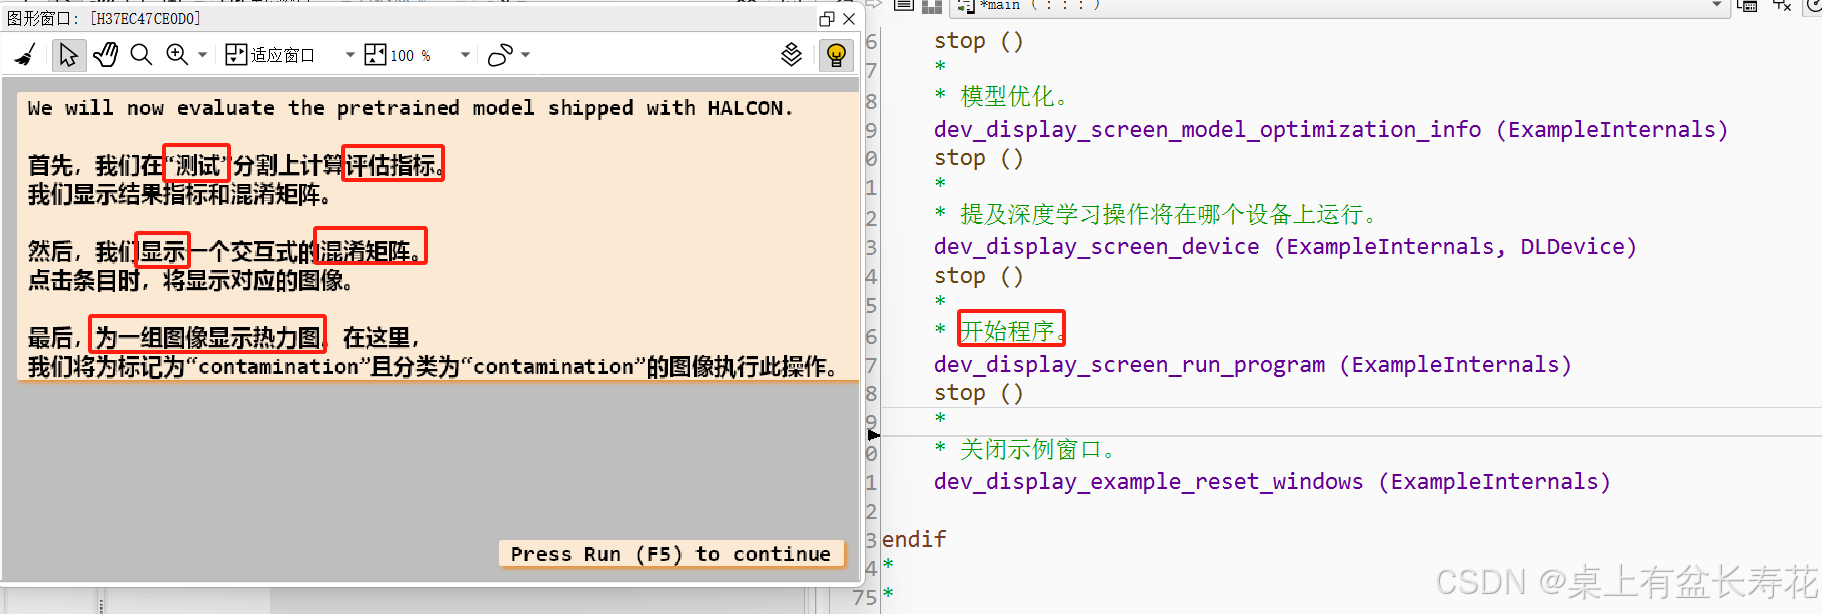
* 评估指标。
dev_display_screen_evaluation_measures (ExampleInternals)
stop ()
dev_display_screen_topK (ExampleInternals)
stop ()
dev_display_screen_confusion_matrix (ExampleInternals)
stop ()
dev_display_screen_precision_recall_f1score (ExampleInternals)
stop ()
*
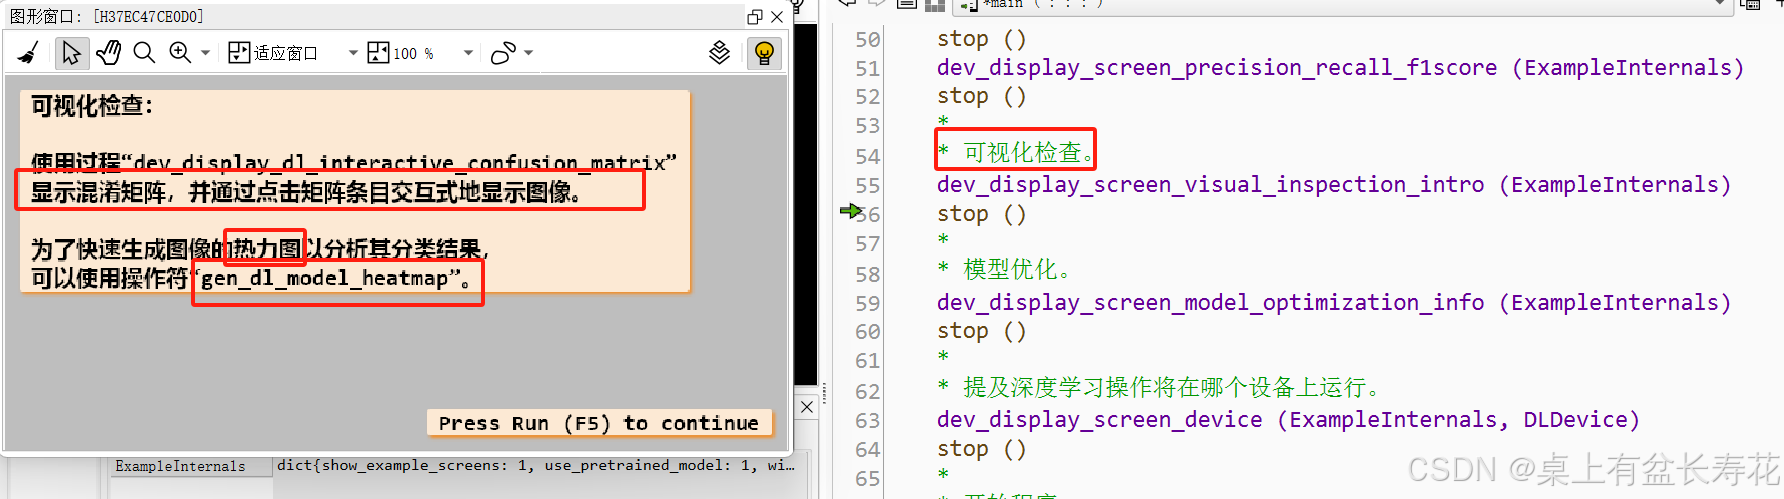
* 可视化检查。
dev_display_screen_visual_inspection_intro (ExampleInternals)
stop ()
*
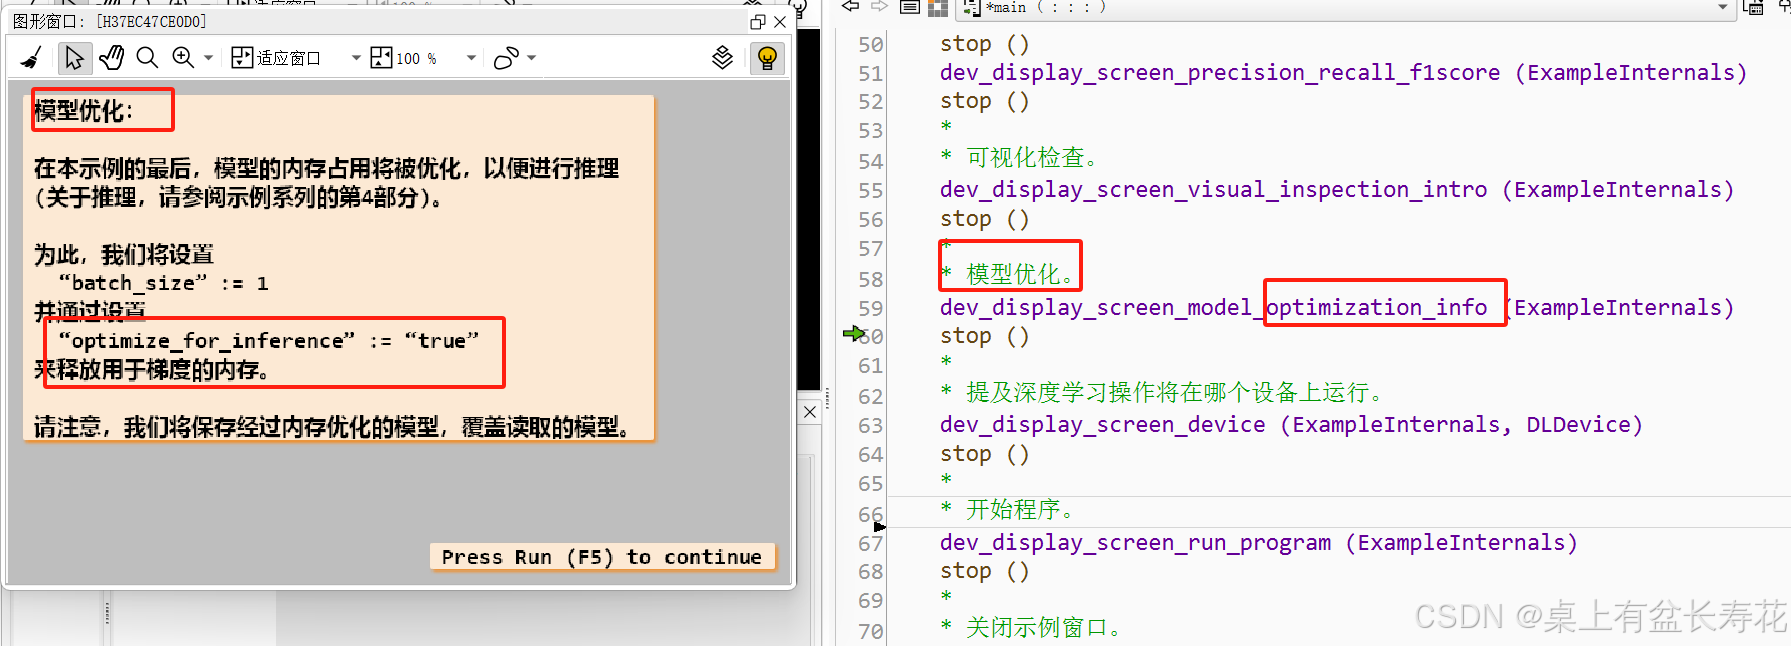
* 模型优化。
dev_display_screen_model_optimization_info (ExampleInternals)
stop ()
*
* 提及深度学习操作将在哪个设备上运行。
dev_display_screen_device (ExampleInternals, DLDevice)
stop ()
*
* 开始程序。
dev_display_screen_run_program (ExampleInternals)
stop ()
*
* 关闭示例窗口。
dev_display_example_reset_windows (ExampleInternals)
endif
*
*
* ******************************************************
* ** 设置评估的路径和参数 ***
* ******************************************************
*
* 路径。
*
* HALCON输出的项目目录。
ExampleDataDir := 'classify_pill_defects_data'
* 预处理DLDataset的文件路径。
* 注意:如果使用其他图像尺寸进行预处理,请调整DataDirectory。
DataDirectory := ExampleDataDir + '/dldataset_pill_300x300'
DLDatasetFileName := DataDirectory + '/dl_dataset.hdict'
*
if (UsePretrainedModel)
* 使用随HALCON提供的预训练模型。
RetrainedModelFileName := 'classify_pill_defects.hdl'
else
* 重新训练的分类模型路径。
RetrainedModelFileName := ExampleDataDir + '/best_dl_model_classification.hdl'
endif
*
* 评估参数。
*
* 评估指标。
ClassificationMeasures := ['top1_error', 'precision', 'recall', 'f_score', 'absolute_confusion_matrix', 'relative_confusion_matrix']
* 在评估期间使用的批量大小。
BatchSize := 10
*
* **********************************
* ** 模型评估 ***
* **********************************
*
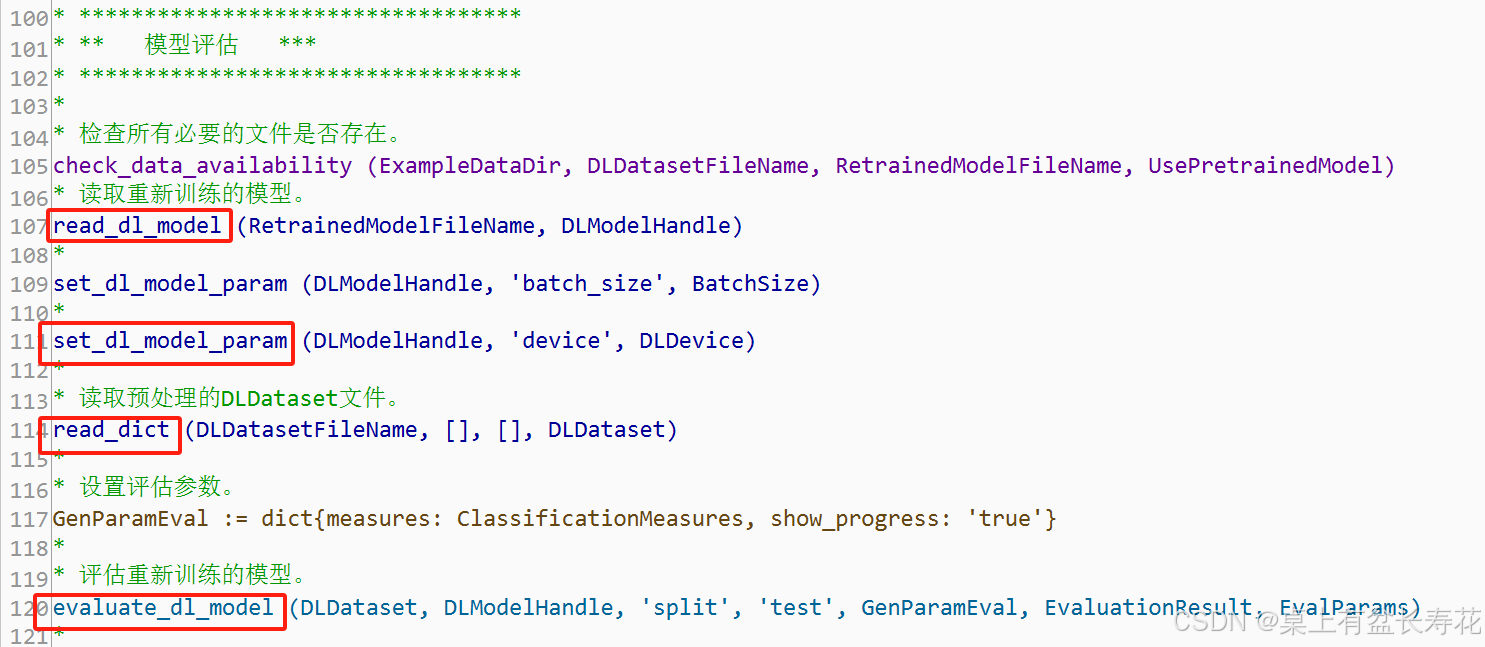
* 检查所有必要的文件是否存在。
check_data_availability (ExampleDataDir, DLDatasetFileName, RetrainedModelFileName, UsePretrainedModel)
* 读取重新训练的模型。
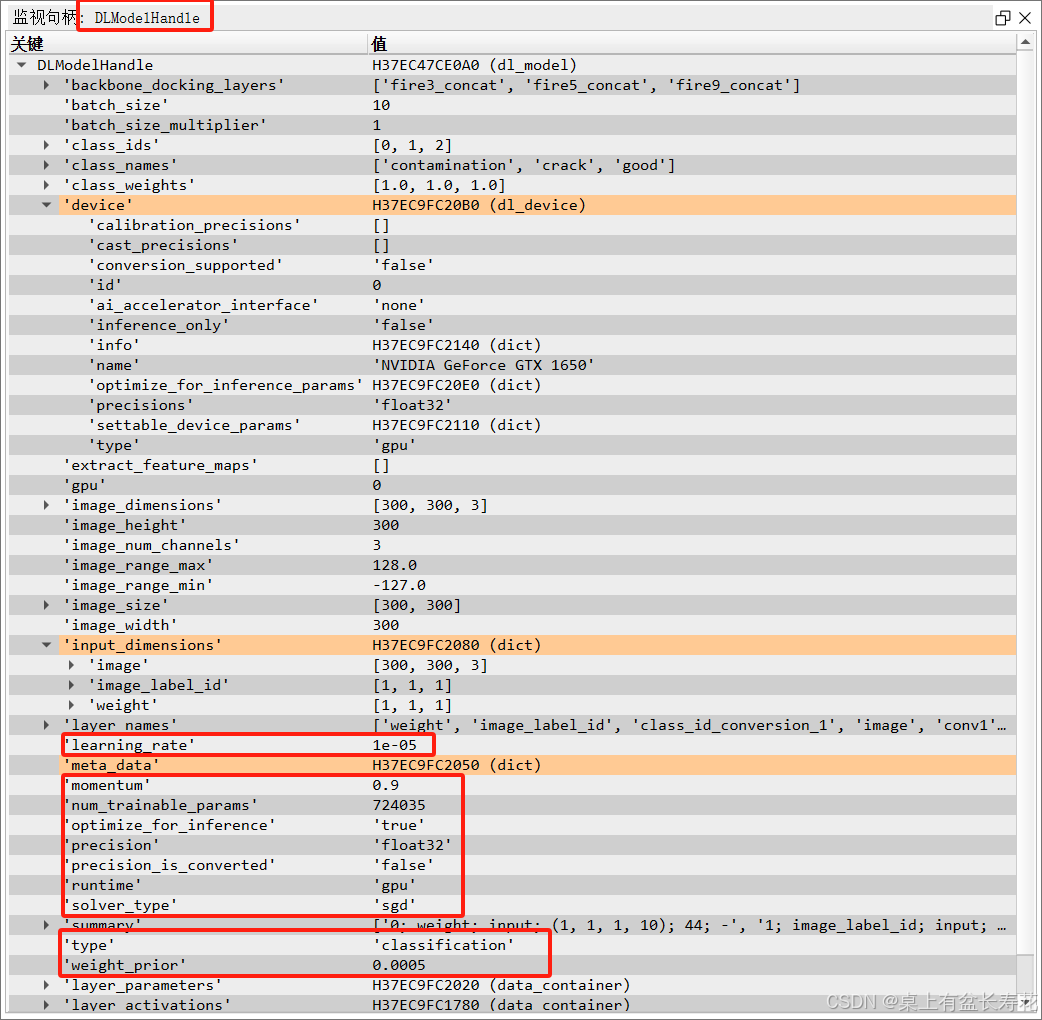
read_dl_model (RetrainedModelFileName, DLModelHandle)
*
set_dl_model_param (DLModelHandle, 'batch_size', BatchSize)
*
set_dl_model_param (DLModelHandle, 'device', DLDevice)
*
* 读取预处理的DLDataset文件。
read_dict (DLDatasetFileName, [], [], DLDataset)
*
* 设置评估参数。
GenParamEval := dict{measures: ClassificationMeasures, show_progress: 'true'}
*
* 评估重新训练的模型。
evaluate_dl_model (DLDataset, DLModelHandle, 'split', 'test', GenParamEval, EvaluationResult, EvalParams)
*
*
* ******************************
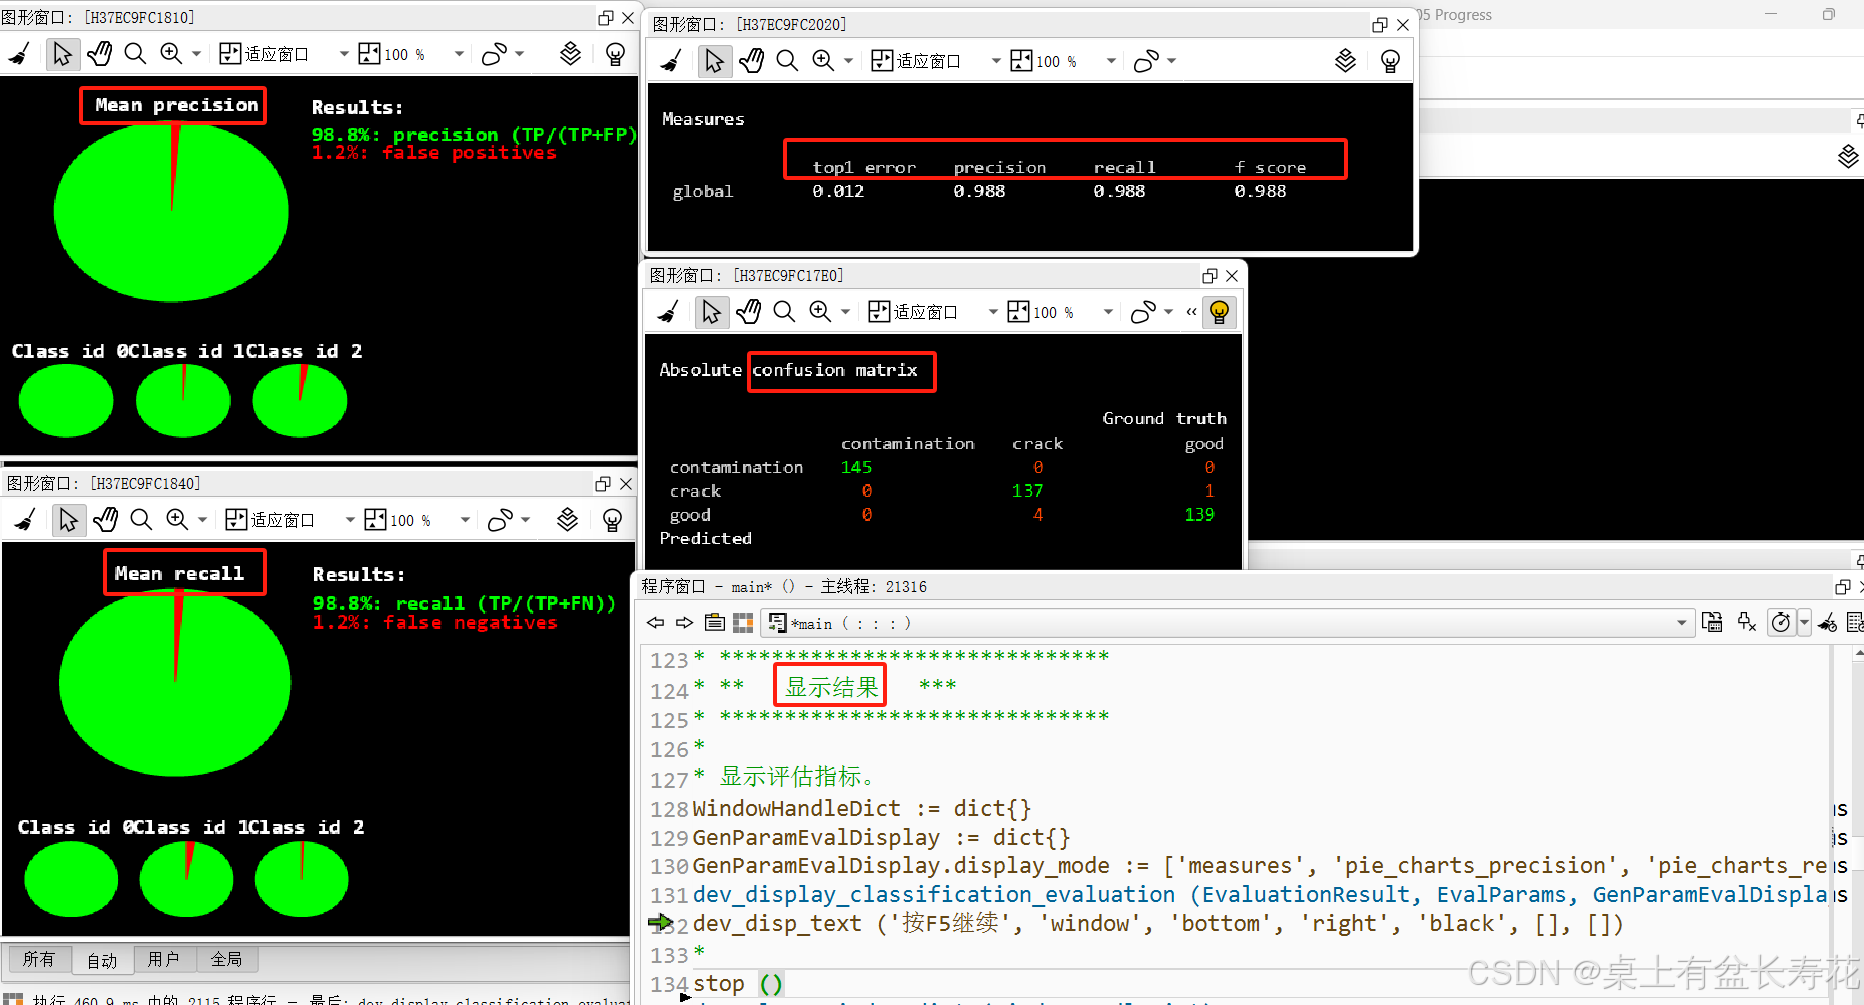
* ** 显示结果 ***
* ******************************
*
* 显示评估指标。
WindowHandleDict := dict{}
GenParamEvalDisplay := dict{}
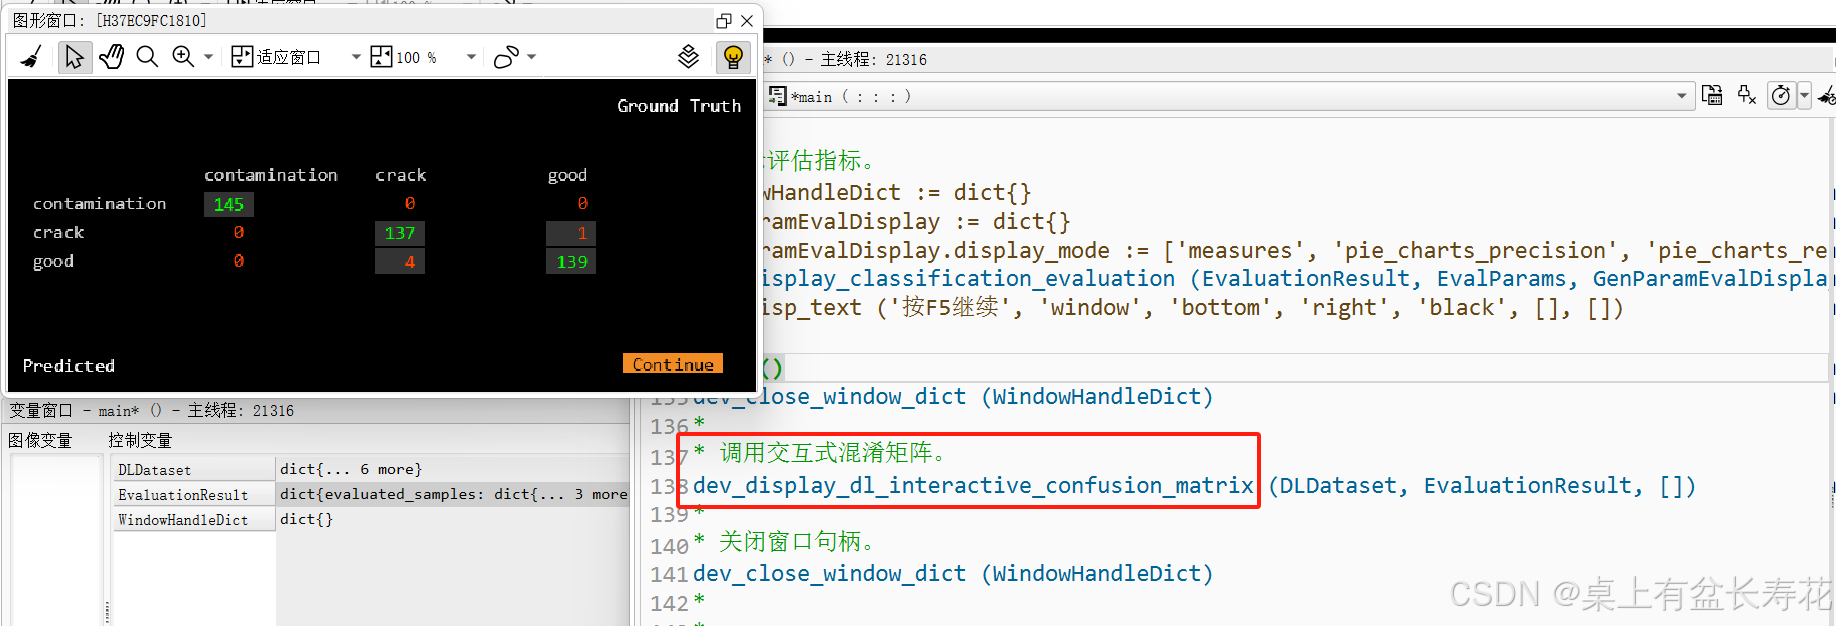
GenParamEvalDisplay.display_mode := ['measures', 'pie_charts_precision', 'pie_charts_recall', 'absolute_confusion_matrix']
dev_display_classification_evaluation (EvaluationResult, EvalParams, GenParamEvalDisplay, WindowHandleDict)
dev_disp_text ('按F5继续', 'window', 'bottom', 'right', 'black', [], [])
*
stop ()
dev_close_window_dict (WindowHandleDict)
*
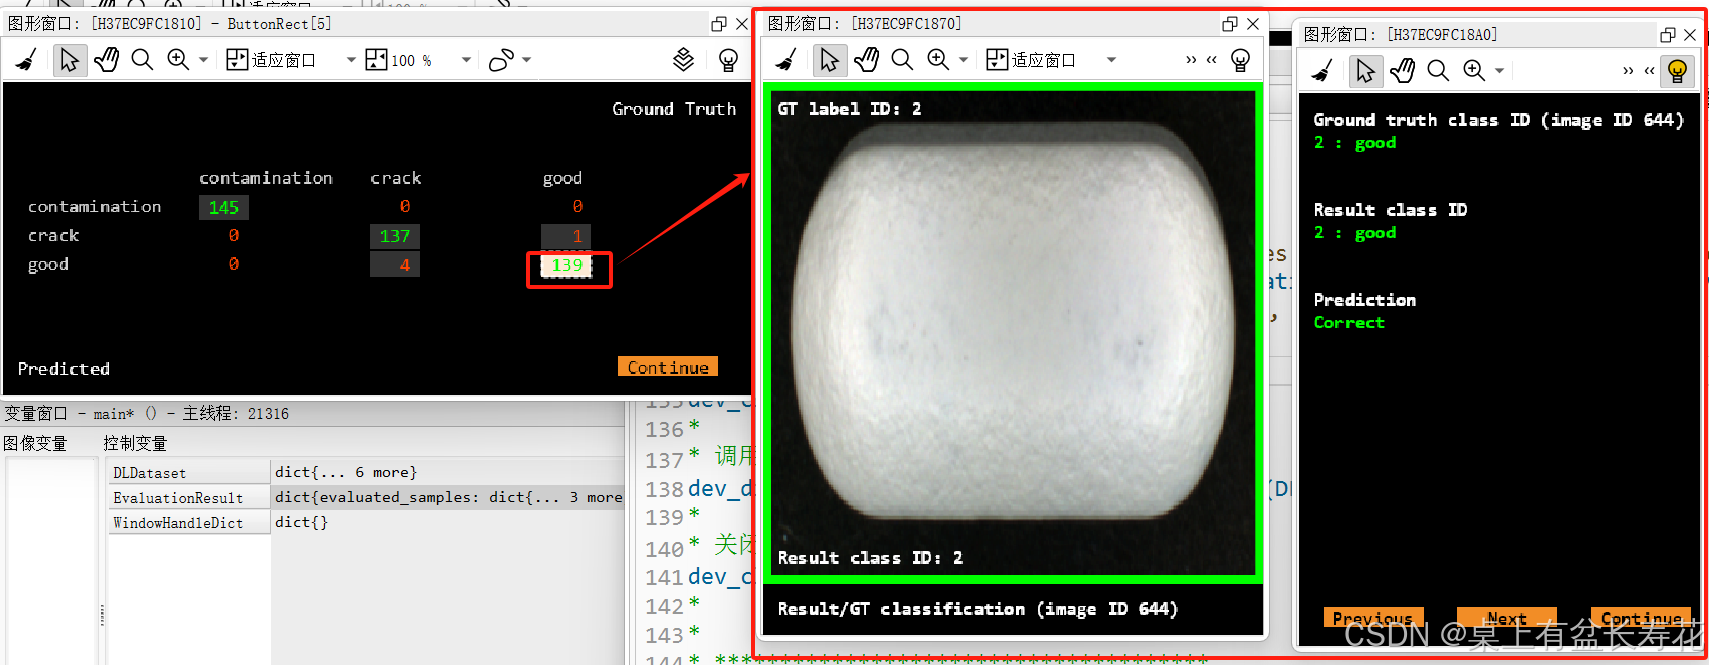
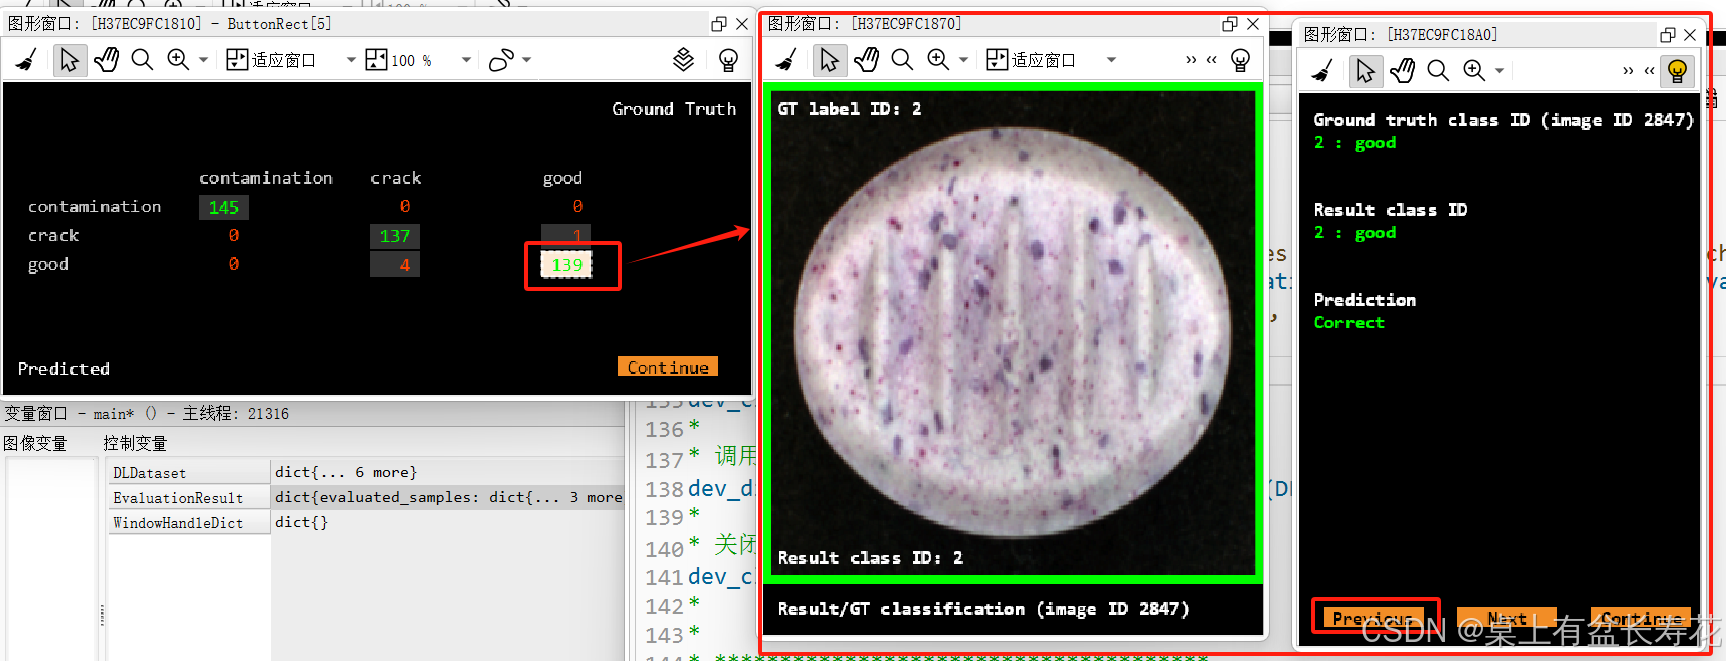
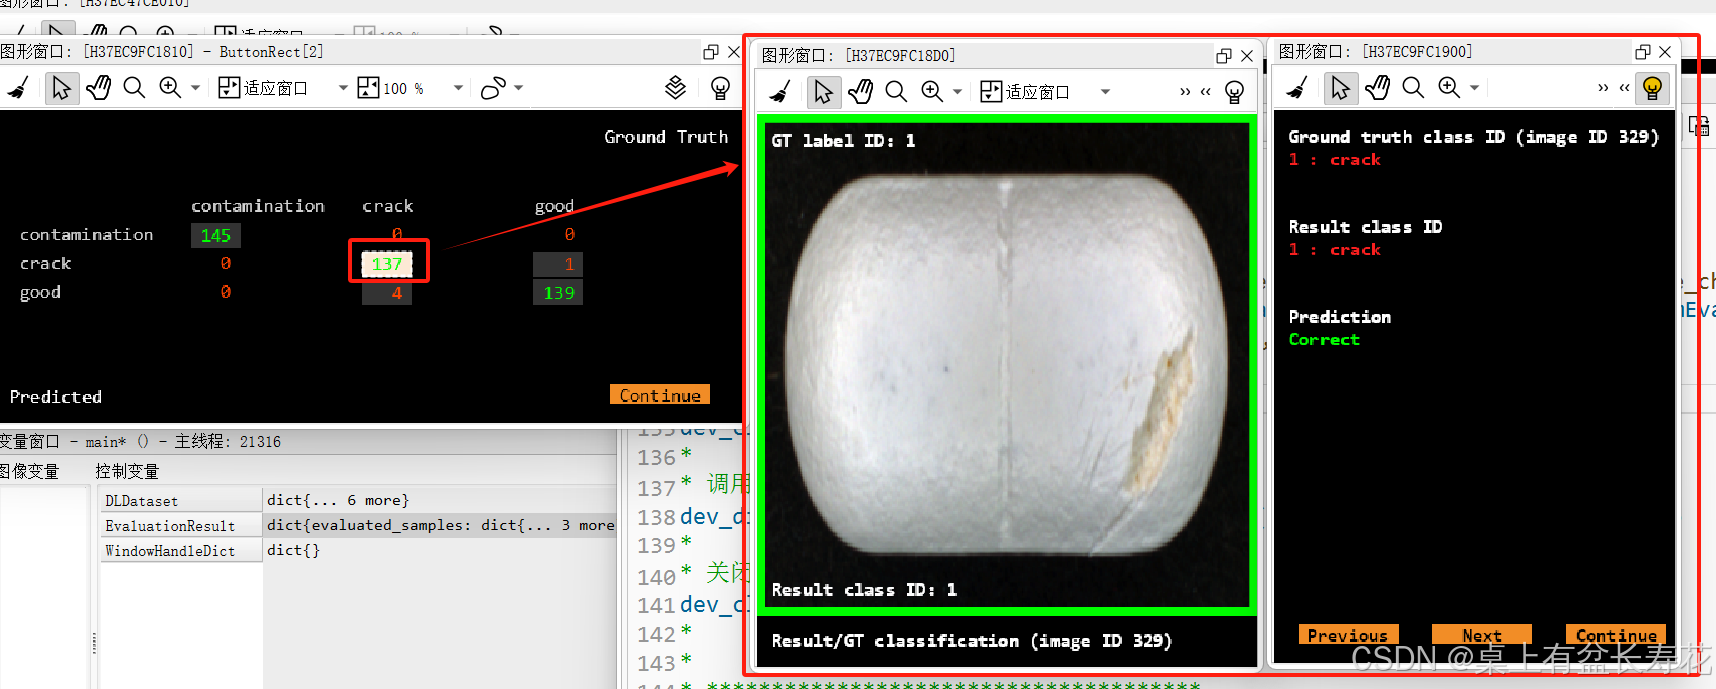
* 调用交互式混淆矩阵。
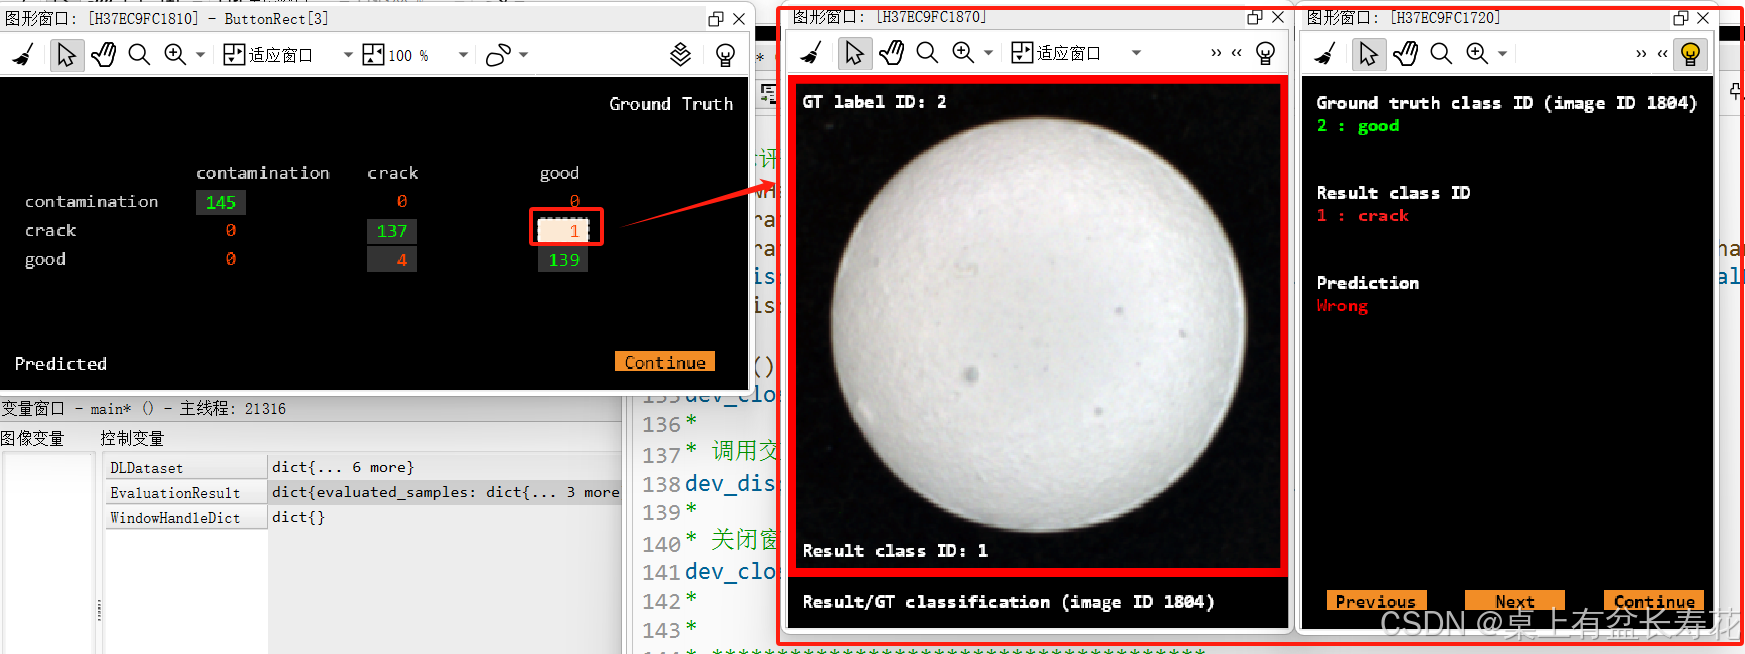
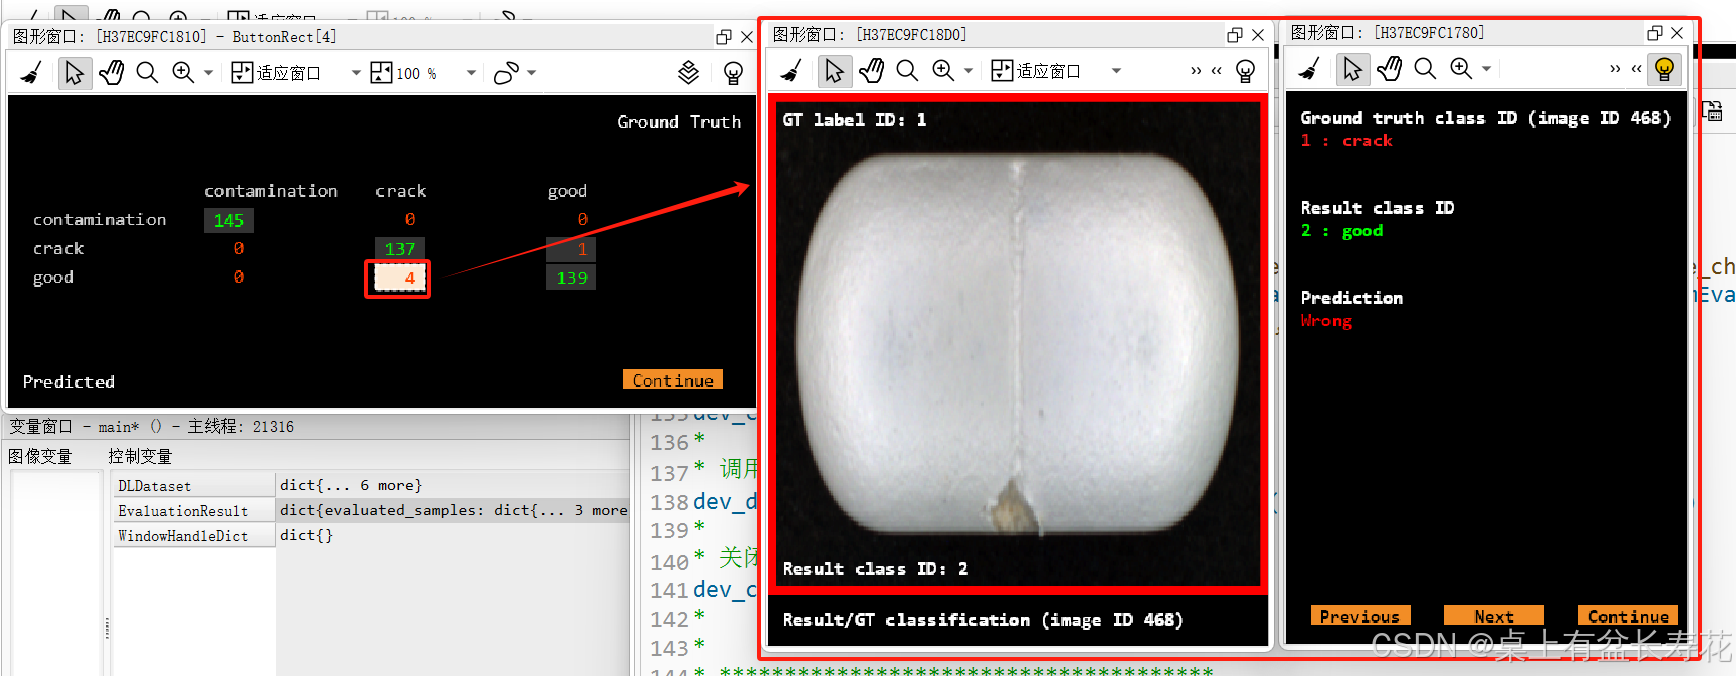
dev_display_dl_interactive_confusion_matrix (DLDataset, EvaluationResult, [])
*
* 关闭窗口句柄。
dev_close_window_dict (WindowHandleDict)
*
*
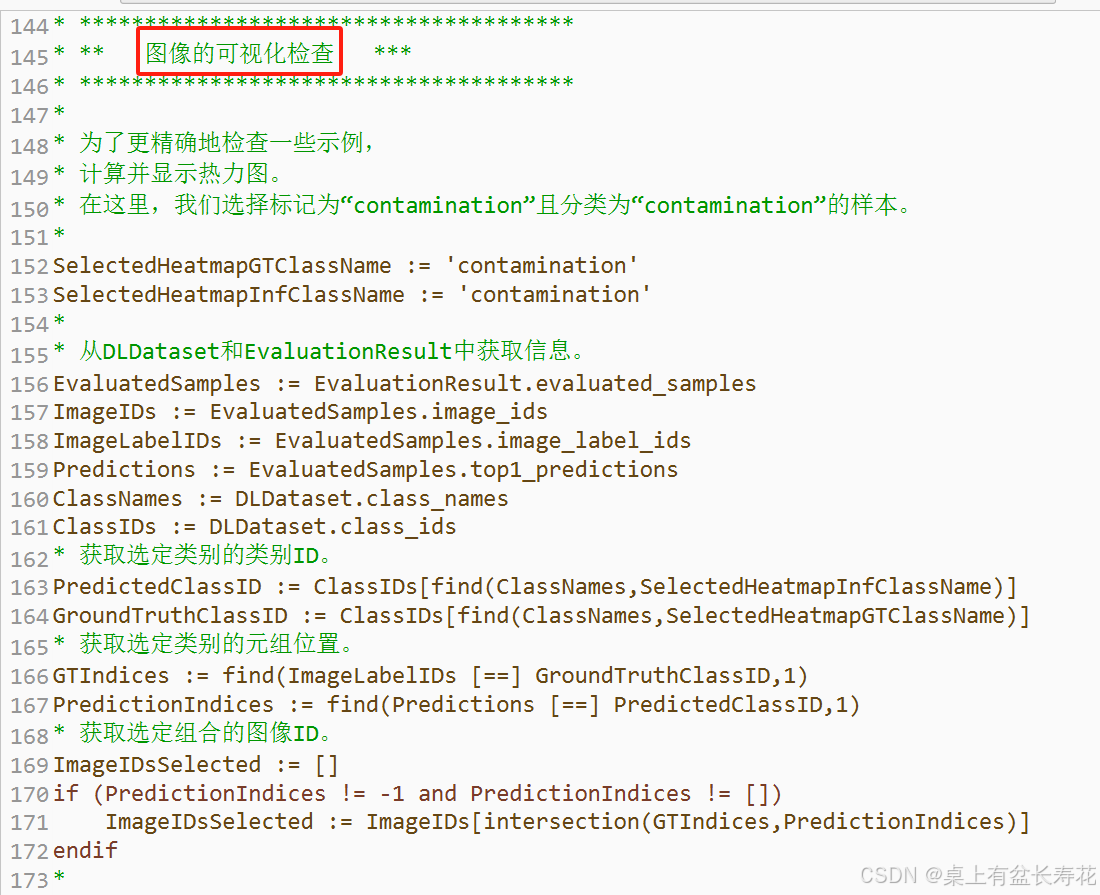
* **************************************
* ** 图像的可视化检查 ***
* **************************************
*
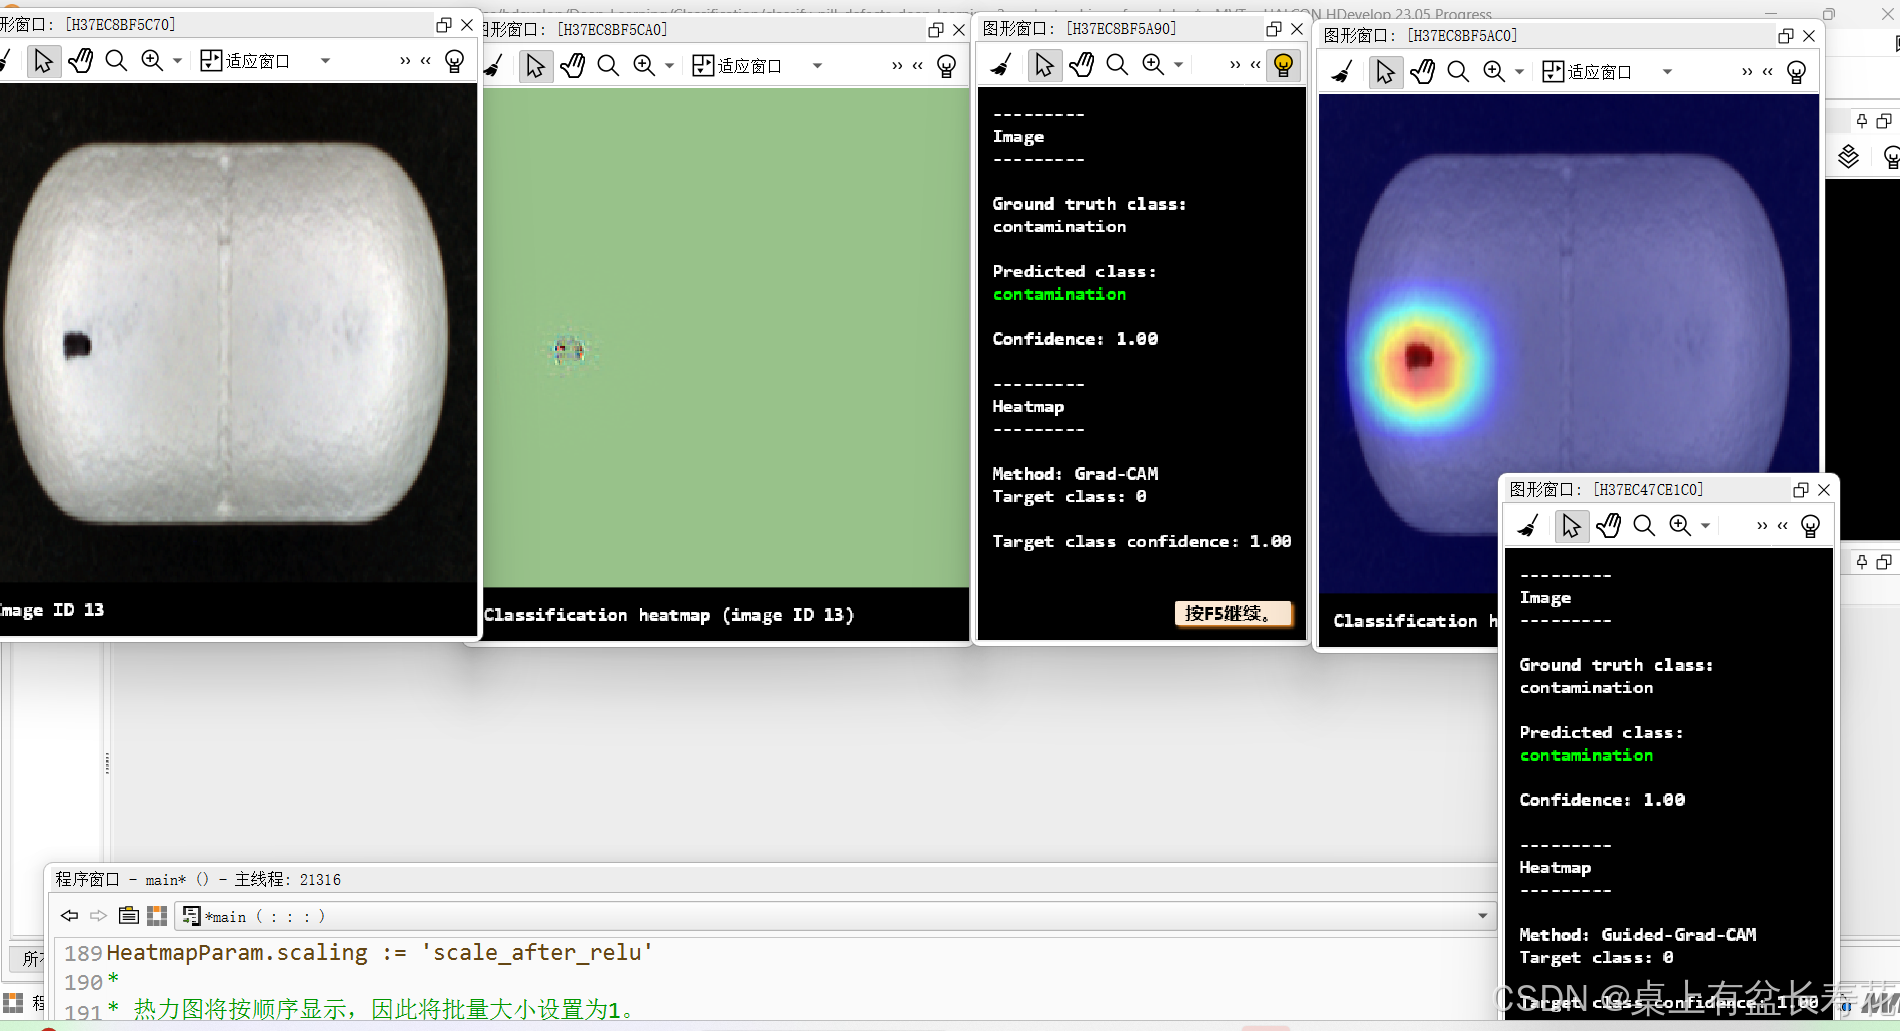
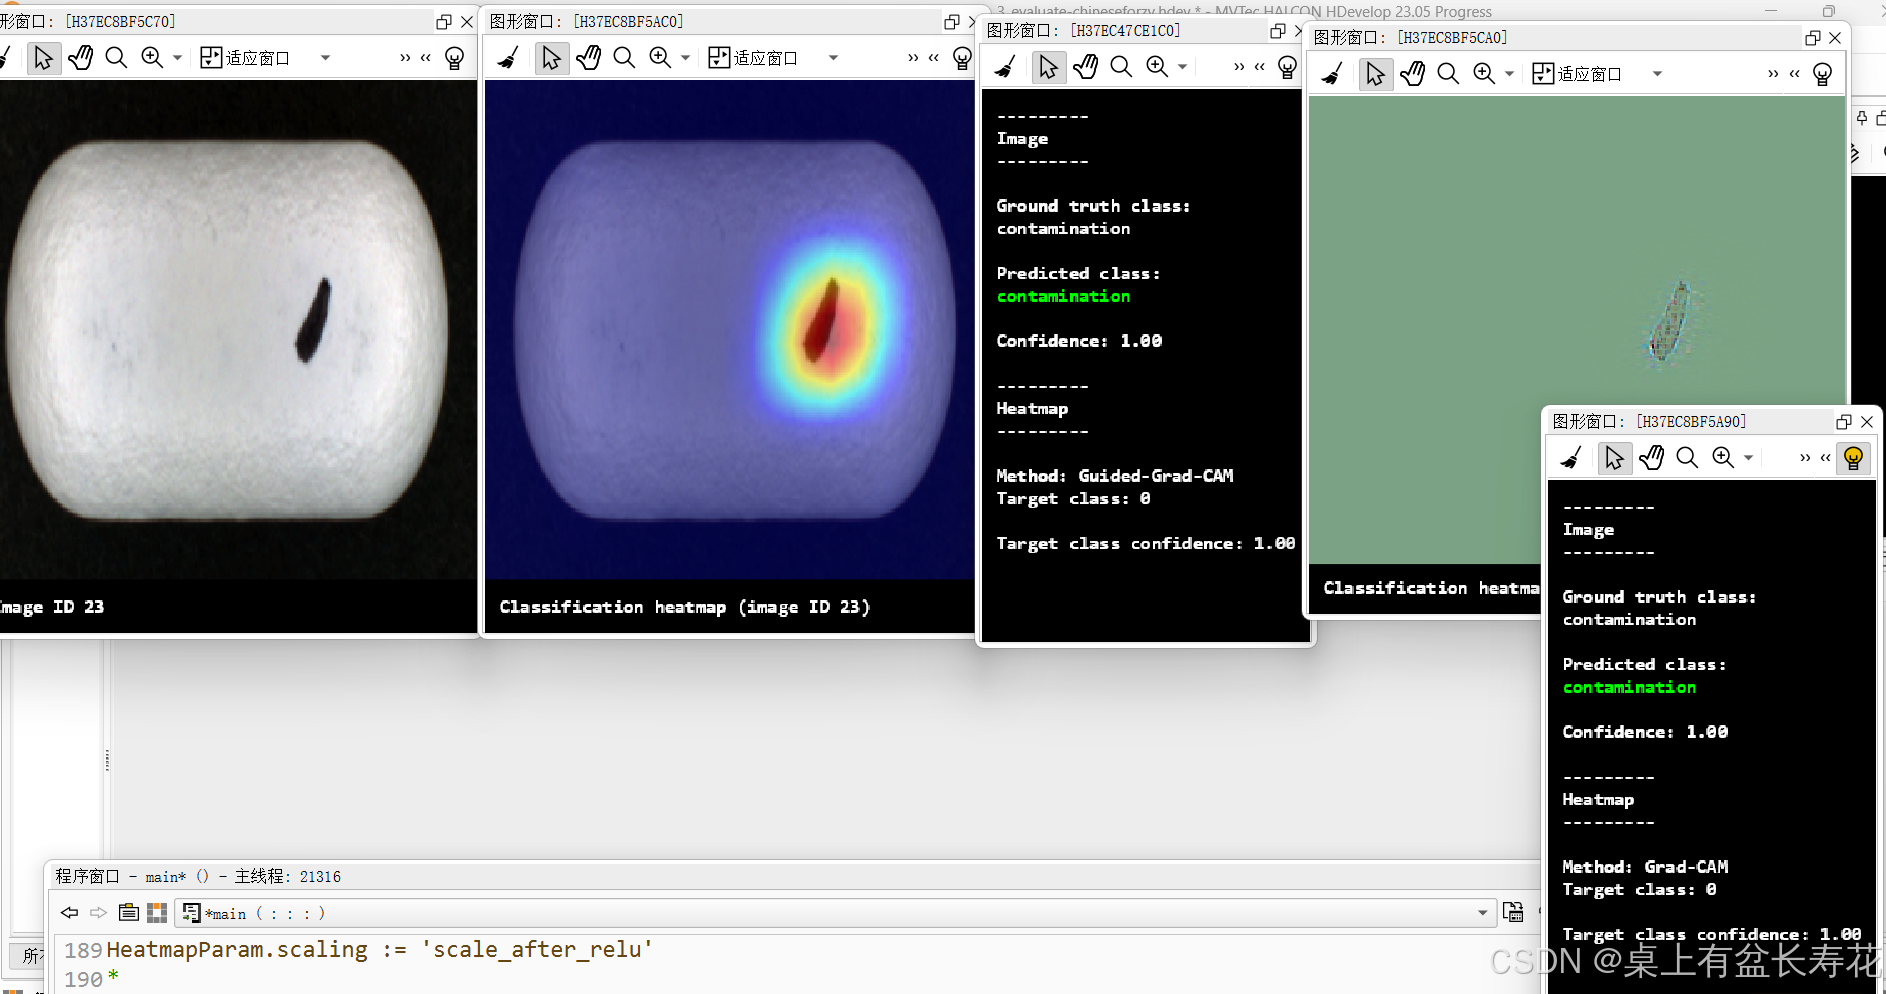
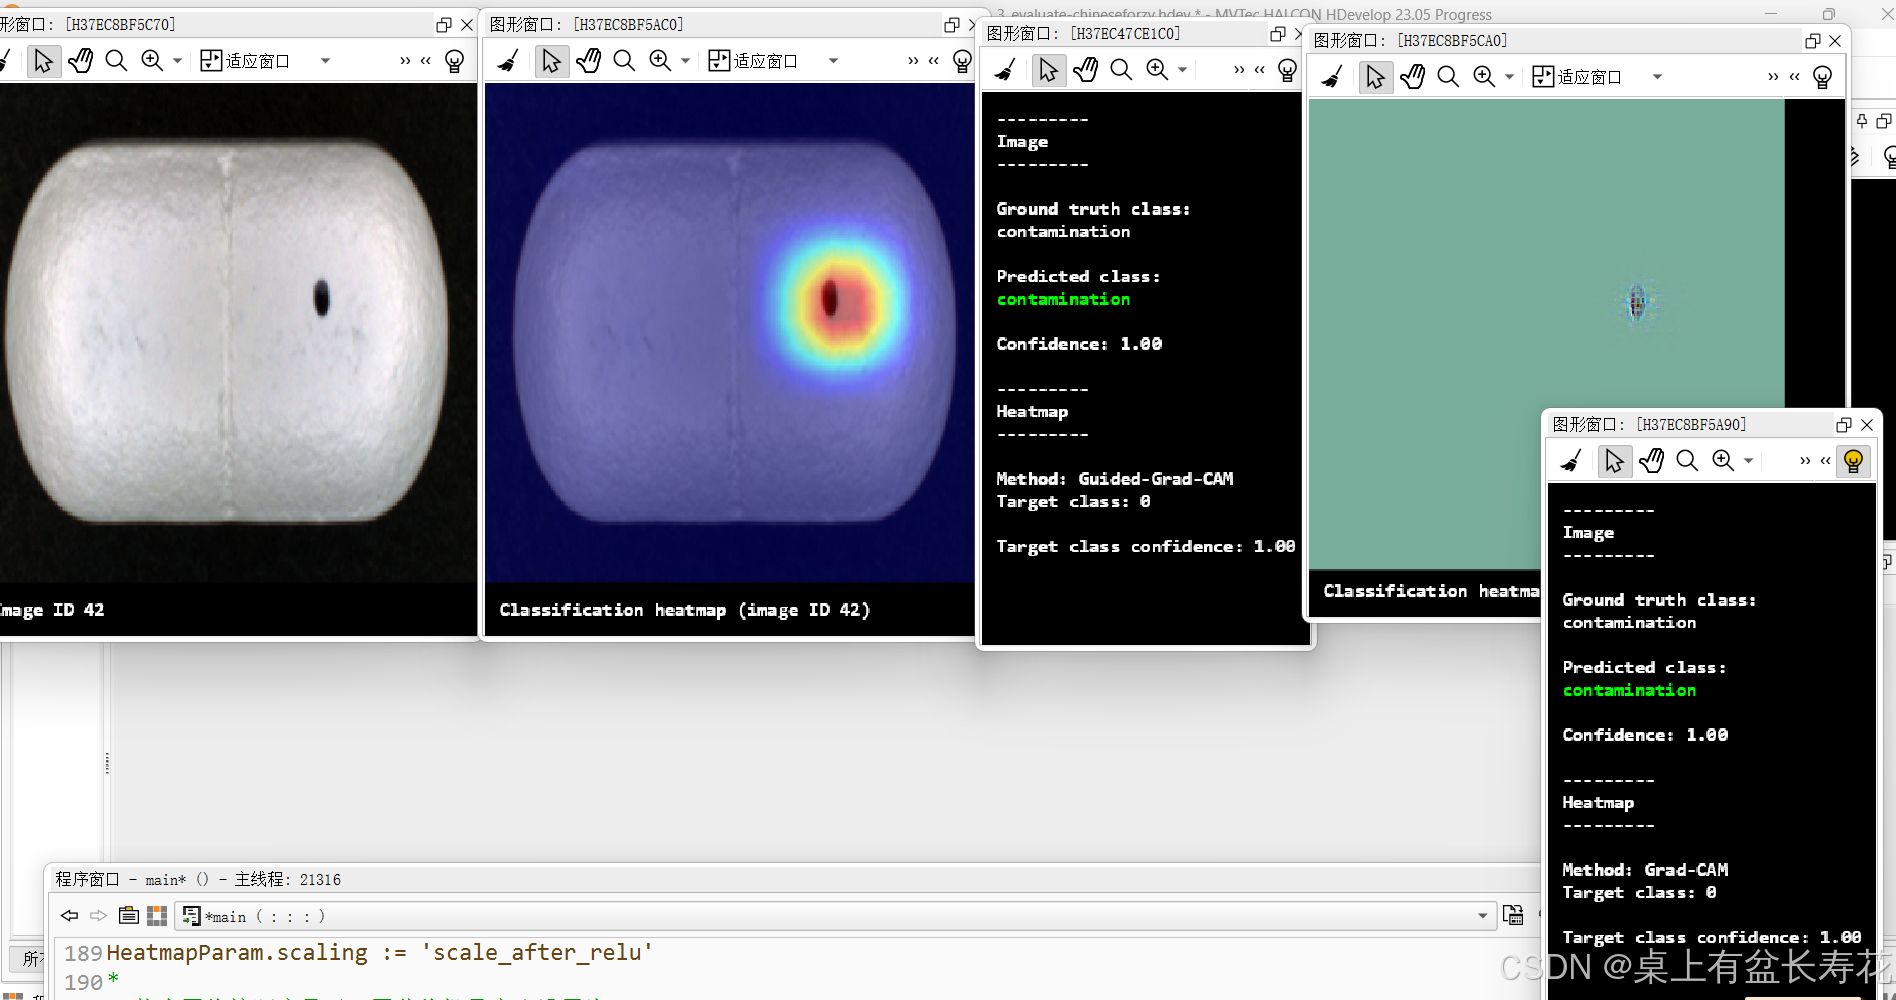
* 为了更精确地检查一些示例,
* 计算并显示热力图。
* 在这里,我们选择标记为“contamination”且分类为“contamination”的样本。
*
SelectedHeatmapGTClassName := 'contamination'
SelectedHeatmapInfClassName := 'contamination'
*
* 从DLDataset和EvaluationResult中获取信息。
EvaluatedSamples := EvaluationResult.evaluated_samples
ImageIDs := EvaluatedSamples.image_ids
ImageLabelIDs := EvaluatedSamples.image_label_ids
Predictions := EvaluatedSamples.top1_predictions
ClassNames := DLDataset.class_names
ClassIDs := DLDataset.class_ids
* 获取选定类别的类别ID。
PredictedClassID := ClassIDs[find(ClassNames,SelectedHeatmapInfClassName)]
GroundTruthClassID := ClassIDs[find(ClassNames,SelectedHeatmapGTClassName)]
* 获取选定类别的元组位置。
GTIndices := find(ImageLabelIDs [==] GroundTruthClassID,1)
PredictionIndices := find(Predictions [==] PredictedClassID,1)
* 获取选定组合的图像ID。
ImageIDsSelected := []
if (PredictionIndices != -1 and PredictionIndices != [])
ImageIDsSelected := ImageIDs[intersection(GTIndices,PredictionIndices)]
endif
*
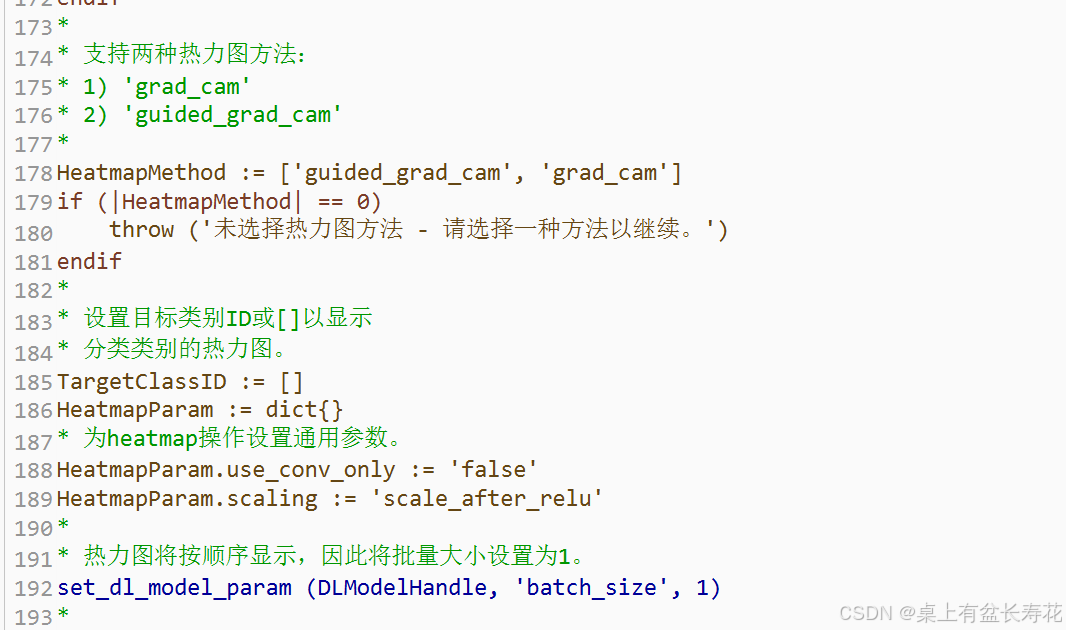
* 支持两种热力图方法:
* 1) 'grad_cam'
* 2) 'guided_grad_cam'
*
HeatmapMethod := ['guided_grad_cam', 'grad_cam']
if (|HeatmapMethod| == 0)
throw ('未选择热力图方法 - 请选择一种方法以继续。')
endif
*
* 设置目标类别ID或[]以显示
* 分类类别的热力图。
TargetClassID := []
HeatmapParam := dict{}
* 为heatmap操作设置通用参数。
HeatmapParam.use_conv_only := 'false'
HeatmapParam.scaling := 'scale_after_relu'
*
* 热力图将按顺序显示,因此将批量大小设置为1。
set_dl_model_param (DLModelHandle, 'batch_size', 1)
*
* 为选定样本显示热力图。
WindowHandleDict := dict{}
for Index := 0 to min([|ImageIDsSelected| - 1,10]) by 1
* 选择对应的DLSample。
find_dl_samples (DLDataset.samples, 'image_id', ImageIDsSelected[Index], 'match', DLSampleIndex)
read_dl_samples (DLDataset, DLSampleIndex, DLSample)
* 生成热力图图像
DLResultCollected := dict{}
DisplayOptions := 'image'
for IndMet := 0 to |HeatmapMethod| - 1 by 1
CurrentMethod := HeatmapMethod[IndMet]
gen_dl_model_heatmap (DLModelHandle, DLSample, CurrentMethod, TargetClassID, HeatmapParam, DLResult)
DLResultCollected.['heatmap_' + CurrentMethod] := DLResult.['heatmap_' + CurrentMethod]
DisplayOptions := [DisplayOptions,'heatmap_' + CurrentMethod]
endfor
DLResultCollected.['classification_class_ids'] := DLResult.['classification_class_ids']
DLResultCollected.['classification_class_names'] := DLResult.['classification_class_names']
DLResultCollected.['classification_confidences'] := DLResult.['classification_confidences']
* 显示收集的结果。
dev_display_dl_data (DLSample, DLResultCollected, DLDataset, DisplayOptions, [], WindowHandleDict)
dev_disp_text ('按F5继续。', 'window', 'bottom', 'right', 'black', [], [])
stop ()
endfor
*
* 优化内存占用。
set_dl_model_param (DLModelHandle, 'optimize_for_inference', 'true')
write_dl_model (DLModelHandle, RetrainedModelFileName)
* 关闭窗口。
dev_close_window_dict (WindowHandleDict)
*
if (ShowExampleScreens)
* 显示最终屏幕。
dev_display_screen_final (ExampleInternals)
stop ()
* 关闭示例窗口
dev_close_example_windows (ExampleInternals)
endif


 被折叠的 条评论
为什么被折叠?
被折叠的 条评论
为什么被折叠?
 到【灌水乐园】发言


