


 本文详细介绍了Flask框架的路由概念,包括路由变量的使用和URL兼容性。接着讨论了设置配置文件的方法,特别是针对不同环境的配置。在模板部分,解释了Response对象和request对象的功能,以及如何处理POST和GET请求。最后,阐述了重定向的两种方式:redirect()和url_for,以及它们在页面跳转中的作用。
Flask 学习笔记.2
一、路由
1.认识路由
首先路由是自上而下的判断
from flask import Flask
app=Flask(__name__)
@app.route('/')	#路由  url http://127.0.0.1:5000的根目录
def index()		#视图函数  view
	return "hello world"
if __name__ == '__main__':
	#最好启动之前设置端口号
	app.run(host='0,0,0,0',port=8000)	#这里可以手动设置host,设为‘0.0.0.0’时候可以由外界访问(非本机)
route实际实现:
@app.route(’/’) 这个装饰器其实就是将rule字符串跟试图函数绑定,源码是通过add_url_rule()实现绑定的
2.路由变量
路由除了可以使用字符串绑定以外,还还可以设置变量绑定
PS: 要注意默认是字符串,如果加上str会报错
@app.route('/str/<key>')
def getstr(key): # 参数必须添加
	print(key)
	return data.get(key)

#不能返回int类型,只能返回tulp、string、dict、Response,或者WSGI 可以调用类型
@app.route('/getint/<int:num>')
def getstr(num):
	print(num)
	return str(num)

#传递uuid
#传入<class uuid.UUID>类型
@app.route('/getint/<uuid:uid>')
def getstr(uid):
	print(uid)
	return str(uid)
3.URL兼容
#当路由不带斜杠的,
#在网页中输入  127.0.0.1/test  时候可以找到网页
#在网页中输入  127.0.0.1/test/  时候无法找到网页
@app.route('/test')   #这个是不带斜杠的
def getstr(): # 参数必须添加
	print('test')
	return 'test'


#当路由带斜杠的,
#在网页中输入  127.0.0.1/test  时候可以找到网页,浏览器会进行重定向 定向到127.0.0.1/test/
#在网页中输入  127.0.0.1/test/  时候可以找到网页
@app.route('/test/')   #这个是带斜杠的
def getstr(): # 参数必须添加
	print('test')
	return 'test'
二.设置配置文件
环境:
production
development
testing
#设置debug模式
app.run(debug=True)
#也是通过配置文件实现。
app.config['ENV']='production'
app.config['DEBUG']=True
将以上配置单独写到一个文件,创建setting.py
ENV='development'
DEBUG=True
#服务器启动文件 app.py
from flask import Flask
import setting
app=Flask(__name__)
app.config.from_boject(setting)
三.模板
1.Response对象
返回的时候,会把字符串转换成Response对象
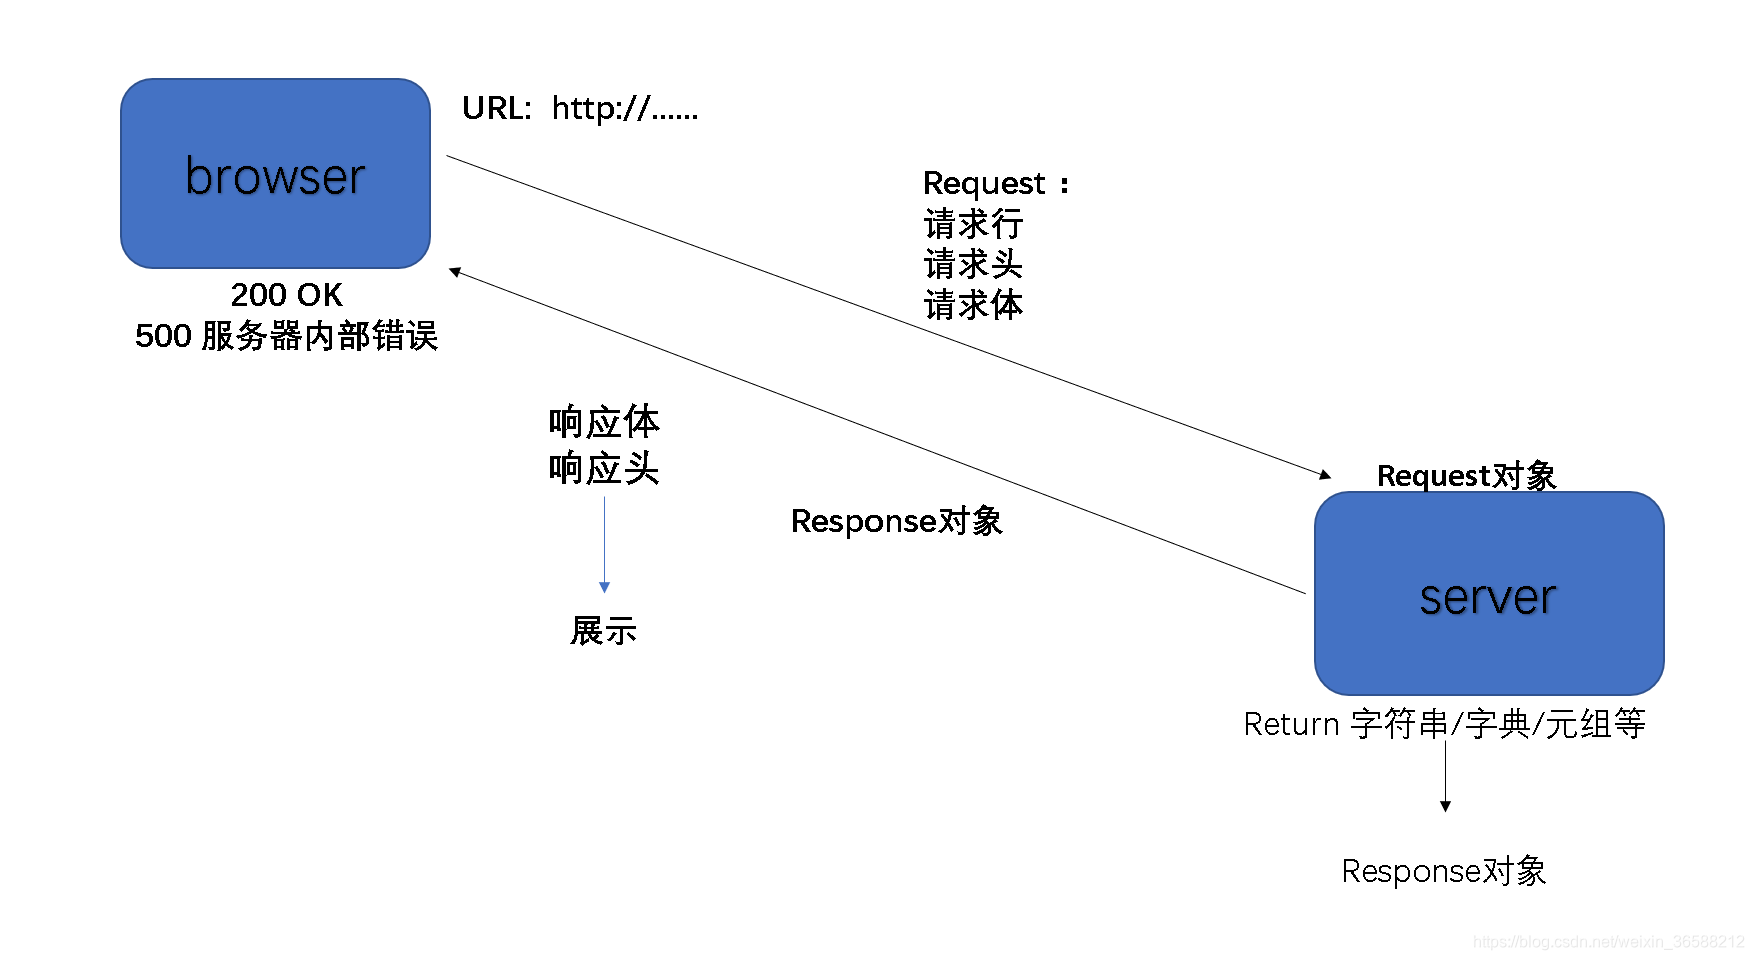
response对象包括响应头、状态码。
Response.status : 200
Response.status_code : 200 OK
Response.headers
Response.content_type
创建response对象方式
1、直接返回字符串,flask默认自动封装成response对象
2、response('字符串',heard={key:value})
3、response = make_response("XXXXXX")
使用字符串创建页面
@app.route("/index")
def index():
	s='''
	<form action="" method="get">
        <p><input type="text" placeholder="请输入用户名"></p>
        <p><input type="text" placeholder="请输入地址"></p>
        <p><input type="text"></p>
    </form>
	'''
	#自动封装成response对象
    return s
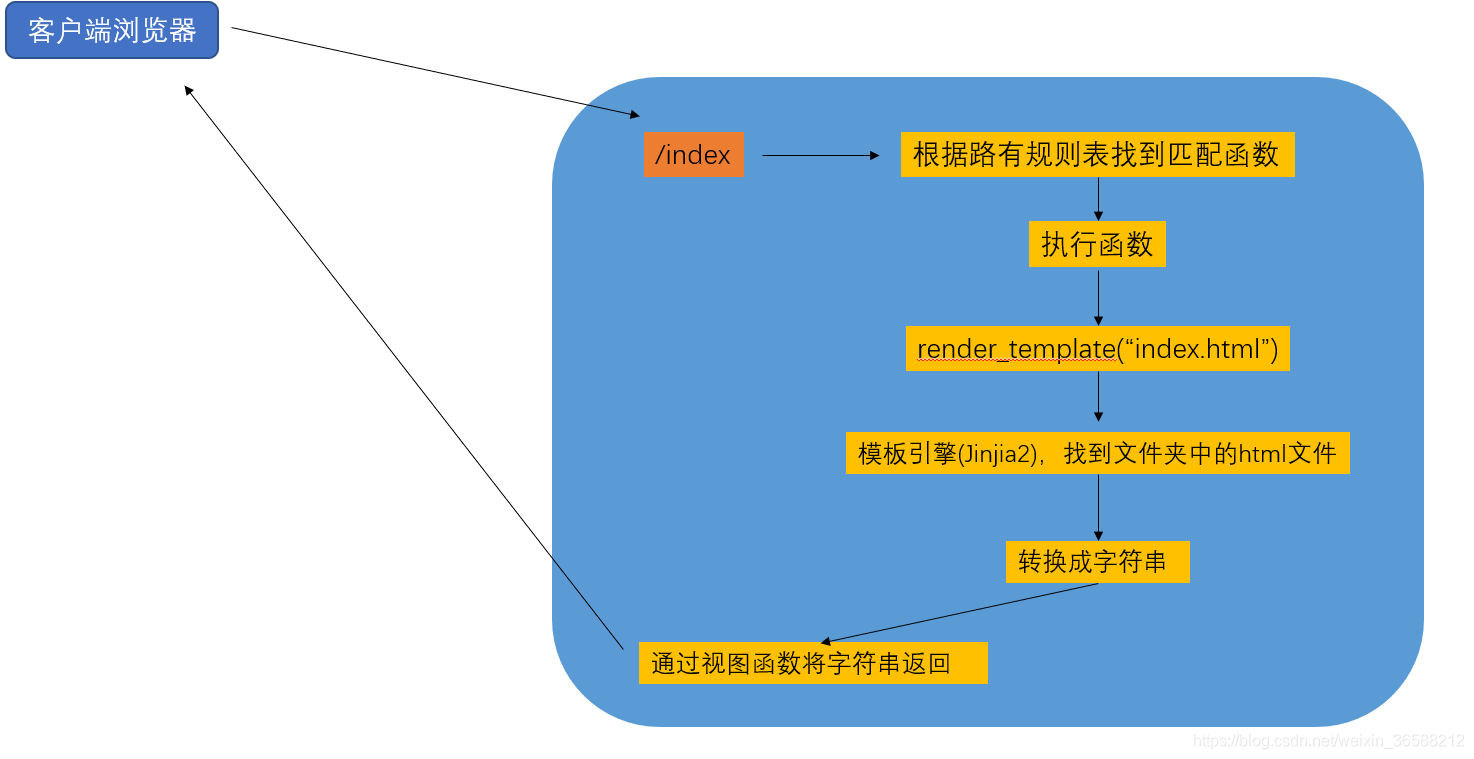
因为当页面多的时候使用这种方法导致代码臃肿,所以选择使用reder_template("**.html")方法创建页面
即如此关联html文件:
使用render_template(“index.html”),这样同样可以创建页面
例如:
@app.route("/index")
def index():
    return render_template("index.html")
index.html文件如下:
<!DOCTYPE html>
<html lang="en">
<head>
    <meta charset="UTF-8">
    <title>用户信息</title>
</head>
<body>
    <ul>
        {% for k,v in user_dict.items() %}
            <li>{{ v.name }}<a href="/detail?uid={{ k }}">查看详情</a></li>
        {% endfor %}
    </ul>
</body>
</html>


<div>
    <form action="" method="get">
        <p><input type="text" placeholder="请输入用户名"></p>
        <p><input type="text" placeholder="请输入地址"></p>
        <p><input type="text"></p>
    </form>

</div>
具体流程如下:
PS:
(1)通过 app.url_map 获取路由规则表,如下为路由规则表
Map([<Rule '/logout' (HEAD, GET, OPTIONS) -> logout>,
 <Rule '/detail' (HEAD, GET, OPTIONS) -> detail>,
 <Rule '/login' (HEAD, GET, POST, OPTIONS) -> login>,
 <Rule '/index' (HEAD, GET, OPTIONS) -> index>,
 <Rule '/static/<filename>' (HEAD, GET, OPTIONS) -> static>])
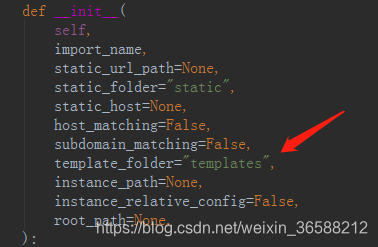
(2)其中默认模板文件夹就是项目目录下的templates,这个目录可是在创建Flask的时候修改,在Flask类初始化的时候,通过修改template_folder参数修改。
2.request对象
request对象,对象访问属性,也可以调用方法。
flask使用request跟html进行传参
首先需要在路由配置的时候添加methods参数
@app.route('/login',methods=["GET","POST"])
def login():
	#通过request的method的请求类型进行相应操作
    if request.method=="GET":
        return render_template('login.html')
    #使用request获取页面值
    #如果是post请求,通过request.form取值
    res=request.from
    user=request.form.get("user")
    pwd=request.form.get("pwd")
    if user=="abc" and pwd  == "123":
        session['user_info']=user
        return “登录成功”
    else:
        return render_template("login.html",msg="用户名或密码错误")
3.关于POST 和 GET 请求
当浏览器操作涉及安全隐私数据的时候,因为使用get请求会把传递数据内容显示在url参数里面,所以涉及隐私数据,一般选用POST请求,就会把信息存储在请求体里面,在通过加密请求提数据来保护安全隐私信息。通过request对象内容获取读取请求体数据。
四.重定向
1.重定向——redirect()
需要实现页面自动跳转的时候需要用到重定向实现跳转到指定URL,这个时候使用redirect()函数( return redirect(url) ),支持301, 302, 303, 305, 307, 308状态码,最终会返回一个response对象,过程如下:
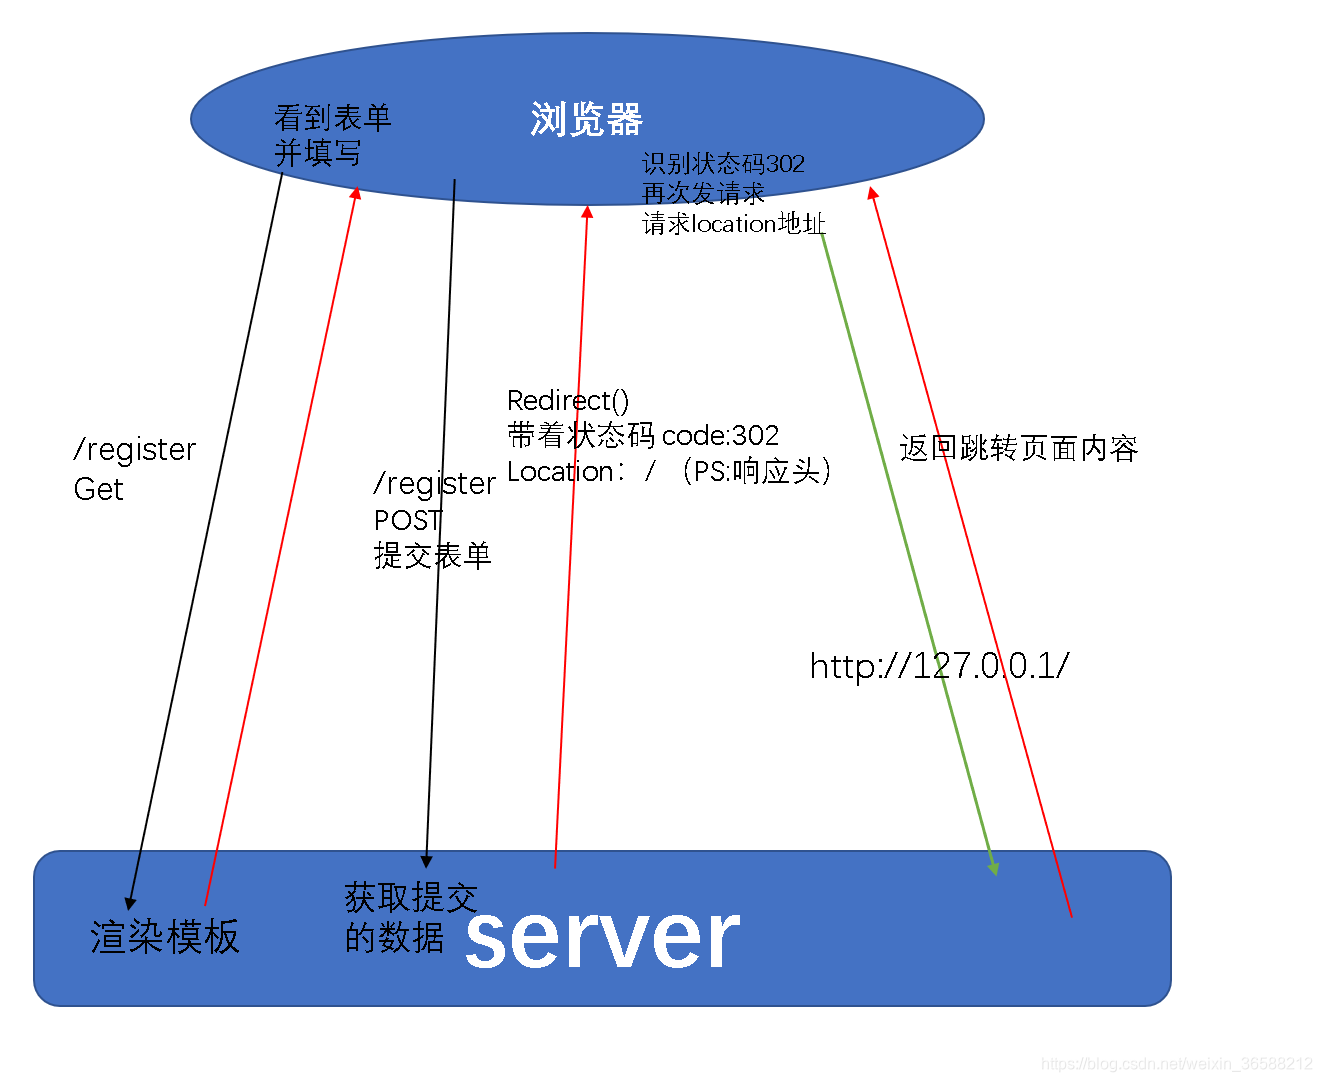
两次响应 1.状态码 302 + location 2.返回location内容
2.url_for
路径反向解析——获取endpoint为指定字符串的url路径
当url路径比较复杂的时候使用。
#创建路由的时候
@app.route('/',endpoint='index')
def reurl():
    return "index"

@app.route('/test')
def reurl():
	#使用url_for 获取endpoint='index'的全部url地址
	url=url_for('index')
	print(url)
    return redirect(url)


 被折叠的 条评论
为什么被折叠?
被折叠的 条评论
为什么被折叠?
 到【灌水乐园】发言


