


 本文详细介绍了一个基于Spring Boot的实战项目,包括项目结构、Maven配置、数据库连接设置、Thymeleaf视图集成及RESTful API开发等内容。

以前的项目都采用xml的配置方式,而spring boot使用的是java config,在配置上有很大的区别。
一、pom.xml
<project xmlns="http://maven.apache.org/POM/4.0.0" xmlns:xsi="http://www.w3.org/2001/XMLSchema-instance" xsi:schemaLocation="http://maven.apache.org/POM/4.0.0 http://maven.apache.org/xsd/maven-4.0.0.xsd">
	<modelVersion>4.0.0</modelVersion>

	<parent>
		<groupId>cn.anhur.cas</groupId>
		<artifactId>anhur-cas</artifactId>
		<version>1.0.0-SNAPSHOT</version>
	</parent>

	<artifactId>anhur-cas-ucenter-webapp</artifactId>
	<packaging>war</packaging>

	<name>anhur-cas-ucenter-webapp</name>
	<description>Anhur CAS user center Web application.</description>

	<properties>
		<framework.version>1.0.0-SNAPSHOT</framework.version>
	</properties>

	<build>
		<finalName>ucenter</finalName>

		<plugins>
			<plugin>
				<artifactId>maven-war-plugin</artifactId>
				<configuration>
					<failOnMissingWebXml>false</failOnMissingWebXml>
				</configuration>
			</plugin>

			<plugin>
				<groupId>org.apache.tomcat.maven</groupId>
				<artifactId>tomcat7-maven-plugin</artifactId>
				<configuration>
					<server>tomcat</server>
					<url>http://www.anhur.cn:8082/manager/text</url>
					<path>/${project.build.finalName}</path>
				</configuration>
				<executions>
					<execution>
						<phase>deploy</phase>
						<goals>
							<goal>redeploy</goal>
						</goals>
					</execution>
				</executions>
			</plugin>

			<plugin>
				<groupId>org.springframework.boot</groupId>
				<artifactId>spring-boot-maven-plugin</artifactId>
				<executions>
					<execution>
						<goals>
							<goal>repackage</goal>
						</goals>
					</execution>
				</executions>
			</plugin>
		</plugins>
	</build>

	<dependencyManagement>
		<dependencies>
			<dependency>
				<groupId>cn.anhur.framework</groupId>
				<artifactId>anhur-framework</artifactId>
				<version>${framework.version}</version>
				<type>pom</type>
				<scope>import</scope>
			</dependency>
		</dependencies>
	</dependencyManagement>

	<dependencies>
		<dependency>
			<groupId>org.springframework.boot</groupId>
			<artifactId>spring-boot-starter-thymeleaf</artifactId>
		</dependency>

		<dependency>
			<groupId>org.springframework.boot</groupId>
			<artifactId>spring-boot-starter-tomcat</artifactId>
			<scope>provided</scope>
		</dependency>

		<dependency>
			<groupId>mysql</groupId>
			<artifactId>mysql-connector-java</artifactId>
			<scope>runtime</scope>
		</dependency>

		<dependency>
			<groupId>cn.anhur.framework</groupId>
			<artifactId>anhur-framework-core</artifactId>
			<version>${framework.version}</version>
		</dependency>
	</dependencies>

</project>
- <packaging>war</packaging>原有的项目采用的是自动化打包成war部署,不想打破配置,依然采用war的方式部署,不过个人觉得,使用jar的方式会好点。
- <failOnMissingWebXml>false</failOnMissingWebXml>spring boot的web工程是没有web.xml的,如果使用了war的打包方式会打包失败,这配置忽略了这一错误。
- <artifactId>tomcat7-maven-plugin</artifactId>自动化部署插件。
- <artifactId>spring-boot-maven-plugin</artifactId>加入spring boot插件
- <artifactId>spring-boot-starter-thymeleaf</artifactId>视图所需依赖,th模板最大的好处是使用了替换的方式填充模型,在html5下可以做到原型即模板。
- <artifactId>spring-boot-starter-tomcat</artifactId>由于使用了tomcat作为运行环境,那么spring boot里依赖的tomcat就不需要打包了。
二、创建程序入口
@SpringBootApplication
@EnableAutoConfiguration
public class AccountApplication {

	public static void main(String[] args) {
		SpringApplication.run(AccountApplication.class, args);
	}

}
- @SpringBootApplication
- @EnableAutoConfiguration 启用自动配置
public class ServletInitializer extends SpringBootServletInitializer {

	@Override
	protected SpringApplicationBuilder configure(SpringApplicationBuilder builder) {
		return builder.sources(AccountApplication.class);
	}

}
使用了外置的tomcat,由于没有web.xml,tomcat无从下手,需要告诉容器怎么启动。
三、数据库等配置
spring.datasource.url=jdbc:mysql://localhost:3306/cas
spring.datasource.username=root
spring.datasource.password=123456
spring.datasource.driver-class-name=com.mysql.jdbc.Driver

spring.jpa.show-sql=true
spring.jpa.hibernate.ddl-auto=update

#spring.http.encoding.charset=UTF-8
#spring.http.encoding.enable=true
spring.http.encoding.force=true

spring.resources.chain.strategy.content.enabled=true
spring.resources.chain.strategy.content.paths=/**
四、第一个http请求
@Controller
@RequestMapping("/user")
public class UserController {
@Autowired
@Qualifier("userService")
private UserService userService;
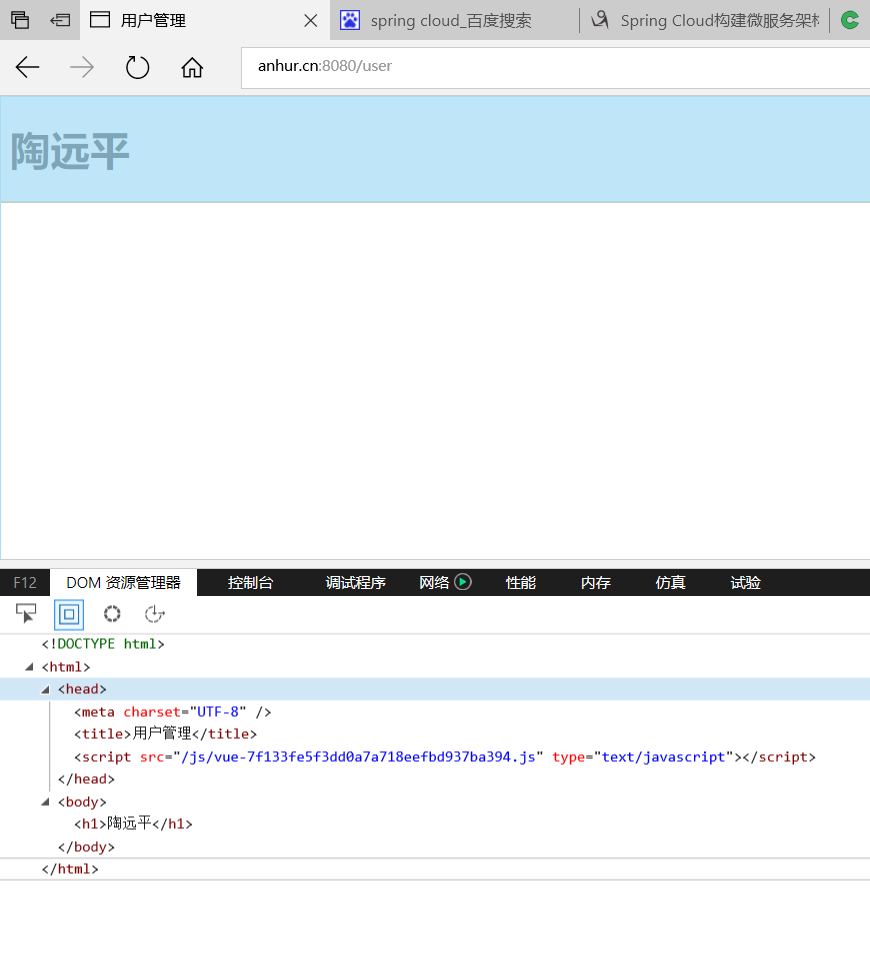
@RequestMapping(value = "/", method = RequestMethod.GET)
public String index(Model model) {
model.addAttribute("title", "用户管理");
model.addAttribute("h", "陶远平");
return "user/index";
}
@ResponseBody
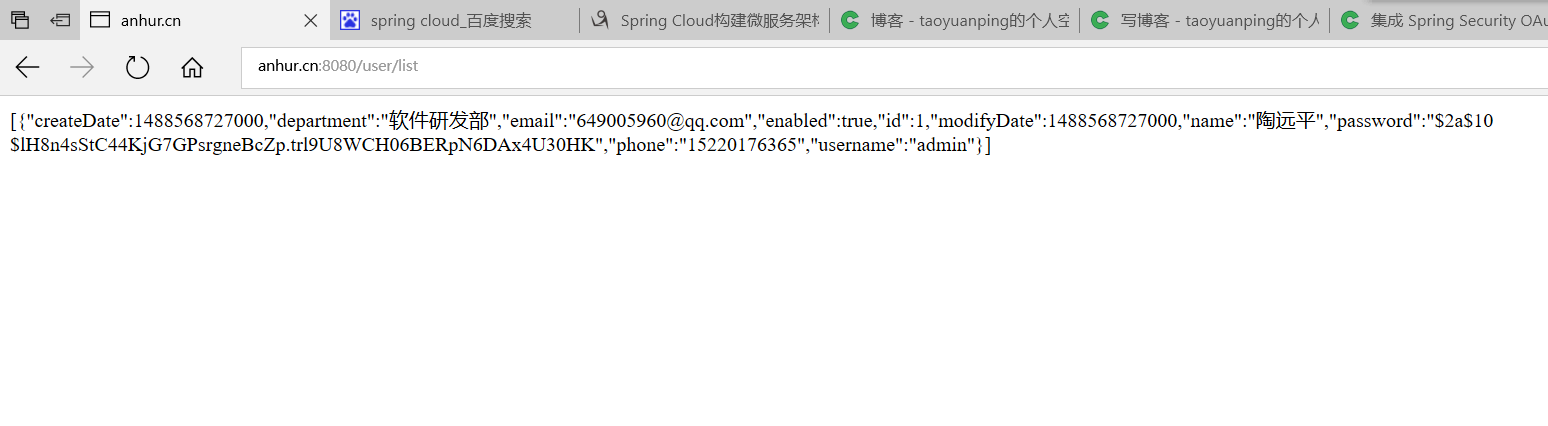
@RequestMapping(value = "/list", method = RequestMethod.GET)
public List<User> list() {
return userService.list();
}
}
@Service("userService")
public class UserServiceImpl extends BaseServiceImpl<User, Long> implements UserService {

	private UserRepository userRepository;

	@Autowired
	public void setUserRepository(UserRepository userRepository) {
		this.userRepository = userRepository;
		setBaseRepository(userRepository);
	}

	@Override
	public List<User> list() {
		return userRepository.findAll();
	}

}
public interface UserRepository extends BaseRepository<User, Long> {

}
使用spring data jpa,可以简单建立数据库操作。
<!DOCTYPE html>
<html xmlns:th="http://www.thymeleaf.org">
<head>
<meta charset="UTF-8" />
<title th:text="${title}">原型标题</title>
<script type="text/javascript" src="../../static/js/vue.js"
	th:src="@{${urls.getForLookupPath('/js/vue.js')}}"></script>
</head>
<body>
	<h1 th:text="${h}">原型</h1>
</body>
</html>
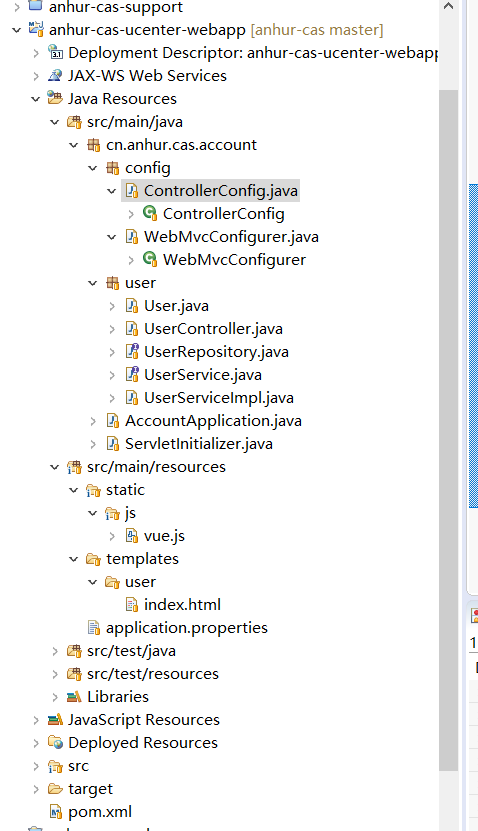
五、整个目录结构
WebMvcConfigurer 配置了fastjson作为json的转换提供者。
@Configuration
public class WebMvcConfigurer extends WebMvcConfigurerAdapter {

	@Override
	public void configureMessageConverters(List<HttpMessageConverter<?>> converters) {
		super.configureMessageConverters(converters);

		FastJsonHttpMessageConverter fastJsonConverter = new FastJsonHttpMessageConverter();
		FastJsonConfig fastJsonConfig = new FastJsonConfig();
		fastJsonConverter.setFastJsonConfig(fastJsonConfig);

		converters.add(fastJsonConverter);
	}

}
@ControllerAdvice
public class ControllerConfig {

	@Autowired
	private ResourceUrlProvider resourceUrlProvider;

	@ModelAttribute("urls")
	public ResourceUrlProvider urls() {
		return this.resourceUrlProvider;
	}

}
ControllerConfig配置了静态资源的版本,使用了MD5的方式,主要静态资源做过修改,那么发布时就可以不用清理浏览器的缓存了。urls.getForLookupPath会得到一串带有MD5的映射。
六、我们可以测试一下
Hibernate: select user0_.id as id1_0_, user0_.create_date as create_d2_0_, user0_.modify_date as modify_d3_0_, user0_.department as departme4_0_, user0_.email as email5_0_, user0_.enabled as enabled6_0_, user0_.name as name7_0_, user0_.password as password8_0_, user0_.phone as phone9_0_, user0_.username as usernam10_0_ from user user0_
符合我们预期的效果。
ps:在程序中使用了默认的目录结构,这符合 约定优于配置


 606
606

 被折叠的 条评论
为什么被折叠?
被折叠的 条评论
为什么被折叠?
 到【灌水乐园】发言


