


 本文介绍了如何在Flutter项目中有效地组织API文件,通过参考链接文章提供了详细的指导,帮助开发者实现更好的代码结构和管理。
flutter api
This explanation will be pretty long and complex, so if you’d want to directly see to the codebase, you can see it here:
该解释将非常冗长且复杂,因此,如果您想直接查看代码库,可以在这里查看:
Almost every app that is available in the market uses and sends data to external source (a.k.a. Internet). Although some app relies on local database to save and fetch its data to display to the user. This is fairly easy in mobile programming because this is a pretty basic topic to mobile programmers around the globe, usually we learned this upon learning the mobile programming framework itself.
市场上几乎所有可用的应用程序都使用数据并将数据发送到外部源(也称为Internet)。 尽管某些应用程序依赖于本地数据库来保存和获取其数据以显示给用户。 在移动编程中,这相当容易,因为对于全球的移动程序员来说,这是一个相当基本的话题,通常我们是在学习移动编程框架本身后才学到这一点的。
For small project probably it’s not that big of a deal because the API calls used in the application is small. But what if the application used and sends data from the internet pretty extensively? Of course that raises a problem, especially if the codebase is handled by multiple programmers. We’ve had to have a standardization in order to make things clear and in the correct order as more and more programmer handles and writes code to the codebase.
对于小型项目而言,这没什么大不了的,因为应用程序中使用的API调用很小。 但是,如果应用程序大量使用并从Internet发送数据该怎么办? 当然,这会带来一个问题,尤其是在代码库由多个程序员处理的情况下。 随着越来越多的程序员处理代码并将代码写入代码库,我们必须进行标准化以使事情变得清晰和正确。
So, what should we take into consideration when designing an API layer for Flutter app? I tried to list down all things that need to be considered before designing an API layer for Flutter
因此,在为Flutter应用程序设计API层时应该考虑什么? 我试图列出在为Flutter设计API层之前需要考虑的所有事项
- API layer must give proper abstraction to the UI layer. API层必须为UI层提供适当的抽象。
- API layer must convert all API responses into a plain dart object, so UI can directly consume it. API层必须将所有API响应转换为普通的dart对象,以便UI可以直接使用它。
- API layer must be able to manage the session by itself, so the UI part should not be responsible to manage session. API层必须能够自己管理会话,因此UI部分不应负责管理会话。
After taking those things into consideration, this is the shape of the API layer that I mostly used on my professional projects.
考虑了这些因素之后,这就是我在专业项目中最常使用的API层的形状。
First, let’s start with the components that will be used by the API layer, I’ll illustrate this with a simple diagram
首先,让我们从API层将要使用的组件开始,我将用一个简单的图来说明这一点
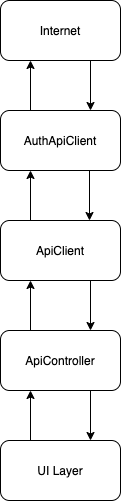
So what are those components means?
那么这些成分意味着什么?
- Let’s start with the Internet. 让我们从互联网开始。
This is well the “Internet” or the external data that we need to get from outside the device. This can be any means of communication, REST API, Websockets, File Download/Upload, anything.
这正是我们需要从设备外部获取的“ Internet”或外部数据。 这可以是任何通信方式,REST API,Websocket,文件下载/上传等等。
- Next, we start with the AuthApiClient. What is this? 接下来,我们从AuthApiClient开始。 这是什么?
Most of modern apps will need the user to login/register to the app’s system (backend), which means most of the API calls will need to be authenticated by the system. A simple example is like this: imagine you’re making an e-commerce app, you don’t want to see user A buying and selling stuff as someone else (user B) right?
大多数现代应用程序将需要用户登录/注册到应用程序的系统(后端),这意味着大多数API调用都需要由系统进行身份验证。 一个简单的例子是这样的:假设您正在开发一个电子商务应用程序,您不想看到用户A与其他人(用户B)一起买卖东西对吗?
So this AuthApiClient will handle all the communication regarding user Authentication and Authorization to other components that needs it. For example, if we need the user information on some page, this is the component that you’re looking for.
因此,此AuthApiClient将处理与用户身份验证和授权到需要它的其他组件的所有通信。 例如,如果我们需要某个页面上的用户信息,那么这就是您要查找的组件。
For more information regarding Backend authentication, you can read here https://www.digitalocean.com/community/tutorials/an-introduction-to-oauth-2
有关后端身份验证的更多信息,您可以在这里阅读https://www.digitalocean.com/community/tutorials/an-introduction-to-oauth-2
- Next up, we got the ApiClient. 接下来,我们得到了ApiClient。
So what is the difference between the ApiClient and AuthApiClient? Ok, so basically they are the “same” things and can be used for almost same things. But the responsibility is the main difference between ApiClient and AuthApiClient.
那么ApiClient和AuthApiClient有什么区别? 好的,所以基本上它们是“相同”的东西,可以用于几乎相同的东西。 但是责任是ApiClient和AuthApiClient之间的主要区别。
ApiClient will be responsible for more practical use-case on user’s point of view, for instance when we have to call an API to create a new e-commerce transaction, this is what you need.
从用户的角度来看,ApiClient将负责更实际的用例,例如,当我们必须调用API创建新的电子商务交易时,这就是您所需要的。
While the AuthApiClient will be responsible only for authentication-related use-case. Mostly user will only “interact” with this component upon Login and Register flow inside the application. But this component will always work under the hood, to serve Authentication related data to other components.
而AuthApiClient仅负责与身份验证相关的用例。 通常,用户仅在应用程序内部的“登录”和“注册”流程后才与该组件“交互”。 但是,此组件将始终在后台运行,以将与身份验证相关的数据提供给其他组件。
ApiClient will fetch and send the original information from and to the API, and will process it until it will be ready for the UI to be consumed (on a Plain Dart Object form). So this will include any data parsing mechanism that you choose for your application. More or less, this is the core of the API layer itself.
ApiClient将获取原始信息并将其从API发送并发送到API,并将对其进行处理,直到可以使用UI为止(在普通Dart对象表单上)。 因此,这将包括您为应用程序选择的任何数据解析机制。 或多或少,这是API层本身的核心。
Also, one thing worth mentioning is that ApiClient, will need an AuthApiClient to operate properly. Because most of the operation done inside a modern mobile app will need authentication data for security reasons. So that’s another reason why I divide these 2 into a different component.
另外,值得一提的是,ApiClient需要一个AuthApiClient才能正常运行。 因为出于安全原因,现代移动应用程序内部完成的大多数操作都需要身份验证数据。 因此,这就是我将这两个部分划分为不同组件的另一个原因。
- Next is the ApiController. 接下来是ApiController。
While the ApiClient will serve the data all-ready for the UI to be consumed, the UI layer shouldn’t communicate directly with the API layer. Mostly because there's a lot of logic going on inside the API layer, and the UI shouldn’t really know much about that.
尽管ApiClient可以为用户界面准备就绪的所有数据,但用户界面层不应直接与API层进行通信。 主要是因为API层内部有很多逻辑,而UI对此并不了解太多。
That’s why I’ve created another abstraction layer here for the UI to consume, called ApiController. So basically the ApiController will be responsible to create request to the ApiClient, switching between which client to use that suits the use-case most.
这就是为什么我在这里为UI使用创建了另一个抽象层,称为ApiController。 因此,基本上,ApiController将负责向ApiClient创建请求,在最适合用例的客户端之间进行切换。
So the UI layer shouldn’t know too much logic behind the API calls, all it needs to do is tell the ApiController what it needs (fetch latest data, send login information, etc), and ApiController should take the rest.
因此,UI层不应该知道API调用背后的太多逻辑,它所要做的就是告诉ApiController它需要什么(获取最新数据,发送登录信息等),而ApiController应该承担其余的工作。
- Last, is the UI layer. 最后是UI层。
This is the UI that user will directly interact with during they’re time inside the apps. e.g. (A button being clicked, A pull-to-refresh widget is being triggered, etc). This will only communicate with the ApiController, no more no less.
这是用户在应用中使用时可以直接与其交互的UI。 例如(单击按钮,触发“刷新按钮”等)。 这只会与ApiController进行通信,不再少不了。
So first, the folders will look like this:
因此,首先,文件夹将如下所示:
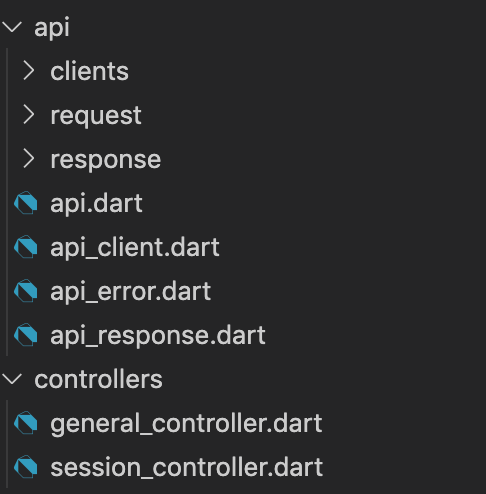
So, we got two top folders, which are Api & Controllers. Most of the Api layer files would be placed inside the Api folder, except for the ApiController classes.
因此,我们得到了两个顶级文件夹,即Api和Controllers。 除了ApiController类,大多数Api图层文件都将放置在Api文件夹中。
Then, we’d need to define a request & response base class of our Api Layer. This is needed because we’d need to convert all the information from the internet/external sources to a Dart object.
然后,我们需要定义Api层的请求和响应基类。 这是必需的,因为我们需要将所有信息从Internet /外部来源转换为Dart对象。
So for all Api response, no matter if it’s an error or not, we’ll convert them to an ApiResponse class. The implementation will look like this
因此,对于所有Api响应,无论是否出错,我们都将其转换为ApiResponse类。 实现将如下所示
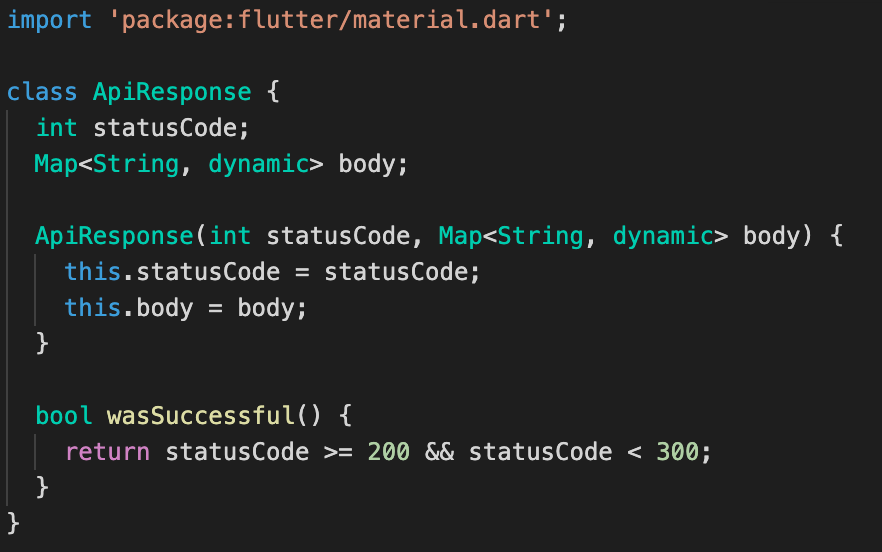
This class will contain the JSON representation of the response that we’ve received from the backend, and the HTTP status code for the original API response (you might not need this if you didn’t use HTTP).
此类将包含我们从后端收到的响应的JSON表示形式,以及原始API响应的HTTP状态代码(如果您不使用HTTP,则可能不需要它)。
Next is the RequestObject and ResponseObject class, which will be the base class for all Plain Dart Object that holds the API response result.
接下来是RequestObject和ResponseObject类,它将是所有包含API响应结果的Plain Dart Object的基类。
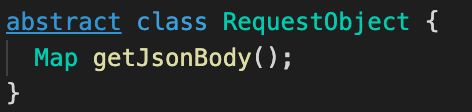

This abstract class is a very simple class, we’d need this so if in the future we need to add new functionality on response / request object, we can just add abstract method on this base class and all child classes will need to follow.
这个抽象类是一个非常简单的类,我们将需要它,因此,如果将来我们需要在response / request对象上添加新功能,则只需在该基类上添加抽象方法,所有子类都将需要遵循。
Next, and this is the most important part, the ApiClient class. This class contains a lot of methods, because we need to support a lot of Api method in a REST API (GET, POST, PUT, PATCH, etc). So I’ll only explain for GET method.
接下来,这是最重要的部分,ApiClient类。 该类包含很多方法,因为我们需要在REST API中支持很多Api方法(GET,POST,PUT,PATCH等)。 所以我只会解释GET方法。
First, we’ll use Dio for the HTTP library as it’s very very functional and almost all REST API methods is ready out of the box. Even for download and upload files.
首先,我们将对HTTP库使用Dio,因为它具有非常好的功能,几乎所有REST API方法都可以直接使用。 甚至用于下载和上传文件。
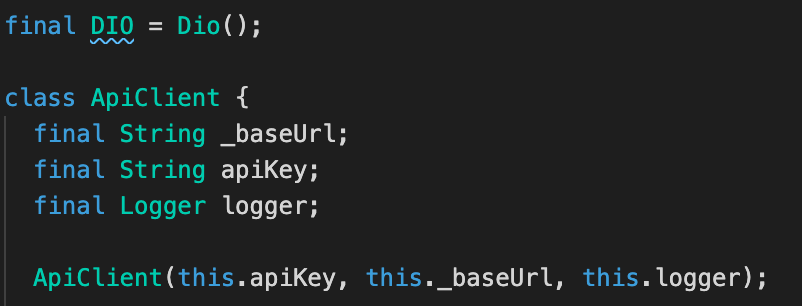
Ok let’s start with the Dio declaration, ideally this should be injected to the ApiClient, so it can be mocked easily for test, but I skipped this part for now.
好吧,让我们从Dio声明开始,理想情况下,应该将其注入ApiClient,以便可以轻松对其进行模拟以进行测试,但是我暂时跳过了这一部分。
Then, we declare all the params needed for the ApiClient, which are:
然后,我们声明ApiClient所需的所有参数,它们是:
- ApiKey (Api Key needed for your backend to ensure HTTP request is coming from your app, not from malicious sources) ApiKey(后端所需的Api密钥,以确保HTTP请求来自您的应用程序,而不是来自恶意源)
- BaseURL (Base URL for your Backend system) BaseURL(您的后端系统的基本URL)
- Logger (this is not needed, but this will be handy to log all the request & response we got to all of logger mechanism that is used inside the app) 记录器(不需要,但这将方便地记录我们对应用程序内部使用的所有记录器机制的所有请求和响应)
Next is, the buildUrl method:
接下来是buildUrl方法:

This method will basically append the base URL of your backend system with each endpoint needed by your application, and add queryparams on the request if needed.
此方法基本上会将后端系统的基本URL附加到应用程序所需的每个端点,并在需要时在请求上添加queryparams。
Then buildHeaders method.
然后是buildHeaders方法。
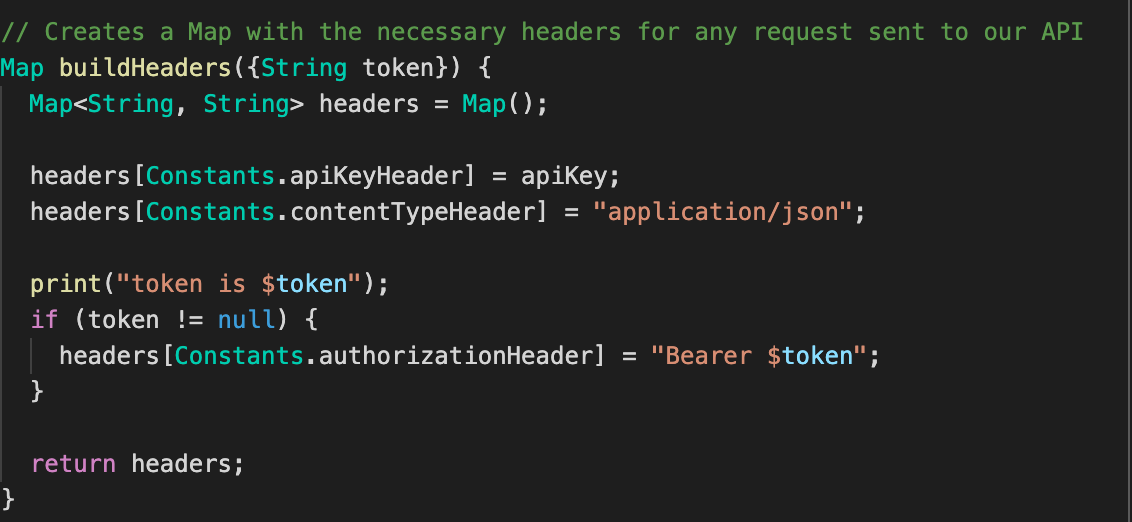
This function will add any HTTP request headers needed by your backend to identify the HTTP request is coming from correct sources, by adding Authorization token and API key. Also you can add more basic headers here based on your own needs.
通过添加授权令牌和API密钥,此函数将添加后端所需的所有HTTP请求标头,以识别HTTP请求是否来自正确的来源。 您也可以根据自己的需要在此处添加更多基本标题。
Next is the handleResponse method.
接下来是handleResponse方法。
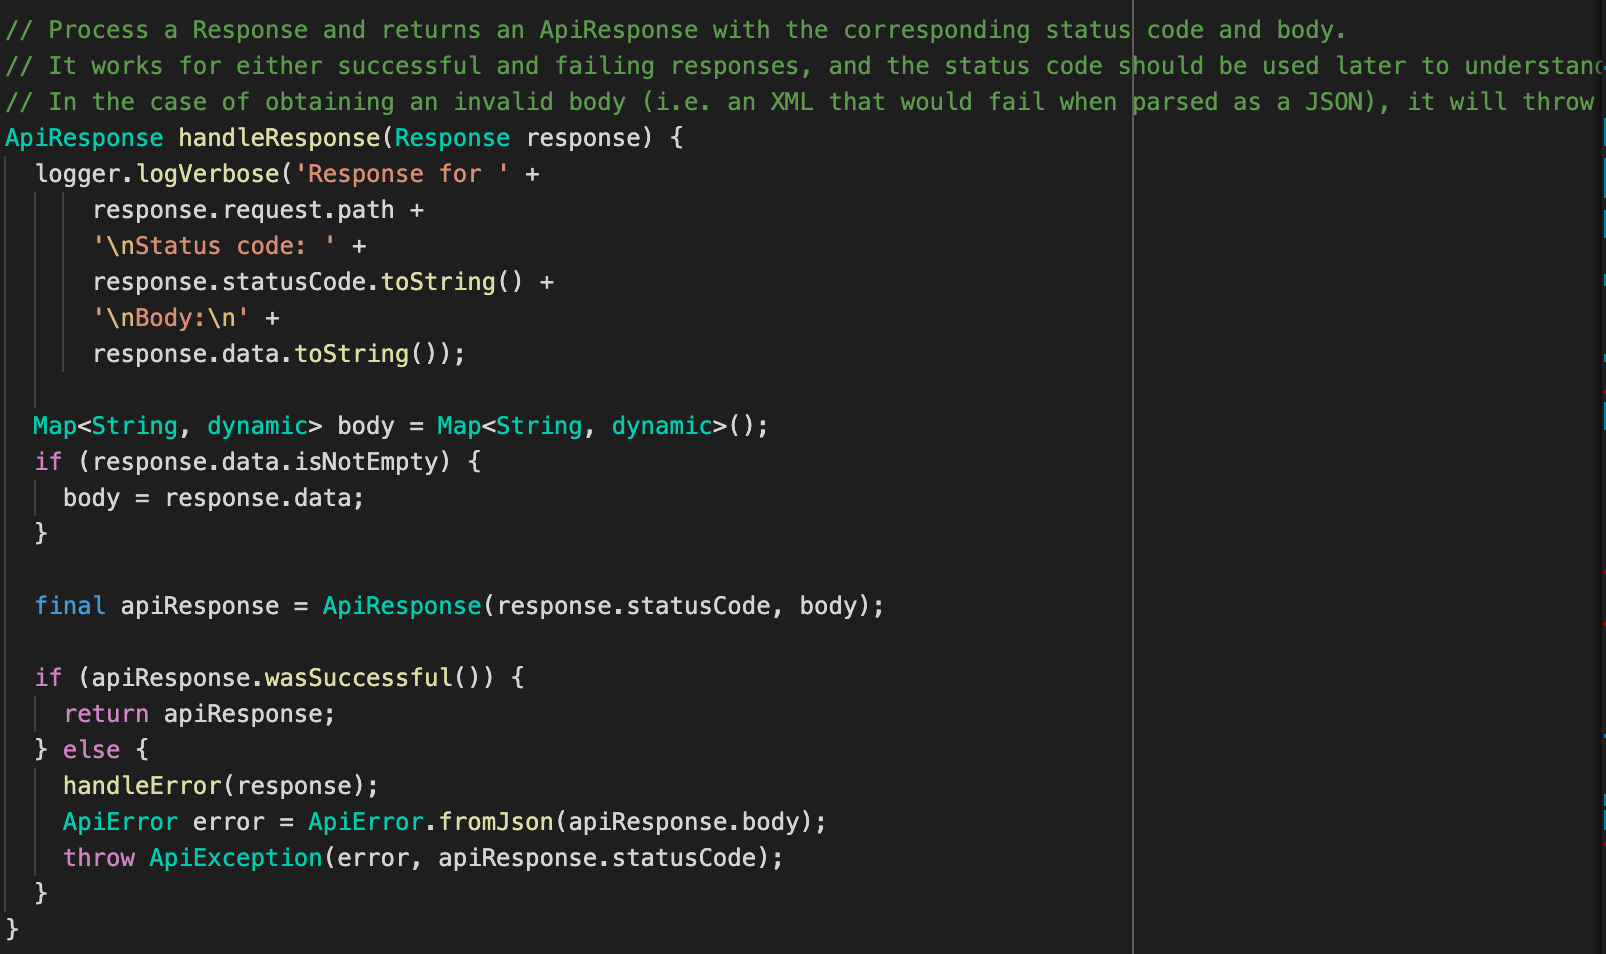
So this method will parse the original Response class by Dio (HTTP implementation that I used), and converts it into an ApiResponse or ApiError (our own Dart object to hold API response).
因此,此方法将通过Dio(我使用的HTTP实现)解析原始的Response类,并将其转换为ApiResponse或ApiError(我们自己的Dart对象以保存API响应)。
Please do note, that the Serializing is not being done inside this function, because we only save the information to a Map<String, dynamic> inside the ApiResponse.
请注意,该函数内部并未完成序列化,因为我们仅将信息保存到ApiResponse内部的Map <String,dynamic>中。
After serialization, we’ll get a plain Dart object that pictures a real-world domain, something like Car, Person, etc.
序列化之后,我们将获得一个普通的Dart对象,该对象描绘了一个真实世界的域,例如Car , Person等。
Next is, the GET method of the ApiClient.
接下来是ApiClient的GET方法。
// Performs a GET request to the given url, returning a Future with the ApiResponse obtained
  // token should be injected by respective client manually by getting it from `SessionController` instance
  Future<ResponseObject> get(
      {@required String endpoint,
      @required ResponseObject Function(Map<String, dynamic>) serializer,
      Map<String, String> queryParams,
      Map headers,
      String token}) async {
    final String url = buildUrl(
        endpoint: endpoint,
        queryParams: queryParams);
    Map requestHeaders = buildHeaders(token: token);
    if (headers != null) {
      requestHeaders.addAll(headers);
    }


    try {
      final response =
          await DIO.get(url, options: Options(headers: requestHeaders));


      ApiResponse apiResponse = handleResponse(response);


      return serializer(apiResponse.body);
    } on ApiException catch (ex) {
      // If the exception caught is an ApiException, then it isn't actually unexpected. We just throw it again
      logger.logVerbose('Unexepected exception obtained with request GET ' +
          endpoint +
          '\nException: ' +
          ex.toString());
      throw ex;
    } on DioError catch (ex) {
      logger.logVerbose('Unexepected exception obtained with request GET ' +
          endpoint +
          '\nException: ' +
          ex.toString());


      handleError(ex.response);
      throw ApiException(
          ApiError(detail: ex.error.toString()), ex.response.statusCode);
    } catch (ex) {
      logger.logVerbose('Unexepected exception obtained with request GET ' +
          endpoint +
          '\nException: ' +
          ex.toString());
      throw CustomException(
          "Something is wrong with your request!", ex, ex.response.statusCode);
    }
  }
This is where the magic happens, so this method will compile the request you’ve made to a certain endpoint, with certain query params (if needed), and call the actual implementation of GET method from Dio, and converts it into an actual Dart object like Car or Person.
这就是魔术发生的地方,因此此方法将使用某些查询参数(如果需要)编译您对特定端点的请求,并从Dio调用GET方法的实际实现,并将其转换为实际的Dart。诸如Car或Person对象。
But probably you’ve seen a missing explanation here, what are the serializer param means in the get function?
但是可能您在这里看不到解释了,在get函数中,序列化程序param意味着什么?
So, I created a simple function definition called Serializer, which this will be implemented by every Dart object that will represent actual object from the Api response, something like Car or Person.
因此,我创建了一个简单的函数定义,称为Serializer,将由每个Dart对象实现,该对象将表示Api响应中的实际对象,例如Car或Person 。
For example, see the SessionResponse class below:
例如,请参见下面的SessionResponse类:
import 'package:flutter_project_boilerplate/core/api/response/response_object.dart';
import 'package:flutter_project_boilerplate/core/models/user.dart';
import 'package:json_annotation/json_annotation.dart';


part 'session_response.g.dart';


@JsonSerializable(createToJson: true)
class SessionResponse extends ResponseObject {
  @JsonKey(name: 'refresh')
  final String refreshToken;


  @JsonKey(name: 'access')
  final String accessToken;


  @JsonKey(name: 'user')
  User user;


  @JsonKey(name: 'timeLogInInMillis')
  int timeLogInInMillis;


  SessionResponse({this.refreshToken, this.accessToken, this.user, this.timeLogInInMillis});


  factory SessionResponse.fromJson(Map<String, dynamic> json) =>
      _$SessionResponseFromJson(json);


  static get serializer => _$SessionResponseFromJson;


  Map toJson() {
    return _$SessionResponseToJson(this);
  }
}
So I used json_annotation package to parse json to a Dart object (you can use your own choice here for json parsing, there are no wrong or right).
因此,我使用json_annotation包将json解析为Dart对象(您可以在此处使用自己的选择进行json解析,没有错误或对错)。
And I created a simple getter called serializer which will returns a static function that will parse a Map<String,dynamic> into a SessionResponse in this case.
我创建了一个简单的名为serializer吸气剂,它将返回一个静态函数,该SessionResponse在这种情况下将Map <String,dynamic>解析为SessionResponse 。
So ApiClient will only receive implementation of how to parse the Json object received from the Api into a Plain dart object.
因此,ApiClient将仅接收有关如何将从Api接收到的Json对象解析为Plain dart对象的实现。
Next, how to implement an actual Api with this client?
接下来,如何使用此客户端实现实际的Api?
It’s simple, so first, for AuthApiClient (I separate this Api component from general ApiClient), implementation will look like this:
这很简单,因此首先,对于AuthApiClient(我将这个Api组件与一般的ApiClient分开),实现将如下所示:

So, we’ll extend this class from ApiClient class, extend all the params from the ApiClient class. And to create a request (for instance, login request), we’ll just need to create an endpoint, a request object (based on requirement from backend), and define a serializer to parse the Json.
因此,我们将从ApiClient类扩展该类,从ApiClient类扩展所有参数。 而要创建一个请求(例如,登录请求),我们只需要创建一个端点,一个请求对象(基于后端的要求),并定义一个序列化器即可解析Json。
Next, for the ApiController of this AuthClient, is defined like below:
接下来,为此AuthClient的ApiController定义如下:
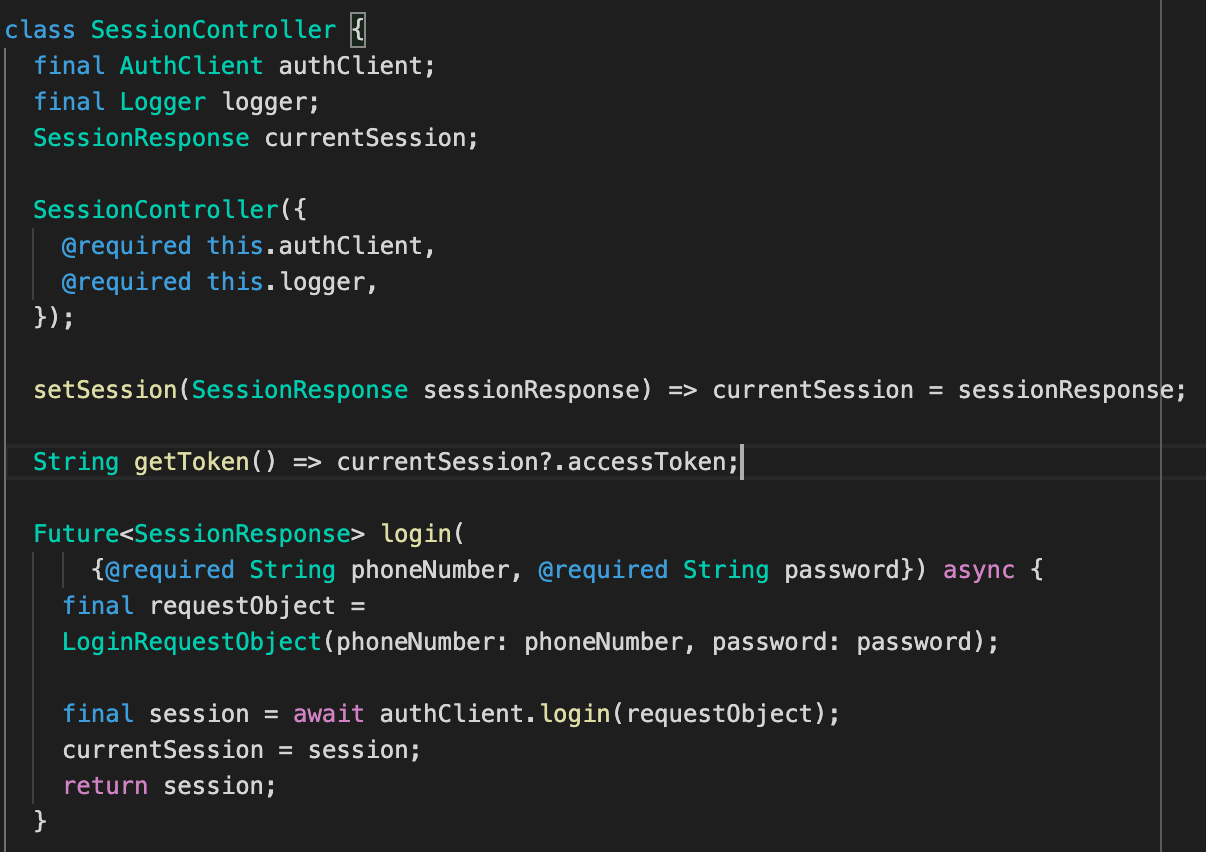
We’ll inject the AuthClient, logger (not required), then we’ll create a login function that will actually call the login implementation from the AuthClient. This will be called directly by the UI layer.
我们将注入AuthClient,记录器(不是必需的),然后创建一个登录函数,该函数实际上将从AuthClient调用登录实现。 UI层将直接调用此方法。
How about other Api clients? the one that will be used for general use-case. It will look like this:
其他Api客户呢? 将用于一般用例的一种。 它看起来像这样:
class GeneralClient extends ApiClient {
  final SessionController sessionController;


  GeneralClient({
    @required String apiKey,
    @required String baseUrl,
    @required Logger logger,
    @required this.sessionController
  }) : super(apiKey, baseUrl, logger);


  Future<SomeResponse> fetchDummy() async {
    final String endpoint = 'dummy';


    return get(
        endpoint: endpoint,
        token: sessionController.getToken(),
        serializer: SomeResponse.serializer);
  }


}
So, this GeneralClient will have one more params compared to AuthClient, which is the SessionController. This will be needed if we’d want to add Authorization token to the request (e.g. the fetchDummy request). Other than that, it’s basically the same implementation compared to the AuthClient.
因此,与AuthClient(SessionController)相比,该GeneralClient将具有更多参数。 如果我们要向请求中添加授权令牌(例如fetchDummy请求), fetchDummy 。 除此之外,与AuthClient相比,它基本上是相同的实现。
And for the ApiController for this one, it’ll look like this:
对于这个的ApiController,它看起来像这样:
import 'package:flutter/material.dart';
import 'package:flutter_project_boilerplate/core/api/clients/general_client.dart';
import 'package:flutter_project_boilerplate/core/api/response/auth/session_response.dart';
import 'package:flutter_project_boilerplate/core/logging/logger.dart';


class GeneralController {
  final GeneralClient generalClient;
  final Logger logger;


  GeneralController({
    @required this.generalClient,
    @required this.logger,
  });


  Future<SessionResponse> fetchDummy() {
    return generalClient.fetchDummy();
  }


}
More or less, the same with the AuthController/SessionController implementation. This will be called directly by the UI layer.
或多或少,与AuthController / SessionController实现相同。 UI层将直接调用此方法。
Ok, last thing to tie it all together, I’ll group all the ApiClients inside an Api class. This is needed so that we can organize all clients here, and we’d just need to call factoryApi.create syntax to initialize all Api clients based on certain params (Api key, base URL, logger, and SessionController)
好的,最后将它们捆绑在一起,我将所有ApiClients分组到一个Api类中。 这是必需的,以便我们可以在这里组织所有客户端,我们只需要调用工厂Api.create语法即可基于某些参数(Api密钥,基本URL,记录器和SessionController)初始化所有Api客户端。
import 'package:flutter/material.dart';
import 'package:flutter_project_boilerplate/core/api/clients/general_client.dart';
import 'package:flutter_project_boilerplate/core/controllers/session_controller.dart';
import 'package:flutter_project_boilerplate/core/logging/logger.dart';


class Api {
  final GeneralClient generalClient;


  Api({
    @required this.generalClient,
  });


  factory Api.create({
    @required String apiKey,
    @required String baseUrl,
    @required Logger logger,
    @required SessionController sessionController,
  }) {
    return Api(
        generalClient: GeneralClient(
            apiKey: apiKey,
            baseUrl: baseUrl,
            logger: logger,
            sessionController: sessionController
        ),
        // add more clients here
    );
  }
}
And voila! we just made an entire Api layer for our Flutter project from scratch & this will cover almost all basic functionalities needed for our application to communicate with Backend to fetch & send data.
瞧! 我们只是从头开始为Flutter项目制作了一个完整的Api层,这几乎涵盖了我们的应用程序与Backend通信以获取和发送数据所需的几乎所有基本功能。
I know this is pretty complex to consume at once, but I hope this can be useful if you’re going to start your Flutter project with Api calls & stuff.
我知道这一次要消耗很复杂,但是我希望这对您使用Api调用和东西启动Flutter项目很有用。
As usual, if you’ve got any questions, you can ask me at anggadwiarifandi96@gmail.com
和往常一样,如果您有任何疑问,可以通过anggadwiarifandi96@gmail.com来问我。
Thank you and have a good day. Stay safe!
谢谢你,有一个美好的一天。 注意安全!
翻译自: https://levelup.gitconnected.com/how-i-organize-api-files-in-my-flutter-project-8f21c17050df
flutter api


 480
480

 被折叠的 条评论
为什么被折叠?
被折叠的 条评论
为什么被折叠?
 到【灌水乐园】发言


