


为了提高虚拟机的多核处理能力,一般会对宿主机CPU进行直通处理,然而宿主机在调度的过程中可能会出现随机CPU核心调度,导致虚拟机内部的虚拟CPU性能不佳,我们将通过对宿主机部分CPU核进行隔离处理,避免宿主机其他进程使用,将隔离出来的核心绑定到指定的虚拟机中,使得虚拟机中的虚拟CPU性能近似宿主机的性能。
1. 宿主机CPU隔离处理
1.1. 宿主机cpu信息以及numa查看
(1)CPU信息查看
lscpu用于查看CPU相关信息,包括处理器类型、架构、大小端、核心数、线程数、缓存大小等。
- 架构信息:显示CPU架构,例如x86、x86_64、ARM、AMD等;
- 操作模式:支持的CPU运行模式,例如32位或64位;
- 缓存大小:显示CPU的缓存大小,包括L1、L2和L3缓存;
- 核心数:显示CPU的物理核心数,即处理器芯片上的实际核心数量。
- 线程数:显示CPU的线程数,包括物理核心和超线程(Thread(s) per core)的逻辑核心。
- 频率:显示CPU的时钟频率,即CPU运行速度。
lscpu 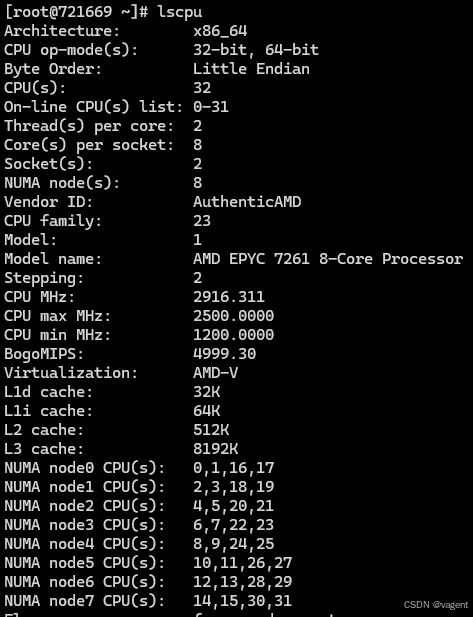
CPU(s): 32
On-line CPU(s) list: 0-31
Thread(s) per core: 2
Core(s) per socket: 8
Socket(s): 2
NUMA node(s): 8...
Virtualization: AMD-V
显示该宿主机有 32核, 2个CPU插槽(Socket(s): 2), 每个Socket有 8Cores, 每个core 有2线程(超线程,允许每个物理内核上运行多个线程), 并支持AMD-V虚拟化。
(2)NUMA信息
NUMA(Non Uniform Memory Access, 非统一内存访问) 专注于提供高速的存储器访问, 没有使用NUMA处理系统同一时间只能有一个处理器访问计算机的存储器,致使系统中存在多个处理器在等待访问存储器。NUMA通过提供分离的存储器给各个处理器,避免当多个处理器访问同一个存储器产生的性能损失。
1)安装numa工具
-
对于基于 Debian 的系统(如 Ubuntu):
sudo apt-get update
sudo apt-get install -y numactl
-
对于基于 Red Hat 的系统(如 CentOS):
sudo yum install -y numactl
- 对于基于 Arch 的系统:
sudo pacman -S numactl
2)查看宿主机的numa信息
numactl --hardware 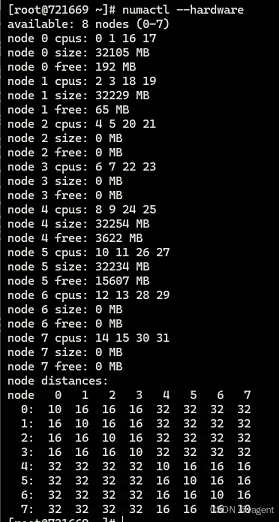
或通过查看cpu信息命令 lscpu
1.2. 在grub设置隔离CPUs
接下来我们将宿主机的8-31核全部隔离。
修改GRUB文件
vim /etc/default/grub在GRUB_CMDLINE_LINUX添加内容(这里需要将cpu8-cpu31全部隔离,即让宿主机不对其使用,留给虚拟机使用):
quiet splash isolcpus=8,9,10,11,12,13,14,15,16,17,18,19,20,21,22,23,24,25,26,27,28,29,30,31

执行 grub2-mkconfig -o /boot/grub2/grub.cfg 重新生成内核启动
grub2-mkconfig -o /boot/grub2/grub.cfg
这里要注意,不同的系统操作不同
- 对于基于 Debian 的系统(如 Ubuntu):
sudo update-grub- 对于基于 Red Hat 的系统(如 CentOS):
grub2-mkconfig -o /boot/grub2/grub.cfg
# 或
grub2-mkconfig -o /boot/efi/EFI/centos/grub.cfg- 对于基于 Arch 的系统:
sudo grub-mkconfig -o /boot/grub/grub.cfg重启宿主机 reboot
1.3. 检验内核隔离设置
- 查看系统引导时传递给内核参数
cat /proc/cmdline 
出现了设置的 isolcpus=8,9,....,31
- 查看cpu隔离情况
cat /sys/devices/system/cpu/isolated ![]()
出现隔离的cpu
- 查看宿主机当前numa信息
numactl --show 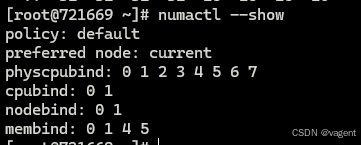
显示宿主机numa目前实际能使用的cpu核心(宿主机进程能够使用的CPUs)。
2. 虚拟机配置CPU核心硬件
这里安装了windows10虚拟机,具体过程略。这里重点介绍Libvirt XML配置。
配置虚拟机的libvirt XML
virsh edit win10或者直接对xml文件修改,然后
virsh define win102.1. 配置vcpu核心数
这里设置虚拟机使用多少核心:
<vcpu placement='static'>24</vcpu>
这里采用24核心。
2.2. 配置cputune
这里主要配置虚拟机vcpu 与 宿主机硬件cpu的映射关系。
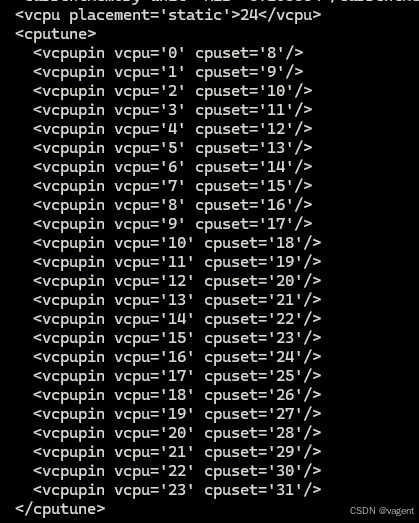
用于设置具体vcpu与宿主机cpu映射项。
如:vcpu23 与宿主机 cpu31硬件映射
2.3. 配置cpu模式
为了保证让虚拟机的vcpu能够与宿主机的cpu性能,设置直通模式,并设置numa
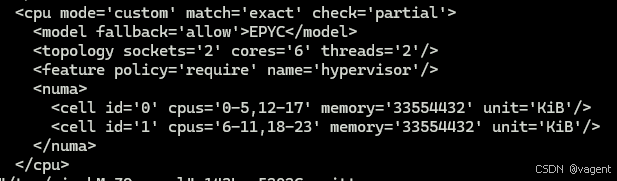
这里的参数的乘积,要与 vcpu核心数相等: 2*6*2 = 24
这里的 threads=‘2’ 启用超线程。
并且启用了2个 numa, 每个32G内存。
启动虚拟机
virsh start win103. 虚拟机内部程序监控
在虚拟机中运行多核程序,检测虚拟机cpu,以及相应的宿主机cpu情况
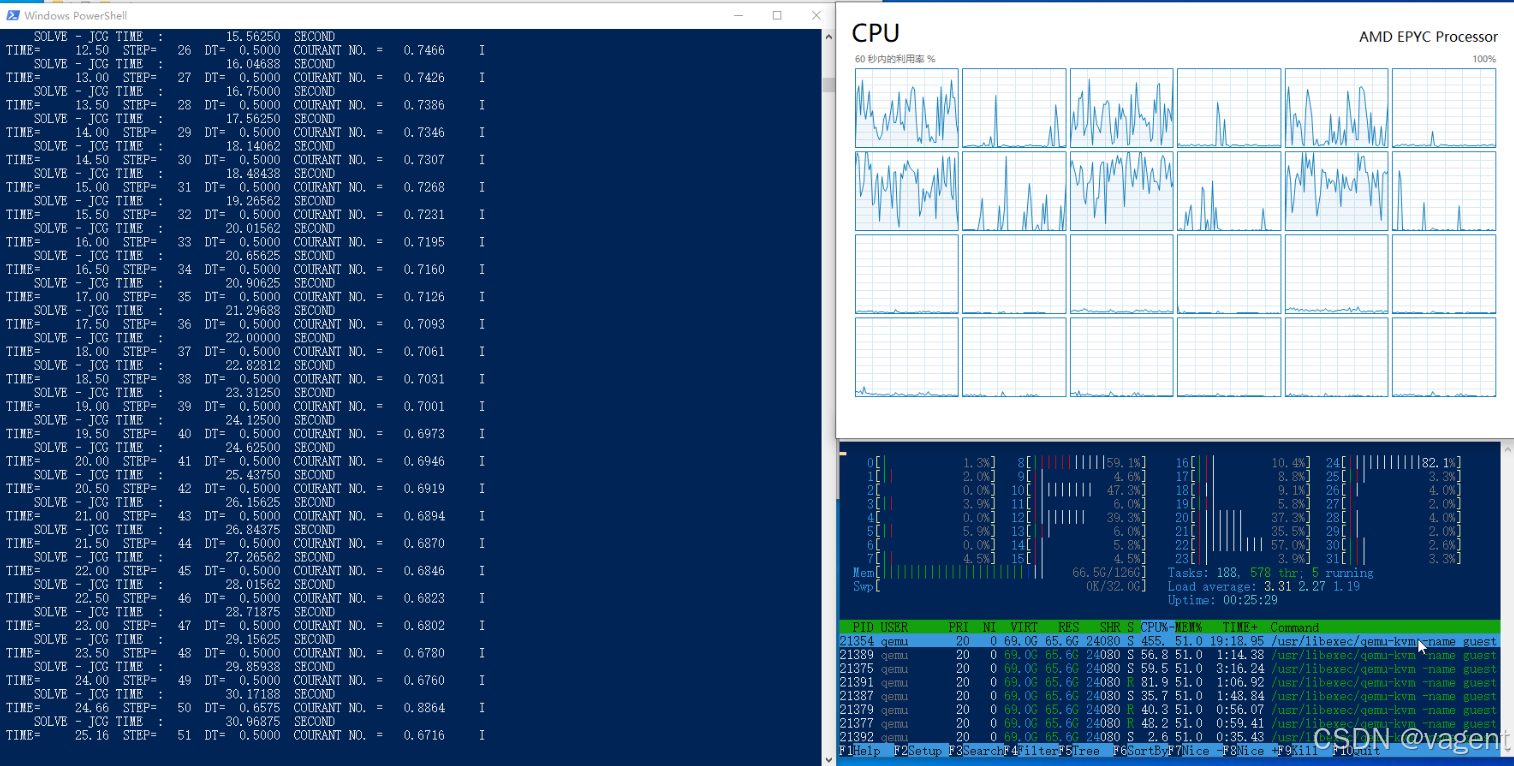
多核程序并未对 0-7 cpu核心进行调度。
附录1:虚拟机win10 LibvirtXML配置
<domain type='kvm'>
  <name>win10</name>
  <memory unit='KiB'>67108864</memory>
  <currentMemory unit='KiB'>67108864</currentMemory>
  <vcpu placement='static'>24</vcpu>
  <cputune>
    <vcpupin vcpu='0' cpuset='8'/>
    <vcpupin vcpu='1' cpuset='9'/>
    <vcpupin vcpu='2' cpuset='10'/>
    <vcpupin vcpu='3' cpuset='11'/>
    <vcpupin vcpu='4' cpuset='12'/>
    <vcpupin vcpu='5' cpuset='13'/>
    <vcpupin vcpu='6' cpuset='14'/>
    <vcpupin vcpu='7' cpuset='15'/>
    <vcpupin vcpu='8' cpuset='16'/>
    <vcpupin vcpu='9' cpuset='17'/>
    <vcpupin vcpu='10' cpuset='18'/>
    <vcpupin vcpu='11' cpuset='19'/>
    <vcpupin vcpu='12' cpuset='20'/>
    <vcpupin vcpu='13' cpuset='21'/>
    <vcpupin vcpu='14' cpuset='22'/>
    <vcpupin vcpu='15' cpuset='23'/>
    <vcpupin vcpu='16' cpuset='24'/>
    <vcpupin vcpu='17' cpuset='25'/>
    <vcpupin vcpu='18' cpuset='26'/>
    <vcpupin vcpu='19' cpuset='27'/>
    <vcpupin vcpu='20' cpuset='28'/>
    <vcpupin vcpu='21' cpuset='29'/>
    <vcpupin vcpu='22' cpuset='30'/>
    <vcpupin vcpu='23' cpuset='31'/>
  </cputune>
  <resource>
    <partition>/machine</partition>
  </resource>
  <os>
    <type arch='x86_64' machine='pc-i440fx-rhel7.6.0'>hvm</type>
    <boot dev='hd'/>
  </os>
  <features>
    <acpi/>
    <apic/>
    <vmport state='off'/>
  </features>
  <cpu mode='custom' match='exact' check='full'>
    <model fallback='forbid'>EPYC</model>
    <topology sockets='2' cores='6' threads='2'/>
    <feature policy='require' name='hypervisor'/>
    <feature policy='disable' name='monitor'/>
    <feature policy='require' name='x2apic'/>
    <feature policy='disable' name='svm'/>
    <feature policy='require' name='topoext'/>
    <numa>
      <cell id='0' cpus='0-5,12-17' memory='33554432' unit='KiB'/>
      <cell id='1' cpus='6-11,18-23' memory='33554432' unit='KiB'/>
    </numa>
  </cpu>
  <clock offset='utc'>
    <timer name='rtc' tickpolicy='catchup'/>
    <timer name='pit' tickpolicy='delay'/>
    <timer name='hpet' present='no'/>
  </clock>
  <on_poweroff>destroy</on_poweroff>
  <on_reboot>restart</on_reboot>
  <on_crash>destroy</on_crash>
  <pm>
    <suspend-to-mem enabled='no'/>
    <suspend-to-disk enabled='no'/>
  </pm>
  <devices>
    <emulator>/usr/libexec/qemu-kvm</emulator>
    <disk type='file' device='disk'>
      <driver name='qemu' type='qcow2'/>
      <source file='/work_local/lk/software/win10.qcow2'/>
      <backingStore/>
      <target dev='hda' bus='ide'/>
      <alias name='ide0-0-0'/>
      <address type='drive' controller='0' bus='0' target='0' unit='0'/>
    </disk>
    <disk type='file' device='cdrom'>
      <driver name='qemu'/>
      <target dev='hdb' bus='ide'/>
      <readonly/>
      <alias name='ide0-0-1'/>
      <address type='drive' controller='0' bus='0' target='0' unit='1'/>
    </disk>
    <controller type='usb' index='0' model='ich9-ehci1'>
      <alias name='usb'/>
      <address type='pci' domain='0x0000' bus='0x00' slot='0x05' function='0x7'/>
    </controller>
    <controller type='usb' index='0' model='ich9-uhci1'>
      <alias name='usb'/>
      <master startport='0'/>
      <address type='pci' domain='0x0000' bus='0x00' slot='0x05' function='0x0' multifunction='on'/>
    </controller>
    <controller type='usb' index='0' model='ich9-uhci2'>
      <alias name='usb'/>
      <master startport='2'/>
      <address type='pci' domain='0x0000' bus='0x00' slot='0x05' function='0x1'/>
    </controller>
    <controller type='usb' index='0' model='ich9-uhci3'>
      <alias name='usb'/>
      <master startport='4'/>
      <address type='pci' domain='0x0000' bus='0x00' slot='0x05' function='0x2'/>
    </controller>
    <controller type='pci' index='0' model='pci-root'>
      <alias name='pci.0'/>
    </controller>
    <controller type='ide' index='0'>
      <alias name='ide'/>
      <address type='pci' domain='0x0000' bus='0x00' slot='0x01' function='0x1'/>
    </controller>
    <controller type='virtio-serial' index='0'>
      <alias name='virtio-serial0'/>
      <address type='pci' domain='0x0000' bus='0x00' slot='0x06' function='0x0'/>
    </controller>
    <interface type='network'>
      <mac address='52:54:00:44:d4:48'/>
      <source network='default' bridge='virbr0'/>
      <target dev='vnet0'/>
      <model type='e1000'/>
      <alias name='net0'/>
      <address type='pci' domain='0x0000' bus='0x00' slot='0x03' function='0x0'/>
    </interface>
    <serial type='pty'>
      <source path='/dev/pts/1'/>
      <target type='isa-serial' port='0'>
        <model name='isa-serial'/>
      </target>
      <alias name='serial0'/>
    </serial>
    <console type='pty' tty='/dev/pts/1'>
      <source path='/dev/pts/1'/>
      <target type='serial' port='0'/>
      <alias name='serial0'/>
    </console>
    <channel type='spicevmc'>
      <target type='virtio' name='com.redhat.spice.0' state='disconnected'/>
      <alias name='channel0'/>
      <address type='virtio-serial' controller='0' bus='0' port='1'/>
    </channel>
    <input type='tablet' bus='usb'>
      <alias name='input0'/>
      <address type='usb' bus='0' port='1'/>
    </input>
    <input type='mouse' bus='ps2'>
      <alias name='input1'/>
    </input>
    <input type='keyboard' bus='ps2'>
      <alias name='input2'/>
    </input>
    <graphics type='spice' port='5900' autoport='yes' listen='127.0.0.1'>
      <listen type='address' address='127.0.0.1'/>
      <image compression='off'/>
    </graphics>
    <sound model='ich6'>
      <alias name='sound0'/>
      <address type='pci' domain='0x0000' bus='0x00' slot='0x04' function='0x0'/>
    </sound>
    <video>
      <model type='qxl' ram='65536' vram='65536' vgamem='16384' heads='1' primary='yes'/>
      <alias name='video0'/>
      <address type='pci' domain='0x0000' bus='0x00' slot='0x02' function='0x0'/>
    </video>
    <redirdev bus='usb' type='spicevmc'>
      <alias name='redir0'/>
      <address type='usb' bus='0' port='2'/>
    </redirdev>
    <redirdev bus='usb' type='spicevmc'>
      <alias name='redir1'/>
      <address type='usb' bus='0' port='3'/>
    </redirdev>
    <memballoon model='virtio'>
      <alias name='balloon0'/>
      <address type='pci' domain='0x0000' bus='0x00' slot='0x07' function='0x0'/>
    </memballoon>
  </devices>
  <seclabel type='dynamic' model='dac' relabel='yes'>
    <label>+107:+107</label>
    <imagelabel>+107:+107</imagelabel>
  </seclabel>
</domain>
附录2:基于OpenMP的多核测试程序
OpenMP是一种为共享内存并行编程设计的应用程序接口(API),旨在简化多处理器系统上的并行程序设计,支持C语言、C++和Fortran等编程语言。OpenMP通过提供一组编译器指令和API,使得开发人员能够利用多线程技术加速计算,同时保持代码的可移植性和灵活性。
https://github.com/llvm-mirror/openmp![]() https://github.com/llvm-mirror/openmp以下基于Windows的OpenMP程序样例,仅供参考:
https://github.com/llvm-mirror/openmp以下基于Windows的OpenMP程序样例,仅供参考:
#include <iostream>
#include <omp.h>

#include <cstdlib>  //使用rand()
#include <ctime>    //使用srand()

// #include <windows.h> // 用于 SetThreadAffinityMask ,用于设置CPU的亲和性
#include <chrono>

using namespace std;
using namespace std::chrono;


// 检查一个数字是否是质数
bool isPrime(long long n) {
    if (n <= 1) return false;
    if (n <= 3) return true;

    if (n % 2 == 0 || n % 3 == 0) return false;

    for (long long i = 5; i * i <= n; i += 6) {
        if (n % i == 0 || n % (i + 2) == 0)
            return false;
    }
    return true;
}

// 计算一定范围内的质数数量
long long countPrimes(long long start, long long end) {
    long long count = 0;
    for (long long i = start; i <= end; ++i) {
        if (isPrime(i)) {
            ++count;
        }
    }
    return count;
}

int main() {
    const long long N = 3000*10000; // 任务大小: 1000万
    const long long chunkSize = N / 24; // 每个线程处理的数据量

    cout << "Starting prime counting with OpenMP." << endl;

    // 测试不同的核心数
    int coreCounts[] = { 1, 2, 4, 8, 12, 16, 24 }; // 测试的核心数列表
    for (int coreCount : coreCounts) {
        cout << "Testing with " << coreCount << " cores." << endl;

        // 设置 OpenMP 线程数
        omp_set_num_threads(coreCount);

        // 记录开始时间
        auto start = high_resolution_clock::now();

        long long totalPrimes = 0;

#pragma omp parallel for reduction(+:totalPrimes) num_threads(coreCount)
        for (int i = 0; i < 24; ++i) {
            long long start = i * chunkSize + 1;
            long long end = (i + 1) * chunkSize;
            if (i == 23) {
                end = N; // 最后一个线程处理剩余的数据
            }
            totalPrimes += countPrimes(start, end);
        }

        // 记录结束时间
        auto stop = high_resolution_clock::now();
        auto duration = duration_cast<milliseconds>(stop - start);

        cout << "Computation took " << duration.count() << " milliseconds. Total primes found: " << totalPrimes << endl;
    }

    return 0;
}


 8834
8834

 被折叠的 条评论
为什么被折叠?
被折叠的 条评论
为什么被折叠?
 到【灌水乐园】发言


