


如何使用 Terraform 在 KVM 上配置虚拟机
如果您是 terraform 和 KVM 的粉丝,我相信您一直在寻找一种使用 Terraform 以自动化方式在 KVM 上配置虚拟机的方法。在这篇博文中,我将引导您完成 Terraform KVM 提供程序的安装并使用它来管理在 KVM 虚拟机管理程序上运行的实例。
Terraform 是由 HashiCorp 创建的开源基础设施即代码软件工具。它允许您安全且可预测地创建、更改和改进基础设施。您的所有基础设施代码都可以保存在 Git 存储库中并进行版本控制。
Terraform 中的提供者负责资源的生命周期:创建、读取、更新、删除。 Hashicorp 有许多官方支持的提供商可供使用。不幸的是,KVM 不在列表中。
第 1 步:安装 KVM 管理程序
此设置的主要先决条件是 KVM 管理程序。请参考以下列表中的相关文章在 Linux 系统中安装 KVM。
- 如何在 RHEL/CentOS 8 上安装 KVM
- 如何在 Fedora 上安装 KVM
- 在 Ubuntu 上安装 KVM 管理程序
- 如何在 Debian 上安装 KVM
- 在 CentOS 7/Ubuntu/Debian/SLES 上安装 KVM
- 在 Arch Linux/Manjaro 上安装 KVM
KVM 服务 (libvird) 应正在运行并能够在引导时启动。
sudo systemctl start libvirtd
sudo systemctl enable libvirtd
在 Ubuntu/Debian 上启用 vhost-net 内核模块。
sudo modprobe vhost_net
echo vhost_net | sudo tee -a /etc/modules
如果要生成KVM虚拟机模板,请参考:
- 在KVM上创建CentOS/Fedora/RHEL VM模板
第 2 步:安装 Terraform
安装并启动 KVM 后,进行 Terraform 安装。
- 如何在 Linux 系统上安装 Terraform
Terraform 安装要容易得多。您只需下载二进制存档,解压并将二进制文件放入 ` PATH 中的目录中。
步骤 3:安装 Terraform KVM 提供程序
Terraform KVM 提供商将使用 libvirt 为 Linux KVM 提供基础设施。它由 Duncan Mac-Vicar P 和其他贡献者共同维护。
该提供程序可从 Terraform 注册表自动安装。在您的 main.tf 文件中,只需指定您要使用的版本:
terraform {
  required_providers {
    libvirt = {
      source = "dmacvicar/libvirt"
    }
  }
}

provider "libvirt" {
  # Configuration options
}
手动安装 Terraform KVM 提供程序(非必需)
但如果您希望手动安装,请按照本节中提供的步骤进行操作。
安装 wget、curl 和解压工具
# Ubuntu / Debian
sudo apt update
sudo apt install wget curl unzip vim

# RHEL Based systems
sudo yum -y install wget curl unzip vim
初始化 Terraform 工作目录。
$ cd ~
$ terraform init
Terraform initialized in an empty directory!
创建用于存储 Terraform 插件的目录。
cd ~/.terraform.d
mkdir plugins
检查 Github 版本页面以获取可用的下载。
在 Linux 上安装 Terraform KVM 提供程序
Linux 64 位系统:
curl -s https://api.github.com/repos/dmacvicar/terraform-provider-libvirt/releases/latest \
  | grep browser_download_url \
  | grep linux_amd64.zip \
  | cut -d '"' -f 4 \
  | wget -i -

curl -s https://api.github.com/repos/dmacvicar/terraform-provider-libvirt/releases/latest \
  | grep browser_download_url \
  | grep linux_386.zip \
  | cut -d '"' -f 4 \
  | wget -i -
解压下载的文件:
# 64-bit Linux
unzip terraform-provider-libvirt_*_linux_amd64.zip
rm -f terraform-provider-libvirt_*_linux_amd64.zip

# 32-bit Linux
unzip terraform-provider-libvirt_*_linux_386.zip
rm -f terraform-provider-libvirt_*_linux_386.zip
将 terraform-provider-libvirt 二进制文件移动到 ~/.terraform.d/plugins 目录。
mkdir -p ~/.terraform.d/plugins/
mv terraform-provider-libvirt_* ~/.terraform.d/plugins/terraform-provider-libvirt
步骤 4:使用 Terraform 在 KVM 上配置虚拟机
一旦你的插件目录中有提供者。创建 Terraform 项目文件夹。
mkdir -p ~/projects/terraform
cd ~/projects/terraform
对于自动安装 KVM Provider,定义如下:
$ vim main.tf
terraform {
  required_providers {
    libvirt = {
      source = "dmacvicar/libvirt"
    }
  }
}

provider "libvirt" {
  ## Configuration options
  uri = "qemu:///system"
  #alias = "server2"
  #uri   = "qemu+ssh://[email /system"
}
此后,运行 terraform init 命令来初始化环境:
$ terraform init

Initializing the backend...

Initializing provider plugins...
- Finding latest version of dmacvicar/libvirt...
- Installing dmacvicar/libvirt v0.7.1...
- Installed dmacvicar/libvirt v0.7.1 (self-signed, key ID 96B1FE1A8D4E1EAB)

Partner and community providers are signed by their developers.
If you'd like to know more about provider signing, you can read about it here:
https://www.terraform.io/docs/cli/plugins/signing.html

Terraform has created a lock file .terraform.lock.hcl to record the provider
selections it made above. Include this file in your version control repository
so that Terraform can guarantee to make the same selections by default when
you run "terraform init" in the future.

Terraform has been successfully initialized!

You may now begin working with Terraform. Try running "terraform plan" to see
any changes that are required for your infrastructure. All Terraform commands
should now work.

If you ever set or change modules or backend configuration for Terraform,
rerun this command to reinitialize your working directory. If you forget, other
commands will detect it and remind you to do so if necessary.
我们现在可以为 KVM 上的 VM 部署创建 libvirt.tf 文件。
vim libvirt.tf
以下是我们将在示例中使用的文件内容:
# Defining VM Volume
resource "libvirt_volume" "centos7-qcow2" {
  name = "centos7.qcow2"
  pool = "default" # List storage pools using virsh pool-list
  source = "https://cloud.centos.org/centos/7/images/CentOS-7-x86_64-GenericCloud.qcow2"
  #source = "./CentOS-7-x86_64-GenericCloud.qcow2"
  format = "qcow2"
}

# Define KVM domain to create
resource "libvirt_domain" "centos7" {
  name   = "centos7"
  memory = "2048"
  vcpu   = 2

  network_interface {
    network_name = "default" # List networks with virsh net-list
  }

  disk {
    volume_id = "${libvirt_volume.centos7-qcow2.id}"
  }

  console {
    type = "pty"
    target_type = "serial"
    target_port = "0"
  }

  graphics {
    type = "spice"
    listen_type = "address"
    autoport = true
  }
}

# Output Server IP
output "ip" {
  value = "${libvirt_domain.centos7.network_interface.0.addresses.0}"
}
生成并显示 Terraform 执行计划
$ terraform plan

Terraform used the selected providers to generate the following execution plan. Resource actions are indicated with the following symbols:
  + create

Terraform will perform the following actions:

  # libvirt_domain.centos7 will be created
  + resource "libvirt_domain" "centos7" {
      + arch        = (known after apply)
      + disk        = [
          + {
              + block_device = null
              + file         = null
              + scsi         = null
              + url          = null
              + volume_id    = (known after apply)
              + wwn          = null
            },
        ]
      + emulator    = (known after apply)
      + fw_cfg_name = "opt/com.coreos/config"
      + id          = (known after apply)
      + machine     = (known after apply)
      + memory      = 2048
      + name        = "centos7"
      + qemu_agent  = false
      + running     = true
      + vcpu        = 2

      + console {
          + source_host    = "127.0.0.1"
          + source_service = "0"
          + target_port    = "0"
          + target_type    = "serial"
          + type           = "pty"
        }

      + graphics {
          + autoport       = true
          + listen_address = "127.0.0.1"
          + listen_type    = "address"
          + type           = "spice"
        }

      + network_interface {
          + addresses    = (known after apply)
          + hostname     = (known after apply)
          + mac          = (known after apply)
          + network_id   = (known after apply)
          + network_name = "default"
        }
    }

  # libvirt_volume.centos7-qcow2 will be created
  + resource "libvirt_volume" "centos7-qcow2" {
      + format = "qcow2"
      + id     = (known after apply)
      + name   = "centos7.qcow2"
      + pool   = "default"
      + size   = (known after apply)
      + source = "https://cloud.centos.org/centos/7/images/CentOS-7-x86_64-GenericCloud.qcow2"
    }

Plan: 2 to add, 0 to change, 0 to destroy.

─────────────────────────────────────────────────────────────────────────────────────────────────────────────────
如果确认所需状态正确,则构建您的 Terraform 基础设施。
$ terraform apply
Terraform used the selected providers to generate the following execution plan. Resource actions are indicated with the following symbols:
  + create

Terraform will perform the following actions:

  # libvirt_domain.centos7 will be created
  + resource "libvirt_domain" "centos7" {
      + arch        = (known after apply)
      + disk        = [
          + {
              + block_device = null
              + file         = null
              + scsi         = null
              + url          = null
              + volume_id    = (known after apply)
              + wwn          = null
            },
        ]
      + emulator    = (known after apply)
      + fw_cfg_name = "opt/com.coreos/config"
      + id          = (known after apply)
      + machine     = (known after apply)
      + memory      = 2048
      + name        = "centos7"
      + qemu_agent  = false
      + running     = true
      + vcpu        = 2

      + console {
          + source_host    = "127.0.0.1"
          + source_service = "0"
          + target_port    = "0"
          + target_type    = "serial"
          + type           = "pty"
        }

      + graphics {
          + autoport       = true
          + listen_address = "127.0.0.1"
          + listen_type    = "address"
          + type           = "spice"
        }

      + network_interface {
          + addresses    = (known after apply)
          + hostname     = (known after apply)
          + mac          = (known after apply)
          + network_id   = (known after apply)
          + network_name = "default"
        }
    }

  # libvirt_volume.centos7-qcow2 will be created
  + resource "libvirt_volume" "centos7-qcow2" {
      + format = "qcow2"
      + id     = (known after apply)
      + name   = "centos7.qcow2"
      + pool   = "default"
      + size   = (known after apply)
      + source = "https://cloud.centos.org/centos/7/images/CentOS-7-x86_64-GenericCloud.qcow2"
    }

Plan: 2 to add, 0 to change, 0 to destroy.

Do you want to perform these actions?
  Terraform will perform the actions described above.
  Only 'yes' will be accepted to approve.

  Enter a value: yes
按“是”确认执行。以下是我的 terraform 执行输出。
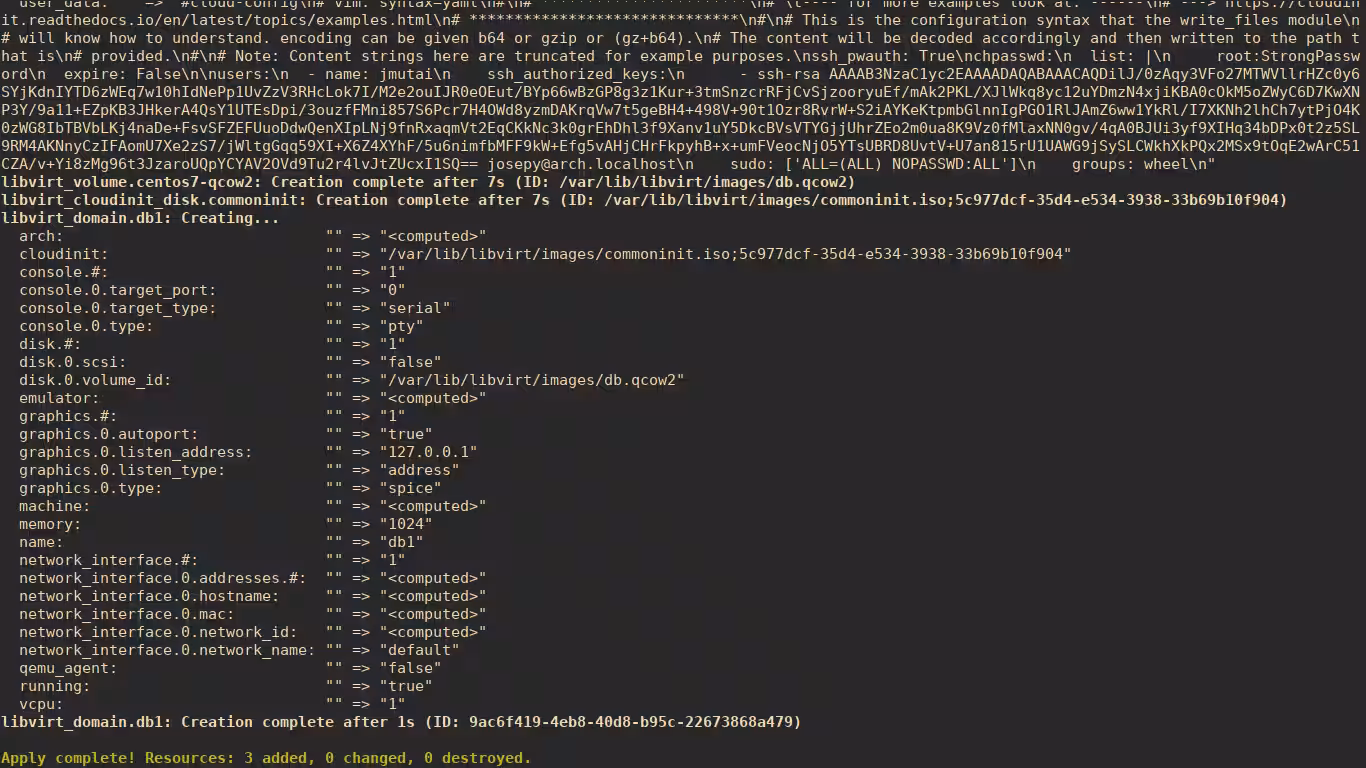
libvirt_volume.centos7-qcow2: Creating...
  format: "" => "qcow2"
  name:   "" => "db.qcow2"
  pool:   "" => "default"
  size:   "" => "<computed>"
  source: "" => "./CentOS-7-x86_64-GenericCloud.qcow2"
libvirt_volume.centos7-qcow2: Creation complete after 8s (ID: /var/lib/libvirt/images/db.qcow2)
libvirt_domain.centos7: Creating...
  arch:                             "" => "<computed>"
  console.#:                        "" => "1"
  console.0.target_port:            "" => "0"
  console.0.target_type:            "" => "serial"
  console.0.type:                   "" => "pty"
  disk.#:                           "" => "1"
  disk.0.scsi:                      "" => "false"
  disk.0.volume_id:                 "" => "/var/lib/libvirt/images/db.qcow2"
  emulator:                         "" => "<computed>"
  graphics.#:                       "" => "1"
  graphics.0.autoport:              "" => "true"
  graphics.0.listen_address:        "" => "127.0.0.1"
  graphics.0.listen_type:           "" => "address"
  graphics.0.type:                  "" => "spice"
  machine:                          "" => "<computed>"
  memory:                           "" => "1024"
  name:                             "" => "centos7"
  network_interface.#:              "" => "1"
  network_interface.0.addresses.#:  "" => "<computed>"
  network_interface.0.hostname:     "" => "<computed>"
  network_interface.0.mac:          "" => "<computed>"
  network_interface.0.network_id:   "" => "<computed>"
  network_interface.0.network_name: "" => "default"
  qemu_agent:                       "" => "false"
  running:                          "" => "true"
  vcpu:                             "" => "1"
libvirt_domain.centos7: Creation complete after 0s (ID: e5ee28b9-e1da-4945-9eb0-0cda95255937)

Apply complete! Resources: 2 added, 0 changed, 0 destroyed.
使用 virsh 命令确认虚拟机创建。
$ sudo virsh  list
 Id   Name       State
--------------------------
 7    centos7    running
获取实例IP地址。
$ sudo virsh net-dhcp-leases default
 Expiry Time           MAC address         Protocol   IP address           Hostname   Client ID or DUID
------------------------------------------------------------------------------------------------------------------------------------------------
 2019-03-24 16:11:18   52:54:00:3e:15:9e   ipv4       192.168.122.61/24    -          -
 2019-03-24 15:30:18   52:54:00:8f:8c:86   ipv4       192.168.122.198/24   rhel8      ff:61:69:21:bd:00:02:00:00:ab:11:0e:9c:c6:63:ee:7d:c8:d1
我的实例 IP 是 192.168.122.61。我可以 ping 通该实例。
$  ping -c 1 192.168.122.61
PING 192.168.122.61 (192.168.122.61) 56(84) bytes of data.
64 bytes from 192.168.122.61: icmp_seq=1 ttl=64 time=0.517 ms

--- 192.168.122.61 ping statistics ---
1 packets transmitted, 1 received, 0% packet loss, time 0ms
rtt min/avg/max/mdev = 0.517/0.517/0.517/0.000 ms
要破坏您的基础设施,请运行:
$ terraform destroy
.....
Plan: 0 to add, 0 to change, 2 to destroy.

Do you really want to destroy all resources?
  Terraform will destroy all your managed infrastructure, as shown above.
  There is no undo. Only 'yes' will be accepted to confirm.

  Enter a value: yes
第 5 步:将 cloud-init 与 Terraform Libvirt 提供程序结合使用
我们使用的实例资源没有传递用户密码的选项。因此,如果您使用的云模板不支持密码验证,您将无法登录。幸运的是,我们可以使用 libvirt_cloudinit_disk 资源将用户数据传递到实例。
创建云初始化配置文件。
$ vim cloud_init.cfg
#cloud-config
# vim: syntax=yaml
#
# ***********************
# 	---- for more examples look at: ------
# ---> https://cloudinit.readthedocs.io/en/latest/topics/examples.html
# ******************************
#
# This is the configuration syntax that the write_files module
# will know how to understand. encoding can be given b64 or gzip or (gz+b64).
# The content will be decoded accordingly and then written to the path that is
# provided.
#
# Note: Content strings here are truncated for example purposes.
ssh_pwauth: True
chpasswd:
  list: |
     root: StrongRootPassword
  expire: False

users:
  - name: jmutai # Change me
    ssh_authorized_keys:
      - ssh-rsa AAAAXX #Chageme
    sudo: ['ALL=(ALL) NOPASSWD:ALL']
    shell: /bin/bash
    groups: wheel
- 这会将 root 密码设置为
StrongRootPassword - 使用指定的公共 SSH 密钥添加名为
jmutai的用户 - 该用户将被添加到wheel组并被允许在没有密码的情况下运行sudo命令。
编辑 libvirt.tf 以使用 Cloud init 配置文件。
# Defining VM Volume
resource "libvirt_volume" "centos7-qcow2" {
  name = "centos7.qcow2"
  pool = "default"
  source = "https://cloud.centos.org/centos/7/images/CentOS-7-x86_64-GenericCloud.qcow2"
  #source = "./CentOS-7-x86_64-GenericCloud.qcow2"
  format = "qcow2"
}

# get user data info
data "template_file" "user_data" {
  template = "${file("${path.module}/cloud_init.cfg")}"
}

# Use CloudInit to add the instance
resource "libvirt_cloudinit_disk" "commoninit" {
  name = "commoninit.iso"
  pool = "default" # List storage pools using virsh pool-list
  user_data      = "${data.template_file.user_data.rendered}"
}

# Define KVM domain to create
resource "libvirt_domain" "centos7" {
  name   = "centos7"
  memory = "2048"
  vcpu   = 2

  network_interface {
    network_name = "default"
  }

  disk {
    volume_id = "${libvirt_volume.centos7-qcow2.id}"
  }

  cloudinit = "${libvirt_cloudinit_disk.commoninit.id}"

  console {
    type = "pty"
    target_type = "serial"
    target_port = "0"
  }

  graphics {
    type = "spice"
    listen_type = "address"
    autoport = true
  }
}

# Output Server IP
output "ip" {
  value = "${libvirt_domain.centos7.network_interface.0.addresses.0}"
}
重新初始化 Terraform 工作目录。
$ terraform init
Initializing the backend...

Initializing provider plugins...
- Finding latest version of hashicorp/template...
- Reusing previous version of dmacvicar/libvirt from the dependency lock file
- Installing hashicorp/template v2.2.0...
- Installed hashicorp/template v2.2.0 (signed by HashiCorp)
- Using previously-installed dmacvicar/libvirt v0.7.1

Terraform has made some changes to the provider dependency selections recorded
in the .terraform.lock.hcl file. Review those changes and commit them to your
version control system if they represent changes you intended to make.

Terraform has been successfully initialized!

You may now begin working with Terraform. Try running "terraform plan" to see
any changes that are required for your infrastructure. All Terraform commands
should now work.

If you ever set or change modules or backend configuration for Terraform,
rerun this command to reinitialize your working directory. If you forget, other
commands will detect it and remind you to do so if necessary.
然后使用 apply 命令创建虚拟机及其资源:
terraform plan
terraform apply
执行输出:
记下屏幕上打印的服务器 IP。

或者使用 virsh 命令获取服务器 IP 地址。
$ sudo virsh net-dhcp-leases default
 Expiry Time           MAC address         Protocol   IP address           Hostname   Client ID or DUID
---------------------------------------------------------------------------------------------------------
 2019-03-24 16:41:32   52:54:00:22:45:57   ipv4       192.168.122.219/24   -          -
尝试以 root 用户和设置的密码登录实例。
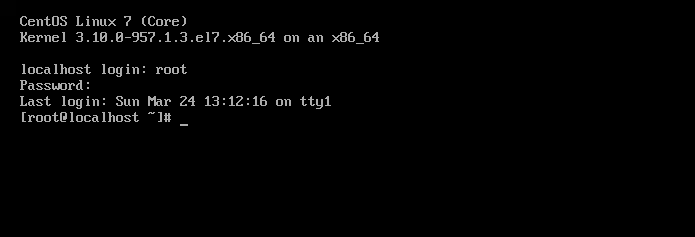
检查创建的 ssh 用户是否可以使用 SSH 密钥登录并无需密码运行 sudo。
$ ssh [email
The authenticity of host '192.168.122.219 (192.168.122.219)' can't be established.
ECDSA key fingerprint is SHA256:G8ByhT4+FXBzh/MabB67rcS6JpTUn1TcrusXhiy8ke0.
Are you sure you want to continue connecting (yes/no)? yes
Warning: Permanently added '192.168.122.219' (ECDSA) to the list of known hosts.

[jmutai@localhost ~]$ sudo su -
Last login: Sun Mar 24 13:16:46 UTC 2019 on tty1
[root@localhost ~]#
检查 Terraform KVM 提供程序文档以了解资源使用情况,并提供有关如何使用提供程序的示例。
使用方法请参考 Cloud Init 文档。
- 使用 Terraform 在 Hetzner Cloud 上部署 VM 实例
- 在 Windows 10/Windows Server 2019 上安装 Terraform
- 在 Ubuntu/CentOS/Debian 上安装和配置 Hashicorp Vault 服务器
- 如何在 KVM 上运行 Minikube
- virsh 命令备忘单管理 KVM 来宾虚拟机
🔥运维干货分享
- 系统集成项目管理师备考经验分享
- [系统
- 系统集成项目管理师备考经验分享
- 系统规划与管理师备考经验分享
- 软考高级系统架构设计师备考学习资料
- 软考中级数据库系统工程师学习资料
- 软考高级网络规划设计师备考学习资料
- Kubernetes CKA认证学习资料分享
- AI大模型学习资料合集
- 免费文档翻译工具(支持word、pdf、ppt、excel)
- PuTTY中文版安装包
- MobaXterm中文版安装包
- pinginfoview网络诊断工具中文版
- Xshell、Xsftp、Xmanager中文版安装包
- Typora简单易用的Markdown编辑器
- Window进程监控工具,能自动重启进程和卡死检测
- Spring 源码学习资料分享
- 毕业设计高质量毕业答辩 PPT 模板分享
- IT行业工程师面试简历模板分享


 939
939

 被折叠的 条评论
为什么被折叠?
被折叠的 条评论
为什么被折叠?
 到【灌水乐园】发言


