【OCCT+ImGUI系列】009-Geom2d-Geom2d_AxisPlacement

在这里插入图片描述

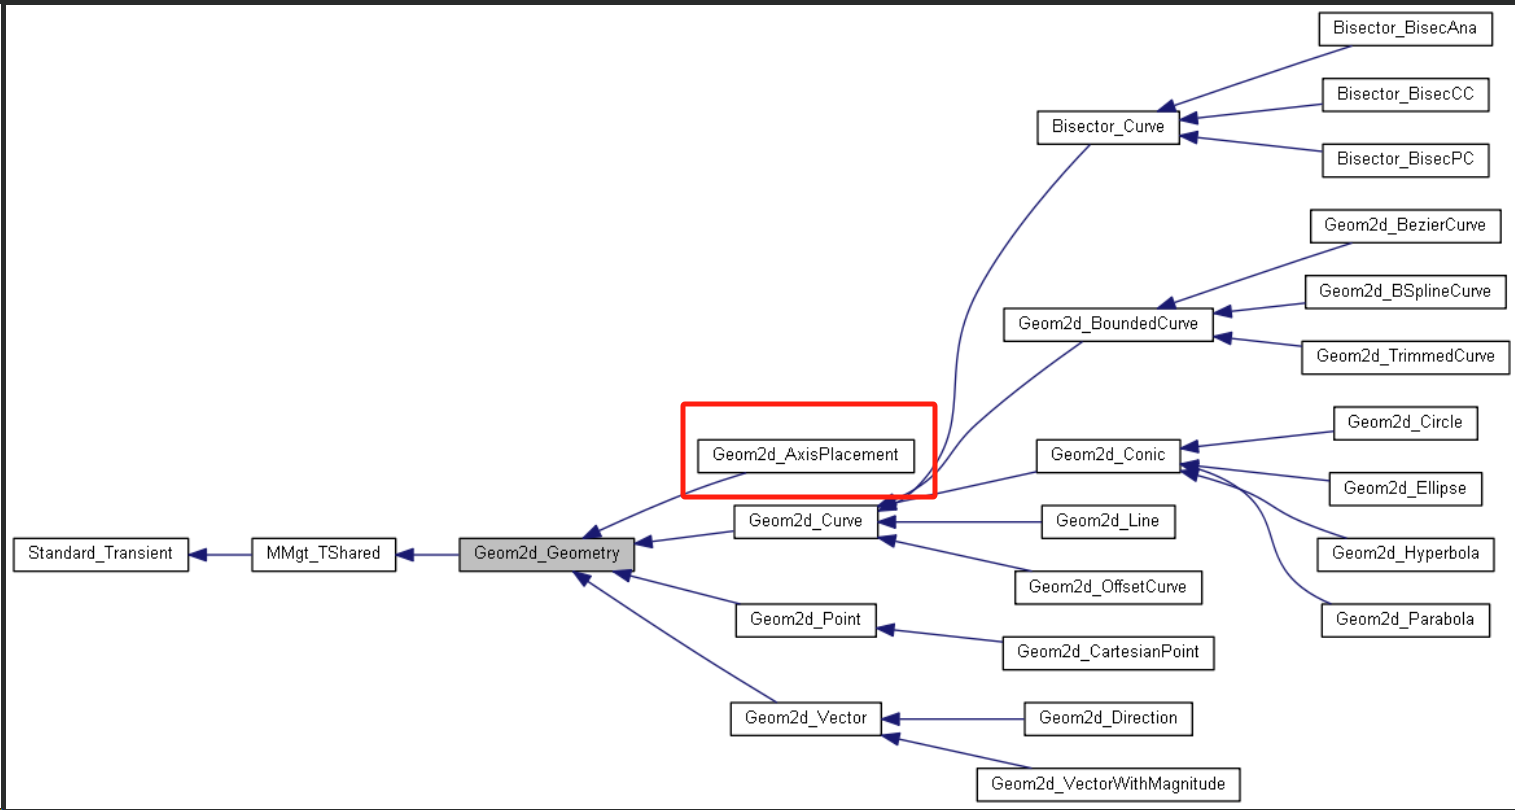
一、Geom2d_AxisPlacement 简介

在 OpenCASCADE 的二维几何库中,Geom2d_AxisPlacement 是一个用于定义二维坐标系的几何类,主要包含一个原点(gp_Pnt2d)和一个方向向量(gp_Dir2d)。它在构造与控制二维几何对象(如线段、曲线)时非常关键,广泛应用于草图建模、投影运算、草图约束系统等场景。
在这里插入图片描述

特点总结:

  • 轻量而直观:只包含一个点与一个方向,结构简洁;
  • 可变操作丰富:支持翻转、镜像、角度测量等变换;
应用场景如何使用
构造二维几何图元(直线、圆等)作为构造函数参数传入,如用于 Geom2d_Circle, Geom2d_Line 等构造中心点与方向信息
进行二维方向对齐(如加工路径、投影线)设定方向向量与参考点,实现图元或路径的旋转、镜像、偏移等操作
在参数空间中定义局部坐标系在曲面 UV 空间中定义原点与方向,便于处理 UV 坐标方向、绘制路径或标注等
构建二维草图、约束求解器等定义草图中局部参考轴系,

二、交互式操作解析

1. 坐标系初始化

教学示例中,场景初始化函数 sceneInit 创建了一个默认的坐标系:
在这里插入图片描述

axis = new Geom2d_AxisPlacement(gp_Pnt2d(0, 0), gp_Dir2d(1, 0));

此操作创建了一个原点在 (0,0),方向为 X 轴正方向的坐标系。

可视化代码:
drawAxis(context, axis, Quantity_NOC_BLUE1);

该函数将坐标系绘制为一条有向线段。


2. 设置新原点与方向

在这里插入图片描述
在这里插入图片描述

用户可以通过 ImGui 界面输入新原点与方向:

ImGui::InputFloat2("Origin", newLoc);
ImGui::InputFloat2("Direction", newDir);

点击按钮后,会应用变换并更新显示:

axis->SetLocation(gp_Pnt2d(newLoc[0], newLoc[1]));
axis->SetDirection(gp_Dir2d(newDir[0], newDir[1]));
参数名类型说明
newLocfloat[2]新的坐标原点位置
newDirfloat[2]新的方向向量(自动归一化)

在这里插入图片描述

3. 方向翻转(Reverse)

点击按钮后,调用 Reverse() 方法实现方向反转:

axis->Reverse();
或使用 Reversed() 返回新对象:
Handle(Geom2d_AxisPlacement) reversed = axis->Reversed();

并使用红色绘制新坐标轴:

drawAxis(context, reversed, Quantity_NOC_RED);

4. 通过 gp_Ax2d 设置坐标轴

Geom2d_AxisPlacement 可从通用坐标系对象 gp_Ax2d 中直接赋值:

gp_Ax2d ax2d(gp_Pnt2d(newLoc[0], newLoc[1]), gp_Dir2d(newDir[0], newDir[1]));
axis->SetAxis(ax2d);

这是在已有 gp_* 数据结构下设置轴系的常用方式。


5. 与反转坐标轴的夹角

计算当前坐标轴与其反转版本之间的角度:

Handle(Geom2d_AxisPlacement) reversed = axis->Reversed();
angleBetween = axis->Angle(reversed);

📌 输出结果为弧度值,理论上为 π(≈3.14159)。


6. 镜像坐标轴

使用 gp_Trsf2d 实现对当前坐标轴的镜像:

gp_Trsf2d trsf;
trsf.SetMirror(axis->Location());
Handle(Geom2d_AxisPlacement) mirrored = Handle(Geom2d_AxisPlacement)::DownCast(axis->Copy());
mirrored->Transform(trsf);

可视化为青色箭头:

drawAxis(context, mirrored, Quantity_NOC_CYAN1);
关键操作说明:
操作类别描述
SetMirror(Pnt2d)gp_Trsf2d设置以某点为中心镜像
Copy()Geom2d 类深拷贝几何对象
Transform(trsf)Geom2d 类应用几何变换

7. 清除场景

点击“Clear Scene”按钮将移除所有显示元素并重新初始化:

context->RemoveAll(Standard_False);
sceneInit(Handle(V3d_View)(), context);

三、教学窗口与提示机制

参考文章《【OCCT+ImGUI系列】feat-执行代码提示窗口》该示例集成了一个 CodeHintManager,可用于集中记录与展示用户所做的操作与对应代码:

hintMgr.AddHint("Apply Origin", "axis->SetLocation(...);");
hintMgr.RenderWindow();

这有助于教学场景中记录用户学习轨迹,便于查阅与复现。


五、代码

#pragma once

#include "pch.h"
#include <Geom2d_AxisPlacement.hxx>
#include <Geom2d_Line.hxx>
#include <Geom_Line.hxx>
#include <AIS_Shape.hxx>
#include <BRepBuilderAPI_MakeEdge.hxx>
#include <BRepBuilderAPI_MakeVertex.hxx>
#include <V3d_View.hxx>
#include "BaseScene.h"
#include "VisSceneComponents.h"
#include "TutorialWindow.h"
#include "GC_MakeSegment.hxx"
#include "CodeHintAction.h"

class Geom2d009 : public BaseScene, public VisSceneComponents, public TutorialWindow {
public:
    Geom2d009() { 
		openTutorialWindow();   // 打开教学窗口
    }

    void displayScene(const Handle(V3d_View)& view, const Handle(AIS_InteractiveContext)& context) override {
        if (!bIsSceneInit) {
            sceneInit(view, context);
            bIsSceneInit = true;
        }
        renderTutorialWindow(context);
    }

    void customInitTutorialWindow(const Handle(AIS_InteractiveContext)&) override {}

    void sceneInit(const Handle(V3d_View)&, const Handle(AIS_InteractiveContext)& context) override {
        // 创建一个初始 axisPlacement
        axis = new Geom2d_AxisPlacement(gp_Pnt2d(0, 0), gp_Dir2d(1, 0));
        drawAxis(context, axis, Quantity_NOC_BLUE1);
    }

    void renderTutorialContent(const Handle(AIS_InteractiveContext)& context) override {
        ImGui::Text("Geom2d_AxisPlacement Tutorial");
        ImGui::Separator();

        const gp_Pnt2d loc = axis->Location();
        const gp_Dir2d dir = axis->Direction();
        ImGui::Text("Current Origin: (%.2f, %.2f)", loc.X(), loc.Y());
        ImGui::Text("Current Direction: (%.2f, %.2f)", dir.X(), dir.Y());

        static float newLoc[2] = { 0.0f, 0.0f };
        static float newDir[2] = { 1.0f, 0.0f };
        static float angleBetween = 0.0f;

        ImGui::Spacing();
        ImGui::Separator();
        ImGui::Text("Set Axis Parameters");

        ImGui::InputFloat2("Origin", newLoc);
        if (ImGui::Button("Apply Origin")) {
            axis->SetLocation(gp_Pnt2d(newLoc[0], newLoc[1]));
            redraw(context);
            hintMgr.AddHint("Apply Origin", "axis->SetLocation(gp_Pnt2d(newLoc[0], newLoc[1]));");
        }

        ImGui::InputFloat2("Direction", newDir);
        if (ImGui::Button("Apply Direction")) {
            axis->SetDirection(gp_Dir2d(newDir[0], newDir[1]));
            redraw(context);
            hintMgr.AddHint("Apply Direction", "axis->SetDirection(gp_Dir2d(newDir[0], newDir[1]));");
        }

        ImGui::Spacing();
        ImGui::Separator();
        ImGui::Text("Axis Operations");

        if (ImGui::Button("Reverse")) {
            axis->Reverse();
            redraw(context);
            hintMgr.AddHint("Reverse", "axis->Reverse();");
        }

        if (ImGui::Button("Draw Reversed (Red)")) {
            Handle(Geom2d_AxisPlacement) reversed = axis->Reversed();
            drawAxis(context, reversed, Quantity_NOC_RED);
            hintMgr.AddHint("Draw Reversed", R"(Handle(Geom2d_AxisPlacement) reversed = axis->Reversed();
drawAxis(context, reversed, Quantity_NOC_RED);)");
        }

        if (ImGui::Button("Apply from gp_Ax2d")) {
            gp_Ax2d ax2d(gp_Pnt2d(newLoc[0], newLoc[1]), gp_Dir2d(newDir[0], newDir[1]));
            axis->SetAxis(ax2d);
            redraw(context);
            hintMgr.AddHint("SetAxis", R"(gp_Ax2d ax2d(gp_Pnt2d(newLoc[0], newLoc[1]), gp_Dir2d(newDir[0], newDir[1]));
axis->SetAxis(ax2d);)");
        }

        if (ImGui::Button("Get Angle with Reversed")) {
            Handle(Geom2d_AxisPlacement) reversed = axis->Reversed();
            angleBetween = axis->Angle(reversed);
            hintMgr.AddHint("Angle", R"(Handle(Geom2d_AxisPlacement) reversed = axis->Reversed();
angle = axis->Angle(reversed);)");
        }
        ImGui::Text("Angle with reversed axis: %.3f radians", angleBetween);

        if (ImGui::Button("Mirror Axis (Cyan)")) {
            gp_Trsf2d trsf;
            trsf.SetMirror(axis->Location());
            Handle(Geom2d_AxisPlacement) mirrored = Handle(Geom2d_AxisPlacement)::DownCast(axis->Copy());
            mirrored->Transform(trsf);
            drawAxis(context, mirrored, Quantity_NOC_CYAN1);
            hintMgr.AddHint("Mirror Axis", R"(gp_Trsf2d trsf;
trsf.SetMirror(axis->Location());
Handle(Geom2d_AxisPlacement) mirrored = Handle(Geom2d_AxisPlacement)::DownCast(axis->Copy());
mirrored->Transform(trsf);
drawAxis(context, mirrored, Quantity_NOC_CYAN1);)");
        }

        ImGui::Spacing();
        ImGui::Separator();

        if (ImGui::Button("Clear Scene")) {
            context->RemoveAll(Standard_False);
            sceneInit(Handle(V3d_View)(), context);
            hintMgr.AddHint("Clear Scene", R"(context->RemoveAll(Standard_False);
sceneInit(Handle(V3d_View)(), context);)");
        }

        // 最后:显示集中提示窗口
        hintMgr.RenderWindow();
    }


private:
    Handle(Geom2d_AxisPlacement)    axis;       // Geom2d_AxisPlacement
    CodeHintManager hintMgr;  // 用于集中管理教学代码提示

    void redraw(const Handle(AIS_InteractiveContext)& context) {
        context->RemoveAll(Standard_False);
        drawAxis(context, axis, Quantity_NOC_BLUE1);
    }

    void drawAxis(const Handle(AIS_InteractiveContext)& context, const Handle(Geom2d_AxisPlacement)& ap, Quantity_NameOfColor color) {
        gp_Pnt2d p1 = ap->Location();
        gp_Vec2d vec(ap->Direction());
        gp_Pnt2d p2 = p1.Translated(vec.Multiplied(50.0));
        Handle(Geom_TrimmedCurve) curve = GC_MakeSegment(gp_Pnt(p1.X(), p1.Y(), 0), gp_Pnt(p2.X(), p2.Y(), 0));
        Handle(AIS_Shape) shape = new AIS_Shape(BRepBuilderAPI_MakeEdge(curve));
        shape->SetColor(color);
        context->Display(shape, Standard_True);
    }

};

评论
添加红包

请填写红包祝福语或标题

红包个数最小为10个

红包金额最低5元

当前余额3.43前往充值 >
需支付:10.00
成就一亿技术人!
领取后你会自动成为博主和红包主的粉丝 规则
hope_wisdom
发出的红包
实付
使用余额支付
点击重新获取
扫码支付
钱包余额 0

抵扣说明:

1.余额是钱包充值的虚拟货币,按照1:1的比例进行支付金额的抵扣。
2.余额无法直接购买下载,可以购买VIP、付费专栏及课程。

余额充值