


 本文详细介绍SpringBoot的诞生背景、核心优势与应用场景,包括快速搭建独立运行的Spring项目、自动配置与版本控制特性。通过实战案例,演示如何使用SpringBoot简化开发流程,提升开发效率。
1 Spring Boot简介
在Spring Boot之前如果要创建一个Spring应用,我们需要导入很多的jar包或者使用maven导入很多依赖,还需要写很多的配置文件。这就造成J2EE开发笨重、繁琐、效率低下且部署流程复杂,第三方技术集成难度大。在这种背景之下,开发人员必须要消耗大量的精力在业务之外的事情上,严重的影响了开发效率。
Spring Boot的推出就是为了简化Spring应用的开发,进而简化整个J2EE的开发。由于Spring Boot的底层就是使用的Spring的整个技术栈1,它会自动帮我们配置好Spring的相关环境,进而使得我们可以在开发过程中将精力集中到业务开发中,以此来提高开发效率,保证业务严谨性。
1.1 Spring Boot优缺点
1.1.1 优点
- 快速创建独立运行的Spring项目以及与主流框架集成。
- 使用嵌入式的Servlet容器,应用无需打成WAR包,我们可以打成一个jar包使用java -jar的命令就可以直接运行。
- starters(也称为启动器)自动依赖与版本控制,如果我们需要使用某一块的功能只需要导入相应的starters,相关依赖jar包以及版本Spring Boot便会自动帮我们配置。
- 大量的自动配置,简化开发,当然也可以根据需要修改默认值。
- 无需配置XML,没有代码生成,开箱即用,其内部写好的API已经帮我们完成了配置,我们只需要创建出来就可以使用。
- 可以提供准生产环境的运行时应用监控
- 与云计算的天然集成。
1.1.2 缺点
- 入门容易精通难:由于Spring Boot是对Spring的再封装,我们如果想要精通Spring Boot就需要对Spring有着深入的了解。
- Spring Boot只是微服务的起点,其虽然适合做微服务开发但对微服务的支持还不够完善。
1.2 时代背景——微服务
在2014年martin fowler发表了一篇关于微服务的论文(其并不是微服务的创始人),形象生动的介绍了微服务的设计思想,如果想要更多的了解微服务请点击这里进行跳转。
1.2.1 微服务简介
微服务是一种架构风格,它提倡将单一的应用程序划分成一组小的服务,每个服务运行在其独立的只属于自己的进程中,各服务之间可以通过轻量级的HTTP方式进行互通。
说到微服务我们就不得不说说单体应用,该应用包含了所有功能,其页面、业务代码等都在这一个应用中,即ALL IN ONE,我们只需要将该应用打成一个WAR包部署到服务器就可以将应用跑起来。
接下来我们便聊聊单体应用的优点:
- 由于单体应用只有一个应用,不涉及多个应用之间的互联、互调,所以开发和测试都比较简单。
- 部署单体应用时只需要将该应用打成一个WAR包并部署到服务器即可,因此不会给运维带来太大困难。
- 水平扩展方便,当应用的负载能力不行的时候,我们把相同的应用复制多份,放在多台服务器上运行,然后通过负载均衡提高并发能力。
虽然单体应用有着一些优点,但其缺点在当今日益增长的软件需求背景下显得更为致命。在单体应用中如果有一个功能出现问题就很可能导致整个应用的崩溃,此时整个应用都会处在瘫痪状态,而在修复问题之后也需要对整个应用进行重新部署。在当今时代背景下,几乎每个系统都很庞大,如果我们还是将所有的东西写到一个应用中,那么分工合作、维护等都是很大的问题,此时微服务的出现便能够很好的解决这些问题。
在微服务架构中,我们将每一个功能单元都独立出来,最终形成多个可独立换和独立升级的软件单元。
2 环境准备
- 安装配置Maven,具体安装步骤不再给出,可自行查阅。需要注意的是配置阿里云镜像以及设置默认使用的jdk版本。
- 安装配置IDEA,具体安装步骤也不再给出,可自行查阅。
- 在IDEA中配置Maven。
3 Sping Boot的HelloWorld
3.1 代码编写
功能描述:浏览器发送hello请求,服务器接受请求并处理,响应HelloWord字符串。
详细内容可参考官方文档
- 创建一个Maven工程(jar)


- 导入Spring Boot的依赖
pom.xml文件内容如下:
<?xml version="1.0" encoding="UTF-8"?>
<project xmlns="http://maven.apache.org/POM/4.0.0"
         xmlns:xsi="http://www.w3.org/2001/XMLSchema-instance"
         xsi:schemaLocation="http://maven.apache.org/POM/4.0.0 http://maven.apache.org/xsd/maven-4.0.0.xsd">
    <modelVersion>4.0.0</modelVersion>

    <groupId>com.sk</groupId>
    <artifactId>spring-boot-01-helloworld</artifactId>
    <version>1.0-SNAPSHOT</version>

    <!-- Inherit defaults from Spring Boot -->
    <parent>
        <groupId>org.springframework.boot</groupId>
        <artifactId>spring-boot-starter-parent</artifactId>
        <version>1.5.19.RELEASE</version>
    </parent>

    <!-- Add typical dependencies for a web application -->
    <dependencies>
        <dependency>
            <groupId>org.springframework.boot</groupId>
            <artifactId>spring-boot-starter-web</artifactId>
        </dependency>
    </dependencies>

</project>
- 编写一个主程序以启动SpringBoot应用
package com.sk.helloworld;

import org.springframework.boot.SpringApplication;
import org.springframework.boot.autoconfigure.SpringBootApplication;

/**
 * @SpringBootApplication 来标注一个主程序类,说明这是一个Spring Boot应用
 */
@SpringBootApplication
public class HelloWorldMainApplication {
    // 在IDEA中生成主方法的快捷键是psvm+回车
    public static void main(String[] args) {

        // 启动Spring应用
        SpringApplication.run(HelloWorldMainApplication.class,args);
    }
}
- 编写Controller、Service等
package com.sk.helloworld.controller;

import org.springframework.stereotype.Controller;
import org.springframework.web.bind.annotation.RequestMapping;
import org.springframework.web.bind.annotation.ResponseBody;

// 标注将该类交给IOC容器进行管理
@Controller
public class HelloController {

    // @RequestMapping:标注该方法将处理浏览的的hello请求
    //@ResponseBody:将controller的方法返回的对象通过适当的转换器转换为指定的格式之后,
    //写入到response对象的body区,通常用来返回JSON数据或者是XML数据
    @ResponseBody
    @RequestMapping("/hello")
    public String hello(){

        return "Hello World!";
    }
}
- 启动主方法,即上面HelloWorldMainApplication 类中的main方法。
- 在浏览器中访问http://localhost:8080/hello(这里不需要指明项目名)

3.2 部署
部署Spring Boot项目时我们不需要再把项目打成一个WAR包,只需要导入一个Maven的插件将项目打成一个可执行的jar包即可。
- 在Maven中导入插件的依赖
	<!-- 这个插件可以将应用打包成一个可执行的jar包 -->
    <build>
        <plugins>
            <plugin>
                <groupId>org.springframework.boot</groupId>
                <artifactId>spring-boot-maven-plugin</artifactId>
            </plugin>
        </plugins>
    </build>
- 打包
如果你的IDEA没有心事侧边框请点击下图红色方框标记的位置调出侧边框。

之后点击IDEA窗口右边缘处的Maven Projects侧边框,之后双击package进行打包。

- 运行
打包后的jar文件在target文件下,如图:

将该jar包拷贝出来,之后使用java -jar命令运行该可执行文件,之后在浏览器中访问http://localhost:8080/hello测试是否成功。

特别说明:在使用package命令打包时会将所有依赖的jar包放入最终打成的可执行jar包中,也因此即便运行的目标机器没有Tomcat环境也能运行成功。具体jar信息可以查看可执行jar包中的BOOT-INF/lib文件夹的内容。
3.3 解析
3.3.1 仲裁中心
打开Hello World项目的pom.xml文件可以发现该项目继承自一个父项目,父项目信息如下:
	<parent>
        <groupId>org.springframework.boot</groupId>
        <artifactId>spring-boot-starter-parent</artifactId>
        <version>1.5.19.RELEASE</version>
    </parent>
进入该父项目之后会发现该父项目依旧是继承自一个父项目,项目信息如下:
	<parent>
		<groupId>org.springframework.boot</groupId>
		<artifactId>spring-boot-dependencies</artifactId>
		<version>1.5.19.RELEASE</version>
		<relativePath>../../spring-boot-dependencies</relativePath>
	</parent>
该项目才是管理依赖的项目,详细信息可自行查看。
spring-boot-dependencies是Spring Boot的版本仲裁中心,管理所有依赖的版本号,继承该项目之后,若要使用在该项目管理中的jar则可以省略pom文件中引用坐标的版本号(若使用仲裁中心管理外的依赖则需要写明版本号)。
3.3.2 启动器
我们可以看到在Hello World项目中存在下面这样的依赖:
	<dependency>
        <groupId>org.springframework.boot</groupId>
        <artifactId>spring-boot-starter-web</artifactId>
    </dependency>
这是SpringBoot的场景启动器,作用是帮我们导入web模块正常运行所需要的组件。
SpringBoot将所有的功能场景抽出来做成一个个的starters(启动器),我们只需要在项目中引用这些starters,就可以使用该场景,比如我们需要使用redis则只主要引入spring-boot-starter-data-redis的pom依赖即可,它会自动将所有依赖的jar导入进来,不需要我们在手动一个个的导入。
如果想要查看详细的starters信息,请点击这里进行跳转。
3.3.3 主程序类
在主程序类中有一个@SpringBootApplication,该注解用来说明被标注的类为SpringBoot的主配置类,如果想要启动该SpringBoot应用就需要运行这个类的main方法,这个方法就是主入口。
@SpringBootApplication是一个组合注解,代码如下:
@Target(ElementType.TYPE)
@Retention(RetentionPolicy.RUNTIME)
@Documented
@Inherited
@SpringBootConfiguration
@EnableAutoConfiguration
@ComponentScan(excludeFilters = {
		@Filter(type = FilterType.CUSTOM, classes = TypeExcludeFilter.class),
		@Filter(type = FilterType.CUSTOM, classes = AutoConfigurationExcludeFilter.class) })
public @interface SpringBootApplication {
- @SpringBootConfiguration:SpringBoot的配置类
标注在某个类上表示这是一个SpringBoot的配置类,查看该注解的源码可以发现该注解也是一个组合注解,其中@Configuration标注这是一个Spring的配置类(使用一个个的配置类来替换xml配置文件)
继续查看@Configuration的源码,可以发现这也是一个组合注解,从@Component可以看出配置类也是容器中的一个组件。 - @EnableAutoConfiguration:开启自动配置功能
在SSM项目中我们要配置Spring监听器、视图过滤器等配置,而在SpringBoot中只要我们使用了@EnableAutoConfiguration注解,这些配置将会自动配置完成。
@Target(ElementType.TYPE)
@Retention(RetentionPolicy.RUNTIME)
@Documented
@Inherited
@AutoConfigurationPackage
@Import(EnableAutoConfigurationImportSelector.class)
public @interface EnableAutoConfiguration {
@AutoConfigurationPackage:自动配置包
查看@AutoConfigurationPackage的注解可以发现其实通过@Import(AutoConfigurationPackages.Registrar.class)来实现的。
@Import是Spring的底层注解,作用是给容器中导入一个组件,该组件由括号中的内容来决定。
包含@AutoConfigurationPackage注解的@SpringBootApplication注解具有将主配置类(@SpringBootApplication标注的类)所在包以及其下所有子包里的所有组件扫描到Spring容器中。
@Import(EnableAutoConfigurationImportSelector.class)注解中EnableAutoConfigurationImportSelector是导包选择器,会将所有需要导入的组件以全类名的方式返回,之后这些组件就会被添加到容器中,该注解将会给容器中导入非常多的自动配置类(xxxAutoConfiguration),这些自动配置类的作用就是给容器中导入这个场景需要的所有组件,并配置好这些组件。
这里的@Import与上面不同之处在于上面的是将包下我们制定的组件导入到容器,这里的是将SpringBoot封装的自动配置类到入容器中。
有了自动配置类,就可以免去手动编写配置、注入功能组件等工作。
EnableAutoConfigurationImportSelector原理简介:查看其父类AutoConfigurationImportSelector的源码,其中有一个selectImports方法,该方法能够选择需要导入的自动配置类。我们主要看下面的方法:
List<String> configurations = getCandidateConfigurations(
					annotationMetadata,
					attributes);
getCandidateConfigurations方法如下:
// EnableAutoConfiguration是注解源信息
protected List<String> getCandidateConfigurations(AnnotationMetadata metadata,
			AnnotationAttributes attributes) {
		List<String> configurations = SpringFactoriesLoader.loadFactoryNames(
				getSpringFactoriesLoaderFactoryClass(), getBeanClassLoader());
		Assert.notEmpty(configurations,
				"No auto configuration classes found in META-INF/spring.factories. If you "
						+ "are using a custom packaging, make sure that file is correct.");
		return configurations;
	}
我们主要看SpringFactoriesLoader.loadFactoryNames方法:
public static List<String> loadFactoryNames(Class<?> factoryClass, ClassLoader classLoader) {
		String factoryClassName = factoryClass.getName();
		try {
			Enumeration<URL> urls = (classLoader != null ? classLoader.getResources(FACTORIES_RESOURCE_LOCATION) :
					ClassLoader.getSystemResources(FACTORIES_RESOURCE_LOCATION));
			List<String> result = new ArrayList<String>();
			while (urls.hasMoreElements()) {
				URL url = urls.nextElement();
				Properties properties = PropertiesLoaderUtils.loadProperties(new UrlResource(url));
				String propertyValue = properties.getProperty(factoryClassName);
				for (String factoryName : StringUtils.commaDelimitedListToStringArray(propertyValue)) {
					result.add(factoryName.trim());
				}
			}
			return result;
		}
		catch (IOException ex) {
			throw new IllegalArgumentException("Unable to load factories from location [" +
					FACTORIES_RESOURCE_LOCATION + "]", ex);
		}
	}
FACTORIES_RESOURCE_LOCATION的值为:
public static final String FACTORIES_RESOURCE_LOCATION = "META-INF/spring.factories";
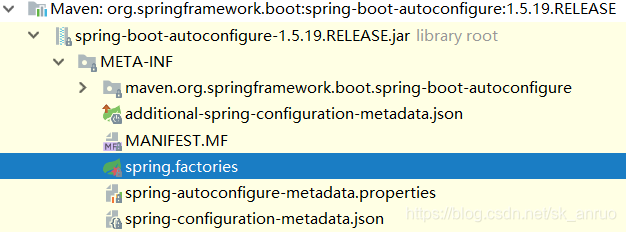
Spring Boot在启动的时候从类路径下的META-INF/spring.factories中获取EnableAutoConfiguration的值,将这些值作为自动配置类导入到容器中,自动配置类就会生效。
IDE为我们提供了快捷创建Spring Boot项目的方式,就是使用Spring Initializer创建Spring项目。
使用IDE项目创建向导生成的项目具有以下的特点:
1. 主程序自动生成
2. resources文件夹中目录结构:
– static:保存所有的静态资源:css、js等
– templates:保存所有的模板页面(Spring Boot默认jar包使用嵌入式Tomcat,默认不支持JSP页面。)可以使用模板引擎(freemarker、thymeleaf);
– application.properties:Spring Boot 应用的配置文件,可以修改一些默认配置。
4 配置文件
SpringBoot使用一个全局配置文件,该文件的名称是固定的,有如下两种:
– application.properties
– application.yml
配置文件放在src/main/resources目录或者类路径/config下
SpringBoot在底层已经帮我们自动配置好了,配置文件的作用就是为了对这些默认配置进行修改。
注意:yml是YAML(YAML Ain’t Markup Language)语言的文件,以数据为中心,比json、xml等更适合做配置文件,点击这里参看详细语法规范
YAML(YAML Ain’t Markup Language):
– YAML A Markup Language:是一个标记语言
– YAML isn’t Markup Language:不是一个标记语言
使用xml做配置文件时语法格式如下:
<server>
	<port>8081</port>
</server>
使用properties配置文件语法格式如下:
server.port=8081
使用yml配置文件的语法格式如下:
server:
  port: 8081 ## 注意该行前的留白,表示该port是server下的
4.1 yml语法
4.1.1 YAML基本语法
– 1. 格式:k:(空格)v,如port: 8081,注意:后必须有一个空格。
– 使用缩进来表示层级关系,缩进时不允许使用tab键,只允许使用空格,空格的数目不重要,只需要相同层级的元素左侧对其即可。
– 大小写敏感!
4.1.2 YAML支持的三种数据结构
1. 对象:键值对的集合
采用k:(空格)v的格式,有两种写法,如下:
使用缩进控制类与属性之间的关系:
people:
  name: zhangsan
  age: 20
行内写法:
people: {name: zhangsan,age: 20}
2. 数组:一组按次序排列的值
使用-(空格)值的格式来表示数组中的一个元素,也可以使用行内写法,示例如下:
pets:
 - cat
 - dog
 - pig
行内写法:
pets: [cat,dog,pig]
3. 字面量:单个的、不可再分的值
按照k:(空格)v的格式来写,字符串默认不用加上单引号或双引号,如果加了则两者所表示的意思有些不同,具体如下:
– 加双引号:不会转义字符串里面的特殊字符,特殊字符会作为本身想表达的意思进行表达。
– 加单引号:会转义特殊字符,特殊字符最终只是一个普通的字符串数据。
4.2 配置文件值注入
对于我们定义的一些类,我们可以根据上述赋值方式在配置文件中赋值,为实现配置文件中值与实体类的映射,我们需要在实体类上添加@ConfigurationProperties(prefix = “person”)注解,该注解会告诉SpringBoot将本类中的所有属性和配置文件中相关的配置进行绑定。
@ConfigurationProperties(prefix = “person”)注解中的prefix = "person"是为了指定配置文件中person下的所有属性和实体类进行一一映射。
注意,只有组件在容器中才能使用容器的功能,所以如果想要完成上面的映射,实体类必须是容器中的一个组件。
示例代码如下:
application.yml
person:
    lastName: hello
    age: 18
    boss: false
    birth: 2017/12/12
    maps: {k1: v1,k2: 12}
    lists:
      - lisi
      - zhaoliu
    dog:
      name: 小狗
      age: 12
Person.java
/**
 * 将配置文件中配置的每一个属性的值,映射到这个组件中
 * @ConfigurationProperties:告诉SpringBoot将本类中的所有属性和配置文件中相关的配置进行绑定;
 *      prefix = "person":配置文件中哪个下面的所有属性进行一一映射
 * 只有这个组件是容器中的组件,才能容器提供的@ConfigurationProperties功能;
 */
@Component
@ConfigurationProperties(prefix = "person")
public class Person {

    private String lastName;
    private Integer age;
    private Boolean boss;
    private Date birth;

    private Map<String,Object> maps;
    private List<Object> lists;
    private Dog dog;
我们对某实体类在配置文件中赋值时默认是不会提示该类下有哪些属性的,为编码方便我们可以导入配置文件处理器,以后编写配置就有提示了。
<!--导入配置文件处理器,配置文件进行绑定就会有提示-->
		<dependency>
			<groupId>org.springframework.boot</groupId>
			<artifactId>spring-boot-configuration-processor</artifactId>
			<optional>true</optional>
		</dependency>
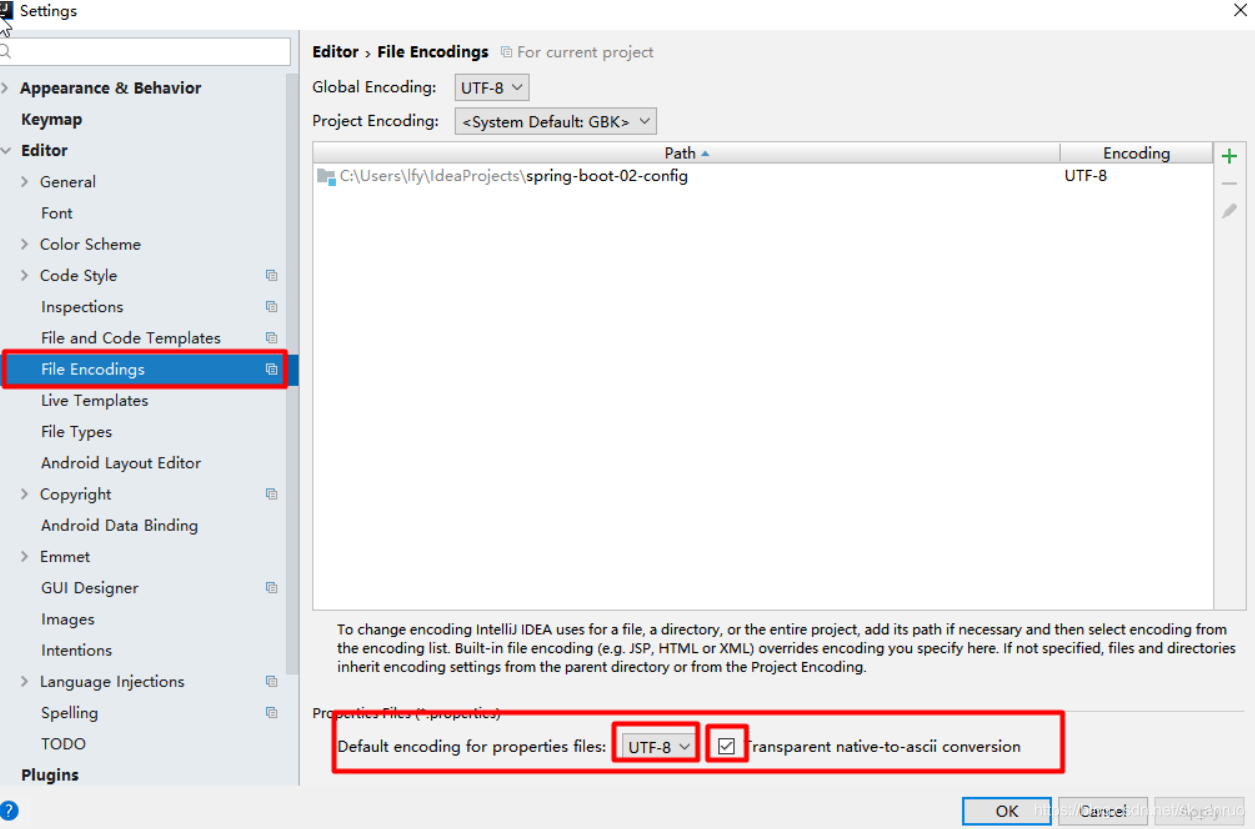
配置文件值注入不仅可使用yml文件,也可以使用peoperties文件,但是由于IDEA使用的是UTF-8编码,而peoperties文件以前使用的是ASCII编码,所以会出现乱码的情况,此时我们需要进行一些设置,如下:
除了使用@ConfigurationProperties注解来实现值的注入,我们还可以使用@value来注入,@value的语法格式如下:
 	@Value("${person.lastName}")
    private String lastName;
    @Value("#{11*2}")
    private Integer age;
    @Value("true")
    private Boolean boss;
上述两种值注入方式的区别如下:
| @ConfigurationProperties | @Value | |
|---|---|---|
| 功能 | 批量注入配置文件中的属性 | 一个个指定 |
| 松散绑定(松散语法) | 支持 | 不支持 |
| SpEL | 不支持 | 支持 |
| JSR303数据校验 | 支持 | 不支持 |
| 复杂类型封装 | 支持 | 不支持 |
针对上述两种值注入方式,如果我们只是在某个业务逻辑中需要获取一下配置文件中的某项值,使用@Value,如果我们专门编写了一个javaBean来和配置文件进行映射,我们就直接使用@ConfigurationProperties;
4.3 加载指定的配置文件
使用@PropertySource注解来加载指定配置文件。
如果我们将所有的配置都写到全局配置文件中,那全局配置文件就会显得臃肿,此时我们可以指定不同的配置文件做不同的配置,比如上一节的值注入,我们可以写一个person.properties文件来存储需要注入的值,示例代码如下:
person.properties
person.lastName= 张三
person.age=18
person.boss= false
person.birth=2017/12/12
person.maps.k1=v1
person.maps.k2=14
person.lists=a,b,c
person.dog.name=dog
person.dog.age=15
Person.java
/**
 *value值可以是一个数组,也就是说可以加载多个配置文件
 */
@PropertySource(value = {"classpath:person.properties"})
@Component
public class Person {
    private String lastName;
    private Integer age;
    private Boolean boss;
4.4 导入配置文件并使其生效
在SpringBoot里面没有Spring的配置文件,我们自己编写的配置文件,也不能自动识别,我们可以使用@ImportResource注解,导入Spring的配置文件,让配置文件里面的内容生效。
创建一个Spring的配置文件bean.xml
<?xml version="1.0" encoding="UTF-8"?>
<beans xmlns="http://www.springframework.org/schema/beans"
       xmlns:xsi="http://www.w3.org/2001/XMLSchema-instance"
       xsi:schemaLocation="http://www.springframework.org/schema/beans http://www.springframework.org/schema/beans/spring-beans.xsd">

    <bean id="helloService" class="com.sk.springboottest.HelloService"></bean>

</beans>
在入口处加上@ImportResource注解,这里的locations 也是一个数组,可以加载多个配置文件。
@ImportResource(locations = {"classpath:beans.xml"})
@SpringBootApplication
public class SpringboottestApplication {

    public static void main(String[] args) {
        SpringApplication.run(SpringboottestApplication.class, args);
    }

}
4.5 使用SpringBoot指定的方法添加组件
我们可以使用4.4中的方式通过Spring的配置文件添加组件,但是如果需要加载的配置文件较多,再使用@ImportResource注解就显得不方便了,所以SpringBoot推荐使用配置类的方式来添加组件。
我们可以新建一个config文件夹来存放所有的配置类,这里我们编写MyAppConfig配置类来做示例。
/**
 * @Configuration:指明当前类是一个配置类;就是来替代之前的Spring配置文件
 * 在配置文件中用<bean><bean/>标签添加组件
 */
@Configuration
public class MyAppConfig {

    //将方法的返回值添加到容器中;容器中这个组件默认的id就是方法名即helloService
    @Bean
    public HelloService helloService(){
        System.out.println("配置类@Bean给容器中添加组件了...");
        return new HelloService();
    }
}
注意:需要给配置类加上@Configuration注解来指定这是一个配置类,之后使用@Bean给容器中添加组件
4.6 配置文件中的占位符
person.last-name=张三${random.uuid}
person.age=${random.int}
person.dog.name=${person.hello:hello}_dog
可以使用$ {random.int}获取随机数,可以使用${person.hello}获取配置文件中对应的值,如果在配置文件中没有person.hello,则会直接将 ${person.hello}这当成字符串进行赋值,为避免这种情况,我们可以使用冒号来指定默认值,格式为 ${person.hello:hello}
4.7 配置文件的多环境支持——profile
1. 多Profile文件
由于不同环境可能需要不同的配置,若在同一个配置文件中修改,容易出错且效率低下,为解决这一问题,我们可以在一个项目下编写多个配置文件,然后根据环境需求激活相应的配置。
一个项目默认加载的配置文件是application.properties/yml,而我们为不同的环境编写配置文件时可以采用application-{profile}.properties/yml的格式对文件进行命名,其中{profile}表示环境表示,比如开发环境下的配置文件我们可以命名为application-dev.properties/yml
2. yml支持多文档块方式
在YAML文件中有一种语法叫文档块,文档块之间使用"- - -"来分割。我们可以使用不同的文档块来区分不同环境的配置,代码示例如下:
server:
  port: 8081 #默认激活该配置
spring:
  profiles:
    active: prod #设置激活prod的配置
---
server:
  port: 8083
spring:
  profiles: dev
---
server:
  port: 8084
spring:
  profiles: prod  #指定属于哪个环境
3. 激活指定profile
1. 在配置文件中配置 spring.profiles.active=dev
2. 运行时在命令行中指定要激活的配置,命令行如下:
java -jar spring-boot-02-config-0.0.1-SNAPSHOT.jar --spring.profiles.active=dev;
运行打包后的jar时使用命令行,如果直接使用IDEA运行则只需要配置一下启动参数:
– 命令行参数:Program arguments: --spring.profiles.active=dev
--虚拟机参数: VM options:-Dspring.profiles.active=dev
4.8 配置文件的加载位置及优先级
spring boot 启动会扫描以下位置的application.properties或者application.yml文件作为Spring boot的默认配置文件
–file:./config/
–file:./
–classpath:/config/
–classpath:/
Spring Boot会加载上述四个位置中的所有配置文件,优先级由高到底,高优先级的配置会覆盖低优先级的配置。即在上述四个位置的所有配置文件都会被加载,只是相同配置以高优先级的为准,低优先级的配置会被覆盖,基于此我们可以利用覆盖的特点进行互补配置。
项目打包之后,运维可能需要对其中的一些配置做临时性的修改,此时可以使用命令行参数的形式在启动项目时通过spring.config.location来改变默认的配置文件位置,让指定配置文件和默认加载的这些配置文件共同起作用形成互补配置。具体命令如下:
java -jar spring-boot-02-config-02-0.0.1-SNAPSHOT.jar --spring.config.location=G:/application.properties
4.9 外部配置加载顺序
SpringBoot也可以从以下位置加载配置,也是优先级从高到低,高优先级的配置覆盖低优先级的配置,所有的配置会形成互补配置。
1. 命令行参数
2. 来自java:comp/env的JNDI属性
3. Java系统属性(System.getProperties())
4. 操作系统环境变量
5. RandomValuePropertySource配置的random.*属性值
6. jar包外部的application-{profile}.properties或application.yml(带spring.profile)配置文件
7. jar包内部的application-{profile}.properties或application.yml(带spring.profile)配置文件
8. jar包外部的application.properties或application.yml(不带spring.profile)配置文件
9. jar包内部的application.properties或application.yml(不带spring.profile)配置文件
10. @Configuration注解类上的@PropertySource
11. 通过SpringApplication.setDefaultProperties指定的默认属性
主要使用的就是上述标红的部分,总结如下:
所有的配置都可以在命令行上进行指定,多个配置用空格分开,例如:java -jar spring-boot-02-config-02-0.0.1-SNAPSHOT.jar --server.port=8087 --server.context-path=/abc
外部配置文件的加载,由jar包外向jar包内进行寻找,优先加载带profile的配置文件,之后加载不带profile。
如果想要参看详细的内容请参考官方文档
5 自动配置原理
Spring Boot启动的时候加载主配置类,在组合注解@SpringBootApplication中有一个@EnableAutoConfiguration注解开启了自动配置功能 。
// 标注一个主程序类,说明这是一个Spring Boot应用
@SpringBootApplication
public class SpringboottestApplication {

    public static void main(String[] args) {
        SpringApplication.run(SpringboottestApplication.class, args);
    }

}
@Target(ElementType.TYPE)
@Retention(RetentionPolicy.RUNTIME)
@Documented
@Inherited
@SpringBootConfiguration
// 开启了自动配置功能
@EnableAutoConfiguration
@ComponentScan(excludeFilters = {
		@Filter(type = FilterType.CUSTOM, classes = TypeExcludeFilter.class),
		@Filter(type = FilterType.CUSTOM, classes = AutoConfigurationExcludeFilter.class) })
public @interface SpringBootApplication {
1. @EnableAutoConfiguration的作用
@Target(ElementType.TYPE)
@Retention(RetentionPolicy.RUNTIME)
@Documented
@Inherited
@AutoConfigurationPackage
// @Import是Spring的底层注解,作用是给容器中导入一个组件,该组件由括号中的内容来决定。
// EnableAutoConfigurationImportSelector是导包选择器,父类是AutoConfigurationImportSelector
// 新版本中不再使用EnableAutoConfigurationImportSelector而是直接使用其父类
@Import(EnableAutoConfigurationImportSelector.class)
public @interface EnableAutoConfiguration {
查看AutoConfigurationImportSelector中的selectImports方法:
public class AutoConfigurationImportSelector
		implements DeferredImportSelector, BeanClassLoaderAware, ResourceLoaderAware,
		BeanFactoryAware, EnvironmentAware, Ordered {
	@Override
	public String[] selectImports(AnnotationMetadata annotationMetadata) {
		if (!isEnabled(annotationMetadata)) {
			return NO_IMPORTS;
		}
		try {
			AutoConfigurationMetadata autoConfigurationMetadata = AutoConfigurationMetadataLoader
					.loadMetadata(this.beanClassLoader);
			AnnotationAttributes attributes = getAttributes(annotationMetadata);
			// 获取候选的配置,具体方法内容在下方
			List<String> configurations = getCandidateConfigurations(annotationMetadata,
					attributes);
			configurations = removeDuplicates(configurations);
			configurations = sort(configurations, autoConfigurationMetadata);
			Set<String> exclusions = getExclusions(annotationMetadata, attributes);
			checkExcludedClasses(configurations, exclusions);
			configurations.removeAll(exclusions);
			configurations = filter(configurations, autoConfigurationMetadata);
			fireAutoConfigurationImportEvents(configurations, exclusions);
			return configurations.toArray(new String[configurations.size()]);
		}
		catch (IOException ex) {
			throw new IllegalStateException(ex);
		}
	}

	protected List<String> getCandidateConfigurations(AnnotationMetadata metadata,
			AnnotationAttributes attributes) {
			//查看该方法,具体方法内容在下方,注意getSpringFactoriesLoaderFactoryClass方法
			List<String> configurations = SpringFactoriesLoader.loadFactoryNames(
					getSpringFactoriesLoaderFactoryClass(), getBeanClassLoader());
			Assert.notEmpty(configurations,
					"No auto configuration classes found in META-INF/spring.factories. If you "
					+ "are using a custom packaging, make sure that file is correct.");
			return configurations;
	}
}
	protected Class<?> getSpringFactoriesLoaderFactoryClass() {
		return EnableAutoConfiguration.class;
	}
public abstract class SpringFactoriesLoader {

	public static final String FACTORIES_RESOURCE_LOCATION = "META-INF/spring.factories";

	public static List<String> loadFactoryNames(Class<?> factoryClass, ClassLoader classLoader) {
		//factoryClass是EnableAutoConfiguration.class
		String factoryClassName = factoryClass.getName();
		try {
			// 从类路径下获得资源,扫描所有jar包类路径下的META-INF/spring.factories文件,之后返回文件的URL
			// FACTORIES_RESOURCE_LOCATION = "META-INF/spring.factories"
			Enumeration<URL> urls = (classLoader != null ? classLoader.getResources(FACTORIES_RESOURCE_LOCATION) :
					ClassLoader.getSystemResources(FACTORIES_RESOURCE_LOCATION));
			List<String> result = new ArrayList<String>();
			//对所有的URL进行遍历
			while (urls.hasMoreElements()) {
				URL url = urls.nextElement();
				// 把扫描到的这些文件的内容包装成properties对象
				Properties properties = PropertiesLoaderUtils.loadProperties(new UrlResource(url));
				// 从properties 文件中获取factoryClassName(EnableAutoConfiguration.class类的类名)对应的值
				String propertyValue = properties.getProperty(factoryClassName);
				// commaDelimitedListToStringArray:将字符串转换成字符串数组,按逗号分隔
				for (String factoryName : StringUtils.commaDelimitedListToStringArray(propertyValue)) {
					// 将值放入结果集中,该结果集就是要交给容器的所有组件
					result.add(factoryName.trim());
				}
			}
			return result;
		}
		catch (IOException ex) {
			throw new IllegalArgumentException("Unable to load factories from location [" +
					FACTORIES_RESOURCE_LOCATION + "]", ex);
		}
	}

}
上述内容就是将类路径下META-INF/spring.factories 里面配置的所有EnableAutoConfiguration的值加入到容器中的过程,其中spring.factories可以在位置如下:
下面将给出部分spring.factories文件中EnableAutoConfiguration的值,即需要添加的组件内容,详细内容可自行查阅。
# Auto Configure
org.springframework.boot.autoconfigure.EnableAutoConfiguration=\
org.springframework.boot.autoconfigure.admin.SpringApplicationAdminJmxAutoConfiguration,\
org.springframework.boot.autoconfigure.aop.AopAutoConfiguration,\
org.springframework.boot.autoconfigure.amqp.RabbitAutoConfiguration,\
每一个这样的 xxxAutoConfiguration类都是容器中的一个组件,都加入到容器中,之后才能使用他们来做自动配置,而这只是自动配置的开始,只有这些配置类都加入到了容器中,各配置类才会起作用,进而进行一系列的自动配置。
5.1 自动配置例子——HttpEncodingAutoConfiguration
//表示这是一个配置类,和以前编写的配置文件一样,也可以给容器中添加组件
@Configuration
//启动指定类的ConfigurationProperties功能,将配置文件中对应的值和HttpEncodingProperties绑定起来,
//并把HttpEncodingProperties加入到ioc容器中
@EnableConfigurationProperties(HttpEncodingProperties.class)
//Spring底层@Conditional注解,根据不同的条件进行判断,如果满足指定的条件,
//整个配置类里面的配置就会生效,这里判断当前应用是否是web应用,如果是,当前配置类生效
@ConditionalOnWebApplication
//判断当前项目有没有这个类CharacterEncodingFilter;SpringMVC中进行乱码解决的过滤器;
@ConditionalOnClass(CharacterEncodingFilter.class)
//判断配置文件中是否存在某个配置spring.http.encoding.enabled;如果不存在,判断也是成立的,
//即使我们配置文件中不配置pring.http.encoding.enabled=true,也是默认生效的;
@ConditionalOnProperty(prefix = "spring.http.encoding", value = "enabled", matchIfMissing = true)
public class HttpEncodingAutoConfiguration {

  	//他已经和SpringBoot的配置文件映射了,后面会给出部分源码
  	private final HttpEncodingProperties properties;

   //只有一个有参构造器的情况下,参数的值就会从容器中拿
  	public HttpEncodingAutoConfiguration(HttpEncodingProperties properties) {
		this.properties = properties;
	}

  	//给容器中添加一个组件,这个组件的某些值需要从properties中获取
    @Bean
    //判断容器有没有这个组件,如果没有才会添加
	@ConditionalOnMissingBean(CharacterEncodingFilter.class)
	public CharacterEncodingFilter characterEncodingFilter() {
		CharacterEncodingFilter filter = new OrderedCharacterEncodingFilter();
		filter.setEncoding(this.properties.getCharset().name());
		filter.setForceRequestEncoding(this.properties.shouldForce(Type.REQUEST));
		filter.setForceResponseEncoding(this.properties.shouldForce(Type.RESPONSE));
		return filter;
	}
总结:根据当前不同的条件判断,决定这个配置类是否生效,一但这个配置类生效,该配置类就会给容器中添加各种组件,这些组件的属性是从对应的properties类中获取的,这些类里面的每一个属性又是和配置文件绑定的。
所有在配置文件中能配置的属性都会封装为一个xxxxProperties类,所以能配置什么就可以参照某个功能对应的这个属性类。
//从配置文件中获取指定的值和bean的属性进行绑定
@ConfigurationProperties(prefix = "spring.http.encoding")
public class HttpEncodingProperties {

   public static final Charset DEFAULT_CHARSET = Charset.forName("UTF-8");
如何只用自动配置总结:
- 1. SpringBoot启动会加载大量的自动配置类
- 2. 我们看我们需要的功能有没有SpringBoot默认写好的自动配置类,如果没有则需要我们自己编写配置类进行配置。
- 3. 我们再来看这个自动配置类中到底配置了哪些组件,如果有我们要用的组件,我们就不需要再来配置了。
- 4. 给容器中自动配置类添加组件的时候,会从properties类中获取某些属性。我们就可以在配置文件中指定这些属性的值
5.2 @Conditional派生注解
| @Conditional扩展注解 | 作用(判断是否满足当前指定条件 |
|---|---|
| @ConditionalOnJava | 系统的java版本是否符合要求 |
| @ConditionalOnBean | 容器中存在指定Bean |
| @ConditionalOnMissingBean | 容器中不存在指定Bean |
| @ConditionalOnExpression | 满足SpEL表达式指定 |
| @ConditionalOnClass | 系统中有指定的类 |
| @ConditionalOnMissingClass | 系统中没有指定的类 |
| @ConditionalOnSingleCandidate | 容器中只有一个指定的Bean,或者这个Bean是首选Bean |
| @ConditionalOnProperty | 系统中指定的属性是否有指定的值 |
| @ConditionalOnResource | 类路径下是否存在指定资源文件 |
| @ConditionalOnWebApplication | 当前是web环境 |
| @ConditionalOnNotWebApplication | 当前不是web环境 |
| @ConditionalOnJndi | JNDI存在指定项 |
5.3 总结
自动配置类必须在一定的条件下才能生效,可以通过在配置文件中启用 debug=true属性来让控制台打印自动配置报告,这样我们就可以很方便的知道哪些自动配置类生效,控制台打印的具体内容如下:
=========================
AUTO-CONFIGURATION REPORT
=========================


Positive matches:(自动配置类启用的)
-----------------

   DispatcherServletAutoConfiguration matched:
      - @ConditionalOnClass found required class 'org.springframework.web.servlet.DispatcherServlet'; @ConditionalOnMissingClass did not find unwanted class (OnClassCondition)
      - @ConditionalOnWebApplication (required) found StandardServletEnvironment (OnWebApplicationCondition)


Negative matches:(没有启动,没有匹配成功的自动配置类)
-----------------

   ActiveMQAutoConfiguration:
      Did not match:
         - @ConditionalOnClass did not find required classes 'javax.jms.ConnectionFactory', 'org.apache.activemq.ActiveMQConnectionFactory' (OnClassCondition)

   AopAutoConfiguration:
      Did not match:
         - @ConditionalOnClass did not find required classes 'org.aspectj.lang.annotation.Aspect', 'org.aspectj.lang.reflect.Advice' (OnClassCondition)
6 日志
市面上的日志框架如JUL、JCL、Jboss-logging、logback、log4j、log4j2、slf4j…
| 日志门面 (日志的抽象层) | 日志实现 |
|---|---|
| JCL(Jakarta Commons Logging,SLF4j(Simple Logging Facade for Java),jboss-logging | Log4j ,JUL(java.util.logging),Log4j2 Logback |
SpringBoot的底层是Spring框架,Spring框架默认是用JCL,而SpringBoot选用了 SLF4j和logback。
6.1 SLF4j使用
点击跳转官网
实际开发中,如果要使用到日志记录,我们不应该直接调用日志实现类中的方法,而是调用日志抽象层里面的方法。这里将简单介绍SLF4j+logback的使用。
首先,SLF4j是一个日志门面,即日志的抽象层,而对该抽象层的实现我们可以采用多种实现方式,logback只是其中一种。我们可以通过官网提供的一张图片来理解,如下:
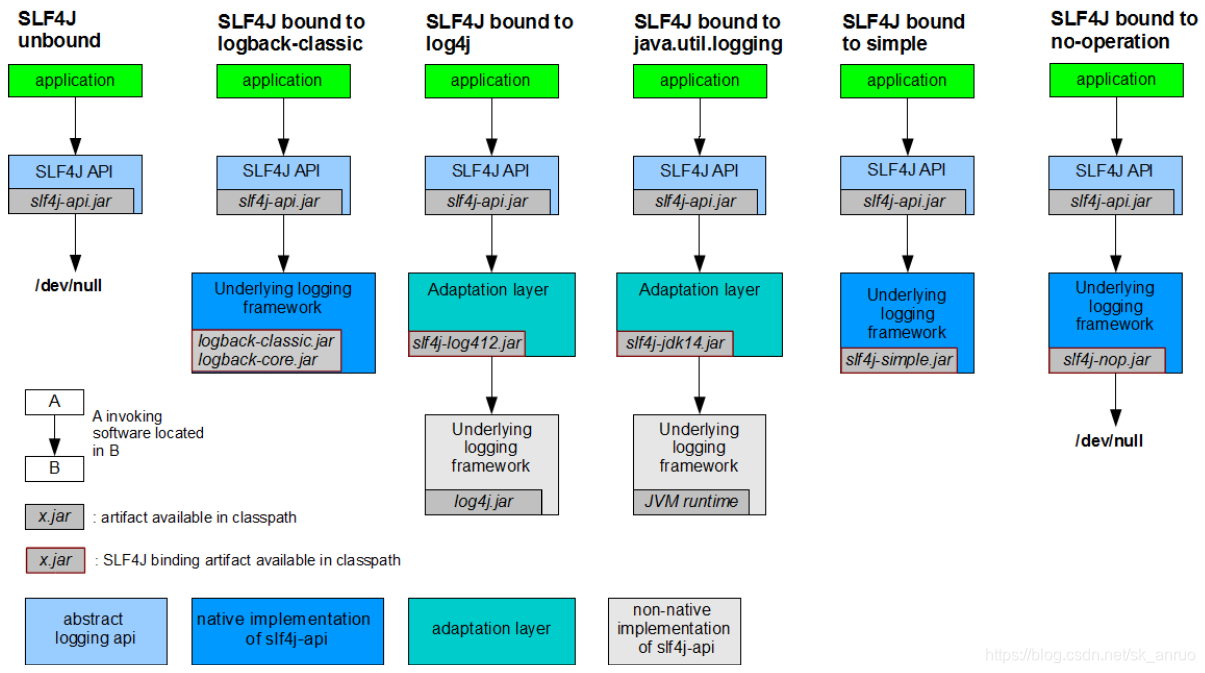
注意:每一个日志的实现框架都有自己的配置文件,即便使用了slf4j,配置文件还是日志实现框架自己本身的配置文件。
官网给出的示例代码如下:
import org.slf4j.Logger;
import org.slf4j.LoggerFactory;

public class HelloWorld {
  public static void main(String[] args) {
    Logger logger = LoggerFactory.getLogger(HelloWorld.class);
    logger.info("Hello World");
  }
}
6.1.1 日志统一问题
几乎每一个框架都有自己的日志体系,如果不能进行统一,在使用多框架时日志的处理将会变得格外繁琐,而SLF4j便可以解决这一问题,将不同的日志统一使用slf4j进行输出。
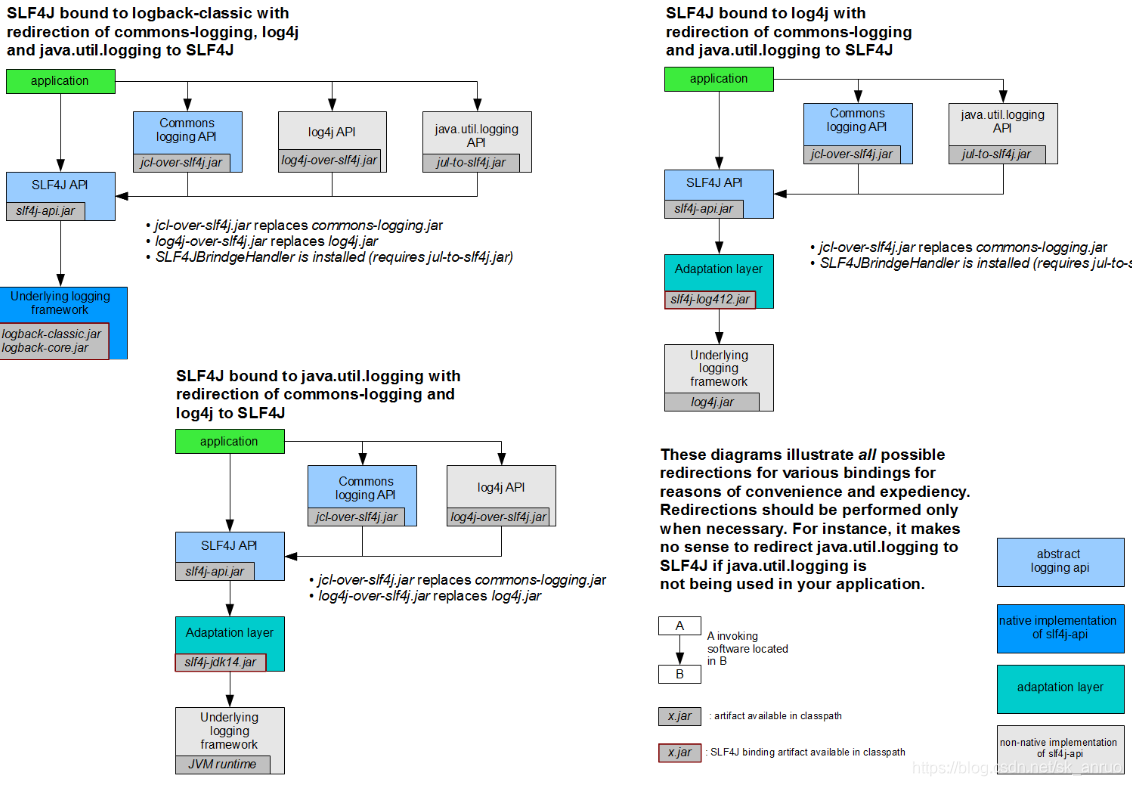
如何让系统中所有的日志都统一到slf4j总结:
1、将系统中其他日志框架先排除出去(防止和中间包冲突)。
2、用中间包来替换原有的日志框架。
3、导入slf4j的实现(根据具体使用的日志实现觉得)
6.2 SpringBoot日志关系
在SpringBoo项目的pom.xml文件中我们可以看到如下的依赖:
<dependency>
    <groupId>org.springframework.boot</groupId>
    <artifactId>spring-boot-starter-web</artifactId>
</dependency>
在spring-boot-starter-web中有如下依赖:
<dependency>
	<groupId>org.springframework.boot</groupId>
	<artifactId>spring-boot-starter</artifactId>
</dependency>
在spring-boot-starter中有如下依赖:
<dependency>
	<groupId>org.springframework.boot</groupId>
	<artifactId>spring-boot-starter-logging</artifactId>
</dependency>
下面以图片的形式给出spring-boot-starter-logging的依赖关系。

SpringBoot底层使用slf4j+logback的方式进行日志记录,同时也把其他的日志都替换成了slf4j,而替换的方式是使用中间包(中间包和原日志的jar包有着相同的类,但类的内容不同,可以理解为伪装成原日志包但行为不同。)

从截图可以看出,在中间包中有着和原日志需要的jar包相同的类名,这能保证框架识别到该类进而正常运行,我们可以比对中间包和原包中类的区别。
由于中间包的存在,我们必须移出原jar包,以防止jar包之间的冲突,SpringBoot的处理如下:
<dependency>
	<groupId>org.springframework</groupId>
	<artifactId>spring-core</artifactId>
	<exclusions>
		<exclusion>
			<groupId>commons-logging</groupId>
			<artifactId>commons-logging</artifactId>
		</exclusion>
	</exclusions>
</dependency>
SpringBoot能自动适配所有的日志,且底层使用slf4j+logback的方式记录日志,引入其他框架的时候,只需要把这个框架依赖的日志框架排除掉即可。
6.3 日志的使用
6.3.1 基本使用
SpringBoot默认帮我们配置好了日志,我们可以直接使用,只需要在需要进行日志记录的类中实例化一个记录器,之后在需要打印日志的位置调用相应的方法,示例代码如下:
	//记录器,getLogger(getClass())中的参数是日志目标
	Logger logger = LoggerFactory.getLogger(getClass());
	@Test
	public void contextLoads() {
		//日志的级别;
		//由低到高   trace<debug<info<warn<error
		//可以调整输出的日志级别;日志就只会在这个级别以以后的高级别生效
		logger.trace("这是trace日志...");
		logger.debug("这是debug日志...");
		//SpringBoot默认给我们使用的是info级别的,没有指定级别的就用SpringBoot默认规定的级别;root级别
		logger.info("这是info日志...");
		logger.warn("这是warn日志...");
		logger.error("这是error日志...");
	}
如果需要对默认配置进行一些修改,可以在SpringBoot的配置文件中进行修改,示例如下:
# 指定com.atguigu包下的日志级别
logging.level.com.atguigu=trace
# 不指定路径在当前项目下生成springboot.log日志
# 可以指定完整的路径;
#logging.file=G:/springboot.log

# 在当前磁盘的根路径下创建spring文件夹和里面的log文件夹;使用 spring.log 作为默认文件
logging.path=/spring/log

#  在控制台输出的日志的格式
logging.pattern.console=%d{yyyy-MM-dd} [%thread] %-5level %logger{50} - %msg%n
# 指定文件中日志输出的格式
logging.pattern.file=%d{yyyy-MM-dd} === [%thread] === %-5level === %logger{50} ==== %msg%n
日志输出格式:
%d表示日期时间,
%thread表示线程名,
%-5level:级别从左显示5个字符宽度
%logger{50} 表示logger名字最长50个字符,否则按照句点分割。
%msg:日志消息,
%n是换行符
例: %d{yyyy-MM-dd HH:mm:ss.SSS} [%thread] %-5level %logger{50} - %msg%n
| logging.file | logging.path | Example | Description |
|---|---|---|---|
| (none) | (none) | 只在控制台输出 | |
| 指定文件名 | (none) | my.log | 输出日志到my.log文件 |
| (none) | 指定目录 | /var/log | 输出到指定目录的 spring.log 文件中 |
注:如果logging.file和logging.path都指定是logging.file起作用。
6.3.2 指定配置
我们可以不使用日志默认配置而通过配置文件来指定配置,要达到这样的效果我们只需要在类路径下放上日志框架对应的配置文件即可。
| Logging System | Customization |
|---|---|
| Logback | logback-spring.xml, logback-spring.groovy, logback.xml or logback.groovy |
| Log4j2 | log4j2-spring.xml or log4j2.xml |
| JDK (Java Util Logging) | logging.properties |
logback.xml:直接就被日志框架识别了;
logback-spring.xml:日志框架不直接加载日志的配置项,由SpringBoot解析日志配置,可以使用SpringBoot的高级Profile功能
我们可以在logback-spring.xml中使用如下配置指定针对日志的配置在某个环境下生效
<springProfile name="staging">
    <!-- configuration to be enabled when the "staging" profile is active -->
  	可以指定某段配置只在某个环境下生效
</springProfile>
下面给出logback-spring.xml中使用Profile功能的示例代码。
<appender name="stdout" class="ch.qos.logback.core.ConsoleAppender">
        <layout class="ch.qos.logback.classic.PatternLayout">
        	<!-- 使用springProfile指定该配置在dev环境下生效,环境的激活可以在SpringBoot配置文件中指定spring.profiles.active=dev -->
            <springProfile name="dev">
                <pattern>%d{yyyy-MM-dd HH:mm:ss.SSS} ----> [%thread] ---> %-5level %logger{50} - %msg%n</pattern>
            </springProfile>
            <!-- 使用springProfile指定该配置在非dev环境下生效 -->
            <springProfile name="!dev">
                <pattern>%d{yyyy-MM-dd HH:mm:ss.SSS} ==== [%thread] ==== %-5level %logger{50} - %msg%n</pattern>
            </springProfile>
        </layout>
</appender>
注:profile相关请点击
如果使用logback.xml作为日志配置文件,还要使用profile功能,会有以下错误:
no applicable action for [springProfile]
6.3.3 切换日志框架
我们可以参考slf4j的日志适配图进行相关的切换,下面给出使用slf4j+log4j的方式时pom.xml文件的变化。
<dependency>
  <groupId>org.springframework.boot</groupId>
  <artifactId>spring-boot-starter-web</artifactId>
  <!-- 比对slf4j+logback的日志适配图,排除slf4j+log4j适配图中不需要的jar包 -->
  <!-- 为什么参考slf4j+logback的日志适配图?因为其为SpringBoot默认的日志组合 -->
  <exclusions>
    <exclusion>
      <artifactId>logback-classic</artifactId>
      <groupId>ch.qos.logback</groupId>
    </exclusion>
    <exclusion>
      <artifactId>log4j-over-slf4j</artifactId>
      <groupId>org.slf4j</groupId>
    </exclusion>
  </exclusions>
</dependency>
<!-- 比对slf4j+logback的日志适配图,加入slf4j+log4j多出的jar包 -->
<dependency>
  <groupId>org.slf4j</groupId>
  <artifactId>slf4j-log4j12</artifactId>
</dependency>
7 Web开发
使用SpringBoot进行Web开发时我们只需要下面几个步骤:
1. 创建SpringBoot应用,根据创建向导选取我们需要的模块。
2. 在配置文件中指定少量配置(SpringBoot已经默认将这些场景配置好了,不用再进行繁琐的配置就可以跑起来)
3. 编写业务代码
我们必须明白SpringBoot的自动配置原理:
- xxxxAutoConfiguration:帮我们给容器中自动配置组件
- xxxxProperties:配置类来封装配置文件的内容
详情请点击
注:在SpringBoot中,所有的SpringMVC相关配置都在WebMvcAutoConfiguration中。
7.1 SpringBoot对静态资源的映射规则
WebMvcAutoConfiguration的部分源码如下:
@Override
// 添加资源映射
public void addResourceHandlers(ResourceHandlerRegistry registry) {
	if (!this.resourceProperties.isAddMappings()) {
		logger.debug("Default resource handling disabled");
		return;
	}
	Integer cachePeriod = this.resourceProperties.getCachePeriod();
	//第一种映射规则:所有/webjars/**的请求 ,都去 classpath:/META-INF/resources/webjars/下找资源
	// webjars相关请往下看7.1.1章
	if (!registry.hasMappingForPattern("/webjars/**")) {
		customizeResourceHandlerRegistration(
				registry.addResourceHandler("/webjars/**")
						.addResourceLocations(
								"classpath:/META-INF/resources/webjars/")
				.setCachePeriod(cachePeriod));
	}
	String staticPathPattern = this.mvcProperties.getStaticPathPattern();
     //第二种映射:静态资源文件夹映射,指定特定文件夹为静态资源目录,staticPathPattern = "/**"
     //详情请往下看7.1.2章
	if (!registry.hasMappingForPattern(staticPathPattern)) {
		customizeResourceHandlerRegistration(
				registry.addResourceHandler(staticPathPattern)
						.addResourceLocations(
								this.resourceProperties.getStaticLocations())
				.setCachePeriod(cachePeriod));
	}
}

// 配置欢迎页映射
// 扫描静态资源文件夹下的所有index.html页面;被"/**"映射
// 如访问localhost:8080/   会访问index页面
// 我们可以编写index.html放在静态资源目录下作为欢迎页
@Bean
public WelcomePageHandlerMapping welcomePageHandlerMapping(
		ResourceProperties resourceProperties) {
	return new WelcomePageHandlerMapping(resourceProperties.getWelcomePage(),
			this.mvcProperties.getStaticPathPattern());
}

// 配置喜欢的图标(标签栏上的图标)
// 所有的 **/favicon.ico  都是在静态资源文件下找
// 我们可以在静态资源目录下访一个名为favicon.ico的图片来定义我们的图标
@Configuration
@ConditionalOnProperty(value = "spring.mvc.favicon.enabled", matchIfMissing = true)
public static class FaviconConfiguration {

	private final ResourceProperties resourceProperties;

	public FaviconConfiguration(ResourceProperties resourceProperties) {
		this.resourceProperties = resourceProperties;
	}

	@Bean
	public SimpleUrlHandlerMapping faviconHandlerMapping() {
		SimpleUrlHandlerMapping mapping = new SimpleUrlHandlerMapping();
		mapping.setOrder(Ordered.HIGHEST_PRECEDENCE + 1);
            	//所有  **/favicon.ico
		mapping.setUrlMap(Collections.singletonMap("**/favicon.ico",
				faviconRequestHandler()));
		return mapping;
	}

	@Bean
	public ResourceHttpRequestHandler faviconRequestHandler() {
		ResourceHttpRequestHandler requestHandler = new ResourceHttpRequestHandler();
		requestHandler
				.setLocations(this.resourceProperties.getFaviconLocations());
		return requestHandler;
	}

}
7.1.1 webjars简介
webjars:以jar包的方式引入静态资源,相关jar包点击跳转页面进行查找。
查找到目标jar后复制其提供的依赖,并导入到项目的pom.xml文件,以jquery为例:
<!--引入jquery-webjar-->
<dependency>
	<groupId>org.webjars</groupId>
	<artifactId>jquery</artifactId>
	<version>3.3.1</version>
</dependency>
引入jQuery之后目录结构如下:

我们可以使用localhost:8080/webjars/jquery/3.3.1/jquery.js访问该jquery静态资源。
7.1.2 静态文件夹映射
“/**” 规则会匹配所有访问该项目的请求,如果该请求没有被处理,则会去静态资源目录查找与之匹配的静态资源,如localhost:8080/abc,若该请求没有与之匹配的处理器就会去静态资源文件夹里面找abc。
我们可以从源码里发现,默认的静态资源目录为:
“classpath:/META-INF/resources/”,
“classpath:/resources/”,
“classpath:/static/”,
“classpath:/public/”
“/”:当前项目的根路径
新建的项目没有自动创建上述所有的静态资源目录,如果需要,我们可以手动进行创建。
如果我们不想用默认的静态资源目录也可以进行自定义,SpringBoot的配置文件配置如下:
spring.resources.static-locations=classpath:/hello1,classpath:hello2
注:static-locations是一个数组,可以指定多个目录,使用逗号进行分割。如果我们指定了静态资源目录,默认的将会失效。
更多的配置可以在ResourceProperties中查阅,部分代码如下:
@ConfigurationProperties(prefix = "spring.resources", ignoreUnknownFields = false)
public class ResourceProperties implements ResourceLoaderAware {
  //可以设置和静态资源有关的参数,缓存时间等
8 模板引擎
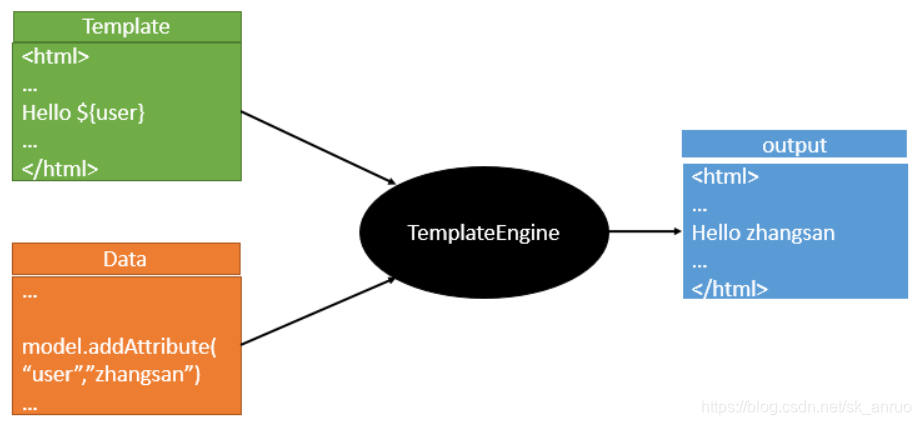
模板引擎(这里特指用于Web开发的模板引擎)是为了使用户界面与业务数据(内容)分离而产生的,它可以生成特定格式的文档,用于网站的模板引擎就会生成一个标准的HTML文档。
模板引擎不属于特定技术领域,它是跨领域跨平台的概念。在Asp下有模板引擎,在PHP下也有模板引擎,在C#下也有,甚至JavaScript、WinForm开发都会用到模板引擎技术。
以上内容摘录自百度百科,详情点击模板引擎-百度百科。
模板引擎有很多,但是其思想是类似的,大都是将模板和需要组装的数据交给模板引擎组合(待确认!),最终输出目标内容,如图所示:
8.1 thymeleaf基本使用
8.1.1 引入thymeleaf
我们可以在SpringBoot官网文档中的Starts章节看到thymeleaf的整合包spring-boot-starter-thymeleaf,我们只需要在SpringBoot项目中引入该整合包的依赖即可。
<dependency>
	<groupId>org.springframework.boot</groupId>
	<artifactId>spring-boot-starter-thymeleaf</artifactId>
</dependency>
我们如果不想使用默认的thymeleaf版本,可以通过以下的方式来修改其版本。
<properties>
		<thymeleaf.version>3.0.9.RELEASE</thymeleaf.version>
		<!-- 布局功能的支持程序  thymeleaf3主程序  layout2以上版本 -->
		<!-- thymeleaf2   layout1-->
		<thymeleaf-layout-dialect.version>2.2.2</thymeleaf-layout-dialect.version>
  </properties>
需要注意的是thymeleaf3版本以上必须使用layout2以上版本以上版本。
8.1.2 Thymeleaf使用
ThymeleafProperties封装了Thymeleaf的默认规则,部分源码如下:
@ConfigurationProperties(prefix = "spring.thymeleaf")
public class ThymeleafProperties {

	private static final Charset DEFAULT_ENCODING = Charset.forName("UTF-8");

	private static final MimeType DEFAULT_CONTENT_TYPE = MimeType.valueOf("text/html");
	// 前缀
	public static final String DEFAULT_PREFIX = "classpath:/templates/";
	// 后缀
	public static final String DEFAULT_SUFFIX = ".html";
	// 只要我们把HTML页面放在classpath:/templates/目录下,thymeleaf就能自动渲染
使用步骤:
- 在html中导入thymeleaf的名称空间
<html lang="en" xmlns:th="http://www.thymeleaf.org">
- 按照语法在html中使用thymeleaf
<!DOCTYPE html>
<html lang="en" xmlns:th="http://www.thymeleaf.org">
<head>
    <meta charset="UTF-8">
    <title>Title</title>
</head>
<body>
    <h1>成功!</h1>
    <!--th:text 将div里面的文本内容设置为 -->
    <div th:text="${hello}">这是显示欢迎信息</div>
</body>
</html>
8.1.3 Thymeleaf语法
th:任意html属性;来替换原生属性的值,如上面的代码中的th:text="${hello}"便是替换可原生的text属性。部分属性及优先级简介如下:

我们需要使用表达式来指定属性的值,下面将介绍表达式的语法。
- ${…}:获取变量值;OGNL;
/*
 * Access to properties using the point (.). Equivalent to calling property getters.
 */
${person.father.name}

/*
 * Access to properties can also be made by using brackets ([]) and writing
 * the name of the property as a variable or between single quotes.
 */
${person['father']['name']}

/*
 * If the object is a map, both dot and bracket syntax will be equivalent to
 * executing a call on its get(...) method.
 */
${countriesByCode.ES}
${personsByName['Stephen Zucchini'].age}

/*
 * Indexed access to arrays or collections is also performed with brackets,
 * writing the index without quotes.
 */
${personsArray[0].name}

/*
 * Methods can be called, even with arguments.
 */
${person.createCompleteName()}
${person.createCompleteNameWithSeparator('-')}
- *{…}:选择表达式:和 在 功 能 上 是 一 样 可 配 合 t h : o b j e c t = " {}在功能上是一样可配合 th:object=" 在功能上是一样可配合th:object="{session.user}使用
<div th:object="${session.user}">
   <p>Name: <span th:text="*{firstName}">Sebastian</span>.</p>
   <p>Surname: <span th:text="*{lastName}">Pepper</span>.</p>
   <p>Nationality: <span th:text="*{nationality}">Saturn</span>.</p>
 </div>
详细内容请翻阅thymeleaf官方文档
代码示例:
package com.sk.springbootweb.controller;

import org.springframework.stereotype.Controller;
import org.springframework.web.bind.annotation.RequestMapping;
import org.springframework.web.bind.annotation.RequestParam;
import org.springframework.web.bind.annotation.ResponseBody;

import java.util.Arrays;
import java.util.Map;

@Controller
public class HelloController {
    //查出用户数据,在页面展示
    @RequestMapping("/success")
    public String success(Map<String,Object> map){
        map.put("hello","<h1>你好</h1>");
        map.put("users",Arrays.asList("zhangsan","lisi","wangwu"));
        return "success";
    }
}
<!DOCTYPE html>
<html lang="en" xmlns:th="http://www.thymeleaf.org">
<head>
    <meta charset="UTF-8">
    <title>Title</title>
</head>
<body>
	<h1>成功!</h1>
	<!--th:text 将div里面的文本内容设置为 -->
	<div id="div01" class="myDiv" th:id="${hello}" th:class="${hello}" th:text="${hello}">这是显示欢迎信息</div>
	<hr/>
		<div th:text="${hello}"></div>
		<div th:utext="${hello}"></div>
	<hr/>

	<!-- th:each每次遍历都会生成当前这个标签: 3个h4 -->
	<h4 th:text="${user}"  th:each="user:${users}"></h4>
	<hr/>
	<h4>
    	<span th:each="user:${users}"> [[${user}]] </span>
	</h4>
</body>
</html>
页面效果如下:

9 SpringMVC自动配置
详情参见SpringBoot官方文档SpringBoot官方文档。
之前的内容也提到过,在SpringBoot中,与SpringMVC相关的配置都在WebMvcAutoConfiguration中,接下来将从WebMvcAutoConfiguration入手来看SpringMVC的自动配置,以下是SpringBoot对SpringMVC的默认配置。
-
Inclusion of
ContentNegotiatingViewResolverandBeanNameViewResolverbeans.- 自动配置了ViewResolver(视图解析器:根据方法的返回值得到视图对象(View),视图对象决定如何渲染(转发/重定向))
- ContentNegotiatingViewResolver:组合所有的视图解析器的;
- 如何定制:我们可以自己给容器中添加一个视图解析器(使用@Bean注解添加,下同);自动的将其组合进来;
-
Support for serving static resources, including support for WebJars (see below).
- 支持提供静态资源,包括对WebJars的支持
-
Automatic registration of
Converter,GenericConverter,Formatterbeans.- 自动注册Converter,GenericConverter,Formatter
- Converter:转换器; public String hello(User user):类型转换使用Converter
- Formatter` 格式化器; 2017.12.17===Date;
- 自己添加的格式化器转换器,我们只需要放在容器中即可
- 自动注册Converter,GenericConverter,Formatter
@Bean
@ConditionalOnProperty(prefix = "spring.mvc", name = "date-format")//在文件中配置日期格式化的规则
public Formatter<Date> dateFormatter() {
	return new DateFormatter(this.mvcProperties.getDateFormat());//日期格式化组件
}
- Support for
HttpMessageConverters(see below).- 支持HttpMessageConverters
- HttpMessageConverter:SpringMVC用来转换Http请求和响应的;User—Json
- HttpMessageConverters` 从容器中确定,获取所有的HttpMessageConverter
- 自己给容器中添加HttpMessageConverter,只需要将自己的组件注册容器中(@Bean,@Component)
- Automatic registration of
MessageCodesResolver(see below).- 自动注册MessageCodesResolver
- 定义错误代码生成规则
- Static
index.htmlsupport.- 静态首页访问
- Custom
Faviconsupport (see below).- 自定义favicon.ico:可以自定义图标(浏览器标签图标)
- Automatic use of a
ConfigurableWebBindingInitializerbean (see below).- 自动使用ConfigurableWebBindingInitializer
- 初始化WebDataBinder,请求数据绑定到JavaBean
- 我们可以配置一个ConfigurableWebBindingInitializer来替换默认的;(添加到容器)
注:我们可以在org.springframework.boot.autoconfigure.web包下查看所有web的自动场景的相关源码。
9.1 扩展SpringMVC
我们可以编写一个配置类(WebMvcConfigurerAdapter类型,标注@Configuration,不能标注@EnableWebMvc)来加载一些我们自定义的一些配置,这样既保留了所有的自动配置,也能用我们扩展的配置。
//使用WebMvcConfigurerAdapter可以来扩展SpringMVC的功能
@Configuration
public class MyMvcConfig extends WebMvcConfigurerAdapter {

    @Override
    public void addViewControllers(ViewControllerRegistry registry) {
       // super.addViewControllers(registry);
        //浏览器发送 /atguigu 请求来到 success
        registry.addViewController("/atguigu").setViewName("success");
    }
}
原理:
1. WebMvcAutoConfiguration是SpringMVC的自动配置类
2. 在做其他自动配置时会导入;@Import(EnableWebMvcConfiguration.class)
public class WebMvcAutoConfiguration {
	@Configuration
	@Import(EnableWebMvcConfiguration.class)
	@EnableConfigurationProperties({ WebMvcProperties.class, ResourceProperties.class })
	@Order(0)
	public static class WebMvcAutoConfigurationAdapter
			implements WebMvcConfigurer, ResourceLoaderAware {
		......
	}
......
}
 @Configuration
public static class EnableWebMvcConfiguration extends DelegatingWebMvcConfiguration {
     private final WebMvcConfigurerComposite configurers = new WebMvcConfigurerComposite();

 //从容器中获取所有的WebMvcConfigurer
     @Autowired(required = false)
     public void setConfigurers(List<WebMvcConfigurer> configurers) {
         if (!CollectionUtils.isEmpty(configurers)) {
             this.configurers.addWebMvcConfigurers(configurers);
           	//一个参考实现;将所有的WebMvcConfigurer相关配置都来一起调用;
           	@Override
            // public void addViewControllers(ViewControllerRegistry registry) {
             //    for (WebMvcConfigurer delegate : this.delegates) {
              //       delegate.addViewControllers(registry);
              //   }
             }
         }
}
3. 容器中所有的WebMvcConfigurer都会一起起作用。
4. 我们自定义的配置类也会被调用。
效果:SpringMVC的自动配置和我们的扩展配置都会起作用。
9.2 全面接管SpringMVC
如果我们不需要SpringMVC的自动配置而是要自己配置,可以在配置类中添加@EnableWebMvc
//使用WebMvcConfigurerAdapter可以来扩展SpringMVC的功能
@EnableWebMvc
@Configuration
public class MyMvcConfig extends WebMvcConfigurerAdapter {

    @Override
    public void addViewControllers(ViewControllerRegistry registry) {
       // super.addViewControllers(registry);
        //浏览器发送 /atguigu 请求来到 success
        registry.addViewController("/atguigu").setViewName("success");
    }
}
原理:
@Import(DelegatingWebMvcConfiguration.class)
public @interface EnableWebMvc {
@Configuration
public class DelegatingWebMvcConfiguration extends WebMvcConfigurationSupport {
@Configuration
@ConditionalOnWebApplication
@ConditionalOnClass({ Servlet.class, DispatcherServlet.class,
		WebMvcConfigurerAdapter.class })
//容器中没有这个组件的时候,这个自动配置类才生效
@ConditionalOnMissingBean(WebMvcConfigurationSupport.class)
@AutoConfigureOrder(Ordered.HIGHEST_PRECEDENCE + 10)
@AutoConfigureAfter({ DispatcherServletAutoConfiguration.class,
		ValidationAutoConfiguration.class })
public class WebMvcAutoConfiguration {
@EnableWebMvc将WebMvcConfigurationSupport组件导入进来。
导入的WebMvcConfigurationSupport只是SpringMVC最基本的功能。
9.3 总结
1. SpringBoot在自动配置很多组件的时候,先看容器中有没有用户自己配置的(@Bean、@Component)如果有就用用户配置的,如果没有,才自动配置;如果有些组件可以有多个(ViewResolver)将用户配置的和自己默认的组合起来;
2. 在SpringBoot中会有非常多的xxxConfigurer帮助我们进行扩展配置
3. 在SpringBoot中会有很多的xxxCustomizer帮助我们进行定制配置
接下来将完成一个CRUD的例子,详情参看基于SpringBoot的CRUD例子
10 错误处理机制
使用浏览器时, 浏览器发送请求的请求头如下:

SpringBoot默认返回的是错误页面如下:

使用其他客户端时,请求头的信息如下:

SpringBoot在处理错误时会返回一个json数据,如下:

10.1 原理
错误处理的自动配置可以查考ErrorMvcAutoConfiguration,打开源码我们可以看到它给我们添加了以下的组件。
- DefaultErrorAttributes
- BasicErrorController
- ErrorPageCustomizer
- DefaultErrorViewResolver
public class ErrorMvcAutoConfiguration {
	@Bean
	@ConditionalOnMissingBean(value = ErrorAttributes.class, search = SearchStrategy.CURRENT)
	public DefaultErrorAttributes errorAttributes() {
		return new DefaultErrorAttributes(
				this.serverProperties.getError().isIncludeException());
	}
	@Bean
	@ConditionalOnMissingBean(value = ErrorController.class, search = SearchStrategy.CURRENT)
	public BasicErrorController basicErrorController(ErrorAttributes errorAttributes) {
		return new BasicErrorController(errorAttributes, this.serverProperties.getError(),
				this.errorViewResolvers);
	}
	@Bean
	public ErrorPageCustomizer errorPageCustomizer() {
		return new ErrorPageCustomizer(this.serverProperties, this.dispatcherServletPath);
	}
	@Configuration
	static class DefaultErrorViewResolverConfiguration {

		private final ApplicationContext applicationContext;

		private final ResourceProperties resourceProperties;

		DefaultErrorViewResolverConfiguration(ApplicationContext applicationContext,
				ResourceProperties resourceProperties) {
			this.applicationContext = applicationContext;
			this.resourceProperties = resourceProperties;
		}

		@Bean
		@ConditionalOnBean(DispatcherServlet.class)
		@ConditionalOnMissingBean
		public DefaultErrorViewResolver conventionErrorViewResolver() {
			return new DefaultErrorViewResolver(this.applicationContext,
					this.resourceProperties);
		}

	}
}
错误处理的步骤:
- ErrorPageCustomizer:当系统出现4xx或者5xx之类的错误时ErrorPageCustomizer就会生效(定制错误的响应规则),来到/error请求。
private static class ErrorPageCustomizer implements ErrorPageRegistrar, Ordered {

	//注册错误页面的响应规则
	@Override
	public void registerErrorPages(ErrorPageRegistry errorPageRegistry) {
		ErrorPage errorPage = new ErrorPage(this.dispatcherServletPath
				.getRelativePath(this.properties.getError().getPath()));
		errorPageRegistry.addErrorPages(errorPage);
	}
}
public class ErrorProperties {
	//从配置文件中获取error.path的值
	//系统出现作物之后来到/error请求进行处理
	@Value("${error.path:/error}")
	private String path = "/error";
	public String getPath() {
		return this.path;
	}
}
- BasicErrorController:处理上述的/error请求
@Controller
@RequestMapping("${server.error.path:${error.path:/error}}")
public class BasicErrorController extends AbstractErrorController {
	 @RequestMapping(produces = "text/html")//产生html类型的数据;浏览器发送的请求来到这个方法处理
	public ModelAndView errorHtml(HttpServletRequest request,
			HttpServletResponse response) {
		HttpStatus status = getStatus(request);
		Map<String, Object> model = Collections.unmodifiableMap(getErrorAttributes(
				request, isIncludeStackTrace(request, MediaType.TEXT_HTML)));
		response.setStatus(status.value());

        //去哪个页面作为错误页面;包含页面地址和页面内容
		ModelAndView modelAndView = resolveErrorView(request, response, status, model);
		return (modelAndView == null ? new ModelAndView("error", model) : modelAndView);
	}

	@RequestMapping
	@ResponseBody    //产生json数据,其他客户端来到这个方法处理;
	public ResponseEntity<Map<String, Object>> error(HttpServletRequest request) {
		Map<String, Object> body = getErrorAttributes(request,
				isIncludeStackTrace(request, MediaType.ALL));
		HttpStatus status = getStatus(request);
		return new ResponseEntity<Map<String, Object>>(body, status);
	}


	protected ModelAndView resolveErrorView(HttpServletRequest request,
      HttpServletResponse response, HttpStatus status, Map<String, Object> model) {
    //所有的ErrorViewResolver得到ModelAndView
   for (ErrorViewResolver resolver : this.errorViewResolvers) {
      ModelAndView modelAndView = resolver.resolveErrorView(request, status, model);
      if (modelAndView != null) {
         return modelAndView;
      }
   }
   return null;
}


}
- DefaultErrorViewResolver:由DefaultErrorViewResolver解析得到去哪个页面。
public class DefaultErrorViewResolver implements ErrorViewResolver, Ordered {
	private static final Map<Series, String> SERIES_VIEWS;

	static {
		Map<Series, String> views = new EnumMap<>(Series.class);
		views.put(Series.CLIENT_ERROR, "4xx");
		views.put(Series.SERVER_ERROR, "5xx");
		SERIES_VIEWS = Collections.unmodifiableMap(views);
	}
@Override
	public ModelAndView resolveErrorView(HttpServletRequest request, HttpStatus status,
			Map<String, Object> model) {
		ModelAndView modelAndView = resolve(String.valueOf(status.value()), model);
		if (modelAndView == null && SERIES_VIEWS.containsKey(status.series())) {
			modelAndView = resolve(SERIES_VIEWS.get(status.series()), model);
		}
		return modelAndView;
	}

	private ModelAndView resolve(String viewName, Map<String, Object> model) {
		////默认SpringBoot可以去找到一个页面?  error/404
		String errorViewName = "error/" + viewName;
		//模板引擎可以解析这个页面地址就用模板引擎解析
		TemplateAvailabilityProvider provider = this.templateAvailabilityProviders
				.getProvider(errorViewName, this.applicationContext);
		if (provider != null) {
			//模板引擎可用的情况下返回到errorViewName指定的视图地址
			return new ModelAndView(errorViewName, model);
		}
		//模板引擎不可用,就在静态资源文件夹下找errorViewName对应的页面   error/404.html
		return resolveResource(errorViewName, model);
	}

}
- DefaultErrorAttributes:在页面共享信息
@Override
public Map<String, Object> getErrorAttributes(RequestAttributes requestAttributes,
		boolean includeStackTrace) {
	Map<String, Object> errorAttributes = new LinkedHashMap<String, Object>();
	errorAttributes.put("timestamp", new Date());
	addStatus(errorAttributes, requestAttributes);
	addErrorDetails(errorAttributes, requestAttributes, includeStackTrace);
	addPath(errorAttributes, requestAttributes);
	return errorAttributes;
}
页面能获取的信息:
timestamp:时间戳
status:状态码
error:错误提示
exception:异常对象
message:异常消息
errors:JSR303数据校验的错误都在这里
<h1>status:[[${status}]]</h1>
<h2>timestamp:[[${timestamp}]]</h2>
10.2 定制错误页面
10.2.1 定制错误的页面
1. 有模板引擎的情况
- 将错误页面命名为 错误状态码.html 放在模板引擎文件夹里面的 error文件夹下,当发生此状态码的错误就会来到 对应的页面。
- 我们可以使用4xx和5xx作为错误页面的文件名来匹配这种类型的所有错误,优先寻找精确的状态码.html。
2. 没有模板引擎:(模板引擎找不到这个错误页面),静态资源文件夹下找;
2. 以上都没有错误页面:就是默认来到SpringBoot默认的错误提示页面;
10.2.2 定制错误的json数据
1. 自定义异常处理&返回定制json数据
// 在SpringBoot中想要成为一个异常处理器就需要该注解
@ControllerAdvice
public class MyExceptionHandler {

    @ResponseBody
    @ExceptionHandler(UserNotExistException.class) // 绑定异常,当系统出现该异常时机会交由该方法处理
    public Map<String,Object> handleException(Exception e){
        Map<String,Object> map = new HashMap<>();
        map.put("code","user.notexist");
        map.put("message",e.getMessage());
        return map;
    }
}
该种方式的缺点是没有自适应效果,浏览器和客户端返回的都是json数据。
2. 转发到/error进行自适应响应效果处理
BasicErrorController处理/error请求时有自适应效果,所以我们可以对上述代码进行改进。
@ExceptionHandler(UserNotExistException.class)
 public String handleException(Exception e, HttpServletRequest request){
      Map<String,Object> map = new HashMap<>();
      //传入我们自己的错误状态码  4xx 5xx,否则就不会进入定制错误页面的解析流程
      /**
       * Integer statusCode = (Integer) request
       .getAttribute("javax.servlet.error.status_code");
       */
      request.setAttribute("javax.servlet.error.status_code",500);
      map.put("code","user.notexist");
      map.put("message",e.getMessage());
      //转发到/error
      return "forward:/error";
  }
3. 携带定制数据
上面也有一些缺点,就是我们在异常处理器中定制的异常数据是无法被携带出去的,页面能获取的只是异常类中原有的异常信息。
出现错误以后,会来到/error请求,之后被BasicErrorController处理,响应出去可以获取的数据是由getErrorAttributes得到的(是AbstractErrorController(ErrorController)规定的方法),所以可以有两种方式来携带我们定制的数据。
- 完全来编写一个ErrorController的实现类【或者是编写AbstractErrorController的子类】,放在容器中;
- 页面上能用的数据,或者是json返回能用的数据都是通过errorAttributes.getErrorAttributes得到,容器中DefaultErrorAttributes.getErrorAttributes()来默认进行数据处理,所以我们可以自己定义ErrorAttributes。
@ControllerAdvice
public class MyExceptionHandler {

    @ExceptionHandler(UserNotExistException.class)
    public String handleException(Exception e, HttpServletRequest request){
        Map<String,Object> map = new HashMap<>();
        //传入我们自己的错误状态码  4xx 5xx
        /**
         * Integer statusCode = (Integer) request
         .getAttribute("javax.servlet.error.status_code");
         */
        request.setAttribute("javax.servlet.error.status_code",500);
        map.put("code","user.notexist");
        map.put("message","用户出错啦");

        request.setAttribute("ext",map);
        //转发到/error
        return "forward:/error";
    }
}
//给容器中加入我们自己定义的ErrorAttributes
@Component
public class MyErrorAttributes extends DefaultErrorAttributes {

    //返回值的map就是页面和json能获取的所有字段
    @Override
    public Map<String, Object> getErrorAttributes(RequestAttributes requestAttributes, boolean includeStackTrace) {
        Map<String, Object> map = super.getErrorAttributes(requestAttributes, includeStackTrace);
        map.put("company","atguigu");

        //我们的异常处理器携带的数据
        Map<String,Object> ext = (Map<String, Object>) requestAttributes.getAttribute("ext", 0);
        map.put("ext",ext);
        return map;
    }
}
效果:


 1万+
1万+

 被折叠的 条评论
为什么被折叠?
被折叠的 条评论
为什么被折叠?
 到【灌水乐园】发言


