


 本文详细介绍如何使用YOLOv2进行目标检测模型训练。从搭建环境到数据准备,再到模型训练与测试,每一步都提供了具体操作指南。特别关注于使用LabelImg进行数据标注的过程及配置文件的调整。
Train yolov2 with my own data
Operating system: Linux on Ubuntu.
Tools: LabelImg , the operation method can be find in README.rst.
Step 1 .Download darknet
According to the linked web, download the darknet, and it’s easy to detect some specific class of objects using a pre-trained model. It’s highly recommended that run the following command line by line, so you can understand these better. After line 1-3, you already get an executable file, and you can find the config file for YOLO in the cfg/ subdirectory. To run line 4 means you intend to download the pre-trained yolo v3 weight file. By changing the directory of .jpg file in line 5, test can be done in different pictures. In addition, you can always switch to yolo v2 or other yolo framework by change the directory. Difference between these yolo frameworks can be found here.
- $ git clone https://github.com/pjreddie/darknet
- $ cd darknet
- $ make
- $ wget https://pjreddie.com/media/files/yolov3.weights
- $ ./darknet detect cfg/yolov3.cfg yolov3.weights data/dog.jpg
After running the above command in the terminal, you can see a picture like fig 1 under the darknet file.
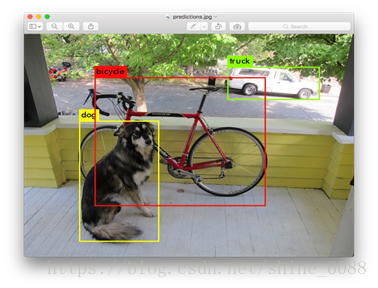
Fig 1.The prediction picture
Step 2 .Prepare data
After reading reference1, reference 2 and etc., the goal is clear: 1.Prepare some JPEG type pictures (.jpg); 2. Label your data, which can be done with some tools.
Step 2.1 Prepare pictures
I used the Open Image Datasets V4 provided by google, and you can find some information about this datasets here. In our project, I downloaded all pictures under the category Human hand, a total of 859 pictures.
Step 2.2 Label
To install the labelImg tool, I run the following commands:
- $ sudo apt-get install pyqt4-dev-tools # 安装PyQt4
- $ sudo apt-get install python-lxml
- $ git clone https://github.com/tzutalin/labelImg.git
- $ cd labelImg
- $ make all
- $ ./labelImg.py
On labelImg, two types of labeled message are provided: PscalVOC and YOLO. Due to I was not familiar with the process of darknet, I chose the PscalVOC type like the other writers did in their blogs, however, I may use the YOLO type later, so I don’t have to transfer the .xml files to .txt files.
When you label the pictures, you can use some hot keys, like Ctrl + s to save your labels, and w to create a new rect box.
Step 3 Change the config files
Two config files should be changed: cfg/voc.data, cfg/yolo-voc.cfg, and one should be created.
cfg/voc.data
According to the directory of your file, rewrite the voc.data file. In my project, I only labeled one feature: hand, so I changed the classes number from 20 to 1. I saved all files related to this project under a folder named mytrain, and got my train.txt and val.txt files guided by this blog, so I changed my voc.data to this:
- classes= 1
- train = /home/tec/darknet/mytrain/train.txt
- valid = /home/tec/darknet/mytrain/val.txt
- names = data/hand.names
- backup = /home/tec/darknet/backup
Don’t forget to create the hand.names file under the folder named data, in hand.names text, I only write one word: hand
cfg/yolo-voc.cfg
Due to I only have one class, so I changed the classes in [region] and the filters in the last [convolutional]:
- classes= 1
- filters=30 #filters = classes+ coords+ 1)* (NUM)=(1+4+1)×5=30 ,5表示每个grid cell预测的bounding box的数量,比如YOLO v1中是2个,YOLO v2中是5个,YOLO v3中是3个
Step 4 Download the pre-trained weight
You can download it here, and the password is "ynhg", in my project I put it under the darknet folder.
Step 5 Train the model
In this case, I used the following command to train, and the command will be different if you put the following files in other path: voc.data, yolo-voc.cfg,and darknet19_448.conv.23.
- ./darknet detector train cfg/voc.data cfg/yolo-voc.cfg darknet19_448.conv.23
Until now, you will get your own fully functional darknet.
Step 6 Test
Test your model by next command:
- ./darknet detector test cfg/voc.data cfg/yolo-voc.cfg backup/yolo-voc_final.weights mytrain/beauty.jpg
References
https://blog.youkuaiyun.com/ch_liu23/article/details/53558549
https://blog.youkuaiyun.com/qq_27840681/article/details/63682694
https://blog.youkuaiyun.com/qq_34484472/article/details/73135354
https://blog.youkuaiyun.com/jozeeh/article/details/79087311
https://blog.youkuaiyun.com/qq_35608277/article/details/79468896
If you have any question about this blog, you are more than welcome to raise your question in the comments section.


 3317
3317

 被折叠的 条评论
为什么被折叠?
被折叠的 条评论
为什么被折叠?
 到【灌水乐园】发言


