


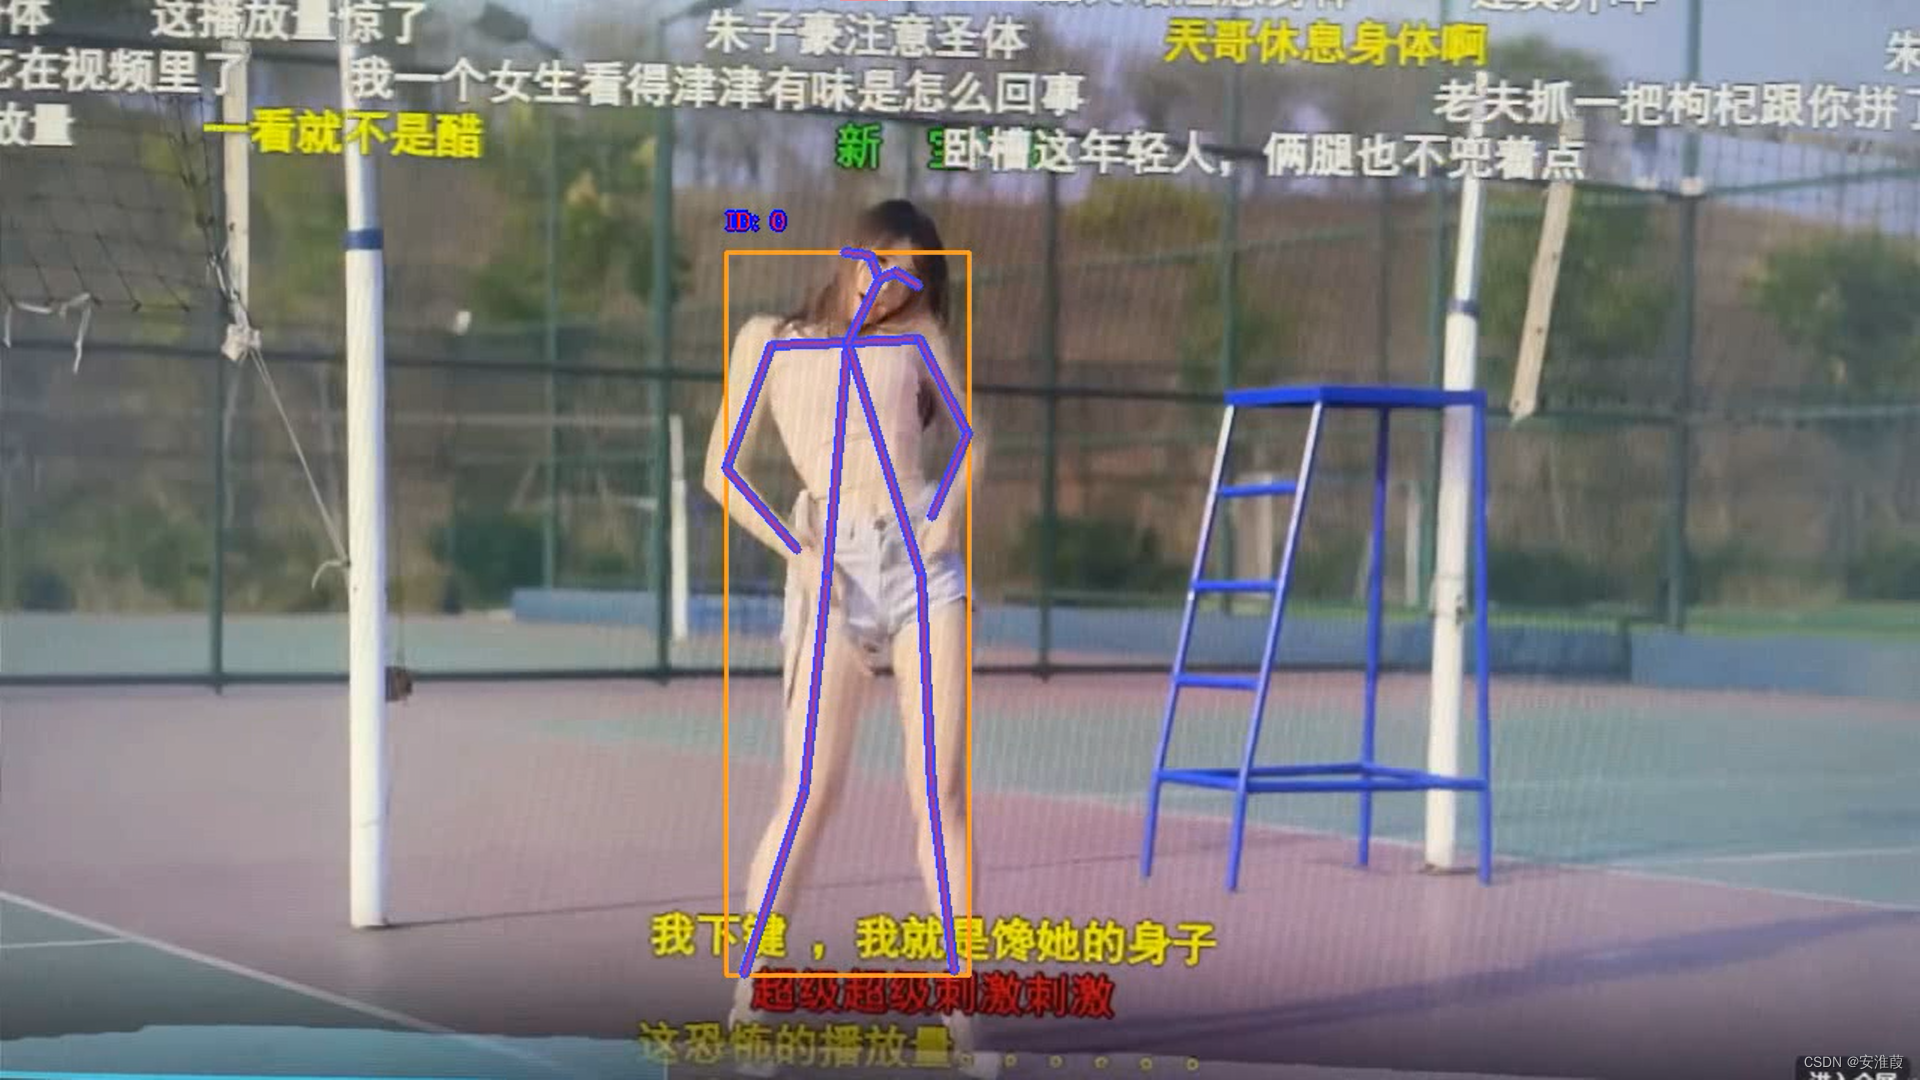
基于视频的人体关键点检测
选取轻量级的基于视频流的关键点检测 。
https://gitcode.net/EricLee/light_pose/-/tree/master/
clone到本地,到README.md中下载预训练权重。
运行inference_video.py脚本,注意对应的权重以及视频路径。
if __name__ == '__main__':
    video_path = "samples/test.mp4" # 加载视频
    # video_path = 0 # 加载相机
    model_path = "light_pose-20210519.pth" # 需要预先下载

    model_pose = light_pose_model(model_path = model_path,heatmaps_thr = 0.08) # 定义模型推理类
    print("load:{}".format(model_path))
    video_capture = cv2.VideoCapture(video_path)

    flag_write_video = True # 是否记录推理 demo 视频
    print('flag_write_video',flag_write_video)
    flag_video_start = False
    video_writer = False

    while True:
        ret, im0 = video_capture.read()
        if ret:

            if flag_video_start == False  and flag_write_video:
                loc_time = time.localtime()
                str_time = time.strftime("%Y-%m-%d_%H-%M-%S", loc_time)
                video_writer = cv2.VideoWriter("./demo/demo_{}.mp4".format(str_time), v2.VideoWriter_fourcc(*"mp4v"), fps=10, frameSize=(int(im0.shape[1]), int(im0.shape[0])))
                flag_video_start = True

            pose_dict = model_pose.predict(im0.copy())
            if pose_dict is not None:
                for pose in pose_dict['data']:
                    bbox = pose['bbox']
                    cv2.rectangle(im0, (int(bbox[0]), int(bbox[1])),
                                  (int(bbox[0] + bbox[2]), int(bbox[1] + bbox[3])), (25, 155, 255),2)

                    cv2.putText(im0, 'ID: {}'.format(pose['id']), (int(bbox[0]), int(bbox[1]) - 16),
                                cv2.FONT_HERSHEY_COMPLEX, 0.5, (255, 0, 0),4)
                    cv2.putText(im0, 'ID: {}'.format(pose['id']), (int(bbox[0]), int(bbox[1] - 16)),
                                cv2.FONT_HERSHEY_COMPLEX, 0.5, (0, 0, 255))
                    draw_one_pose(im0,np.array(pose['keypoints']),(int(pose['color'][0]),int(pose['color'][1]),int(pose['color'][2])))

            cv2.namedWindow('image',0)
            cv2.imshow('image',im0)
            if flag_write_video and flag_video_start:
                video_writer.write(im0)

            if cv2.waitKey(1) == 27:
                break
        else:
            break

    cv2.destroyAllWindows()
    if flag_write_video:
        video_writer.release()
输出如下视频截图:
video_writer = cv2.VideoWriter("./demo/demo_{}.mp4".format(str_time), v2.VideoWriter_fourcc(*"mp4v"), fps=10, frameSize=(int(im0.shape[1]), int(im0.shape[0])))
可以通过修改fps得到输出视频的帧率。
基于图片的人体关键点检测
## 导入相关模块
import numpy as np
import torchvision
import torch
import torchvision.transforms as transforms
from PIL import Image, ImageDraw, ImageFont
import matplotlib.pyplot as plt

COCO_INSTANCE_CATEGORY_NAMES = [
    '__BACKGROUND__', 'person', 'bicycle', 'car', 'motorcycle',
    'airplane', 'bus', 'train', 'trunk', 'boat', 'traffic light',
    'fire hydrant', 'N/A', 'stop sign', 'parking meter', 'bench',
    'bird', 'cat', 'dog', 'horse', 'sheep', 'cow', 'elephant',
    'bear', 'zebra', 'giraffe', 'N/A', 'backpack', 'umbrella', 'N/A',
    'N/A', 'handbag', 'tie', 'suitcase', 'frisbee', 'skis', 'snowboard',
    'sports ball', 'kite', 'baseball bat', 'baseball glove', 'skateboard',
    'surfboard', 'tennis racket', 'bottle', 'N/A', 'wine glass',
    'cup', 'fork', 'knife', 'spoon', 'bowl', 'banana', 'apple',
    'sandwich', 'orange', 'broccoli', 'carrot', 'hot dog', 'pizza',
    'donut', 'cake', 'chair', 'couch', 'potted plant', 'bed', 'N/A',
    'dining table', 'N/A', 'N/A', 'toilet', 'N/A', 'tv', 'laptop',
    'mouse', 'remote', 'keyboard', 'cell phone', 'microwave', 'oven',
    'toaster', 'toaster', 'sink', 'refrigerator', 'N/A', 'book', 'clock',
    'vase', 'scissors', 'teddy bear', 'hair drier', 'toothbrush'
]

# 定义能够检测出的关键点名称
"""
    elbow 胳膊肘,wrist 手腕,hip 臀部
"""
COCO_PERSON_KEYPOINT_NAMES = ['nose', 'left_eye', 'right_eye', 'left_ear',
                              'right_ear', 'left_shoulder', 'right_shoulder', 'left_elbow',
                              'right_elbow', 'left_wrist', 'right_wrist', 'left_hip', 'right_hip',
                              'left_knee', 'right_knee', 'left_ankle', 'right_ankle']

# 加载pytorch提供的keypointrcnn_resnet50_fpn()网络模型,可以对17个人体关键点进行检测。
model = torchvision.models.detection.keypointrcnn_resnet50_fpn(pretrained=True)
model.eval()


def Object_Detect(model, image_path, COCO_INSTANCE_CATEGORY_NAMES, threshold=0.5):
    # 准备需要检测的图像
    image = Image.open(image_path)
    transform_d = transforms.Compose([transforms.ToTensor()])
    image_t = transform_d(image)    ## 对图像进行变换
    print(image_t.shape)
    pred = model([image_t])         ## 将模型作用到图像上
    print(pred)

    # 检测出目标的类别和得分
    pred_class = [COCO_INSTANCE_CATEGORY_NAMES[ii] for ii in list(pred[0]['labels'].numpy())]
    pred_score = list(pred[0]['scores'].detach().numpy())

    # 检测出目标的边界框
    pred_boxes = [[ii[0], ii[1], ii[2], ii[3]] for ii in list(pred[0]['boxes'].detach().numpy())]

    ## 只保留识别的概率大约 threshold 的结果。
    pred_index = [pred_score.index(x) for x in pred_score if x > 0.8]

    ## 设置图像显示的字体
    # fontsize = np.int16(image.size[1] / 20)
    # font1 = ImageFont.truetype("FreeMono.ttf", fontsize)

    ## 可视化对象
    draw = ImageDraw.Draw(image)
    for index in pred_index:
        box = pred_boxes[index]
        draw.rectangle(box, outline="blue")
        texts = pred_class[index]+":"+str(np.round(pred_score[index], 2))
        draw.text((box[0], box[1]), texts, fill="blue", )


    pred_keypoint = pred[0]["keypoints"]
    # 检测到实例的关键点
    pred_keypoint = pred_keypoint[pred_index].detach().numpy()
    # 可视化出关键点的位置
    r = np.int16(image.size[1] / 150)   # 圆的半径
    # fontsize = np.int16(image.size[1] / 50)
    # font1 = ImageFont.truetype("FreeMono.ttf", fontsize)
    # 可视化图像
    image3 = image.copy()
    draw = ImageDraw.Draw(image3)
    # 对实例数量索引
    for index in range(pred_keypoint.shape[0]):
        # 对每个实例的关键点索引
        keypoints = pred_keypoint[index]
        for ii in range(keypoints.shape[0]):
            x = keypoints[ii, 0]
            y = keypoints[ii, 1]
            visi =keypoints[ii, 2]
            if visi > 0:
                draw.ellipse(xy=(x-r, y-r, x+r, y+r), fill=(255, 0, 0))
                texts = str(ii+1)
                draw.text((x+r, y-r), texts, fill="red", )
    return image3


if __name__ == '__main__':
    image_path = "./test.jpg"
    image = Object_Detect(model, image_path, COCO_INSTANCE_CATEGORY_NAMES)
    plt.imshow(image)
    plt.axis("off")
    # 保存图片,没有白边。
    plt.savefig('./test_result.png', bbox_inches='tight', pad_inches=0.0)
    plt.show()
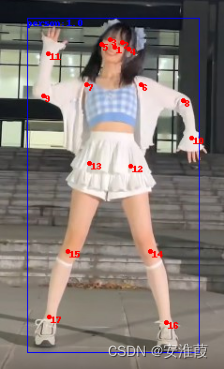
直接引用torchvision.models.detection.keypointrcnn_resnet50_fpn(pretrain = True)进行识别。
torchvision中集成了以resnet50加fpn层的人体关键点检测。
输出图片如下所示:
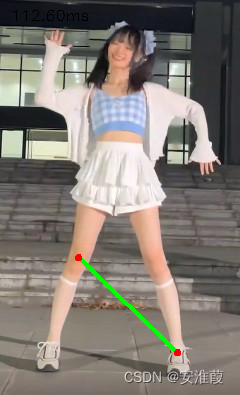
使用PaddleHub人体骨骼关键点检测
使用模型human_pose_estimation_resnet50_mpii
pip install --upgrade paddlehub -i https://pypi.tuna.tsinghua.edu.cn/simple
import cv2
import paddlehub as hub

pose_estimation = hub.Module(name="human_pose_estimation_resnet50_mpii")

result = pose_estimation.keypoint_detection(images=[cv2.imread(image)],visualization=True)
print(result)
结果如图所示:

由微软公司提供的人体姿态估计:
https://github.com/microsoft/human-pose-estimation.pytorch
轻量级的人体姿态估计:
https://github.com/Daniil-Osokin/lightweight-human-pose-estimation.pytorch
发表在CVPR2020上的基于HigherHRNet的人体姿态估计:
https://github.com/HRNet/HigherHRNet-Human-Pose-Estimation
基于opencv的openpose(效果不佳)
https://github.com/quanhua92/human-pose-estimation-opencv
Fast Human Pose Estimation CVPR2019
https://github.com/ilovepose/fast-human-pose-estimation.pytorch


 1万+
1万+

 被折叠的 条评论
为什么被折叠?
被折叠的 条评论
为什么被折叠?
 到【灌水乐园】发言


