


目录
1. 项⽬介绍:
背景:
为了进⼀步加深对Spring Cloud组件的理解和应⽤,通过这个项⽬的练习, 加深对Spring Cloud的理解.
需求描述:
和Spring Boot阶段的博客系统类似, 除此之外, 增加⽤⼾注册和邮箱通知. 简单描述功能:
1. ⽤⼾功能
a. ⽤⼾注册, 登录.
b. ⽤⼾注册完成后, 发邮件通知.
c. 查询⽤⼾信息
2. 博客功能
a. 博客增删改查.
2. 系统设计:
服务拆分原则:
拆分微服务—般遵循如下原则:
1. 单⼀职责原则
单⼀职责原则原本是⾯向对象设计中的⼀个基本原则, 它指的是⼀个类应该专注于单⼀功能. 不要存在多于⼀个导致类变更的原因.
在微服务架构中, ⼀个微服务也应该只负责⼀个功能或业务领域, 每个服务应该有清晰的定义和边界, 只关注⾃⼰的特定业务领域.
2. 服务⾃治原则
服务⾃治是指每个微服务都应该具备⾼度⾃治的能⼒, 即每个服务要能做到独⽴开发, 独⽴测试, 独⽴构建, 独⽴部署, 独⽴运⾏. 不需要过多关注其他微服务的状态和数据, 有助于提⾼团队的协同开发效率和产品的交付速度.
3. 单向依赖原则
微服务之间需要做到单向依赖, 严禁循环依赖, 双向依赖
循环依赖: A -> B -> C ->A
双向依赖: A -> B, B -> A
如果⼀些场景确实⽆法避免循环依赖或者双向依赖, 可以考虑使⽤消息队列等其他⽅式来实现
微服务拆分⽅案:
微服务拆分没有绝对标准的⽅案, 服务拆分需要考虑维护成本, 系统的可扩展性, 软件的发布频率等. 最重要的是根据具体的业务场景和团队情况进⾏合理的规划和调整. 随着业务的发展, 原先的架构⽅案可能需要进⾏调整以适应新的需求.
根据前⼈的经验, 不同的技术专家也给出不同的拆分建议, 下⾯介绍⼏种常⻅的拆分⽅案:
1. 纵向拆分: 从业务维度进⾏拆分. 标准是按照业务的关联程度来决定, 关联⽐较密切的业务适合拆分为⼀个微服务,⽽功能相对⽐较独⽴的业务适合单独拆分为⼀个微服务.
2. 横向拆分: 从公共且独⽴功能维度拆分, 按照是否有公共的被多个其他服务调⽤,且依赖的资源独⽴不与其他业务耦合.
3. 基于稳定性拆分: 将系统中的业务模块按照稳定性进⾏排序. 稳定的, 不经常修改的划分⼀块. 将不稳定的, 经常修改的划分为⼀个独⽴服务. ⽐如⽇志服务, 监控服务都是相对稳定的服务, 可以归到⼀起. ⽐如20%经常变动的部分进⾏抽离, 80%不经常变动的单独部署和管理. 这样可以尽可能的减少发布频率. 减少发布产⽣的后遗症.
4. 基于可靠性拆分: 将系统中的业务模块按照可靠性进⾏排序, 对可靠性要求⽐较⾼的核⼼模块归在⼀起, 对可靠性要求不⾼的⾮核⼼模块归在⼀块. 避免"⼀颗⽼⿏屎坏了⼀锅粥"的单体弊端, 同时将来要做⾼可⽤⽅案也能很好的节省机器或带宽的成本.
5. 基于⾼性能拆分: 将系统中的业务模块按照对性能的要求进⾏优先级排序. 把对性能要求较⾼的模块独⽴成⼀个服务, 对性能要求不⾼的放在⼀起. ⽐如全⽂搜索, 商品查询独⽴成单独的微服务拆分出来.
6. .....
这些拆分从⼀些⻆度来看, 可能会冲突或者重合. 所以这⾥的拆分应该有个优先级, 在拆分相互冲突的时候应该要优先考虑权重⽐较⾼的那个(具体以业务场景来衡量)
💡 微服务架构并⽆标准架构, 合适的就是最好的, 不然架构师⼤会也不会各个系统架构百花⻬放了.
在架构设计的过程中, 坚持 "合适优于业界领先", 避免"过度设计"(为了设计⽽设计).
罗⻢不是⼀天建成的, 很多业界领先⽅案并不是⼀群天才在某个时期⼀下⼦做出来的, ⽽是经过数年的发展逐步完善. 业界领先的⽅案⼤多是"逼"出来的, 随着业务的发展, 量变导致质变, 新的问题出现了, 当前的⽅案⽆法满⾜需求, 需要⽤新的⽅案来解决. 通过不断的创新和尝试, 业界领先的⽅案才得以形成.
博客系统拆分:
业务优先是最基本, 最重要的划分⽅式. 博客系统的业务⽐较简单, 分为两⼤块: ⽤⼾模块, 博客模块.
我们把博客系统拆分为⽤⼾服务和博客服务, 对于公共且功能独⽴的模块, 抽取出公共SDK(复杂业务场景, 也可以抽取出公共服务模块, 此处选择SDK).
技术选型:
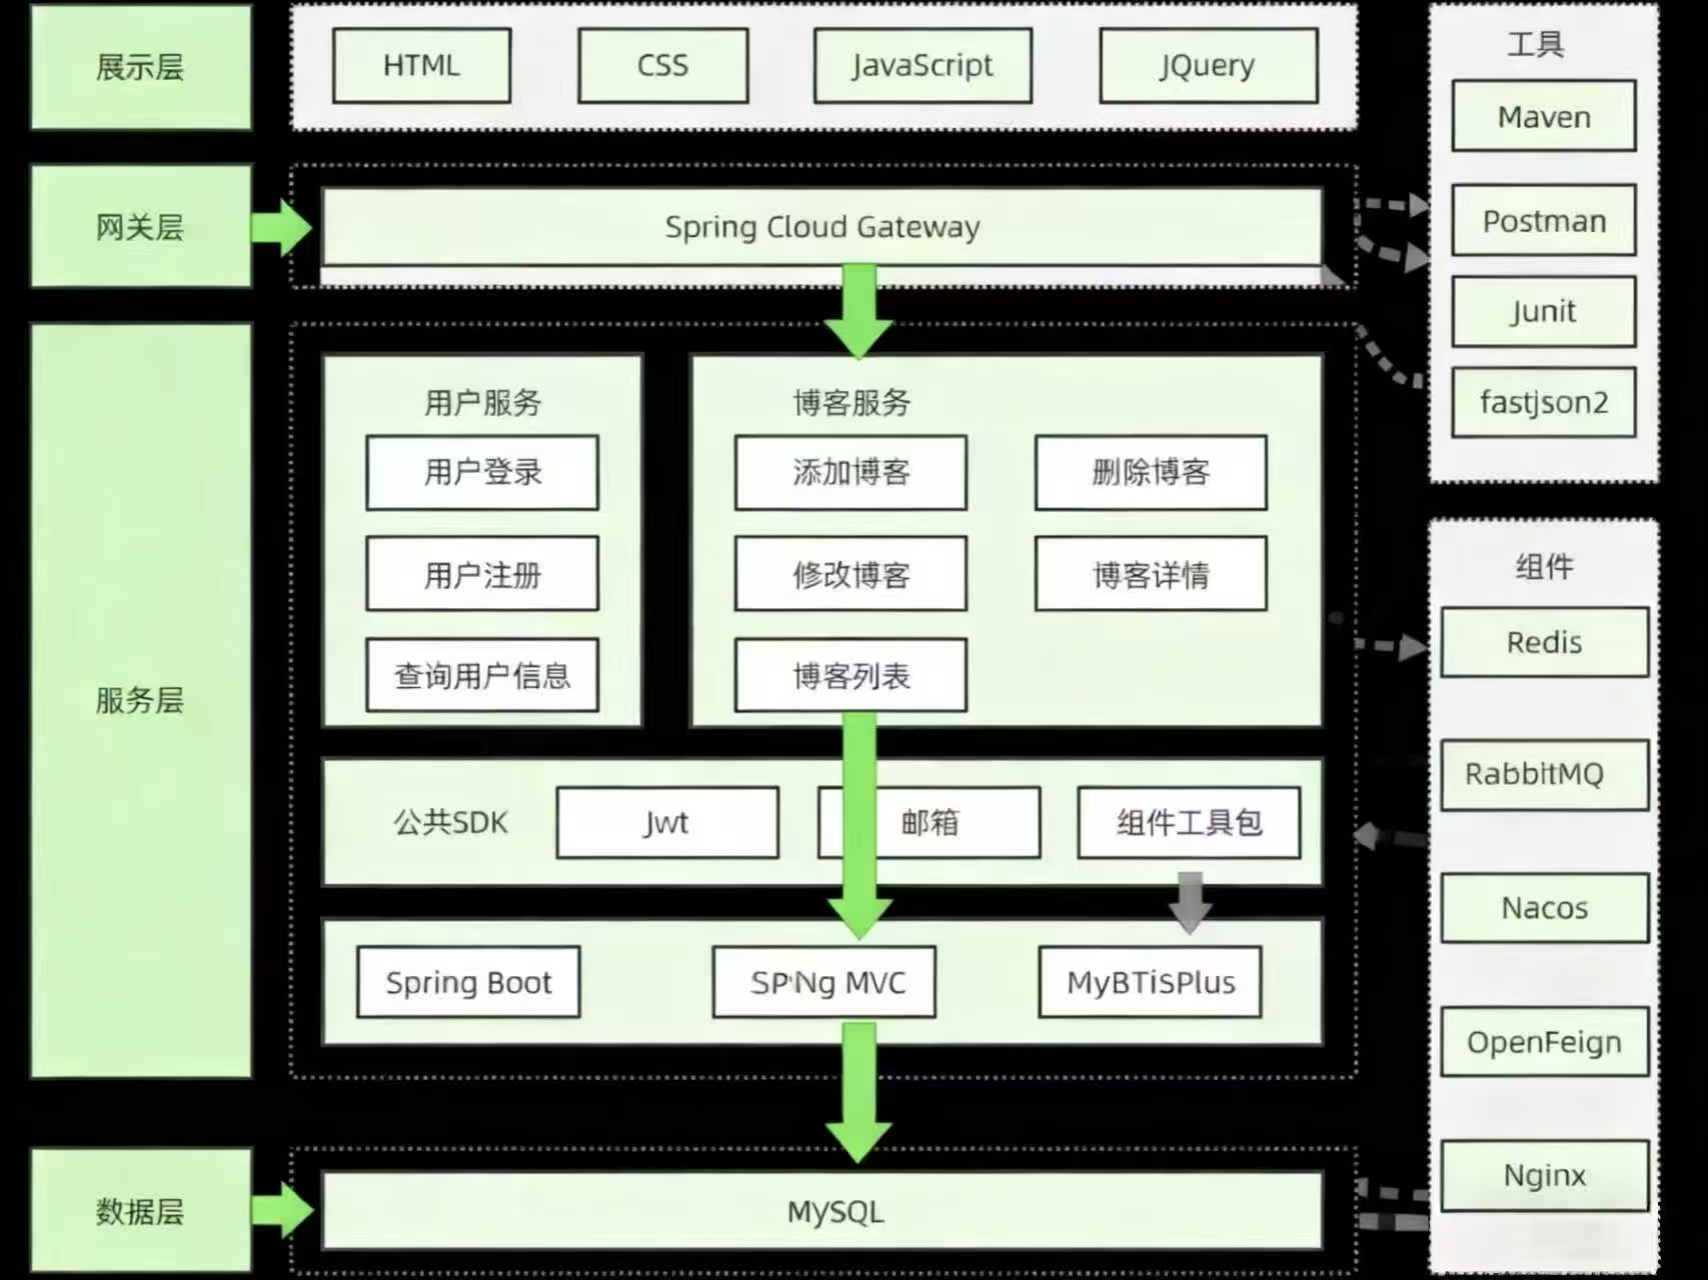
博客系统从⼤的模块分为展⽰层, ⽹关层, 服务层, 数据层.
展⽰层: 依然采⽤课堂中讲的HTML+CSS+JavaScript+JQuery, 使⽤Nginx来提供静态资源服务. ⽹关: 采⽤Spring Cloud Gateway
服务层: 采⽤SpringBoot框架进⾏开发, MyBatisPlus访问数据库, 服务拆分为⽤⼾服务和博客服务, 服务之间使⽤OpenFeign进⾏远程调⽤. Nacos来处理服务注册/服务发现以及配置相关的内容.
◦ 为了提⾼⽤⼾登录的性能, 使⽤Redis作为缓存.
◦ ⽤⼾注册成功后, 给⽤⼾发邮箱, 使⽤RabbitMQ来解耦
◦ 数据交互使⽤JSON, 为了提⾼⼤家知识的⼴度, 本次引⽤fastjson2
数据层: 采⽤MySQL来提供数据服务
公共SDK: 针对⼀些公共模块, 把代码抽取出来, ⽅便其他模块使⽤, ⽐如发送邮件, 操作Redis, Jwt, Json处理等.
基于以上, 博客系统的系统架构简单如下:
3.准备⼯作:
前置代码:
代码: Spring Cloud版本博客系统是基于SpringBoot版本进⾏开发改造的,由SpringBoot 版本代码进⾏改造.
⻚⾯: 新增两个⻚⾯: 1. 注册⻚⾯ 2. 注册成功⻚⾯
数据设计:
数据库⼤多数和SpringBoot版本保持⼀致, 修改部分如下:
1. ⽤⼾表: 新增邮箱字段(⽤⼾注册需要)
2. 数据表拆分为不同的数据库
数据库初始化SQL:
-- 用户服务数据库
create database if not exists spring_cloud_user charset utf8mb4;

use spring_cloud_user;
-- 用户表
DROP TABLE IF EXISTS spring_cloud_user.user_info;
CREATE TABLE spring_cloud_user.user_info(
        `id` INT NOT NULL AUTO_INCREMENT,
        `user_name` VARCHAR ( 128 ) NOT NULL,
        `password` VARCHAR ( 128 ) NOT NULL,
        `github_url` VARCHAR ( 128 ) NULL,
        `email` VARCHAR ( 128 ) NULL,
        `delete_flag` TINYINT ( 4 ) NULL DEFAULT 0,
        `create_time` DATETIME DEFAULT now(),
        `update_time` DATETIME DEFAULT now() ON UPDATE now(),
        PRIMARY KEY ( id ),
UNIQUE INDEX user_name_UNIQUE (user_name ASC )) ENGINE = INNODB DEFAULT CHARACTER
SET = utf8mb4 COMMENT = '用户表';

-- 新增用户信息
insert into spring_cloud_user.user_info (user_name, password,github_url)values("zhangsan","11eb2423c6064044aaa1df7ed6156331d1244f113ad54a982cb0215e0af22b68","https://gitee.com/bubble-fish666");
insert into spring_cloud_user.user_info (user_name, password,github_url)values("lisi","25ce8e32469c4bdb9868c182b6164d3006de2cb47383384df8279e7cfc251d9d","https://gitee.com/bubble-fish666");


-- 博客服务数据库
create database if not exists spring_cloud_blog charset utf8mb4;

use spring_cloud_blog;

-- 博客表
drop table if exists spring_cloud_blog.blog_info;
CREATE TABLE spring_cloud_blog.blog_info (
  `id` INT NOT NULL AUTO_INCREMENT,
  `title` VARCHAR(200) NULL,
  `content` TEXT NULL,
  `user_id` INT(11) NULL,
  `delete_flag` TINYINT(4) NULL DEFAULT 0,
  `create_time` DATETIME DEFAULT now(),
  `update_time` DATETIME DEFAULT now() ON UPDATE now(),
  PRIMARY KEY (id))
ENGINE = InnoDB DEFAULT CHARSET = utf8mb4 COMMENT = '博客表';


insert into spring_cloud_blog.blog_info (title,content,user_id) values("第一篇博客","111我是博客正文我是博客正文我是博客正文",1);
insert into spring_cloud_blog.blog_info (title,content,user_id) values("第二篇博客","222我是博客正文我是博客正文我是博客正文",2);
4.环境和⼯程搭建:
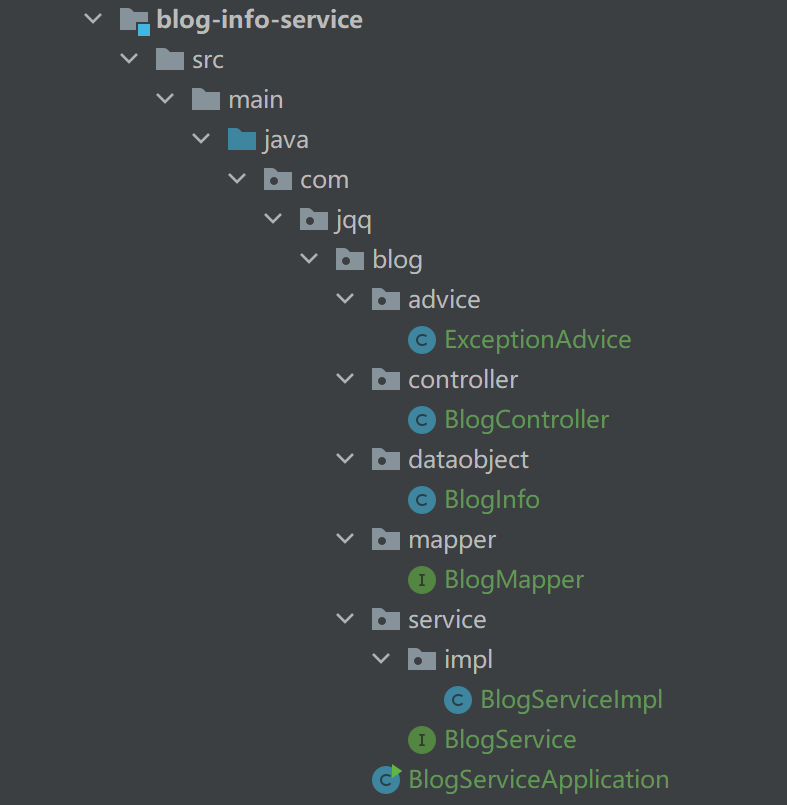
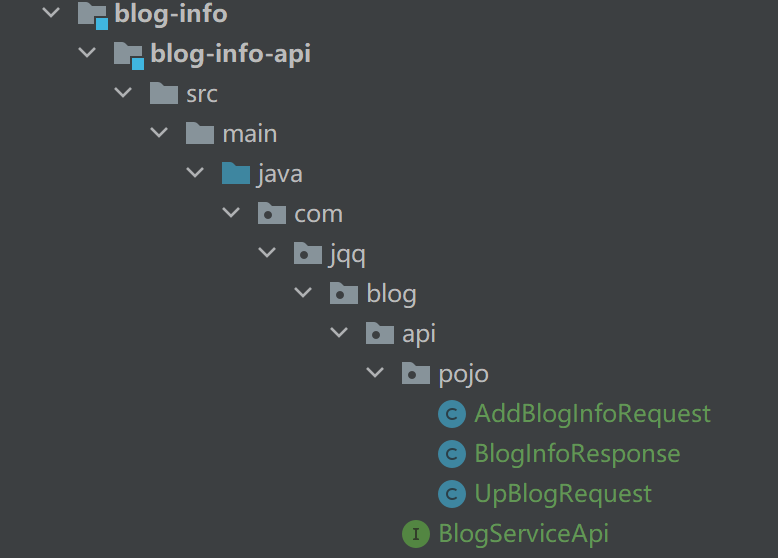
⼯程结构介绍
整个项⽬共创建3个服务(⽹关服务, 博客服务, ⽤⼾服务), ⼀个公共SDK, 为了⽅便代码管理, 我们采⽤⽗⼦⼯程的⽅式进⾏创建(也可以分开创建单独的SpringBoot项⽬).
整体结构如下:
spring-cloud-blog
├── .idea
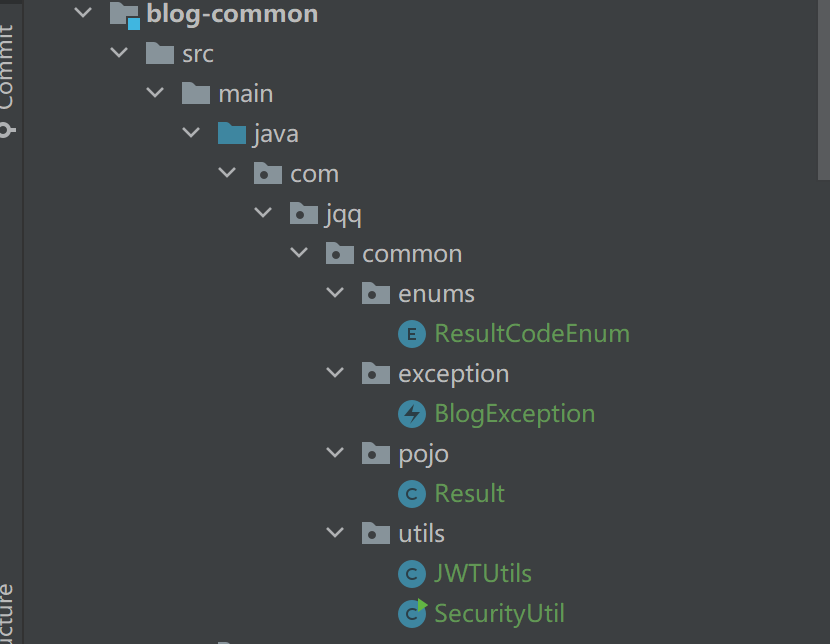
├── blog-common (公共SDK)
│ └── src
│ └── main
│ └── java
│ └── com.bite.common (公共工具类、枚举、异常等)
├── blog-info (博客服务父模块)
│ ├── blog-info-api (博客服务API模块)
│ │ └── src
│ │ └── main
│ │ └── java
│ │ └── com.bite.blog.api (API接口、请求/响应实体)
│ ├── blog-info-service (博客服务实现模块)
│ │ └── src
│ │ └── main
│ │ ├── java
│ │ │ └── com.bite.blog (Controller、Service、Mapper等)
│ │ └── resources (配置文件)
│ └── pom.xml
├── gateway-service (网关服务)
│ └── src
│ └── main
│ ├── java
│ │ └── com.bite.gateway (启动类、过滤器等)
│ └── resources (配置文件)
├── user-info (用户服务父模块)
│ ├── user-info-api (用户服务API模块)
│ │ └── src
│ │ └── main
│ │ └── java
│ │ └── com.bite.user.api (API接口、请求/响应实体)
│ ├── user-info-service (用户服务实现模块)
│ │ └── src
│ │ └── main
│ │ ├── java
│ │ │ └── com.bite.user (Controller、Service、Mapper等)
│ │ └── resources (配置文件)
│ └── pom.xml
├── pom.xml (父工程pom)
└── spring-blog.log创建⼯程:
创建⽗⼯程
1. 创建⼀个空的Maven项⽬, 删除所有代码, 只保留pom.xml
⽬录结构:
spring-cloud-blog
├── .idea
└── pom.xml
2. 完善pom⽂件
<?xml version="1.0" encoding="UTF-8"?>
<project xmlns="http://maven.apache.org/POM/4.0.0"
         xmlns:xsi="http://www.w3.org/2001/XMLSchema-instance"
         xsi:schemaLocation="http://maven.apache.org/POM/4.0.0 http://maven.apache.org/xsd/maven-4.0.0.xsd">
    <modelVersion>4.0.0</modelVersion>

    <groupId>org.example</groupId>
    <artifactId>spring-cloud-blog</artifactId>
    <version>1.0-SNAPSHOT</version>
    <modules>
        <module>blog-info</module>
        <module>user-info</module>
        <module>gateway-service</module>
        <module>blog-common</module>
    </modules>

    <!-- 声明父工程的打包方式为pom -->
    <packaging>pom</packaging>

    <!-- 完善依赖 -->
    <parent>
        <groupId>org.springframework.boot</groupId>
        <artifactId>spring-boot-starter-parent</artifactId>
        <version>3.1.6</version>
        <relativePath/> <!-- lookup parent from repository -->
    </parent>
    <properties>
        <maven.compiler.source>17</maven.compiler.source>
        <maven.compiler.target>17</maven.compiler.target>
        <java.version>17</java.version>
        <mybatis.version>3.0.3</mybatis.version>
        <mysql.version>8.0.33</mysql.version>
        <mysql.plus.version>3.5.5</mysql.plus.version>
        <spring-cloud.version>2022.0.3</spring-cloud.version>
        <spring-cloud-alibaba.version>2022.0.0.0-RC2</spring-cloud-alibaba.version>
    </properties>

    <dependencies>
        <dependency>
            <groupId>org.projectlombok</groupId>
            <artifactId>lombok</artifactId>
            <optional>true</optional>
        </dependency>
    </dependencies>

    <dependencyManagement>
        <dependencies>
            <dependency>
                <groupId>org.springframework.cloud</groupId>
                <artifactId>spring-cloud-dependencies</artifactId>
                <version>${spring-cloud.version}</version>
                <type>pom</type>
                <scope>import</scope>
            </dependency>
            <dependency>
                <groupId>com.alibaba.cloud</groupId>
                <artifactId>spring-cloud-alibaba-dependencies</artifactId>
                <version>${spring-cloud-alibaba.version}</version>
                <type>pom</type>
                <scope>import</scope>
            </dependency>
            <dependency>
                <groupId>org.mybatis.spring.boot</groupId>
                <artifactId>mybatis-spring-boot-starter</artifactId>
                <version>${mybatis.version}</version>
            </dependency>
            <dependency>
                <groupId>com.baomidou</groupId>
                <artifactId>mybatis-plus-spring-boot3-starter</artifactId>
                <version>${mysql.plus.version}</version>
            </dependency>

            <dependency>
                <groupId>com.mysql</groupId>
                <artifactId>mysql-connector-j</artifactId>
                <version>${mysql.version}</version>
            </dependency>
            <dependency>
                <groupId>org.mybatis.spring.boot</groupId>
                <artifactId>mybatis-spring-boot-starter-test</artifactId>
                <version>${mybatis.version}</version>
                <scope>test</scope>
            </dependency>
        </dependencies>
    </dependencyManagement>

</project>
创建⼦⼯程-博客服务&⽤⼾服务
博客服务有对外提供的接⼝, 所以拆分为api和service两个⼯程.
1. 创建⼀个空的⼯程, 只保留pom⽂件
2. 依次创建blog-info-api, blog-info-service
3.在service⼯程中添加⼯程基础依赖, 其他依赖随开发时再进⾏添加即可.
    <dependencies>
        <dependency>
            <groupId>com.alibaba.cloud</groupId>
            <artifactId>spring-cloud-alibaba-dependencies</artifactId>
            <version>${spring-cloud-alibaba.version}</version>
            <type>pom</type>
            <scope>import</scope>
        </dependency>
        <dependency>
            <groupId>org.springframework.boot</groupId>
            <artifactId>spring-boot-starter-web</artifactId>
        </dependency>
        <dependency>
            <groupId>org.springframework.boot</groupId>
            <artifactId>spring-boot-starter-test</artifactId>
        </dependency>
        <dependency>
            <groupId>com.baomidou</groupId>
            <artifactId>mybatis-plus-boot-starter</artifactId>
            <version>3.5.5</version>
        </dependency>
        <dependency>
            <groupId>com.mysql</groupId>
            <artifactId>mysql-connector-j</artifactId>
        </dependency>
        <dependency>
            <groupId>org.springframework.boot</groupId>
            <artifactId>spring-boot-starter-validation</artifactId>
        </dependency>
        <dependency>
            <groupId>com.alibaba.cloud</groupId>
            <artifactId>spring-cloud-starter-alibaba-nacos-config</artifactId>
        </dependency>
        <!-- SpringCloud 2020.*之后版本需要引入bootstrap-->
        <dependency>
            <groupId>org.springframework.cloud</groupId>
            <artifactId>spring-cloud-starter-bootstrap</artifactId>
        </dependency>
    </dependencies>

    <build>
        <plugins>
            <plugin>
                <groupId>org.springframework.boot</groupId>
                <artifactId>spring-boot-maven-plugin</artifactId>
                <configuration>
                    <includeSystemScope>true</includeSystemScope>
                </configuration>
            </plugin>
        </plugins>
    </build>
4. ⽤⼾服务同样的创建⽅式, 也可以采⽤复制的⽅式创建
创建⽹关服务:
⽹关服务作为系统的统⼀⼊⼝点, 通常情况下处理请求的转发, 认证授权, 限流等功能. 不需要拆分出api和service
重复上⾯的步骤, 创建⽹关服务gataway-service
添加⽹关依赖
<!--⽹关-->
        <dependency>
            <groupId>org.springframework.cloud</groupId>
            <artifactId>spring-cloud-starter-gateway</artifactId>
        </dependency>
创建公共SDK:
创建⽅式和上述⼀样, 这个属于公共SDK包, 不需要添加SpringWeb相关依赖, 等开发相关公共功能处理时再添加对应依赖即可.
Spring Boot代码迁移:
SpringBoot代码简单分为以下⼏⼤块, 把相应代码挪到指定的⽬录下即可.
1. 博客相关代码
2. ⽤⼾相关代码
3. 公共代码
4. 前端代码(暂不处理)
1.公共代码:
把博客功能和⽤⼾功能都可能⽤到的代码挪到blog-common模块
有依赖相关报错, 添加响应依赖即可
    <dependencies>
        <!-- https://mvnrepository.com/artifact/io.jsonwebtoken/jjwt-api -->
        <dependency>
            <groupId>io.jsonwebtoken</groupId>
            <artifactId>jjwt-api</artifactId>
            <version>0.11.5</version>
        </dependency>
        <!-- https://mvnrepository.com/artifact/io.jsonwebtoken/jjwt-impl -->
        <dependency>
            <groupId>io.jsonwebtoken</groupId>
            <artifactId>jjwt-impl</artifactId>
            <version>0.11.5</version>
            <scope>runtime</scope>
        </dependency>
        <dependency>
            <groupId>io.jsonwebtoken</groupId>
            <artifactId>jjwt-jackson</artifactId> <!-- or jjwt-gson if Gson is preferred -->
            <version>0.11.5</version>
            <scope>runtime</scope>
        </dependency>

        <dependency>
            <groupId>org.slf4j</groupId>
            <artifactId>slf4j-api</artifactId>
        </dependency>
        <dependency>
            <groupId>ch.qos.logback</groupId>
            <artifactId>logback-classic</artifactId>
        </dependency>

        <dependency>
            <groupId>org.springframework</groupId>
            <artifactId>spring-core</artifactId>
        </dependency>
    </dependencies>
2.⽤⼾系统:
1. 创建⽬录 com.jqq.user
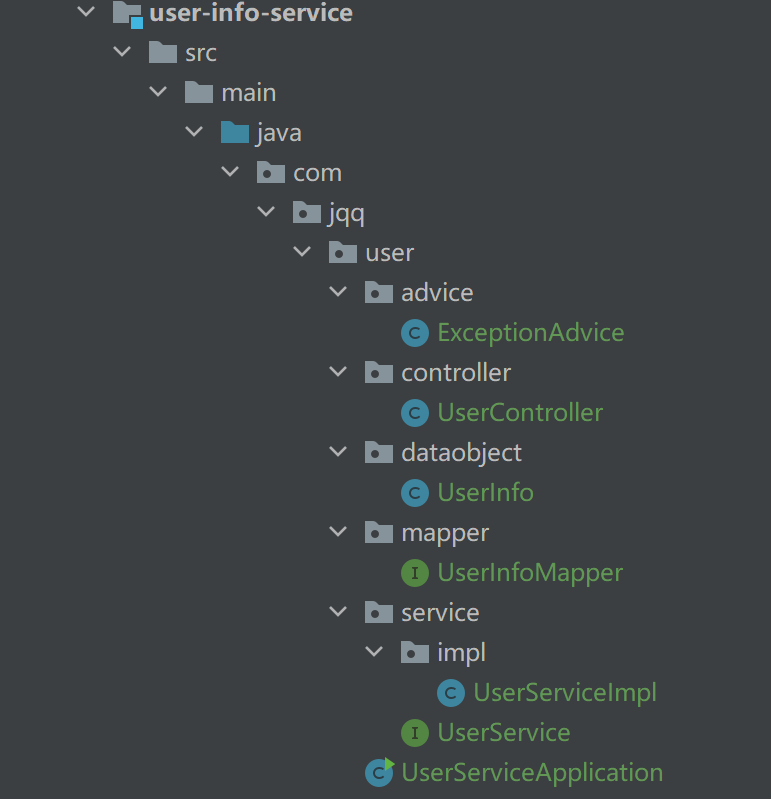
2. 创建启动类UserServiceApplication
@EnableFeignClients(clients = {BlogServiceApi.class})
@SpringBootApplication
public class UserServiceApplication {
	public static void main(String[] args) {
		SpringApplication.run(UserServiceApplication.class, args);
	}
}
3. 调整博客系统相关代码
主要是以下⼏点:
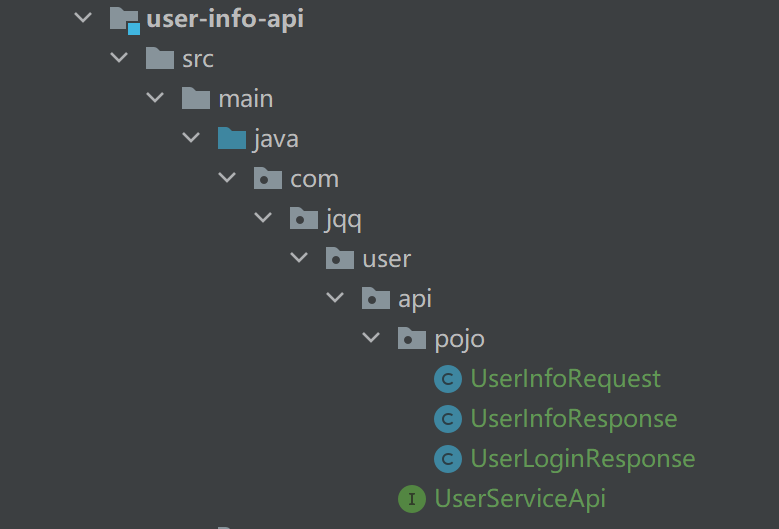
• 请求响应相关代码, 放在api模块
添加相应依赖
    <dependencies>
        <dependency>
            <groupId>org.springframework.cloud</groupId>
            <artifactId>spring-cloud-starter-openfeign</artifactId>
        </dependency>
        <dependency>
            <groupId>org.springframework.boot</groupId>
            <artifactId>spring-boot-starter-validation</artifactId>
        </dependency>
        <dependency>
            <groupId>org.example</groupId>
            <artifactId>blog-common</artifactId>
            <version>1.0-SNAPSHOT</version>
            <scope>compile</scope>
        </dependency>
    </dependencies>

    <build>
        <plugins>
            <plugin>
                <groupId>org.springframework.boot</groupId>
                <artifactId>spring-boot-maven-plugin</artifactId>
                <configuration>
                    <includeSystemScope>true</includeSystemScope>
                </configuration>
            </plugin>
        </plugins>
    </build>
• 编写OpenFeign API
@FeignClient(value = "user-service",path = "/user")
public interface UserServiceApi {

    @RequestMapping("/login")
    Result<UserLoginResponse> login(@RequestBody UserInfoRequest user);

    @RequestMapping("/getUserInfo")
    Result<UserInfoResponse> getUserInfo(@RequestParam("userId") Integer userId);

    @RequestMapping("/getAuthorInfo")
    Result<UserInfoResponse> getAuthorInfo(@RequestParam("blogId") Integer blogId);
}
实现UserServiceApi 接⼝, 添加 @Override 注解 • 修改启动类
• 拦截器放在⽹关处理(后⾯调整)
• 端⼝号和数据库配置
server:
  port: 9090
spring:
  datasource:
    url: jdbc:mysql://127.0.0.1:3306/spring_cloud_user?characterEncoding=utf8&useSSL=false
    username: root
    password: "123456"
    driver-class-name: com.mysql.cj.jdbc.Driver
mybatis-plus:
  configuration:
    map-underscore-to-camel-case: true
    log-impl: org.apache.ibatis.logging.stdout.StdOutImpl
logging:
  file:
    name: user.log
3.博客系统:
1. 创建⽬录 com.jqq.blog
2. 创建启动类 BlogServiceApplication
@SpringBootApplication
public class BlogServiceApplication {
	public static void main(String[] args) {
		SpringApplication.run(BlogServiceApplication.class, args);
	}
}
3. 调整博客系统相关代码
和⽤⼾系统类似
• 请求响应相关代码, 放在api模块
• 端⼝号和数据库配置
server:
  port: 8080
spring:
  datasource:
    url: jdbc:mysql://127.0.0.1:3306/spring_cloud_blog?characterEncoding=utf8&useSSL=false
    username: root
    password: "123456"
    driver-class-name: com.mysql.cj.jdbc.Driver
mybatis-plus:
  configuration:
    map-underscore-to-camel-case: true
    log-impl: org.apache.ibatis.logging.stdout.StdOutImpl
logging:
  file:
    name: blog.log
• 修改⽤⼾系统调⽤博客系统的⽅式, 服务间的调⽤通过OpenFeign完成.
SpringBoot阶段学习的 @ControllerAdvice 会改变接⼝的返回结果, 造成调⽤失败, 所以不能使⽤. 把Controller 返回结果改为 Result<?>
4.配置Nacos:
OpenFeign通过服务名来获取服务列表, 所以需要我们把博客系统和⽤⼾系统注册到Nacos上.
添加依赖和配置:
依赖:
        <!--Nacos依赖-->
        <dependency>
            <groupId>com.alibaba.cloud</groupId>
            <artifactId>spring-cloud-starter-alibaba-nacos-discovery</artifactId>
        </dependency>
        <dependency>
            <groupId>org.springframework.cloud</groupId>
            <artifactId>spring-cloud-starter-loadbalancer</artifactId>
        </dependency>
配置:
spring:
  application:
    name: blog-service
  cloud:
    loadbalancer:
      nacos:
        enabled: true
    nacos:
      discovery:
        server-addr: 152.136.172.144:10020
启动服务和Nacos:
启动Nacos, 启动服务, 进⾏测试, 观察博客系统和⽤⼾系统是否成功注册到Nacos上了

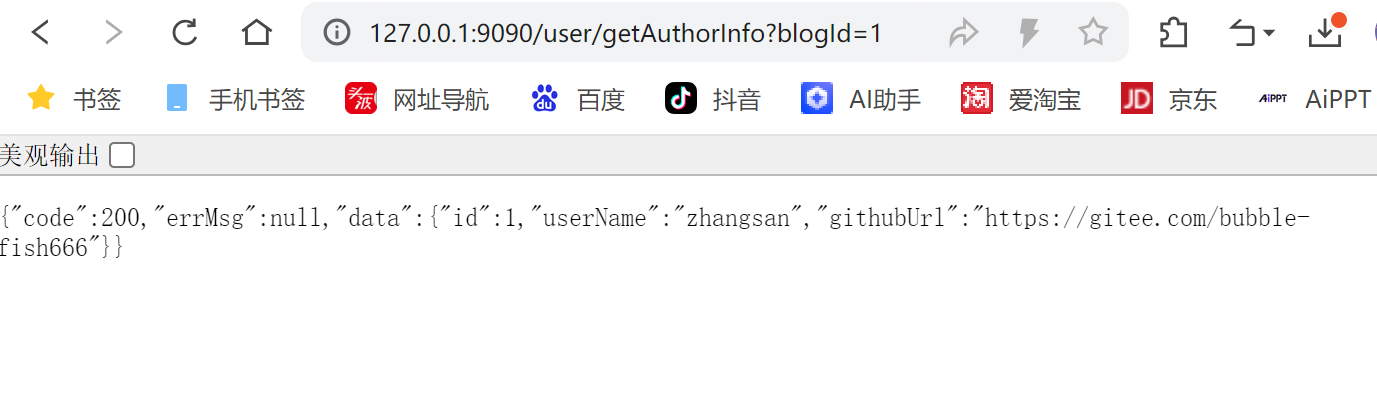
测试远程接⼝调⽤
http://127.0.0.1:8080/user/getAuthorInfo?blogId=1
5. ⽹关服务:
初始化项⽬:
1. 添加依赖
        <!--⽹关-->
        <dependency>
            <groupId>org.springframework.cloud</groupId>
            <artifactId>spring-cloud-starter-gateway</artifactId>
        </dependency>

        <dependency>
            <groupId>com.alibaba.cloud</groupId>
            <artifactId>spring-cloud-alibaba-dependencies</artifactId>
            <version>${spring-cloud-alibaba.version}</version>
            <type>pom</type>
            <scope>import</scope>
        </dependency>
        <!--Nacos依赖-->
        <dependency>
            <groupId>com.alibaba.cloud</groupId>
            <artifactId>spring-cloud-starter-alibaba-nacos-discovery</artifactId>
        </dependency>
        <dependency>
            <groupId>org.springframework.cloud</groupId>
            <artifactId>spring-cloud-starter-loadbalancer</artifactId>
        </dependency>
2. 创建启动类
创建⽬录 com.jqq.gateway
@SpringBootApplication
public class GatewayServiceApplication {
    public static void main(String[] args) {
        SpringApplication.run(GatewayServiceApplication.class,args);
    }
}
3. 配置yml
server:
  port: 10030
spring:
  application:
    name: gateway-service
  cloud:
    nacos:
      discovery:
        server-addr: 152.136.172.144:10020
    gateway:
      routes: #⽹关路由配置
        - id: user-service #路由ID, ⾃定义, 唯⼀即可
          uri: lb://user-service #⽬标服务地址
          predicates: #路由条件
            - Path=/user/**
        - id: blog-service
          uri: lb://blog-service
          predicates:
            - Path=/blog/**
4. 测试⽹关
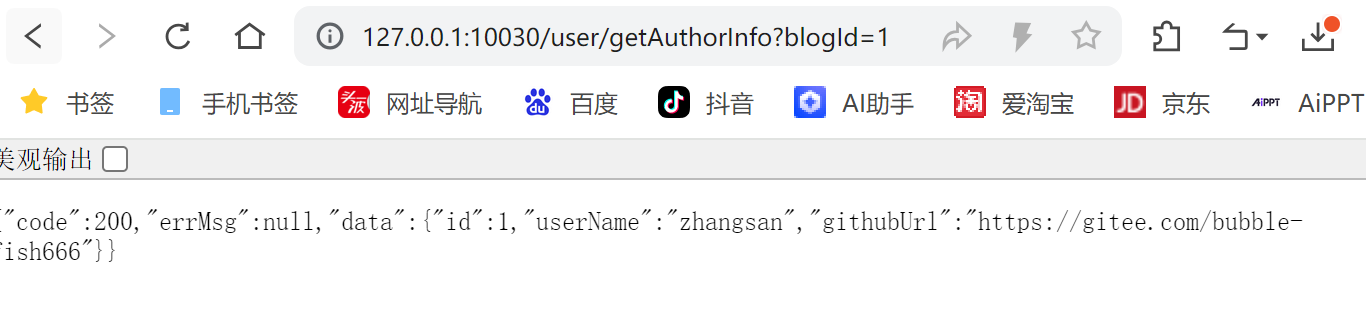
通过⽹关访问⽤⼾系统/博客系统, 确认响应结果
http://127.0.0.1:10030/user/getAuthorInfo?blogId=1
⽤⼾认证过滤:
⽤⼾登录后, 会返回前端token, ⾥⾯包含⽤⼾信息, 后续⽤⼾再访问时, 携带token信息, 以便系统验证⽤⼾⾝份, 这项⼯作, 我们放在过滤器中实现
1. 判断当前url是否拦截
2. 如果拦截, 验证⽤⼾⾝份
代码如下:
@Slf4j
@Component
public class AuthFilter implements GlobalFilter, Ordered {

    @Autowired
    private ObjectMapper objectMapper;

    private List<String> whiteNames = List.of("/user/login","user/register");

    @Override
    public Mono<Void> filter(ServerWebExchange exchange, GatewayFilterChain chain) {
        //配置白名单,如果请求url为白名单,则放行
        ServerHttpRequest request = exchange.getRequest();
        String path = request.getURI().getPath();
        if(whiteNames.contains(path)){
            //放行
            return chain.filter(exchange);
        }
        //从header中获取token
        String userToken = request.getHeaders().getFirst("user_token");
        log.info("从header中获取token:{}",userToken);
        if(!StringUtils.hasLength(userToken)){
            //TODO
            return unauthorizedResponse(exchange,"令牌不能为空");
        }
        //验证用户token
        Claims claims = JWTUtils.parseJWT(userToken);
        if (claims==null){
            log.info("令牌验证失败");
            //TODO
            return unauthorizedResponse(exchange,"令牌过期或者违法");
        }
        return chain.filter(exchange);
    }

    @SneakyThrows
    private Mono<Void> unauthorizedResponse(ServerWebExchange exchange , String errorMsg){
        log.error("[用户认证失败],url: {}", exchange.getRequest().getURI().getPath());
        ServerHttpResponse response = exchange.getResponse();
        response.setStatusCode(HttpStatus.UNAUTHORIZED);
        response.getHeaders().add(HttpHeaders.CONTENT_TYPE, MediaType.APPLICATION_JSON_VALUE);
        Result result = Result.fail(errorMsg);
        DataBuffer dataBuffer = response.bufferFactory().wrap(objectMapper.writeValueAsBytes(result));
        return response.writeWith(Mono.just(dataBuffer));
    }

    @Override
    public int getOrder() {
        return -200;//order值越小,优先级越高
    }
}
1. response.bufferFactory() 获取⼀个 BufferFactory 实例,这个实例⽤于创建和管理数据缓冲区, wrap ⽅法将这个字节数组包装成⼀个 DataBuffer 对象, DataBuffer 是WebFlux中⽤于处理数据流的接⼝.
2. Mono 是响应式编程库Reactor中的⼀个类, 代表⼀个异步的, 可能只发出⼀个数据的响应式类型, Mono.just(dataBuffer) 创建了⼀个包含 dataBuffer 的 Mono 实例,这意味着它将异步地发出⼀个数据,即前⾯创建的 DataBuffer 对象, response.writeWith(...)⽅法接受⼀个 Publisher ( Mono 是 Publisher 的⼀个实现),并将其作为HTTP响应的主体。 writeWith ⽅法将 Mono.just(dataBuffer) 作为响应体,发送给客⼾端.
3. Spring WebFlux 是 Spring 5 中引⼊的⼀个响应式编程模块, 旨在为构建⾮阻塞, 事件驱动的服务提供⽀持. Spring Cloud Gateway 是基于 Spring WebFlux 构建的, 这意味着 Spring Cloud Gateway 继承了 Spring WebFlux 的⾮阻塞 I/O 和反应式编程特性, 使其能够以异步的⽅式处理⼤量的并发请求,同时保持较低的资源消耗. 这种结合使得 Spring Cloud Gateway 能够⾼效地处理⾼并发请求,同时保持系统的可伸缩性和弹性.
Nacos 配置MySQL:
考虑到url⽩名单可能会被修改, 我们可以把url⽩名单放在配置⽂件中, 使⽤Nacos的配置功能来管理. 为了简化部署和测试, Nacos 默认情况下使⽤嵌⼊式数据库 Derby 来存储数据. 在⽣产环境中,为了提⾼性能和保证数据的持久化, 推荐使⽤ MySQL 或其他⽀持的关系型数据库, 如 PostgreSQL, Oracle等.
使⽤MySQL作为Nacos数据源的优势有以下⼏点:
1. 数据持久性: 数据不会因为 Nacos 服务的重启⽽丢失
2. ⾼性能:相⽐于内嵌数据库, MySQL 可以提供更⾼的读写性能和更好的并发处理能⼒.
3. 可扩展性:MySQL ⽀持集群部署, 可以⽔平扩展以满⾜⼤规模服务注册和服务发现的需求.
4. ⾼可⽤性:通过 MySQL 的⾼可⽤性解决⽅案, 如主从复制、集群等,可以提⾼数据的可靠性.
5. 易于维护:MySQL 拥有成熟的维护和管理⼯具,便于数据库的监控、备份和恢复。
接下来我们看下如何配置Nacos数据库 具体操作参考官⽅回复:nacos配置mysql数据库
主要分为以下⼏步:
1. 修改配置
2. 初始化数据库
3. 启动Nacos服务
修改配置
打开Nacos配置⽂件 conf/application.properties ,进⾏以下配置更改:
spring.datasource.platform=mysql
db.num=1
db.url.0=jdbc:mysql://你的数据库地址:端⼝/nacos?
characterEncoding=utf8&connectTimeout=1000&socketTimeout=3000&autoReconnect=tru
e
db.user=你的数据库⽤⼾名
db.password=你的数据库密码
根据实际情况替换 你的数据库地址 、 端⼝ 、 nacos (数据库名)、 你的数据库⽤⼾名 和 你的数据库密码
初始化数据库
从Nacos的 conf ⽬录下找到 mysql-schema.sql (针对Nacos 2.x版本),并使⽤该SQL脚本在你的MySQL数据库中创建所需的表结构。执⾏脚本前,请确保你连接的是正确的数据库实例
-- 创建数据库
create if not exists nacos_config charset utf8mb4;
-- 执⾏SQL
SOURCE /usr/local/src/nacos/conf/mysql-schema.sql;
/usr/local/src/nacos/conf/mysql-schema.sql 改为你的真实⽬录
启动Nacos服务
完成上述配置后,重新启动Nacos服务. Nacos将使⽤配置的MySQL数据库作为其数据存储.
配置URL⽩名单:
接下来把URL⽩名单修改为从Nacos平台读取
代码改造
@Data
@Configuration
@RefreshScope
@ConfigurationProperties(prefix = "auth.white")
public class AuthWhiteName {
    private List<String> url;
}
在AuthFilter中注⼊⽩名单
@Autowired
    private AuthWhiteName authWhiteName;
修改路径排除逻辑
if(match(path,authWhiteName.getUrl())){
            //放行
            return chain.filter(exchange);
        }

private boolean match(String path, List<String> url) {
        if(url == null||url.size() == 0){
            return false;
        }
        return url.contains(path);
    }
添加配置:
添加依赖
        <dependency>
            <groupId>com.alibaba.cloud</groupId>
            <artifactId>spring-cloud-starter-alibaba-nacos-config</artifactId>
        </dependency>
        <!-- SpringCloud 2020.*之后版本需要引⼊bootstrap-->
        <dependency>
            <groupId>org.springframework.cloud</groupId>
            <artifactId>spring-cloud-starter-bootstrap</artifactId>
        </dependency>
添加配置bootstrap.yml
spring:
  application:
    name: gateway-service
  cloud:
    nacos:
      config:
        server-addr: 152.136.172.144:10020
        file-extension: yaml
nacos配置:
创建配置 gateway-service.yaml 配置如下:
auth:
    white:
        url:
            - /user/login
            - /user/register
Data Id 格式介绍
在 Nacos Spring Cloud 中, dataId 的完整格式如下:
${prefix}-${spring.profiles.active}.${file-extension}• prefix 默认为 spring.application.name 的值, 也可以通过配置项spring.cloud.nacos.config.prefix 来配置.
• spring.profiles.active 即为当前环境对应的 profile. 当spring.profiles.active 为空时,对应的连接符 - 也将不存在,dataId 的拼接格式变成 ${prefix}.${file-extension}
• file-exetension 为配置内容的数据格式,可以通过配置项spring.cloud.nacos.config.file-extension 来配置。⽬前只⽀持 properties和 yaml 类型. 默认为properties.
微服务启动时, 会从Nacos读取多个配置⽂件:
${prefix}-${spring.profiles.active}.${file-extension} 如: productservice-dev.properties
${prefix}.${file-extension} , 如: product-service.properties
${prefix} 如product-service
配置之后, 可以查看到配置的内容在数据库中存储

重启服务, 验证
1. 登录时, 没有token, 可以正常登录
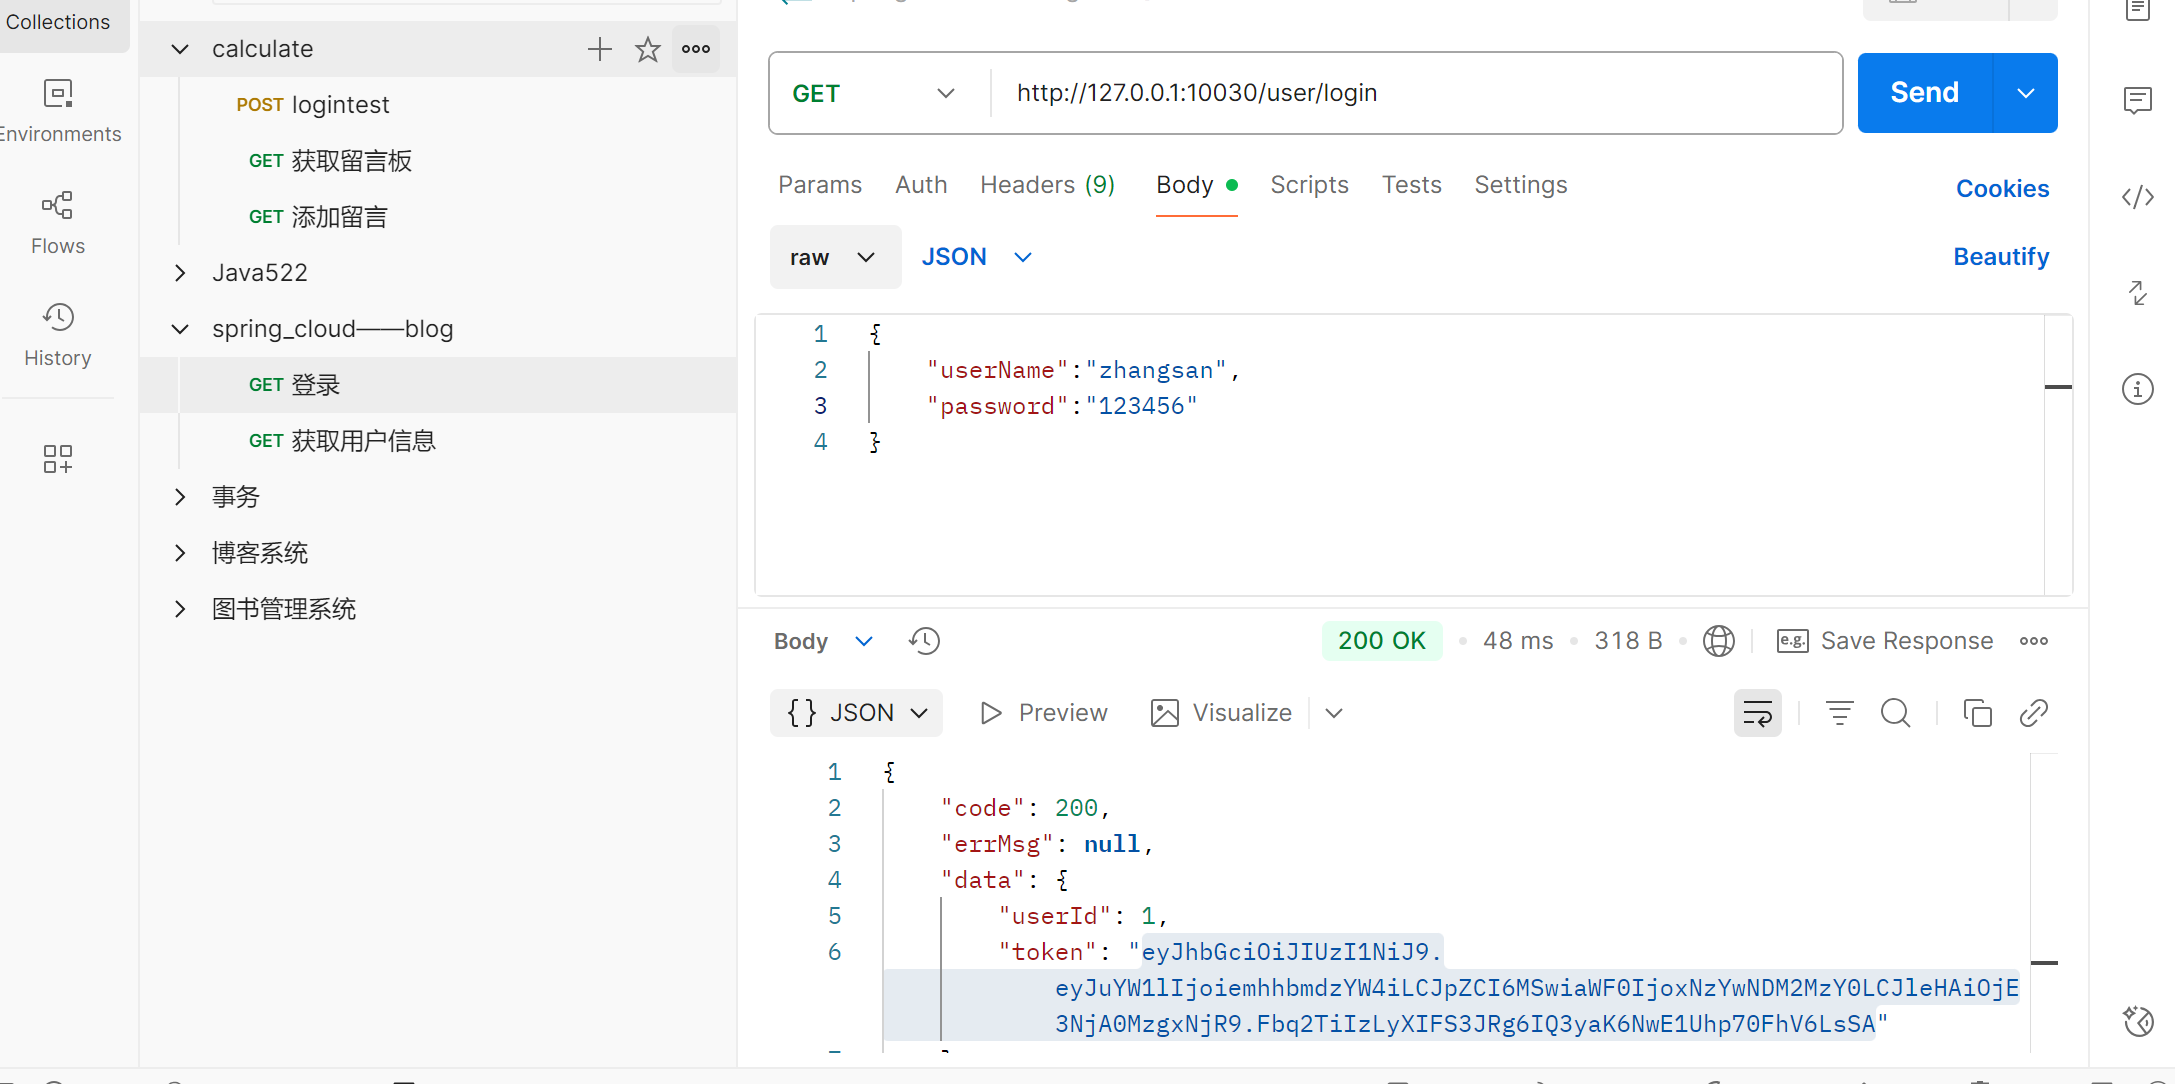
2. 获取⽤⼾信息时
• 没有token, 访问失败
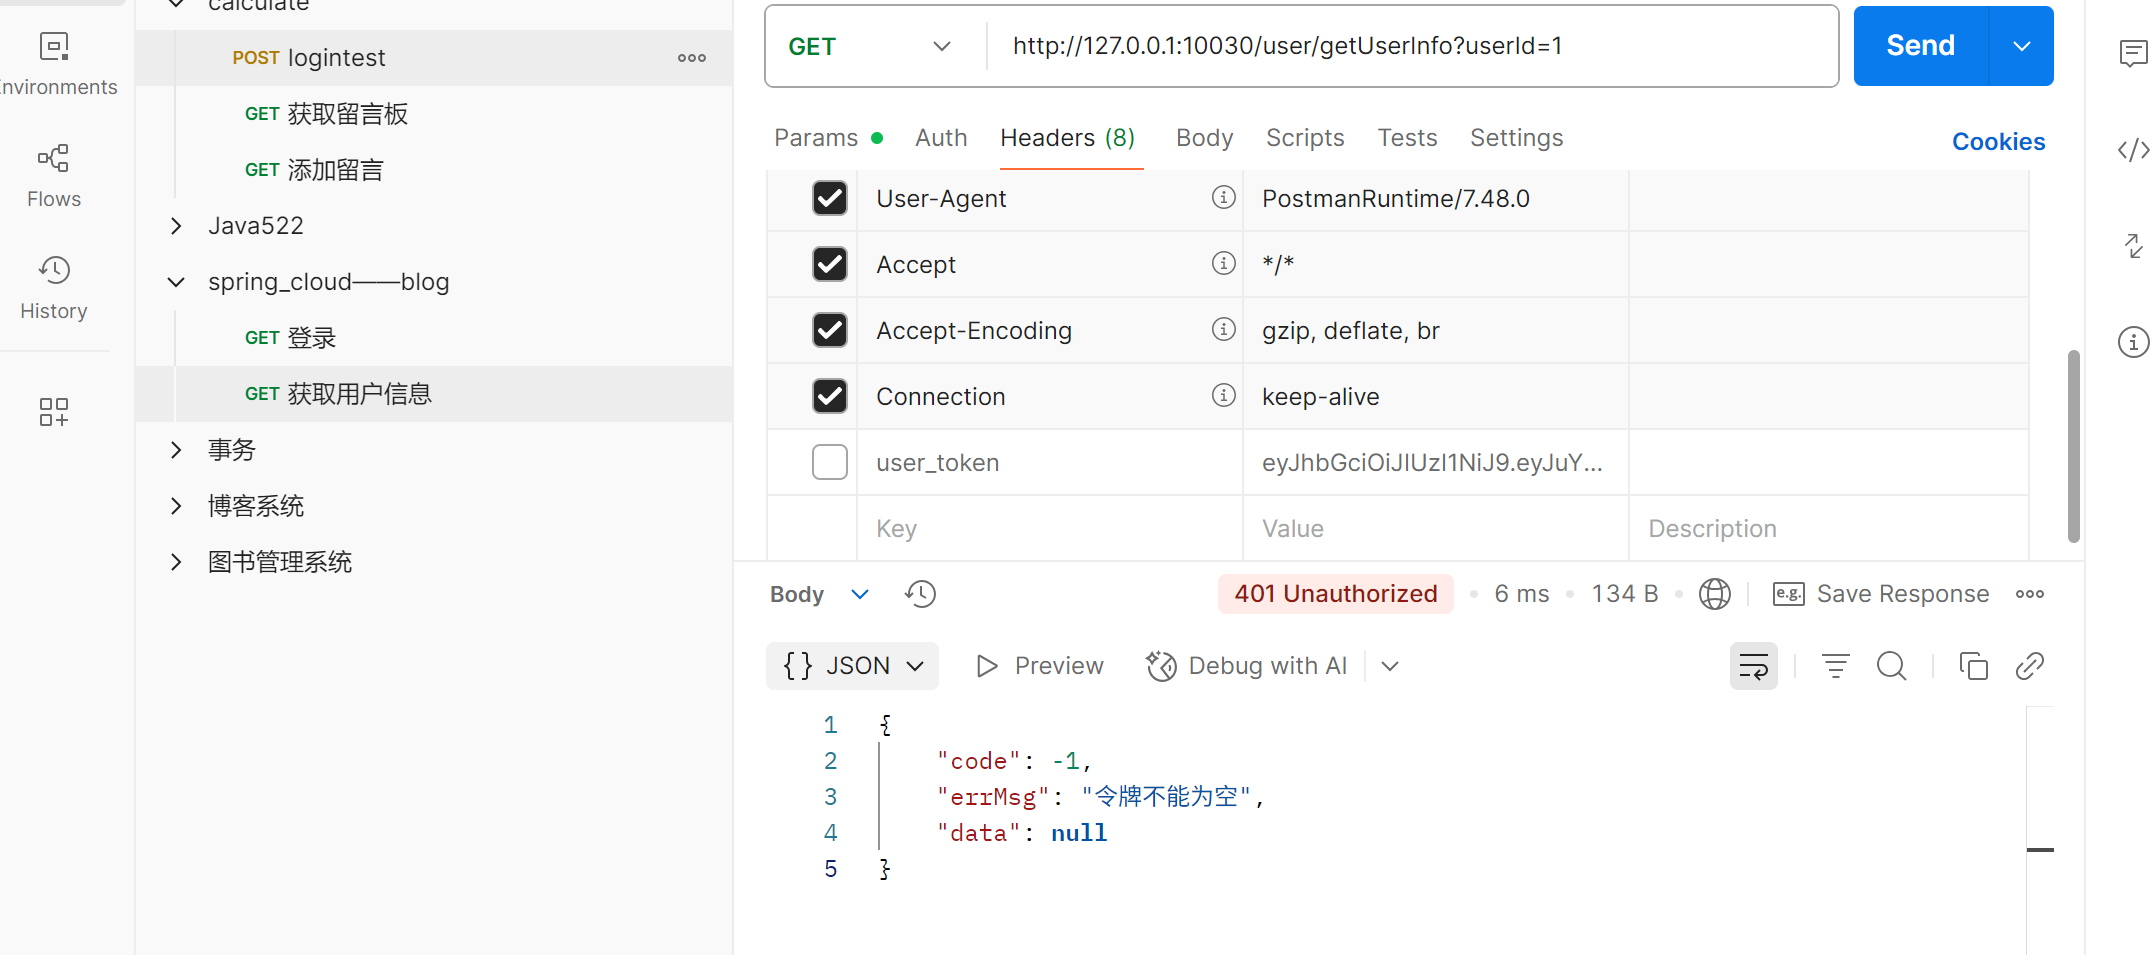
• 存在token, 访问成功
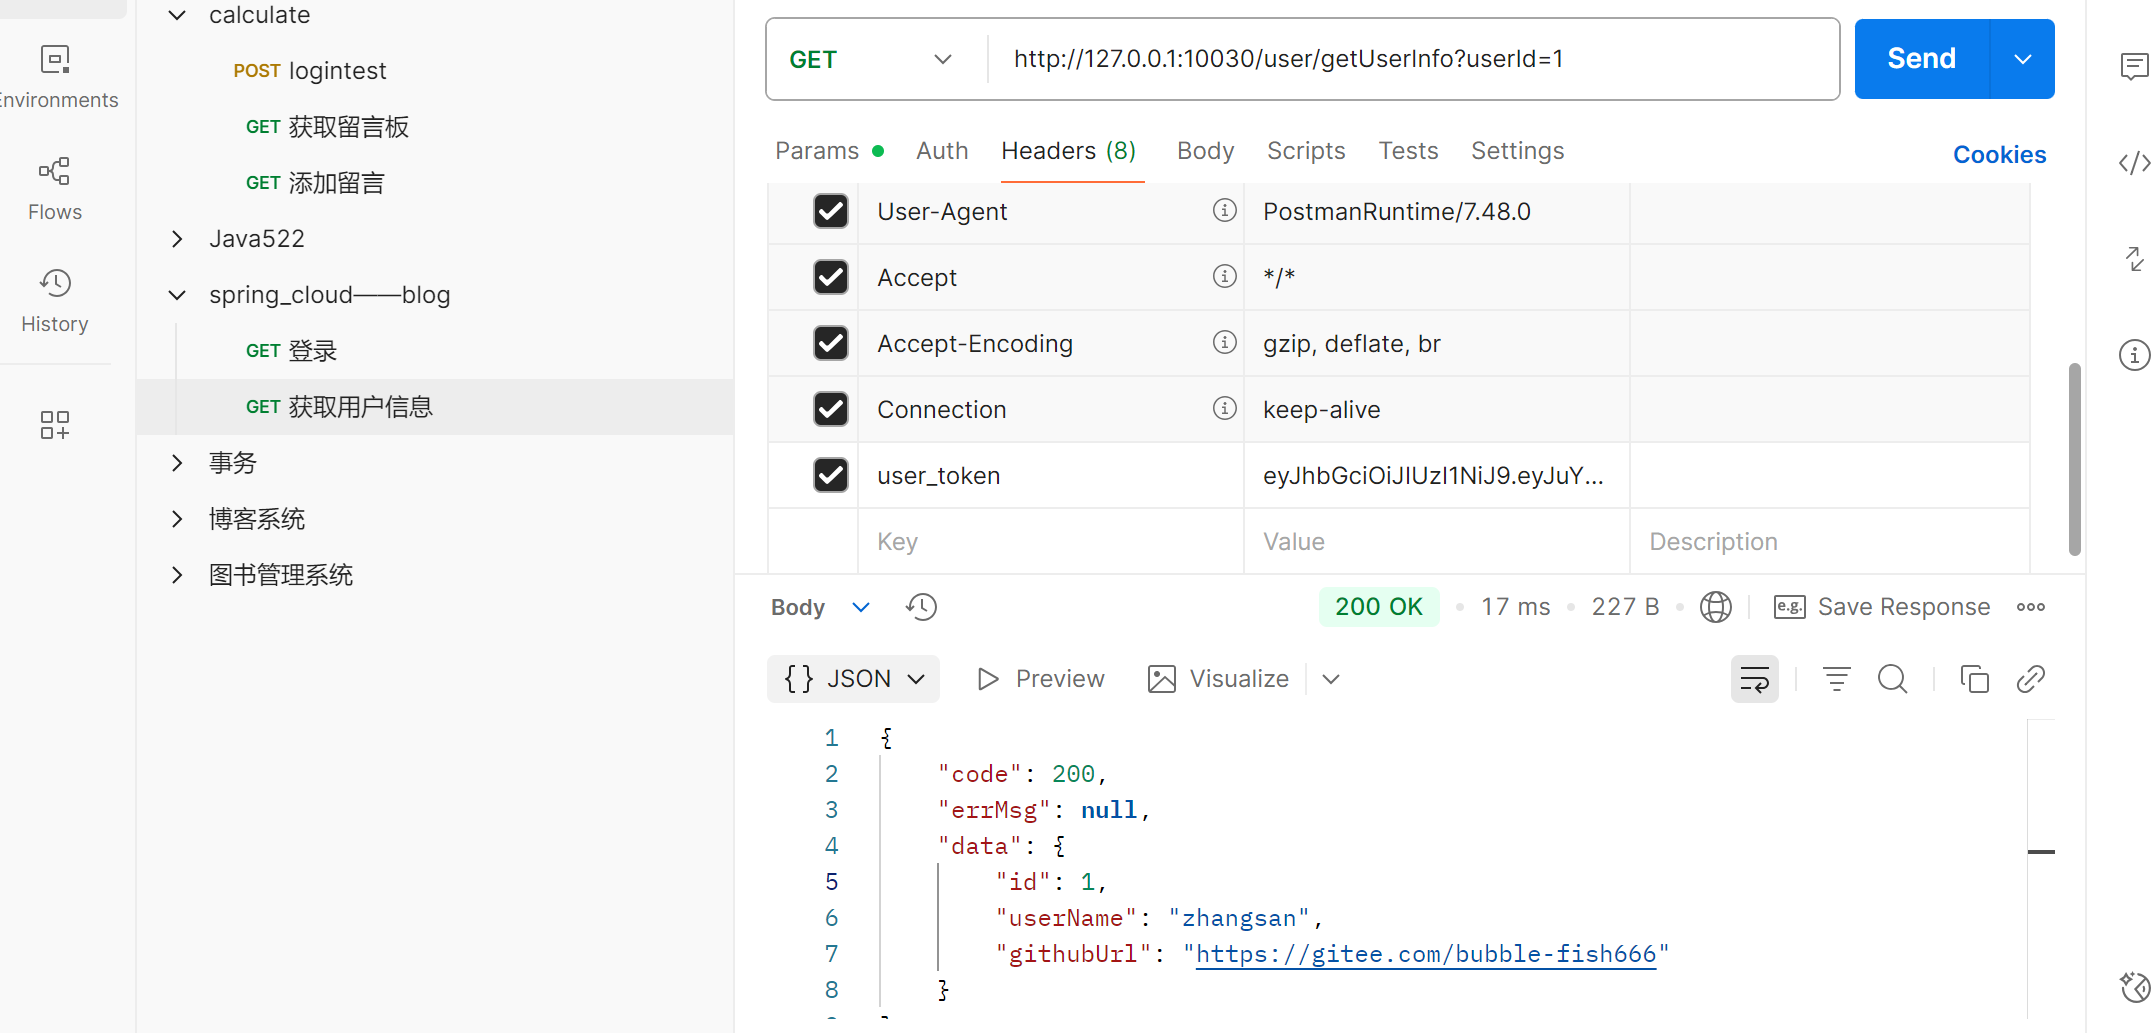
http://127.0.0.1:10030/user/getAuthorInfo?blogId=1
6. ⽤⼾注册功能:
为了加深⼤家对于Redis和RabbitMQ的理解和应⽤, 我们在⽤⼾注册功能中添加Redis和RabbitMQ的使⽤.
我们先完成基本的⽤⼾注册功能, 再添加组件的使⽤.
业务开发:
接⼝定义
[请求]
/user/register
[参数]
contentType: application/json
{
    "userName":"wangwu",
    "password":"456789",
    "githubUrl": "https://gitee.com/bubble-fish666/spring-cloud",
    "email": "bite666@126.com"
}
[响应]
{
    "code": 200,
    "errMsg": null,
    "data": 3 //⽤⼾ID
}
数据库表修改
⽤⼾注册增加邮箱字段(数据设计阶段, 提供的SQL已包含该部分内容)
后端开发
API定义
@Data
public class UserInfoRegisterRequest {
    @NotBlank(message = "用户名不能为空")
    @Length(max = 20,message = "用户名长度不能超过20")
    private String userName;
    @NotBlank(message = "密码不能为空")
    @Length(max = 20,message = "密码长度不能超过20")
    private String password;
    @Length(max = 64,message = "githubUrl长度不能超过64")
    private String githubUrl;
    @NotBlank(message = "邮箱不能为空")
    @Length(max = 20,message = "邮箱长度不能超过20")
    private String email;
}
@RequestMapping("/register")
Result<Integer> register(@RequestBody UserInfoRegisterRequest registerRequest);API实现
UserInfo 增加邮箱字段
Controller
@Override
    public Result<Integer> register(@Validated @RequestBody UserInfoRegisterRequest registerRequest) {
        return Result.success(userService.register(registerRequest));
    }
对应Service,Service实现
    @Override
    public Integer register(UserInfoRegisterRequest registerRequest) {
        //校验
        checkUserInfo(registerRequest);
        //用户注册,插入数据库
        UserInfo userInfo = BeanConvert.convertUserInfoEncrypt(registerRequest);
        try{
            int result = userInfoMapper.insert(userInfo);
            if(result == 1){
                return userInfo.getId();
            }else{
                throw new BlogException("用户注册失败");
            }
        }catch (Exception e){
            log.error("用户注册失败,e:{}",e);
            throw new BlogException("用户注册失败");
        }
    }

    private void checkUserInfo(UserInfoRegisterRequest param) {
        //用户名不能重复
        UserInfo userInfo = selectUserInfoByName(param.getUserName());
        if(userInfo!=null){
            throw new BlogException("用户名已存在");
        }
        //邮箱格式
        if(!RegexUtil.checkMail(param.getEmail())){
            throw new BlogException("邮箱格式不合法");
        }
        //url格式
        if(!RegexUtil.checkURL(param.getGithubUrl())){
            throw new BlogException("GithubUrl格式不合法");
        }
    }
邮箱和URL验证
邮箱和URL我们采⽤正则来进⾏校验.
githubURL并不校验地址为github的地址, 只校验位url即可
public class RegexUtil {
    /**
     * 匹配 邮箱:xxx@xx.xxx(形如:abc@qq.com)
     * ^ 表示匹配字符串的开始。
     * [a-z0-9]+ 表示匹配一个或多个小写字母或数字。
     * ([._\\-]*[a-z0-9])* 表示匹配零次或多次下述模式:一个点、下划线、反斜杠或短横线,后面跟着一个或多个小写字母或数字。这部分是可选的,并且可以重复出现。
     * @ 字符字面量,表示电子邮件地址中必须包含的"@"符号。
     * ([a-z0-9]+[-a-z0-9]*[a-z0-9]+.) 表示匹配一个或多个小写字母或数字,后面可以跟着零个或多个短横线或小写字母和数字,然后是一个小写字母或数字,最后是一个点。这是匹配域名的一部分。
     * {1,63} 表示前面的模式重复1到63次,这是对顶级域名长度的限制。
     * [a-z0-9]+ 表示匹配一个或多个小写字母或数字,这是顶级域名的开始部分。
     * $ 表示匹配字符串的结束。
     */
    private static final String emailRegex = "^[a-z0-9]+([._\\\\-]*[a-z0-9])*@([a-z0-9]+[-a-z0-9]*[a-z0-9]+.){1,63}[a-z0-9]+$";
    /**
     * 进行简单校验, 为URL即可
     * https://gitee.com/bubble-fish666/
     * ^:匹配字符串的开始。
     * (https?):匹配http或https。
     * :\/\/:匹配://。
     * ([a-zA-Z0-9.-]+):匹配域名,可以包含字母、数字、点和破折号。
     * (:\d+)?:可选部分,匹配冒号和端口号。
     * (\/[^\s]*)?:可选部分,匹配斜杠和路径,路径中不包含空白字符。
     * (\?[^\s]*)?:可选部分,匹配查询参数,参数中不包含空白字符。
     * $:匹配字符串的结束。
     */
    private static final String urlRegex = "^(https?):\\/\\/([a-zA-Z0-9.-]+)(:\\d+)?(\\/[^\\s]*)?(\\?[^\\s]*)?$";

    /**
     * 邮箱:xxx@xx.xxx(形如:abc@qq.com)
     *
     * @param content
     * @return
     */

    public static boolean checkMail(String content) {
        if (!StringUtils.hasText(content)) {
            return false;
        }
        return Pattern.matches(emailRegex, content);
    }

    public static boolean checkURL(String content) {
        if (!StringUtils.hasText(content)) {
            return false;
        }
        return Pattern.matches(urlRegex, content);
    }

    public static void main(String[] args) {
        System.out.println(checkMail("bite@126.com"));
    }
}
public class BeanConvert {
    public static UserInfo convertUserInfoEncrypt(UserInfoRegisterRequest registerRequest){
        UserInfo userInfo = new UserInfo();
        userInfo.setUserName(registerRequest.getUserName());
        userInfo.setPassword(SecurityUtil.encrypt(registerRequest.getPassword()));
        userInfo.setGithubUrl(registerRequest.getGithubUrl());
        userInfo.setEmail(registerRequest.getEmail());
        return userInfo;
    }
}
引⼊Redis:
Redis介绍和简单使用:
在对于性能要求⽐较⾼的模块中, Redis作为⼀个缓存层, 经常存储⼀些热点数据, 减少数据库的读取压⼒, 提⾼数据访问速度. 为了加深⼤家对Redis的理解和应⽤, 我们在博客系统的⽤⼾管理模块也加⼊Redis的使⽤.
Redis简单介绍参考:
1. Redis 是什么
Redis 是⼀种基于键值对(key-value)的 NoSQL 数据库,与很多键值对数据库不同的是,Redis 中的值可以是由 string(字符串)、hash(哈希)、list(列表)、set(集合)、zset(有序集合)、Bitmaps(位图)、HyperLogLog、GEO(地理信息定位)等多种数据结构和算法组成,因此 Redis 可以满⾜很多的应⽤场景. 因为 Redis 会将所有数据都存放再内存中,所以它的读写性能⾮常惊⼈。不仅如此,Redis 还可以将内存的数据利⽤快照和⽇志的形式保存到硬盘上,这样在发⽣类似断电或者机器故障的时候,内存中的数据不会“丢失”。除了上述功能以外,Redis 还提供了键过期、发布订阅、事务、流⽔线、Lua 脚本等附加功能。总之,如果在合适的场景使⽤号 Redis,它就会像⼀把瑞⼠军⼑⼀样所向披靡
2. Redis 的使⽤场景
缓存(Cache)
缓存机制⼏乎在所有⼤型⽹站都有使⽤,合理地使⽤缓存不仅可以加速数据的访问速度,⽽且能够有效地降低后端数据源的压⼒。Redis 提供了键值过期时间设置,并且也提供了灵活控制最⼤内存和内存溢出后的淘汰策略。可以这么说,⼀个合理的缓存设计能够为⼀个⽹站的稳定保驾护航。
排⾏榜系统
排⾏榜系统⼏乎存在于所有的⽹站,例如按照热度排名的排⾏榜,按照发布时间的排⾏榜,按照各种复杂维度计算出的排⾏榜,Redis 提供了列表和有序集合的结构,合理地使⽤这些数据结构可以很⽅便地构建各种排⾏榜系统。
计数器应⽤
计数器在⽹站中的作⽤⾄关重要,例如视频⽹站有播放数、电商⽹站有浏览数,为了保证数据的实时性,每⼀次播放和浏览都要做加 1 的操作,如果并发量很⼤对于传统关系型数据的性能是⼀种挑战。Redis 天然⽀持计数功能⽽且计数的性能也⾮常好,可以说是计数器系统的重要选择。
社交⽹络
赞 / 踩、粉丝、共同好友 / 喜好、推送、下拉刷新等是社交⽹站的必备功能,由于社交⽹站访问量通常⽐较⼤,⽽且传统的关系型数据不太合适保存这种类型的数据,Redis 提供的数据结构可以相对⽐较容易地实现这些功能。
消息队列系统
消息队列系统可以说是⼀个⼤型⽹站的必备基础组件,因为其具有业务解耦、⾮实时业务削峰等特性。Redis 提供了发布订阅功能和阻塞队列的功能,虽然和专业的消息队列⽐还不够⾜够强⼤,但是对于⼀般的消息队列功能基本可以满⾜。
3. Redis 的基本操作
Redis安装:
Ubuntu 安装Redis
#使⽤apt安装Redis

apt install redis -y
Redis 启动/停⽌
#查看Redis状态
systemctl status redis-server
#启动redis
service redis-server start
#停⽌redis服务
service redis-server stop
#重启redis服务
service redis-server restart
操作 Redis
使⽤以下命令启动redis客⼾端︰
redis-cli常⻅命令介绍:
• SET key value
• GET key
• DEL key [key ...]
• EXISTS key [key ...]
• EXPIRE key seconds
• KEYS pattern(性能比较低,慎用)
更多命令:https://redis.io/commands/set/
4. Redis使⽤
SpringBoot集成Redis
添加依赖
<dependency>
    <groupId>org.springframework.boot</groupId>
    <artifactId>spring-boot-starter-data-redis</artifactId>
</dependency>
或者使⽤快速⾯板添加Redis依赖
配置Redis
spring:
    data:
        redis:
            host: 127.0.0.1
            port: 6379
            timeout: 60s #连接空闲超过N(s秒、ms毫秒)后关闭,0为禁⽤,这⾥配置值和tcpkeepalive值⼀致
            lettuce:
                pool:
                    max-active: 8 #允许最⼤连接数
                    max-idle: 8 #最⼤空闲连接数, 默认8
                    min-idle: 0 #最⼩空闲连接数
                    max-wait: 5s #请求获取连接等待时间
测试代码:
@SpringBootTest
public class RedisTest {
    @Autowired
    private StringRedisTemplate redisTemplate;

    @Test
    void test(){
        redisTemplate.opsForValue().set("hello","spring");
        String hello = redisTemplate.opsForValue().get("hello");
        System.out.println(hello);
    }
}
Redis配置端⼝转发
Redis 服务器安装在云服务器上, 我们的代码在本地主机.
要想让本地主机能访问 redis, 有两种⽅式:
1. 开放Redis端⼝号[不推荐]
把 redis 的端⼝通过云服务器后台⻚⾯的 "防⽕墙" / "安全组" 放开端⼝到公⽹上, 但是这个操作⾮常危险(⿊客会顺着 redis 端⼝进来).
2. 端⼝转发[推荐],隧道
我们可以使⽤端⼝转发的⽅式, 直接把服务器的 redis 端⼝映射到本地.
具体操作:
在 xshell 中, 进⾏如下配置:
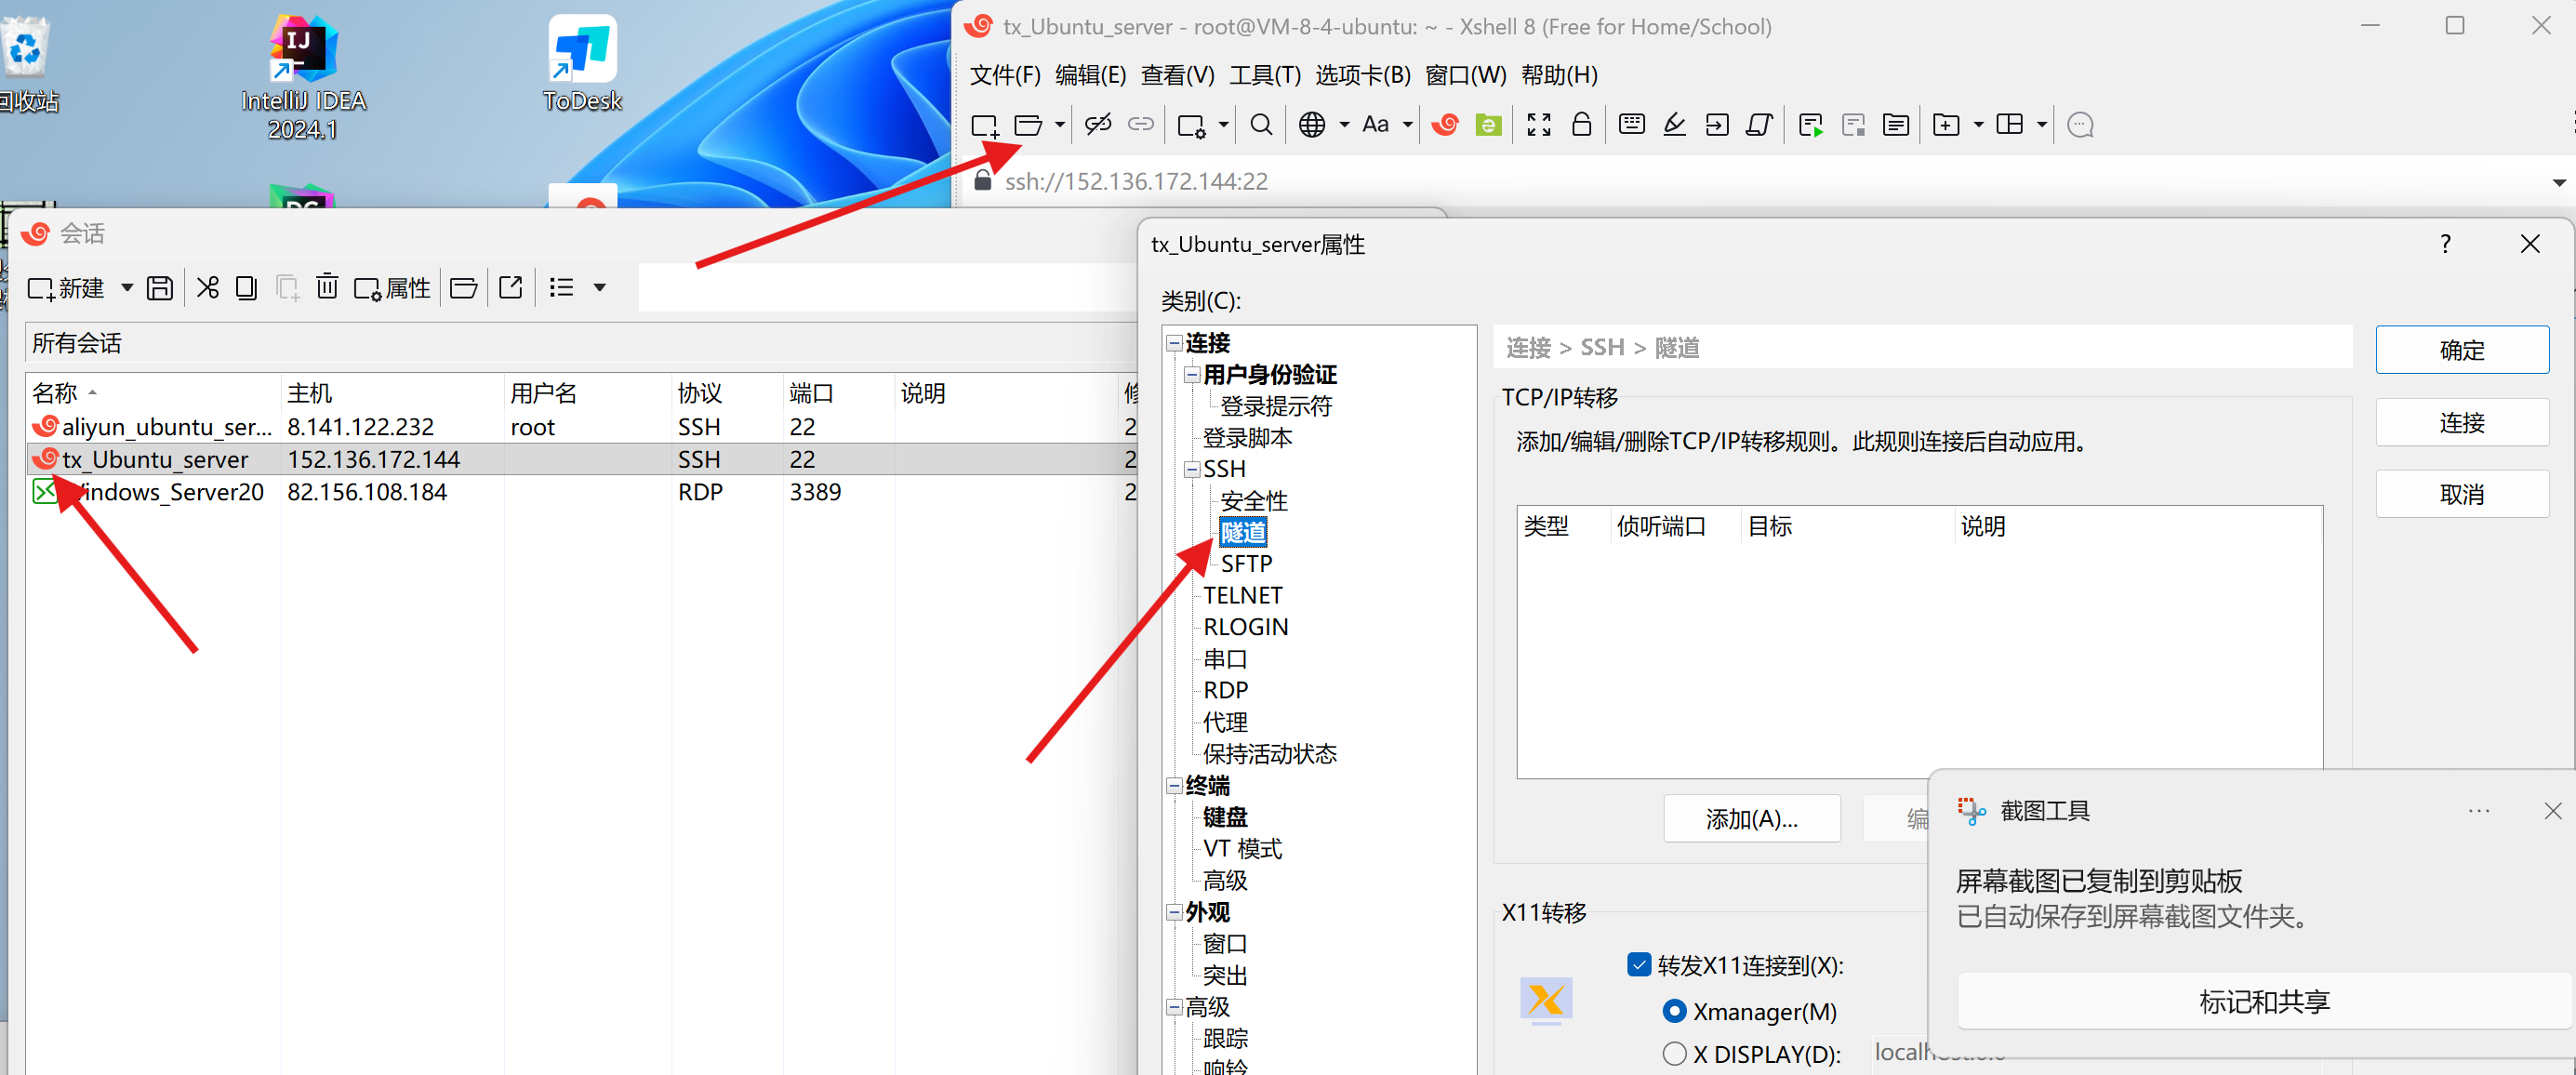
1) 右键云服务器的会话, 选择属性.
2) 找到隧道 -> 配置转移规则
3) 使⽤该会话连接服务器.
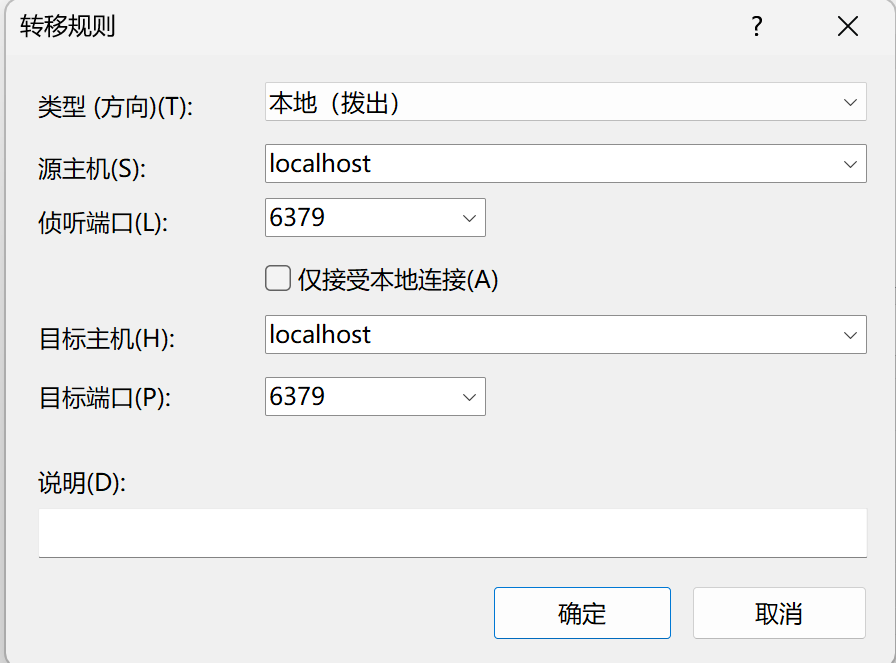
全部配置之后, 需要重新关闭连接, 打开连接才可以
后续访问云服务器的Redis, 就可以使⽤ 127.0.0.1 6379端⼝号(上图中配置的端⼝号) 来访问
Redis客⼾端:
除了通过云服务器查看Redis, 市⾯上也有⼀些客⼾端或者插件可以操作Redis 这两种⽅式分别各介绍⼀种
1. 客⼾端 Another-Redis-Desktop-Manager
下载地址: Another Redis Desktop Manager
安装后创建连接即可
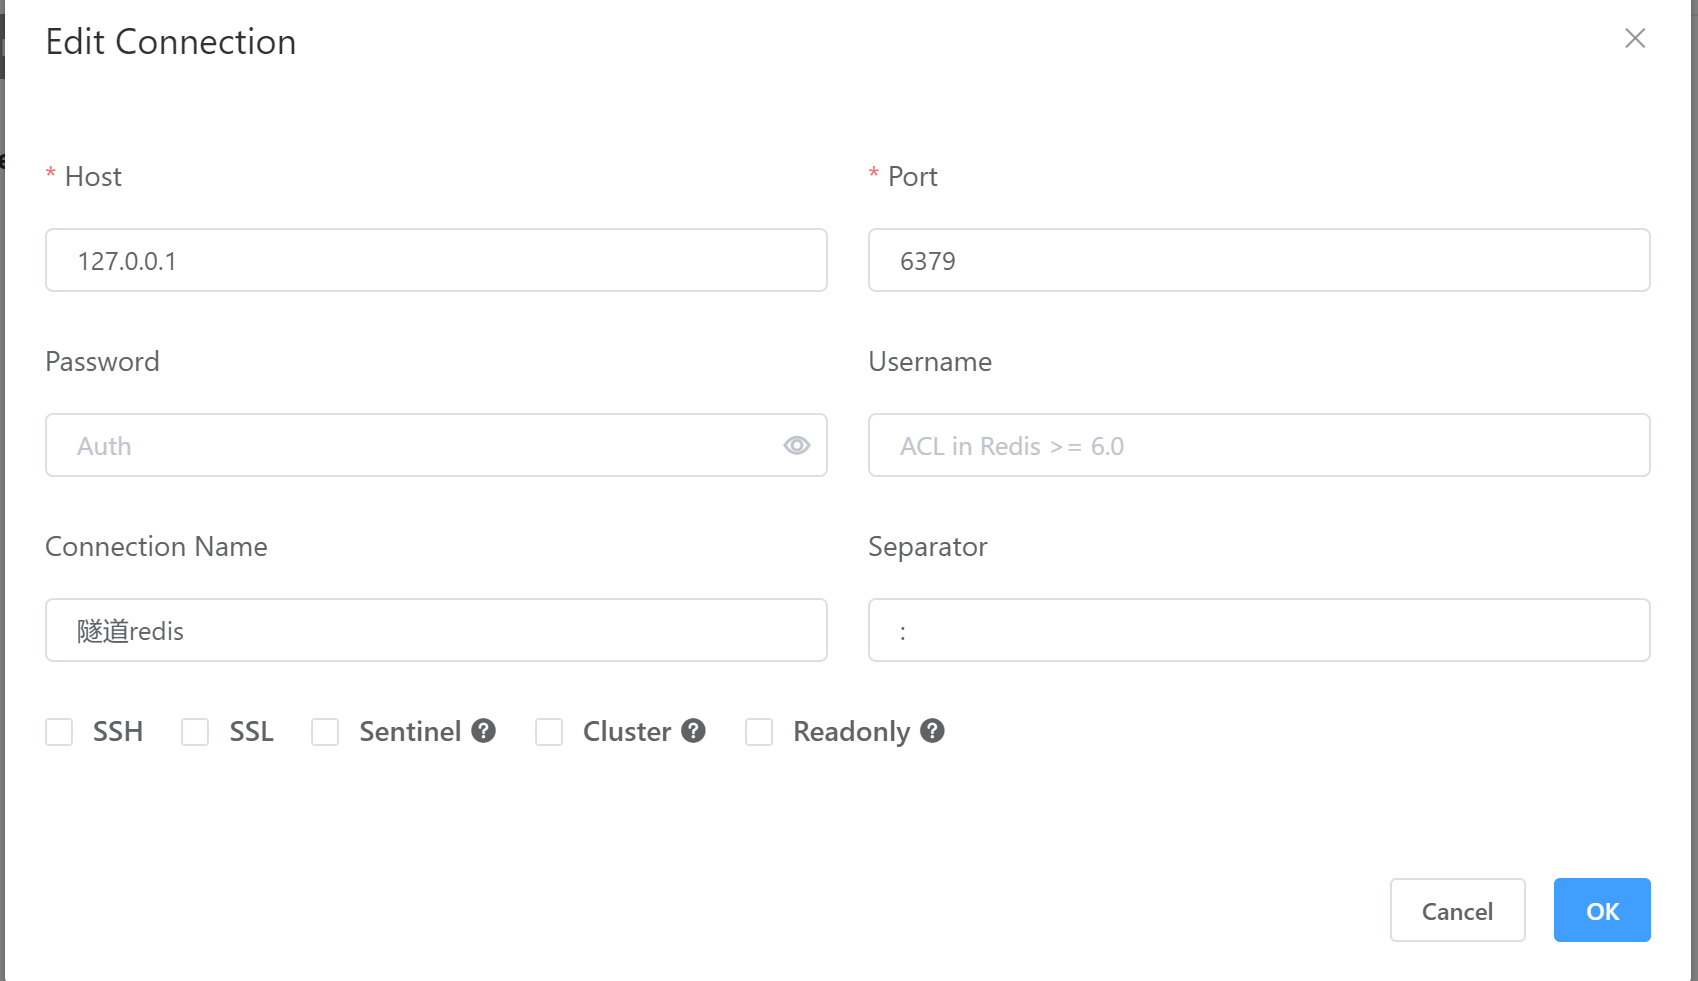
端⼝号设置为上⾯配置的监听端⼝号即可
可以查看到刚才存储的数据
2. 插件
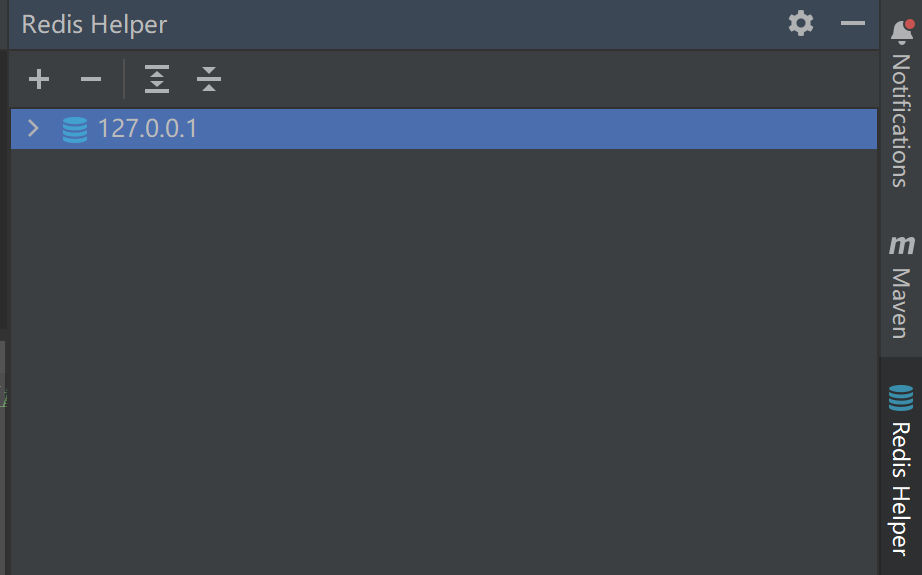
在File->Settings->Plugins->搜索Redis Helper插件
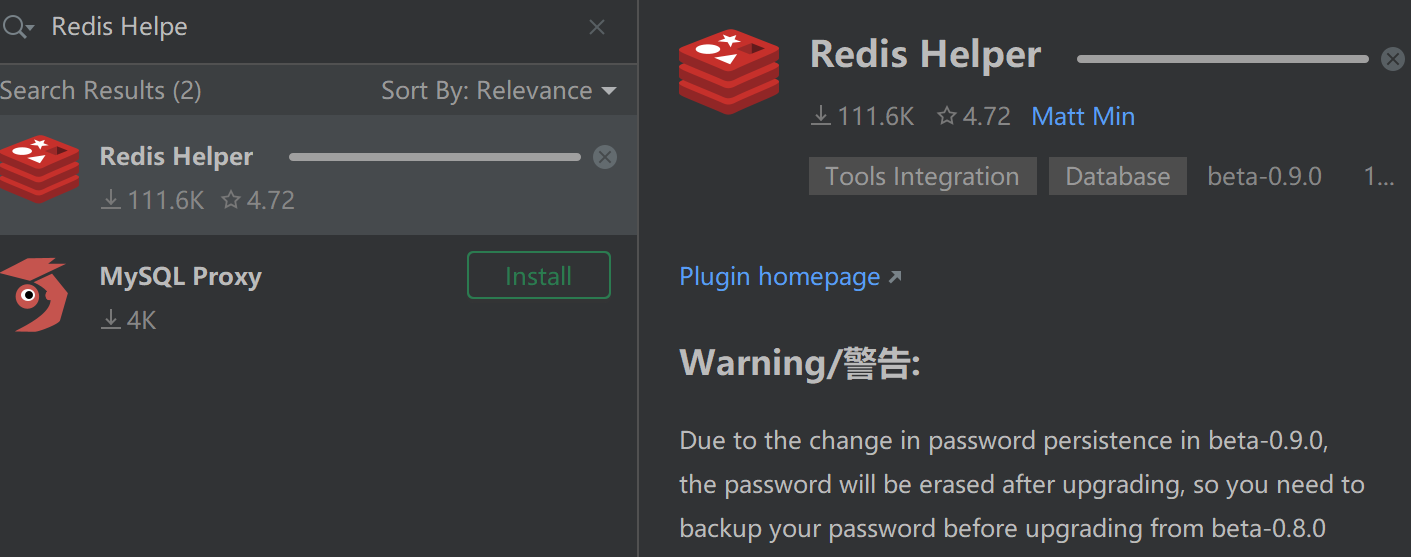
然后点击左上⻆+,登录远程Redis
在⽤⼾登录后, 可以将⽤⼾的信息存储在Redis中, 当需要获取⽤⼾信息时, 可以直接从Redis中获取, ⽽不需要每次都查询数据库, 这样可以加快数据的读取速度, 减少数据库的压⼒.
对于⽤⼾信息的增删改查, 除了数据库中存储, 也在Redis中进⾏存储, 简单流程如下:
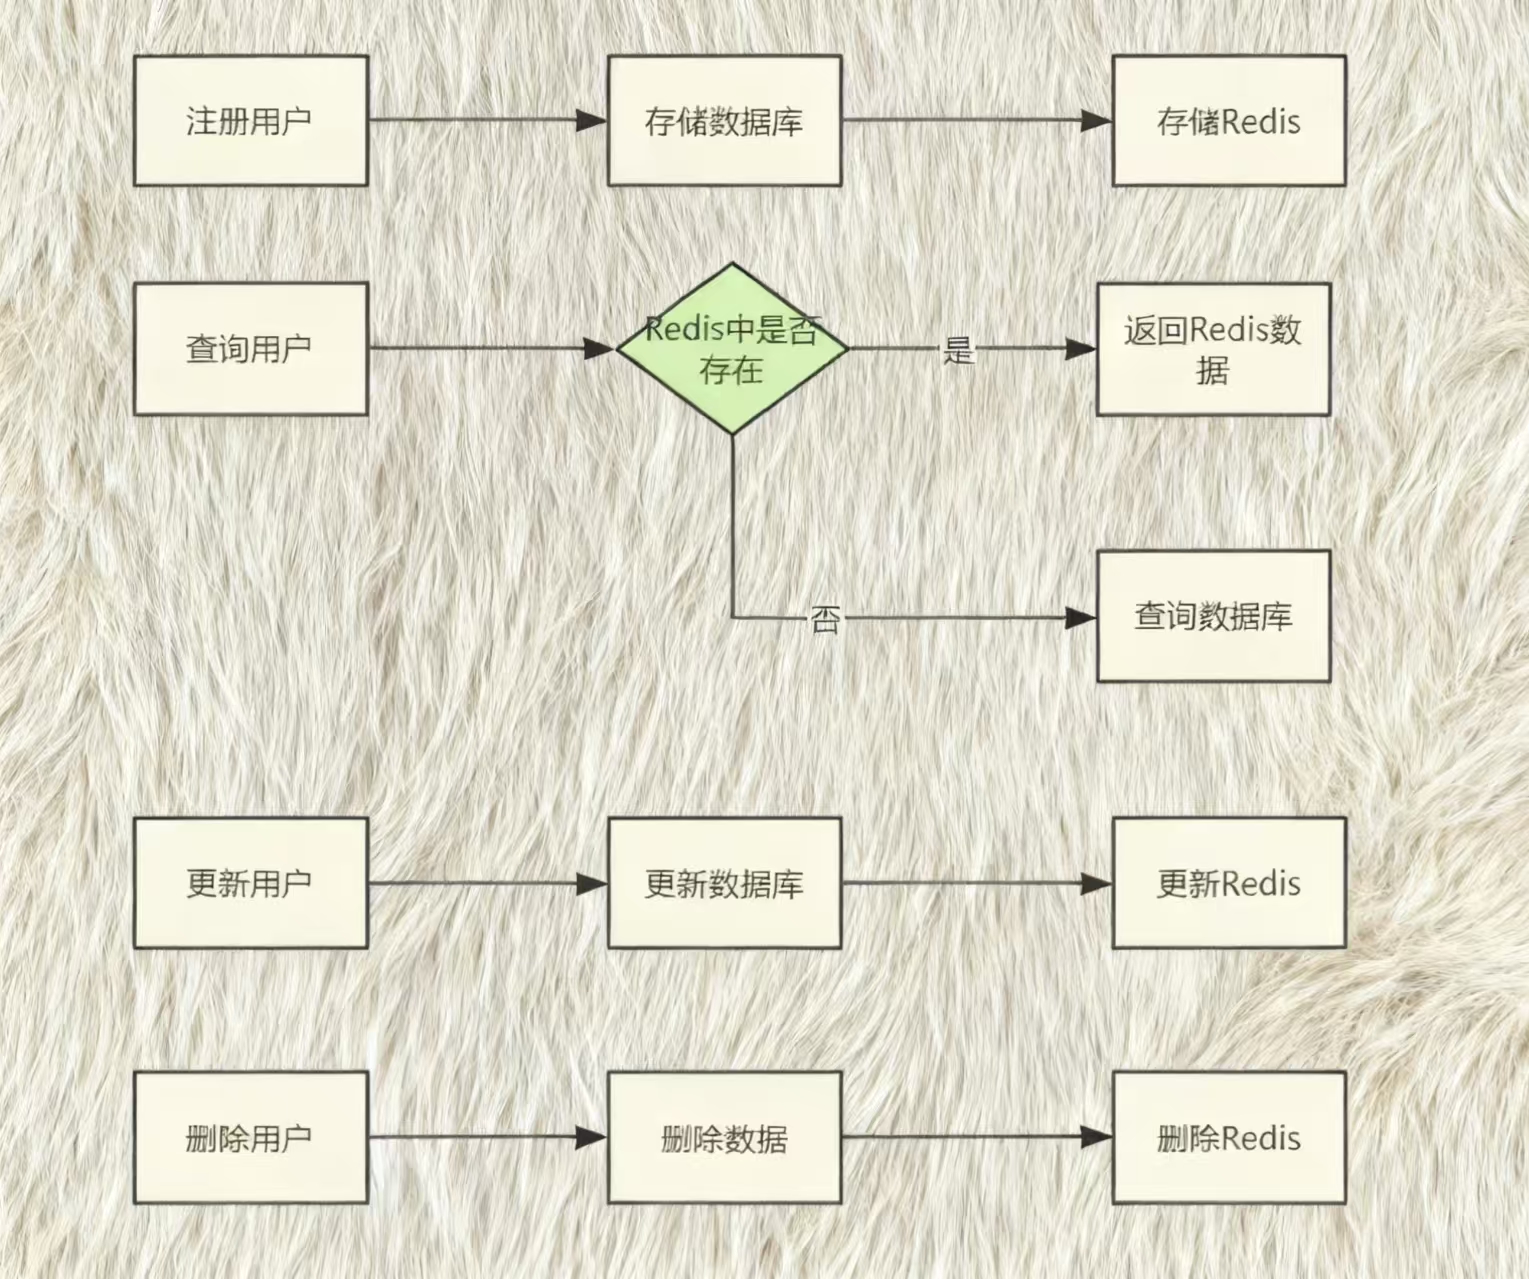
本案例中, 我们只实现⽤⼾的注册和查询功能 接下来先看⽤⼾的注册如何实现.
针对Redis的操作, 我们可以封装⼀个⼯具包, 给所有模块使⽤
@Slf4j
public class Redis {
    private StringRedisTemplate redisTemplate;

    public Redis(StringRedisTemplate redisTemplate) {
        this.redisTemplate = redisTemplate;
    }

    /**
     * redis的get操作
     */
    public String get(String key){
        try{
            return key == null ? null : redisTemplate.opsForValue().get(key);
        }catch (Exception e){
            log.error("redis get error,key:{}",key);
            return null;
        }
    }
    /**
     * hasKey
     * true则存在key
     */
    public Boolean hasKey(String key){
        try{
            return key == null ? false : redisTemplate.hasKey(key);
        }catch (Exception e){
            log.error("redis hasKey error,key:{}",key);
            return false;
        }
    }

    /**
     * set
     */
    public Boolean set(String key,String value){
        try{
            //可以增加参数校验
            redisTemplate.opsForValue().set(key,value);
            return true;
        }catch (Exception e){
            log.error("redis set error,key:{},value:{}",key,value);
            return false;
        }
    }

    /**
     * set 设置过期时间,单位为秒
     */
    public Boolean set(String key,String value,long timeout){
        try{
            //可以增加参数校验
            if(timeout>0){
                redisTemplate.opsForValue().set(key,value,timeout,TimeUnit.SECONDS);
            }else{
                set(key,value);
            }
            return true;
        }catch (Exception e){
            log.error("redis set error,key:{},value:{}",key,value);
            return false;
        }
    }
}
在使⽤时, 可以创建⼀个Redis对象, 调⽤Redis⾥的⽅法
@Configuration
public class RedisConfig {
    @Bean
    public Redis redis(StringRedisTemplate redisTemplate){
        return new Redis(redisTemplate);
    }
}
考虑到其他项⽬也可能会操作Redis, 我们可以把RedisConfig 放置在 jqq-common 包下.
思考:
问题⼀: 放在jqq-common包下的话, 并不在项⽬的扫描路径下, @Configuration 注解并不⽣效, 我们可以借助Spring的⾃动配置来让RedisConfig 交给Spring 管理.


问题⼆: 如果交给Spring的⾃动配置来完成RedisConfig 的管理, 那所有引⽤bite-common包的⼯程都会加载这个Bean, 但是我们的需求并不是如此.
解决办法:
借助 @Conditional 注解或扩展注解来实现根据条件完成Bean的配置管理.
@Conditional:
@Conditional 是 Spring 框架从 4.0 版本开始引⼊的⼀个注解,它允许开发者根据特定的条件来控制 Bean 的注册. ⼀般与 @Configuration 和 @Bean 配合使⽤。简单说,Spring 在解析@Configuration 配置类的时候,如果该配置类增加了 @Conditional 注解,那么会根据该注解配置的条件来决定是否要实现 Bean 的装配.
@Conditonal 注解类声明代码如下, 该注解可以接收⼀个Condition 的数组, 位于org.springframework.context.annotation 包下.
@Target({ElementType.TYPE, ElementType.METHOD})
@Retention(RetentionPolicy.RUNTIME)
@Documented
public @interface Conditional {
    Class<? extends Condition>[] value();
}
Condition 是⼀个函数式接⼝, 提供了 matches ⽅法, 它主要是提供⼀个条件匹配规则, 返回 true 表⽰可以注⼊ Bean, 反之不注⼊.
@FunctionalInterface
public interface Condition {
    boolean matches(ConditionContext context, AnnotatedTypeMetadata metadata);
}
条件装配案例
基于 @Conditional 实现⼀个条件装配案例
⾃定义⼀个 Condition , 如果当前JDK版本是21, 就注册JDK21, 如果当前JDK版本是17, 就注册JDK17。
@SpringBootTest
public class ConditionalTest {
//    @Autowired
//    private JDK17 jdk17;
    @Test
    void test(){
        System.out.println("执行test的方法");
    }
}


@Configuration
class AppConfig{
    //如果Jdk17Conditional matches返回true,则注册该Bean
    @Bean
    @Conditional(Jdk17Conditional.class)
    public JDK17 jdk17(){
        System.out.println("JDK17初始化");
        return new JDK17();
    }

    //如果Jdk21Conditional matches返回true,则注册该Bean
    @Bean
    @Conditional(Jdk21Conditional.class)
    public JDK21 jdk21(){
        System.out.println("JDK21初始化");
        return new JDK21();
    }
}

class JDK17{}

class JDK21{}

class Jdk17Conditional implements Condition {
    @Override
    public boolean matches(ConditionContext context, AnnotatedTypeMetadata metadata) {
        return JavaVersion.getJavaVersion().equals(JavaVersion.SEVENTEEN);
    }
}

class Jdk21Conditional implements Condition {
    @Override
    public boolean matches(ConditionContext context, AnnotatedTypeMetadata metadata) {
        return JavaVersion.getJavaVersion().equals(JavaVersion.TWENTY_ONE);
    }
}
可以观察, 如果JDK版本为17时, jdk17就会被注册. 如果JDK为21, JDK21就会被注册.
扩展注解
@Conditional 注解是 Spring 框架中⼀个强⼤的⼯具, 它允许根据特定条件来控制 Bean 的创建和注册. Spring Boot 在此基础上提供了⼀系列的扩展注解,使得条件注册 Bean 更加⽅便和直观. 以下是⼀些常⽤的 @Conditional 扩展注解及其使⽤场景:
• @ConditionalOnBean
当容器中存在指定的 Bean 时, 使⽤这个注解的配置类或 Bean ⽅法才会⽣效
只有当 DependencyBean 存在时, MyBean 才会被注册
@ConditionalOnBean(DependencyBean.class)
public class MyBean {
// ...
}
• @ConditionalOnMissingBean
与 @ConditionalOnBean 相反,只有当容器中不存在指定的 Bean 时,才会注册使⽤这个注解的 Bean
如果 DependencyBean 不存在, MyBean 会被注册。
@ConditionalOnMissingBean(DependencyBean.class)
public class MyBean {
// ...
• @ConditionalOnClass
当类路径上存在指定的类时,使⽤这个注解的配置类或 Bean ⽅法才会⽣效.
如果 DependencyClass 存在于类路径上, MyBean 会被注册
@ConditionalOnMissingClass
当类路径上不存在指定的类时,使⽤这个注解的配置类或 Bean ⽅法才会⽣效.
如果 DependencyClass 不存在于类路径上, MyBean 会被注册
• @ConditionalOnProperty:
这个注解允许基于配置⽂件中的属性值来注册 Bean. 你可以指定属性的名称和期望的值, 如果配置的属性存在且匹配指定的值, 则相应的 Bean 会被注册
如果 my.property 的值是 true ,则 MyBean 会被注册
@ConditionalOnProperty(name = "my.property", havingValue = "true")
public class MyBean {
// ...
}
这些注解只需要添加到 @Configuration 配置类的类级别或者⽅法级别,然后根据每个注解的作⽤传参就⾏.
@Conditional 注解及扩展注解在实际项⽬中有⼴泛的应⽤场景, 尤其是在需要根据特定条件动态配置 Bean 的情况下, 在第三⽅的依赖中也经常出现. ⽐如Redis的⾃动配置⽂件:
⼯具封装:
基于以上知识的了解, 我们来完成公共模块的开发
⾃动配置, 加载 RedisConfig , 根据条件是否加载 Redis对象 具体步骤如下:
1. 在resources下创建 METAINF/spring/org.springframework.boot.autoconfigure.AutoConfiguration.imports⽂件内容设置需要Spring⾃动加载的对象
com.jqq.common.config.RedisConfig
2. 设置条件装配
如果配置⽂件中配置了redis相关的内容, 我们进⾏Redis相关内容的加载
@Configuration
public class RedisConfig {
    @Bean
    @ConditionalOnProperty(prefix = "spring.data.redis",name = "host")
    public Redis redis(StringRedisTemplate redisTemplate){
        return new Redis(redisTemplate);
    }
}
项⽬应⽤:
⽤⼾注册后, 数据存储到数据库中后, 再存储到Redis⼀份, 获取⽤⼾信息时, 从Redis中获取. Redis格式定义:
key设置为: user:zhangsan
为了避免键名冲突, 通常会为key添加命名空间前缀, 这个前缀通常反映了键的⽤途或归属, ⽐如 user: 、 session: 、 product:
value设置为⽤⼾信息的Json字符串
JSON⼯具类
在 Java 中,有⼏个流⾏的 JSON 处理库,常⻅的有: Jackson, Gson 和 Fastjson
1. Jackson
Jackson 是⼀个开源的 JSON 处理库, ⼴泛⽤于将 Java 对象与 JSON 数据进⾏互相转换, Jackson 是 Spring 框架的默认JSON 解析器, 拥有活跃的社区⽀持和频繁的更新迭代.
ObjectMapper mapper = new ObjectMapper();
String jsonString = mapper.writeValueAsString(yourObject);
YourClass obj = mapper.readValue(jsonString, YourClass.class);
2. Gson
Gson 是 Google 开发的⼀个 JSON 库.
Gson gson = new Gson();

String json = gson.toJson(yourObject);

YourClass obj = gson.fromJson(json, YourClass.class);
3. Fastjson
https://mvnrepository.com/artifact/com.alibaba.fastjson2/fastjson2
Fastjson 是阿⾥巴巴开源的 JSON 处理库, 具有⾼性能的特点.该项⽬中我们采⽤fastjson来进⾏数据的处理.
使⽤如下: 添加依赖:
<dependency>
    <groupId>com.alibaba.fastjson2</groupId>
    <artifactId>fastjson2</artifactId>
    <version>2.0.52</version>
</dependency>
封装⼯具类:
@Slf4j
public class JsonUtil<T> {
    /**
     * 字符串转对象
     */
    public static <T> T parseJson(String json ,Class<T> clazz){
        if(!StringUtils.hasLength(json) || clazz == null){
            return null;
        }
        try{
            return JSON.parseObject(json,clazz);
        }catch (Exception e){
            log.error("JsonUtil parseJson error,e:{} ",e);
            return null;
        }
    }


    /**
     * 对象转字符串
     */
    public static String toJson(Object o){
        try{
            return o == null ? null : JSON.toJSONString(o);
        }catch (Exception e){
            log.error("JsonUtil toJson error,e:{} ",e);
            //看需求是否需要抛出异常
            return null;
        }
    }
}
⽤⼾注册修改:
UserServiceImpl修改如下:
注⼊Redis⼯具类
@Autowired
    private Redis redis;

    //redis超时时间:14天
    private static final long EXPIRE_TIME = 14*24*60*60;
    private static final String USER_PREFIX = "user";
⽤⼾注册添加Redis存储逻辑
@Override
    public Integer register(UserInfoRegisterRequest registerRequest) {
        //校验
        checkUserInfo(registerRequest);
        //用户注册,插入数据库
        UserInfo userInfo = BeanConvert.convertUserInfoEncrypt(registerRequest);
        try{
            int result = userInfoMapper.insert(userInfo);
            if(result == 1){
                //存储数据到redis中
                //存储失败,就从数据库查询,此处异常不处理
                redis.set(buildKey(userInfo.getUserName()), JsonUtil.toJson(userInfo),EXPIRE_TIME);
                return userInfo.getId();
            }else{
                throw new BlogException("用户注册失败");
            }
        }catch (Exception e){
            log.error("用户注册失败,e:{}",e);
            throw new BlogException("用户注册失败");
        }
    }

    private String buildKey(String userName) {
        return redis.buildKey(USER_PREFIX,userName);
    }
⽤⼾登录修改;
⽤⼾注册时, 存储数据到Redis中, 那么⽤⼾登录时, 就可以先从Redis中获取数据, 如果Redis中数据不存在(Redis数据可能过期), 则从数据库中查找.
private UserInfo QueryUserInfo(String userName) {
        //先从redis中获取
        String key = buildKey(userName);
        Boolean aBoolean = redis.hasKey(key);
        if(aBoolean){
            //从redis中读取
            log.info("从redis中get数据,key:{}",key);
            String userJson = redis.get(key);
            UserInfo userInfo = JsonUtil.parseJson(userJson,UserInfo.class);
            return userInfo == null ? selectUserInfoByName(userName):userInfo;
        }else {
            log.info("从mysql中get数据,userName:{}",userName);
            UserInfo userInfo = selectUserInfoByName(userName);
            redis.set(key, JsonUtil.toJson(userInfo),EXPIRE_TIME);
            return userInfo;
        }
    }
测试:
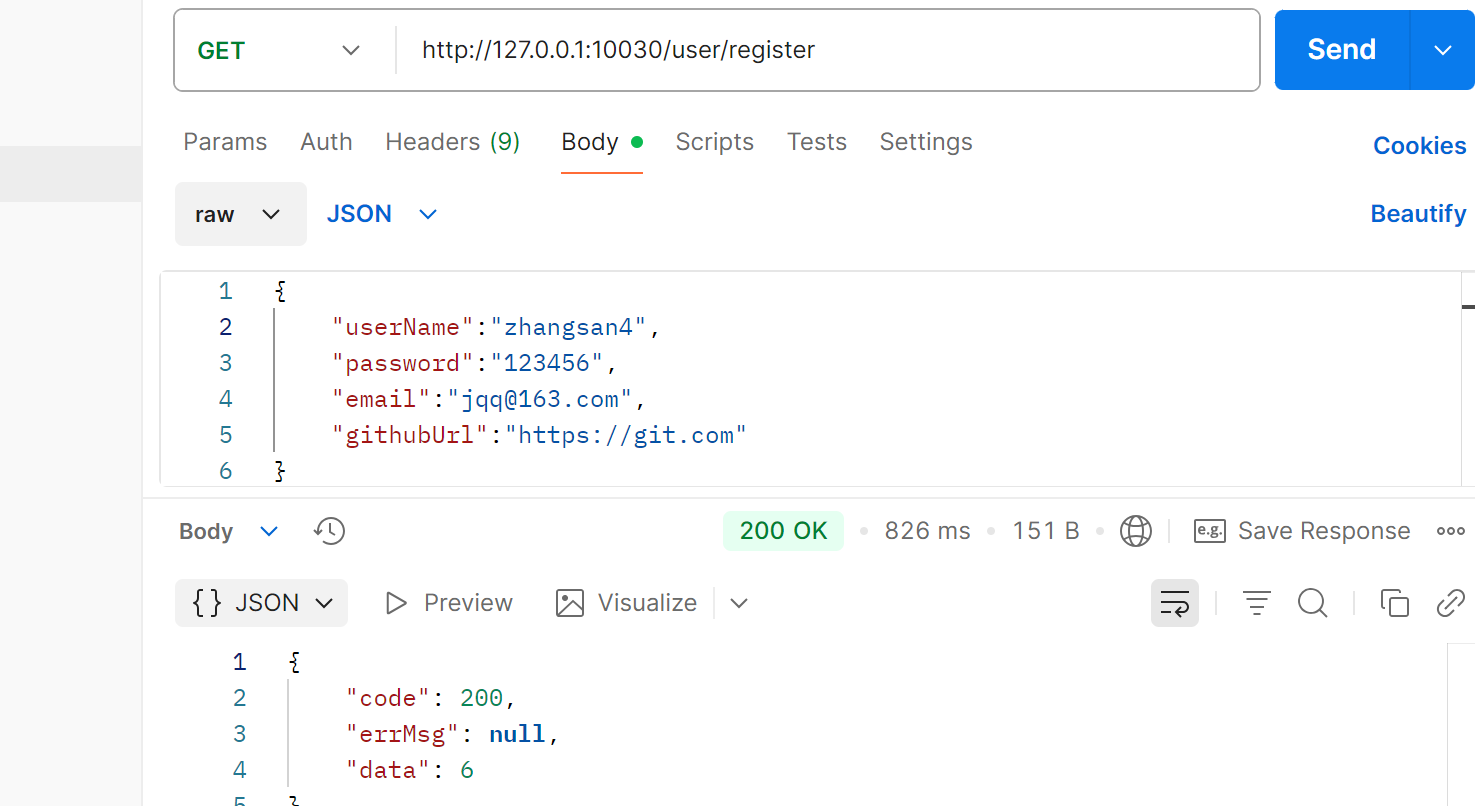
⽤⼾注册: http://127.0.0.1:10030/user/register 程序执⾏成功观察Redis
⽤⼾登录 http://127.0.0.1:10030/user/login 程序执⾏成功,观察⽇志, 从Redis中获取值
把Redis中的值删除, 再次观察⽇志, 从mysql中取值成功
引⼊RabbitMQ:
⽤⼾注册完成之后, 系统会给⽤⼾发送⼀封邮件通知.
但是邮件发送成功失败并不影响我们⽤⼾注册成功.我们可以采⽤RabbitMQ来进⾏服务的解耦.
RabbitMQ介绍:
RabbitMQ 是⼀个开源的消息代理和队列服务器,⼴泛⽤于实现消息队列和事件通知. 它⽀持多种消息协议,并且具有⾼可⽤性、灵活的路由、可靠的消息传递和易于使⽤的管理界⾯.
RabbitMQ简单介绍参考:
1. 什么是 MQ?
MQ( Message queue ), 从字⾯意思上看, 本质是个队列, FIFO 先⼊先出,只不过队列中存放的内容是消息(message) ⽽已. 消息可以⾮常简单,⽐如只包含⽂本字符串, JSON等,也可以很复杂, ⽐如内嵌对象.
MQ多⽤于分布式系统之间进⾏通信. 系统之间的调⽤通常有两种⽅式:
同步通信:
直接调⽤对⽅的服务, 数据从⼀端发出后⽴即就可以达到另⼀端.
异步通信:
数据从⼀端发出后,先进⼊⼀个容器进⾏临时存储,当达到某种条件后,再由这个容器发送给另⼀端. 容器的⼀个具体实现就是MQ( message queue )
RabbitMQ 就是MQ的⼀种实现
2. MQ的作⽤
MQ主要⼯作是接收并转发消息, 在不同的应⽤场景下可以展现不同的作⽤
1. 异步解耦: 在业务流程中, ⼀些操作可能⾮常耗时, 但并不需要即时返回结果. 可以借助MQ把这些操作异步化, ⽐如 ⽤⼾注册后发送注册短信或邮件通知, 可以作为异步任务处理, ⽽不必等待这些操作完成后才告知⽤⼾注册成功.
2. 流量削峰: 在访问量剧增的情况下, 应⽤仍然需要继续发挥作⽤, 但是是这样的突发流量并不常⻅. 如果以能处理这类峰值为标准⽽投⼊资源,⽆疑是巨⼤的浪费. 使⽤MQ能够使关键组件⽀撑突发访问压⼒, 不会因为突发流量⽽崩溃. ⽐如秒杀或者促销活动, 可以使⽤MQ来控制流量, 将请求排队, 然后系统根据⾃⼰的处理能⼒逐步处理这些请求.
3. 异步通信: 在很多时候应⽤不需要⽴即处理消息, MQ提供了异步处理机制, 允许应⽤把⼀些消息放⼊MQ中, 但并不⽴即处理它,在需要的时候再慢慢处理.
4. 消息分发: 当多个系统需要对同⼀数据做出响应时, 可以使⽤MQ进⾏消息分发. ⽐如⽀付成功后, ⽀付系统可以向MQ发送消息, 其他系统订阅该消息, ⽽⽆需轮询数据库.
5. 延迟通知: 在需要在特定时间后发送通知的场景中, 可以使⽤MQ的延迟消息功能, ⽐如在电⼦商务平台中,如果⽤⼾下单后⼀定时间内未⽀付,可以使⽤延迟队列在超时后⾃动取消订单
6. ......
3. 为什么选择 RabbitMQ
⽬前业界有很多的MQ产品, 例如RabbitMQ, RocketMQ, ActiveMQ, Kafka, ZeroMQ等, 也有直接使⽤Redis充当消息队列的案例, 这些消息队列, 各有侧重, 也没有好坏, 只有适合不适合, 在实际选型时, 需要结合⾃⾝需求以及MQ产品特征, 综合考虑
以下介绍⼀下当前最主流的3种MQ产品
Kafka:
Kafka⼀开始的⽬的就是⽤于⽇志收集和传输,追求⾼吞吐量, 性能卓越, 单机吞吐达到⼗万级, 在⽇志领域⽐较成熟, 功能较为简单,主要⽀持简单的 MQ 功能, 如果有⽇志采集需求,肯定是⾸选kafka了。
RocketMQ:
RocketMQ采⽤Java语⾔开发, 由阿⾥巴巴开源, 后捐赠给了Apache.
它在设计时借鉴了Kafka,并做出了⼀些⾃⼰的改进, ⻘出于蓝⽽胜于蓝, 经过多年双⼗⼀的洗礼, 在可⽤性、可靠性以及稳定性等⽅⾯都有出⾊的表现. 适合对于可靠性⽐较⾼,且并发⽐较⼤的场景, ⽐如互联⽹⾦融. 但⽀持的客⼾端语⾔不多, 且社区活跃度⼀般
RabbitMQ:
采⽤Erlang语⾔开发, MQ 功能⽐较完备, 且⼏乎⽀持所有主流语⾔,开源提供的界⾯也⾮常友好, 性能较好, 吞吐量能达到万级, 社区活跃度也⽐较⾼,⽐较适合中⼩型公司, 数据量没那么⼤, 且并发没那么⾼的场景.
综合: 由于 RabbitMQ 的综合能⼒较强, 咱们这边的项⽬没有那么⼤的⾼并发, 且RabbitMQ社区⽐较成熟, 管理界⾯友好, 所以咱们接下来主要RabbitMQ的使⽤
4. RabbitMQ 的安装
Ubuntu 环境安装
RabbitMQ已经包含在标准的Ubuntu仓库中, 然⽽,包含的版本通常⽐最新的RabbitMQ发⾏版落后很多,可能提供的RabbitMQ版本已经不⽀持. RabbitMQ团队制作了⾃⼰的软件包,并使⽤Cloudsmith进⾏分发
具体操作可以参考: Installing on Debian and Ubuntu | RabbitMQ
由于该种⽅法安装⽐较复杂, 使⽤Ubuntu仓库中的版本来安装
⼀. 安装Erlang
RabbitMq需要Erlang语⾔的⽀持,在安装rabbitMq之前需要安装erlang
更新软件包

sudo apt-get update

安装erlang

sudo apt-get install erlang

查看erlang版本

erl

退出命令:

halt().
⼆. 安装RabbitMQ
更新软件包

sudo apt-get update

安装RabbitMQ

sudo apt-get install rabbitmq-server

确认安装结果

systemctl status rabbitmq-server
三. 安装RabbitMQ管理界⾯
默认是不安装管理界⾯的
rabbitmq-plugins enable rabbitmq_management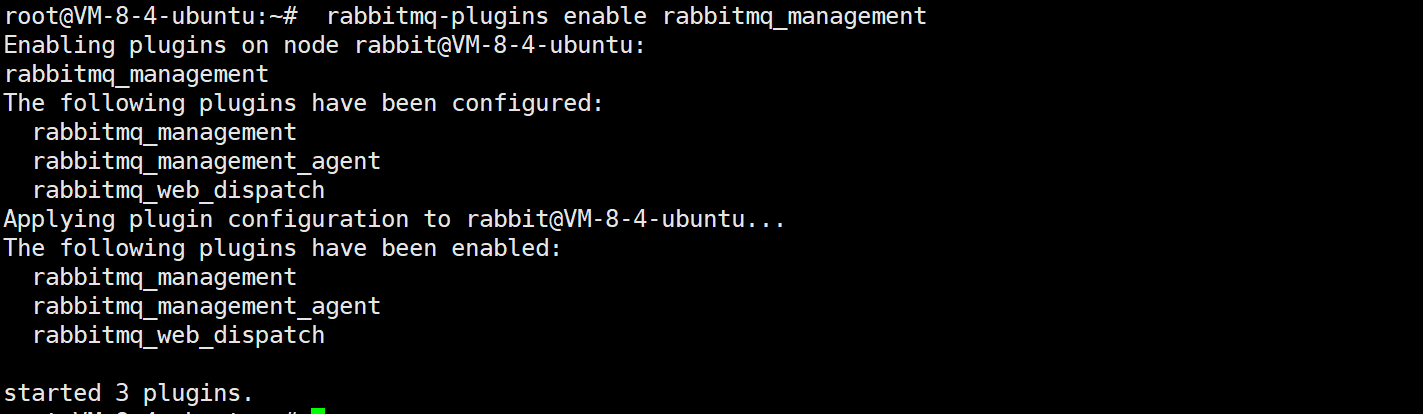
四. 启动服务并访问
1. 启动服务
若服务已经启动了, 此步省略
sudo service rabbitmq-server start

systemctl status rabbitmq-server
2. 通过 IP:port 访问界⾯
http://110.41.51.65:15672/ (15672 为默认端⼝号, 云服务器需要开启端⼝))
服务端通信默认端口号5672
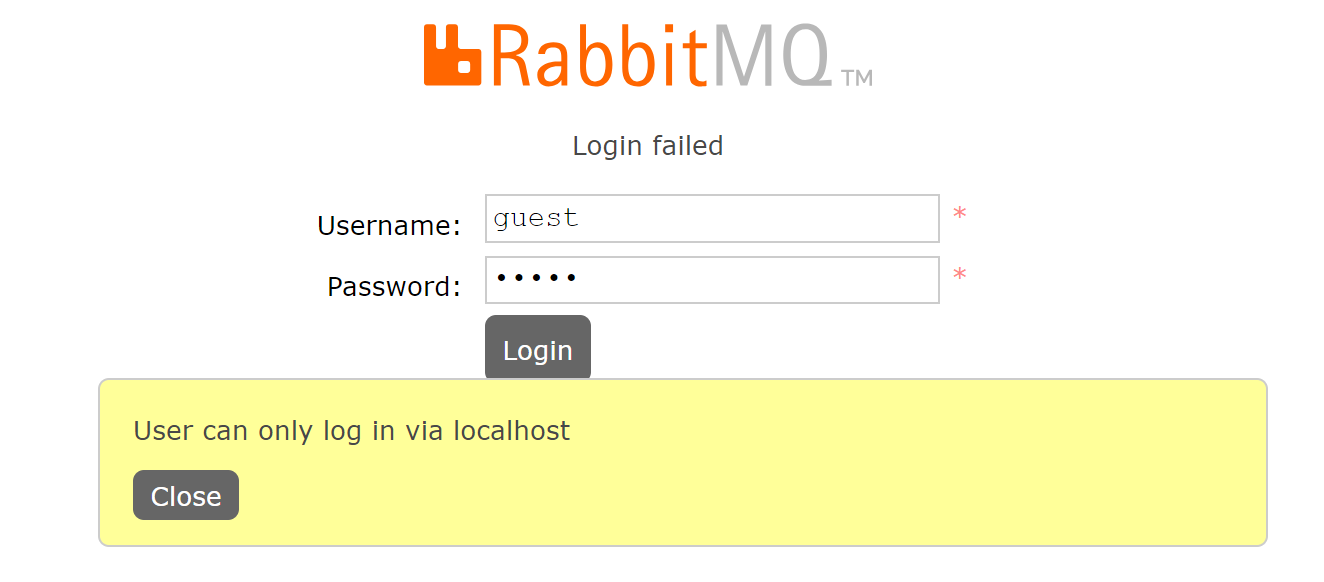
默认⽤⼾名和密码都是: guest
rabbitmq从3.3.0开始禁⽌使⽤guest/guest权限通过除localhost外的访问,
3. 添加管理员⽤⼾
a) 添加⽤⼾admin, 密码:admin
#rabbitmqctl add_user ${账号} ${密码}
rabbitmqctl add_user admin admin b) 给⽤⼾添加权限
#rabbitmqctl set_user_tags ${账号} ${⻆⾊名称}
rabbitmqctl set_user_tags admin administrator 以下⻆⾊可选:
RabbitMQ⽤⼾⻆⾊分为Administrator、Monitoring、Policymaker、Management、Impersonator、None共六种⻆⾊
1. Administrator 超级管理员,可登陆管理控制台(启⽤management plugin的情况下),可查看所有的信息,并且可以对⽤⼾,策略(policy)进⾏操作
2. Monitoring 监控者,可登陆管理控制台(启⽤management plugin的情况下),同时可以查看rabbitmq节点的相关信息(进程数,内存使⽤情况,磁盘使⽤情况等)。
3. Policymaker 策略制定者,可登陆管理控制台(启⽤management plugin的情况下),同时可以对policy进⾏管理。但⽆法查看节点的相关信息.
4. Management 普通管理者,仅可登陆管理控制台(启⽤management plugin的情况下),⽆法看到节点信息,也⽆法对策略进⾏管理.
5. Impersonator 模拟者,⽆法登录管理控制台。
6. None 其他⽤⼾,⽆法登陆管理控制台,通常就是普通的⽣产者和消费者。
c) 通过IP:port访问, 并使⽤刚才设置的⽤⼾名和密码登录 http://110.41.51.65:15672
5. RabbitMQ 核⼼概念
在安装完RabbitMQ之后, 并安装了管理界⾯
界⾯上的导航栏共分6部分, 这6部分分别是什么意思呢, 我们先看看RabbitMQ的⼯作流程
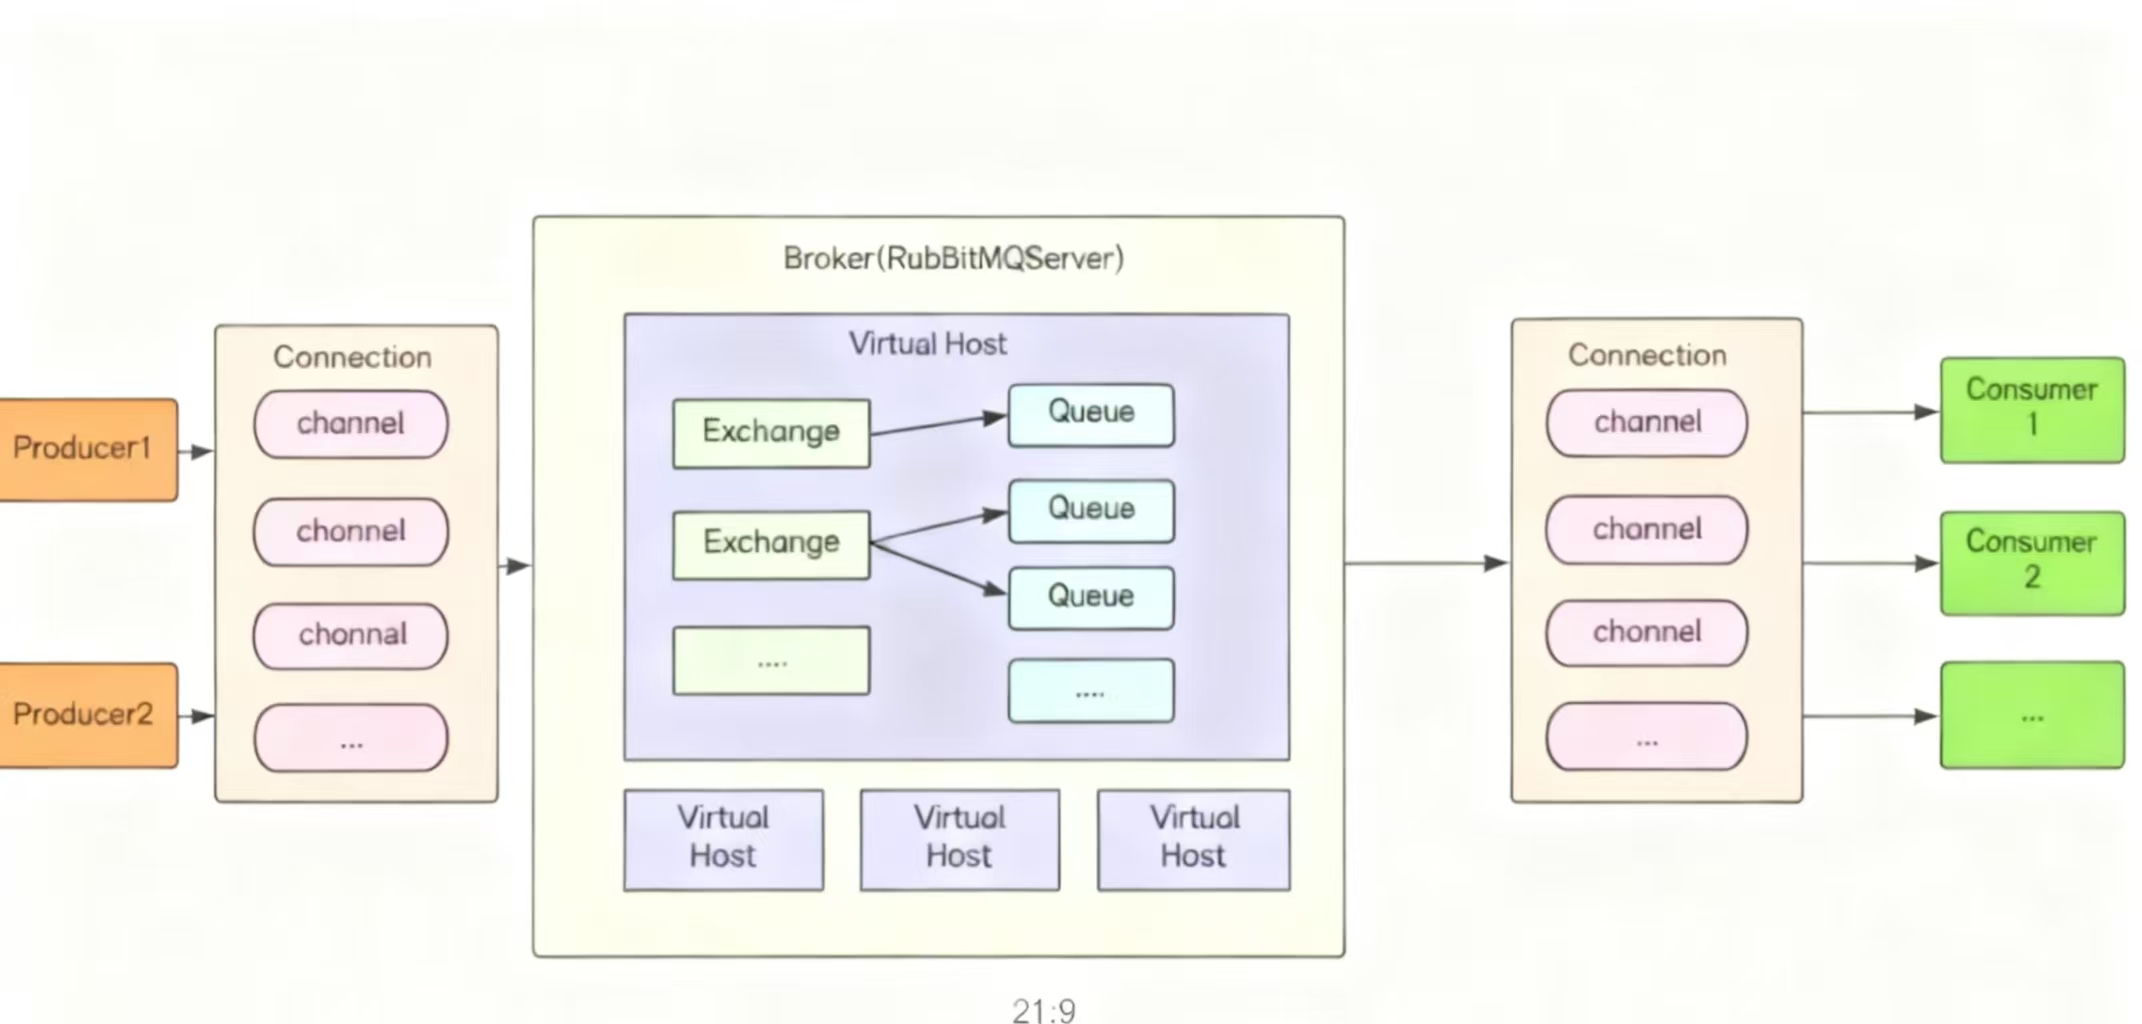
RabbitMQ是⼀个消息中间件, 也是⼀个⽣产者消费者模型. 它负责接收, 存储并转发消息.
消息传递的过程类似邮局.
当你要发送⼀个邮件时,你把你的邮件放到邮局,邮局接收邮件, 并通过邮递员送到收件⼈的⼿上.
按照这个逻辑, Producer 就类似邮件发件⼈. Consumer 就是收件⼈, RabbitMQ就类似于邮局
Producer和Consumer:
Producer: ⽣产者, 是RabbitMQ Server的客⼾端, 向RabbitMQ发送消息
Consumer: 消费者, 也是RabbitMQ Server的客⼾端, 从RabbitMQ接收消息
Broker:其实就是RabbitMQ Server, 主要是接收和收发消息
• ⽣产者(Producer)创建消息, 然后发布到RabbitMQ中. 在实际应⽤中, 消息通常是⼀个带有⼀定业务逻辑结构的数据, ⽐如JSON字符串. 消息可以带有⼀定的标签, RabbitMQ会根据标签进⾏路由, 把消息发送给感兴趣的消费者(Consumer).
• 消费者连接到RabbitMQ服务器, 就可以消费消息了, 消费的过程中, 标签会被丢掉. 消费者只会收到消息, 并不知道消息的⽣产者是谁, 当然消费者也不需要知道.
• 对于RabbitMQ来说,⼀个RabbitMQ Broker可以简单地看作⼀个RabbitMQ服务节点, 或者RabbitMQ服务实例. ⼤多数情况下也可以将⼀个RabbitMQ Broker看作⼀台RabbitMQ服务器
Connection和Channel:
Connection: 连接. 是客⼾端和RabbitMQ服务器之间的⼀个TCP连接. 这个连接是建⽴消息传递的基础, 它负责传输客⼾端和服务器之间的所有数据和控制信息.(端口号默认:5672)
Channel: 通道, 信道. Channel是在Connection之上的⼀个抽象层. 在 RabbitMQ 中, ⼀个TCP连接可以有多个Channel, 每个Channel 都是独⽴的虚拟连接. 消息的发送和接收都是基于 Channel的.
通道的主要作⽤是将消息的读写操作复⽤到同⼀个TCP连接上,这样可以减少建⽴和关闭连接的开销, 提⾼性能.
Virtual host:
Virtual host: 虚拟主机. 这是⼀个虚拟概念. 它为消息队列提供了⼀种逻辑上的隔离机制. 对于RabbitMQ⽽⾔, ⼀个 BrokerServer 上可以存在多个 Virtual Host. 当多个不同的⽤⼾使⽤同⼀个 RabbitMQ Server 提供的服务时,可以虚拟划分出多个 vhost,每个⽤⼾在⾃⼰的 vhost 创建 exchange/queue 等
类似MySQL的"database", 是⼀个逻辑上的集合. ⼀个MySQL服务器可以有多个database.
Queue
Queue: 队列, 是RabbitMQ的内部对象, ⽤于存储消息.
多个消费者, 可以订阅同⼀个队列
Exchange:
Exchange: 交换机. message 到达 broker 的第⼀站, 它负责接收⽣产者发送的消息, 并根据特定的规则把这些消息路由到⼀个或多个Queue列中.
Exchange起到了消息路由的作⽤,它根据类型和规则来确定如何转发接收到的消息.
类似于发快递之后, 物流公司怎么处理呢, 根据咱们的地址来分派这个快递到不同的站点, 然后再送到收件⼈⼿⾥. 这个分配的⼯作,就是交换机来做的
RabbitMQ⼯作流程:
理解了上⾯的概念之后, 再来回顾⼀下这个图, 来看RabbitMQ的⼯作流程
1. Producer ⽣产了⼀条消息
2. Producer 连接到RabbitMQBroker, 建⽴⼀个连接(Connection),开启⼀个信道(Channel)
3. Producer 声明⼀个交换机(Exchange), 路由消息
4. Producer 声明⼀个队列(Queue), 存放信息
5. Producer 发送消息⾄RabbitMQ Broker
6. RabbitMQ Broker 接收消息, 并存⼊相应的队列(Queue)中, 如果未找到相应的队列, 则根据⽣产者的配置, 选择丢弃或者退回给⽣产者.
6. AMQP
AMQP(Advanced Message Queuing Protocol)是⼀种⾼级消息队列协议, AMQP定义了⼀套确定的消息交换功能, 包括交换器(Exchange), 队列(Queue) 等. 这些组件共同⼯作, 使得⽣产者能够将消息发送到交换器. 然后由队列接收并等待消费者接收. AMQP还定义了⼀个⽹络协议, 允许客⼾端应⽤通过该协议与消息代理和AMQP模型进⾏交互通信
RabbitMQ是遵从AMQP协议的,换句话说,RabbitMQ就是AMQP协议的Erlang的实现(当然RabbitMQ还⽀持STOMP2, MQTT2等协议). AMQP的模型结构和RabbitMQ的模型结构是⼀样的.
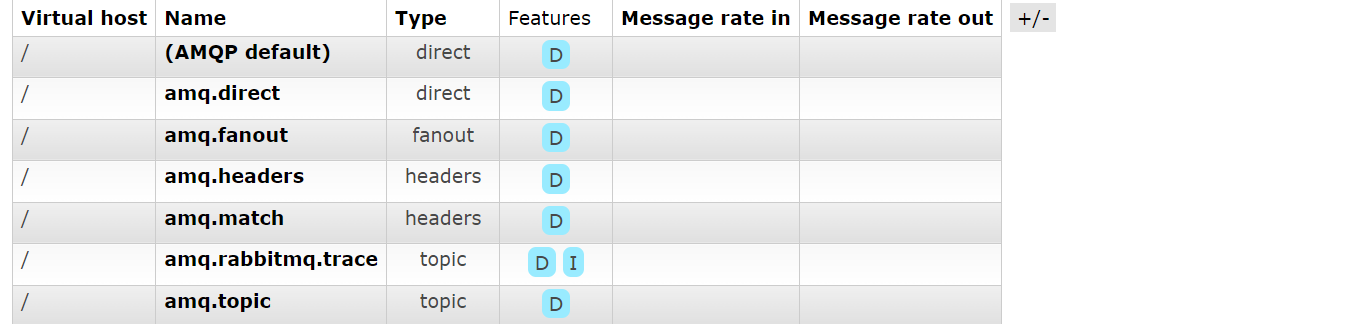
7. web界⾯操作
RabbitMQ管理界⾯上的Connections,Channels, Exchange, Queues 就是和上⾯流程图的概念是⼀样的, Overview就是视图的意思, Admin是⽤⼾管理.
我们在操作RabbitMQ前, 需要先创建Virtual host 接下来看具体操作:
⽤⼾相关操作:
添加⽤⼾
a) 点击 Admin -> Add user
b) 设置账号密码及权限
①: 设置账号
②: 设置密码
③: 确认密码
④: 设置权限
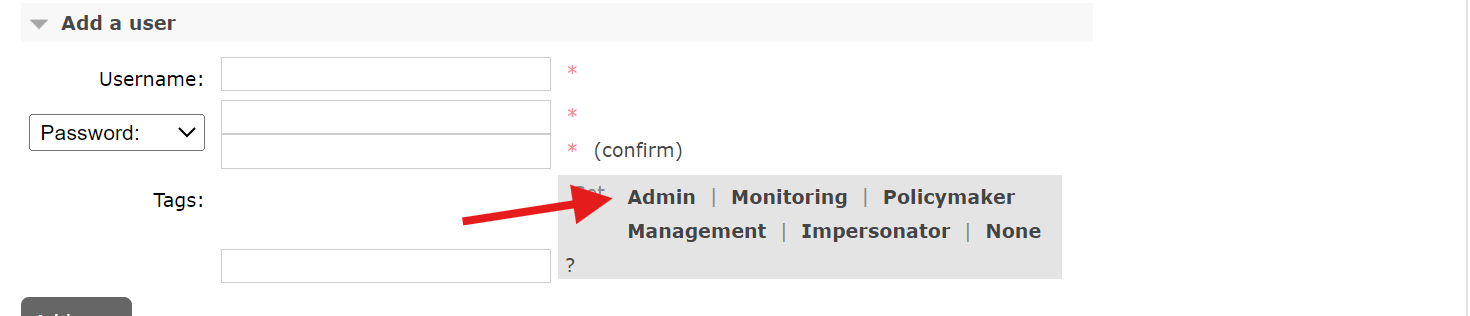
添加完成后, 点击[Add user]
c) 观察⽤⼾是否添加成功
⽤⼾相关操作:
a) 点击要删除的⽤⼾, 查看⽤⼾详情
b) 在⽤⼾详情⻚⾯, 进⾏更新或删除操作
• 设置对虚拟机的操作权限
• 更新/删除⽤⼾
退出当前⽤⼾
虚拟主机相关操作:
创建虚拟主机
在Admin标签⻚下, 点击右侧 Virtual Hosts -> Add a new virtual host 设置虚拟主机名称
观察设置结果
此操作会为当前登录⽤⼾设置虚拟主机
8. SpringBoot 继承RabbitMQ
对于RabbitMQ开发, Spring 也提供了⼀些便利. Spring 和RabbitMQ的官⽅⽂档对此均有介绍 Spring官⽅: Spring AMQP
RabbitMQ 官⽅:RabbitMQ tutorial - "Hello World!" | RabbitMQ
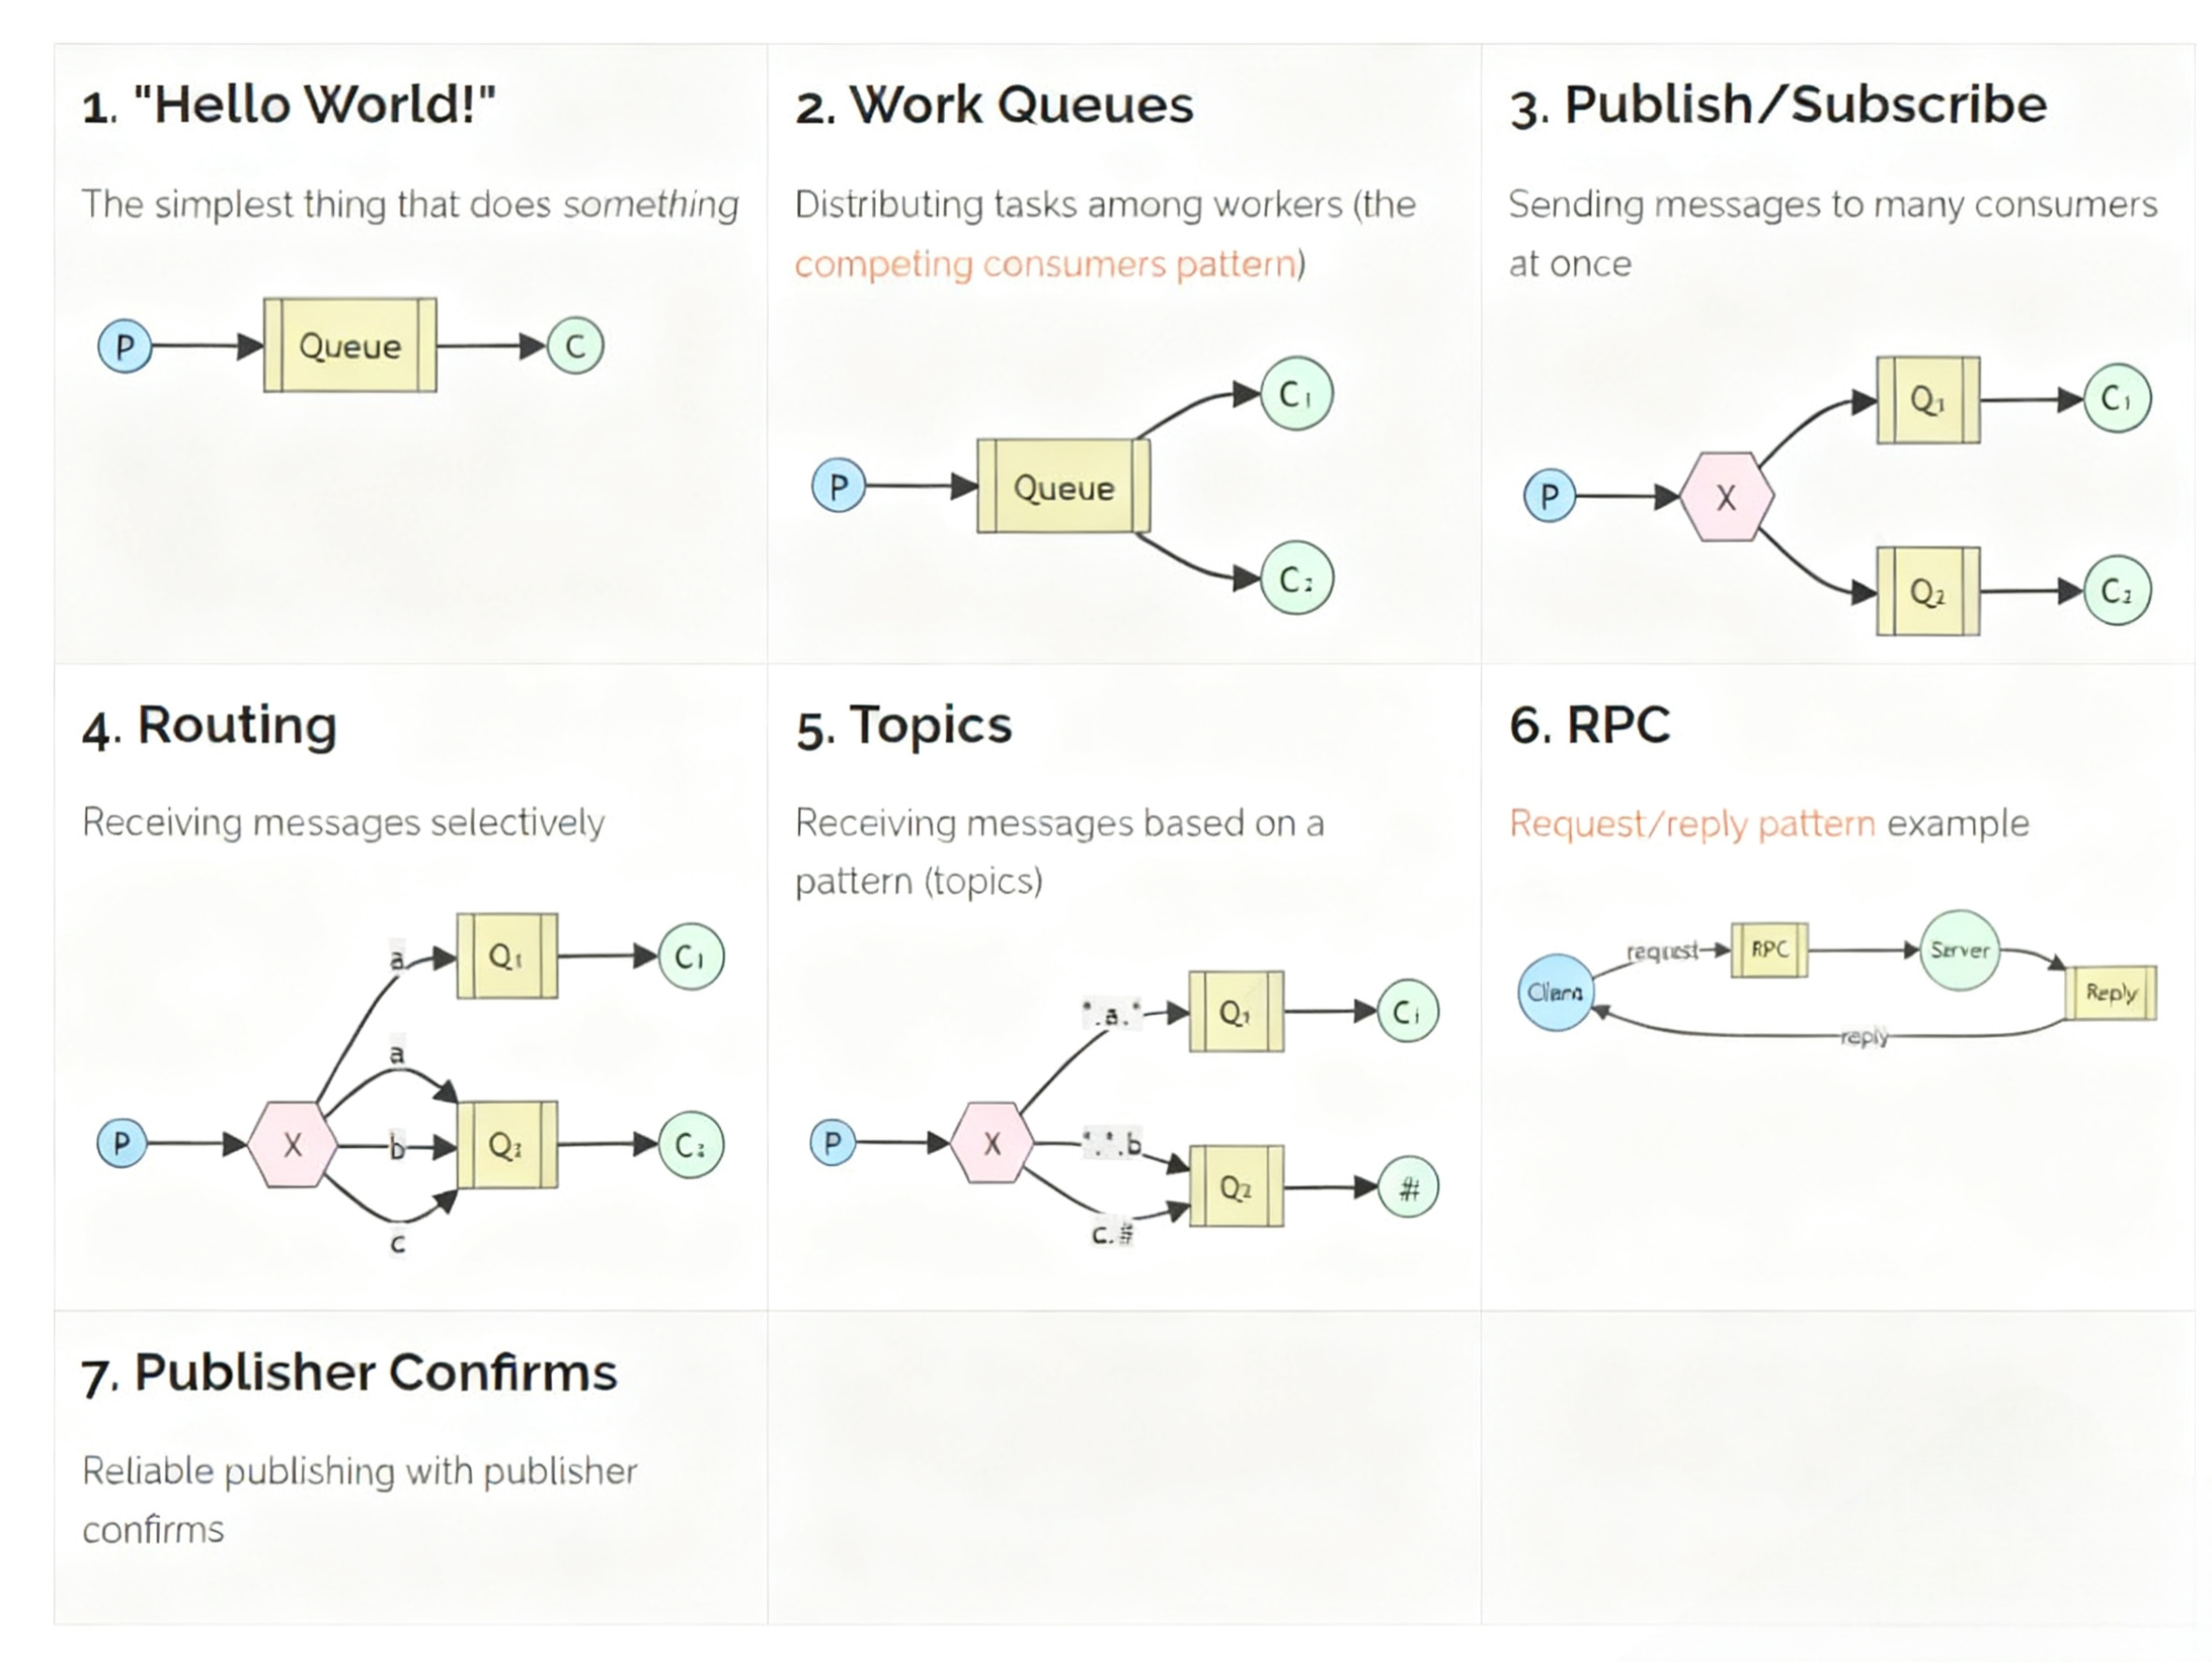
RabbitMQ 共提供了7种⼯作模式, 进⾏消息传递, :
https://www.rabbitmq.com/tutorials

下⾯来看如何基于SpringBoot 进⾏RabbitMQ的开发. 步骤如下:
1. 引⼊依赖
2. 编写yml配置,基本信息配置
3. 编写⽣产者代码
4. 编写消费者代码
a. 定义监听类, 使⽤@RabbitListener注解完成队列监听
5. 运⾏观察结果
引⼊依赖
<dependency>
    <groupId>org.springframework.boot</groupId>
    <artifactId>spring-boot-starter-amqp</artifactId>
</dependency>
也可以通过创建项⽬时, 加⼊依赖
添加配置
#配置RabbitMQ的基本信息
spring:
    rabbitmq:
        host: 110.41.51.65
        port: 15673    默认为5672
        username: study
        password: study
        virtual-host: jqq    默认值为 /
或以下配置
amqp://username:password@Ip:port/virtual-host

spring:
    rabbitmq:
        addresses: amqp://study:study@47.108.157.13:5672/jqq
编写⽣产者代码
声明队列
@Configuration
public class RabbitConfig {
@Bean("helloQueue")
public Queue queue(){
return QueueBuilder.durable("hello").build();//durable表示持久化 ,队列名称:hello
}
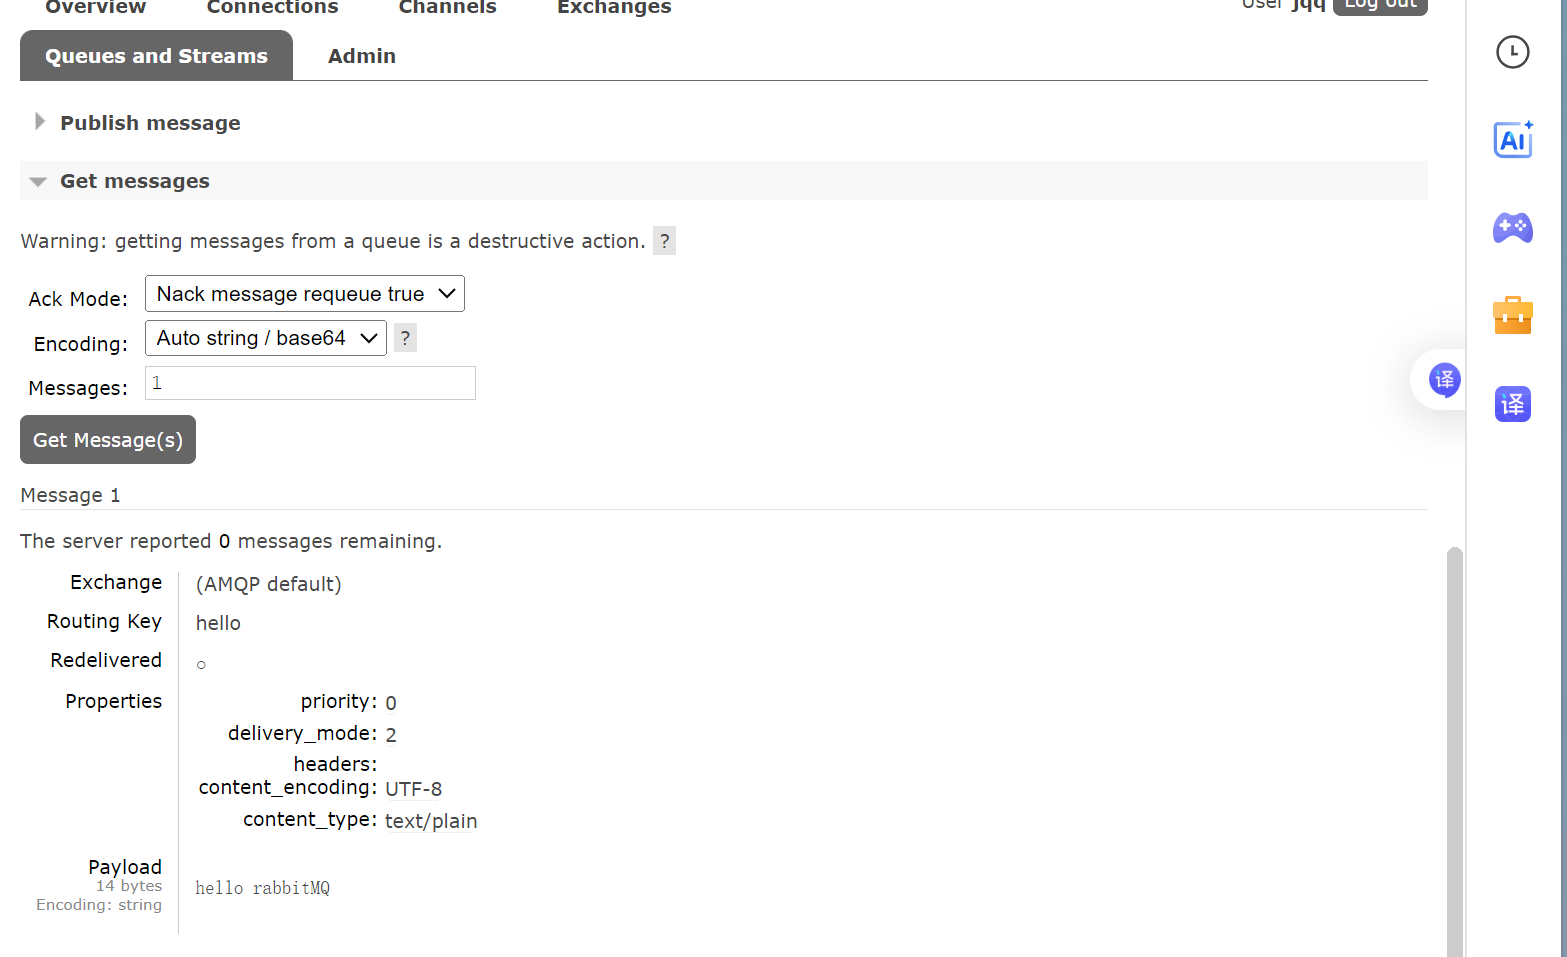
}测试发送消息
@SpringBootTest
public class RabbitMQTest {
    @Autowired
    private RabbitTemplate rabbitTemplate;

    @Test
    void send(){
        rabbitTemplate.convertAndSend("","hello","hello rabbitMQ");
    }
}
运⾏程序, 观察消息发送成功
编写消费者代码
定义监听类
@Component
public class HelloQueueListener {
    @RabbitListener(queues = "hello")
    public void handler(Message message){
        System.out.println("收到消息:"+message);
    }
}
@RabbitListener 是Spring框架中⽤于监听RabbitMQ队列的注解, 通过使⽤这个注解,可以定义⼀个⽅法, 以便从RabbitMQ队列中接收消息. 该注解⽀持多种参数类型,这些参数类型代表了从RabbitMQ接收到的消息和相关信息. 以下是⼀些常⽤的参数类型:
1. String :返回消息的内容
2. Message ( org.springframework.amqp.core.Message ): Spring AMQP的Message 类,返回原始的消息体以及消息的属性, 如消息ID, 内容, 队列信息等.
3. Channel ( com.rabbitmq.client.Channel ):RabbitMQ的通道对象, 可以⽤于进⾏更⾼级的操作,如⼿动确认消息.
运⾏程序, 观察结果
消费者打印消息内容

集成RabbitMQ:
引⼊依赖:
<dependency>
    <groupId>org.springframework.boot</groupId>
    <artifactId>spring-boot-starter-amqp</artifactId>
</dependency>
添加配置, 并配置⼿动确认⽅式
#配置RabbitMQ的基本信息
spring:
    rabbitmq:
        host: 110.41.51.65
        port: 15673    默认为5672
        username: study
        password: study
        virtual-host: jqq    默认值为 /
或以下配置
amqp://username:password@Ip:port/virtual-host

spring:
    rabbitmq:
        addresses: amqp://study:study@47.108.157.13:5672/jqq
    listener:
        simple:
            acknowledge-mode: manual   配置⼿动确认
声明队列, 交换机
    @Bean("userQueue")
    public Queue userQueue(){
        return QueueBuilder.durable(Constants.USER_QUEUE_NAME).build();
    }

    @Bean("userExchange")
    public FanoutExchange userExchange(){
        return ExchangeBuilder.fanoutExchange(Constants.USER_EXCHANGE_NAME).durable(true).build();
    }

    @Bean("userBinding")
    public Binding userBinding(@Qualifier("userQueue") Queue userQueue,@Qualifier("userExchange") FanoutExchange userExchange){
        return BindingBuilder.bind(userQueue).to(userExchange);
    }
发送消息
//发送消息
userInfo.setPassword("");

rabbitTemplate.convertAndSend(Constants.USER_EXCHANGE_NAME,"",JsonUtil.toJson(userInfo));
消费消息
@Slf4j
@Component
public class UserQueueListener {
    @RabbitListener(queues = Constants.USER_QUEUE_NAME)
    public void handler(Message message,Channel channel) throws IOException {
        //发送邮件
        long deliveryTag = message.getMessageProperties().getDeliveryTag();
        try {
            String body = new String(message.getBody());
            log.info("收到用户信息,body:{}",body);
            //发送邮件
            //确认
            channel.basicAck(deliveryTag,true);
        }catch (Exception e){
            //否定确认
            channel.basicNack(deliveryTag,true,true);
            log.error("邮件发送失败,e:",e);
        }
    }
}
也可以使⽤ @RabbitListener 来声明队列, 交换机
@RabbitListener是⼀个功能强⼤的注解。这个注解⾥⾯可以注解配置@QueueBinding、@Queue、@Exchange直接通过这个组合注解⼀次性搞定多个交换机、绑定、路由、并且配置监听功能等
@RabbitListener(bindings = @QueueBinding(
            value = @Queue(value = Constants.USER_QUEUE_NAME,durable = "true"),
            exchange = @Exchange(value = Constants.USER_EXCHANGE_NAME,durable = "true",type = ExchangeTypes.FANOUT)
    ))
    public void handler(Message message,Channel channel) throws IOException {
        //发送邮件
        long deliveryTag = message.getMessageProperties().getDeliveryTag();
        try {
            String body = new String(message.getBody());
            log.info("收到用户信息,body:{}",body);
            //发送邮件
            //确认
            channel.basicAck(deliveryTag,true);
        }catch (Exception e){
            //否定确认
            channel.basicNack(deliveryTag,true,true);
            log.error("邮件发送失败,e:",e);
        }
    }
测试: http://127.0.0.1:10030/user/register
⽤⼾注册成功时, 从⽇志观察, 消费者接收到消息

引⼊邮件发送:
基于 JavaMail API,Spring Boot 提供了⼀个⽤于发送邮件的Starter: spring-boot-startermail . 通过简单的配置即可实现邮件发送功能. 参考: Spring Boot 发送邮件
快速上⼿
引⼊依赖
<!--邮件发送依赖-->
        <dependency>
            <groupId>org.springframework.boot</groupId>
            <artifactId>spring-boot-starter-mail</artifactId>
        </dependency>
配置邮箱
spring:
    mail:
        host: smtp.qq.com       #需要在设置中开启 smtp
        username: 3471714098@qq.com  #发件⼈的邮箱
        password: sndvxlvhcfcidbbe      #邮箱的授权码, 并⾮个⼈密码
        port: 465  # SSL加密端口(必须用465,不能用25)
        protocol: smtp
        default-encoding: UTF-8
        properties:
          personal: "JQQ"
          mail:
            smtp:
              ssl:
                  enable: true  # 强制启用SSL加密(关键配置)
              socketFactory:
                  class: javax.net.ssl.SSLSocketFactory  # SSL连接工厂
auth: true # 启用认证| host: smtp.qq.com | #需要在设置中开启 smtp |
| username: XXXXX@qq.com | #发件⼈的邮箱 |
| password: XXXXXXXX |
password:#邮箱的授权码, 并⾮个⼈密码
邮箱授权码通常在: 邮箱设置-》第三⽅服务-》开启IMAP/SMTP服务-》获取授权码
测试发送邮件
@SpringBootTest
public class MailTest {

    @Autowired
    private JavaMailSender mailSender;

    @Test
    void send() throws Exception {
        MimeMessage mimeMessage = mailSender.createMimeMessage();
        MimeMessageHelper helper = new MimeMessageHelper(mimeMessage, false);
        helper.setFrom("3471714098@qq.com","JQQ");
        helper.setTo("2147406100@qq.com");
        helper.setSubject("测试邮件发送");
        helper.setText("<h1>注册用户成功</h1>",true);

        mailSender.send(mimeMessage);

    }
}
⼯具封装:
把邮件发送功能封装成⼀个⼯具
发件⼈邮件和名称从配置⽂件中读取, 关于邮箱的配置会被封装到 MailProperties 这个对象中.
public class Mail {
    private JavaMailSender mailSender;

    private MailProperties mailProperties;

    public Mail(JavaMailSender mailSender,MailProperties mailProperties) {
        this.mailSender = mailSender;
        this.mailProperties = mailProperties;
    }

    public void send(String to,String subject,String content) throws Exception {
        MimeMessage mimeMessage = mailSender.createMimeMessage();
        MimeMessageHelper helper = new MimeMessageHelper(mimeMessage, false);
        String personal = Optional.ofNullable(mailProperties.getProperties().get("personal")).orElse(mailProperties.getUsername());
        helper.setFrom(mailProperties.getUsername(),personal);//发件人
        helper.setTo(to); //收件人
        helper.setSubject(subject); //邮件主题
        helper.setText(content,true);
        mailSender.send(mimeMessage);

    }
}
@Configuration
public class MailConfig {
@Bean
@ConditionalOnProperty(prefix = "spring.mail",name = "username")
public Mail mail(JavaMailSender javaMailSender, MailProperties mailProperties){
return new Mail(javaMailSender,mailProperties);
}
}把 com.bite.common.config.MailConfig 添加到SpringBoot ⾃动配置⽂件中org.springframework.boot.autoconfigure.AutoConfiguration.imports
项⽬应⽤:
配置yml
spring:
    mail:
        host: smtp.qq.com       #需要在设置中开启 smtp
        username: 3471714098@qq.com  #发件⼈的邮箱
        password: sndvxlvhcfcidbbe      #邮箱的授权码, 并⾮个⼈密码
        port: 465  # SSL加密端口(必须用465,不能用25)
        protocol: smtp
        default-encoding: UTF-8
        properties:
          personal: "JQQ"
          mail:
            smtp:
              ssl:
                  enable: true  # 强制启用SSL加密(关键配置)
              socketFactory:
                  class: javax.net.ssl.SSLSocketFactory  # SSL连接工厂
              auth: true  # 启用认证
当消费者收到MQ消息后, 发送消息
@Autowired
    private Mail mail;

mail.send(userInfo.getEmail(), "恭喜加入J家军",buildContent(userInfo.getUserName()));

public String buildContent(String userName){
        StringBuilder builder = new StringBuilder();
        builder.append("尊敬的").append(userName).append(",您好!").append("<br/>");
        builder.append("感谢您注册成为我们J家军的一员!我们很高兴您加入我们的大家庭!<br/>");
        builder.append("您的注册信息如下:用户名:").append(userName).append("<br/>");
        builder.append("为了您的账户安全,请妥善保管您的登录信息...");
        return builder.toString();
    }
7. 前端开发&部署
Nignx简单介绍参考
1. Nginx 介绍
Nginx是⼀款开源的 Web 服务器软件, 可以⽤作反向代理、负载均衡器. 它因⾼性能, ⾼稳定性, 丰富的功能和低资源消耗⽽闻名.
Nginx本⾝也是⼀个静态资源的服务器, 当只有静态资源的时候, 可以使⽤Nginx来做服务器实现部署.
2. Nignx 下载及安装
官⽹下载: https://nginx.org/en/download.html
安装
Windows:
1. 下载完成后,将压缩包解压到本地, 放在希望安装的地⽅即可
2. 启动nginx
双击nginx.exe, 启动Nginx, 访问: http://127.0.0.1:80/
出现以下界⾯, 说明nginx启动成功
3. 启停命令
我们也可以掌握⼀些命令来启停nginx. 进⼊Nginx的安装⽬录cmd
启动

start nginx

停⽌

.\nginx.exe -s stop

或者.\nginx.exe -s quit
stop是快速停⽌nginx,可能并不保存相关信息;quit是完整有序的停⽌nginx,并保存相关信息
Ubuntu
安装命令
更新软件包

sudo apt-get update

安装nginx

sudo apt-get install nginx

查看nginx版本

nginx -v

启动nginx

systemctl start nginx

查看nginx状态

systemctl status nginx
开放80端⼝号, 访问Nginx
3. 配置⾃⼰项⽬
Windows
修改 conf/nginx.conf
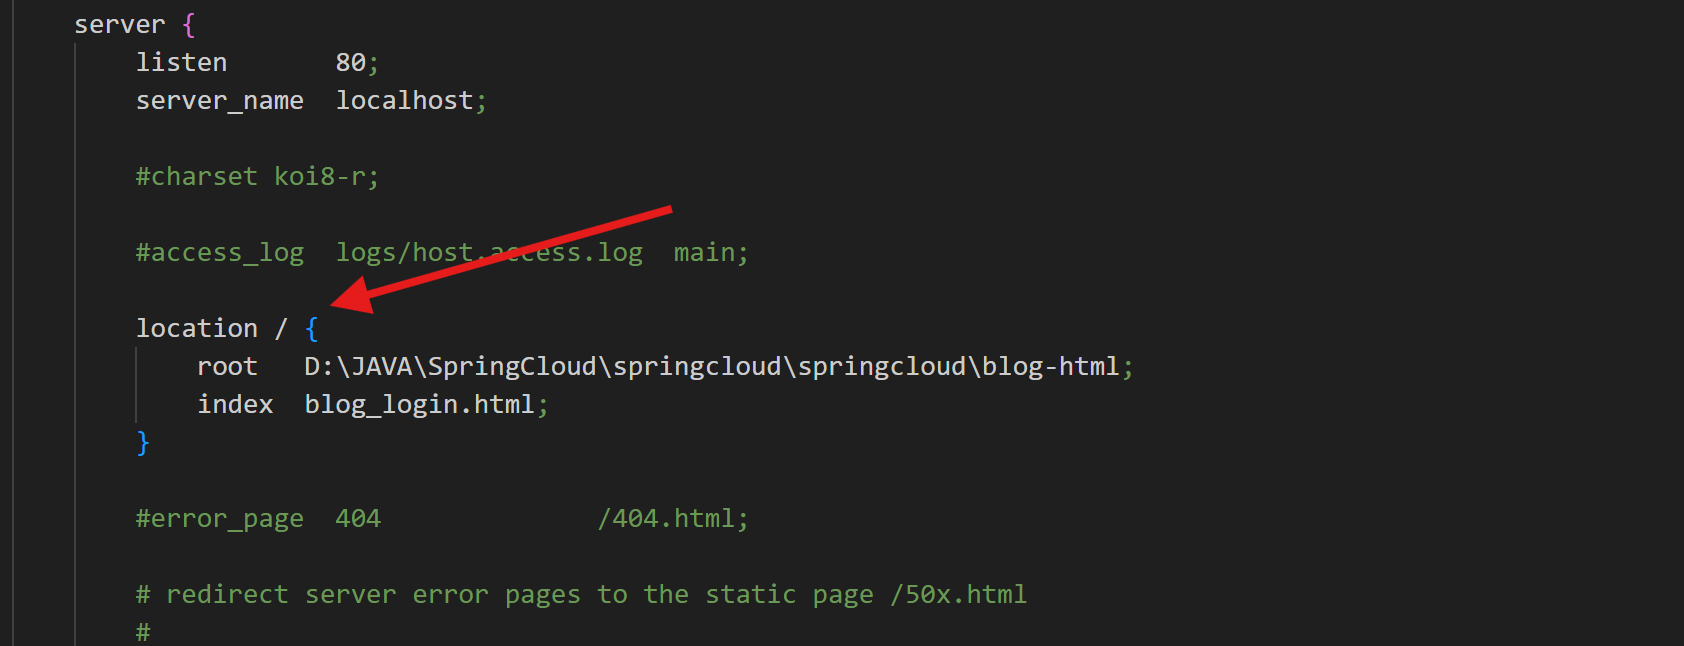
Nginx 默认端⼝号为80, 访问路径为html/index.html 或者index.html, 可以改成⾃⼰的⽬录
访问 http://127.0.0.1:80, 就可以看到⾃⼰配置的项⽬了.
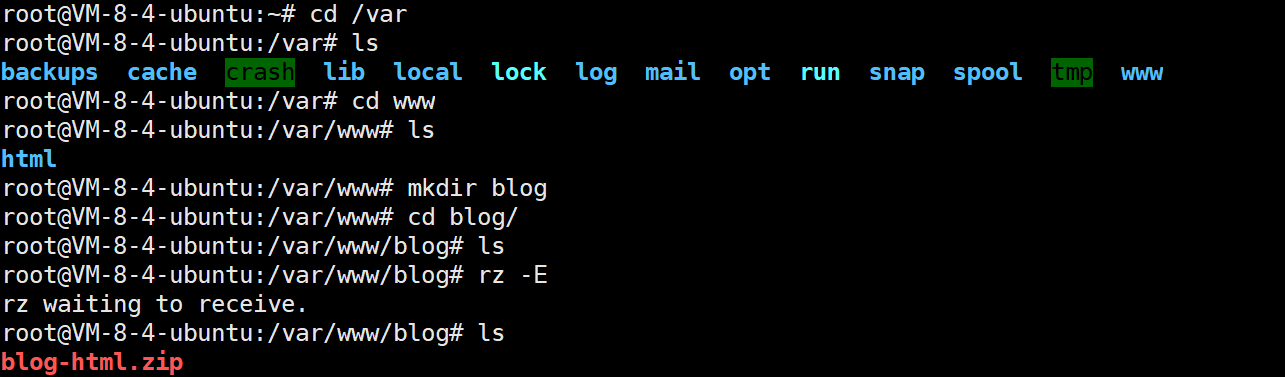
Ubuntu
修改配置⽂件 /etc/nginx/sites-enabled/default 修改访问路径为⾃⼰的⽬录和⽂件
本地部署前端服务:
部署前端:
把Spring-boot中开发好的前端代码, 放在某个⽬录下, 配置Nginx访问路径
修改访问路径
因为前后端完全分离, 不在⼀个服务中, 所以前端访问时, 需要加上完整url
const baseURL = "http://127.0.0.1:10030";

$(document).ajaxSend(function (e, xhr, opt) {
    opt.url = baseURL+opt.url;
    var user_token = localStorage.getItem("user_token");
    xhr.setRequestHeader("user_token", user_token);
});
后端统⼀⼊⼝为从⽹关服务访问, 所以前端请求需要加上 http://127.0.0.1:10030 修改common.js, 给所以请求url添加前缀
后端允许跨域:
跨域(Cross-Origin)指的是浏览器阻⽌前端⽹⻚从⼀个域名(Origin)向另⼀个域名的服务器发送请求. 具体来说,⼀个⻚⾯的协议, 域名, 端⼝三者任意⼀个与请求的⽬标地址不同, 就被视为跨域请求.
当前前端和后端不在⼀个服务, 端⼝号也就不同, 就会存在跨域问题
配置⽹关项⽬允许跨域: 参考:CORS Configuration
spring:
    gateway:
      globalcors:
        # 解决options请求被拦截的问题
        add-to-simple-url-handler-mapping: true
        cors-configurations:
          '[/**]':
            allowedOriginPatterns: "*" #设置允许跨域的来源
            allowedMethods: "*"
            allowedHeaders: "*"
            allowCredentials: true
测试博客系统的各个功能是否正常.
⽤⼾注册,⻚⾯准备
后端增加了⽤⼾注册功能, 前端也需要添加相应的⻚⾯
⽤⼾登录⻚⾯添加
            <div class="row">
                <span>还没账号? 点此<a href="blog_register.html">注册</a></span>
            </div>
前后端交互
后端接⼝定义
[请求]

/user/register

[参数]

contentType: application/json

{

"userName":"wangwu",

"password":"456789",

"githubUrl": "https://gitee.com/bubble-fish666/spring-cloud",

"email": "999@126.com" }

[响应] {

"code": 200,

"errMsg": null,

"data": 3 //⽤⼾ID

}
前端发送请求:
        function register() {
            $.ajax({
                type:"post",
                url:"/user/register",
                contentType:"application/json",
                data: JSON.stringify({
                    "userName": $("#username").val(),
                    "password": $("#password").val(),
                    "email": $("#email").val(),
                    "githubUrl": $("#githubUrl").val()
                }),
                success:function(result){
                    if(result.code == 200&& result.data!=null){
                        //注册成功
                        location.href=("blog_register_success.html");
                    }else{
                        alert("注册失败");
                    }
                }
            });
        }
8. Linux部署
环境准备
• Mysql
• Redis
• RabbitMQ
• Nacos
• Nginx
部署前端
修改访问url:
const baseURL = "http://47.108.157.13:10030";
修改Nginx 访问路径


多环境配置
SpringBoot 还可以通过 --- 来区分环境配置
博客服务, 设置mysql, nacos
server:
  port: 8080
spring:
  application:
    name: blog-service
  cloud:
    loadbalancer:
      nacos:
        enabled: true
    nacos:
      discovery:
        server-addr: ${nacos.address}
  datasource:
    url: jdbc:mysql://127.0.0.1:3306/spring_cloud_blog?characterEncoding=utf8&useSSL=false
    username: root
    password: ${mysql.password}
    driver-class-name: com.mysql.cj.jdbc.Driver
mybatis-plus:
  configuration:
    map-underscore-to-camel-case: true
    log-impl: org.apache.ibatis.logging.stdout.StdOutImpl
logging:
  file:
    name: blog.log

---
#开发环境
spring:
  config:
    activate:
      on-profile: dev
nacos:
  address: 152.136.172.144:10020
mysql:
  password: "123456"

---
#生产环境
spring:
  config:
    activate:
      on-profile: prod
nacos:
  address: 127.0.0.1:10020
mysql:
  password: Jqq200506,
⽤⼾服务:
server:
  port: 9090
spring:
  application:
    name: user-service
  cloud:
    loadbalancer:
      nacos:
        enabled: true
    nacos:
      discovery:
        server-addr: ${nacos.address}
  datasource:
    url: jdbc:mysql://127.0.0.1:3306/spring_cloud_user?characterEncoding=utf8&useSSL=false
    username: root
    password: ${mysql.password}
    driver-class-name: com.mysql.cj.jdbc.Driver
  #redis配置
  data:
    redis:
      host: 127.0.0.1
      port: 6379
      timeout: 60s #连接空闲超过N(s秒、ms毫秒)后关闭,0为禁⽤,这⾥配置值和tcpkeepalive值⼀致
      lettuce:
        pool:
          max-active: 8 #允许最⼤连接数
          max-idle: 8 #最⼤空闲连接数, 默认8
          min-idle: 0 #最⼩空闲连接数
          max-wait: 5s #请求获取连接等待时间
  rabbitmq:
    username: jqq
    password: Jqq200506,
    virtual-host: blog
    addresses: ${rabbitmq.address}
    listener:
      simple:
        acknowledge-mode: manual   #配置⼿动确认
  mail:
    host: smtp.qq.com       #需要在设置中开启 smtp
    username: 3471714098@qq.com  #发件⼈的邮箱
    password: sndvxlvhcfcidbbe      #邮箱的授权码, 并⾮个⼈密码
    port: 465  # SSL加密端口(必须用465,不能用25)
    protocol: smtp
    default-encoding: UTF-8
    properties:
      personal: "JQQ"
      mail:
        smtp:
          ssl:
            enable: true  # 强制启用SSL加密(关键配置)
          socketFactory:
            class: javax.net.ssl.SSLSocketFactory  # SSL连接工厂
          auth: true  # 启用认证

mybatis-plus:
  configuration:
    map-underscore-to-camel-case: true
    log-impl: org.apache.ibatis.logging.stdout.StdOutImpl
logging:
  file:
    name: user.log

---
#开发环境
spring:
  config:
    activate:
      on-profile: dev
nacos:
  address: 152.136.172.144:10020
mysql:
  password: "123456"
rabbitmq:
  addresses: 152.136.172.144:5672


---
#生产环境
spring:
  config:
    activate:
      on-profile: prod
nacos:
  address: 127.0.0.1:10020
mysql:
  password: Jqq200506,
rabbitmq:
  addresses: 127.0.0.1:5672
打包
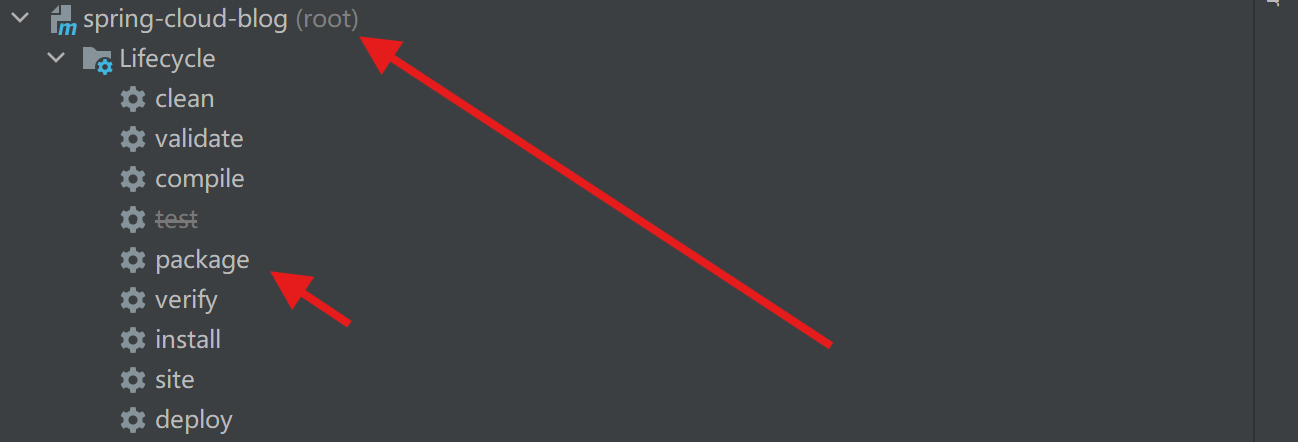
检查是否添加打包插件
启动服务
分别启动三个服务
nohup java -jar -Dspring.profiles.active=prod blog-info-service-1.0-
SNAPSHOT.jar &
nohup java -jar -Dspring.profiles.active=prod user-info-service-1.0-
SNAPSHOT.jar &
nohup java -jar -Dspring.profiles.active=prod gateway-service-1.0-SNAPSHOT.jar
&
测试,服务启动完成后, 进⾏测试. 观察⽇志.


 2999
2999

 被折叠的 条评论
为什么被折叠?
被折叠的 条评论
为什么被折叠?
 到【灌水乐园】发言


